Air Towel KTM120 User manual

HandDryerSupply.com | 804-859-2498 | http://www.handdryersupply.com
1\
•-
T
~WJ:I
50
yea
r
s'
tec
h
no
l
ogy
Ttl
K I\..)•
...
L
devo
tedinh
an
ddr
ye
rs
KTM120
/120UV
( )
nstruction
Manual
AiR
TOWEL

HandDryerSupply.com | 804-859-2498 | http://www.handdryersupply.com
2
~
Warning
{S)
Do
not
disassemble
,
repair
or
modify
the
product.
Disassembly,
repair
or
mo
difi
cation
may
cause
t
he
p
rod
uct
to
ignite
or
ca
u
se
a
malfunctio
n
resulting
in
fire
or
electroc
utio
n.
>!!To
repair
the
product,
contact
the
deal
er
from
whom
you
purchased
the
pr
oduct.
{S)
Do
not
tamper
with
the
power
cable
or
plug.
*
Do
no
t
damage
or
mod
i
fy
the
p
ower
cable
or
plug
*
Do
no
t pl
ace
the
cable
or
plug
near
an
app
l
iance
that
emits
heat
*
Do
not
excessively
bend,
twistor
pull
on
the
cable
or
plug
*
Do
notplace
heavy
objects
on
the
cable
and
plug
*
Do
no
t
incorrectly
bind
the
cable
or
plug
*
Doing
any
of
the
above
may
result
in
a
short-circuit
,
electrocution
or
fi
r
e.
*
To
repairthe
cable
or
pl
ug
,
co
n
tact
the
dea
l
er
from
whom
you
pu
rc
hased
the
produc
t.
{S)
Do
not
subject
the
product
to
liquids.
A
shor
t
-circuit
or
fire
may
occur
or
you
may
receive
an
electric
shock
if
the
product
is
wet.
{S)
Do
not
touch
the
power
plug
with
wet
hands-there
is
danger
of
electrocution.
If
the
plug
is
covered
with
dust
, it
may
abso
rb
humidity
,
caus
i
ng
in
sufficient
insulation
and
r
esulting
ina
fire.
*
Clean
the
plug
by
di
sconnecting
it
from
the
power
source
.Wi
pe
and
cl
ean
with
adry
cloth.
* If
you
wi
ll
not
be
using
the
product
for
long
periods
,
disconnec
t
the
power
pl
ug
from
the
power
source.
The
symbols
shown
on
this
page
define
the
warnings
and
cautions
.
.ffi
Warning
Not
following
the
warning
may
result
in
death
or
ser
i
ous
injury
.
.ffi
Caution
Not
following
the
caution
may
result
in
personal
injury
or
product
damage.
The
following
symbols
define
the
seriousness
of
the
danger
or
potential
product
damage
if
used
incorrectly.
{S)
Do
not
do
this
. Q
Follow
the
instruction.

HandDryerSupply.com | 804-859-2498 | http://www.handdryersupply.com
(S)
Do
not
hang
on
the
product-you
may
slip
and
fall
and
injure
yourself.
Do
not
place
anything
on
the
product
-
the
object
may
fall
to
the
floor
and
you
may
be
injured.
&
Notice
0
Hold
the
power
plug
firmly
when
disconnecting.
Do
not
pull
on
the
cable
when
disconnecting.
Pulling
on
the
power
plug
may
damage
the
cable,
resulting
in
a
short-circuit
or
fire
or
you
may
be
electrocuted.
0
Make
sure
the
power
plug
is
firmly
connected.
If not
correctly
connected
you
may
be
electrocuted
or
heat
generation
may
cause
a
fire
.
* Do
not
u
se
a
damaged
or
loose
plug.
0
Use
single-phase
alternating
current
120V
(for
KTM120
/120UV).
(S)
Do
not
insert
foreign
objects
such
as
pins,
wires
or
metal
into
the
air
exhaust
opening
or
any
other
opening-doing
so
may
result
in
electrocution.
Do
not
use
the
product
with
o
th
er
appliances
sharing
the
same
power
source-the
heat
generated
may
cause
a
fire.
0
Unplug
the
power
plug
from
the
power
source
when
maintenance
is
required.
(
If
the
product
is
connected
to
a
dedicated
power
source
,
turn
off
the
earth
leakage
breaker
.)
If
you
perform
maintenance
on
the
product
while
the
power
pl
ug
is
connected
to
the
power
source,
the
product
may
accidentally
turn
on
and
you
may
be
injured
or
electrocuted.
0
Make
sure
an
earth
leakage
breaker
is
installed
at
the
power
source.
If
an
earth
leakage
breaker
has
not
been
installed,
you
may
be
electrocuted
when
the
product
malfunctions
or
current
leakage
occurs.
AiR
TOWEl
KTM120/120UV
3

HandDryerSupply.com | 804-859-2498 | http://www.handdryersupply.com
4
Specifications
Construction
Main
body
Water
block
I Water
cup
HEPA
Filter (separated sold)
If
you order
HEPA
F
ilt
er,
HEPA
Filterwill be
the
bas
ic
filt
er
that
comes
with
your products.
=~=
(j 0
~
0 0
0 0 0 0
Mounting
board
-
-~-
-
;
Screw 0 4 X 14L
2EA
Screw
04
X 16L6EA
Anchor
plug
0 4 X 16L
6EA
Opener 1
EA
(Attach
to
the
bottom
of
the
downspout
and keep
it
that
way
.)
KTM120/120UV
In
struction
Manua
l
Mounting
surface
guiding
sheet
(packaging board) Manual

HandDryerSupply.com | 804-859-2498 | http://www.handdryersupply.com
Front View I SideView
(Unit
:
mm
)
256
(
10"
)
Main
uni
t - -
~
General
Filter or
HEPA
Filter
vv
'
g /
Under hood
Air
exhaust
openin
Sensor
I/
Water
receptor cup
-
~
......,
0
Opener
ins
ert
hole
--
1--
-
--*~
~
S
wi
tc
hes
(
Ope
ra
t
io
n
pane
l)
r
--
-..1
105
(41/
8")
1
Installation I Switches (Operation)
Cable
draw
opening
02
0
142
(5
3/4")
0 · -
-- ----1
u
:
1~
105
(4
1/8
")
I 0
I ,....
I
l()
~
C\J
\---
~--
~
-
-
-
_
-
_
--/---
__!_
54
(2
1/8
")
Wood
screw,
A
nc
hor
p
lu
g
q;
3.8X2
0mm
(7/8')
(6)
Tapping
screw
q;
4X
1
2mm
(1/2')
(2)
i==
~
A/C
POWER
ON/O
FF
Pow
er
switch
-----
..!=::
~
0
I==
~ 0
i==
HEATER
ON/OFF
H
ea
t
er
switch
-----
..!=::
;:::=
0.
PUSH
~
(FA
N S
PE
ED)
Air
adjustmen
t -
-==
)A
BS(
Pressing the button changes the airflow
(
High
-
Low
-
Medium)
AiR
TOWEl
.
KTM
120/120UV
Man
..)truct1ons
5

HandDryerSupply.com | 804-859-2498 | http://www.handdryersupply.com
6
Attaching
Face
GuideSheet
(Product Packaging Cardboard)
Attach
the
Attaching
Face
Guide Sheet
to
the
area
to
install
the
AirTow
temporarily
with
an adhesive tape.
Mark
the
area
with
a pen and install
it
with
an anchorplug.
Attaching Plate Installing
Face
Downspout
Installing
Face
o Locate
the
position
to
install
the
AirTowel.
Secure
the
space in
about
1
Ocm
or
wider
in all
directions
of
the
product.
Install
it
470mm
above
the
upper
side
of
the
washbowl. J
Washbowl
As
for
males,install
it
1,250mm above
the
washbowl.
As
for
females,install
it
1,
170mm
above
the
washbowl.
~---------------
~
----------
Ground
EJ
Detach
the
Attaching
Face
Guide Sheet and
fasten
the
Attaching Plate
to
the
Installing
Face
with
screws.

HandDryerSupply.com | 804-859-2498 | http://www.handdryersupply.com
D
El
Take
out
the
two
04X 1
OL
bolts
on
the
front
cover.
Connect
the
mounting
board
with
the
back plateset.
.,..
Connectthem from above and check
if
aclicking
soundisgiven when
it
is
pressed
from
below.
Removing
the
main
unit
from
the
wall
1.
Remove thecover
(2
screws)
mPull
the
front
cover ahead
lifting
it
up
.
In case
the
cables are protruded
unnecessarily
out
of
the
main body
Adjust
them
according
to
the
installation
position.Then Fasten
them
with
the
use
of
acable
tie
.
2.
Push
the pawls
(2)
(in the lower side
of
the
main unit) down. Pull
the
main unit
up
and
out
to
detachfrom
the
installation board.
*Before removing the main unitfrom thewall,disconnect
the
powerplug (dedicated powercable)
AiR
TOWf
l"
KTM120
/120UV
7

HandDryerSupply.com | 804-859-2498 | http://www.handdryersupply.com
8
Separate
the
water
tank
a
~
t t
0 Insert
the
wood
screws (provided) in
the
holes located
at
the
lower
part
of
the
water
receptor
unit.
Install
the
water
receptor
cup
to
the
main unit.
AiR
TOWfl
KTM120
/120UV
Bolt
the
back plate
with
the
water
tank
's
connection parts.
Connect
the
front
cover
from
above.
Fasten
the
two
04 X 1
OL
bolts
on
the
front
cover.
)

HandDryerSupply.com | 804-859-2498 | http://www.handdryersupply.com
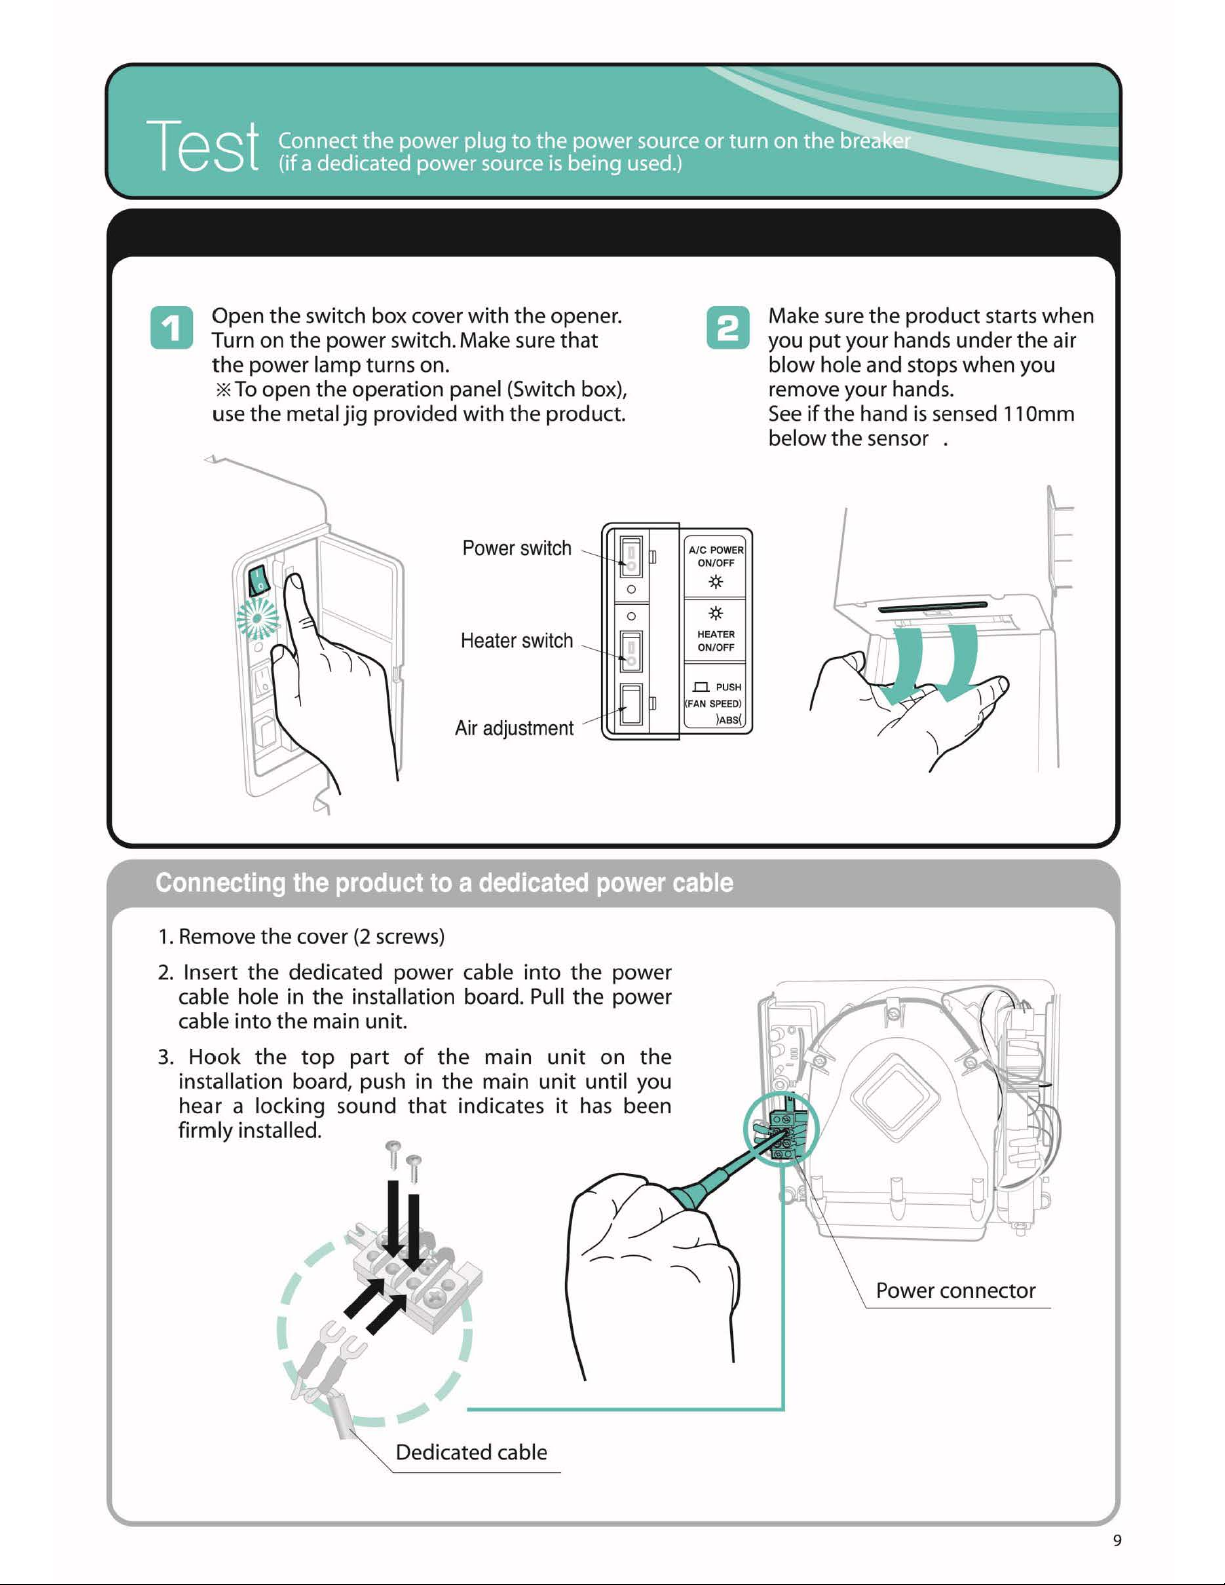
D Open the switch box cover
with
the opener.
Turn on the powerswitch.Make sure
that
the
power lampturns on.
*
To
openthe operation panel (Switch box),
use the metal
jig
provided
with
the product.
Power
switch
Heater
switch
Air
adjustment
AIC
PO
WER
ON/OFF
*
*
HEATER
ON/OFF
.0
PUSH
FAN SP
EE
D)
)ABS(
Connecting
the
product
to
a
dedicated
power
cable
1. Remove the cover
(2
screws)
2. Insert the dedicated power cable
into
the
power
cable hole in the installation board. Pull the power
cable
into
the main unit.
3.
Hook
the
top
part
of
the main
unit
on
the
installation board, push in the main
unit
until you
hear a locking sound
that
indicates
it
has been
firmly installed.
~
Dedicated
cable
Make sure the productstarts when
you
put
your hands under
the
air
blow holeand stops when you
remove your hands.
See
if
the
hand
is
sensed 110mm
belowthe sensor .
Power connector
9

HandDryerSupply.com | 804-859-2498 | http://www.handdryersupply.com
10
How
to
set
the
Air
Towel
Sensor
(operating
distance
reception
adjustment)
1.
Install
the
device
in
your
workplace
and
open
the
cover
ofthe
switch
box.
3.
Adjust
the
distance
by
turning
the
sensitivity
wheel
on
the
main
board
if
necessary.
2.
Turn
the
heater
switch
on.
The
switch
is
in
the middle of the
switch
box.
Turn
clockwise
until it
is
tight.
Place
your
hand
11
Omm
away
from the
sensor
and
turn
counterclockwise sl
owly.
The
sensor
will
stop
the product if
it
senses
your
hand.
3.
With
the
push
button
switch
which
is
in
the
lower part of the
switch
box
pressed,
turn the
power
switch
on.
The
motor will
rotate
for 1to 9
seconds,
adjusting
the
reception
ofthe
sensor
.
Filter replacement
Clockwise-
the
sensing length shortens.
Counterclockwise-
the
length extends.
Removing
the
water
from
the
Drain
tray
(Depending
on
the
condition
of
the
installed
place,
it
needs
to
be
changed
in
about
every
one
to
six
months
.)
'*'
If
the
filter
is
not
clean,
the
air
blow
force
will
decrease
,
requiring
a
longer
time
to
dry
the
ha
nds
.
1.
Remove
thefilterfrom the
main
unit.
'*'
To
open
the
filter
box
,
use
the
metal
jigthat
has
been
provided.
General
Filter 2.
Clean
filter
or
HEPA
Filter
'*'
Ifthefilter
is
excessively
dirty,
wash
it
wi
th amild
detergent.
Dry
the
filtercompletely.
3.
Install
the
filter
back
intothe
main
unit.
'*'
Make
sure
the
filter
ha
s
been
securely
installed
.
You
will
hear
a
clicking
sound
after
it
has
been
locked
into
position.
4.
Clean
filter
Open the filter boxcover
with
the opener.
'*'
Check
the
cleanliness
every
week.
Clean
thedust
once
amonth without
using
water.
Just
dust
it
off.
Water receptor cup replacement
1.
Remove
the
water
receptor
cup
from
the
main
unit.
2.
Remove
the
top
cover
from
the
water
receptor
cup.
Dump
outthe
water.
'*'
Wash
and
clean
the
cup
if
necessary
u
sing
mild detergent.
3.
Replace
the
top
cover.
In
sta
ll
the
water
receptor
cup
to the
main
unit.
Lamp replacement
1.
Cut
power.
2.
Remove
the
lamp
protection
cover.
3.
Turn
the
lamp
of
the
main
body
slig
htly.
go
•
Top
cove
r
4.
Remove
thel
amp
from
the
main
body
and
connect
a
new
one.
5.
Supply
power
and
check
the
lamp
by
putting
your
hand
on
the
sensor
wi
nd
ow.
6.
Conn
ectthe l
amp
protection
cover.

HandDryerSupply.com | 804-859-2498 | http://www.handdryersupply.com
I Power supplyfailure I
Functioning
without
detection
I Weak wind I
•
If
the
problem persists,
turn off
the
power switch,
and
contact dealer you
purchased
the
product.
AiR
TOWtL
"KTM120
/120UV
11

5 years
If the product fails even after being used correctly, it will be
repaired
free of charge 5 years after the day of purchase.
HandDryerSupply.com | 804-859-2498 | http://www.handdryersupply.com
This manual suits for next models
1
Table of contents