AirCaddy K8350 User manual

Home Instruction Sheet
(1) B1000-00 FOLDED TRIANGULAR
CORRUGATED BOX
39”L X 31”W X 3”H
Step-1Please check for
any missing parts.
Model K8350
(Aircraft Kit)
(Optional)
(2) C3755-00 LARGE
CORRUGATED INSERTS
(1) B3210-00 METAL TRANSIT PLATE
(6)B1220-00 FLAT NYLON TIES
(1) B1250-00 SADDLE TRAVEL BAG
Model K9100 COMPACT
(Basic AirCaddy) (1) T3230-00 METAL WHEEL TRUCK
(1) B1382-00 5MM AND 6MM ALLEN
(6) B1220-00 FLAT NYLON TIES
(1) B1350-00 2 INCH WIDE
TAPE AND DISPENSER
aIRCADDY.com
Worldwide Cycling Solutions Through Creative Innovations.
(1)T3197-00 METAL FORK MOUNT
aircaddy web page 20 04/03/12 98%
(1) S7035-00
7MM AXLE WASHER
(2) C3750-00 SMALL
CORRUGATED INSERTS
2012 K9100 COMPACT
Because of the constant evolution of our products the
materials and colors are subject to change without notice.
(1) B1250-00 SADDLE TRAVEL BAG
31” width
39” length


aircaddy web page 22 04/04/12
Step-7 Flip the front flaps
over so that they are on top of
the side flap (folded over in the
previous step). Be sure to con-
nect the matching numbers
(i.e., match “1” with “1.
Step-8 Flip the last big flap over so that
it completely closes the bottom of the box .
This will match-up the number “2” with “2”.
Tape the free edges of the box closed with
six or seven strips to bridge the edges as
shown. Place the strips approximately 8-
inches apart. Then use a long, continuous strip
to completely seal the edges of the box.
No.2
Step-6 The side flaps should be
flipped over to begin forming the closed
bottom of the box.
Bottom of box
Bottom of box
No.1
1
1
22
1

No.3
3
8
Wheel Truck
(only in K8350 Aircraft kit)
OPTIONAL AT EXTRA COST.
Step-10 Carefully flip the box over while
holding the transit plate or wheel truck in place.
The lettering will now be upright and the ar-
rows will point up. Once this is done, pull the
small flaps from the inside of the box to the
outside.
Step-9 Locate the ground transit
plate. (You may substitute the wheel
truck for the ground transit plate, if you
purchased the K8350 kit.) Place the
wheel truck or ground transit plate at
the front of the bottom of the box so
that the studs go through the holes
into the box. This will connect number
“3” on the wheel truck or ground tran-
sit plate with “3” on the container.
Ground Transit Plate
aircaddy web page 23 04/04/12
No.3
3

aircaddy web page 24 04/04/12
C
2012 LARGE INSERT
Stand up the insert.
Lock the green tab on one of the
inserts into the slot of the other insert. Push the locked inserts flat against
the rear of the shell.This will form
two triangles in the corners.
Lay insert on a flat surface. Have
the side with th Aʼs closest to you..
Crease the folds so they show the two
letter Aʼs.
H
F
Crease the three folds at the
near end as shown.
E
Put both inserts into the shell.
D
Step-11 Fold each large insert as shown. Then fit both inserts into the shell of the
box. Be sure to lock the tab of the inserts at the rear of the shell as show in steps F, G, and H.
G
A
(Your first fold.)
(Your first fold.)
Fold up the small flap at the far end.
B

aircaddy web page 25 04/04/12
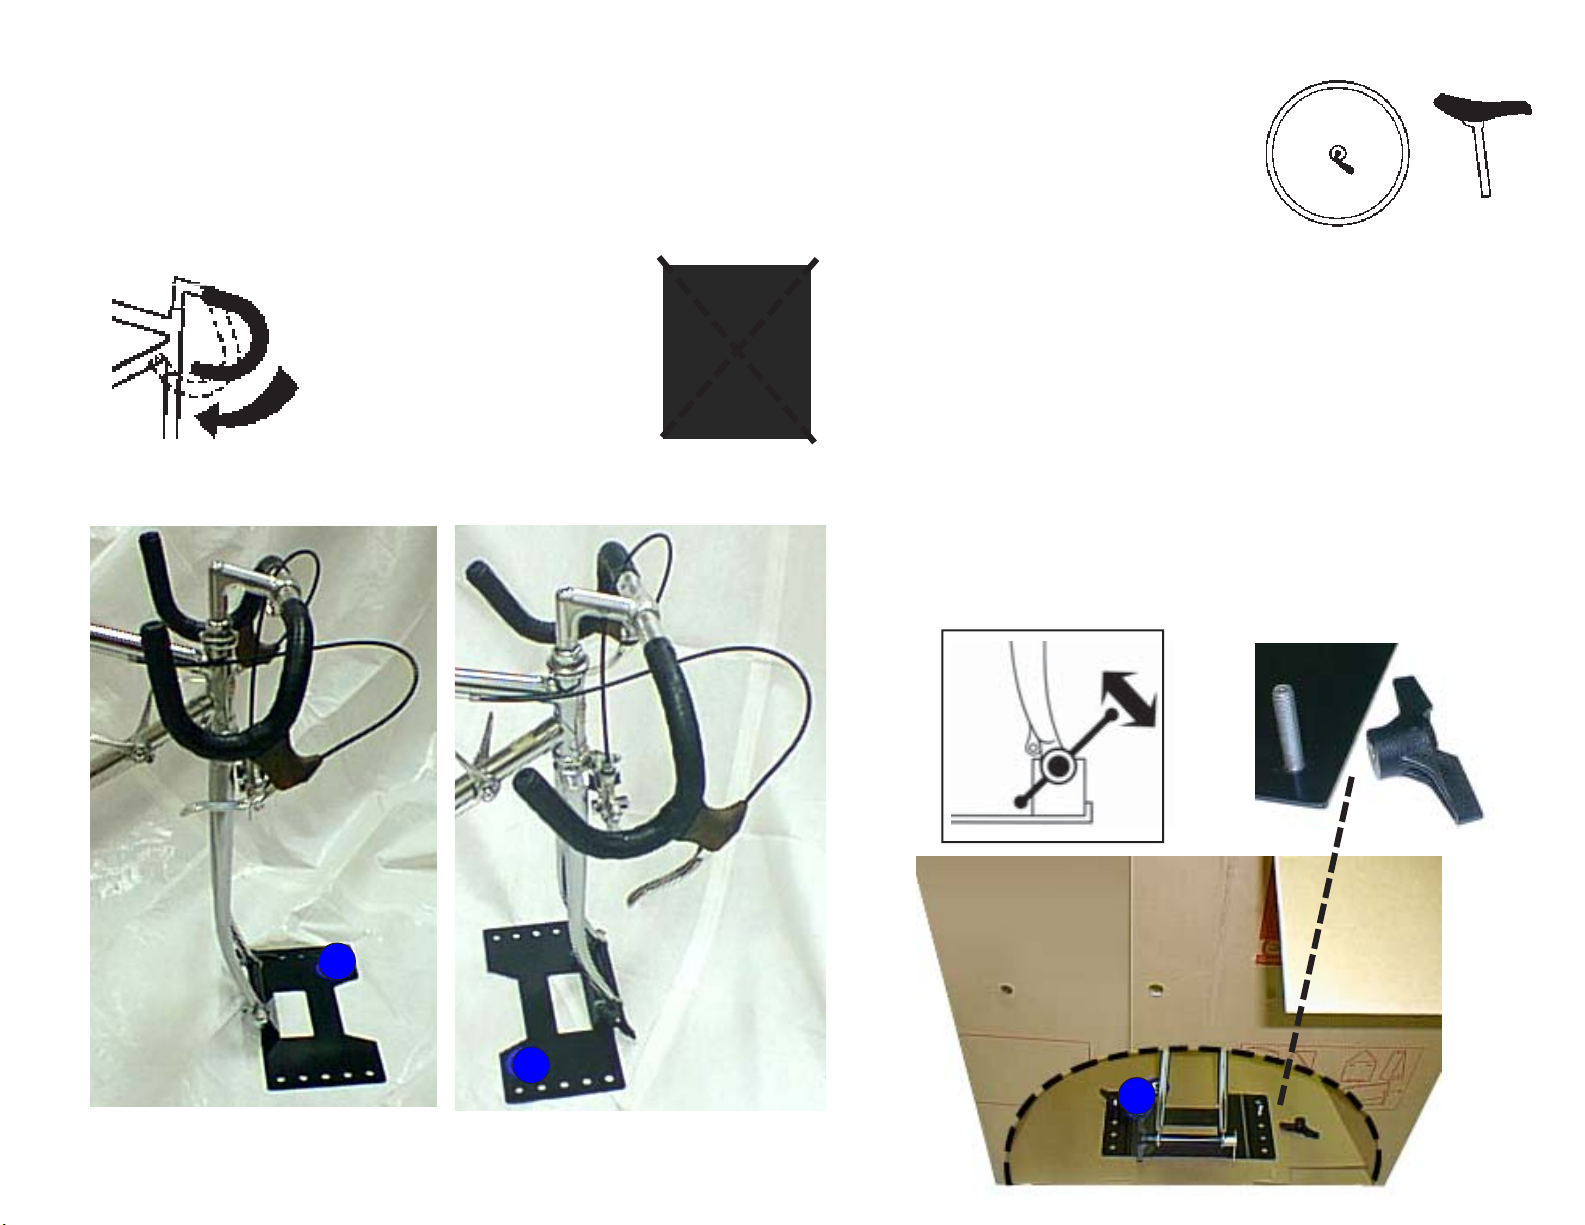
Step-12 Before going further, mark your seatpost and handlebar position for later as-
sembly. Now remove the front wheel and the saddle with seatpost from your bicycle. Loosen
the handlebar binder bolt just enough so that your handlebars can rotate in the stem. Shift
your rear derailleur so that the chain is on the hubʼs largest sprocket. Make sure the seat post
is lightly greased to prevent future problems.
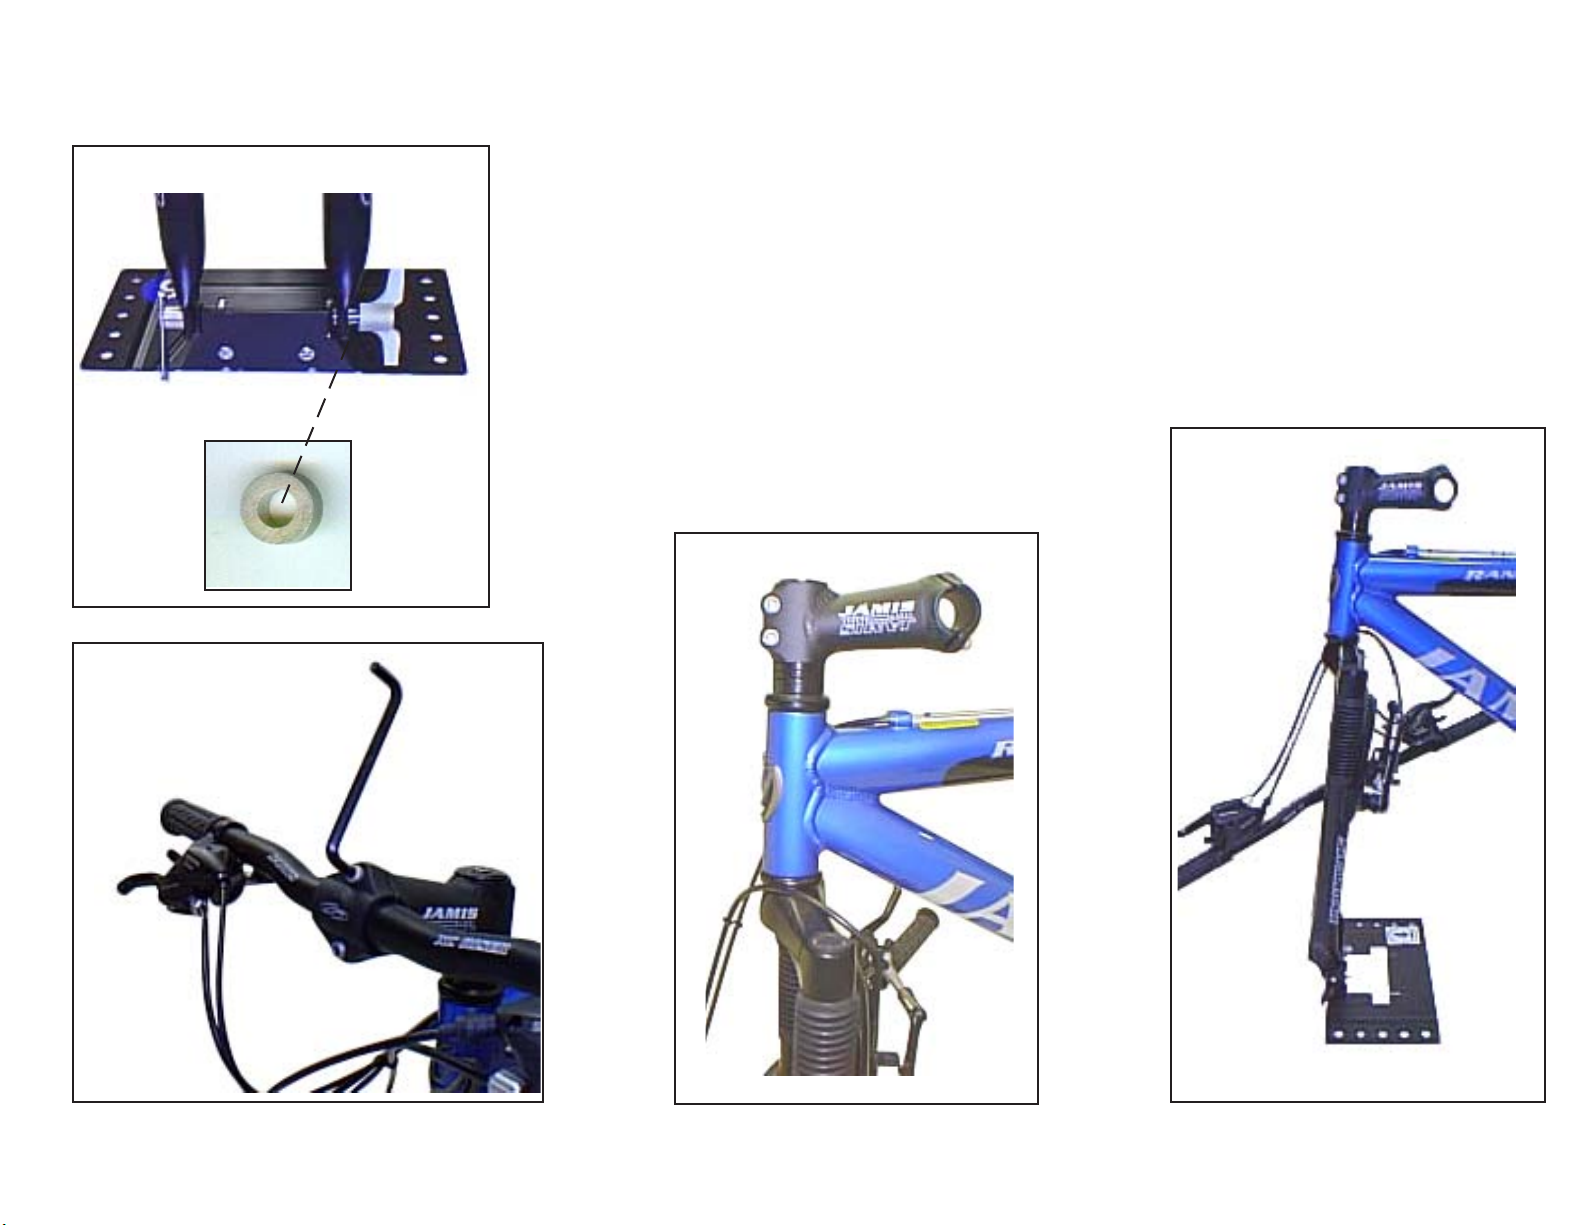
Step-13A Place the fork mount on a flat surface
outside the box. Depending on your wheel size, orient
the fork mount as shown. Insert the fork into the fork mount
and tighten the wing nut clockwise. Place the bike, with
fork mount attached, into the box. Place the fork mount
over the threaded studs protruding through the bottom of
the box. Choose the pair of holes in the fork mount which
allow the handlebar to be as close as possible to the
front of the box, without touching. Place two wing nuts
over the threaded studs and tighten clockwise.
( 27”- 700C)
(20”- 24”- 26 ATB- 650C)
STOP!
4
4
44
Remove all lights
and computers from the handlebar.
We are not responsible for any damage.

aircaddy web page26 04/04/12
For Mountain Bicycles with Flat Bars (optional)
Step-13B Place the fork mount on a flat surface outside the box. De-
pending on wheel size, orient the fork mount as shown. Insert the fork into the fork
mount and tighten the wing nut clockwise. Use as many washers as necessary to
prevent interference. Remove the front 2 or 4 handlebar stem bolts using the
allen wrench provided. Rotate the stem and fork so that the stem faces the back
wheel as shown. Upon reinstallation always tighten the handlebar stem bolts to
the recommended manufacturers torque settings found in the bicycle owners
manual.
Front brake faces
the rear wheel.

aircaddy web page27 04/04/12
For Mountain Bicycles with Flat Bars (optional)
Step-13C Place bike with fork mount into the box. Place the fork mount over the threaded studs
protruding through the bottom of the box. Choose the pair of holes in the fork mount which allow the head
tube to be as close as possible to the front of the box without touching. Place two wing nuts over the
threaded studs and tighten clockwise. Strap the handlebars to the sprocket side of the box at two points. If
possible, lower the seat on the bicycle or place the seat in the plastic bag provided on the sprocket side of
the box. The crank arms should be perpendicular to the floor for the best fit.

aircaddy web page34 10 24 08
acweb2002 page 28 04/04/12
Step-14 Fold the two small inserts and insert them into the box as shown.
Position them toward the rear of the box to the point where they lightly press
against the bicycleʼs seat stays and or chain stays. Do not let the inserts touch
the chainrings (chainwheels).
SMALL INSERT
D
C
A
E
B
Position the rear wheel to the right of center to provide more protection
for the rear derailleur. Always shift the rear derailleur into the largest rear
sprocket for shipping.

aircaddy web page 29 04/04/12
Step-16 Place the front
wheel inside the box, opposite
the bicycle chain. Use two ties to
secure the wheel to the side of
the box.
Step-15 Place your saddle
with seatpost into the small white
draw string bag and secure it to the
chain side of the box with one tie.
Useone more tie tosecure the white
drawstring bag abouthalfway down
to prevent the bag from swinging.


Step-21 Multiple containers can be
stacked on top one another in several ways as
shown or nested next to another.
Step-20 If you have the Aircraft Kit with
the wheel truck, moving the box is as simple as
picking up the pointed end and rolling it away.
Grasp the box using the lower, vertical slot.
Make sure to lift the pointed end high enough to
engage the wheels and either push or pull the
AirCaddy, whichever method gives you the most
control.
aa
aa
aIRIR
IRIR
IRCADDCADD
CADDCADD
CADDYY
YY
Y
.com.com
.com.com
.com
Worldwide Cycling Solutions Through Creative Innovations
PATENT USA 6,039,243 & 5,520,280 & GB2345691 AND OTHER FOREIGN PATENTS PENDING
Please call us, we want to solve yourAirCaddy
problems or questions immediately.
AirCaddy tech support. 877-323-4083, Mon-Sat
24hour answer machine 708-383-5541
AirCaddy will repair or replace any original equipment parts it determines to be defective for lifetime of the original owner. Note: the cardboard box is designed for 4-6 trips,
and is not covered in this warranty. When the outer shell is worn out, the K9100 replacement shell is available to the original owner with proof of purchase.This warranty
applies only to the original owner and is nontransferable.AirCaddy cannot be responsible for failures due to improper assembly, modification of parts or instructions,
neglect, abuse, accident, and/or normal wear. The warranty does not cover any shipping container used for rental or commercial use, nor does it cover the cost of repair or
replacement for any bicycle or equipment other than theAirCaddy shipping container. AirCaddy neither assumes nor authorizes any person to assume any other liabilities
in connection withAirCaddy shipping containers, and there are no oral agreements or warranties collateral to or affecting this agreement. Any implied warranty of mer-
chantability or fitness for a particular purpose is limited in duration to the duration of this warranty. 02/28/08
aircaddy web page31 04/04/12
shipBikes.com
Hassle free shipping door to door anywhere in the USA.
This manual suits for next models
1
Popular Bicycle Accessories manuals by other brands

Sigma
Sigma BC 1009 STS manual

Bosch
Bosch BRC3600 Original operating instructions

Electric Bike Technologies
Electric Bike Technologies E-BikeKit Owner's manual and installation instructions

BOS
BOS iDylle rare user manual

Vetta
Vetta CYCLE COMPUTER owner's manual

sks
sks Mountain MUDROCKER REAR Mounting instruction