Aircraft Clean-Flush PIL-PC12-001-1 User manual

MODEL
PIL-PC12-001-1
Self-Contained
Aircraft Toilets
USER’S GUIDE
AND
ILLUSTRATED PARTS LIST

ZZ-PIL
Rev. B 12/5/2017 Page 2
AIRCRAFT TECHNOLOGIES INC.
3650 Highpoint St.
San Antonio, Texas 78217
USER’S GUIDE
RELEASE APPROVAL BLOCK
Authorization:
Release
Name
Title
Initials
Date
Created By:
IR
Ed Riebesehl
Pres.
ER
9/6/2012
Approved By:
Mark Riebesehl
VP Oper.
MR
Authorized By:
Jon Riebesehl
JR
Created By:
A
Mark Riebesehl
VP Oper.
MR
11/11/2013
Approved By:
Ed Riebesehl
Pres.
ER
Authorized By:
Jon Riebesehl
VP Sales
JR
Created By:
B
James Rupprecht
QA Mgr.
JSR
12/12/2017
Approve By:
Mark Riebesehl
VP Oper.
MR
Authorized By:
Jon Riebesehl
VP Sales
JR
Created By:
Approved By:
Authorized By:
Created By:
Approved By:
Authorized By:
Created By:
Approved By:
Authorized By:
Created By:
Approved By:
Authorized By:
Created By:
Approved By:
Authorized By:

ZZ-PIL
Rev. B 12/5/2017 Page 3
Revision Summary
Rev.
Date
Change
IR
9/6/12
Initial Release
A
11/11/13
Revised trouble shooting table, updated index, updated parts list, added approval and
revision pages.
B
12/12/17
Updated Parts List, pg 8

ZZ-PIL
Rev. B 12/5/2017 Page 4
USER GUIDE INDEX
GENERAL …………………………………………………………… 5
TOILET OPERATION ………………………………………………. 5
TOILET SERVICING ……………………………………………….. 5
TOILET TROUBLE SHOOTING ……………………………………6
MINOR MAINTENANCE …………………………………………... 6
TOILET FUNCTIONAL TEST ……………………………………... 7
PARTS LIST ………………………………………………………… 8
ILLUSTRATED PARTS ……………………………………………. 9
WIRING SCHEMATIC …………………………………………….. 10
ADDITIVES ………………………………………………………… 11
WARRANTY………………………………………………………....12

ZZ-PIL
Rev. B 12/5/2017 Page 5
GENERAL:
The Model PIL-PC12-001-1 Clean Flush aircraft toilet incorporates a unique dual-compartment concept that
separates bowl-rinsing fluid from the waste compartment. This marks a significant improvement over the single
compartment concept that used an offensive mixture to accomplish the bowl rinsing function.
With the Clean Flush concept, the flushing pump is mounted in the clean flushing reservoir and precludes the
need for troublesome strainers and filters.
These models present a more hygienic and odor-free flushing method, ease of servicing and reliability without
ground servicing equipment.
TOILET OPERATION:
To use toilet:
1. Lift cover.
2. Ensure waste container cap is stowed.
3. The toilet is ready for use.
To flush unit:
1. Close cover.
2. Activate “FLUSH” switch.
3. Flushing fluid is pumped from the reservoir.
4. Bowl receives a thorough rinse from waste-free fluid.
5. Flushing reservoir has sufficient capacity for 10-13 flushes.
TOILET SERVICING:
Servicing the waste container:
1. Lift the bowl assembly straight up about 6 inches and tilt assembly backwards at least 100 degrees.
Rest bowl assembly on cabinet seal at rear of cabinet.
2. Place cap firmly onto waste container.
3. Grasp both handles and remove container from the cabinet.
4. Dispose of contents in a commode and rinse waste container.
5. Pre-charge container with approximately 1 pint of water and 2 ounces of Clean Flush Flushing
Fluid (CFF-001 or CFF-003) or ½ tablespoon of Clean Flush Flushing Powder (CFP-006) or 1
packet of pre-measured Clean Flush Flushing Powder (CFP-004). NOTE: If the aircraft is parked
in sub-freezing temperatures, ensure the appropriate amount of Clean Flush Antifreeze (CFA-002)
is added to the pre-charge mixture.
6. Reinstall waste container in the toilet and stow the container cap.

ZZ-PIL
Rev. B 12/5/2017 Page 6
Servicing the flushing reservoir:
1. Lift the bowl assembly straight up about 6 inches and tilt assembly backwards at least 100 degrees.
Rest bowl assembly on cabinet seal at rear of cabinet.
2. Fill the reservoir with water to “Fill to Here” line.
Add 2 ounces of Clean Flush Flushing Fluid (CFF-001 or CFF-003) or 1/2 tablespoon of Clean
Flush Flushing Powder (CFP-006) or 1 packet of pre-measured Clean Flush Flushing Powder
(CFP-004). See NOTE in item 5 of preceding section.
3. Replace the bowl assembly on the cabinet seal. Wipe down the bowl and seat with ammonia free
disinfectant.
TOILET TROUBLE SHOOTING:
Perform the following procedures to isolate and identify possible problems before starting disassembly.
Problem
Probable Cause
Action
Toilet will not cycle.
Aircraft power not operating.
Non-functioning switch or wiring.
Non-functioning flushing pump
motor. (See note)
Non-functioning timer.
Check aircraft power, fuses, circuit
breakers. Check input power to
toilet.
Check switch and wire for
continuity.
Replace pump.
Replace timer.
Toilet cycles but little or no
flushing liquid pumps into the
bowl.
Inadequate flushing fluid in
reservoir.
Broken or loose pump hose.
Loose or broken pump impellor.
Fill reservoir to “Fill to Here” line.
Replace or re-secure pump hose.
Replace pump.
Note: To determine if the pump is inoperative, connect a separate power supply (28vdc) to the pump
leads. If the pump does not operate, replace the pump.
MINOR MAINTENANCE:
Remove and replace flushing pump (P/N 5250-A):
1. Disconnect unit from power supply.
2. Lift bowl assembly from cabinet. Disconnect pump wire plug from cabinet socket.
3. Place bowl assembly flat on work surface, seat side down being careful to protect plastic from
scratching.

ZZ-PIL
Rev. B 12/5/2017 Page 7
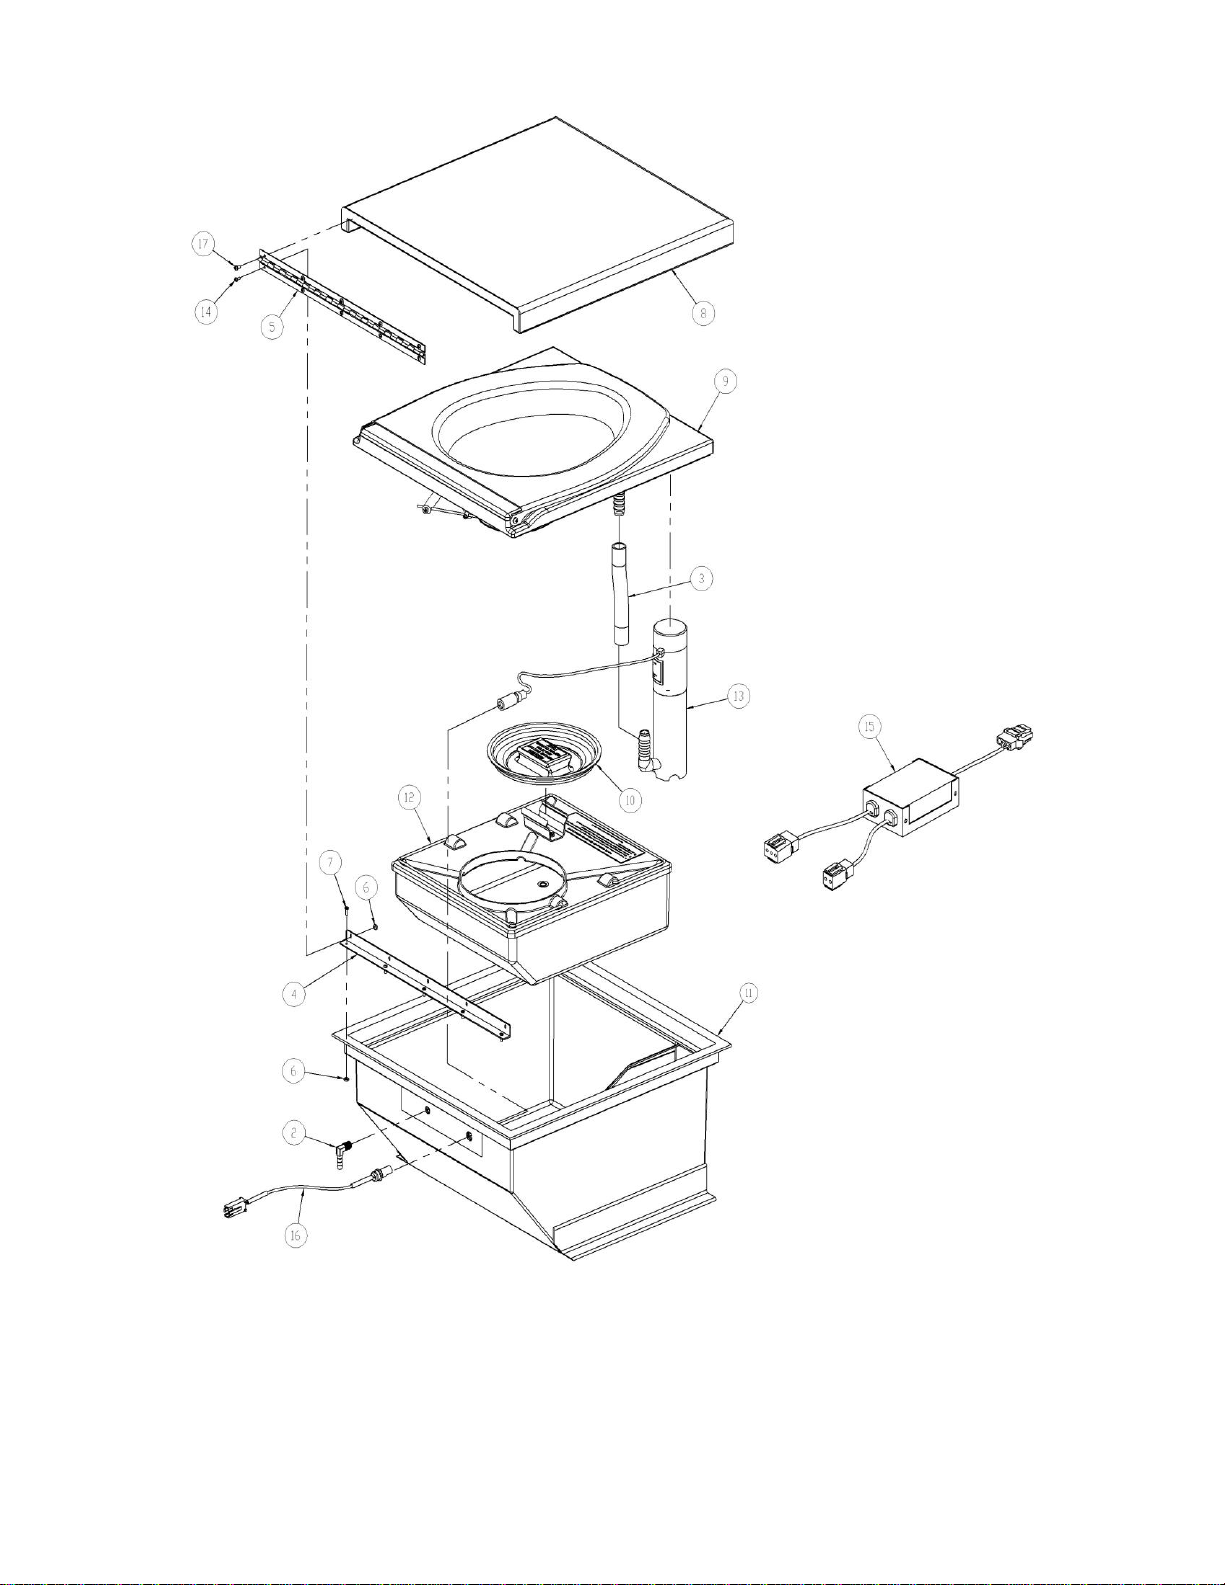
4. Remove screw(s) holding wire clamp (P/N N-2). Remove clamp(s) from wire and save for
reinstallation later.
5. Remove pump from bowl assembly by pulling straight up and rocking back and forth. Note: There
is a sealant/adhesive or double-faced foam tape in the pump cavity for retention. The hose will also
hinder removal and it may be easier to cut the hose and replace it with a new one.
6. Remove hose from bowl fitting.
7. Clean all sealant/adhesive or foam tape from the cavity.
8. Lubricate new hose on the interior of each end with silicone grease and install it on the bowl fitting
by pressing straight down.
9. Place a small amount of sealant or double-faced foam tape in the pump cavity. Ensure the small
hole in the side of the cavity is not covered.
10. Place the new pump into the cavity and align the hose with the pump barb fitting. Check that the
two fittings are aligned.
11. Press the pump into the cavity and onto the hose with firm pressure straight down. Note: The pump
power wire outlet should come within approximately 3/16” of the bowl surface.
12. Replace the wire clamp(s) (P/N N-2) to their original location(s).
13. Lubricate the plug and socket with electrical silicone grease and connect.
Remove and replace pump power wire connector:
1. Remove the screws that attach the socket to the cabinet then cut wire and discard socket and
connector.
2. Install replacement socket, seal connector wire posts with silicone sealant and install pins in
connector to ensure correct polarity and correct pin placement.
3. To replace pump power wire plug, cut wire as close as possible to connector. Strip wire and solder
to new connector plug posts. Ensure positive wire (white) goes to narrow blade and negative wire
(white w/blue stripe) goes to the wide blade.
4. For units that have a neoprene connector: The socket portion in the cabinet can be removed by
grasping the inner portion and twisting the socket as inward pressure is exerted. Cut off the
connector and replace with a new socket and wire assembly. Insert pins in the connector housing.
5. Replacement of the pump plug pins requires special tools not normally available in the field.
TOILET FUNCTIONAL TEST:
1. Fill reservoir to “Fill to Here” line.
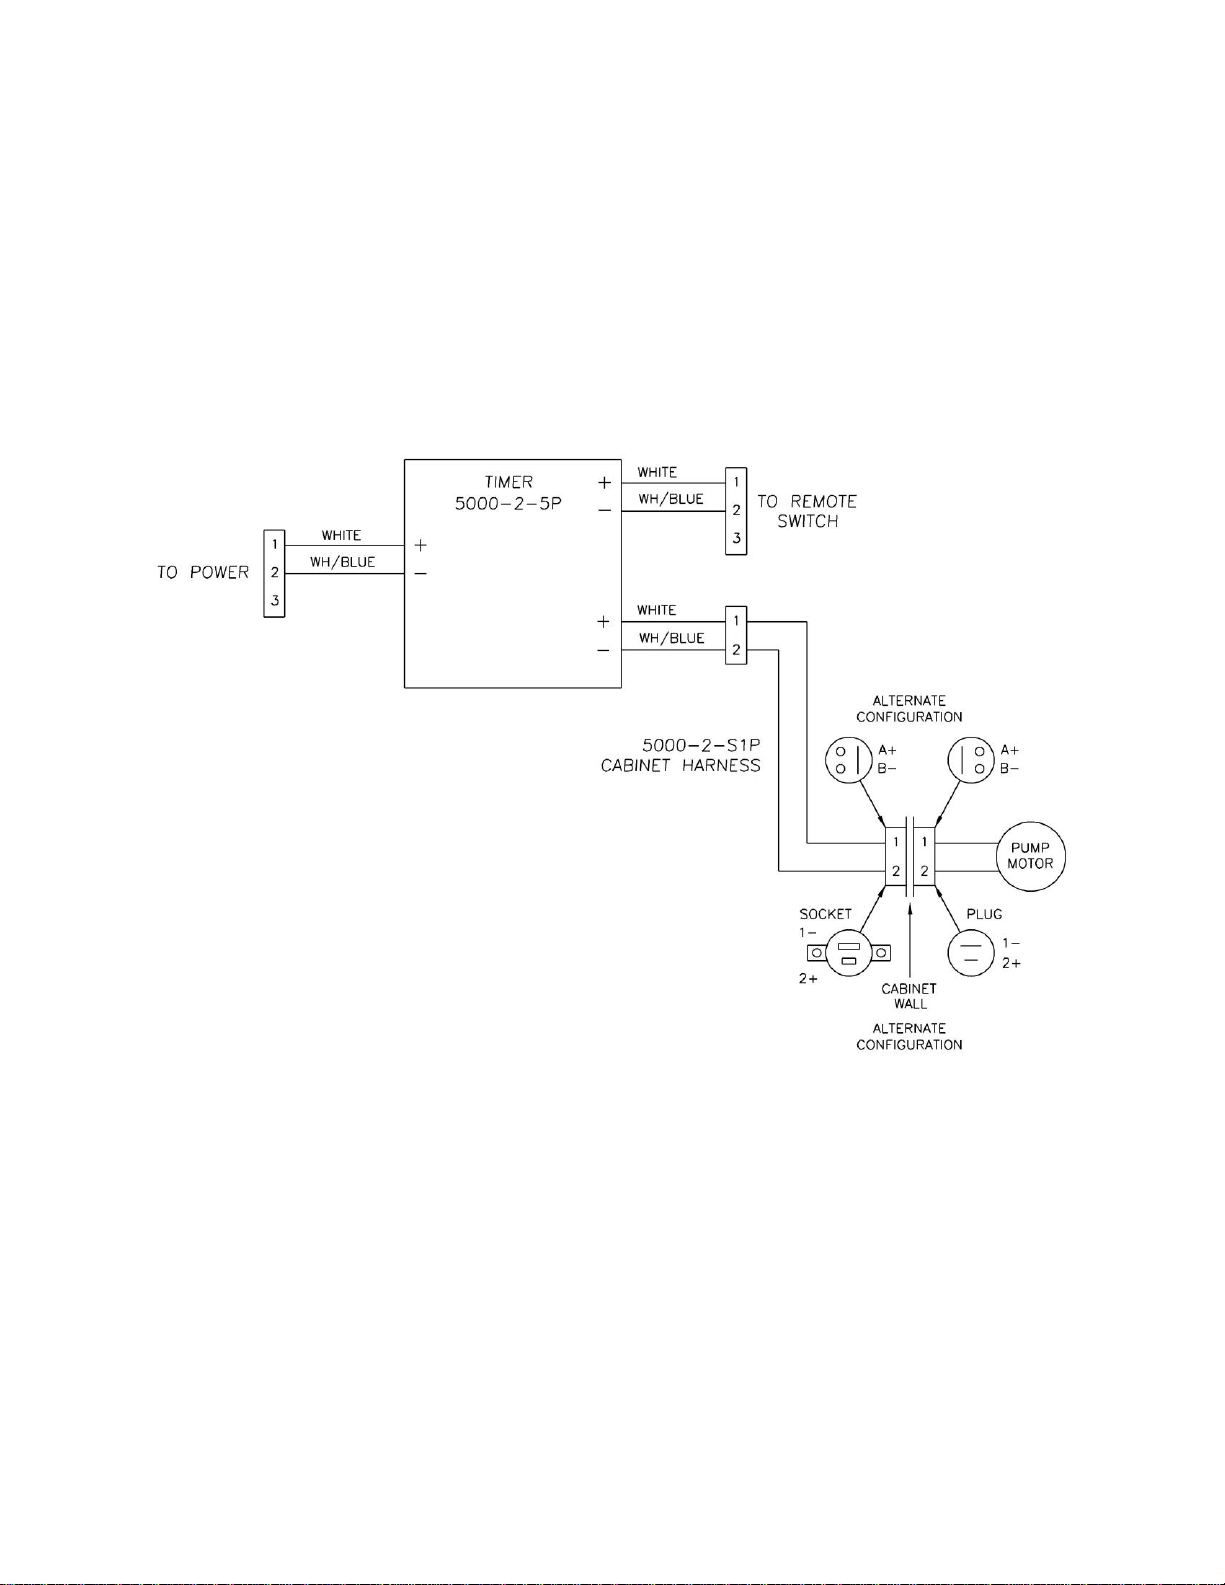
2. Check that pump power wire plug is plugged into socket on rear wall of cabinet.
3. Check that timer is connected to aircraft power, pump power wire and to flush switch.
4. Depress and release flush button. Observe that flushing action continues for approximately 1
second. (There are approximately 10 –13 flushes available in the reservoir.)

ZZ-PIL
Rev. B 12/5/2017 Page 8
PARTS LIST
Model PIL-PC12-001-1
ITEM
NO.
PART NUMBER
DESCRIPTION
QTY
1
PIL-PC12-001-1
CLEAN FLUSH TOILET ASSEMBLY
1
2
5000-2-12
FITTING, VENT, 1/4X1/8 90 DEG BRASS
1
3
5000-2-2E
HOSE, PUMP, 5/8D TEFLON, WIRE RE-ENFORCED
1
4
5000-2-10
ANGLE, HINGE MOUNTING (on PIL-PC12-001-1 only)
1
5
5000-2-9
HINGE, 14-3/8L ALUMINUM, MS20001-2-72 (on PIL-PC12-001-1 only)
1
6
MS21083-C04
NUT, NYLON SELF-LOCKING 4-40 CRES (on PIL-PC12-001-1 only)
10
7
MS51957-15
SCREW, 4-40X3/8" PAN HEAD, CRES (on PIL-PC12-001-1 only)
5
8
5000-2-7A
MODEL 50 LID ASSY (on PIL-PC12-001-1 only)
1
9
5000-2-3B
BOWL ASSEMBLY, MODEL 50
1
10
2105
CAP WITH WARNING LABEL, WASTE CONTAINER
1
11
PIL-PC12-2-4
CABINET ASSEMBLY
1
12
5000-2-1A
WASTE CONTAINER, 1.25 GAL [4.75 LITER] FILL CAPACITY
1
13
5250-A
PUMP, FLUSHING 2 PIN
1
14
MS51957-13
SCREW, 4-40X1/4" PAN HEAD, CRES (on PIL-PC12-001-1 only)
5
15
5000-2-5P
TIMER BOX ASSEMBLY
1
16
5000-2-S1P
CABINET WIRE HARNESS
1
17
MS6-32X1/4
SCREW, 6-32X1/4" PAN HEAD, CRES (on PIL-PC12-001-1 only)
5
Table 1

ZZ-PIL
Rev. B 12/5/2017 Page 9
Clean Flush®
Model PIL-PC12-001-1
Figure 1

ZZ-PIL
Rev. B 12/5/2017 Page 10
Model PIL-PC12-001-1
Wiring Schematic
Figure 2

ZZ-PIL
Rev. B 12/5/2017 Page 11
CHEMICALS
…SAFE PRODUCTS that neutralize offensive odors --
without a masking after-odor!
Many chemicals made for self-contained, re-circulating toilets contain perfume-like
substances to cover up unpleasant odors. They succeed only in leaving a thinly disquised
after-odor.
Clean FlushFluid is a unique compound that is designed to neutralize offensive odors.
It contains no masking substances and leaves no after-odor of its own.
Clean Flush Fluid can be used in all makes of self-contained, re-circulating toilets by
following the simple instructions on the container label. It is non-flammable and safe.
These additional features make Clean Flush Fluid pleasant and easy to use.
•Unbreakable plastic bottles •Requires only 2 ounces per quart of water
•Lightweight for storing on board to completely service
•Semi-clear fluid
Clean Flush® FLUSHING POWDER
Economical and convenient, Clean Flush Powder is available in pre-measured,
dissolvable packets or in 18 oz. bulk powder form.
•Neutralizes Offensive Odors •Non-staining
•Safe for Use in All Toilets •Easy Storage
Clean Flush® ANTIFREEZE
Use of Clean Flush antifreeze will assure trouble-free operation if temperatures below
freezing are encountered. Clean Flush antifreeze is specifically selected so as not to
harm the adhesives or plastic components of your toilet. It is non-staining and safe to
use.
Unbreakable plastic bottles are packed 4 gallons per case.

ZZ-PIL
Rev. B 12/5/2017 Page 12
Aircraft Technologies, Inc.
3650 Highpoint Street
San Antonio, Texas 78217
Manufacturer of Clean Flush Aircraft Toilets
Aircraft Technologies, Inc. is an FAA Certified Repair Station for Clean Flush Toilets (FAA CRS
D0NR886N).
Your Clean Flush toilet can be repaired, overhauled or rebuilt by Aircraft Technologies, Inc.
Parts and chemicals for your Clean Flush toilet are also available at Aircraft Technologies, Inc.
A complete line of lavatory support items is only a phone call or click away.
For technical support or to order parts, chemicals or support items contact us at:
Telephone 210-590-6858
Fax 210-590-7509
Web Site www.aircrafttech.com
Our hours are 8:00 AM to 4:30 PM central time, Monday to Friday
NOTES
______________________________________________________
______________________________________________________
______________________________________________________
______________________________________________________
______________________________________________________
______________________________________________________
______________________________________________________
______________________________________________________

ZZ-PIL
Rev. B 12/5/2017 Page 13
WARRANTY
The manufacturer guarantees, that for a period of one year from date of purchase, this product
will be free from defects in either workmanship or materials that affect the proper operation of
the product. During the warranty period, manufacturer will repair or replace any faulty parts or
correct any defects in workmanship when the product is returned to the factory or any
authorized repair station.
The manufacturer assumes no liability for loss or damage beyond its obligation to repair,
replace or correct workmanship or materials as limited by this warranty. This guarantee will be
void: 1) if this product has been serviced improperly; 2) if it has been damaged by casualty; 3)
if the manufacturer’s care and maintenance instructions have not been followed; 4) if
unauthorized chemicals or parts have been used in connection with its operation or 5) if any
physical change has been made to the unit. The manufacturer reserves the right to improve,
modify or change this product without obligation as to previously manufactured products.
This warranty is limited and is in lieu of any other warranty or warranties made by anyone,
whether expressed or implied, and the manufacturer has no other liability or obligations except
as specified above. The terms and obligations of this limited warranty will be interpreted and
be enforceable under the laws of the State of Texas.
Aircraft Technologies Inc.
San Antonio, Texas 78217
Table of contents
Popular Toilet manuals by other brands

Maykke
Maykke HYA1100101 installation guide

Kohler
Kohler K-6191X Installation and care guide

Intra
Intra INU 82RS Instructions for use

Woodbridge
Woodbridge T0033 Installation and care guide

Cinderella
Cinderella CINDERELLA GAS installation manual

miseno
miseno Yosemite MT-YOSE32-15WST-WHTOU installation manual