AIRINNOVATIONS SMARTSENS AI-C120A Instruction Manual

nished size 5.5” wide x 8.5” high
SMARTSENS™IONIC AIR PURIFIER
with Pollutant & Odor Detection Technology
Instruction Manual and Warranty Information
READ AND SAVE THESE INSTRUCTIONS
nished size 5.5” wide x 8.5” high

Contents
Safety Instructions ............................................................................................................. 1
Parts & Features ................................................................................................................ 2
Operating Instructions ....................................................................................................... 3
Control Panel Instructions ................................................................................................. 4
Cleaning ......................................................................................................................... 5-6
Maintenance & Troubleshooting ........................................................................................ 7
Other Great Products ........................................................................................................ 8
Warranty ............................................................................................................................ 9
Specications
Model # Rated Voltage Power
Consumption
CADR Value Max Noise
Level
Dimensions Net Weight Room Size
AI-C120A 120V~ 60 Hz 14W 102 M3/H 55dB(A) 14.75” x
11.14” x
6.125”
8.45 Lbs. Up to 325
Sq. Ft.

SAFETY INSTRUCTIONS
WARNING
CAUTION!
1
READ AND SAVE THESE INSTRUCTIONS
NOTE: To reduce the risk of electrical shock, this equipment has a polarized plug (one blade
is wider than the other). This plug will t in a polarized outlet only one way. If the plug does
not t fully in the outlet, reverse the plug. If it still does not t, contact qualied personnel
to install the proper outlet. Do not alter the plug in any way.
• Only use the air purier as described in this manual. Failure to do so may result in
serious injury.
• Do not use the air purier with a damaged cord or plug.
• Do not handle the unit with wet hands. Doing so may result in electrical shock or
serious injury. Thoroughly dry your hands before handling any part of the air purier.
• Do not unplug by pulling on the cord. Unplug the unit by grasping, and pulling
the plug.
• Do not use an extension cord. Position the air purier so the plug on the power cord
easily reaches a standard electrical outlet for a polarized plug.
• Do not use the air purier outdoors or on wet surfaces. Doing so may result in electric
shock or serious injury. Use only indoors and under dry conditions.
• Do not place the air purier near sources of heat, such as stovetops, ovens, radiators
or computers.
• Do not use the air purier in an enclosed space where ammable, combustible or
explosive gases are present. Doing so may result in serious injury.
• Do not place open ames, including candles, directly in front of the air purier.
• Do not attempt to repair or adjust the unit. Professional or qualied personnel must
perform servicing.
• Keep hair, loose clothing and body parts away from openings and moving parts.
• Not intended for use by children age 12 and under.
• To avoid injury or damage, keep children away from the product and do not allow
children to place ngers or other objects into opening.
• Position the air purier on a at, solid, stable surface. Never place the unit on soft
surfaces such as a bed or sofa.
• Use only in a well-ventilated area, maintaining a minimum distance of 10 inches from
a wall or corner to insure proper air ow and air intake. Keep objects away from air
intake and exhaust grills.

Parts & Features
2
1. Air Intake Grill: Air enters here for the rst stage of cleaning.
2. Pre-Filter: Filters large particles such as dust, hair and lint.
3. Cleaning Brush: Use to clean the air intake and exhaust grills.
4. Electrostatic Collector Cell: Captures small particles such as dust, smoke,
pollen and pet dander from the air that passes through the lter.
5. VOC Odor Absorber: Reduces odors and chemical fumes from glue, solvents
and synthetic materials from the air that passes through the lter
6. Catalytic Oxygenator: This model contains a Catalytic Oxygenator, used to
reduce odors and chemical fumes. The catalyst system cannot be removed.
. 7. Exhaust Grill: Directs the ow of air as it exits the unit.
8. Power Cord: Plug into the outlet to begin use.
9. Cover Release Button: Press in to release the cover for maintenance access.
10. Control Panel Large digital display with surface touch controls for easy operation.
Thank you for purchasing the Air Innovations® SMARTSENS™ Ionic Air Purier with
Pollutant & Odor Detection Technology. This product comes with a 1-YEAR
WARRANTY from the date of purchase as your satisfaction is our primary concern.
HOW IT WORKS
Your new air purier contains several technologies which together make it one of the
most advanced and eective air ltration systems available, all in a stylish and compact
cabinet. The Air Innovations® SMARTSENS™ Ionic Air Purier with Pollutant & Odor Detec-
tion Technology is comprised of a multi-stage ltration system: a mechanical pre-lter,
an electrostatic collector cell, activated carbon odor removal, and catalytic ozone removal.
1
2
3
4
5
6
78
910

3
Operating Instructions
GETTING STARTED
1. Place the air purier on a hard level surface such as a table or desk.
Be sure the grill is not blocked by other objects and there are no candles or ames
near the unit.
2. Plug into the nearest standard electrical outlet that accepts a polarized plug.
3. To select the air cleaning speed, press the Power Button and the unit starts to
operate under AUTO mode. Press the Auto/Fan Button until you reach the
desired speed (Low, Medium, High).
Timer UV Power Auto/Fan Night Mode

4
Control Panel Instructions
A) Power Button: Pressing the Power Button once will illuminate the display screen and the unit
will start to operate under AUTO mode. Pressing the button again will turn the unit o.
B) AUTO mode/Fan Speed:
If the unit is left in AUTO mode, the air purier will automatically sense and adjust the air cleaning
speed when it detects pollutants in the air. The Light Bar on the control panel will clearly show
your current air condition.
• Green-Clean • Yellow-Low pollution • Orange-Medium pollution • Red-High pollution
Or, press the Auto/Fan Button repeatedly for the desired fan speed .
• Low for silent mode • Medium for normal use • High for maximum cleaning
C) Operation with Oxygenator: Button is used for turning the Catalytic Oxygenator on and o
(symbol “UV + TIO2” lights up when activated ). This feature provides additional air freshness via
the release of negative ions and is designed to run continuously, but may be turned o if desired.
D) Timer: Use button to set the timer function—adjustable between 1~9 hours or continuous op-
eration (denoted by the circulated ). Symbol shows the operating period that has been set (1H,
2H, 3H, 4H, 5H, 6H, 7H, 8H, 9H, ).
E) Night Mode: Press button once for night mode—display brightness automatically dims and unit
operates under low/silent mode. If the button is pressed again, the unit return to previous setting.
F) Cleaning Indicator: If red “CLEAN CELL” indicator appears on the display, the Electrostatic
Collector Cell should be cleaned as recommended. After the collector cell is cleaned and
re-installed, turn on the unit, press and hold button until buzzer beeps, and red “CLEAN CELL”
indicator goes out; the unit’s timer is now reset.
G) Catalytic Oxygenator Indicator: Illuminates when Catalytic Oxygenator is turned on.
H) Replace Filter Indicator: If red “REPLACE FILTER” indicator appears on the display, the VOC
Odor Absorber should be replaced. After the new lter is installed, turn on the unit, press and hold
button until buzzer beeps, and red “REPLACE FILTER” indicator goes out; the unit’s timer is now
reset.
I) Speed Indicator: Lighting starts from the center for the lowest fan speed to all three lights for full
fan speed.
J) Timer Indicator
K) Light Bar
K

5
Cleaning
WARNING: Cleaning the unit while it is plugged in may result in electric shock, electric spark,
and serious injury. Unplug the unit for cleaning or maintenance.
CLEANING INTERVALS
Proper care and cleaning of the air purier is critical to performance. The following chart shows the
cleaning intervals and method.
Part Cleaning Time Method
Internal & External Cabinet As Needed Wipe with a damp cloth
rst. If required, follow
with a mild, non-abrasive
cleaner.
Electrostatic Collector Cell 4 to 6 weeks Soak in warm water with
mild liquid dish detergent.
Rinse and dry completely.
For tough dirt and residue
we recommend using
Rejuvenate Stainless Steel
Cleaner (purchase at
www.Air-Innovations.com).
Pre-Filter 2 to 4 weeks Rinse thoroughly in warm
water or as needed and dry
completely before replac-
ing.
VOC Odor Absorber 6 months, or as needed Replace lter (purchase at
www.Air-Innovations.com).
Do not wash; vacuum
gently with a soft brush
attachment to clean if
necessary.
Catalytic Oxygenator As needed Vacuum the front surface
gently with a soft brush
attachment. Do not use
liquids for cleaning.
CLEANING THE PRE-FILTER
1. Unplug the air purier.
2. Open the cover from the right side by pressing
the Cover Release button.
3. Pull the Electrostatic Collector Cell straight up and
out of the cabinet; place to the side.
4. Remove the Pre-Filter by gently pulling on the
nger tab, located on the right side of the lter.
5. Thoroughly rinse the Pre-Filter and let it air dry before
placing it back in the cabinet. Do not use heated or
compressed air as part of the drying process.
6. Insert the Pre-Filter back into the unit and snap into place.
7. Close the cover securely.

6
CLEANING THE ELECTROSTATIC COLLECTOR CELL
Note: The Collector Cell may require more frequent cleaning if “arcing” occurs. Arcing is a sharp
snapping sound that occurs when large particles are collected on the Collector Cell. If prolonged or
continuous arcing occurs the Collector Cell should be cleaned and dried thoroughly.
1. Unplug the air purier.
2. Open the cover from the right side by
pressing the Cover Release button.
3. Pull the Collector Cell straight up and out
of the cabinet.
4. Place in sink, bathtub or other location where
cleaner can cover every surface.
5. Rinse or soak in warm water for loose debris.
Mild liquid dish detergent in water may be used
to help break down tough dirt and residue.
Thoroughly rinse the Collector Cell with
clean water.
6. Tough residue such as from tobacco smoke may
need additional cleaning or longer soaking.
We recommend using Rejuvenate Stainless Steel Cleaner
(purchase at www.Air-Innovations.com).
Note: To prevent damage to the components of the Collector Cell, do not put in the dishwasher or
use a cotton swab.
7. Shake excess water from the Collector Cell or place in direct sunlight to speed up drying time.
Do not use heated or compressed air to dry.
8. Place the Collector Cell back into the unit. The Collector Cell is designed so that it can only be
inserted in one direction. The arrow on Cell should point towards unit face. Please refer to instructions
on page 4 for resetting after cleaning; if not reset, the “CLEAN CELL” indicator will remain on screen.
Note: The Collector Cell must be completely dry after cleaning in order to operate properly. If the
Collector Cell is damp from cleaning, arcing may occur; remove Cell and let air dry longer. If the
power supply detects the Collector Cell is wet, it shuts down power to the cell and causes the red
“CLEAN CELL” indicator to blink rapidly. Re-dry the Collector Cell until the power supply
successfully restarts; the unit will return to its original speed and run as normal.
CLEANING THE EXHAUST GRILL
1. Unplug the air purier.
2. Remove the Cleaning Brush from the storage slot located under the cover.
3. Brush away any debris that has collected between the grill slots.
4. Return the cleaning brush to the storage slot.

7
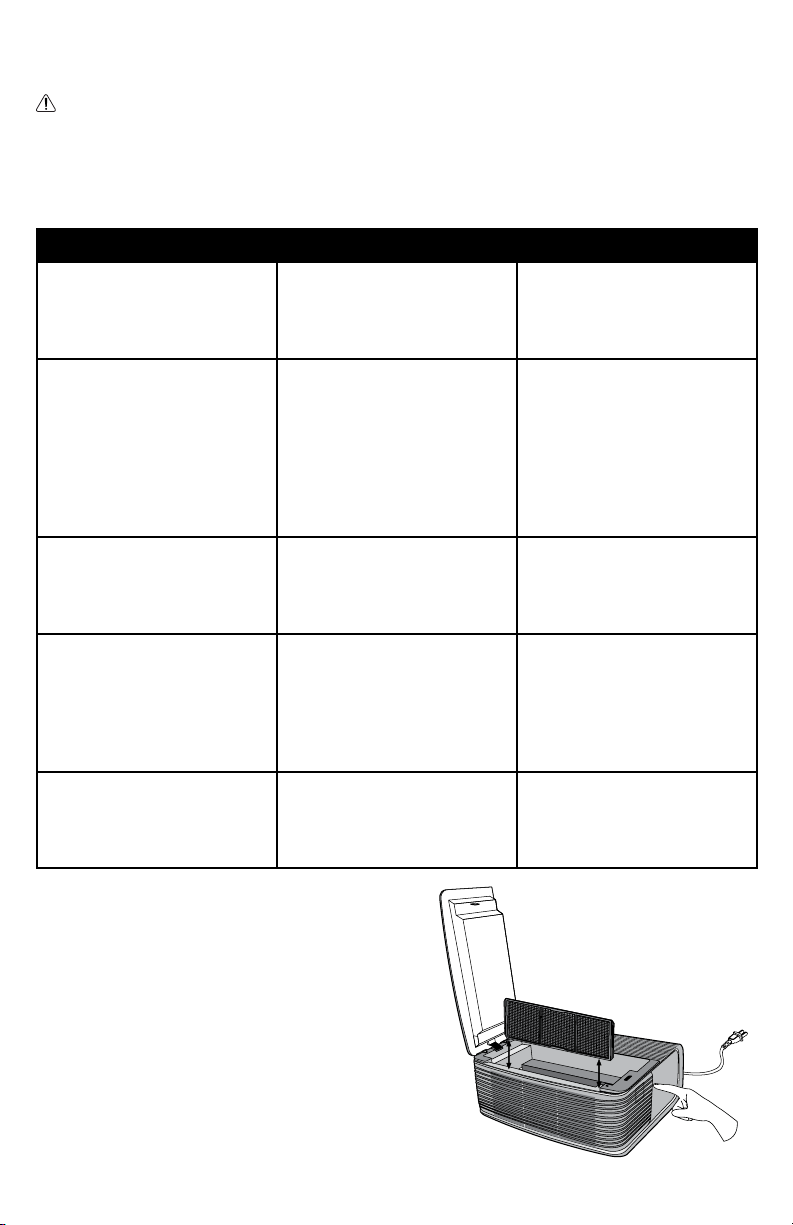
REPLACING THE VOC ODOR ABSORBER
1. Unplug the air purier
2. Open the cover from the right side by
pressing the Cover Release button.
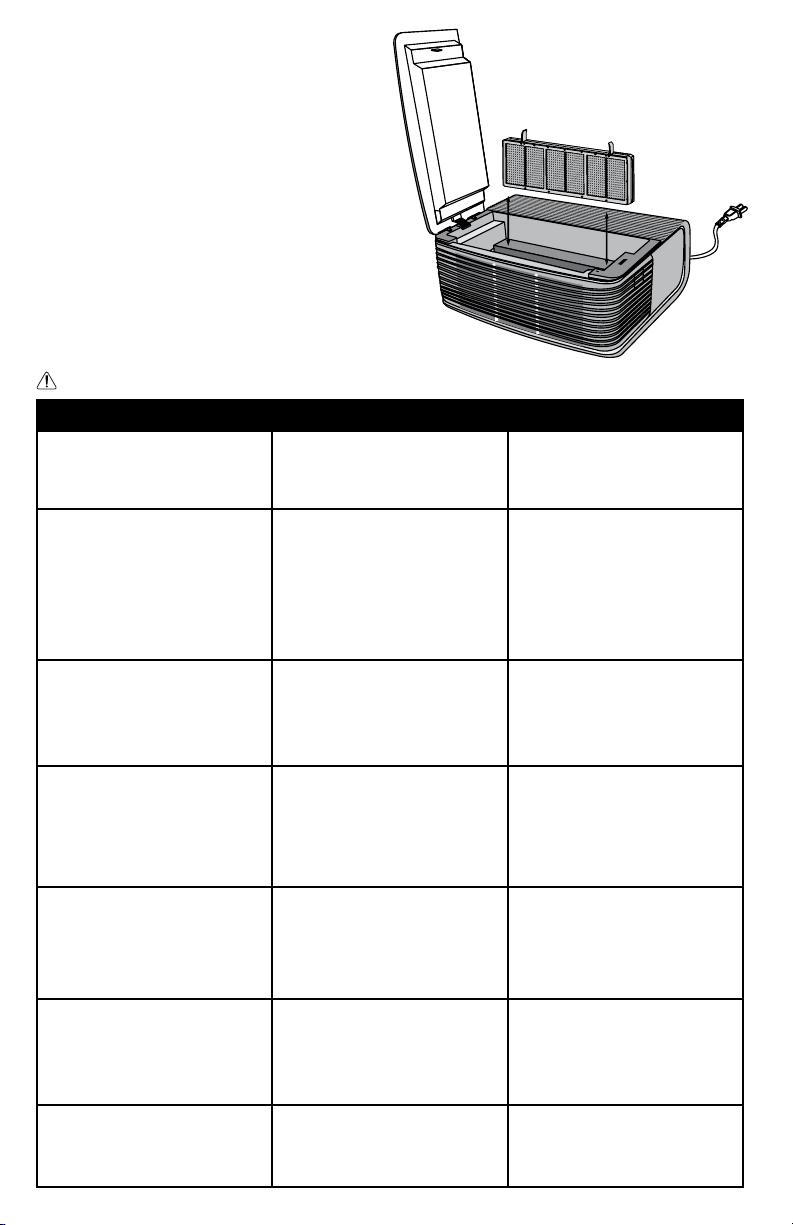
3. Using the two nger tabs pull the lter straight
up and out of the cabinet.
4. Replace with a new lter.
5. Close the cover securely.
Please refer to instructions on page 4 for resetting after cleaning;
if not reset, the “REPLACE FILTER” indicator will remain on screen.
Visit Air-Innovations.com to re-order lter.
Maintenance
Troubleshooting
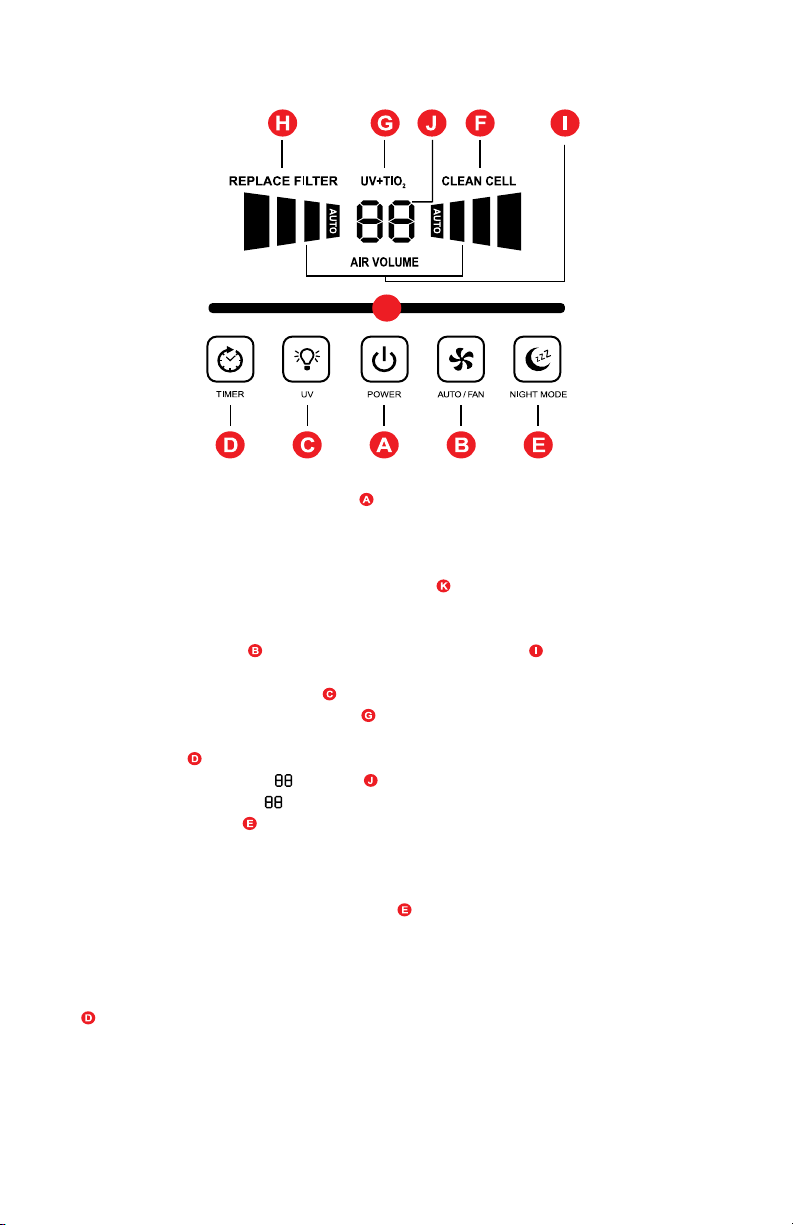
Problem Check Solution
Unit does not turn ON. •Power Cord
•Power Button
•Top Cover
•Plug in Power Cord
•Press the Power Button
•Make sure the top cover is
securely closed.
Unit makes an occasional sharp
snapping sound.
Electrostatic Collector Cell This is a normal occurrence
called “arcing” and occurs
as large particles of dust are
captured in the Collector Cell. If
prolonged arcing occurs,
Collector Cell should be
thoroughly cleaned and dried
completely.
CLEAN CELL light has turned solid
red.
Electrostatic Collector Cell A solid red light is a 60 day cleaning
reminder. Wash Collector Cell.
Make sure it is thoroughly clean
and dry before reinstalling. Refer to
instructions on page 4 for resetting
indicator after cleaning.
CLEAN CELL light is blinking red. Electrostatic Collector Cell •A fast blinking light indicates the
power supply has shut down due
to arcing or short circuit.
•The cell should be inspected and
cleaned, or replaced.
•Collector Cell is not in the unit;
replace Collector Cell.
Unit does not remove
pollutants.
Electrostatic Collector Cell •Clean the Collector Cell and make
sure it is completely dry before
reinstalling.
•Collector Cell may be damaged
and needs to be replaced.
REPLACE FILTER light on unit has
turned red.
VOC Odor Absorber •Replace Odor Absorber as
desired.
•If Odor Absorber is not replaced,
remove the lter from the unit to
turn o the REPLACE FILTER light
(refer to instructions on page 4).
Unit does not remove odor. VOC Odor Absorber •Vacuum Odor Absorber with a soft
brush attachment if dirty.
•Replace Odor Absorber if desired.
WARNING: To reduce to risk of personal injury, unplug before cleaning or servicing.

8
Try These Other Great
Products For Your Life!
Available at: www.ForLifeProducts.com, www.Air-Innovations.com, www.Pursfection.com, www.RejuvenateProducts.com

1-YEAR WARRANTY - AI-C120A
Air Innovations® SMARTSENS™ Ionic Air Purier with Pollutant & Odor Detection Technology
comes with a 1-year manufacturer’s warranty. If this unit should become defective within
1-year from the date of purchase, or if you have any questions or comments or regarding
replacements for any of our products, please contact us directly at:
Call us toll free at: 844-600-1370
Monday thru Friday 8:30 AM to 5:00 PM EST.
Visit us on the web at: www.Air-Innovations.com
e-mail us: sales@air-innovations.com
Or write us:
Air Innovations
Att: Quality Assurance Dept.
2301 SW 145th Ave.
Miramar, FL. 33027 USA
Please ll out the warranty card and
mail back to the above address.
Or, register your warranty online today.
Simply go to:
www.Air-Innovations.com
NAME
ADDRESS
CITY
STATE ZIP
TELEPHONE
E-MAIL
DATE OF PURCHASE
PLACE OF PURCHASE
THIS UNIT COMES WITH A 1-YEAR WARRANTY SUBJECT TO THE FOLLOWING CONDITIONS:
In the rst year, all repairs will be performed free of charge or the unit will be replaced. This war-
ranty is not transferable, it is valid only for the original purchaser. This warranty will be voided if
the unit is subjected to unauthorized repair or impact damage. If you have any questions please
call toll free: 844-600-1370. This warranty gives you specic legal rights, and you may also have
other rights which vary from state to state.
Please check here if you would not like to receive any solicitations from our company
!

Air Innovations® ©2020 Great Innovations, LLC. All Rights Reserved. US & International Patents Pending. Printed in China.
Table of contents
Other AIRINNOVATIONS Air Cleaner manuals

AIRINNOVATIONS
AIRINNOVATIONS XJ-209 Instruction Manual

AIRINNOVATIONS
AIRINNOVATIONS AI-210 Instruction Manual

AIRINNOVATIONS
AIRINNOVATIONS AI-400 User manual

AIRINNOVATIONS
AIRINNOVATIONS COMPACT AIR PURIFIER User manual

AIRINNOVATIONS
AIRINNOVATIONS XJ-209 User manual

AIRINNOVATIONS
AIRINNOVATIONS HEPAirX Technical Document

AIRINNOVATIONS
AIRINNOVATIONS XJ-209 Instruction Manual
Popular Air Cleaner manuals by other brands

A.O. Smith
A.O. Smith KJ1200F-B01-HK instruction manual

Blueair
Blueair Blue Pure 411i Max user manual

Sharp
Sharp UA-HG30E Operation manual

Genano
Genano 200 operating instructions

AllerAir
AllerAir Air Rhino AR 2000 Replacement guide

MODULE-AIR
MODULE-AIR AF-36 VT Series Operating instructions & parts manual