Airlink101 AR690W User manual

Wireless 300N Gigabit Router
Model # AR690W
User’s Manual
Ver. 1A

2
Table of Contents
1. Introduction................................................................................................................................. 4
1.1 Package Contents.................................................................................................................. 4
1.2 Features................................................................................................................................. 4
2. Connecting the Router ................................................................................................................ 5
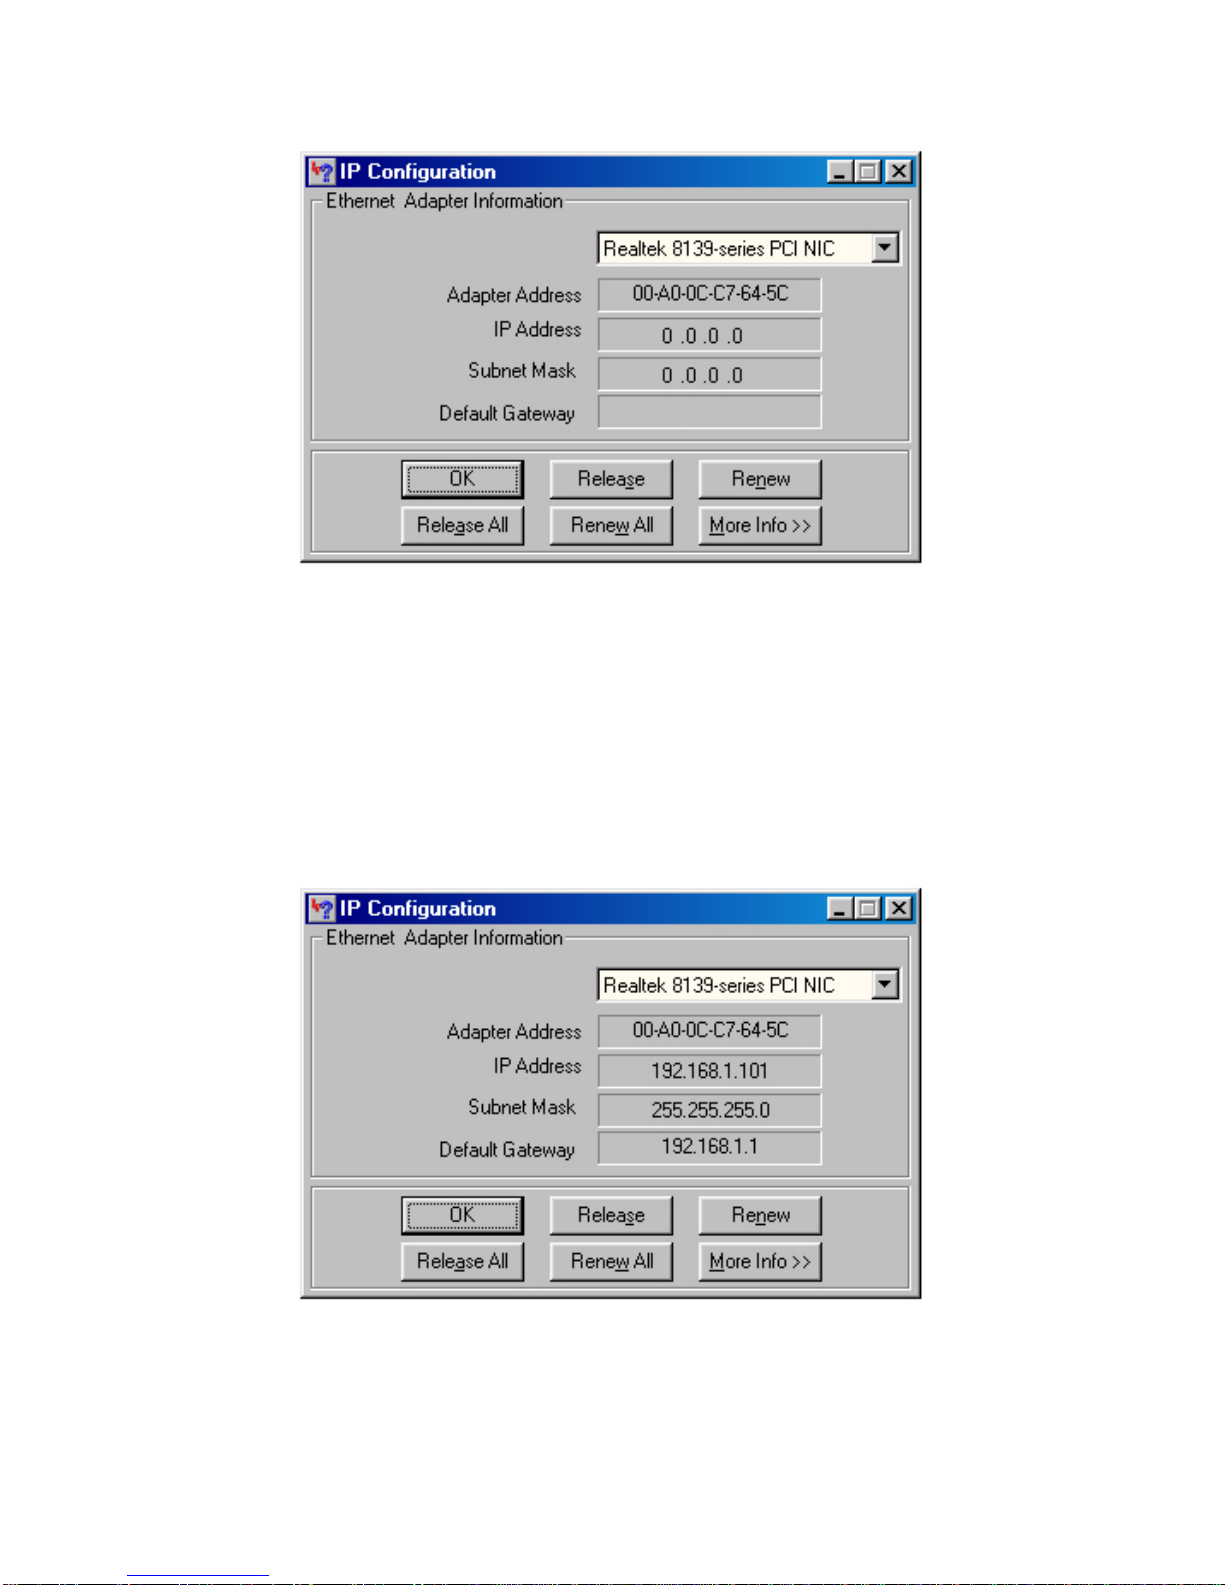
3. Verifying Connection to the Router............................................................................................ 6
4. Configuring the Router............................................................................................................... 9
Cable Modem............................................................................................................................ 10
DSL........................................................................................................................................... 10
5. Connecting to the Router Wirelessly........................................................................................ 11
6. Web Configuration Utility........................................................................................................ 13
6.1 Setup ................................................................................................................................... 13
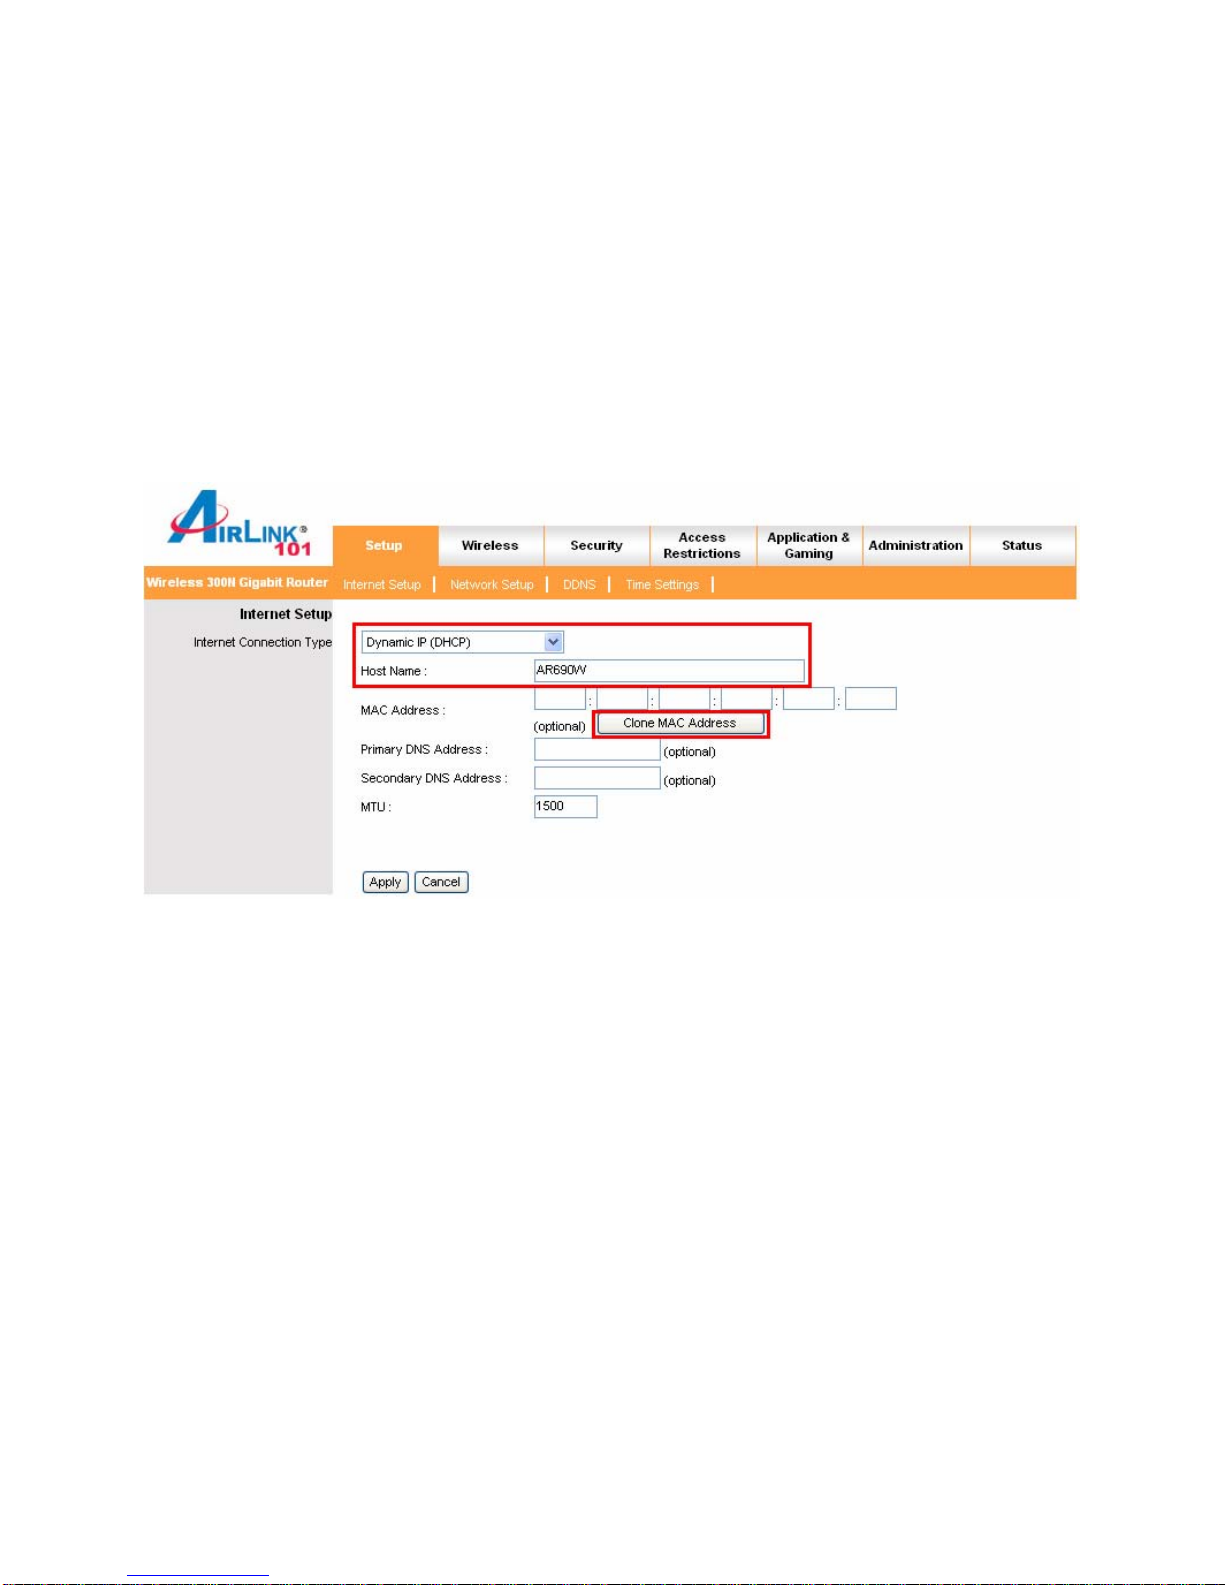
6.1.1 Internet Setup........................................................................................................... 13
6.1.2 Network Setup ......................................................................................................... 14
6.1.3 DDNS....................................................................................................................... 15
6.1.4 Time Settings........................................................................................................... 16
6.2. Wireless.............................................................................................................................. 17
6.2.1 Basic Wireless Settings............................................................................................ 17
6.2.2 Wireless Security..................................................................................................... 18
WEP.............................................................................................................................. 18
WPA.............................................................................................................................. 19
WPA with RADIUS...................................................................................................... 20
Wi-Fi Protected Setup (WPS)....................................................................................... 21
6.2.3 Wireless MAC Filter................................................................................................ 26
6.2.4 Advanced Wireless Settings .................................................................................... 27
6.3 Security............................................................................................................................... 28
6.3.1 Firewall.................................................................................................................... 28
6.3.2 VPN Passthrough..................................................................................................... 29
6.4 Access Restrictions............................................................................................................. 29
6.4.1 IP Filters................................................................................................................... 29
6.4.2 MAC Filters............................................................................................................. 30
6.4.3 URL Blocking.......................................................................................................... 31
6.4.4 Domain Blocking..................................................................................................... 32
6.4.5 Schedule................................................................................................................... 32
6.5 Applications & Gaming...................................................................................................... 33
6.5.1 Port Range Forwarding............................................................................................ 33
6.5.2 Port Range Triggering.............................................................................................. 34
6.5.3 DMZ......................................................................................................................... 35
6.5.4 QoS .......................................................................................................................... 36
6.6 Administration .................................................................................................................... 37
6.6.1 Management............................................................................................................. 37
6.6.2 Log........................................................................................................................... 38
6.6.3 Diagnostics............................................................................................................... 39
6.6.4 Factory Defaults....................................................................................................... 39

3
6.6.5 Firmware Upgrade................................................................................................... 40
6.6.6 Restart...................................................................................................................... 40
6.7 Status................................................................................................................................... 41
6.7.1 Router....................................................................................................................... 41
6.7.2 Local Network ......................................................................................................... 42
6.7.3 Wireless Network..................................................................................................... 42
7. Troubleshooting........................................................................................................................ 43
Appendix A – Specifications........................................................................................................ 44
Appendix B – Information............................................................................................................ 45
Technical Support......................................................................................................................... 47

4
1. Introduction
Congratulations on your purchase of the AR690W Wireless 300N Gigabit Router. The
Wireless 300N Router is recommended to be used with AirLink101®Wireless 300N
products to provide the best performance. The high bandwidth combined with extended
wireless coverage delivers fast and reliable connections for all of your networking
applications. The built-in gigabit switch highly increases the wired Ethernet speed.
A full range of security features such as WEP, WPA-PSK, and WPA2-PSK provide the
highest level of wireless network security. The built-in Web Configuration Utility allows
you to set up the router with an easy-to-use user interface. Best of all, the AR690W
works with 802.11g and 802.11b network devices that ensures compatibility with your
existing wireless products.
1.1 Package Contents
Before you begin the installation, please check the items of your package:
•Wireless 300N Router
•RJ-45 Cable
•Power Adapter
•Quick Installation Guide
•Manual CD
If any item contained is damaged or missing, please contact your local dealer
immediately. Also, keep the box and packaging materials in case you need to ship the
unit in the future.
1.2 Features
•Industry’s highest wireless data rate of up to 300Mbps with IEEE 802.11n draft
specification 2.0
•3 external fixed antennas for wider coverage and stronger signal strength to
eliminate dead spots
•64-bit/128-bit WEP encryption, Pre-shared Key (PSK), and Wi-Fi Protected
Access (WPA2 and WPA) support provide full protection for your wireless
connection
•Stronger signal strength increases the reliability and speed of wireless
connections
•Great for environments with higher wireless data traffic requirements
•Fully backward-compatible with 802.11b/g devices
•Works best with AirLink101® Wireless N and 300N Adapters

5
2. Connecting the Router
Note: Prior to connecting the router, be sure to power off your computer, DSL/Cable
modem, and the router. You should setup the router with a wired connection first before
attempting to setup any wireless connections.
Step 1 Connect one end of a network cable to the WAN port of the router and connect
the other end of the cable to the DSL/Cable modem.
Step 2 With another network cable, connect one end of the cable to your computer’s
network card and connect the other end to one of the LAN (Ethernet) ports of the router.
Step 3 Power on the DSL/Cable modem and wait for the lights on the modem to settle
down.
Step 4 Power on the router by connecting one end of the supplied power adapter to the
power jack of the router and connecting the other end to an electrical outlet.
Step 5 Power on your computer.
Step 6 Make sure the WAN, WLAN, and the LAN ports that the computer is connected
to are lit. If not, try the above steps again.
AR690W Icon Illustrations:
Power
On:Power on
Status
Blinking: Functioning properly
WAN
On: Link established
Blinking:Data transmission
Wireless
On: Wireless is ready

6
Blinking: Data transmission
LAN
On (Green): 1000Mbps device is connected
Blinking (Green): Data transmit under 1000Mbps mode
On (Orange): 100Mbps device is connected
Blinking (Orange): Data transmit under 100Mbps mode
WPS (WiFi Protected Setup)
Blinking Blue: WPS set up in progress
Static Blue: WPS set up successfully
Blinking Red: Error found
3. Verifying Connection to the Router
Step 1 Go to Start, Run, type command (for Windows 95/98/ME) or cmd (for Windows
2000/XP) and click OK. You will see the command prompt as below.
Step 2 Type ping 192.168.1.1 and press Enter. You should get four reply responses
back.
Step 3 If you get Request timed out, or Destination host unreachable, double-check
the network cable connection between the computer and the router and try Step 2 again.
If you still encounter problem, go to the next step; otherwise proceed to Section 3,
Configuring the Router.
Step 4 For Windows 2000/XP, type ipconfig/release and press Enter. (Windows
98se/ME users skip ahead to Step 6)

7
Step 5 Type ipconfig/renew and press Enter. You should get an IP address of
192.168.1.x (where xis a number between 2 - 254). Proceed to Section 3,
Configuring the Router. If you don’t get an IP address, reset the router by holding in
the reset button at the back of the router for 10 seconds while it is ON and try
ipconfig/renew again.
Step 6 For Windows 95/98/ME go to Start, Run, type winipcfg and click OK. (Step is
not necessary for Windows 2000/XP)
Step 7 Select your network card from the drop-down menu and click Release.

8
Step 8 After your IP address is released, click Renew. You should get an IP address of
192.168.1.x (where x is a number between 2 - 254). If you don’t get an IP address,
reset the router by holding in the reset button at the back of the router for 10 seconds
while it is ON and try Renew again.

9
4. Configuring the Router
Step 1 Open the web browser and type 192.168.1.1 in the URL Address field and press
Enter.
Step 2 Enter admin for both the username and password fields and click Login.
Step 3 Select the proper region, North America or South America, and click Apply.
Warning: This device requires that the user or installer properly selects the current
region of operation before using this device. This device will automatically limit the
allowable channels determined by the current region of operation. Incorrectly
selecting the current region of operation may result in illegal operation and may
cause harmful interference to other systems. The user is obligated to ensure the

10
device is operating according to the channel limitations, indoor/outdoor restrictions and
license requirements for the current country of operation.
Cable Modem
For most cable modem users, you should be able to connect to the Internet without any
configuration. If your ISP has provided you with a host name, enter it in the optional
Host Name field.
Click on the Clone MAC Address button. Click Apply and OK to save the settings.
If you have trouble connecting to the Internet, please refer to the Troubleshooting
section at the end of this guide.
DSL
For DSL users, follow the steps below to configure the router.
Step 1 Select PPPoE from the drop-down menu.

11
Step 2 Enter your username and password provided by your ISP.
Note: Depending on the ISP, you may need to include the domain name with your
username.
Example: [email protected]
Step 3 Click Apply and OK to save the settings.
If you have trouble connecting to the Internet, please refer to the Troubleshooting
section at the end of this manual.
5. Connecting to the Router Wirelessly
Below are the default wireless settings of the router. You must configure your wireless
network card to the same settings in order to establish a wireless connection to the

12
router. Please refer to your wireless network card’s manual on how to configure these
settings.
SSID: default
Operating Mode: Infrastructure
Authentication: Open System
Channel #: 6
WEP: disabled
If you want to change the router’s wireless settings, log in to the router and select the
Wireless tab. Make sure that you click Apply and OK to save the settings.
For more information about wireless settings, refer to section 6.2.

13
6. Web Configuration Utility
This router has a built-in web configuration utility that you can use to configure the
router’s settings. Simply log in to the router using your computer’s web browser.
6.1 Setup
6.1.1 Internet Setup
This is the default screen when you log in to the router’s web configuration utility. You
can setup your Internet connection here.

14
6.1.2 Network Setup
Network Setup allows manually configuring TCP/IP and DHCP settings.
Assigning Static DHCP Settings
Step 1 Select Enabled in the under the Static DHCP Settings section
Step 2 Select a computer name from the drop-down menu or enter a name associated
with this Static IP Address
.
Step 3 Enter the Static IP Address in the IP Address field
Step 4 Enter the MAC address of the corresponding computer in the MAC Address
field
Remember to click Apply and OK to save your changes.

15
6.1.3 DDNS
Dynamic DNS (DDNS) allows any user who wishes to access your server to reach it by
a registered DNS name instead of an IP address. Before you enable DDNS, you need
to register an account with one of the DDNS providers listed in the drop-down menu.
To Enable DDNS, select the DDNS provider you have registered with and enter the
required fields. Click Apply and OK to save the settings.

16
6.1.4 Time Settings
Time Settings allow you to configure the router clock.
Automatic connects to the internet and synchronizes the router’s clock with time
provided by accurate timeservers on the internet. Using this feature requires that your
router have a working internet connection.
Your computer’s clock allows you to synchronize the router’s clock with your
computer’s system clock
Manual provides you with the option of setting your own date and time.
Click Apply and OK to save the settings.

17
6.2. Wireless
6.2.1 Basic Wireless Settings
You can configure the router’s basic wireless settings on this screen.
Mode: Choose from Mixed (n/g/b), Mixed (g/b), Wireless-11n Only, Wireless-11g Only,
Wireless-11b Only, or Disabled to stop wireless function.
Network Name (SSID): You can change the router’s SSID in this field. The SSID is the
name that your router sends out wirelessly. Once you have changed the SSID, your
network clients need to re-connect themselves using the new SSID.
Channel: Select the desired channel.
Changing channels is useful when you are experiencing slow, unstable wireless
connections, or if you are unable to establish a wireless connection at all.
Your router has 11 channels available (1-11). Start with channel 1 and work your way
up. Each time you change channels on the router, restart the wireless computers and
then try to connect. If the computers are able to connect, test the channel out for a
while and make sure that they hold the connection. Keep changing channels until you
find one that gives you a stable connection.
All the network clients need to be using the same channel.
SSID Broadcast: Choose to enable or disable the broadcasting of your SSID.

18
6.2.2 Wireless Security
You can configure wireless security such as WEP or WPA encryption on this screen.
Note: It is recommended that you use WPA-PSK or WPA2-PSK encryption over WEP if
your wireless clients support it. All of the wireless clients must use the same security
settings in order to connect to the router.
WEP
To enable WEP, select WEP from the Security Mode.
Authentication Type: Select “Shared Key”

19
Encryption: Choose 64 bits
Key Type: Choose HEX
WEP Key 1: Enter a 10 digit number. This will be your wireless password. An easy
one to remember is a phone number with area code (ex: 8887463238). You do not
need to enter anything in WEP Key 2, 3 and 4.
Default Key: Select key 1
Click Apply and OK to save the settings.
WPA
To enable WPA, select WPA-PSK or WPA2-PSK from the Security Mode.
Encryption Methods: Select either TKIP or AES as the encryption method. AES is
only supported by some newer cards, so make sure that your card supports AES before
selecting that option. TKIP will work with most cards. If you are unsure, choose TKIP.
Passphrase: Enter a passphrase between 8 to 63 characters long. For best security,
use a passphrase that is at least 30 characters long.

20
Key Renewal: Enter the desired key renewal time in seconds. It is best to leave this at
the default setting of 1500.
Click Apply and OK to save the settings.
WPA with RADIUS
If you are using a RADIUS server in your network for authentication, you may choose
WPA or WPA2 from the Security Mode.
Encryption Methods: Select either TKIP or AES as the encryption method.
RADIUS Server: Enter the IP Address of your RADIUS server.
RADIUS Port: Enter the port number of your RADIUS server.
Shared Key: Enter the shared key.
Key Renewal: Enter the desired key renewal time in seconds.
Click Apply and OK to save the settings.
Other manuals for AR690W
1
Table of contents
Other Airlink101 Network Router manuals

Airlink101
Airlink101 Wireless 150 Router User manual

Airlink101
Airlink101 AGIGA8SW User manual

Airlink101
Airlink101 AGIGA5SW User manual

Airlink101
Airlink101 AR686W User manual

Airlink101
Airlink101 ASW105 User manual

Airlink101
Airlink101 AR570WV2 User manual

Airlink101
Airlink101 AR725W User manual

Airlink101
Airlink101 ASW316 User manual

Airlink101
Airlink101 AR686W User manual

Airlink101
Airlink101 ASW108 User manual