CAUTION: To reduce the risk of electric shock, pull plug before
servicing this pump.
WARNING: Risk of electrical shock, this pump has not been
investigated for use in swimming pool areas. This pump is supplied
with a grounded plug. To reduce the risk of electric shock: connect
only to a properly grounded receptacle which is serviced by a
Ground Fault Interrupter.
• Do not place pump where it
might fall into water.
• Do not place pump
in direct sunshine.
• Do not place pump near
ammable or other dangerous
materials or objects.
• Use only to pump air.
• Place horizontally and make
sure pump is above the height
of the water surface to prevent
water siphoning out of pond.
WARNING
!
ATTENTION: Pour réduire le risque de choc électrique,
débrancher la pompe avant de réparer cette pompe.
AVERTISSEMENT: Rish de choc électrique, cette pompe n’a
pas été étudié pour une utilisation dans les piscines. Cette pompe
est fournie avec une prise de terre. Pour réduire le risque de choc
électrique: se connecter uniquement à une prise correctement mise à
la terre qui est desservi par un disjoncteur de fuite à la terre.
• Ne pas placer la pompe où elle
pourrait tomber dans l’eau.
• Ne pas placer la pompe
en plein soleil.
• Ne pas placer la pompe près de
substances inammables ou
autres matières dangereuses ou
des objets.
• Utiliser uniquement pour
pompe à air.
• Placer horizontalement et
s’assurer que la pompe est
supérieure à la hauteur de la
surface de l’eau pour empêcher
l’eau de l’étang à siphonner.
IMPORTANT SAFETY INSTRUCTIONS
WARNING - To guard against injury, basic safety precautions should be observed, including the following:
READ AND FOLLOW ALL SAFETY INSTRUCTIONS
To avoid possible electric shock, special care should be taken since water is employed in the use of aquarium equipment.
For each of the following situations, do not attempt repairs by yourself; return the appliance to an authorized service facility
for service or discard the appliance:
1. If the appliance falls into the water, DON’T
reach for it! First unplug it and then retrieve
it. If electrical components of the appliance
get wet, unplug the appliance immediately.
2. Carefully examine the appliance after instal-
lation. It should not be plugged in if there is
water on parts not intended to be wet.
3. Do not operate any appliance plug or recep-
tacle getting wet, position aquarium stand
and tank to one side of a wall-mounted re-
ceptacle to prevent water from dripping onto
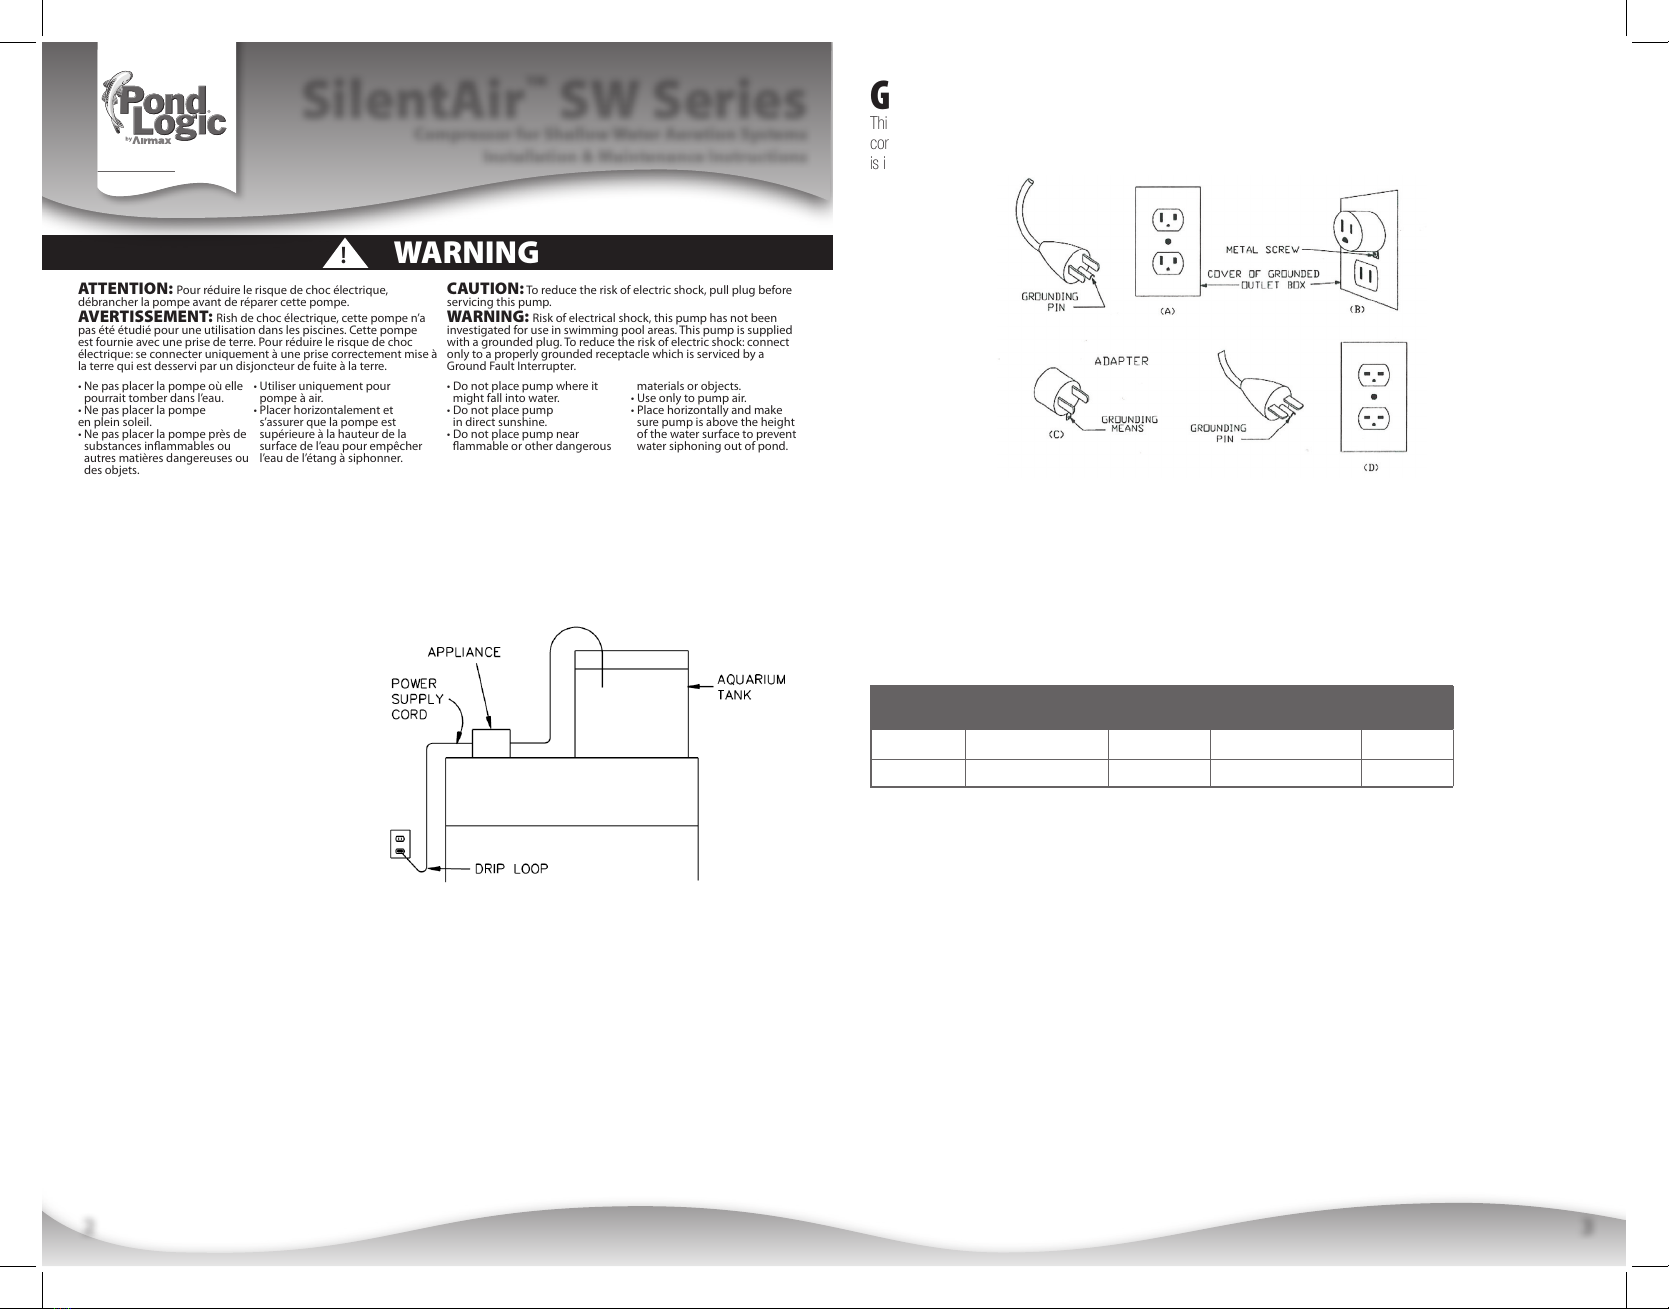
the receptacle or plug. A “drip loop” should
be arranged by the user for each cord con-
necting an aquarium appliance to a receptacle. The “drip loop” is that part of the cord below the level of the receptacle,
or the connector if an extension cord is used, to prevent water traveling along the cord and coming in contact with the
receptacle. If the plug or receptacle does get wet, DON’T unplug the cord. Disconnect the fuse or circuit breaker that
supplies power to the appliance. Then, unplug and examine for presence of water in the receptacle.
c. Close supervision is necessary when any appliance is used by or near children.
d. To avoid injury, do not contact moving parts.
e. Always unplug an appliance from an outlet when not in use, before putting on or taking off parts, and before cleaning.
never yank cord to pull plug from outlet. Grasp the plug and pull to disconnect.
f. Do not use an appliance for other than intended use. The use of attachments not recommended or sold by the appliance
manufacturer may cause an unsafe condition.
g. Do not install or store the appliance where it will be exposed to the weather or to temperatures below freezing.
h. If an extension cord is necessary, a cord with a proper rating should be used. A cord rated for less ampreres or watts tan
the appliance rating may overheat. Care should be taken to arrange the cord so that it will not be tripped over or pulled.
SAVE THESE INSTRUCTIONS
GROUNDING INSTRUCTIONS
This appliance should be grounded to minimize the possibility of electric shock. This appliance is equipped with an electric
cord having an equipment grounding conductor and a grounding type plug. The plug must be plugged into an outlet that
is installed and grounded in accordance with all appropriate codes and ordinances.
The appliance is for use on a nominal 120-volt circuit, and has a grounding plug that looks like the plug illustrated in (A)
below. A temporary adapter which looks like the adapter illustrated in (B) and (C) below may be used to connect this plug
to a two-pole receptacle as shown in (B) if a grounded outlet is not available. The temporary adapter should be used only
until a grounded outlet can be installed by a qualified electrician. The green-colored rigid ear( lug, and the like) extending
from the adapter must be fastened to a permanent ground such as a grounded outlet box.
IMPORTANT: Airmax® Ecosystems, Inc. is not responsible for losses, injury or death resulting from a failure to follow these
safety precautions, misuse or abuse of equipment.
TECHNICAL SPECS
MODEL VOLTAGE WATTAGE MAX DIFFUSER
WATER DEPTH AIR FLOW
SW-10 120V / 60 Hz 50 Watts Up to 6 Feet 2.5 CFM
SW-20 120V / 60 Hz 100 Watts Up to 8 Feet 4.9 CFM
INSTALLATION
Compressors should be installed 12 inches or more above the water level to ensure that water cannot flow from the airline/
diffuser back to the pump. Compressors may be used without protection although for longer life it is suggested that it be
placed indoors or under a protective ventilated cover. Keep pump as dry as possible. If left outdoors place it on a hard
surface that will stay dry during heavy rains.
MAINTENANCE & TROUBLESHOOTING
There are no parts that need lubrication. The integrated air filter requires periodic cleaning. To clean the filter media, remove
the air filter cover. Extract the filter media from the pump and rinse thoroughly with cold water. Before replacing, wait for
the air filter to dry. Replace media into the empty filter cavity, replace the air filter cover and refasten. When the airflow
decreases, it is time to replace the diaphragms. There are two diaphragms, one at either end of the pump.
1. Disconnect the pump from the AC receptacle.
2. Remove the cover lid.
3. Unscrew the diaphragm assembly from either end of the pump.
4. Remove the diaphragm assembly.
5. Remove the black, round doughnut-like diaphragm and replace with the supplied parts.
6. Replace the diaphragm assembly and refasten.
7. Replace the cover lid.
32
SilentAir™ SW Series
Compressor for Shallow Water Aeration Systems
Installation & Maintenance Instructions


 User manual")


