Airzone AZAI6WSCDKA User manual

2
UNIT CONTROL.....................................................................................................................................................................................................................................................................................2
Setting the unit on/o ...........................................................................................................................................................................................................................................................2
Setting the set-point temperature....................................................................................................................................................................................................................................2
Setting the operating mode................................................................................................................................................................................................................................................3
Setting the fan-speed.............................................................................................................................................................................................................................................................3
Getting information from unit............................................................................................................................................................................................................................................3
Setting the louver....................................................................................................................................................................................................................................................................3
SCHEDULES ...........................................................................................................................................................................................................................................................................................4
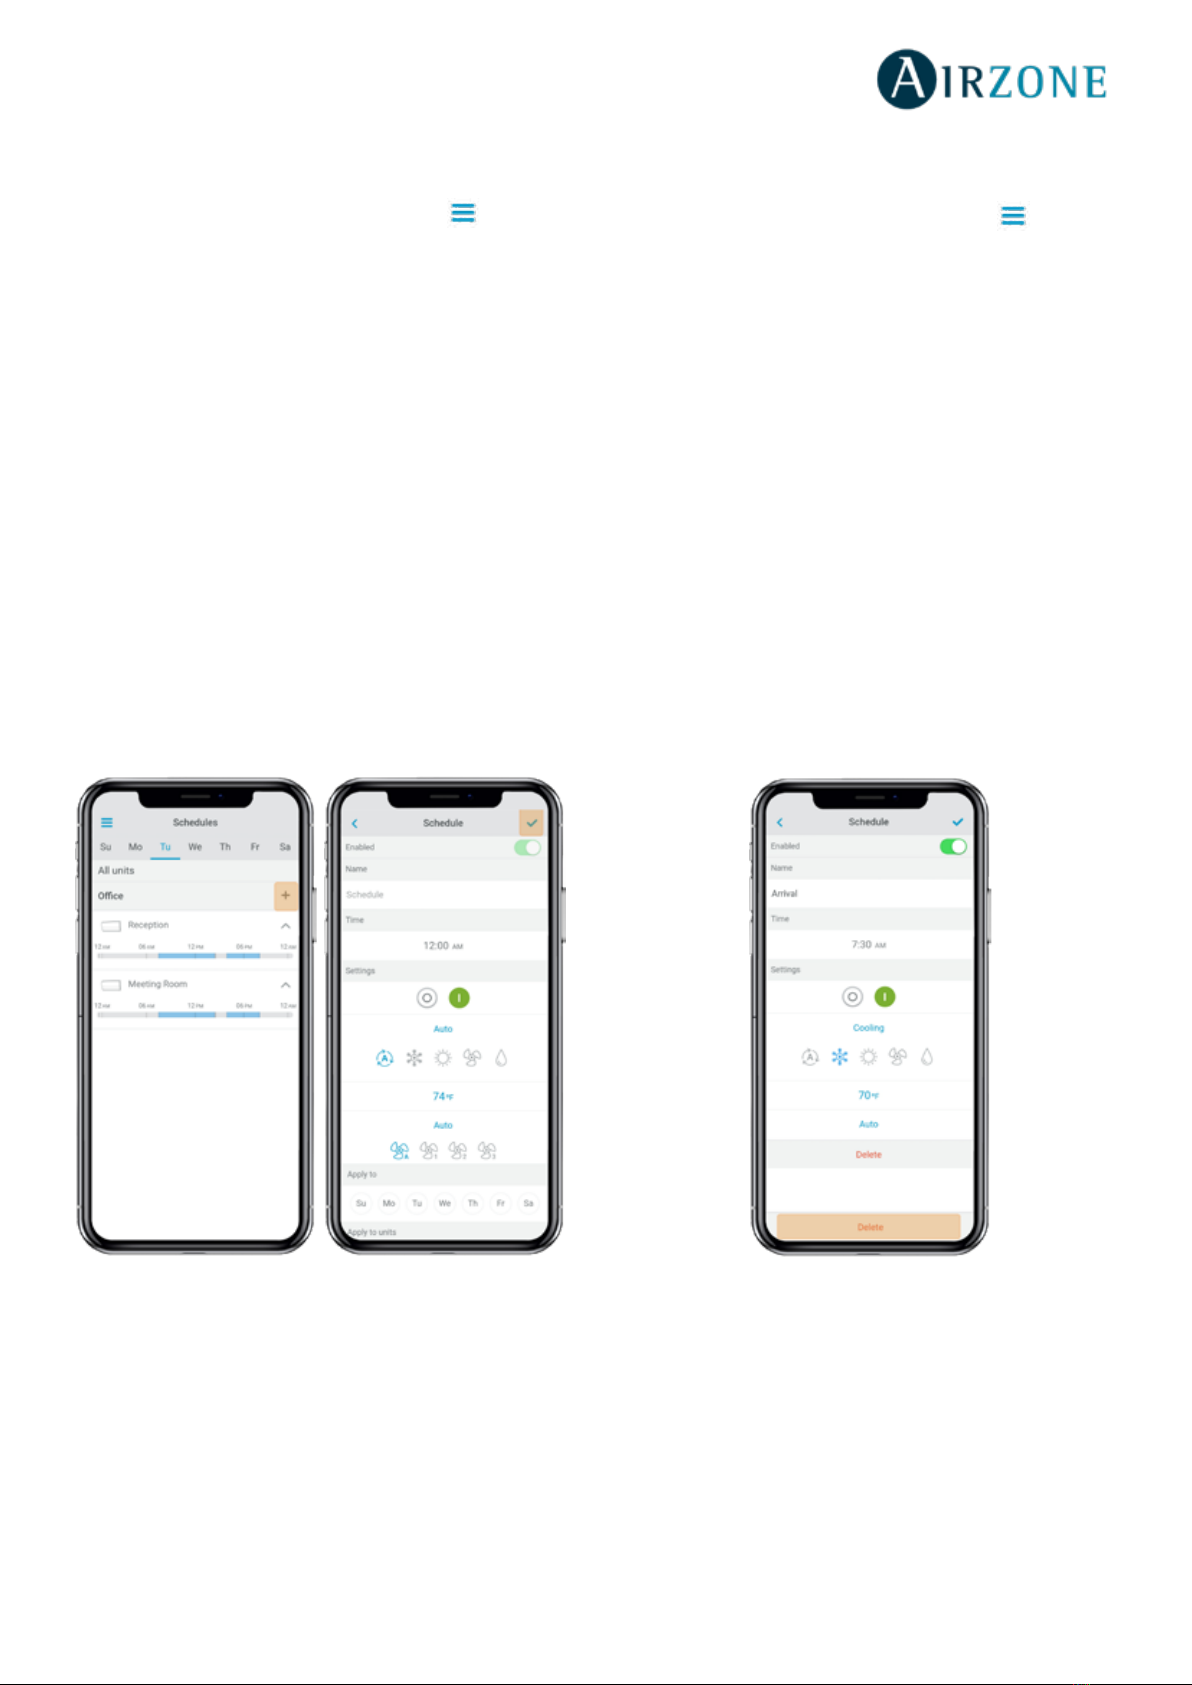
Seeing a schedule....................................................................................................................................................................................................................................................................4
Activating/deactivating a schedule..................................................................................................................................................................................................................................4
Creating a new schedule.......................................................................................................................................................................................................................................................5
Editing a schedule ...................................................................................................................................................................................................................................................................5
Deleting a schedule ................................................................................................................................................................................................................................................................5
UNITS MANAGEMENT........................................................................................................................................................................................................................................................................6
Adding a unit.............................................................................................................................................................................................................................................................................6
Releasing unit............................................................................................................................................................................................................................................................................6
Changing unit network..........................................................................................................................................................................................................................................................6
Editing unit data.......................................................................................................................................................................................................................................................................7
Removing the unit from the app........................................................................................................................................................................................................................................7
Editing group data ..................................................................................................................................................................................................................................................................7
Removing a group...................................................................................................................................................................................................................................................................7
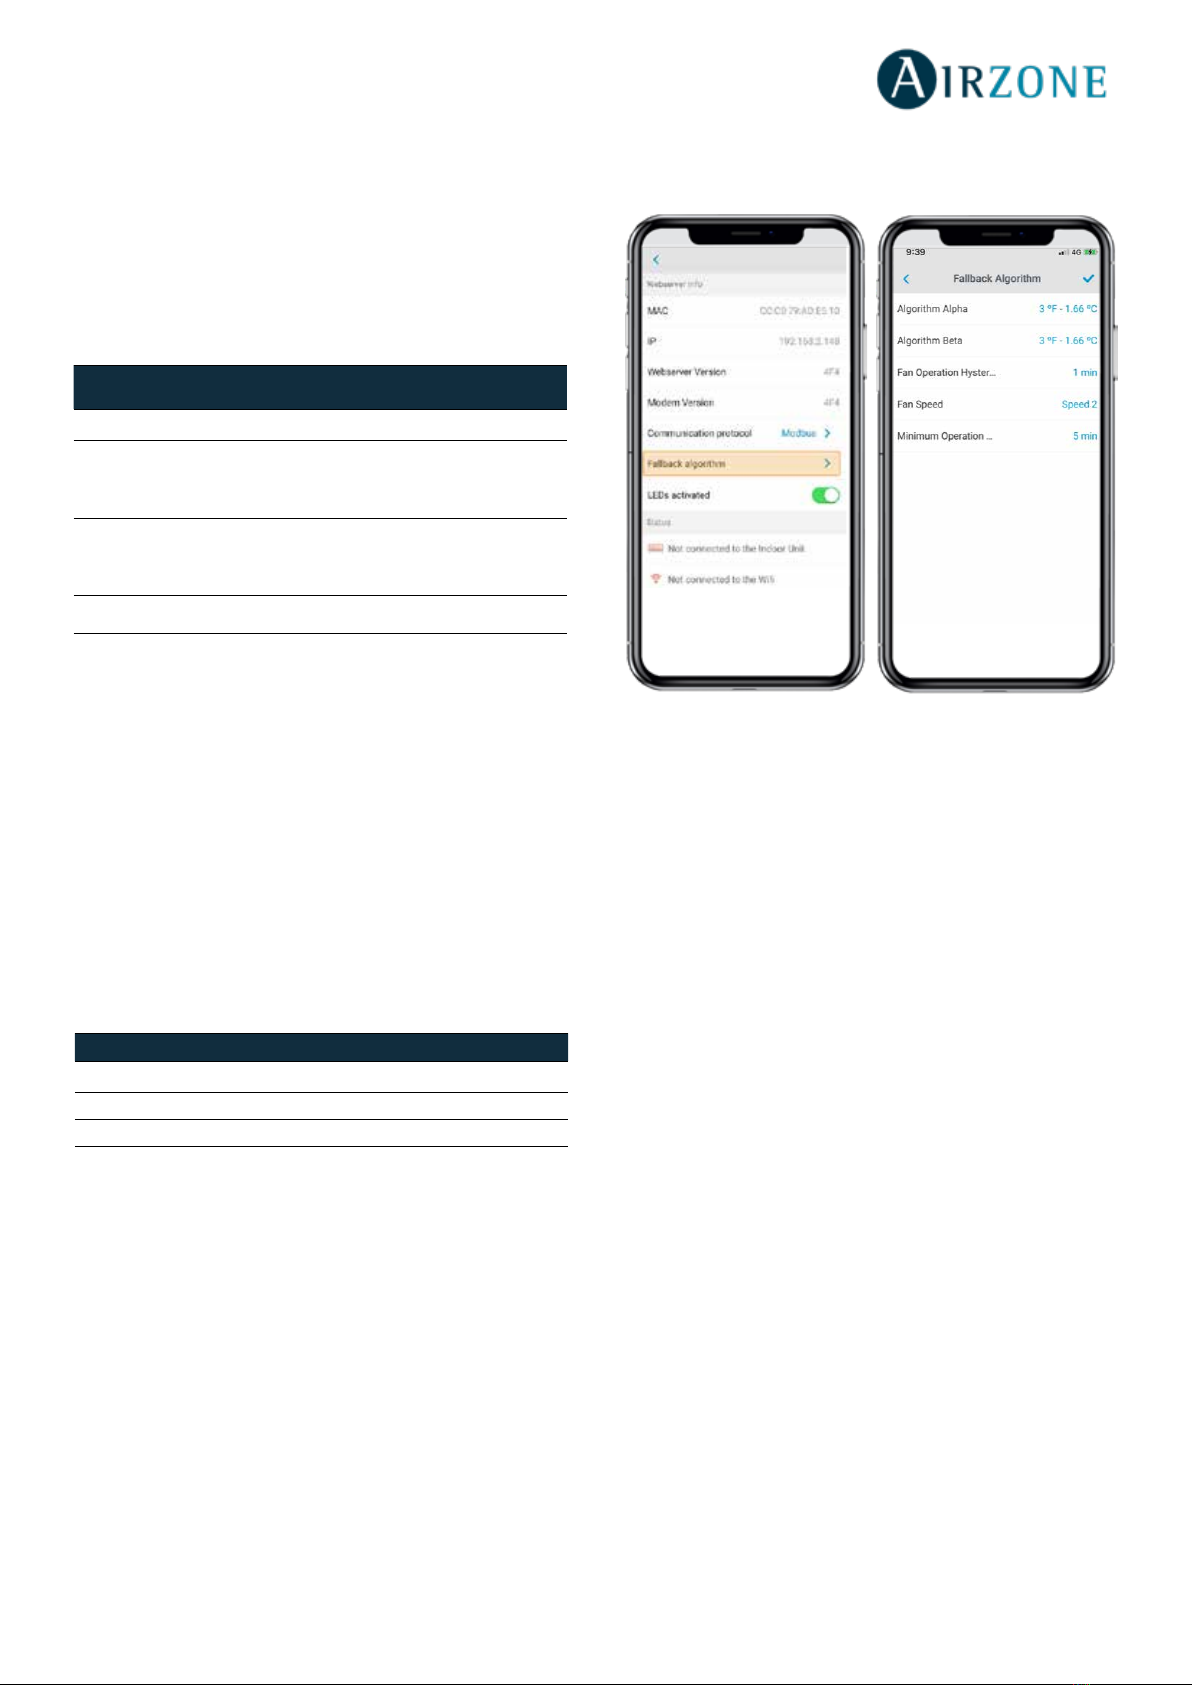
Conguring the Communication Protocol.....................................................................................................................................................................................................................8
Conguring the Fallback Algorithm..................................................................................................................................................................................................................................9
LED Settings...............................................................................................................................................................................................................................................................................9
USERS MANAGEMENT .......................................................................................................................................................................................................................................................................10
Editing my account .................................................................................................................................................................................................................................................................10
Deleting my account..............................................................................................................................................................................................................................................................10
Inviting a user............................................................................................................................................................................................................................................................................11
Editing user permission.........................................................................................................................................................................................................................................................11
Removing a user.......................................................................................................................................................................................................................................................................11
THIRD PARTY DEVICES 3PTI.........................................................................................................................................................................................................................................................12
Linking the account of third party device.......................................................................................................................................................................................................................12
Unlink your DKN Plus third-party account......................................................................................................................................................................................................................13
Changing the zone..................................................................................................................................................................................................................................................................14
Unlinking a third party device from your DKN Plus ....................................................................................................................................................................................................14
SETTINGS................................................................................................................................................................................................................................................................................................15
Changing language ................................................................................................................................................................................................................................................................15
Information 3PTI.......................................................................................................................................................................................................................................................................15
INSTALLATION DKN CLOUD WIFI ADAPTOR FOR VRV/SKYAIR AZAI6WSCDKA.................................................................................................................................................16
Package content.......................................................................................................................................................................................................................................................................16
LED Operation...........................................................................................................................................................................................................................................................................16
Connection (AZAI6WSCDKA)...............................................................................................................................................................................................................................................17
INSTALLATION DKN RESIDENTIAL CLOUD WIFI ADAPTOR FOR DUCTLESS AZAI6WSCDKB........................................................................................................................18
Package content.......................................................................................................................................................................................................................................................................18
LED Operation...........................................................................................................................................................................................................................................................................18
Connection (AZAI6WSCDKB)...............................................................................................................................................................................................................................................19
INSTALLATION DKN PLUS ADAPTOR FOR VRV/SKYAIR/DUCTLESS AZAI6WSPDKC..........................................................................................................................................20
Package content.......................................................................................................................................................................................................................................................................20
LED Operation...........................................................................................................................................................................................................................................................................20
P1P2 Connection (AZAI6WSPDKC)....................................................................................................................................................................................................................................21
S21 Connection (AZAI6WSPDKC).......................................................................................................................................................................................................................................21
Smart thermostat connection.............................................................................................................................................................................................................................................22
REGULATIONS.......................................................................................................................................................................................................................................................................................23
TABLE OF CONTENTS

2
UNIT CONTROL
From the Home screen tap on the Menu icon and select
the Daikin unit to control.
Setting the unit on/o
Tap on the On and O buttons individually or by groups
from the Home screen or tap the unit to access the control
screen for turning on and o the zone.
Setting the set-point temperature
Adjust the set-point temperature by sliding your nger
around the ring on the screen or by tapping the + and
- buttons.
Depending on the installation, the reference temperature will be
measured from:
The Indoor Unit
The Thermostat
Both

3
Setting the operating mode
The available modes, depending on the installation type,
are:
Auto. Allows automatic switching between cooling and
heating.
Cooling. The air conditioning unit will start a cooling
cycle.
Heating. The air conditioning unit will start a heating
cycle.
Fan. The system works exclusively in fan mode.
Dry. The air conditioning unit will start a
dehumidication cooling cycle decreasing the humidity.
Setting the fan-speed
Tap the fan icon to select from the available speeds.
Getting information from unit
Open the drop-down menu, tap on Home icon and
select the Daikin unit to control.
Tap on unit information which shows the device MAC
address, rmware version running and Wi-Fi signal and
Modbus address.
Tap the‘’Ok’’ button to return to the previous screen.
Setting the louver
Tap the louver icon to select from the available positions.

4
SCHEDULES
Seeing a schedule
Tap the day of the week to see the schedule associated to
that day.
Select a unit to see all the schedules associated to it.
Schedules can also be seen at the Unit control menu.
Activating/deactivating a schedule
Tap the day of the week to see the schedule associated to
that day.
Select a unit to see all the schedules associated to it.
Select a schedule and activate/deactivate it by tapping the
switch within the schedule.
From the Home screen tap on the Menu icon and go to
Schedules.

5
Creating a new schedule
From the Home screen tap on the Menu icon and go to
Schedules.
Each system group can set up to 24 schedules.
Follow the steps below to set the schedule:
1. Tap the + icon in the group where the schedule is
going to be created.
2. Create a name for the schedule
3. Set the starting time of the schedule.
4. Select the parameters of the schedule:
. On and o.
. Operation mode.
. Set-point temperature.
. Fan-speed.
5. Select the days of the week when the schedules
will take place.
6. Assign the schedule to the units.
7. Tap the conrmation icon to save the schedule or
< to go back.
Important: The schedules do not have an automatic end
time, hence it is necessary to create a schedule event to turn
ON/OFF the unit.
Editing a schedule
From the Home screen tap on the Menu icon and go to
Schedules.
Follow the steps described below:
1. Tap the schedule to be edited.
2. Change the selected parameters.
3. Assign the schedule to the units.
4. Tap the conrmation icon to save the schedule or
< to go back.
To delete the schedule, tap Delete Schedule.
Important: The schedules do not have an automatic end
time, hence it is necessary to create a schedule event to turn
ON/OFF the unit.
Deleting a schedule
Follow the steps described below:
1. Tap the schedule to be deleted.
2. Tap Delete.
3. If you do not want to delete the schedule, tap the
icon < to go back.

6
Adding a unit
From the Home screen tap on the Menu icon and tap
Congure Unit.
To add a new Daikin unit, tap Search units and follow the
steps below.
Important: The Bluetooth connection must be enabled on
your smartphone to add the unit.
Important: Depending on your device, a notication may
show up requesting access to the geolocation, conrm and
continue.
1. Select the unit from the list of available units to
add.
Note: If your unit does not appear, conrm if the bluetooth
function is enabled on your iOS or Android device and the
DKN Cloud Wi-Fi Adaptor LED operation light is green and
blinking.
2. Tap the selected unit again to access.
3. Tap Connect to Network to choose the network to
connect, select the network and enter its password.
Note: If the Wi-Fi connected status is displayed red,
please verify that the password is correct.
4. Tap Associate.
5. Set the name, group and unit icon. If there is no
group, create a new one and set the name, temperature
units and time zone of the group.
If the unit has already been added and it needs to be
released in order to be added by other user, tap Release
and enter the pin code located in the DKN Cloud Wi-Fi
Adaptor.
UNITS MANAGEMENT
Releasing unit
From the Home screen tap on the Menu icon and tap
Congure Unit.
To nd a Daikin unit, tap Search units.
Important: The Bluetooth connection must be enabled on
your smartphone to add the unit.
Tap Release and enter the pin code located in the DKN
Cloud Wi-Fi Adaptor if required.
Changing unit network
From the Home screen tap on the Menu icon and tap
Congure Unit.
To add a new Daikin unit, tap Search units and follow the
steps below.
Important: The Bluetooth connection must be enabled on
your smartphone to add the unit.
1. Select the unit from the list of available units to add.
Note: If your unit does not appear, conrm the Bluetooth
function of your iOS or Android is activated and the DKN
Cloud Wi-Fi Adaptor LED operation light is green and blinking
2. Tap the selected unit again to access.
3. Tap Change Network to change the network to connect,
select the network and enter its password.
Note: If the Wi-Fi connection status is displayed red, please
verify that the password is correct.

7
Editing unit data
From the Home screen tap on the Menu icon and tap
Manage Units.
Select the unit to be edited.
Edit the parameters: Name and Unit icon.
Tap Delete to remove the unit.
If there is no unit, tap Congure Unit and enter the
following parameters:
Removing the unit from the app
From the Home screen tap on the Menu icon and tap
Manage Units.
Tap the unit to be removed or restored.
Tap Delete to remove the unit.
Editing group data
From the Home screen tap on the Menu icon and tap
Manage Units.
Tap the group to edit and set the following parameters:
Group parameters: Name and Time zone.
Units: Select the units which belong to the group.
Tap the conrmation icon to save changes.
Tap Delete to remove the group and unlink the units
associated.
Removing a group
From the Home screen tap on the Menu icon and tap
Manage Units.
Tap the group to be removed.
Tap Delete to remove the group and unlink the units
associated with the app.

8
Conguring the Communication Protocol
The communication protocol settings menu is only
available on DKN Plus devices and can only be congured
in the initial association process.
1) Press Communication Protocol to access the settings
menu.
2) Select Modbus or BACnet as the communication
protocol the device will use.
3) You can adjust the following settings parameters for
each communication protocol.
Modbus
- Modbus address: Congurable value between 1 and 256.
- Speed bps: Value selectable from among the available
options.
BACnet
- Device Addess: Congurable value between 0 and 127.
- Speed bps: Value selectable from among the available
options.
- Max master nodes: Congurable value between 1 and
127.
- Max frames: Congurable value between 1 and 127.

9
Conguring the Fallback Algorithm
The DKN+ Fallback logic enables the control of indoor
unit by a thermostat using G, Y and W contacts. The DKN+
Fallback logic is available as a default until the adaptor is
connected to the cloud. Once the adaptor is connected to
the cloud the Fallback logic is disabled automatically.
Residual Operation: Most Thermostats have a residual
operation period that keeps fan (G) energized for a few
seconds to few minutes to dissipate heat/cool from the
unit. During this time, the unit is commanded to a high
setpoint (cooling) or a low setpoint (heating) for a period
of time and the fan remains operational. Once residual
fan operation is stopped the unit turns O. The residual
operation time is 70 seconds by default and adjustable by
the DKN App for the DKN+ adaptor. The setting should be
at least 10 seconds higher than value set at the thermostat.
Fan Speed: During the fallback logic, the indoor unit will
use its last fan speed set at the indoor unit. At the time of
install make sure to set the desired fan speed in cooling
and heating from the DKN+ or using the VRV Remote
controller.
Requirements for Fallback logic.
1) The thermostat is hardwired to the DKN+ adaptor.
2) The DKN+ adaptor is not connected to the cloud.
3) The DKN+ adaptor is the P1P2 Main Remote
Controller.
4) A return air temperature (R1T) sensor must be
available at the indoor unit or remote temperature sensor
5) Set the eld setting to enable fan operation in thermo-
O condition to the user set value at the indoor unit.
6) Set the eld setting to allow indoor unit to operation
with deadband of 0.9°F or 0.5°C.
Thermostat
Command
Indoor unit
Mode
Indoor unit
On/O Indoor unit Setpoint
G Fan On N/A
Y Cool On
Calculated by the fallback logic.
Larger Alpha = Large Setpoint
corrections, smaller Alpha = smaller
alpha corrections.
W Heat On
Calculated by the fallback logic.
Larger Beta = Large Setpoint
corrections, smaller Beta = smaller
setpoint corrections.
G,Y,W open Last Mode O N/A
The Fallback logic works by dynamically adjusting
indoor unit’s internal setpoint with reference to the room
temperature based operation signal from the thermostat.
When the adaptor is rst connected to the indoor unit, the
minimum cooling setpoint or maximum heating setpoint is
used as initial setpoint. As the adaptor continues to receive
the signal from thermostat, the new setpoint is calculated
to maintain thermo-on status. The Alpha (cooling) and
Beta (heating) numbers aect the calculation of new
setpoint. Higher alpha or beta values cause the setpoint
correction to increase or decrease by a larger amount. The
alpha and beta value are xed during commissioning by
the installer.
Alpha Beta
3ºF - 1.66ºC 3ºF - 1.66ºC
5ªF - 22.78ºC 5ªF - 22.78ºC
7ºF - 3.89ºC 7ºF - 3.89ºC

10
USERS MANAGEMENT
Editing my account
From the Home screen tap on the Menu icon , tap My
Account.
This menu allows the editing of the rst and last name and
e-mail of the user.
This screen enables/disables the notications.
Tap Delete Account to delete the account. This action will
prevent the user’s email account from accessing the unit.
Deleting my account
From the Home screen tap on the Menu icon , tap My
Account.
Tap Delete Account to delete the account. This action will
prevent the user’s email account from accessing the unit.
LED Settings
Select whether you want to keep the status LEDs on your
DKN device working or prefer that they always remain o.
1) Press Communication Protocol to access the settings
menu.
*Note: The power LED will always remain on.*
You can change this setting later in the Edit Unit section.

11
Inviting a user
From the Home screen tap on the Menu icon , tap
Manage Users.
Tap the + icon and set the following parameters:
Email.
User type. Advanced or Basic.
Select the units to control. Advanced users can control
all the units. Basic users are only able to control allowed
units.
Tap the conrmation icon.
Tap Advanced and Basic features to know the dierences
between advanced and basic users.
Editing user permission
From the Home screen tap on the Menu icon , tap
Manage Users.
Tap the user to edit and change the parameters:
User type. Advanced or Basic.
Select the units to control. Advanced users can control
all the units. Basic users are only able to control allowed
units.
Tap the conrmation icon.
Tap Advanced and Basic Features know the dierences
between advanced and basic users.
Removing a user
From the Home screen tap on the Menu icon , tap
Manage Users.
Select the user to remove.
Tap Delete to remove the access to a unit.

12
THIRD PARTY DEVICES 3PTI
This option is only available on DKN Plus devices.
Linking the account of third party device
From the Home screen tap on the Menu icon , tap Third
Party Devices.
To link your DKN Plus with another manufacturer, you will
need to have a previously registered account.
1) Press Link Account to associate your other
manufacturer’s account with your DKN Plus.
2) Select the manufacturer whose account you wish to
associate from among the compatible manufacturers.
3) You will be redirected to the manufacturer’s website
to authorize the link through your user credentials.
4) Once the account has been successfully linked, a list
of the thermostats linked to that user account is displayed.
Select the one you wish to associate with a zone.
5) Select from the list of available zones which you wish
to associate your thermostat with.

13
6) Finally, you must choose from the following options
how the indoor unit will behave if the thermostat loses its
Internet connection:
1. The indoor unit will follow the commands of the
DKN Plus device.
2. The indoor unit will follow the commands of the
associated smart thermostat.
Important: If you choose to have the indoor unit follow
the commands of the associated smart thermostat, it
is possible that when the thermostat loses the Internet
connection, communications with your DKN Plus device
will also be lost, preventing you from interacting with the
thermostat from the application.
Unlink your DKN Plus third-party account
From the Home screen tap on the Menu icon , tap Third
Party Devices.
1) Select the manufacturer whose account you wish to
unlink from your installation.
2) Press the lower button Unlink account to unlink the
manufacturer’s account from your installation.

14
Changing the zone
From the Home screen tap on the Menu icon , tap Third
Party Devices.
1) Select the device whose zone you wish to change.
2) Press Zone to access the list of available zones.
3) You will be redirected to the manufacturer’s website
to authorize the link through your user credentials.
Important: It is only possible to select a zone from those
with a DKN Plus device and with no other thermostat
previously associated.
Unlinking a third party device from your DKN Plus
From the Home screen tap on the Menu icon , tap Third
Party Devices.
1) Select the device you wish to unlink from your
installation.

15
SETTINGS
Changing language
From the Home screen tap on the Menu icon .
Tap on General Settings.
Select the language to set in the app.
2) Press the lower button Unlink device and conrm to
unlink the thermostat.
Important: When a device is unlinked it does not disappear
from the list of available devices, it is unlinked from any
zone to which it was associated.
Information 3PTI
From the Home screen tap on the Menu icon , tap Third
Party Devices.
1) Below is a list of third party devices linked to your DKN
Plus together with the zone to which each is associated.
Select the device you wish to consult to access complete
information.

16
INSTALLATION DKN CLOUD WIFI ADAPTOR FOR VRV/SKYAIR AZAI6WSCDKA
Meaning
Wiring cable for power supply and P1P2 communication
Modbus port
Indoor unit port for wiring cable
Wi-Fi connection reset
Account association reset
The DKN Cloud Wi-Fi Adaptor have integrated LEDs that detects the operation of the device.
Depending on the LED operation, it indicates:
1. O. Wi-Fi not congured.
2. Blinking green. Connecting to Wi-Fi network.
3. Steady green. Connected to Wi-Fi network.
4. Steady blue. Connected to the server.
Blinks red to indicate the cloud communication.
Blinks green to indicate microprocessor performance.
Stays red to indicate that the device is on.
Blinks red to indicate the data transmission to the indoor unit.
Blinks green to indicate the data reception from the indoor unit.
LED Operation
Package content
https://dkncloudna.com/modbus/MI_AZAI6_MODBUS_A4_MUL.pdf

17
Connection (AZAI6WSCDKA)
The DKN Cloud Wi-Fi Adaptor for VRV/SkyAir units has 4 connecting wires: 2 for communication with the indoor unit (red and
black) and 2 for the power supply. Follow these steps to connect them:
1. Disconnect the indoor unit power.
2. Connect the DKN to the terminals of the indoor unit using the supplied cable, X35A/X18A/X9A (depending on the
indoor unit) and P1 P2.
3. Power the indoor unit. Check the LEDs (see LED Operation section).
The LED of the DKN Cloud Wi-Fi Adaptor for VRV/SkyAir stays blinking in green when the connection is correct.
Note: To facilitate the access to the DKN Cloud Wi-Fi Adaptor for VRV/SkyAir units, place it in an accessible location.
Note: For FXTQ_PA(B) and FTX_PA(B) indoor units, use the X9A terminal on the A2P PCB for power supply.
Note: When room temperature is to be sent to the indoor unit from the DKN Cloud Adaptor from Modbus the adaptor must be set
as the main controller.
X35A P1 P2

18
INSTALLATION DKN RESIDENTIAL CLOUD WIFI ADAPTOR FOR DUCTLESS AZAI6WSCDKB
Package content
Meaning
Wiring cable for power supply and S21 connection
Modbus port
Indoor unit port for wiring cable
Wi-Fi connection reset
Account association reset
The DKN Cloud Wi-Fi Adaptor have integrated LEDs that detects the operation of the device.
Depending on the LED operation, it indicates:
1. O. Wi-Fi not congured.
2. Blinking green. Connecting to Wi-Fi network.
3. Steady green. Connected to Wi-Fi network.
4. Steady blue. Connected to the server.
Blinks red to indicate the cloud communication.
Blinks green to indicate microprocessor performance.
Stays red to indicate that the device is on.
Blinks red to indicate the data transmission to the indoor unit.
Blinks green to indicate the data reception from the indoor unit.
LED Operation
https://dkncloudna.com/modbus/MI_AZAI6_MODBUS_A4_MUL.pdf

19
Connection (AZAI6WSCDKB)
The DKN Residential Cloud Wi-Fi Adaptor for Ductless units has one wiring cable. Follow these steps to connect it:
1. Disconnect the indoor unit power.
2. Connect the supplied cable to S21 connector on the indoor unit or an accessory adapter (ordered separately).
3. Power the indoor unit. Check the LEDs (see LED Operation section).
T h e LED of the DKN Residential Cloud Wi-Fi Adaptor for Ductless stays blinking in green when the connection is correct.
Note: To facilitate the access to the DKN Residential Cloud Wi-Fi Adaptor for Ductless units, place it in an accessible location.
S21
This manual suits for next models
3
Table of contents
Languages:
Popular Adapter manuals by other brands

Bosch
Bosch Conettix D6672 installation instructions

Wenglor
Wenglor A485-232 operating instructions

ABB
ABB 8209-101-500 operating instructions

Sipura Technology
Sipura Technology SPA-2100 Supplemental user's manual

Allen-Bradley
Allen-Bradley 1734-AENTRK installation instructions

EXP Computer
EXP Computer ThinCom ThinCom PCMCIA Ethernet Modem... user manual