Aiwa CDC-MP3 YU User manual

CDC-MP3
YU
STEREO CAR CD RECEIVER
RADIO-CD ESTEREOFONICO PARA AUTOMOVIL
d
OPERATING INSTRUCTIONS
MANUAL DE INSTRUCCIONES
MODE D’EMPLOI
OWNER’S RECORD
For your convenience, record the model number and
serial number (you will find them on the right side of
yourset)inthespaceprovidedbelow. Pleasereferto
them when you contact your AIWA dealer in case of
difficulty.
Model No. CDC-MP3
Serial No.
ENGLISH
ESPAÑOL
FRANÇAIS
c
00_CDCMP3(YU)Cov 00.11.22, 11:31 AM3

tousi-E-2
Welcome
ThankyouforyourpurchasingthisAIWAproduct.
To optimize the performance of this unit, please
read through this manual carefully.
In addition to this operating instructions manual,
be sure to refer to the separate installation and
connections manuals as well.
PRECAUTIONS
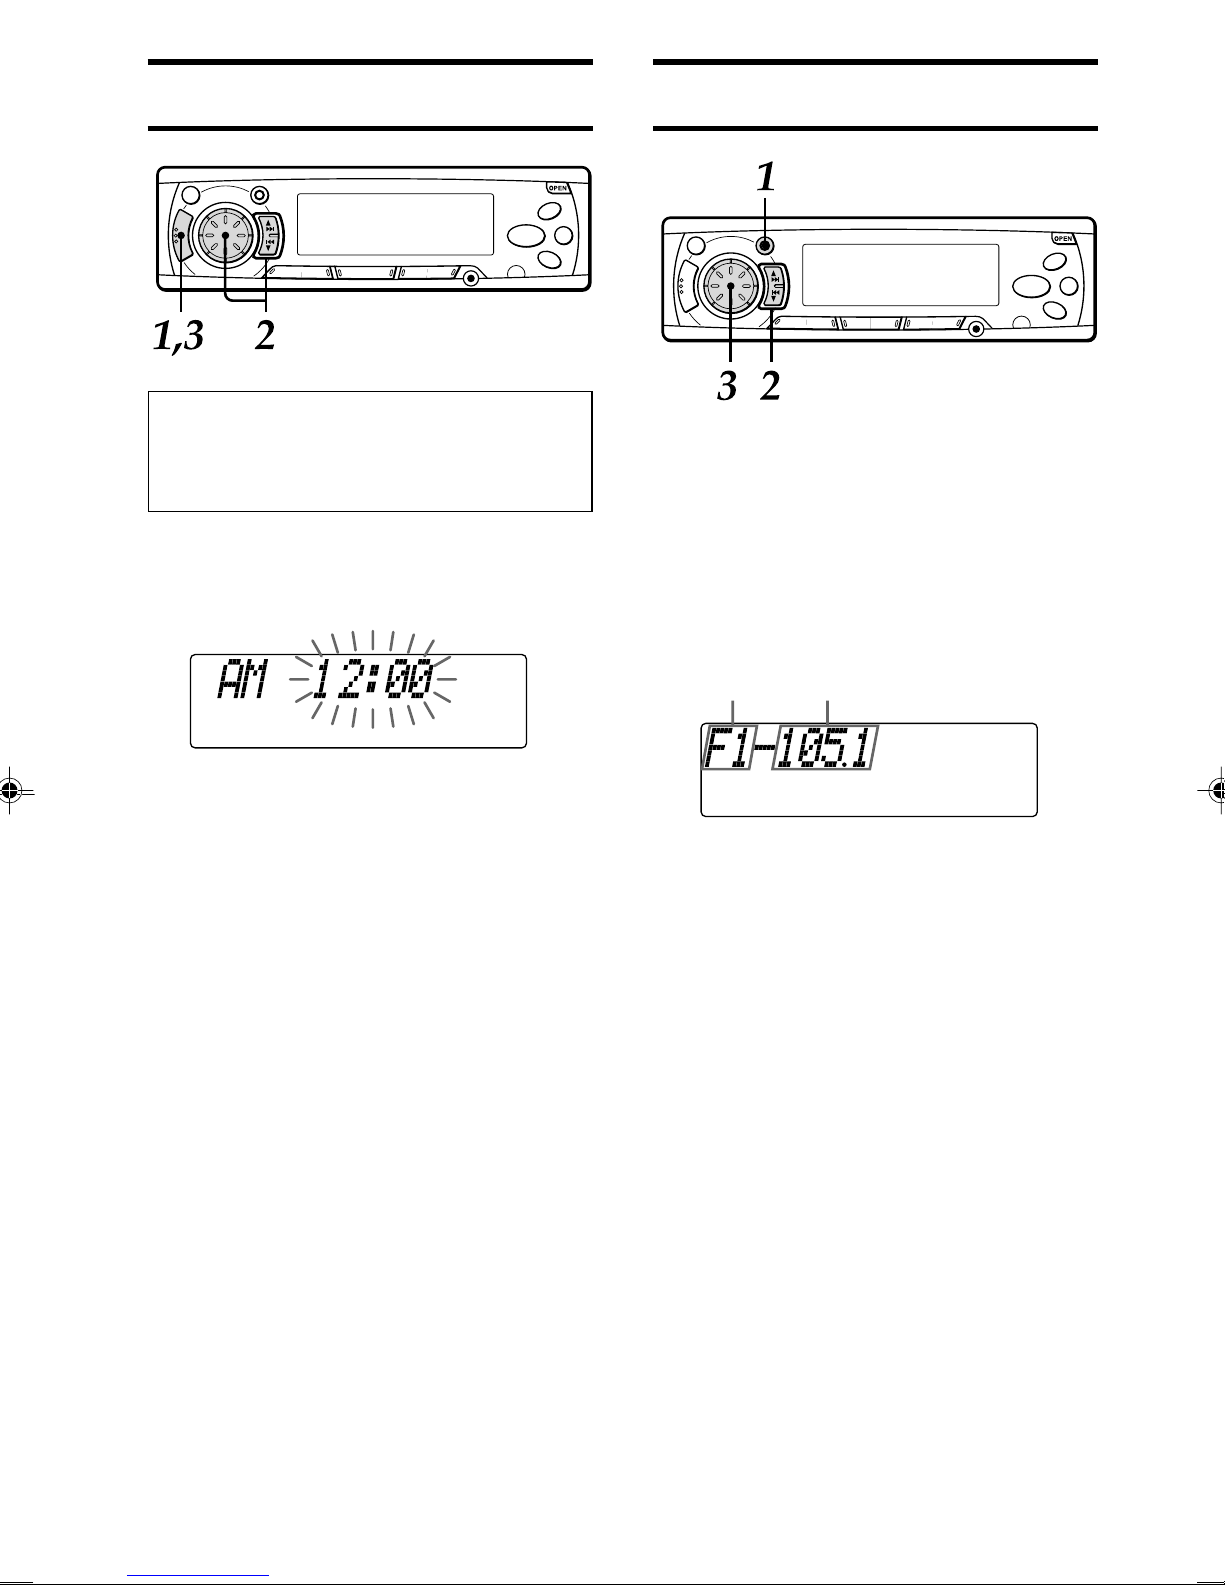
•Thisunitisdesignedtobeoperatedona12-volt
DC negative-ground electrical system only.
•To prevent short-circuiting, disconnect the
negative car battery terminal until the unit has
been mounted and connected completely.
•When replacing the fuse, be sure to use one
whose amperage rating is identical. Use of a
fuse of higher amperage may cause serious
damage to the unit.
•DoNOTattempttodisassemblethisunit. Laser
rays from the optical pickup are dangerous to
the eyes.
•Make sure that pins or other foreign objects do
not get inside the unit; they may cause
malfunctioning, or a safety hazard such as
electrical shock or exposure of laser rays.
•When your car was parked in direct sunlight
resulting in a considerable rise in temperature
inside the car, allow the unit to cool off before
operating it.
•Keep the volume at such a level that you can
hear outside warning sounds (horns, sirens,
etc.).
Notes on CDs
•A defectiveorsoiled CDinsertedin the unitcan
cause sound to drop out during playback.
•Handle a CD by holding its
inner and outer edges.
•DoNOTtouchthesurfaceoftheunlabeledside
of a CD.
•Do NOT attach any seal
or label to either side
(the labeled side or the
recorded side) of a disc.
•Do NOT expose the CD to
directsunlightorexcessive
heat.
•Clean the CD before
playback. Wipe the CD
from the center outward
with a cleaning cloth.
•NEVERusesolventssuchasbenzineoralcohol
to clean a CD.
•
Smaller 3-inch (8-cm) CDs cannot be played on
this unit. And do not use an adaptor as it may
cause a malfunction. NEVER insert a 3-inch (8-
cm)CDoritsadaptor.Ifinserted,itmaynoteject.
•
Do NOT use irregularly shaped CDs (example:
heart-shaped, octagonal ones). Doing so may
resultinamalfunction. NEVERinsertanirregularly
shaped CD. If inserted, it may not eject.
NOTE
This equipment has been tested and found to
complywiththelimitsforaClassBdigitaldevice,
pursuant to Part 15 of the FCC Rules. These
limits are designed to provide reasonable
protection against harmful interference in a
residential installation.
This equipment generates, uses, and can radiate
radio frequency energy and, if not installed and
usedinaccordancewiththeinstructions,maycause
harmful interference to radio communications.
However, there is no guarantee that interference
will not occur in a particular installation. If this
equipmentdoescauseharmfulinterferencetoradio
ortelevisionreception,whichcanbedeterminedby
turning the equipment off and on, the user is
encouragedtotrytocorrecttheinterferencebyone
or more of the following measures:
— Reorient or relocate the receiving antenna.
—Increase the separation between the
equipment and receiver.
— Connect the equipment into an outlet on a
circuitdifferentfromthattowhichthereceiver
is connected.
— Consult the dealer or an experienced radio/
TV technician for help.
CAUTION
Modifications or adjustments to this product, which
arenotexpresslyapprovedbythemanufacturer,may
voidtheuser’srightorauthoritytooperatethisproduct.
1
ENGLISH
01_CDCMP3(YU)E 00.11.22, 11:40 AM2

tousi-E-3
TABLE OF CONTENTS
PARTS AND CONTROLS .................................................................................................................. 3
DETACHING AND ATTACHING THE FRONT PANEL ...................................................................... 4
SETTING THE CLOCK ....................................................................................................................... 5
RADIO OPERATION .......................................................................................................................... 5
PRESETTING STATIONS .................................................................................................................. 6
MY INFORMATION SWITCH ............................................................................................................. 8
CD PLAY........................................................................................................................................... 10
MP3 PLAY ........................................................................................................................................ 11
SOUND ADJUSTMENTS ................................................................................................................. 14
CD CHANGER PLAY........................................................................................................................ 16
CONNECTING A PORTABLE CASSETTE/MD/MP3 PLAYER OR OTHER EQUIPMENT.............. 17
SETTING THE BEEP TONE............................................................................................................. 17
SETTING THE CONTRAST CONTROL ........................................................................................... 17
STEERING-WHEEL-MOUNTED REMOTE CONTROL UNIT .......................................................... 18
TROUBLESHOOTING ...................................................................................................................... 22
MAINTENANCE ................................................................................................................................ 22
SPECIFICATIONS ............................................................................................................................ 23
DEMO (Demonstration) mode
The unit has an extra display mode (DEMO mode), which demonstrates the display of the operation
modes of the unit. The unit switches to DEMO mode automatically if you turn the unit on and leave it as
it is for 5 seconds after all the connections have been completed.
To cancel DEMO mode
During DEMO mode, press and hold DISP for more than 2 seconds.
To resume DEMO mode, press and hold DISP again for more than 2 seconds.
Before operation
Discs with the logo on the right side can be played back on this unit.
In addition, this unit can be played back a CD-R or CD-RW that contains audio
titles or MP3 files.
Notes
• Depending on the conditions of the recording equipment or the CD-R/RW disc itself, some CD-R/
RW discs can not be played on this unit.
• The unit can not play back the CD-R/RW discs that contains no data or different kind on formatted
data other than MP3.
For more information about MP3, see page 11.
ENGLISH
ENGLISH
2
01_CDCMP3(YU)E 00.11.22, 11:40 AM3

tousi-E-4
Display window
PARTS AND CONTROLS
3
ENGLISH
Front panel
Rear panel
Front panel
1PWR (power on/off)/MUTE button
2FUNCTION button
3TUNE
i
/t(forward skip) button
4TUNE
k
/r(back skip) button
5DISP (display) button
6OPEN button
7A.ME (Auto Memory)/PS (Preset Scan)
button
8SELECT button
9Jog Dial
0Preset station buttons 1 – 6
!ALBUM/DISC Mbutton*
@ALBUM/DISC Nbutton*
#INT (intro) button
$REP (repeat) button*
%REP1 (repeat 1) button
^RANDOM button
&AUX IN jack (3.5-mm dia.)
*Sensor for the remote control
(INFO (My Information) button
)LO (local) button
Display window
-Main display section
=MT (mute) indicator
qCD-CH (CD changer) indicator
wCD operation indicator
eDSSA (Drivers Sound Stage Adjustment)
indicator
rMY INFO (My Information) indicator
tST (stereo) indicator
yLO (local) indicator
uH-BASS (High BASS) indicator
iLevel indicator
oCD indicator
pCD-ROM indicator
Rear panel
[Antenna jack
]REAR preout jacks
\FRONT preout jacks
aPower supply/speaker connector
sFuse
dCD changer connector
*Usable only when MP3 play or an optional CD
changer is connected.
01_CDCMP3(YU)E 00.11.22, 11:40 AM4

tousi-E-5
ENGLISH
4
DETACHING AND
ATTACHING THE FRONT
PANEL
You can detach the front panel from the unit and
carry it with you when you leave your car
unattended.
When you carry the front panel out of your car,
use the supplied carrying case.
1Press and hold PWR for more than 2
seconds to turn the unit off.
2Press OPEN to open the front panel
and pull it out as illustrated 1– 3.
Notes
•Whenyouleavethefrontpanelopen,donotput
anything on the panel.
•When you carry the front panel in the carrying
case,do not dropor applymechanical shock to
the panel, and never let the panel become wet.
Attaching the front panel
1Fit the lower side of the front panel to
its hinge pegs as illustrated 1– 2.
2Close the front panel.
Notes
•DonotpressOPENbyaccidentwhenyoupush
the front panel to secure it in above procedure.
•Do not touch the connector on the reverse side
ofthefront panel, as doingsomaycontaminate
the connector and cause poor connection,
resulting in a malfunction.
Security Lamp
Whenthefrontpanelisdetached,youcanfindan
LEDlamp onthe frontside ofthe unit. This lamp
is designed to deter theft, and continues to flash
whenthefrontpanelisdetached. This unit isnot
equippedwithanyothersecuritysystem,suchas
a security alarm, so there are limitations to its
effectiveness.
LED lamp
01_CDCMP3(YU)E 00.11.22, 11:40 AM5

tousi-E-6
5
ENGLISH
SETTING THE CLOCK
To turn the unit on
You can turn the unit on by pressing any
button on the front panel except OPEN and
the Jog Dial.
1Withtheuniton,pressandholdSELECT
formore than2seconds untilthe clock
indication appears.
2Press TUNE
i
, then rotate the Jog Dial
to set the hour.
Press TUNE
k
, then rotate the Jog Dial
to set the minute.
Rotate the Jog Dial clockwise to go forward.
Rotate the Jog Dial counterclockwise to go
backward.
3Press SELECT.
The clock starts working from 0 second.
To have the clock displayed when the unit is on
Press DISP. To return the unit to its former
display, press DISP repeatedly.
RADIO OPERATION
1Press FUNCTION repeatedly to select
the band from among F1 (FM1), F2
(FM2),F3(FM3),A1(AM1)andA2(AM2).
The band indications appear cyclically in
order.
•F1, F2 and F3 share the same frequency
range.
•A1andA2sharethesamefrequencyrange.
2Press (and hold for more than 2
seconds) either TUNE
i
or TUNE
k
to
tune in the desired station.
Theunitstartsscanningandtunesinastation
automatically (seek tuning).
Press TUNE
i
to increase and TUNE
k
to
decrease the frequency.
Pressthebuttonagaintocancelseektuning.
Repeattheprocedureuntilthedesiredstation
is tuned in.
Note
If you press (for less than 0.5 second at a
time)eitherTUNE
i
orTUNE
k
,thefrequency
increases or decreases step by step.
3Adjust the volume with the Jog Dial.
Band
indication Frequency
indication
01_CDCMP3(YU)E 00.11.22, 11:40 AM6

tousi-E-7
ENGLISH
6
To turn the unit off
PressandholdPWRformorethan2seconds.
Ifyoupressthisbuttonforlessthan2seconds,
it functions as MUTE.
Note
Theunit turns onin the last mode selectedwhen
you turned off the unit.
LO (local/DX) button
You can use Local mode when you wish to tune
in only strong stations during seek tuning. In
Radiomode,pressLOtoselectLocalmode. The
“LO” indicator lights up.
•Press LO to cancel Local mode and switch to
DX (distance) mode.
•The “ST” (stereo) indicator lights up when the
tuned-in station is broadcasting in stereo and
the reception is good.
FUNCTION button
Each time you press FUNCTION, the unit
switches to one of the following modes, in
cyclic order.
* CD Play mode (available while a CD is in
the unit)
** CD Changer Play mode (available while
the optional CD changer is connected)
PRESETTING STATIONS
To preset stations automatically
(Auto Memory)
1PressFUNCTIONrepeatedlytoselecta
desired band from among F1 (FM1), F2
(FM2),F3(FM3),A1(AM1)andA2(AM2).
2Press and hold A.ME/PS for more than
2 seconds to activate the automatic
presetting function.
The 6 strongest stations found will be stored
inmemory forpreset stationbuttons 1 to6 in
order of their signal strength. The “A MEM”
indication appears while the unit is in this
mode.
Use this function to automatically preset up to 6
stations each for F1, F2, F3, A1 and A2 (up to a
total of 30 stations).
•Whentheautomemoryoperationiscompleted,
thepresetstationsareautomaticallytunedinfor
5 seconds each in order.
•Tostoptheautomemoryoperation,pressA.ME/
PS again.
To check the preset stations (Preset Scan)
•If you wish to check the preset stations, press
A.ME/PS for less than 2 seconds. The preset
stations stored in memory will be tuned in for 5
seconds each in order.
•To stop this function, press A.ME/PS again or
press any of the preset station buttons 1 to 6.
continued
01_CDCMP3(YU)E 00.11.22, 11:40 AM7

tousi-E-8
7
ENGLISH
To tune in a preset station
1PressFUNCTIONrepeatedlytoselecta
desired band from among F1 (FM1), F2
(FM2),F3(FM3),A1(AM1)andA2(AM2).
2Pressthedesiredpresetstationbutton.
The preset station number appears to the
right of the frequency indication.
Active tuning reception control (ATRC)
This unit automatically suppresses FM noise
caused by varying signal strength resulting from
movement of the car.
•Thebuilt-inautomaticblendingcircuitmixesthe
left and right channel signals according to the
strength of the reception. At the same time, the
high-cut circuit activates to maintain sound
quality.
•If the reception becomes even weaker, the unit
automatically switches to Monaural mode to
reduce noise.
To preset stations manually
You can manually preset stations that have not
been selected by an auto memory operation.
1Press FUNCTION repeatedly to select
the band from among F1 (FM1), F2
(FM2),F3(FM3),A1(AM1)andA2(AM2).
2Tune in the station that you wish to
preset with TUNE
i
or TUNE
k
.
3Pressandholdoneofthepresetstation
buttons 1 to 6 for approximately 2
seconds.
While the station you are presetting is being
registered in memory, the unit beeps.
The preset station number appears to the
right of the frequency indication.
Preset station number
Repeattheseprocedurestopresetupto6stations
each for F1, F2, F3, A1 and A2.
•If youpreset astation ona presetstation button
on which another station of the same band has
alreadybeenpreset,thepreviouslypresetstation
will be erased.
PRESETTING STATIONS
01_CDCMP3(YU)E 00.11.22, 11:40 AM8

tousi-E-9
ENGLISH
8
MY INFORMATION
SWITCH
You can timer-activate the radio for up to two
dailyradio programs. Theunitturnsonandoffin
Radio mode at the preset turn-on and turn-off
times automatically.
Setting the timer
1With the unit off, press and hold INFO
for more than 2 seconds.
The “PROGRAM1” or “PROGRAM2”
indication flashes in the display window.
The number for which no program
is preset flashes.
2Press either preset station button 1 or
2 to select program 1 or 2.
3Press SELECT.
The “ON TIME” indication flashes.
Press SELECT again.
The timer indication flashes.
continued
4Setthetimeyouwishtheunittoturnon
in Radio mode.
PressTUNE
i
,thenrotatetheJogDialtoset
the hour.
PressTUNE
k
,thenrotatetheJogDialtoset
the minute.
5Press SELECT.
The “BAND SEL” indication flashes.
Press SELECT again.
The radio indication flashes.
6Press FUNCTION repeatedly to select
the band.
7Tune in the station that you wish to
presetwithTUNE
i
orTUNE
k
oroneof
the preset station buttons 1 to 6.
8Press SELECT.
The “OFF TIME” indication flashes.
Press SELECT again.
The timer indication flashes.
9Set the time you wish the unit to turn
off.
PressTUNE
i
,thenrotatetheJogDialtoset
the hour.
PressTUNE
k
,thenrotatetheJogDialtoset
the minute.
10 Press SELECT.
The clock indication appears.
11 Press INFO.
Yoursettingisstoredinmemory,andtheunit
turns off.
•If you preset another program, repeat all the
steps from step 1.
•To cancel a timer setting in progress, pressand
hold PWR for more than 2 seconds.
Band
indication Frequency
indication
01_CDCMP3(YU)E 00.11.22, 11:40 AM9

tousi-E-10
Activating the timer
You can activate the timer for program 1 and/or
program 2.
1With the unit on, press INFO.
The “PRG1 ON” or “PRG1 OFF” indication
(the current setting for program 1) appears.
2Press TUNE
i
or TUNE
k
repeatedly
untilthe“PRG1ON”indicationflashes.
3Press INFO.
The “PRG2 ON” or “PRG2 OFF” indication
(the current setting for program 2) appears.
4Press TUNE
i
or TUNE
k
repeatedly
untilthe“PRG2ON”indicationflashes.
5Press INFO to activate the timer.
The “MY INFO” indicator lights up.
If you do not proceed to the next step within 5
seconds in steps 1 – 4, the display returns to the
current source indication.
To cancel the timer
To cancel program 1, press INFO, then press
TUNE
i
or TUNE
k
repeatedly until the “PRG1
OFF” indication flashes in step 2.
To cancel program 2, press INFO, then press
TUNE
i
or TUNE
k
repeatedly until the “PRG2
OFF” indication flashes in step 4.
9
ENGLISH
MY INFORMATION SWITCH
Notes
•When you preset two programs, be sure that
they do not overlap.
•Even if the unit is in a mode other than Radio
mode, the unit switches to Radio mode and
tunes in the preset radio program at the preset
time automatically. When the program is over,
theunitreturnstotheformermodeautomatically.
•When this function is activated, TUNE
i
/
k
,
A.ME/PS, LO, INFO, and the preset number
buttons do not work for tuning in stations.
•
Even if the unit is turned off and on, or the front
panel is detached and attached, this function is
active until turn-off time.
•Evenifyouare listening toa radioprogram with
thisfunction,pressingFUNCTIONswitchesthe
unit to another mode. If you switch modes with
FUNCTION,theunitdoesnotturnoffattheturn-
off time of the timer.
01_CDCMP3(YU)E 00.11.22, 11:40 AM10

tousi-E-11
CD PLAY
YoucanplayaCD,CD-R,orCD-RWbyfollowing
the procedure below.
1Press OPEN to open the front panel,
then insert a CD with the labeled side
upward to start CD play.
z(eject) button
2Close the front panel.
The track number and elapsed playing time
will be displayed.
3Adjust the volume with the Jog Dial.
Notes
•If a CD is already inserted, press FUNCTION
repeatedly to select CD Play mode to start CD
play.
•Besuretoclosethefrontpanelafterinsertingor
ejecting a CD.
ENGLISH
10
continued
Button operations in CD Play mode
Switching modes
When the unit is in a mode other than CD Play
mode,insertingaCDswitchestheunittoCDPlay
mode automatically.
Notes
•Smaller3-inch(8-cm)CDscannotbeplayedon
this unit. And do not use an adaptor, as it may
cause a malfunction.
•When you insert a CD, CD play starts with the
first track on the CD. In other cases (when
switchingfrom the radiooperation or turningon
the unit), CD play starts at the point on the CD
where it had stopped previously.
•When you insert a CD-R/CD-RW, it may take
longer to start playing.
•A CD-R/CD-RW cannot be played if it contains
nodataordatainthewrongformat,etc.Inthose
cases,theindication“CANCELTOEJECTKEY”
appears.
Track number Elapsed
playing time CD indicator
CD operation
indicator
Press
z
t
r
To
Eject a CD.
Skip to the next track with a short press
(for less than 0.5 second).
Each extra press skips forward one
extra track.
To search forward rapidly, press and
hold tuntil the desired part is
played, then release it.
Restart the track currently in play with a
short press (for less than 0.5 second).
Each extra press skips backward one
extra track.
To search backward rapidly, press and
hold runtil the desired part is
played, then release it.
01_CDCMP3(YU)E 00.11.22, 11:40 AM11

tousi-E-12
CD PLAY
11
ENGLISH
Intro play
Press INT during CD play.
The “SCAN” indication flashes, and the first 10
seconds of all the tracks on the CD are played in
order.
Whenthedesiredtrackisfound,pressINTagain.
The unit returns to normal CD play.
Repeat play
Press REP1 during CD play.
The “REPEAT 1” indication lights up, and the
currently selected track is played repeatedly.
Press REP1 again to cancel Repeat play.
Note
If Repeat play is not activated, all the tracks on
the CD are played repeatedly.
Random play
Press RANDOM during CD play.
The “RANDOM” indication lights up, and the
tracks on the CD are played in random order.
Press RANDOM again to cancel Random play.
Note
During Random play, even if ris pressed
repeatedly, it won’t take you back to previous
tracks, only to the beginning of the current track.
MP3 PLAY
You can play MP3 files* written on CD-ROMs,
CD-Rs, or CD-RWs by following the procedure
below.
*An MP3 file stores audio data compressed
using MPEG1, the audio layer-3 file-coding
scheme. We call files that have the “.mp3”
extension “ MP3 files.”
1Press OPEN to open the front panel,
theninsertaCD-ROM,CD-R,orCD-RW
with the labeled side upward.
The unit starts scanning the disc.
2Close the front panel.
Duringscanningofthedisc,“NOWREADING”
scrolls across the display.
The CD-ROM indicator lights up.
Notes
•Itmaytake2minutesormoretoscanadisc,
depending on the complexity of the folder
tree. If scanning does not finish within 2
minutes, “CANCEL TO EJECT KEY”
appearsonthedisplay.Ifyouleavetheunit
as it is, it will start scanning again.
•Iftherearenotracks(MP3files)onthedisc,
“NO MP3” appears.
After scanning, the total number of albums
and tracks appear on the display, then the
unitautomaticallystartsplayingthediscfrom
the first track of the first album.
The total number
of Albums The total number
of Tracks
continued
CD-ROM indicator
01_CDCMP3(YU)E 00.11.22, 11:40 AM12

tousi-E-13
ENGLISH
12
Each time the track is changed, this display
appears and remains for 5 seconds.
Afterplaying atrack, the unitplays thenext track
of the same album.
After playing all the tracks of the album, the unit
plays the first track of the next album.
Notes
•If a disc is already inserted, press FUNCTION
repeatedlytoselectCD Play mode to start MP3
play.
•Besuretoclosethefrontpanelafterinsertingor
ejecting a disc.
To skip tracks and albums
Press To
9Skip to the next track
Album number Track number
Elapsed playing time
To switch modes
To switch to another mode, press FUNCTION.
If you play the disc again after switching to
another mode or turning off the unit, the unit will
start playing the disc from the beginning of the
track previously played.
To change the display mode
PressDISPrepeatedlyuntilyour desired display
appears.
Each time you press DISP, the display changes
as follows:
↓
Clock
↓
Elapsed playing time
↓
Track number and filename
↓
Track name*
↓
Artist’s name*
↓
Album number and album name
*If there are no names on the track, “NONE”
appears.
Intro play
Press INT during MP3 play.
The SCN indication flashes, and the first 10
seconds of all the tracks are played in order.
Press INT again or press 0/9or ALBUM/
DISC N/Mto cancel Intro play.
Note
The unit scans all the tracks on the disc in order
without sorting by album.
Album Repeat play
Press REP during MP3 play.
The REPEAT is displayed, and the currently
selected album is played repeatedly.
Press REP again or press ALBUM/DISC
N/Mto cancel Album Repeat play.
continued
To search backward
rapidly, press and hold
0until the desired
part is played, then
release it.
To search forward
rapidly, press and hold
9until the desired
part is played, then
release it.
During rapid forward
search, no sound is
heard.
0Skip to the beginning of
the current track or the
previous track
During rapid backward
search, no sound is
heard.
ALBUM/DISCNSkip to the next album
ALBUM/DISCMSkip to the previous
album
01_CDCMP3(YU)E 00.11.22, 11:40 AM13

tousi-E-14
Repeat 1 play
Press REP 1 during MP3 play.
The REPEAT 1 is displayed, and the currently
selected track is played repeatedly.
PressREP1againorpress0/9orALBUM/
DISC N/Mto cancel Repeat 1 play.
Random play
Press RANDOM during MP3 play.
The RANDOM is displayed, and the currently
selected album is played in random order.
Press RANDOM again or press ALBUM/DISC
N/Mto cancel Random play.
Note
If you select one of the play modes mentioned
above (Intro play, Album Repeat play, Repeat 1
play, or Random play mode) while the elapsed
playing time is displayed, the mode indication
corresponding to the selected play mode (SCN,
REP,REP1,orRANDOM)flashesorisdisplayed
solid.WhileinadisplaymodeotherthanElapsed
Playing Time mode, the mode indication is
displayed for approximately five seconds, then
the previously display mode is resumed.
Notes on MP3
•TheunitcanreadMP3fileswrittenintheformat
compliant with ISO 9660. However it does not
support the MP3 data written by the method of
Packet Write.
•The unit cannot read an MP3 file that has a file
extension other than “.mp3.”
•If you play a non-MP3 file that has the “.mp3”
extension, you may hear some noise.
•In thismanual,werefertowhatarecalled“MP3
file” and “folder” in PC terminology as “track”
and “album,” respectively.
•The unit can play up to 512 tracks per disc.
•Theunitmaynotplaytracksintheorderoftrack
numbers.
•The unit plays only the audio tracks if a disc
contains both audio tracks and MP3 files.
•When playing a disc of 8k bps or VBR*, the
elapsed playing time in the display window will
not be correct and also the intro play may not
function properly.
* VBR: Variable Bit Rate
MP3 PLAY
13
ENGLISH
Notes on indications in the display
•Up to 32 characters are displayed for the name
of an album or a track. Characters other than
uppercase letters (“A” to “Z”), lowercase letters
(“a”to“z”),numerals(“0”to“9”),andunderscore
(“_”) may not be displayed.
•When playing MP3 files, the elapsed playing
time displayed may not be correct.
•To display up to 30 characters for a track name
or an artist’s name, ID3TAG version 1.x is
required. Characters other than uppercase
letters (“A” to “Z”), lowercase letters(“a” to “z”),
numerals (“0” to “9”), and underscore (“_”) may
not be displayed.
Notes on creating your own CD-Rs
or CD-RWs containing MP3 files
•To enjoy high quality sound, we recommend
convertingtoMP3fileswithasamplingfrequency
of 44.1 kHz and a fixed bit rate of 128 kbps.
•DoNOTstoremorethan512MP3filesperdisc.
•Note that the unit may not play tracks in the
order that you wrote them to the disc.
•The unit can read up to 5 sessions with a multi
session disc.
•For ISO 9660-compliant format, the maximum
allowabledepthofnestedfoldersis8,including
the root directory (folder).
Tips on identifying the order of the tracks
•Include a two- or three-digit number at the
beginning of each album or track name. (e.g.
“01,” “02,” … or “001,” “002,” …)
If you use the numbers such as “1,” “2,” “3,” …
”9,”“10,”“11,”…,theunitunexpectedlyplaysin
the order of “1,” “10,” “11,” … “2,” “20,” “21,” …
“3,” “30,” “31,” and so on.
•It is recommended that you use only the parent
folders (do not create child folders under a
folder).
•Writing software capable of writing MP3 files in
numerical and alphabetical order is required if
youwanttheminorder.Fordetailson using the
software, refer to the operating instructions
supplied with your software.
01_CDCMP3(YU)E 00.11.22, 11:40 AM14

tousi-E-15
H-BASS (High BASS)
You can enjoy music with strong bass sound.
1Press SELECT repeatedly to select
H-BASS (High BASS) mode.
2Rotate the Jog Dial to select the bass
sound level.
The bass sound level changes as follows.
When H-BASS is activated, the “H-BASS”
indicator lights up.
↓
OFF
H-BASS 1 Low
H-BASS 2 Medium
H-BASS 3 High
↑
↔↔↔
SOUND ADJUSTMENTS
1Press SELECT repeatedly to select the
mode that you wish to adjust from:
BASS,TRE(treble),BAL(balance),FAD
(fader) and VOL (volume).
Each time you press SELECT, one of the
following indicators appears, in cyclic order.
If you do not proceed with the following step
2 within 5 seconds, the selected mode is
canceled, and the indication returns to the
current source mode.
2Rotate the Jog Dial to adjust the level.
Adjust each mode referring to the audio
control indications in the display window.
Without selecting any mode with SELECT,
only the volume level can be adjusted by
rotating the Jog Dial.
MUTE button
Pressthisbuttontotemporarilylowerthevolume.
Press it again to restore the previous volume.
The“MT”indicatorflasheswhilethemutefunction
is active.
Clockwise
Increases the
bass level
Increases the
treble level
Decreases the
level of the left
speaker(s)
Decreases the
level of the rear
speakers
Increases the
volume level
Counterclockwise
Decreases the
bass level
Decreases the
treble level
Decreases the
level of the right
speaker(s)
Decreases the
level of the front
speakers
Decreases the
volume level
ENGLISH
14
continued
01_CDCMP3(YU)E 00.11.22, 11:40 AM15

tousi-E-16
DSSA (Drivers Sound Stage
Adjustment)
Youcanadjustthesoundstageandtonebalance
to best serve a particular seat in the car.
1Press SELECT repeatedly to select
DSSA (Drivers Sound Stage
Adjustment) mode.
2RotatetheJogDialtoselecttheposition
of sound stage.
Sound stage changes as follows.
Note
WhenDSSAis activated, youcannotadjust BAL
(balance), FAD (fader), BASS and TRE (treble)
modes.
↔↔
↓
OFF
For the front left seat
For the front right seat
↑
Source Level Adjuster
You can adjust the output level in each mode to
equalize the volume level.
1Press FUNCTION repeatedly to select
the desired mode.
2Press DISP while pressing SELECT.
The “LEVEL 0” indication appears.
3Rotate the Jog Dial to adjust the level.
Rotateclockwisetoincreasetheoutputlevel.
Rotate counterclockwise to decrease the
output level.
If you do not operate the Jog Dial within 5
seconds, this function is canceled, and the
indicationreturnstothecurrentsourcemode.
Returning to the factory settings
Adjusted settings of VOL, BASS, TRE, BAL,
FAD, H-BASS, DSSA, and source level can be
returned to the factory settings with a simple
operation.
1With the unit off, press and hold DISP
for more than 2 seconds.
The “LEVEL--” indication appears, and all
sound settings are returned to the factory
settings.
SOUND ADJUSTMENTS
15
ENGLISH
01_CDCMP3(YU)E 00.11.22, 11:40 AM16

tousi-E-17
CD CHANGER PLAY
YoucanplayCDswiththisunitbyconnectingthe
optional AIWA CD changer. Make sure that the
discmagazine loaded withthe CDsisinserted in
the connected CD changer.
Toinstalltheunit,refertotheseparateInstallation
and Connections manual.
1Press FUNCTION repeatedly to select
CDChanger Playmode to start playing
from the CD.
TheCDandtracknumberswillbedisplayed.
CD changer operation indicator
2Adjust the volume with the Jog Dial.
CD
number Track
number CD changer
indicator
To switch modes
To switch to another mode, press FUNCTION.
To skip tracks
*Press for less than 0.5 second.
To play another CD
To start playing the previous CD in the disc
magazine, press ALBUM/DISC M.
To start playing the next CD, press
ALBUM/DISC N.
The CD number appears.
Intro play
Press INT (the “SCAN” indication appears).
The first 10 seconds of each track on all the CDs
in the disc magazine are played in sequence.
To cancel Intro play, press INT again.
Repeat play
To repeat the current track, press REP1 (the
“REPEAT 1” indication appears).
To repeat the current CD, press REP (the
“REPEAT” indication appears).
To cancel either mode, press the same button
again.
Random play (with optional AIWA CD changer
only)
Press RANDOM (the “RANDOM” indication
appears).
All the tracks on the current CD are played in
random order.
To cancel Random play, press RANDOM again.
Buttons
t
r
Press*
Skips to the next
track
Skips back to
the beginning of
the current track
or the previous
track
Press and hold
Advances
rapidly
Release it to
resume play
Reverses
rapidly
Release it to
resume play
ENGLISH
16
01_CDCMP3(YU)E 00.11.22, 11:40 AM17

tousi-E-18
17
ENGLISH
SETTING THE BEEP TONE
Theunitispresetatthefactorytobeepeachtime
you press any button on the front panel except
OPEN(nobeepwiththeJogDial). Youcanmute
this beeping by following the procedure below.
1Withtheunitoff,pressandholdSELECT
for more than 2 seconds.
2Rotate the Jog Dial to select “BEEP
ON” or “BEEP OFF”.
3Press SELECT.
The unit turns off.
SETTING THE CONTRAST
CONTROL
You can change the contrast of the display.
1With the unit on, press and hold
FUNCTION for more than 2 seconds.
The current contrast indication appears.
2Rotate the Jog Dial to select the
contrast.
Rotate clockwise for higher contrast.
Rotate counterclockwise for lower contrast.
CONNECTING A
PORTABLE CASSETTE/
MD/MP3 PLAYER OR
OTHER EQUIPMENT
This unit is equipped with a line-level input (AUX
IN) jack, enabling high sound quality.
1Connect a portable cassette/MD/MP3
player,etc.viatheAUXIN jack (3.5-mm
dia.) of the unit.
2Press FUNCTION repeatedly to select
AUX IN mode.
The “AUX IN” indication appears.
3Start playback from the connected
equipment.
•Forfurtherinformationontheportablecassette/
MD/MP3 player, etc., refer to the operating
instructions for that equipment.
01_CDCMP3(YU)E 00.11.22, 11:40 AM18

tousi-E-19
aAllen screw M3 ×4 mm (1 ea.)
bAllen wrench (1 ea.)
cCushion (2 ea.)
dBelt (1 ea.)
eInner belt holder (1 ea.)
fOuter belt holder (1 ea.)
Supplied mounting kit
The letters below are keyed to those in the instructions.
Use only the supplied mounting hardware for safe and secure installation.
STEERING-WHEEL-
MOUNTED REMOTE
CONTROL UNIT
Precautions
•When the infrared receptor on the main unit is
exposedtodirectsunlight,itmaynotrespondto
signals from the remote control unit.
•Whiledriving,keepyoureyesontheroadasyou
operatetheremotecontrolunit. NEVERoperate
the remote control unit while turning.
•Do NOT install the remote control unit where it
may hinder the function of any safety device,
such as an air bag.
•Besuretoinstalltheremotecontrolunitsecurely
on the steering wheel. Unstable installation
may interfere with operation of the vehicle.
•Do NOT install the remote control unit where it
will obstruct your view of the instrument panel.
•Be sure to install the remote control unit on the
side of the steering wheel closer to the main
unit. If you install the remote control unit on the
opposite side from the main unit, the infrared
signal may not reach the main unit’s receptor,
disabling remote operation.
•Theremaybecasesinwhichtheinfraredsignal
doesnotreachtheinfraredreceptoronthemain
unit, depending on the installation location.
•Do NOT install the remote control unit on the
outer rim of the steering wheel. Doing so may
hindersteeringandcauseatrafficaccident. Be
sure to install the remote control unit on the
inner rim of the steering wheel.
CAUTION
Modificationsoradjustmentstothisproduct,which
arenotexpresslyapprovedbythemanufacturer,
may void the user’s right or authority to operate
this product.
ENGLISH
18
continued
01_CDCMP3(YU)E 00.11.22, 11:40 AM19

tousi-E-20
19
ENGLISH
Setting up the remote control unit
Replacing the battery
1Pulloutthebatteryholder,grippingthe
clawBwhilepressingthegrooveAto
the right to remove the lithium battery.
2Install a new lithium battery with the +
sidefacingupwardinthebatteryholder.
3Pushthebatteryholderintotheremote
control unit until it clicks.
CAUTION
•Keep the lithium battery out of the reach of
children. If swallowed, consult a physician
immediately.
•Topreventashortcircuit,neverpinchthebattery
with pliers, etc.
Steering-wheel-mounted
remote control unit
Lithium battery
(CR2025)
Battery holder
Gap
Steering wheel
Gap
Steering wheel
Gap
Installing the remote control unit
Installation in a vehicle with left-hand drive
1Attach the belt dto the inner belt
holder e.
Note
If the inner belt holder edoes not fit the
steering wheel, attach the cushion cto the
belt holder as illustrated.
Large steering wheel
Small steering wheel
STEERING-WHEEL-MOUNTED REMOTE
CONTROL UNIT
01_CDCMP3(YU)E 00.11.22, 11:40 AM20
Other manuals for CDC-MP3 YU
4
This manual suits for next models
1
Table of contents
Languages:
Other Aiwa Car Receiver manuals

Aiwa
Aiwa NSX-AV520 Specification sheet

Aiwa
Aiwa CDC-X2670 User manual

Aiwa
Aiwa CT-FX730M User manual

Aiwa
Aiwa CDC-X417 User manual

Aiwa
Aiwa CDC-X307 User manual

Aiwa
Aiwa NSX-T77 User manual

Aiwa
Aiwa CDC-X155 User manual

Aiwa
Aiwa CT-X2058 User manual

Aiwa
Aiwa FR-CD1500 User manual

Aiwa
Aiwa CDC-Z117 User manual