Aiwa XD-DV520 User manual

8C-AVE-903-01
020123AMK-H-O U
DVD PLAYER
PLATINA DVD
XD-DV520
OPERATING INSTRUCTIONS
MANUAL DE INSTRUCCIONES
En
(English)
E
(Español)
For assistance and information,
call toll free 1-800-BUY-AIWA.
(United States and Puerto Rico)
Model No. Serial No. (Lot No.)
Owner’s record
Foryourconvenience,recordthemodelnumberandserial
number(you willfind themon therear ofyour set)in the
space provided below . Please refer to them when you
contactyour Aiwadealerincaseof dif ficulty .

2
ENGLISH
ENGLISH
WARNING
TO REDUCE THE RISK OF FIRE OR
ELECTRIC SHOCK, DO NOT EXPOSE THIS
APPLIANCE TO RAIN OR MOISTURE.
Explanation of Graphical Symbols:
Thelightningflashwitharrowheadsymbol,
withinanequilateraltriangle,isintendedto
alerttheusertothepresenceofuninsulated
"dangerousvoltage"withintheproduct’sen-
closurethatmaybeofsufficientmagnitudeto
constituteariskofelectricshocktopersons.
Theexclamationpointwithinanequilateral
triangleisintendedtoalerttheusertothe
presenceofimportantoperatingandmain-
tenance (servicing) instructions in the
literatureaccompanyingtheappliance.
PRECAUTIONS
ReadtheOperating Instructionscarefullyandcompletely
beforeoperating the unit.Be sureto keepthe Operating
Instructionsforfuturereference. Allwarningsandcautions
in the Operating Instructions and on the unit should be
strictlyfollowed,aswell asthesafetysuggestionsbelow .
Installation
1Water and moisture —Do notusethis unitnearwater ,
such as near a bathtub, sink, swimming pool, or the
like.
2Heat — Do not use this unit near sources of heat,
includingheatingvents,stoves,orotherappliancesthat
generate heat. This unit should not be placed in
temperaturesless than5˚C(41˚F) orgreaterthan 35˚C
(95˚F).
3Mounting place — Place the unit:
-ona flat, evensurface
-awayfromstrongmagneticfields
-atleastonemeterawayfromanyradios orreceivers
Donot placeheavyobjectson theunit.
4Ventilation—Theunitshouldbesituatedwithadequate
spacearounditsothatproperheatventilationisassured.
Allowa clearanceof10 cm(4in.)fromtherearandthe
topof theunit, and5 cm(2 in.)from eachside.
-Donotplacetheunit onabed,rug,orsimilarsurface
thatmayblocktheventilationopenings.
-Donotinstalltheunitinabookcase,cabinet,orairtight
rackwhereventilation maybeimpeded.
-To avoid internal heat build-up, do not cover the
ventilationopeningson therearpanel.
5Foreign objects and liquid — Be careful that foreign
objects or liquid do not enter the unit through the
ventilationopenings.
6Carts and stands —Theunitshould
be moved with care when placed or
mountedon astandor cart.
Suddenstops,excessiveforce,oran
unevensurfacemaycausetheunitor
carttofall over .
7Condensation —Moisture mayformonthepickuplens
when:
-Thisunitis movedfroma coldspotto awarmspot
-Aheatingsystem hasjustbeen turnedon
-Theunit isusedin averyhumid room
-Theunitis cooledbyanair conditioner
When this unit has condensation inside, it may not
functionnormally .Shouldthisoccur ,leavetheunitfora
fewhours,then trytooperate again.
Electric power
1Power sources — Connect this unit only to power
sourcesspecifiedintheOperating Instructions,andas
markedonthe unit.
2AC power cord
-Whendisconnectingthe ACpowercord,pullitoutby
the ACpowerplug. Donotpullthe corditself.
-Neverhandle the ACpowerplug withwet hands,as
thiscouldresultin fireorelectricalshock.
-Powercordsshouldbefirmlysecuredtoavoid being
severelybent,pinched,orwalkedupon.Payparticular
attentiontothecordfromtheunittothepowersocket.
-Avoid overloading AC power plugs and extension
cordsbeyond theircapacity , as thiscould resultin
fireorelectricalshock.
3When not in use — Unplug the AC power cord from
the AC outlet if the unit will not be used for several
monthsor more.When thecordis pluggedin, asmall
electricalcurrentcontinuesto flowintotheunit,evenif
thepoweris turnedof f.
4In case of lightning —Immediately disconnectthe AC
powercordfrom the ACoutlet.
Maintenance
Clean the unit only as recommended in the Operating
Instructions.
Damage requiring service
Havethisunitserviced byaqualifiedservicetechnicianif:
-TheAC powercordor plughas beendamaged
-Aforeignobjectorliquid hasenteredtheunit
-Theunit hasbeenexposed torainor water
-Theunitdoesnotseemto operatenormally
-Theunitexhibits amarkedchangein performance
-The unit has been dropped, or the cabinet has been
damaged
DO NOT OPEN THE CABINET AND ATTEMPT TO
SERVICETHE UNITYOURSELF.

ENGLISH
3
INTRODUCTION
En
Features
DVD provides a completely new dimension in video
entertainment.
•Multi-language function*: You can select audio
soundtracksandsubtitles.
•Multi-angle function*: You can select a viewing angle
ofscenesshotfrommultiplecameraanglesandrecorded
onthedisc.
•Parental lock function*: You can prevent playback of
specifieddiscsunsuitableforcertainaudiences.
*Thesefunctionsdif ferdependingontheDVDsoftware.
High quality digital audio and images
•The linear PCM sound of a 96 kHz/24 bit createsaudio
qualitysuperiorto thatofaudioCDs.
•Compatible with audio CDs, as well as DVDs
•MP3 playback
Accessory checklist
Remotecontrol(1)
Battery(installedin theremotecontrol) (1)
Audio/V ideocord(1)
OperatingInstructions
TABLE OF CONTENTS
Introduction
Precautions ...............................................................2
Before use .................................................................4
About symbols .................................................. 4
Supported disc formats ....................................4
Disc-related terms..............................................5
Notes on copyright ............................................5
Handling discs....................................................6
Cleaning discs....................................................6
Storing discs ......................................................6
Handling the unit................................................6
Cleaning the unit................................................6
Remote control .........................................................7
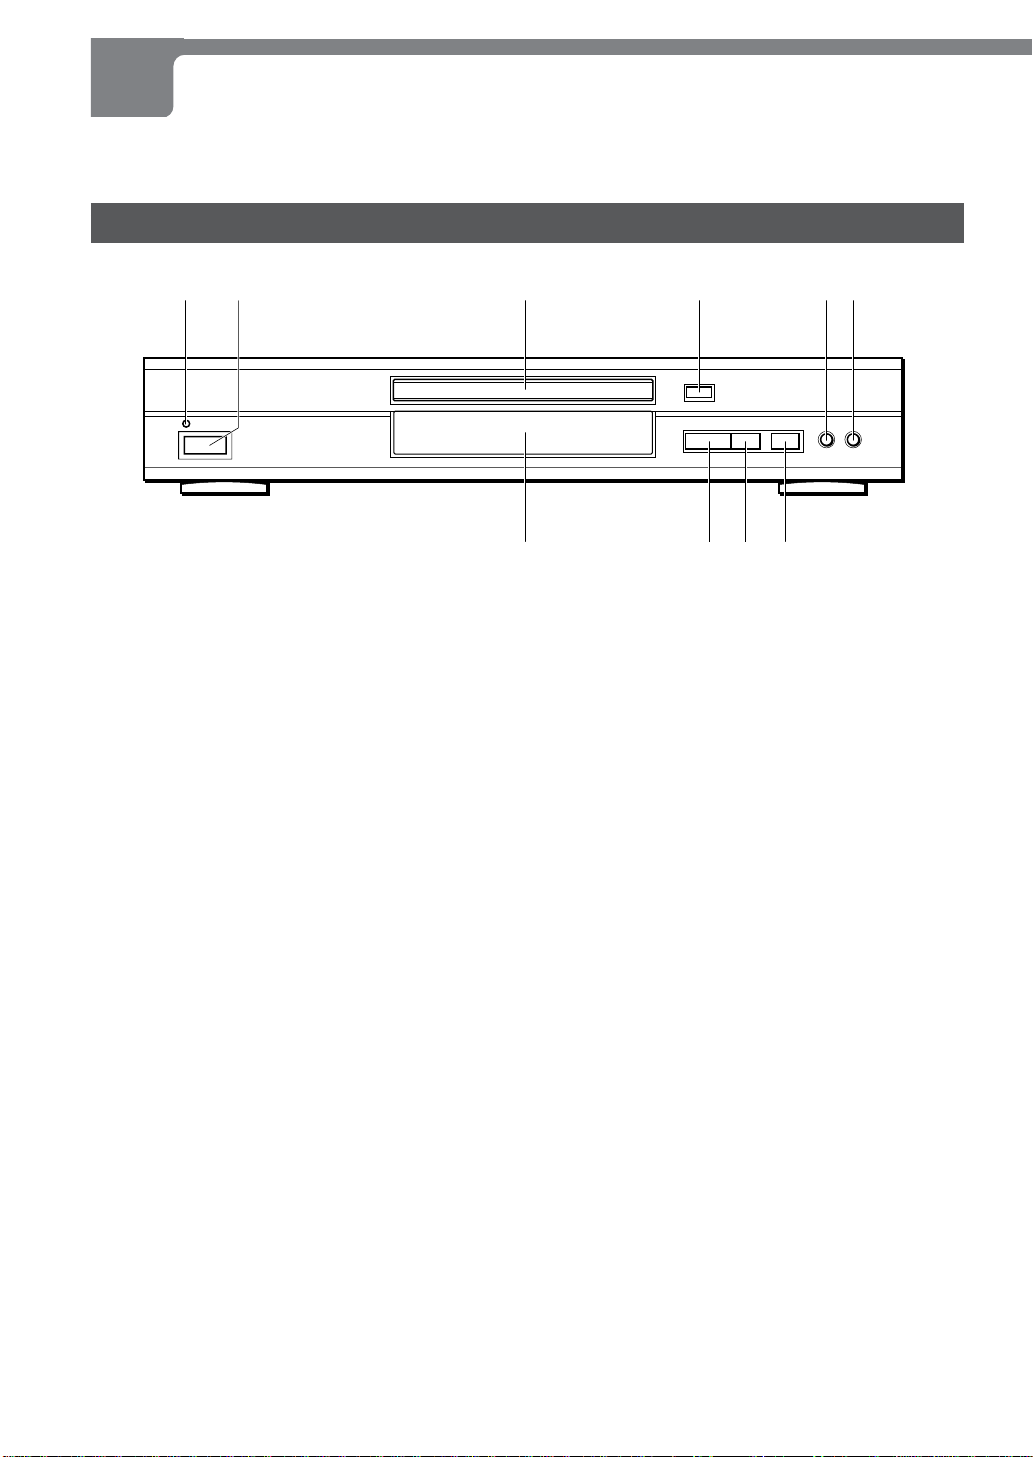
Parts and controls ....................................................8
Front panel......................................................... 8
Remote control.................................................. 9
Display window ............................................... 10
Preparations
Connections........................................................... 11
AConnecting to a TV only ..............................12
BConnecting to a TV and an amplifier
with a Digital In jack ...................................13
CConnecting to a TV and an audio
system .........................................................14
DConnecting to a TV and an AV receiver
equipped with a Dolby Digital (AC-3)
decoder .......................................................15
EConnecting to a TV and an AV receiver
equipped with a DTS decoder...................16
FConnecting to a TV and an AV
receiver with the Dolby Pro Logic
Surround system....................................... 17
Connecting to a TV equipped with
an S-video jack.......................................... 18
Connecting to a TV or monitor with
component video input connectors ....... 19
Basic Operations
Playback ................................................................. 20
Still (Pause)...................................................... 21
Frame advance ................................................ 21
Resuming playback ........................................ 21
Fast forward and reverse ............................... 22
Slow playback.................................................. 22
Skipping ........................................................... 22
Muting the sound ............................................ 22
On Screen Display (OSD) menu .................... 23
Detailed description of each OSD menu ...... 24
More Features
Search ..................................................................... 26
Title search ...................................................... 26
Chapter/track search ...................................... 27
Time search ..................................................... 27
Mark search ..................................................... 28
Zooming and changing the angle........................ 29
Zooming the picture ....................................... 29
Changing the angle......................................... 29
Random and repeat playback .............................. 30
Random playback ........................................... 30
Repeat playback .............................................. 30
Repeating a portion between two
specified points (A-B Repeat) ................. 31
Programmed playback .......................................... 32
Disabling OSD........................................................ 33
Changing the audio track ..................................... 34
Displaying and changing subtitles...................... 35
Playing back an MP3 disc .................................... 36
Notes on MP3 discs ........................................ 36
Glossary ........................................................... 36
Playing back an MP3 disc .............................. 37
Editing the MP3 Song Selection List ............ 37
Using the command box ................................ 38
As Necessary
Changing setup values ......................................... 40
Basic operations ............................................. 40
Language ......................................................... 41
Subtitle ............................................................. 42
TV aspect ......................................................... 42
Audio set .......................................................... 44
Digital out......................................................... 45
Parental ............................................................ 46
On screen......................................................... 47
Troubleshooting .................................................... 48
Specifications ........................................................ 49

4
ENGLISH
Pleasereadthe followingbeforeoperatingthe unit.
About symbols
AlthoughthisunitcanplayDVDs,audioCDsorMP3 discs,
someofthefunctionsarerestricteddependentonthetype
ofdisc.
Thefollowingsymbolsareused tomakedistinction.
PlaybackofMP3 discsisdif ferentfromthat ofotherkinds
ofdiscs. Forinformationabout playingback MP3discs,
see page 36.
: Shows the function or the display for only
DVDs.
: Shows the function or the display for only
audioCDs.
Nosymbols: ThefunctionworksforDVDsandaudio CDs.
Supported disc formats
Thisunitcanplaydiscswiththefollowingmarksonly .
DVD
(8cm disc/12cmdisc)
AudioCD
(8cm disc/12cmdisc)
Thisunit canplaya DVD-Rrecorded inV ideomode.
In addition, this unit can play a CD-R or CD-R W that
containsaudiotitles orMP3files.
NOTES
•TheunitcanplayDVD-Rdiscs recordedinV ideo mode
only. DVD-R discs recorded in VR (V ideo Recording)
modecannotbe playedonthe unit.
•Dependingontheconditionsoftherecordingequipment,
someDVD-Rdiscscannotbeplayed ontheunit evenif
theyhavebeenrecordedinV ideo mode.
•SomeDVD-R discscannotbe playedonthe unitdueto
scratchesonthe surfaceorwarp, etc.
•Dependingontheconditionsoftherecordingequipment
ortheCD-R/R Wdiscitself,someCD-R/R Wdiscscannot
beplayedontheunit.
•Theunitcannotplay theCD-R/R Wdiscsthatcontain no
data,or containdif ferentkindsofformatted dataother
thanMP3.
Formore informationabout MP3,seepage 36.
•Donotattachany sealorlabeltoeitherside(the labeled
sideor therecordedside) ofadisc.
•Donot useirregularshaped CDs(e.g.,heart-shaped or
octagonal).Itmayresultin malfunctions.
Notes on color format
Thematerials forDVD discsare recordedin theP AL and
NTSCcolorformat.
SelectDVDsrecordedinNTSCcolor format.
Notes on DVDs
Someplayback operationsof DVDsmaybe intentionally
fixedby softwaremanufacturers. AsthisunitplaysDVDs
according to disc content designed by the software
manufacturer ,someplaybackfeatures oftheunitmaynot
beavailable,or otherfunctionsmay beadded.
Referalsoto theinstructionssuppliedwiththe DVDs.
SomeDVDsmadeforbusinesspurposesmaynotbeplayed
ontheunit.
BEFORE USE

ENGLISH
5
INTRODUCTION
En
Region code of the DVD player and DVDs
ThisDVDplayerisdesignedandmanufacturedforplayback
ofregion "1"encodedDVD software. Theregion codeon
thelabelsofsomeDVDdiscsindicateswhichtypeofplayer
can play those discs. This unit can play only DVD discs
labeled"1"or "ALL".Ifyoutry toplayany otherdiscs,the
message"Invalidregiondisc"willappearonthe TVscreen.
SomeDVD discs maynot havea region codelabel even
thoughtheirplaybackisprohibited byarealimits.
Note on DTS-encoded CDs
Whenplaying DTS-encodedCDs,excessivenoisewillbe
exhibitedfromtheanalogstereooutputs. Toavoidpossible
damagetotheaudiosystem,turndownthevolumebefore
playingbacksuchdiscs, adjustthevolumegradually ,and
keepthevolumelevellow .ToenjoyDTSDigitalSurround TM
playback,anexternal5.1channelDTS DigitalSurround TM
decodersystemmustbeconnectedtothe digitaloutputof
theunit.
Disc-related terms
Title (DVD only)
The longest section of a picture or a musical piece on a
DVD,a moviefor apicturepiece onvideo software,oran
albumfor amusicalpiece onaudiosoftware. Eachtitleis
assignedatitlenumberenabling youtolocatethetitleyou
want.
Chapter (DVD only)
Sectionsof a pictureor a musicalpiece thatare smaller
thantitles.
Atitleis composedofseveralchapters. Eachchapteris
assignedachapter number ,enablingyouto locatethe
chapteryouwant.Dependingonthedisc,nochaptersmay
berecorded.
Track (audio CD only)
Sectionsofa musicalpieceon anaudioCD. Eachtrackis
assignedatrack number ,enablingyou tolocatethe track
youwant.
Notes on copyright
Itisforbiddenbylawtocopy ,broadcast,show ,broadcast
viacable,play inpublic,orrent copyrightmaterialwithout
permission.
This product features the copy protection function
developedby Macrovision. Copyprotection signalsare
recordedonsome discs.Whenrecordingand playingthe
pictures of these discs on a VCR, the picture noise will
appear.
Thisproductincorporatescopyrightprotectiontechnology
thatisprotected bymethodclaims ofcertainU.S.patents
andotherintellectualpropertyrightsownedbyMacrovision
Corporationandotherrightsowners.Useofthiscopyright
protectiontechnologymustbeauthorizedbyMacrovision
Corporation,and isintendedfor homeand otherlimited
viewing uses only unless otherwise authorized by
Macrovision Corporation. Reverse engineering or
disassemblyisprohibited.

6
ENGLISH
Handling discs
Donottouch theplaybackside ofthedisc.
Holdthedisc bytheedgesso thatfingerprintswillnot get
onthesurface.
Donot stickpaperor tapeonthe disc.
Cleaning discs
Fingerprintsand dustonthe disccancause poorpicture
qualityandsounddistortion.Beforeplaying,cleanthedisc
withacleancloth.W ipethe discfromthe centerout.
Do not use strong solvents such as alcohol, benzine,
thinner ,commerciallyavailablecleaners,oranti-staticspray
intendedforanalogrecords.
BEFORE USE (CONTINUED)
Storing discs
Afterplaying,store thediscinits case.
Donotexposethedisctodirectsunlightorsourcesofheat,
or leave it in a parked car exposed to direct sunlight, as
theremay beaconsiderable temperatureincreaseinside
thecar.
Handling the unit
When shipping the unit
Theoriginalshipping cartonandpacking materialscome
inhandy . Formaximumprotection, re-packthe unitas it
wasoriginallypackedat thefactory .
When setting the unit
Thepicture andsound ofanearby TV,VCR, orradiomay
bedistortedduringplayback.Inthiscase,positionthe unit
awayfrom the TV,VCR, orradio, orturnof fthe unit after
removingthedisc.
To keep the surface clean
Donotusevolatile liquids,suchasinsecticidespray , near
theunit.Donotleave rubberorplasticproductsincontact
withtheunitforalongperiodoftime. Theywillleavemarks
onthesurface.
Cleaning the unit
To clean the cabinet
Use a soft, dry cloth. If the surfaces are extremely dirty ,
use a soft cloth lightly moistened with a mild detergent
solution. Do not use strong solvents, such as alcohol,
benzine,orthinner , asthesemightdamagethesurfaceof
theunit.
To obtain a clear picture
TheDVD playerisahigh-tech,precisiondevice.If the
opticalpick-up lensanddisc drivepartsare dirtyorworn
down,thepicturequality willbepoor .
Regularinspection andmaintenance arerecommended
after every 1,000 hours of use. (This depends on the
operatingenvironment.)
Fordetails,please contactyour Aiwadealer .

ENGLISH
7
INTRODUCTION
En
Before using the remote control
Abattery(CR2025)isalreadyinstalledintheremotecontrol
whenshippedfromthefactory .
Remove the insulating tape from the battery holder by
pullingitsendas shownbelow .
When to replace the battery
The maximum operating distance between the remote
controlandtheremote sensoroftheunitisapproximately
7 meters. If the operating range decreases, replace the
batterywith anewone.
How to replace the battery
Insertaballpointpenor similarpointedtoolinthenotchof
the battery holder at the bottom, and then slide out the
battery holder . Place a new battery (CR2025) into the
batteryholderwithcorrectpolarity . Finally ,pushtheholder
backintoposition.
NOTES
•Whenoperating withtheremotecontrol,pointthetopof
theremotecontrol towardtheDVDplayer .
•Iftheunitis notgoingtobeusedfor anextendedperiod
oftime,removethebatterytopreventpossibleelectrolyte
leakage.
•Theremotecontrolmaynotoperatecorrectlywhen:
-Thereis anintense light,such assunlight, intheline
ofsightbetweentheremotecontrolandtheDVDplayer .
-Thereisfluorescent lightingneartheremotesensor .
-Otherremote controlsareused nearby(thoseof a TV
set,etc.).
REMOTE CONTROL
CAUTION
•Lithium battery (CR2025) for the remote control
ReplacethebatterywithHitachiMaxellorPanasonic,
Part No. CR2025 only . Use of another battery may
presentarisk offireorexplosion.
The battery may explode if mistreated. Do not
recharge,disassembleor disposeofinfire.
•Donotkeepmetallicobjectssuchasrings,bracelets,
andkeysnearthebattery .Theymaycausethebattery
toshortcircuit.
•Afterremoving thebattery , besure tokeep itout of
reachofchildren. Ifit isswallowed,consultadoctor
immediately .

8
ENGLISH
Theinstructions inthismanual refermainlyto thebuttonson theremotecontrol. Buttonsonthe mainunitwith thesame
namesas thoseonthe remotecontrol canbeused aswell.
Front panel
16STANDBYindicator
Lightsinred whentheunitis instandbymode.
2POWERbutton
Pressto turnonand of ftheunit.
3Disc tray
Loadingandremovingdiscs.
4zOPEN/CLOSE button
Presstoopenandclosethe disctray .
5rbutton
Presstoreturntothebeginningofthecurrentorprevious
chapter/track.
6tbutton
Presstoskip tothenextchapter/track.
12 3 4 56
7890
PARTS AND CONTROLS
7aPAUSE button
Presstopause playback.
8sSTOPbutton
Presstostop playingbackadisc.
9cPLAY button
Presstostart playback.
0Displaywindow
Displaystheinformationoftheunit’ s status.

ENGLISH
9
INTRODUCTION
En
Remote control
1POWERbutton
Pressto turnonand of ftheunit.
2Numberbuttons
Presstoselect atrackor titledirectly .
3gbuttons
•Presstofastforwardadisc.
•Pressto selectanitem inthe setupmenu.
4TOP MENU button
Presstodisplay thetitlemenu ifpresenton thedisc.
5MENUbutton
•Pressto displaythediscmenuduring play .
•Press todisplaythesetup menuinstopmode.
6fbutton
•Press tofastreverse adisc.
•Pressto selectanitem inthe setupmenu.
7AUDIObutton
•Pressto displaythelanguage/soundmenuicon.
•Presstodisplaytheprogrammenu.
8rbutton
Presstoreturntothebeginningofthecurrentorprevious
chapter/track.
9tbutton
Presstoskip tothenextchapter/track.
0MUTEbutton
Presstomute andunmutethe sound.
!MARK button
Presstodisplay themarkmenuduringplay .
@OK cbutton
•Pressto startplayback.
•Pressto confirmtheselectediteminthe setupmenu.
#ON SCREEN button
Pressto enterandexit fromtheOn ScreenDisplay .
$j/lbuttons
•Press lto slow forward a disc. Press jto slow
reverseadisc.
•Press tonavigate throughtheOn ScreenDisplay , or
changethe valueinthe setupmenu.
%EXITbutton
Presstoexitfrommenusor OnScreenDisplay .
^abutton
Presstopause playback.
&sbutton
Presstostop playingbackadisc.
4
5
7
1
8
9
6
2
3
@
!
&
^
0
#
$
%
CONTINUE

10
ENGLISH
Display window
Thisunitshows OnScreenDisplaymessageson thescreenofthe TV connectedtotheunit, aswellasthedisplay window
oftheunit.
TheOn ScreenDisplayof eachoperationmakes operationsimpleand easy ,especially whenplayingDVDs. They appear
whenyou presstheON SCREENbuttonon theremotecontrol.
Theinstructionsin thismanualrefermainlytotheOn ScreenDisplaymessages.
1cindicator
Lightsinplaybackmode.
aindicator
Lightsinpausemode.
2DVDindicator
Lightswhen aDVDis loaded.
3A-Bindicator
Indicates A-Brepeatplaymode(whenplayingadesired
portionofa trackrepeatedly).
ALL indicator
Indicatesalltrack repeatplaymode.
indicator
Indicatesonetrack repeatplaymode.
4ANGLE indicator
Lightswhena multi-anglesceneisplayed.
RAND indicator
Lightsduringrandomplayback.
PROGindicator
Lightsduringprogrammedplayback.
TITLE
PBC
CHAPTER
ALL
AB
RAND
ANGLE
PROG
VCD
12 3 4
5678
5Timecounter
•Indicates theelapsedtimeof thechapteror track.
•Indicatesthetotalplaying timeofaCD,instopmode.
(The total playing time is not displayed when other
kindsofdiscsstopped.)
6Operating status indicator
Rotateswhenloading andplayingbacka disc.
7CHAPTERindicator
•IndicatesthechapternumberbeingplayedduringDVD
playback.
•Indicatesa totalnumberoftracksinstopmode,orthe
tracknumberbeing playedduringplaybackofa CD.
8TITLEindicator
Indicates the title number being played during DVD
playback.
PARTS AND CONTROLS (CONTINUED)

ENGLISH
11
PREPARATIONS
En
Before making connections
•Connect the AC cords of the unit and any external
equipmentlast,afterfinishingall otherconnections.
•Insert the plugs completely into the jacks. Loose
connectionsmay produce ahumming soundor other
noiseinterference.
•Refer totheinstructionsofthe connectedequipment.
CAUTION
Donotset"DolbyDigital"to"Bitstream",and "DTS"to
"Bitstream"inthesetupmenuwhenconnectingtoan AV
receivernotequippedwithaDolbyDigitaldecoderorDTS
decoder(withacoaxialconnectingcord).
MerelyattemptingtoplayaDVDmaycauseascreeching
noisewhichcouldbeharmful toyourearsanddamage
thespeakers.Insuchacase,besuretoselect"PCM"in
"DigitalOut".
Beforeconnecting,identifyyourtypeofaudioequipmentor TVreferringtothefollowingchart. Then,decidetheconnection
andthesetupprocedureaccordingly .
NOTES
•Theunitcannot beconnectedto a TVwhichis notequippedwitha videoinputconnector .
•Useacommercially availablestereo-monauralaudiocord whenconnectingtoa monaural TV.
Audio system to be connected
None(only a TVis connected)
Astereo systemor anamplifier
An AVreceiverequipped withDTSdecoder
Connection type
Aon page 12
Bon page 13
Con page 14
Don page 15
Fon page 17
Eonpage16
Input jack of equipment to
be connected to the unit
––––
Digitalinputjack
Analogaudioinput jacks(L/R)
Digitalinputjack
Analogaudioinput jacks(L/R)
Digitalinputjack
An AVreceiverequippedwith DolbyDigitaldecoder ora
DolbyProLogicdecoder
CONNECTIONS
CONTINUE
NOTES
•If picture noise appears while playing copy-protected
DVDs,connect theunitdirectly toa TV. Donot connect
througha VCR, TV/VCR, or AVselector .
•Forspeaker connection,refer tothe instructionsofthe
AV receiver .
Whenyour TV isequipped withanS-video inputjack, seepage 18.
Whenyour TV isequippedwithcomponentvideoinputjacks, seepage19.

12
ENGLISH
AUDIO OUT VIDEO OUT COMPONENT
VIDEO OUT DIGITAL OUT
S-VIDEO OUT
COAXIAL
R
L
2
1
C
R
Y
C
B
CONNECTIONS (CONTINUED)
AConnecting to a TV only
Set the setup menu correctly after connecting!
Setthe"TV Aspect"ofthe setupmenuaccordingtothe TV
connectedtotheunitas follows:
(See"CHANGINGSETUP VALUES"onpage40for details.)
TV Aspect
Whenyour TVisaconventional-screensize TV:
L-BOXor P-SCAN
Whenyour TV isa wide-screensize TV:
16:9
Rear of the TV
yellow
tothevideoinputjack(yellow)
totheaudio input jacks(Left/white,Right/red)
to VIDEO OUT 1 or 2 jack (yellow)
Audio/videocord (supplied)
red whiteyellow
Rearoftheunit
to AUDIO OUT
L(white)/R(red)
jacks
toan ACoutlet

ENGLISH
13
PREPARATIONS
En
AUDIO OUT VIDEO OUT COMPONENT
VIDEO OUT DIGITAL OUT
S-VIDEO OUT
COAXIAL
R
L
2
1
C
R
Y
C
B
BConnecting to a TV and an amplifier with a Digital In jack
Usea commerciallyavailable 75ohmcoaxial cordwhen connectingthe unittoan AVamplifierwith aDigital Injack. The
supplied Audio/videocordis alsoavailableinsteadofa coaxialcord.
Set the setup menu correctly after connecting!
Setthe "TV Aspect" and"Digital out" ofthe setupmenu
accordingtotheaudioequipmentand TVconnectedtothe
unitasfollows:
(See"CHANGINGSETUP VALUES"onpage40fordetails.)
Digital out
"DolbyDigital"to"PCM"
"DTS"to"Off"
TV Aspect
Whenyour TVisaconventional-screensize TV:
L-BOXor P-SCAN
Whenyour TV isa wide-screensize TV:
16:9
CONTINUE
TV
tothevideo input jack(yellow)
yellow
Audio/videocord (supplied)
yellow to VIDEO OUT 1 or 2 jack (yellow) Rearoftheunit
toDIGITAL OUTCOAXIAL jack
toan ACoutlet
Coaxialcord(not supplied)
tothedigital inputjack
Frontspeaker(L) Amplifier with aDigitalInjack Frontspeaker (R)

14
ENGLISH
CONNECTIONS (CONTINUED)
CConnecting to a TV and an audio system
Set the setup menu correctly after connecting!
Setthe"TV Aspect"ofthe setupmenuaccordingtothe TV
connectedtotheunitas follows:
(See"CHANGINGSETUP VALUES"onpage40fordetails.)
TV Aspect
Whenyour TVisaconventional-screensize TV:
L-BOXor P-SCAN
Whenyour TV isa wide-screensize TV:
16:9
AUDIO OUT VIDEO OUT COMPONENT
VIDEO OUT DIGITAL OUT
S-VIDEO OUT
COAXIAL
R
L
2
1
C
R
Y
C
B
TV
tothevideo input jack(yellow)
yellow
Videocord(not supplied)
yellow to VIDEO OUT 1 or 2 jack (yellow) Rearoftheunit
to AUDIO OUT L (white)/ R (red) jacks
redwhite
Audio/videocord (supplied)
toan ACoutlet
toaudioinput jacks(Left/white,Right/red)
Audiosystem

ENGLISH
15
PREPARATIONS
En
AUDIO OUT VIDEO OUT COMPONENT
VIDEO OUT DIGITAL OUT
S-VIDEO OUT
COAXIAL
R
L
2
1
C
R
Y
C
B
DConnecting to a TV and an AV receiver equipped with a Dolby Digital (AC-3)
decoder
Useeithera commerciallyavailableopticalcord ora75ohm coaxialcordwhenconnecting thisunittoan AVreceiverwith
aDigitalIn jack. Thesupplied Audio/videocordis alsoavailableinstead ofacoaxialcord.
Set the setup menu correctly after connecting!
Setthe "TV Aspect" and"Digital out" ofthe setupmenu
accordingtotheaudioequipmentand TVconnectedtothe
unitasfollows:
(See"CHANGINGSETUP VALUES"onpage40for details.)
Digital out
"DolbyDigital"to"Bitstream"
"DTS"to"Off"
TV Aspect
Whenyour TVisaconventional-screensize TV:
L-BOXor P-SCAN
Whenyour TV isa wide-screensize TV:
16:9
CONTINUE
TV
yellow
tothevideo input jack(yellow)
Audio/videocord (supplied)
yellow to VIDEO OUT 1 or 2 jack (yellow) Rearoftheunit
toDIGITAL OUTCOAXIAL jacks
Coaxialcord(not supplied)
toan ACoutlet
Receiverequippedwith
aDolbyDigital decoder
Frontspeaker(L)
Surroundspeaker(L) Centerspeaker Subwoofer Surroundspeaker(R)
Frontspeaker(R)
CAUTION
Whenconnectingan AVreceivernotequippedwithaDolby
Digitaldecoder using acoaxial connectingcord, do not
set "Dolby Digital" to "Bitstream" in "Digital out" of the
setupmenu.
Merelyattempting toplaya DVDmaycause ascreeching
noisewhichcouldbeharmfultoyourearsand damagethe
speakers. Insucha case,besureto set"DolbyDigital"to
"PCM"in"DigitalOut".

16
ENGLISH
CONNECTIONS (CONTINUED)
EConnecting to a TV and an AV receiver equipped with a DTS decoder
Usea commerciallyavailable 75ohm coaxialcord whenconnecting theunit toan AVreceiverwitha DigitalIn jack. The
supplied Audio/videocordis alsoavailableinsteadofa coaxialcord.
AUDIO OUT VIDEO OUT COMPONENT
VIDEO OUT DIGITAL OUT
S-VIDEO OUT
COAXIAL
R
L
2
1
C
R
Y
C
B
Set the setup menu correctly after connecting!
Setthe "TV Aspect" and"Digital out" ofthe setupmenu
accordingtotheaudioequipmentand TVconnectedtothe
unitasfollows:
(See"CHANGINGSETUP VALUES"onpage40fordetails.)
Digital out
"DolbyDigital"to"PCM"
"DTS"to"Bitstream"
TV Aspect
Whenyour TVis aconventional-screensize TV:
L-BOXor P-SCAN
Whenyour TV isa wide-screensize TV:
16:9
CAUTION
Whenconnectingan AVreceiver notequippedwitha DTS
decoderusingacoaxialconnectingcord, donot set "DTS"
to "Bitstream" in"Digital out"ofthesetupmenu.
Merelyattempting toplaya DVDmaycause ascreeching
noisewhichcouldbeharmfultoyourearsand damagethe
speakers. Insuch acase,be sureto set"DTS"to "Of f"in
"DigitalOut".
TV
yellow
tothevideo input jack(yellow)
Audio/videocord (supplied)
yellow to VIDEO OUT 1 or 2 jack (yellow) Rearoftheunit
toDIGITAL OUT COAXIAL jacks
Coaxialcord(not supplied)
toan ACoutlet
Receiverequipped
withaDTSdecoder
Frontspeaker(L)
Surroundspeaker(L) Centerspeaker Subwoofer Surroundspeaker(R)
Frontspeaker(R)

ENGLISH
17
PREPARATIONS
En
FConnecting to a TV and an AV receiver with the Dolby Pro Logic Surround system
AUDIO OUT VIDEO OUT COMPONENT
VIDEO OUT DIGITAL OUT
S-VIDEO OUT
COAXIAL
R
L
2
1
C
R
Y
C
B
TV
Set the setup menu correctly after connecting!
Setthe "TV Aspect" and"Digital out" ofthe setupmenu
accordingtotheaudioequipmentand TVconnectedtothe
unitasfollows:
(See"CHANGINGSETUP VALUES"onpage40fordetails.)
Digital out
"DolbyDigital"to"Bitstream"
"DTS"to"Off"
TV Aspect
Whenyour TVis aconventional-screensize TV:
L-BOXor P-SCAN
Whenyour TV isa wide-screensize TV:
16:9
CONTINUE
yellow
tothevideo input jack(yellow)
Videocord(not supplied)
yellow
to VIDEO OUT 1 or 2 jack (yellow) Rearoftheunit
to AUDIO OUT L (white)/ R (red) jacks
redwhite
Audio/videocord (supplied)
toan ACoutlet
Receiverequipped
withDolbyPro
Logicdecoder
totheaudio inputjacks
(Left/white,Right/red)
Frontspeaker(L)
Surroundspeaker(L)
Centerspeaker
Surroundspeaker(R)
Frontspeaker(R)

18
ENGLISH
AUDIO OUT VIDEO OUT COMPONENT
VIDEO OUT DIGITAL OUT
S-VIDEO OUT
COAXIAL
R
L
2
1
C
R
Y
C
B
Connecting to a TV equipped with an S-video jack
Set the setup menu correctly after connecting!
Setthe"TV Aspect"ofthe setupmenuaccordingtothe TV
connectedtotheunitas follows:
(See"CHANGINGSETUP VALUES"onpage40fordetails.)
TV Aspect
Whenyour TVisaconventional-screensize TV:
L-BOXor P-SCAN
Whenyour TV isa wide-screensize TV:
16:9
Rear of the TV
S-videoinputconnector(S1,S2)
S-videocord(not supplied)
toS-VIDEOOUTconnector
Rearoftheunit
toan ACoutlet
NOTE
Forthebestpossiblepictureclarity ,itisrecommendedthat
an S (separate) video cord (not supplied) be used when
connectingtheunittoa TVequipped withanS-videoinput
terminal.
CONNECTIONS (CONTINUED)

ENGLISH
19
PREPARATIONS
En
AUDIO OUT VIDEO OUT COMPONENT
VIDEO OUT DIGITAL OUT
S-VIDEO OUT
COAXIAL
R
L
2
1
C
R
Y
C
B
Connecting to a TV or monitor with component video input connectors
TVormonitor
Component video output jacks (CB/CR/Y)
Thecomponentvideooutput jacksoutputthedif ferent
color signals (C B/CR) and luminance signal (Y)
separatelyinordertoachievehighfidelityinreproducing
colors.
The description of the component video output
connectorsmaydif ferdependingontheconnected TV
ormonitor(e.g.P B/PR/Y, CB/CR/Y, B-Y/R-Y/Y,etc.). Refer
totheoperatinginstructionsofthe TVfordetails.
Set the setup menu correctly after connecting!
Setthe"TV Aspect"ofthe setupmenuaccordingtothe TV
connectedtotheunitas follows:
(See"CHANGINGSETUP VALUES"onpage40fordetails.)
TV Aspect
Whenyour TVisaconventional-screensize TV:
L-BOXor P-SCAN
Whenyour TV isa wide-screensize TV:
16:9
tovideoinputjacks(Y/C B/CR)
Videocables(notsupplied)
to COMPONENT VIDEO OUT (Y/CB/CR) jacks Rearoftheunit
toan ACoutlet

20
ENGLISH
Getting ready to play
•Turnonthe TV,and setitsvideo source(V ideo1, Video
2,Video3, etc.)to theone connectedto theunit.
•Turnontheaudioequipment connectedtotheunit. Set
itsinputsource totheoneconnected totheunit.
1
Press POWER.
Theunit turnson andthe 6STANDBY indicator turnsof f.
The" "screen appearsonthe TV screen.
2
Press zOPEN/CLOSE.
Thedisctray opens.
TITLE
PBC
1L 2R
CHAPTER
ALL
AB
RAND
D
ANGLE
PROG
VCD
3
Load a disc.
Placea disc inthe trayguides (depressedarea) withthe
labelsidefacingup. Whenloadingan8-cmdisc,placeitin
theinnerdepression.
4
Press zOPEN/CLOSE.
The disc tray closes, and the unit automatically starts
playingthedisc.
Ifplayback doesnot start,press OK c.
TITLE
PBC
1L 2R
CHAPTER
ALL
AB
RAND
D
ANGLE
PROG
VCD
TITLE
PBC
1L 2R
ALL
AB
RAND
D
ANGLE
PROG
PLAYBACK
1
132,4
sa
rt
c
MENU
r,t
OKc
j,l
f,g
a
s
MUTE
Number
buttons
6STANDBY
indicator
About the symbol display
•The symbolwill bedisplayed onthe TVscreen if
youpressabutton whichcannotbeusedorenter an
incorrectnumber .
•SomeDVDdiscsmayhaveplaceswherepressingof
theSTOP,SKIP,or otherbuttonsis notallowed. The
mark will be displayed on the TV screen if you
pressa buttonthatisnot allowedinsuch aplace.
Other manuals for XD-DV520
1
Table of contents
Other Aiwa DVD Player manuals