Aiwa XD-DV300 User manual


WARNING
TO REDUCE THE RISK OF FIRE OR ELECTRIC
SHOCK, DO NOT EXPOSE THIS APPLIANCE TO RAIN
OR MOISTURE,
“CAUTION:TO REDUCE THE RISK OF
ELECTRIC SHOCK,
DO NOT REMOVE COVER (OR BACK).
NO USER-SERVICEABLE PARTS INSIDE.
REFER SERVICING TO QUALIFIED
SERVICE PERSONNEL.”
Explanation of Graphical Symbols:
The lightning flash with arrowhead symbol, within
A
an equilateral triangle, is intended to alerl the
user to the presence of uninsulated “dangerous
voltage” within the product’s enclosure that may
be of sufficient magnitude to constitute arisk of
electric shock to persons.
The exclamation point within an equilateral trian-
A
gle is intended to alert the user to the presence
of important operating and maintenance (servic-
ing) instructions in the literature accompanying
●the appliance.
PRECAUTIONS
Read the Operating Instructions carefully and completely before
operating the unit. Be sure to keep the Operating Instructions for
future reference. All warnings and cautions in the Operating
instructions and on the unit should be strictly followed, as well as
the safety suggestions below.
Installation
1
2
3
4
Water and moisture —Do not use this unit near water, such
as near abathtub, sink, swimming pool, or the like,
Heat —Do not use this unit near sources of heat, including
heating vents, stoves, or other appliances that generate heat.
This unit should not be placed in temperatures less than 5-C
(41‘F) or greater than 35°C (95”F).
Mounting place —Place the unit:
on a flat ,even surface
-away from strong magnetic fields
-at least one meter away from any radios or receivers
Do not place heavy objects on the unit.
Ventilation —The unit should be situated with adeauate s~ace
5
6
7
Foreign objects and liquid —Be careful that foreign objects
or Iiauid do not enter the unit throuah the ventilation o~eninas.
Carts and stands —The unit should be moved ‘“
with care when placed or mounted on a stand
or cart.
Sudden stops, excessive force, or an uneven
surface may cause the unit or cart to fall over. @A
Condensation —Moisture mav form on the ~s
pickup lens when:
-This unit is moved from acold spot to awarm spot
-Aheating system has just been turned on
-The unit is used in avery humid room
-The unit is cooled by an air conditioner
When this unit has condensation inside, it may not function
normally. Should this occur, leave the unit for afew hours,
then try to operate again.
Electric Dower
1Power sources —Connect this unit only to power sources
specified in the Operating Instructionsj and as marked on the
unit.
2AC power cord
-When disconnecting the AC power cord, pull it out by the AC
power plug. Do not pull the cord itself.
-Never handle the AC power plug with wet hands, as this could
result in fire or electrical shock.
-Power cords should be firmly secured to avoid being severely
bent, pinched, or walked upon. Pay particular attention to
the cord from the unit to the power socket.
-Avoid overloading AC power plugs and extension cords
beyond their capacity, as this could result in fire or electrical
shock.
3When not in use —Unplug the AC power cord from the AC
outlet if the unit will not be used for several months or more.
When the cord is plugged in, asmall electrical current continues
to flow into the unit, even if the power is turned off.
4In case of lightning —Immediately disconnect the AC power
cord from the AC outlet.
Maintenance
Clean the unit only as recommended in the Operating Instructions.
Damaae reauirina service
Have this unit serviced by aqualified service technician if:
-The AC power cord or plug has been damaged
-Aforeign objector liquid have entered the unit
-The unit has been exposed to rain or water
-The unit does not seem to operate normally
-The unit exhibits amarked change in performance
-The unit has been dropped, or the cabinet has been damaged
DO NOT OPEN THE CABINET AND ATTEMPTTOSERVICE THE
UNIT YOURSELF.
around it so that proper heat ventilation is assured. Allow a
clearance of 10 cm (4 in.) from the rear and the top of the unit,
and 5 cm (2 in.) from each side.
-Do not place the unit on a bed, rug, or similar surface that
may block the ventilation openings.
-Do not install the unit in abookcase, cabinet, or airtight rack
where ventilation may be impeded.
-To avoid internal heat build-up, do not cover the
ventilation openings on the rear panel.
2ENGLISH

TABLE OF CONTENTS
Introduction
Precautions ...............................m.................................... 2
Before Use ............................................................................ 4
Handling and cleaning ........................................................ 5
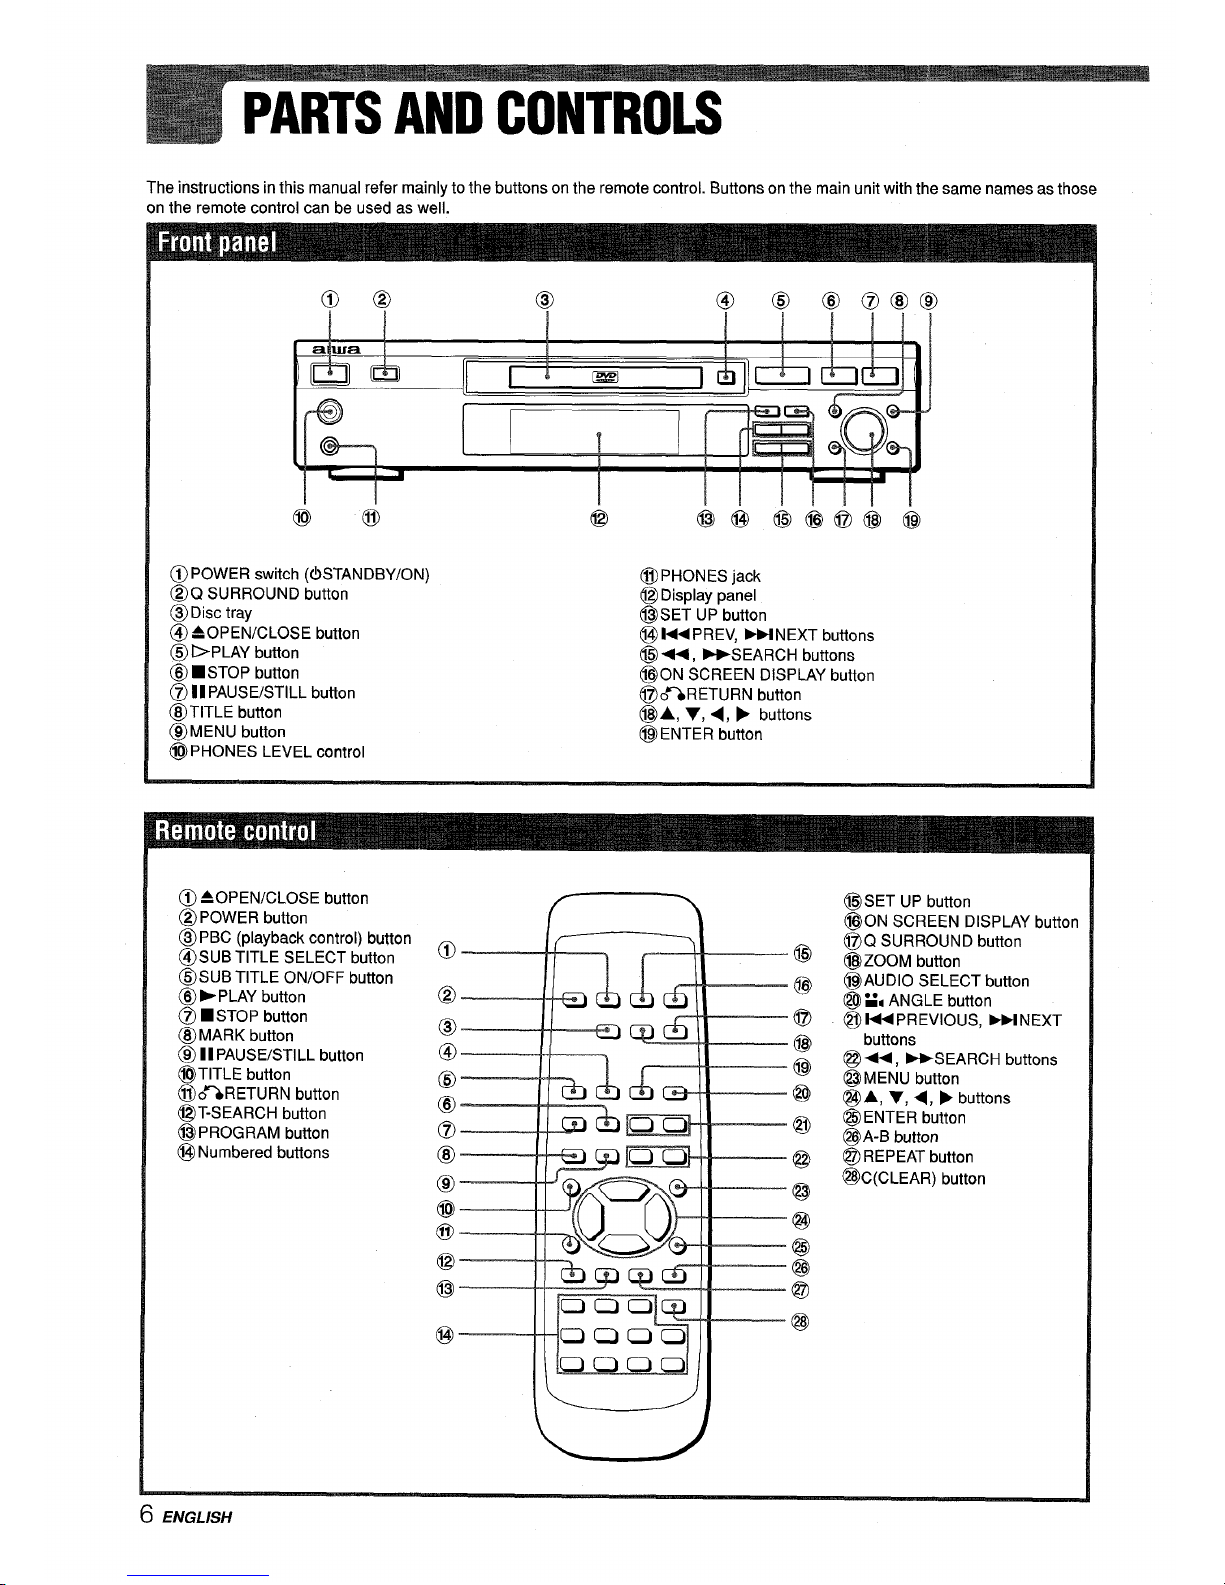
Parts and Controls ............................................................... 6
Front panel ..................................................................... 6
Remote control .............................................................. 6
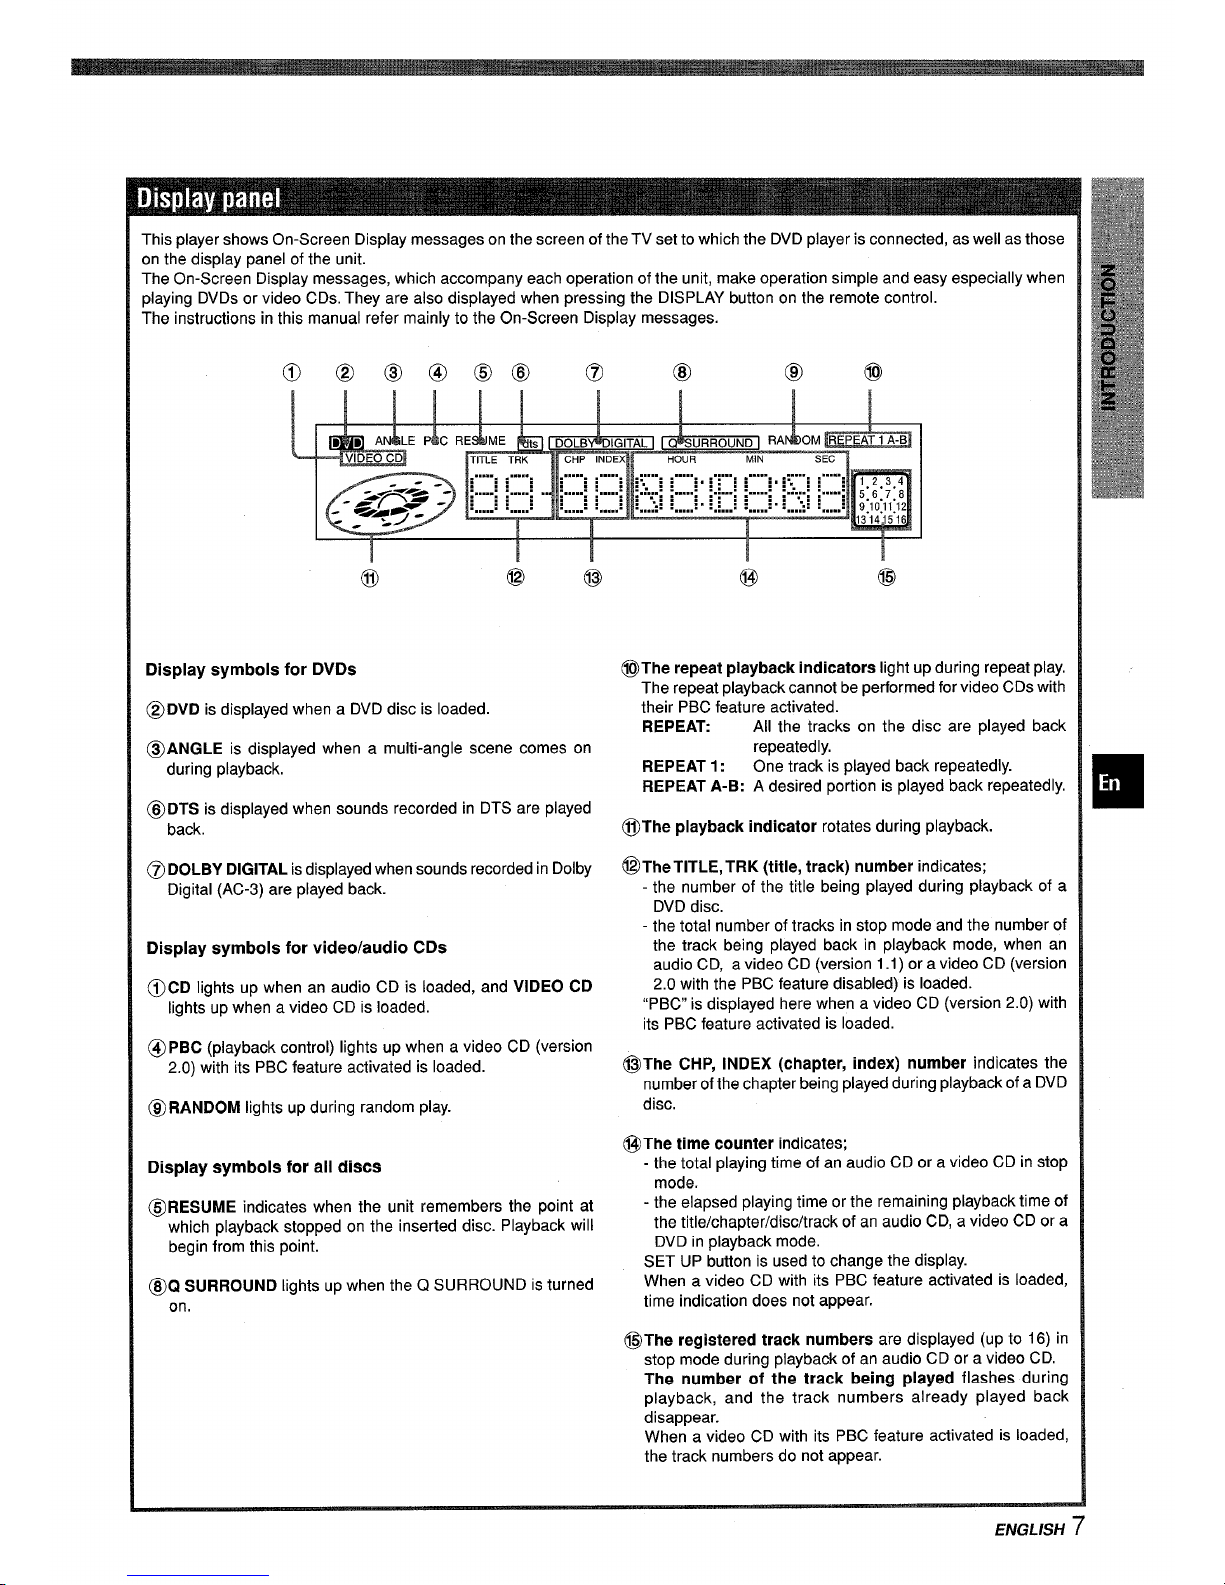
Display panel .................................................................. 7
Preparations
COnneCtiOnS ......................................................................... 8
❑Connecting to aTV set only .................................... 9
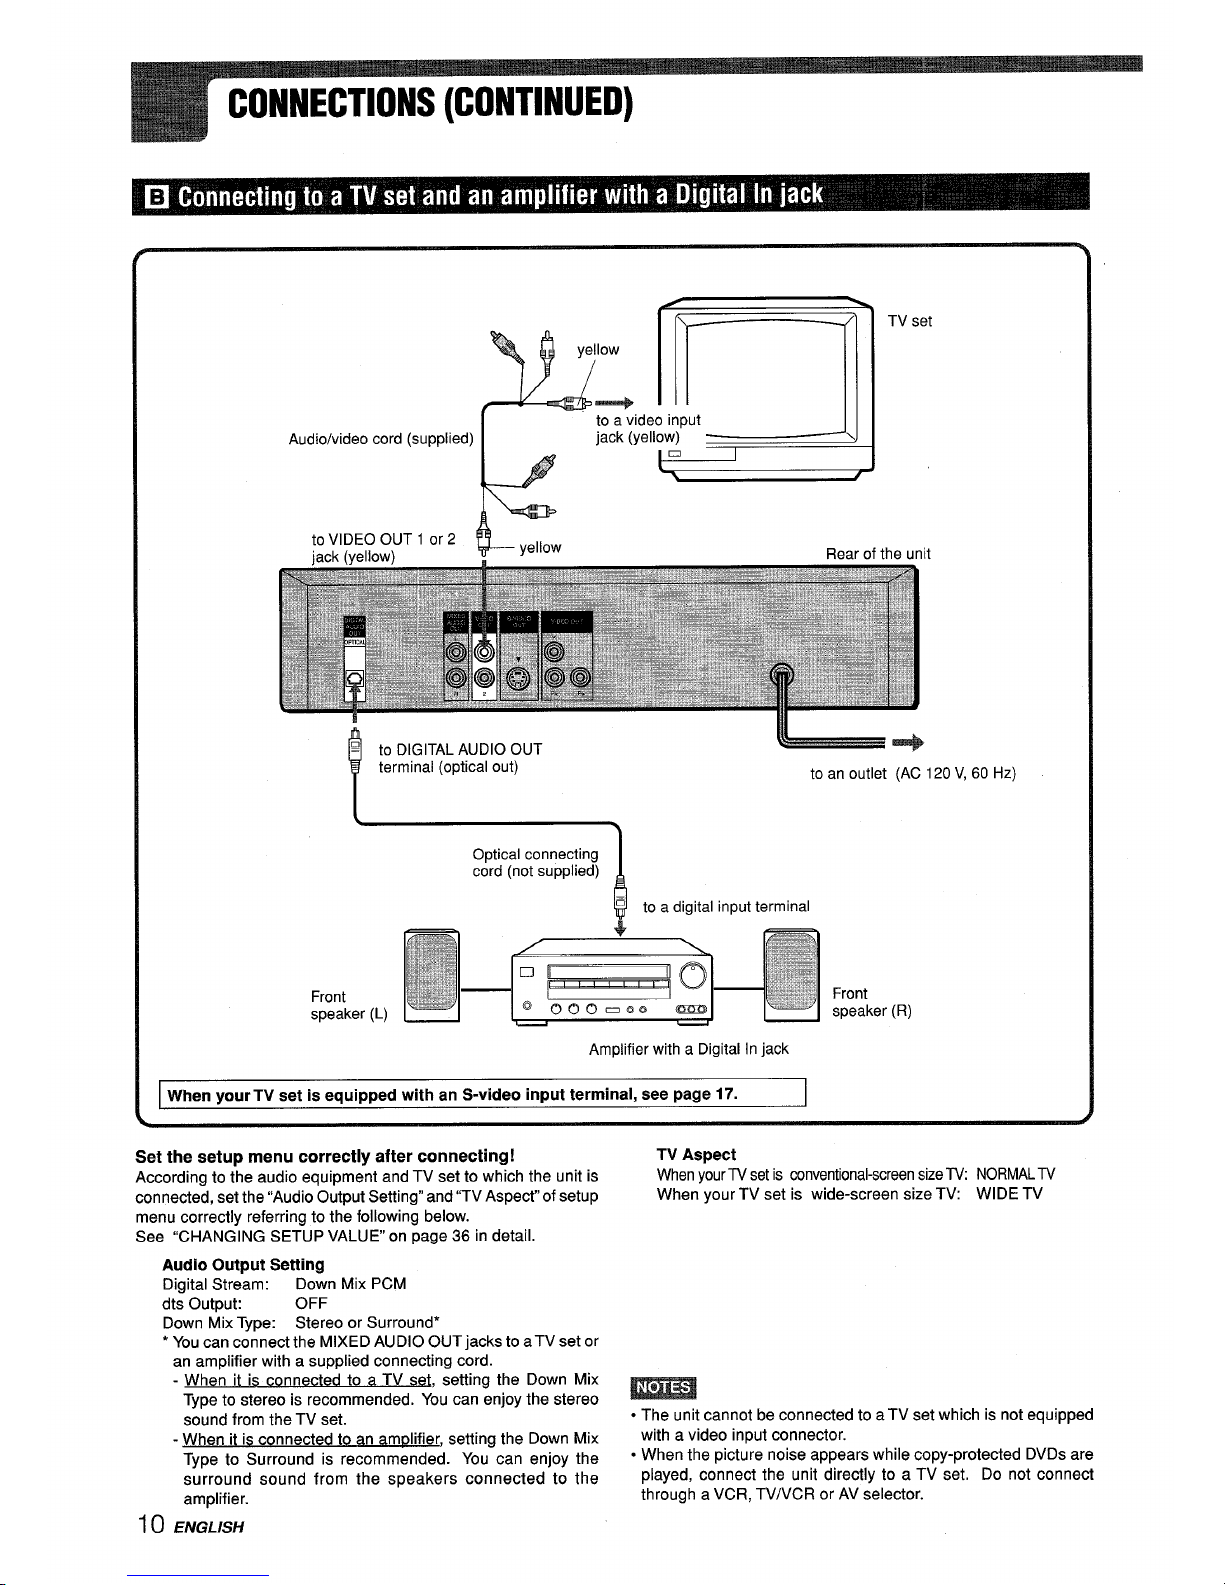
❑Connecting to aTV set and an amplifier with a
Digital In jack ...................................................... 10
❑Connecting to aTV set and an audio system ......11
❑Connecting to adecoder with Dolby Digital
processing or an AV amplifier equipped with a
Dolby Digital decoder ........................................ 12
EConnecting to adecoder with DTS processing or an
AV amplifier equipped with aDTS decoder .......14
❑Connecting to aTV set and an AV amplifire with
the Dolby Pro Logic Surround system ............16
Connecting to aTV set equipped with S-video jack 17
Connecting to aTV set or monitor with component
video input connectors ......................................... 18
Connecting headphones ............................................. 19
Remote control ............................................................. 19
Basic O~erations
Playback (the basics) ........................................................ 20
Stopping playback (DVD, video CD, audio CD) ........21
Still (Pause) (DVD, video CD, audio CD) .................... 21
Frame Advance (DVD, video CD) ................................ 21
Slow Playback (DVD, video CD) ................................. 22
Fast Forward, Reverse(DVD, video CD, audio CD) ...22
Skipping(DVD, video CD, audio CD) .......................... 23
Enlarge the picture -Zoom function (DVD) ..............23
Checkingplaybackconditions(DVD,videoCD,audioCD).. 23
PlayingavideoCDwithoutusing PlayBackControl(PBC) 23
Creating asimulated surround effect (Q SUUROUND) 24
Playing avideo CD or an audio CD in random order ...24
Mark function ................................................................ 24
Information on the TV screen ...................................... 25
More Features
Search ................................................................................. 26
Title search (DVD)/Track search (Video CD with PBC
off, audio CD) ......................................................... 26
Chapter search (DVD) ...................t.............................. 27
Time search (DVD, video CD with PBC off, audio CD) .27
Programmed playback -play an audio or video CD in a
desired order ................................................................ 28
Repeat playback ................................................................. 30
Repeating aDVD .......................................................... 30
Repeating avideo CD/an audio CD ........................... 31
Repeating asection between two specified points (A-
BRepeat) ................................................................ 31
Changing the angle -viewing the same scene from a
different angle (DVD) ................................................... 32
Displaying and changing subtitles .................................. 33
Displaying subtitles ..................................................... 33
Changing the subtitles ................................................ 33
Changing the audio track ................................................. 34
Changing audio tracks (DVD) ..................................... 34
Selecting karaoke audio (video CD, DVD) .................35
As Necessary
Changing setup values ..................................................... 36
Basic operations .......................................................... 37
On-screen Menu ........................................................... 37
Disc Languages ........................................................... 38
Audio Output Setting ................................................... 3g
TV Aspect ..................................................................... 41
Rating Limit .................................................................. 42
PBC ................................................................................ 43
Demonstration ............................................................. 43
Disc Resume ................................................................ 43
Country codes .............................................................. 44
Language codes .......................................................... 46
Troubleshooting ................................................................. 47
Specifications .................................................................... 48
z?ektt?twz4&?i%umP*
Congratulations on your purchase of an Aiwa DVD Player.
To optimize the performance of this player, please take the time to
read through these Operating Instructions and become familiar
with the operating procedures.
Features
DVD: providing acompletely new dimension in video
entertainment.
●With the multi-language function you can select an audio ❑
.
.
soundtrack in up to 8languages, and subtitles in up to 32
languages.
With the multi-angle function you can select aviewing angle
of scenes shot from multiple camera angles and recorded on
the disc.
With the parental lock function you can prevent playback of
specified discs unsuitable for certain audiences.
*All of the above functions are dependent on the DVD software.
High quality digital audio and images
●The linear PCM sound of a 96 kHz/24 bit creates audio quality
superior to that of audio CDs.
●Compatible with video CDs and audio CDs as well as DVDS
Accessory checklist
Remote control (1)
AV cord (1)
Batteries (R6/size AA) (2)
Operating Instructions
Owner’s record
For your convenience, record the model number and serial number
(you will find them on the rear of your set) in the space provided
below. Please refer to them when you contact your Aiwa dealer in
case of difficulty.
IModel No. ISerial No. (Lot No.) I
IXD-DV300U II
ENGLISH 3

Please read the following before operating the DVD player.
This DVD player can play discs with the following marks only.
I
sag DVDS
(8 cm disc/1 2cm disc)
~FKE Video CDs
~(8 cm disc/1 2cm disc)
dr!E Audio CDs
(8 cm disc/1 2cm disc)
DIGITAL AUDIO
●Do not use irregular shape CDs (example: heart-shaped,
octagonal ones). It may result in malfunctions.
Color system of the DVDS and video CDs
This unit is designed for the NTSC co/or systems only.
The materials for both the DVD discs and the video CDs are
recorded in the PAL and NTSC color systems.
Select the DVDS and video CDs recorded in the NTSC color
svstem.
Notes on DVDS and video CDs
Some playback operations of DVDS and video CDs may be
intentionally fixed by software manufacturers. As this player plays
DVDS and video CDs according to disc contents designed by the
software manufacturer, some playback features of this player may
not be available, or other functions may be added.
Also refer to the instructions supplied with the DVDS and video
CDs.
Some DVDS made for business purposes may not be played on
this player.
Region code of the DVD player and DVDS
This DVD player is designed and manufactured for playback of
region”1” encoded DVD software. Region code labels appear on
the labels of some DVD discs to indicate which type of player can
play those discs. Unless “1” is included in these labels, or “ALL”
appears on the DVD disc labels, those discs cannot be played on
this player. If you try to play these discs, the message “REGIONAL
CODE VIOLATION” will appear on the TV screen. Some DVD discs
may not have aregion code label even though their playback is
prohibited by area limits.
Note on DTS-encoded CDs
When playing DTS-encoded CDs, excessive noise will be exhibited
from the analog stereo outputs. To avoid possible damage to the
audio system, the consumer should take proper pre-cautions when
the analog stereo outputs of the CD player is connected to an
amplification system. To enjoy DTS Digital SurroundTMplayback,
an external 5.1 channel DTS Digital SurroundTMdecoder system
must be conneted to the digital output (S/PDIF, AES/EBU, or
TosLink) of the CD player.
Title
The longest section of apicture or amusical piece on a DVD; a
movie for apicture piece on video software, or an album for a
musical piece on audio software
Each title is assigned atitle number enabling you to locate the title
you want.
Chapter
Sections of apicture or amusical piece that are smaller than titles
Atitle is composed of several chapters. Each chapter is
assigned achapter number, enabling you to locate the
chapter you want. Depending on the disc, there maybe no chapter
recorded.
Track
Sections of apicture or amusical piece on a video CD or an audio
CD
Each track is assigned atrack number, enabling you to locate the
track you want.
Scene
On avideo CD with PBC (playback control) functions, moving
pictures and still pictures are divided into sections called “Scenes”.
Each scene is displayed in the menu screen and assigned ascene
number, enabling you to locate the scene you want.
Ascene is composed of one or several tracks.
There are two types of video CDs.
Video CDs equipped with PBC (Version 2.0)
PBC (playback control) allows you to interact with the system via
menus, search functions or other typical computer-like operations.
Moreover, still pictures of high resolution can be played, if they
are included in the disc.
Video CDs not equipped with PBC (Version 1.1)
Operated in the same way as audio CDs, these discs allow
playback of video pictures as well as sound, but they are not
equipped with PBC.
This player cannot play discs such as CD-ROMs, other than those
listed in the table on this page, including PHOTO CDs, CD-1, DVD-
ROMS.
4ENGLISH

When shipping the DVD player
The original shipping carton and packing materials come in handy.
For maximum protection, re-pack the unit as it was originally
packed at the factory.
When setting the DVD player
The picture and sound of anearby TV, VCR or radio may be
distorted during DVD playback. In this case, position the player
away from the TV, radio or VCR, or turn off the player after removing
the disc.
To keep the surface clean
Do not use volatile liquids, such as insecticide spray, near the
player. Do not leave rubber or plastic products in contact with the
player for along period of time.They will leave marks on the surface.
Fingerprints and dust on the disc can cause poor picture quality
and sound distortion, Before playing, clean the disc with aclean
cloth. Wipe the disc from the center out.
Do not use strong solvents such as alcohol, benzene, thinner,
commercially available cleaners or anti-static spray intended for
analog records.
Do not touch the playback side of the disc.
Hold the disc by the edges so that fingerprints will not get on the
surface.
Do not stick paper or tape on the disc.
To clean the cabinet
Use asoft, dry cloth. If the surfaces are extremely dirty, use asoft
cloth lightly moistened with amild detergent solution. Do not use
strong solvents, such as alcohol, benzene or thinner, as these
might damage the surface of the player.
To obtain aclear picture
The DVD player is ahigh-tech, precision device. If the
optical pick-up lens and disc drive parts are dirty or worn down,
the picture quality will be poor.
Regular inspection and maintenance are recommended after every
1,000 hours of use. (This depends on the operating environment.)
For details, please contact your Aiwa dealer.
After playing, store the disc in its case.
Do not expose the disc to direct sunlight or sources of heat, or
leave it in aparked car exposed to direct sunlight, as there may
be a considerable temperature increase inside the car.
It is forbidden by law to copy, broadcast, show, broadcast via cable,
play in public, or rent copyright material without permission,
This product features the copy protection function developed by
Macrovision, Copy protection signals are recorded on some discs.
When recording and playing the pictures of these discs on a VCR,
the picture noise will appear.
This products incorporates copyright protection technology that is
protected by U.S. patents and other intellectual property rights.
Use of this copyright protection technology must be authorized by
Macrovision, and is intended for home and other limited pay-per-
view uses only, unless otherwise authorized by Macrovision.
Reverse engineering or disassembly is prohibited.
ENGLISH 5

The instructions in this manual refer mainly to the buttons on the remote control. Buttons on the main unit with the same names as those
on the remote control can be used as we~.
(3’2) @ @ @@@@(
@ @ @ @@@@@@@
(@POWER switch (@TANDBY/ON)
@Q SURROUND button
@Disc tray
@AOPEN/CLOSE button
@C-PLAY button
@■STOP button
@II PAUSE/STILL button
@TITLE button
@MENU button
@pHONES LEvEL control
@pHONES jack
@Display panel
@SET wbutton
@W PREV, MNEXT buttons
@+, *SEARCH buttons
@ON SCREEN DISPLAY button
@oORETURN button
(@A, 7,<, ➤buttons
@ENTER button
o=OPEN/CLOSE button
@POWER button
@PBC (playback control) button
@SUB TITLE SELECT button
@SUB TITLE ON/OFF button
@~PLAY button
@■STOP button
@MARK button
@II PAUSE/STILL button
@TITLE button
@)ofiFtETuRN button
@T-SEARCH button
@PROGRAM button
@Numbered buttons
@
@
@
@
@
@SET uP button
@ON SCREEN DISPLAY button
(@Q SURROUND button
@ZOOM button
@AUDIO SELECT button
@& ANGLE button
@KPREVIOUS, MNEXT
buttons
@+, -SEARCH buttons
@MENu button
@A, T,+, Fbuttons
@ENTER button
@A-B button
@REPEAT button
@C(CLEAR) button
@
6ENGLISH

This player shows On-Screen Display messages on the screen of the TV set to which the DVD player is connected, as well as those
on the display panel of the unit.
The On-Screen Display messages, which accompany each operation of the unit, make operation simple and easy especially when
playing DVDS or video CDs. They are also displayed when pressing the DISPLAY button on the remote control.
The instructions in this manual refer mainly to the On-Screen Display messages.
@@@@@@@@ @ m
Display symbols for DVDS
@DVD is displayed when aDVD disc is loaded.
@)ANGLE is displayed when amulti-angle scene comes on
during playback.
@DTS is displayed when sounds recorded in DTS are played
back.
@DOLBY DIGITAL is displayed when sounds recorded in Dolby
Digital (AC-3) are played back.
Display symbols for videolaudio CDs
@CD lights up when an audio CD is loaded, and VIDEO CD
lights up when avideo CD is loaded.
@PBC (playback control) lights up when avideo CD (version
2.0) with its PBC feature activated is loaded.
@RANDOM lights up during random play.
Display symbols for all discs
@RESUME indicates when the unit remembers the point at
which playback stopped on the inserted disc. Playback will
begin from this point.
@Q SURROUND lights up when the QSURROUND is turned
on.
@@
@The repeat playback indicators light up during repeat play.
The repeat playback cannot be performed for video CDs with
their PBC feature activated.
REPEAT: All the tracks on the disc are played back
repeatedly.
REPEAT 1: One track is played back repeatedly.
REPEAT A-B: Adesired portion is played back repeatedly.
@The playback indicator rotates during playback.
@The TITLE, TRK (title, track) number indicates;
-the number of the title being played during playback of a
DVD disc.
-the total number of tracks in stop mode and the number of
the track being played back in playback mode, when an
audio CD, avideo CD (version 1.1) or avideo CD (version
2.o with the PBC feature disabled) is loaded.
“PBC” is displayed here when avideo CD (version 2.0) with
its PBC feature activated is loaded.
@The CHP, INDEX (chapter, index) number indicates the
number of the chapter being played during playback of aDVD
disc.
@The time counter indicates;
-the total playing time of an audio CD or avideo CD in stop
mode.
-the elapsed playing time or the remaining playback time of
the title/chapter/disc/track of an audio CD, avideo CD or a
DVD in playback mode.
SET UP button is used to change the display.
When avideo CD with its PBC feature activated is loaded,
time indication does not appear.
(@The registered track numbers are displayed (up to 16) in
stop mode during playback of an audio CD or avideo CD.
The number of the track being played flashes during
playback, and the track numbers already played back
disappear.
When avideo CD with its PBC feature activated is loaded,
the track numbers do not appear.
ENGLISH /

At first, decide the outline of the connection among this unit, your TV set and the amplifier, etc. It is necessary to set the setup menu of
this unit according to the connection.
Before connection, identify the type of your audio equipment or of the TV set referring to the following chart. Then decide the connection
and the setup menu according to the types.
Audio system to be connected IInput jack of equipment to be IReferring I
connected to the DVD player Letter
I I
None (only the television is connected) See ❑.
I I
Astereo system or an amplifier Digital (optical) input jack See E3.
Analog audio input jacks (UR) See ❑.
An AV amplifier equipped with Dolby Digital Digital (optical) input jack See ❑.
decoder or aDolby Digital decoder Analog audio input jacks (UR) See ❑.
IAn AVamplifier equipped with DTS decoder IDigital (optical) input jack ISee ❑. I
or aDTS decoder
Before making connections
●Connect the AC cords of the unit and external equipment at
the end, after finishing the other connections.
●Insert the plugs completely into the jacks. Loose connections
may produce ahumming sound or other noise interference.
●Refer to the instructions for the connected equipment.
CAUTION
Do not select “Dolby Digital” in the “Audio Output Setting” when
connecting to an AV amplifier not equipped with aDolby Digital
decoder (with an optical connecting cord).
Merely attempting to play aDVD may cause ahigh level of noise
which could be harmful to your ears and damage the speakers. In
such acase, be sure to select “Down Mix PCM” in the “Digital
Stream”.
8ENGLISH

jack (yellow)
Audio/video
Rear of TV set
p]
to an audio input jacks (Left/ white, Righti red)
rIII
cord (supplied) I
to an outlet (AC 120V,60 Hz)
~When your TV set is equipped with an S-video input terminal, see page 17.
Set the setup menu correctly after connecting!
Accordingto the audio equipment and TV set to which the unit is
connected, set the “Audio Output Setting” and “TV Aspect” of setup
menu correctly referring to the following below.
See “CHANGING SETUP VALUE on page 36 in detail.
Audio Output Setting
Digital Stream: Down Mix PCM
dts Output: OFF
Down Mix Type: Stereo
●The player cannot be connected to aTV set which is not equipped
with avideo input connector.
●Use acommercially available stereo-monaural audio cord when
connecting to amonaural TV set.
●When the picture noise appears while copy-protected DVDSare
played, connect the unit directly to aTV set. Do not connect
through aVCR, TVNCR or AV selector.
TV Aspect
WhenyourTVsetis conventional-screensizeTV: NORMALTV
When your TV set is wide-screen size TV: WIDE TV
ENGLISH 9

CONNECTIONS (CONTINUED)
:g[
TV set
oinput
Audio/video cord (supplied) Ow) \
n
I
=to DIGITAL AUDIO OUT ~+
terminal (optical out) to an outlet (AC 120V, 60 Hz)
Front
speaker (L)
Optical connecting
cord (not supplied) A
u
❑to adigital input terminal
.
Amplifier with aDigital In jack
When your TV set is equipped with an S-video input terminal, see page 17.
Front
speaker (R)
Set the setup menu correctly after connecting!
Accordingto the audio equipment and TV set to which the unit is
connected, set the “Audio Output Setting” and “TV Aspect” of setup
menu correctly referring to the following below.
See “CHANGING SETUP VALUE” on page 36 in detail.
Audio Output Setting
Digital Stream: Down Mix PCM
dts Output: OFF
Down Mix Type: Stereo or Surround’
*You can connect the MIXED AUDIO OUT jacks to aTV set or
an amplifier with asupplied connecting cord.
-When it is connected to a TV set, setting the Down Mix
Type to stereo is recommended. You can enjoy the stereo
sound from the TV set.
-When it is connected to an amriifier, setting the Down Mix
Type to Surround is recommended. You can enjoy the
surround sound from the speakers connected to the
amplifier.
1() ENGLLSH
TV Aspect
WhenyourTV setis conventional-screensizellL NORMALTV
When your TV set is wide-screen size TV: WIDE TV
●The unit cannot be connected to aTV set which is not equipped
with avideo input connector.
●When the picture noise appears while copy-protected DVDSare
played, connect the unit directly to aTV set. Do not connect
through aVCR, TVNCR or AV selector.

to avideo input
jack (yellow)
Video cord (not supplied) r+
to VIDEO OUT 1or 2
jack (yellow) I
red F/ to an outlet (AC 120V,60 Hz)
TV set
Audio/video cord (supplied)
naudio input jacks
t/ white, Right/ red)
system
When your TV set is equipped with an S-video input terminal, see page 17.
Set the setup menu correctly after connecting!
Accordingto the audio equipment and TV set to which the unit is m
connected,setthe “AudioOutput Setting”and “TV Aspect” of setup ●The unit cannot be connected to aTV set which is not equipped
menu correctly referring to the following below. with avideo input connector.
See “CHANGING SETUP VALUE” on ~aae 36 in detail. ●When the picture noise appears while copy-protected DVDSare
.-
Audio Output Setting played, connect the unit directly to aTV set. Do not connect
Digital Stream: Down Mix PCM through aVCR, TV/VCR or AV selector.
dt: Output: OFF
Down Mix Type: Stereo
TV Aspect
WhenyourTV setis conventional-screensizeWNORMALTV
When your TV set is wide-screen size TV: WIDE TV
ENGLISH 1I

CONNECTIONS (CONTINUED)
This DVD player contains aDolby Digital decoder, and enables the playback of DVDS recorded in Dolby Digital Surround without the
need for an optional decoder with Dolby Digital processing. Once the DVD player is connected to adecoder with Dolby Digital processing
or an AV amplifier which is equipped with aDolby Digital decoder, you can enjoy theater-quality realistic audio sound right in your own
home when playing the DVDS recorded in Dolby Digital Surround.
Connect the DIGITAL AUDIO OUT jack of the DVD player to the DIGITAL IN jack of the decoder or AV amplifier with an optional optical
connecting cord.
Audio/video cord (supplied)
TV set
?J
., Ill
‘= to av~eo input
jack (yellow)
7=kd
—yellow Rear of the unit
~+
to an outlet (AC 120V, 60 Hz)
A
v
E
Front to adigital input terminal ~Amplifier equipped with aFront
speaker (L) Dolby Digital decorder speaker (R)
DI
““=WS
“’’”“’<’:?==
., ,1!111!11Ig*
**48$/!,!!=!! ~~=’
Wa$fi$
y,jj=d
‘s.”,,,,‘f”“,: 00 000
Surround speaker (L) Center speaker Subwoofer Surround speaker (R)
IWhen yourTV set is equipped with an S-video input terminal, see page 17. ]
12 ENGLISH

1Remove the dust cap on lhe DIGITAL
AUDIO OUT jack of the player.
Also, remove the dust
cap on the optical input
5
w,ck
jack of the connected
equipment. *R
@
r
/
I
Dust cap
2C onnect the optical connecting cord
firmly so that the configurations of
both the plug and the jack match.
Keep the dust cap, and
always reattach the cap
when not using the jack
R
nlcAL
to protect against dust.
Standard equipment for enjoying Dolby Digital sound
Prepare the following equipment as well as this DVD player.
“One of the following amplifier/decoder
-An AV amplifier that contains aDolby Digital decoder
-ADolby Digital decoder and an AV amplifier
●Front speakers (L, R), center speaker, surround speakers
(L, R) and subwoofer
●DVDS recorded in Dolby Digital Surround
Set the setup menu correctly after connecting!
According to the audio equipment and TV set to which the unit is
connected, set the “Audio Output Setting” and “TV Aspect” of setup
menu correctly referring to the following below.
See “CHANGING SETUP VALUE” on page 36 in detail.
Audio Output Setting
Digital Stream: Dolby Digital
dts Output: OFF
Down Mix TyDe: Stereo or Surround*
*You can connect the MIXED AUDIO OUT jacks to aTV set or
an amplifier with asupplied connecting cord.
-When it is connected to aTV set, setting the Down Mix
Type to stereo is recommended. You can enjoy the stereo
sound from the TV set.
-When it is connected to an amtXifier, setting the Down Mix
Type to Surround is recommended. You can enjoy the
surround sound from the speakers connected to the
amplifier.
TV Aspect
WhenyourTVsetis conventional-screensizeWNORMALTV
When yourTV set is wide-screen size TV: WIDE TV
cThe unit cannot be connected to aTV set which is not equipped
with avideo input connector.
●When the picture noise appears while copy-protected DVDSare
played, connect the unit directly to aTV set. Do not connect
through aVCR, TV/VCR or AV selector.
●For the speakers and their connection, refer to the instructions
for the AV amplifier.
CAUTION
If the AV amplifier is not equipped with aDolby Digital decoder, do
not select “DOLBY DIGITAL’ in the “Audio Output Setting” when
connecting the AV amplifier with an optical connecting cord.
Merely attempting to play aDVD may cause ahigh level of noise
which could be harmful to your ears and damage the speakers. In
such acase, be sure to select “Down Mix PCM” in the “Digital
Stream”.
ENGLISH 13

COIWECTIONS (CONTINUED)
This DVD player contains aDTS decoder, and enables the playback of DVDSrecorded in DTS Surround without the need for an optional
decoder with DTS processing. Once the DVD player is connected to adecoder with DTS processing or an AV amplifier which is
equipped with aDTS decoder, you can enjoy theater-quality realistic audio sound right in your own home when playing the DVDS
recorded in DTS Surround.
Connect the DIGITAL AUDIO OUT jack of the DVD player to the DIGITAL IN jack of the decoder or AV amplifier with an optional optical
connecting cord.
TV set
Audio/video cord (supplied) pzll+,
to VIDEO OUT 1or 2~b
o
to DIGITAL AUDIO OUT ~
terminal (optical out) -
IOptical connecting
cord (not supplied)
L+
to an outlet (AC 120V, 60 Hz)
A
v
E
Front to adigital input terminal +Amplifier equipped with Front
speaker (L) aDTS decorder speaker (R)
Surround speaker (L) Center speaker Subwoofer Surround speaker (R)
When your TV set is equipped with an S-video input terminal, see page 17.
14 ENGLISH

~R emove the dust capon the DIGITAL
AUDIO OUT jack of the player.
Also, remove the dust
cap on the optical input R
PTCN
jack of the connected
equipment.
I
Dust cap
2C onnectthe optical connecting cord
firmly so that the configurations of
both the plug and the jack match.
Keep the dust cap, and
always reattach the cap
when not using the jack
to protect aga(nst dust.
d
LQ
@
.-
Standard equipment for enjoying DTS sound
Prepare the following equipment as well as this DVD player.
●One of the following amplifier/decoder
-An AV amplifier that contains aDTS decoder
-ADTS decoder and an AV amplifier
●Front speakers (L, R), center speaker, surround speakers
(L, R) and subwoofer
●DVDS recorded in DTS
Set the setup menu correctly after connecting!
According to the audio equipment and TV set to which the unit is
connected, set the “Audio Output Setting” and “TV Aspect” of setup
menu correctly referring to the following below.
See “CHANGING SETUP VALUE” on page 36 in detail.
Audio Outmt Settina
Digital Stre~m: Do~n Mix PCB
dts Output: ON
Down Mix Type: Stereo or Surround”
*You can connect the MIXED AUDIO OUT jacks to aTV set or
an amplifier with asupplied connecting cord,
-~, setting the Down Mix
Type to stereo is recommended. You can enjoy the stereo
sound from the TV set.
-When it is connected to an amplifier, setting the Down Mix
Type to Surround is recommended. You can enjoy the
surround sound from the speakers connected to the
amplifier.
TV Aspect
WhenyourTV setis conventional-screensizeTV NORMALTV
When your TV set is wide-screen size TV: WIDE TV
●The unit cannot be connected to aTV set which is not equipped
with avideo input connector.
●When the picture noise appears while copy-protected DVDSare
played, connect the unit directly to aTV set. Do not connect
through aVCR, TV/VCR or AV selector.
●For the speakers and their connection, refer to the instructions
for the AV amplifier.
CAUTION
If the AV amplifier is not equipped with aDTS decoder, do not
select “dts” in the “Audio Output Setting” when connecting the AV
amplifier with an optical connecting cord.
Merely attempting to play aDVD may cause ahigh level of noise
which could be harmful to your ears and damage the speakers. In
such acase, be sure to select “Down Mix PCM” in the “Digital
Stream”.
ENGLISH15

nCONNECTIONS (CONTINUED)
,.
Set the setup menu correctly after connecting!
According to the audio equipment and TV set to which the unit is m
connected, set the ‘rAudioOutput Setting” and “TV Aspec~ of setup ●The player cannot be connected to aTV set which is not equipped
menu correctly referring to the following below. with avideo input connector.
See “CHANGING SETUP VALUE” on page 36 in detail. .When the picture noise appears while copy-protected DVDSare
Audio Output Setting
Digital Stream: Down Mix PCM
played, connect the unit directly to aTV set. Do not connect
through aVCR, TV/VCR or AV selector,
dt~ Output: OFF
Down Mix Type: Surround
TV Aspect
WhenyourTVsetis conventional-screensizeTW NORMALTV
When yourTV set is wide-screen size TV: WIDE TV
16 ENGLISH

4
Rear of TV set
S-video cord
(not supplied)
\
to S-VIDEO OUT terminal h
I
S-video input terminal
(s1 ,S2)
Rear of the unit
to an outlet (AC 120V, 60 Hz)
—
●For the best possible picture clarity, it is recommended that an S
(separate) video cord (not supplied) be used when connecting
the unit to aTV set equipped with an S-video input terminal.
In this case, do not connect the conventional video cord to
the VIDEO OUT jack.
●When the picture noise appears while copy-protected DVDS are
played, connect the unit directly to aTV set. Do not connect
through aVCR, TVIVCR or AV selector.
ENGLISH 17

CONNECTIONS (CONTINUED)
n]TV set or monitor
/\
—
I“ I
u
to an audio input jacks ~
(Left/ white, Right/ red)
Audio/video cord
(supplied)
k
to MIXED AUDIO OUT ,
1
yellow
}
‘B
L(white)/ R(red) jacks ~o
.
.
Rear of the unit
J
to video input jacks
(P,/PBN)
Video cables
(not supplied)
to an outlet (AC 120V, 60 Hz)
Component video output connector (PR/PB/Y)
The component video output connector outputs the different color
signals (PtiPB) and luminance signal (Y) separately in order to
achieve high fidelity in reproducing colors.
The description of the component video output connectors may
differ depending on the TV set or monitor (e.g. PR/PB/YCR/CBN,
R-Y/B-Y/Y, etc.). Refer to the operating instructions of the TV set
for detail.
~8 ENGLISH

Connect headphones to the PHONES jack with astereo
standard plug, and adjust the volume with PHONE LEVEL.
PHONE LEVEL
-Iito PHONES jack
m
Before connection, turn PHONE LEVEL toward MIN.
Installing batteries
Detach the battery cover on the rear of the remote control, and
insert two R6 (size AA) batteries with 0 and 0 aligned correctly.
When to replace the batteries
The maximum operational distance between the remote control
and the sensor of the units should be approximately 5meters (16
feet). If this distance decreases, replace the batteries with new
ones.
●When operating with the remote control, point the top of the
remote control toward the player.
●If the unit is not going to be used for an extended period of time,
remove the batteries to prevent possible electrolyte leakage. m
●The remote control may not operate correctly when:
-The line of sight between the remote control and the unit is
exposed to intense light, such as direct sunlight
-There is fluorescent lighting near the remote sensor in the
display panel window.
-Other remote controls are used nearby (those of aTV set, etc.).
ENGL/SH 19

PLAYBACK (THE BASICS)
3 214 y yu
TITLE AT+
!
o-RETURN ENTER
4
llPAUSE/
STILL pa
ENTER
Numbered
buttons
About the Qsymbol display
●The @symbol will be displayed on the screen if you press
abutton which cannot be used or enter an incorrect number.
●Some DVD discs may have places where they do not allow
pressing the STOi? SKIR or other buttons. The @mark
will be displayed on the screen if you press abutton that is
not allowed in such aplace.
Getting ready to play
.Turn on the television, and set its video source (Video 1, Video
2, Video 3, etc.) to the one connected to the DVD player.
●Turn on the audio device connected to the DVD player. Set its
input source to the one connected to the DVD player.
Press POWER on the DVD player.
The power comes on, and the STANDBY lamp on the
POWER turns green.
Press AOPEN /CLOSE.
The disc tray opens.
Load adisc.
Place adisc in the tray guides (depression), with the label
side facing up. When loading an 8-cm disc, place it in the
inner depression.
Press 40 PEN /CLOSE.
The disc tray closes, and the DVD player automatically
begins to play the disc.
+
If the disc does not begin to play, press >PLAY,
20 ENGLISH
Other manuals for XD-DV300
4
Table of contents
Languages:
Other Aiwa DVD Player manuals