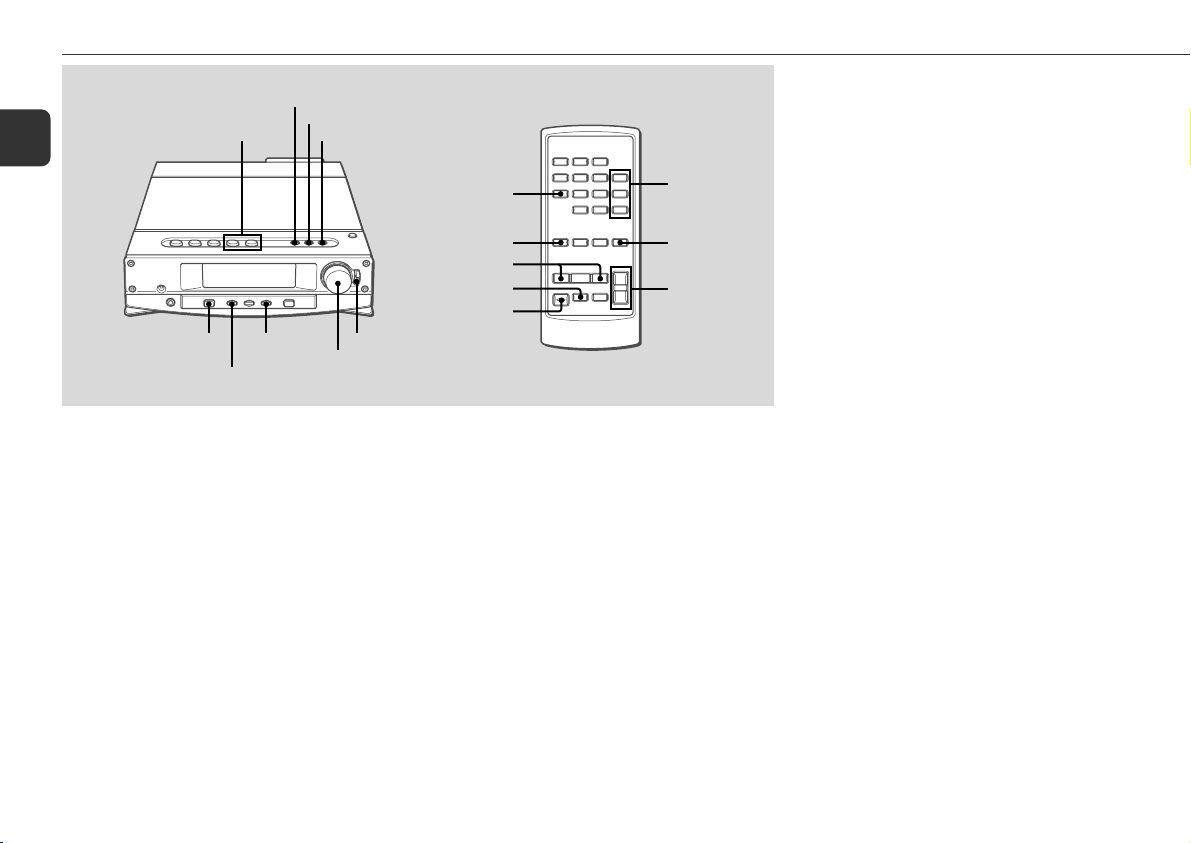
Aiwa XR-X7 User manual

Compact Disc
Stereo System
EZ
XR-X7
8B-CL2-906-01
010325AYK-H-M
En (English)
OPERATING INSTRUCTIONS
E (Español)MANUAL DE INSTRUCCIONES
F (Français)MODE D'EMPLOI
D (Deutsch)BEDIENUNGSANLEITUNG
I (Italiano)ISTRUZIONI PER L’USO
NL
(Nederlands)
GEBRUIKSAANWIJZING
Cz (Česky)NÁVOD K OBSLUZE
M (Magyar)HASZNÁLATI UTASÍTÁS
Po (Polski)INSTRUKCJA OBSŁUGI

2
En
PRECAUTIONS
Read these Operating Instructions carefully and completely
before operating the unit. All precautions in this booklet and
on the unit should be strictly followed.
Keep the Operating Instructions for future reference.
Installation
1Water and moisture —Donot use thisunit nearwater,
such as near a bathtub, washbowl, swimming pool, or the
like.
2Heat—Donotusethisunitnearsourcesofheat,including
heatingvents,stoves,orotherappliancesthatgenerateheat.
It also should not be placed in temperatures less than 5°C
or greater than 35°C.
3Mountingsurface—Placetheunitonaflat,evensurface.
4 Ventilation —Theunit should besituatedwith adequate
space around it so that proper heat ventilation is assured.
Allow10cmclearancefromtherearandthetopofthe unit,
and 5 cm from each side.
- Donotplacetheunitonabed,rug,orsimilarsurfacethat
may block the ventilation openings.
- Do not install the unit in a bookcase, cabinet, or airtight
rack where ventilation may be impeded.
5Objects and liquid entry — Make sure that objects or
liquids do not get inside the unit through the ventilation
openings.
6Cartsandstands—Whenplacedormountedonastand
or cart, the unit should be moved with care.
Quick stops, excessive force, and uneven surfaces may
cause the unit or cart to overturn or fall.
7Condensation — Moisture may form on the CD pickup
lens when.
- The unit is moved from a cold spot to a warm spot
- The heating system has just been turned on
- The unit is used in a very humid room
- The unit is cooled by an air conditioner
Whenthisunithascondensationinside,itmaynotfunction
normally.Should thisoccur, leave theunit forafew hours,
then try to operate again.
8Wall or ceiling mounting — The unit should not be
mounted on a wall or ceiling, unless specified in the
Operating Instructions.
Electric Power
1 Power sources—Connectthisunitonlytopowersources
specified in the Operating Instructions, and as marked on
the unit.
2AC power cord
- WhendisconnectingtheACpowercord,pullitoutbythe
AC power plug. Do not pull the cord itself.
- Never handle the AC power plug with wet hands, as this
could result in fire or shock.
- Power cords should be firmly secured to avoid being
severely bent, pinched, or walked upon. Pay particular
attention to the cord from the unit to the power socket.
- AvoidoverloadingACpowersocketsandextensioncords
beyondtheircapacity,asthiscouldresultinfireorshock.
3When not in use —Unplugthe AC powercord from the
AC power socket if the unit will not be used for several
months or more. When the cord is plugged in, a small
amount of current continues to flow to the unit, even when
the power is turned off.
Maintenance
Clean the unit only as recommended in the Operating
Instructions.
Damage Requiring Service
Have the unit serviced by a qualified service technician if:
- The AC power cord or plug has been damaged
- Foreign objects or liquid have got inside the unit
- The unit has been exposed to rain or water
- The unit does not seem to operate normally
- The unit exhibits a marked change in performance
- Theunithasbeendropped,orthecabinethasbeendamaged
DO NOT ATTEMPT TO SERVICE THE UNIT YOURSELF.
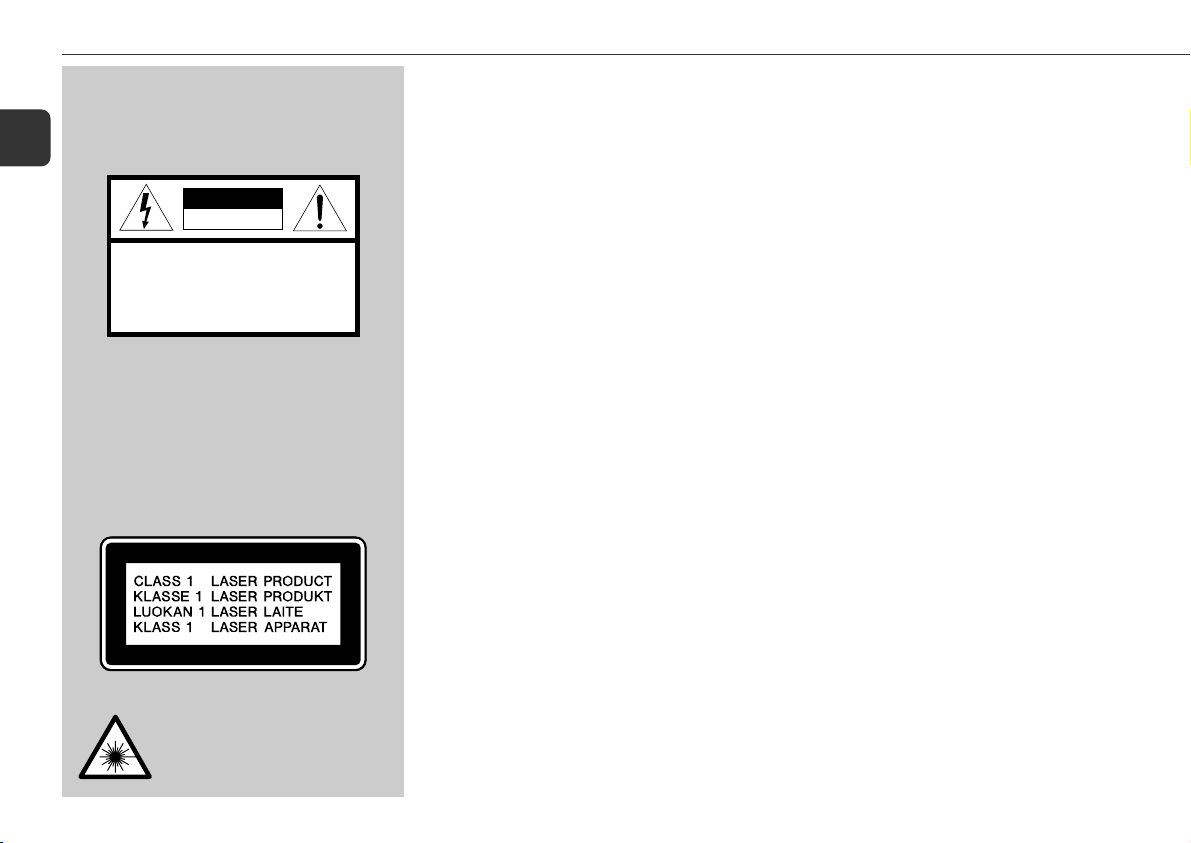
WARNING
TO REDUCE THE RISK OF FIRE OR ELECTRIC SHOCK,
DO NOT EXPOSE THIS APPLIANCE TO RAIN OR
MOISTURE.
“CAUTION:TO REDUCE THE RISK OF
ELECTRIC SHOCK,
DO NOT REMOVE COVER (OR BACK).
NO USER-SERVICEABLE PARTS INSIDE.
REFER SERVICING TO QUALIFIED
SERVICE PERSONNEL.”
CAUTION
RISK OF ELECTRIC SHOCK
DO NOT OPEN
CAUTION
Use of controls or adjustments or performance of
procedures other than those specified herein may result
in hazardous radiation exposure.
ThiscompactdiscplayerisclassifiedasaCLASS1LASER
product.
The CLASS 1 LASER PRODUCT label is located on the
exterior.
CAUTION!
Invisible laser radiation when open and
interlocks defeated. Avoid exposure to
beam.

3
En
System and accessories
Main unit CX-LX7
Speakers SX-LX7
Speakers cords
Remote control
Lithium battery (CR2025)
FM antenna
MW/LW antenna
TABLE OF CONTENTS
PRECAUTIONS .................................... 2
PREPARATIONS .................................. 4
PARTS AND CONTROLS ......................... 5
ADJUSTMENTS BEFORE OPERATION ......... 8
CD OPERATIONS................................ 10
RADIO OPERATIONS ........................... 12
SOUND ADJUSTMENTS........................ 15
TIMER OPERATIONS ........................... 16
REFERENCE ..................................... 18

4
En
Remote control
While sliding the latch, pull out the battery holder from the
bottom of the remote control. Place the supplied battery on
thebatteryholderwithcorrectpolarity.Finally,inserttheholder
back into position.
CR2025
•Whenyouoperatetheremotecontrol,aimtheremotecontrol
at the main unit. When the remote control is operated, the
display colour changes for a few seconds.
•Replace the battery with a new one when the operational
distancebetweentheremotecontrolandmainunitbecomes
shorter.
•Removethebatteryiftheunitis not goingtobeusedforan
extended period of time.
•Theremotecontrolmaynotoperateifitisusedunderintense
sunlight or if its line of sight is obstructed.
Caution!
•Donotkeepthebatterynearmetallicobjectssuchasrings,
bracelets,andkeys.Itmaycausethebatterytoshortcircuit.
•Afterremovingthebattery,besuretokeepitoutofreachof
children. In case it is swallowed, consult a doctor
immediately.
Connection
Plug in the AC power cord to the AC power socket after all
otherconnectionsare made.
1
Connect the speaker cords to the speakers.
Connecttheambercordstothe+terminalsandthesilver
cords to the – terminals.
2
Connect the speakers to the main unit.
Connect the right speaker to the SPEAKERS R terminals
andthelefttotheSPEAKERSLterminals.Theambercords
go to the terminals.
PREPARATIONS
3
Connect the supplied antennas.
ConnecttheFMantennatotheFM75Ωterminalandthe
MW/LW antenna to the MW/LW LOOP terminals.
4
Connect the AC power cord to an AC power
socket.
When the AC power cord is connected to an AC power
socketforthefirsttime,"DEMO"appearsonthedisplay.
TodeactivateDEMO,pressDEMO/ECO/RDSandtheclock
will flash on the display. For setting the clock, see page
9.
Speakers
•Do not short-circuit the and speaker cord leads.
•Do not leave objects generating magnetism or objects
affected by magnetism near the speakers.
Antennas
Keep antennas away from metallic objects, electrical
equipment and cords.
FMantenna:Extendfullyandpositionforthebestreception.
If reception is poor, connect an optional outdoor antenna to
the FM 75 Ωterminal.
MW/LW antenna: Rotate to find the best reception.
MW/LW antenna
FM antenna

5
En
Main unit: rear
1DIGITAL OUT (OPTICAL) jack
CDdigitalsoundsignalscanbeoutputthroughthisjack.
Useanopticalcabletoconnectdigitalaudioequipment.
Removethe dustcapfrom theDIGITALOUT (OPTICAL)
jack. ThenconnectanopticalcableplugtotheDIGITAL
OUT (OPTICAL) jack.
2MW/LW LOOP and FM 75 Ωterminals
Connect the supplied MW/LW and FM antennas.
3SPEAKERS3terminals
Connect the supplied speakers using the supplied
speaker cords.
4AC power cord
1
4 75 6
2 3
PARTS AND CONTROLS
5VIDEO/AUX IN jacks
Acceptanaloguesoundsignalsfromexternalequipment.
Connectexternalequipmentusinganoptionalconnecting
cablewithRCAphonoplugs(redplugtotheRjack,white
plugtothe Ljack).Referalsototheoperatinginstructions
for your equipment.
To switch function to external input, press VIDEO/AUX
(AUXontheremotecontrol)toselecttheAUX(VIDEOor
TV) function.
Tip:
To change a source name in the display, hold down
VIDEO/AUX and press POWER while the power is on.
AUX → VIDEO → TV
6LINE OUT jacks
Analogue sound signals for all functions can be output
throughthese jacks.Use a cablewith RCAphonoplugs
to connect audio equipment.
ConnecttheredplugtotheR jack, andthewhiteplugto
the L jack.
Signals input through the VIDEO/AUX jacks are not
output from the LINE OUT jacks.
73SUPER WOOFER jack
Connectan optionalpoweredsub wooferwitha built-in
amplifier to this jack.

6
En
1aSET
CD: pauses playback.
Radio: stores the received station to preset.
sCLEAR
CD: stops playback.
Radio: clears a preset station.
cPRESET
CD: starts playback.
Radio: tunes in a preset station.
f/r,t/g(TUNING DOWN/UP)
CD: skips to a previous or a succeeding track when
pressed, searches a track in fast forward or reverse
playback when held down.
Radio: manually tunes up or down within the band.
Main unit: front
45
$@
!976
8 0 #
2
1
3
2TUNER/BAND
Selects radio function and the radio band.
3VIDEO/AUX
Selectsthe functionof externalequipment connectedto
the VIDEO/AUX IN jacks.
4CD
Selects CD function.
5zOPEN/CLOSE
Opens or closes the disc compartment.
6PHONES jack
Pluginoptionalheadphonesset with astereominiplug
(ø3.5 mm). Speaker output is cancelled.
7POWER 6STANDBY/ON
Switches the unit on and off (standby).
8DEMO/ECO/RDS
When the unit is turned off: selects DEMO mode, ECO
mode or displays the clock.
When the unit is turned on: selects DEMO mode. Also
takesadvantageoftheRDS(Radiodatasystem)features.
9DISPLAY
CD: displays the track number being played and
remaining time of play.
Radio: displays the frequency of the tuned station.
0COLOR
Selects the display colour.
!QSURROUND
Turns QSURROUND on and off.
@VOLUME/MULTI JOG
Adjusts the volume.
Clock and Timer: sets the time.
Sleep: sets the sleep timer duration.
#ENTER
Determines the mode and the time (clock and timer).
$MODE
Selects T-BASS, BASS, TREBLE, sleep and timer.

7
En
Remote control
Buttons with the same or similar names on the main unit
basicallyhavethe same function.
10–9, +10
CD: selects a track of the specified number.
Radio: tunes in the station with the specified preset
number.
2
Thenumberedbuttonstakeonthesefunctionswhenpressedwith
SHIFTheld down
:
RANDOM/REPEAT
Selects random or repeat CD playback mode.
PROGRAM
Selects programmed CD playback mode.
DISPLAY
TIMER
Selects timer playback setting mode.
SLEEP
Selects sleep-timer setting mode.
CLOCK
Selects clock setting mode.
MONO TUNER
Switches between stereo or monaural FM reception.
3T-BASS
4SHIFT
Holddownwhenpressinganumberedbuttonto change
its function to that printed above the number.
5aSET
cPRESET
f/r,t/g(TUNING DOWN/UP)
sCLEAR
6POWER
7TUNER/BAND
Selects radio function and the radio band.
AUX
Selectsthe functionof externalequipment connectedto
the VIDEO/AUX IN jacks.
CD
Selects CD function.
8EQ
Selects BASS and TREBLE.
9ENTER
0VOLUME (N,M)
6
9
4
3
1,2
5
7
8
0

8
En
ADJUSTMENTS BEFORE OPERATION
Power
Turning the unit on
Press POWER 6STANDBY/ON (POWER on the remote
control).
Alternatively, press TUNER/BAND, CD, or VIDEO/AUX (AUX
on the remote control). Playback will start automatically if a
disc is inserted.
Turning the unit off
Press POWER 6STANDBY/ON again.
The unit goes into standby.
DEMO/ECO/RDS
COLOR ENTER
VOLUME/MULTI JOG
POWER 6STANDBY/ON
VIDEO/AUX
CD
f,g
TUNER/BAND
f,g
CLOCK
SHIFT
aSET
POWER VOLUME
(N,M)
TUNER/BAND,
AUX, CD
ENTER
DEMO
Iftheclockhasnotbeenset,
"DEMO"
appearsonthedisplay
whentheunit is turned off.
To deactivate the DEMO
While "DEMO" is displayed press DEMO/ECO/RDS. The
clock flashes. For setting the clock, see page 9.
ECO mode
Reducespowerconsumption with the followingoperations.
After clock is set, this unit allows you to regulate its power
consumption by displaying nothing on the display while the
power is off. This is called power economizing mode.
Press DEMO/ECO/RDS while the unit is turned off.
Eachpressofthisbuttonchangesthedisplaystatusasfollows:
1Demo display (power economizing mode cancelled)
2Power economizing mode
3Clock display (power economizing mode cancelled)
When power economizing mode is activated
When the unit turns off, "ECO MODE" is displayed for 4
seconds, and everything on the display clears.
Only the red indicator on the POWER button lights to show
that power is being supplied to the unit.
Standby power consumption
When power economizing mode is activated: 1.2 W
When power economizing mode is deactivated: 13 W
Volume
TurnVOLUME/MULTIJOG(pressVOLUME(N,M)
on the remote control).
Adjust from 0 (minimum) to 49 and MX (maximum).
Tip:
Volume level setting is retained during power-off standby. If
theunit isturned offwith the volumeset to21 orhigher, it is
automaticallyturneddownto20thenexttimetheunitisturned
on.
To adjust the volume level of the equipment
connected to the VIDEO/AUX IN jacks
Press VIDEO/AUX (AUX on the remote control) to select the
function of external equipment connected to the VIDEO/AUX
IN jacks, then press for grepeatedly.
The volume level can be adjusted from "AUX MIN"
(minimum),"AUX 1"to"AUX 6",followedby"AUX MAX"
(maximum).

9
En
Setting the clock
1
HolddownSHIFTandpressCLOCKontheremote
control.
When the unit is turned off, you can also press aor
ENTER.
2
Press for gto set the time.
Each press changes the time in 1-minute steps.
Holdingthesebuttonsdownwillvarythetimein10-minute
units.
Ifforgis not pressedwithin4seconds,setting
is cancelled.
•You can also turn VOLUME/MULTI JOG to the right to
advance the time and to the left to move the time back.
Thespeedwithwhichthetimechangesvariesaccording
to how fast you turn VOLUME/MULTI JOG.
3
Press aor ENTER.
Thetime displaystops flashing andthe clockstarts from
00 seconds.
To display the time while the power is on
Hold down SHIFT and press CLOCK on the remote control.
The time will be displayed for 4 seconds.
To switch to the 24-hour standard
Display the time and press swithin 4 seconds.
With each press, the clock alternates between 12- and 24-
hour standard time.
Tip:
Inthe12-hourstandard,"AM12:00"indicatesmidnightand
"PM12:00" noon.
If the clock display flashes when the unit is turned
off
There has been a power interruption. Reset the clock.
Changing the display colour
Youcan presetup to3 ofyourfavouritecoloursyouadjusted.
Thedisplay colour canbe changedto12 differentcoloursand
3 adjusted preset colours (select colour mode). You can also
select 12 different colours and 3 adjusted preset colours for
eachfunction(function colour mode).
Youcanselectbetweenselectcolourmodeandfunctioncolour
mode.
Presetting select colour mode
1
Press COLOR to display "SELECT CL" while the
power is on.
2
Within4seconds,turnVOLUME/MULTIJOGuntil
"COLOR M 1", "COLOR M 2" or "COLOR M 3"
is displayed.
3
Press COLOR.
"AGB" is displayed and "A" flashes.
4
TurnVOLUME/MULTIJOGto select"A","G"
or "B".
-A: adjust amber colour.
-G: adjust green colour.
-B: adjust blue colour.
5
Press COLOR.
6
Turn VOLUME/MULTI JOG to adjust the colour.
"50" is the brightest level.
7
Press COLOR.
8
Repeat steps 4 to 7 to set the desired colour.
9
Press ENTER.
•Ifpowerisinterruptedformorethanapproximately12hours,
allsettingsstoredinmemoryafterpurchaseneedtobereset.
•If you select "00" in each colour, it displays no colour on
the display.
Select colour mode
1
PressCOLOR to display"SELECT CL" whilethe
power is on.
2
Within 4 seconds, turn VOLUME/MULTI JOG to
select the colour.
3
Press ENTER.
Function colour mode
1
Hold down COLOR until "F-CL" is displayed.
2
Within 4 seconds, turn VOLUME/MULTI JOG so
that "CL EDIT" is displayed.
3
Press ENTER.
The source name and colour number flashes on the
display.
Ifthereisnooperationfor4seconds,settingiscancelled.
4
Turn VOLUME/MULTI JOG to select a source,
then press ENTER.
5
Turn VOLUME/MULTI JOG to select the colour,
then press ENTER.
6
Repeat steps 4 and 5 to determine the colours
for other sources.
7
Press ENTER.
Changing the colour mode
1
Hold down COLOR until "F-CL" is displayed.
2
Within 4 seconds, turn VOLUME/MULTI JOG to
select "F-CL ON" or "F-CL OFF".
- F-CL ON: function colour mode
- F-CL OFF: select colour mode
3
Press ENTER.
Ifthereisnooperationfor4seconds,settingiscancelled.

10
En
This unit plays back finalized CD-R/RW discs as well as audio
CDs.
Playing a CD
1
Press CD to select the CD function.
2
Press zOPEN/CLOSE to open the disc
compartment.
Place a disc with the label side up. Then close the disc
compartment.
zOPEN/CLOSE
CD OPERATIONS
3
Press cto start play.
To stop play
Press s.
To pause play
Press a. Press again to resume play.
To skip to the beginning of the current/preceding/
succeeding track
Press for grepeatedly.
To search (playing in fast forward or reverse)
Hold down for g. Release at the desired point.
To remove the disc
Press zOPEN/CLOSE in stop mode to open the disc
compartment.Thenpulloutthediscwhilepressingthecentre
pivot.
Toselectatrackwiththe remotecontrol(Directplay)
Press the numbered buttons to select a track.
- To select track 25, press +10, +10 and 5.
- To select track 10, press +10 and 0.
To change the display in playback mode
Press DISPLAY (hold down SHIFT and press DISPLAY on
the remote control) during play.
The display changes in the following order:
1 Track number being played and elapsed playing time
2 Remaining time of play
•Remainingtimeofplaycannotbedisplayedduringrandom
play or programmed play.
Random/Repeat play
In random play mode the unit plays all the tracks in random
order.In repeatplay modeit playsrepeatedly allthe tracksor
thetrackbeing played. Youcanselect randomandrepeatall
playatthe same time.
1
Hold down SHIFT and press RANDOM/REPEAT
repeatedly to select one of the following modes:
""1": Repeat 1 playback
""": Repeat all playback
"RANDOM": Random playback
"RANDOM "": Random/Repeat all playback
2
Press cto start play.
DISPLAY
VOLUME/MULTI JOG
zOPEN/CLOSE
cPRESET
CD
f,g
DISPLAY
SHIFT
sCLEAR
aSET
sCLEAR
aSET
VOLUME
(N,M)
RANDOM/
REPEAT
0-9,+10
PROGRAM
CD
f,g
cPRESET
Pivot

11
En
To cancel random/repeat play
Hold down SHIFT and press RANDOM/REPEAT repeatedly
until "RANDOM", ""1" or """ disappears.
Direct selection of the tracks with the numbered buttons
cancels random play mode.
To repeat a selected set of tracks
First select the tracks with programmed play (see
"Programmed play" on this page).
Then select repeat playback.
Programmed play
Playsbackup to 30 selectedtracksin programmed order.
1
Hold down SHIFT and press PROGRAM on the
remote control in stop mode.
"PRGM" flashes on the display.
2
Press the numbered buttons on the remote
control to program a track.
-To select the 25th track, press +10, +10 and 5.
-To select the 10th track, press +10 and 0.
The selected track number lights up on the display.
3
Repeat step 2 to program other tracks.
Thetotalnumberofselectedtracksandtotalplayingtime
will be displayed.
4
Press cto start play.
The track number for the current track flashes on the
display.
•Duringprogrammedplay,youcannotselectatrackwiththe
numbered buttons. "Can’t USE" is displayed when you
try to select a track .
•Ifthetotal playing timeofthe program exceeds99minutes
and59seconds,orifatrackwithatracknumberexceeding
30 is programmed, the playing time is displayed as
"- - - -:- - - -".
•You cannot program more than 30 tracks. "FULL" is
displayed.
To check the program
Press for grepeatedly in stop mode. The track
number and program number are displayed in succession.
To clear the program
Presssinstopmode."PRGM"disappearsfromthedisplay.
To add tracks to the program
Repeatstep2beforestartingplay.Thetracksareaddedtothe
end of the program.
To change the programmed tracks
Clear the program and repeat all the steps again.
Notes on CDs
•Do not insert more than one disc.
•Do not tilt the unit with a disc inserted.
•TheunitmaynotplayCD-R/RWdiscsrecordedonpersonal
computers or certain kinds of CD-R/RW recorders.
•DonotattachadhesivelabeltoeithersideofCD-R/RWdiscs,
as doing so may cause malfunction.
•Do not insert an unrecorded CD-R/RW disc. The disc may
be damaged.
•Do not touch the CD pickup lens. If it is soiled, CDs may
not be played normally.

12
En
RADIO OPERATIONS
Manual tuning
1
Press TUNER/BAND repeatedly to select a band.
The unit switches to the radio from any other function
and alternates between FM, MW and LW.
2
Pressforgrepeatedlytotuneinastation.
"TUNE" is displayed when a station is tuned in.
"1" lights up for FM stereo reception.
When a station is tuned in, the display colour changes
for a few seconds.
To search for a station automatically (Auto search)
Hold down for g.
The unit searches for a station and stops at reception.
To stop the search manually, press for g.
•Auto search may not stop at stations with weak signals.
Preset tuning
Preset your favourite stations by either of the following ways
("Manualpresetting"or"Automaticpresetting")andtunethem
indirectlyby using numbers.
Manual presetting
1
Tune in the desired station.
2
Press ato store the station.
The preset number, beginning from "1", appears on the
display.
3
Repeat steps 1 and 2 to preset other stations.
•You cannot store more than 32 preset stations.
"FULL" is displayed.
•Ifpowerisinterruptedformorethanapproximately12hours,
allsettingsstoredinmemoryafterpurchaseneedtobereset.
Automatic presetting
Scansthereceivablefrequencyrangeandstorestunedstations
automaticallywiththe preset number.
1
Press TUNER/BAND.
2
Hold down DEMO/ECO/RDS for 4 seconds until
"AUTO PRESET" is displayed.
3
Press a.
Ifaisnotpressedwithin4seconds,automaticpresetting
is not activated.
The tuning indicator is displayed and scanning begins
with the FM band.
Thefrequencyand the presetnumber(beginningfrom 1)
will be displayed when a tuned station is stored.
The display will return to the first stored station when
scanning is finished.
•TheunitscanstheMWandLWbandsifpresetnumbersare
still available.
•Automaticpresettingclears all thepreviouslystoredpreset
stations.
•If identical RDS stations with alternative frequencies are
detected,onlythestationwiththestrongersignalisstored.
cPRESET
f,g
TUNING UP/DOWN
sCLEAR
aSET
SHIFT
MONO
TUNER
sCLEAR
aSET
0-9,+10 TUNER/
BAND
f,g
cPRESET
TUNER/BAND
POWER 6STANDBY/ON
DEMO/ECO/RDS

13
En
Tuning in preset stations
1
Select the band.
2
Press crepeatedly.
With each press, the station with the succeeding preset
number is tuned in.
You can tune in the desired preset station directly by
pressing the numbered buttons on the remote control.
- To select preset number 10, press +10 and 0.
- To select preset number 15, press +10 and 5.
To clear a preset station
1 Tune in the station by preset tuning.
2 Press s, then press awithin 4 seconds.
Preset station numbers in the band which are higher than
the cleared number decrease by one.
RDS features
RDS(RadioDataSystem)isabroadcastingservicewhichallows
FMstationstosendadditionalinformationalongwiththeregular
radiosignal.
Theadditional informationisderivedfromthefeaturesof RDS
describedbelow.
Program Service station name (PS)
ThestationnameisdisplayedautomaticallywhenanRDSstation
istunedin.
Radio Text (RT)
Youcanseetextinformationsuchasthetitleofasongonthe
display.
Press DEMO/ECO/RDS when tuning in an RDS
station.
If the tuned station is not transmitting text information,
"NO RT" will be displayed.
To return to the regular display
Press DEMO/ECO/RDS again.
Program Type (PTY)
Thisisanidentificationtospecifytheprogrambeingbroadcast
currently.
Press DEMO/ECO/RDS to display a program type
when tuning in an RDS station.
The program type will be displayed for 4 seconds.
If no PTY data or undefined PTY data is being transmitted,
"NO PTY" or "UNDEFINE" will be displayed.
The following PTYs can be received on the unit
*TRAFFIC, NEWS, AFFAIRS, INFO, SPORT, EDUCATE,
DRAMA, CULTURE, SCIENCE, VARIED, POP M, ROCK M,
EASY M (easy listening music), LIGHT M (light classical
music), CLASSICS, OTHER M (other music), WEATHER,
FINANCE, CHILDREN (children’s program), SOCIAL (social
affairs), RELIGION, PHONE IN, TRAVEL, LEISURE, JAZZ,
COUNTRY (country music), NATION M (national music),
OLDIES, FOLK M, DOCUMENT, TEST (alarm test), ALARM.
*The unit identifies TRAFFIC with one of the PTYs.

14
En
PTY search
TheunitcansearchforastationbroadcastingyourdesiredPTY
easily.To doso, youneed topreset everyavailablestationin
advancesincethe unit searches onlythepreset stations.
1
Press DEMO/ECO/RDS repeatedly until the
program type of the currently tuned station is
displayed.
2
Press for gto select a program type.
If for gis not pressed within 10 seconds, the
PTY search will be cancelled.
3
Press c.
If cis not pressed within 10 seconds, the PTY search
will be cancelled.
"NOT FOUND"is displayed ifa suitable stationis not
found, and the unit returns to the previous station.
If there is no button input for 4 seconds in step 2, the
search is not activated.
Tip:
IfTRAFFIC isselected ,the unitsearches for a station which
regularly broadcasts traffic announcements. Therefore, a
detected station may not be currently broadcasting traffic
announcements. You will, however, be able to hear the
announcements in a while.
EON search
Theunitcanleaptoastationwhichhasjuststartedbroadcasting
yourdesiredPTY.
In EON (Enhanced Other Networks information) search, the
unit is in standby mode until the desired PTY begins. As soon
as it begins, the unit "leaps to" another station with the PTY
andreturnsto thepreviouslytuned station whenitends. EON
searchmakesthefunctionabovepossiblewiththehelpofEON
which gives the receivers a cross reference to other stations.
Youneedtopreseteveryavailablestationinadvancesincethe
unitsearchesonly the preset stations.
1
Press DEMO/ECO/RDS repeatedly until the
program type of the currently tuned station is
displayed.
2
Press for gto select a program type.
If for gis not pressed within 10 seconds, the
PTY search will be cancelled.
3
Press a.
If ais not pressed within 10 seconds, the PTY search
will be cancelled.
"EON ON"is displayed for3 seconds andthen theunit
entersthestandbymodewhile"EON"flashes.Whenthe
unit leaps to another station, "EON" flashes rapidly.
If there is no button input for 4 seconds in step 3, the
search is not activated.
To return to the previously tuned station from the
"leaped to" station
Presss.ThestandbymodeforEONsearchisalsocancelled.
To cancel the standby mode for EON search
Press DEMO/ECO/RDS repeatedly so that the program type
display appears. Press sand then press a.
•ThestandbymodeforEONsearchwillnotbecancelledeven
if the unit is turned off.
Note on PTY & EON Search
PTY & EON search do not function under the
following conditions:
- FM stations are not preset.
- Thesignalsofthestationbroadcastingthe desired PTYare
weak.
- FM RDS stations cannot be received.
Clock-Time (CT)
You can automatically set and update the clock on the hour
everyhour justbytuning inanRDS stationsince RDSstations
transmitclocksignals.
1
Press DEMO/ECO/RDS repeatedly to select
"CT ON" while the unit is on and the time is
displayed (see "Setting the clock").
2
Tune in an RDS station.
To deactivate CT function (If the clock is set wrongly
due to an incorrect clock signal)
An RDS signal will update the clock time on the hour every
hour.
Note on RDS features
TheRDSfeaturesdescribedabovemaynotfunction correctly
if the RDS transmission data from the station contains too
much interference or the reception signal is too weak.

15
En
Adjustments
To switch to monaural FM reception
Hold down SHIFT and press MONO TUNER on the remote
controlsothat"MONO"isdisplayed.To cancel,pressagain
to display "STEREO".
Tip:
When FM stereo reception is poor, switching to monaural
reduces noise.
To switch the MW tuning interval
Thedefault settingofthe MWtuning interval is9 kHz/step.If
you use this unit in an area where the frequency allocation
system is 10 kHz/step, change the tuning interval.
HolddownTUNER/BANDandpressPOWERonthemainunit.
Tip:
When the MW tuning interval is changed, all preset stations
are cleared.
BASS
Adjuststhebass level.
1
Press MODE (EQ on the remote control)
repeatedly so that "BASS" is displayed.
2
Within 7 seconds, turn VOLUME/MULTI JOG
(pressVOLUME(N,M)ontheremotecontrol)
to adjust the bass level.
The bass level can be adjusted from "–5" to "+5".
•IfthesoundbecomesdistortedwiththeBASSeffect,cancel
the effect.
SOUND ADJUSTMENTS
VOLUME/MULTI JOG
T-BASS
VOLUME
(N,M)
EQ
MODE
QSURROUND
TREBLE
Adjuststhetreble level.
1
Press MODE (EQ on the remote control)
repeatedly so that "TREBLE" is displayed.
2
Within 7 seconds, turn VOLUME/MULTI JOG
(pressVOLUME(N,M)ontheremotecontrol)
to adjust the treble level.
The treble level can be adjusted from "–5" to "+5".
•If the sound becomes distorted with the TREBLE effect,
cancel the effect.

16
En
T-BASS
Emphasizeslowfrequencies for a powerfulsound.
On the main unit
1
Press MODE repeatedly so that "T-BASS" is
displayed.
2
Within 7 seconds, turn VOLUME/MULTI JOG to
selectoneof thethreeemphaseslevels ortheoff
position.
On the remote control
Press T-BASS repeatedly to select one of the three
emphasis levels or the off position.
•If the sound becomes distorted with the T-BASS effect,
cancel the effect.
Q SURROUND system
The Q SURROUND system built into this unit uses only two
speakers at the left and right to create an atmosphere that
soundsasifyouaresurroundedbytwofrontspeakersandtwo
rearspeakers.
Press QSURROUND repeatedly until
"ON QSURROUND" flows from right to left.
To cancel the Q SURROUND effect
Repeattheabovesothat"OFF QSURROUND"flowsfrom
right to left and the "QSURROUND" indicator goes off.
Tip:
•TheQSURROUNDsystemdoesnotworkinmonauralmode.
•WhentheQSURROUNDsystemisactivated,thesoundmay
be distorted. If this happens, decrease the volume.
TIMER OPERATIONS
Sleep timer
Turnsoffthe unit automatically afteraspecified time.
1
Press MODE repeatedly (hold down SHIFT and
press SLEEP on the remote control).
"SLEEP" is displayed.
2
Press for grepeatedly to set the sleep
timer duration.
With each press, the timer duration changes in 5-minute
stepsbetween5to240minutes.Ifthereisnobuttoninput
for7seconds,thecurrentsettingisenteredautomatically.
The unit turns off after the selected time.
•VOLUME/MULTIJOGisalsoavailableinplaceoff
or g.
To check the remaining time until the unit turns off
PressMODE repeatedly(hold downSHIFT andpress SLEEP
ontheremote control). Theremainingtimeis displayed for7
seconds.
To cancel the sleep timer
Press MODE and turn VOLUME/MULTI JOG (hold down
SHIFT and press SLEEP repeatedly on the remote control)
until "SLEEP oFF" is displayed.
f,g
aSET
POWER 6STANDBY/ON
SHIFT
aSET
ENTER
SLEEP
f,g
TIMER
POWER
TUNER/BAND,
AUX, CD
ENTER
MODE
VOLUME/MULTI JOG
VOLUME
(N,M)
VIDEO/AUX
CD
TUNER/BAND

17
En
Timer playback
Turnsonthe unitata specifiedtimeforthespecifiedduration.
Makesurethe clock is setcorrectly.
1
Select the desired playback source.
2
On the main unit
1 Press MODE repeatedly so that " " is
displayed.
2 Within 7 seconds, turn VOLUME/MULTI JOG
so that " PLAY" is displayed.
On the remote control
Hold down SHIFT and press TIMER.
"5" indicator lights up and " PLAY" appears on the
display. The timer-on time and the source name along
withthetimer-activateddurationappearalternatelyonthe
display.
3
Within7seconds,pressENTER(aontheremote
control).
"5" lights up. The timer-on time and the source name
alongwiththetimer-activateddurationappearalternately
on the display.
4
Pressforgtosetthetimer-ontime,then
press ENTER or a.
5
Press for gto set the timer-activated
duration, then press ENTER or a.
Witheach press,the timer-activatedduration changesin
5-minute steps between 5 to 240 minutes.
Ifthereisnobuttoninputfor4seconds,thecurrentsetting
is entered automatically.
•VOLUME/MULTIJOGisalsoavailableinplaceoff
or g.
6
Adjust the volume and tone for timer playback.
Ifthevolumelevelissetto21orhigher,itisautomatically
turneddownto20whentheunitisturnedonbythetimer.
7
Prepare the source.
To play CD, insert a disc.
Toplay theradio,select theband and tunein thedesired
station.
To play external equipment connected to the
VIDEO/AUX IN jacks, set an external timer for the
equipment so that playback begins at the same time.
8
Press POWER to turn the unit off.
"5"remainsonthedisplaytoindicatethetimerstandby
mode (when ECO mode is deactivated).
Attimer-ontime, the unitturnsonand playstheselected
source. After the specified timer-activated duration, the
unit turns off again.
•Timer playback will not begin unless the unit is turned off
first.
•Connectedequipmentcannotbeturnedonoroffbythebuilt-
in timer of this unit. Use an external timer.
To check the timer setting
Hold down SHIFT and press TIMER.
Thetimer-ontime,thesourceandthetimer-activatedduration
are displayed for 7 seconds.
To change the timer setting
Reset the timer again.
To turn off the timer
On the main unit
Press MODE to display " PLAY" and turn
VOLUME/MULTI JOG so that " OFF" is displayed. Then
press ENTER. "5" disappears from the display.
On the remote control
Hold down SHIFT and press TIMER repeatedly until
"OFF" is displayed. "5" disappears from the display.
Tip:
Your timer setting is retained even if the timer is turned off.
Nexttimethetimeristurnedon,youcanchangeyourprevious
setting, or simply use the same setting again.

18
En
Poor radio reception
•Check the antenna connection. Adjust the antenna to find
the best reception.
•Move the unit and antenna away from other electric
appliances and cords.
The CD player works poorly
•Is the disc correctly inserted?
•Is the disc dirty?
•Is the lens affected by condensation? If so, wait
approximately one hour and try again.
Resetting the unit
If an unusual condition occurs in the display window, reset
the unit as follows:
1 Press POWER to turn off the power.
Ifthe powercannot beturned off,disconnect the AC power
cord, then plug it in again.
2 Hold down sand press POWER on the main unit.
Everything stored in memory after purchase is cleared.
Care and maintenance
Occasionalcareandmaintenanceof theunitandthesoftware
areneededto optimize the performanceofyour unit.
To clean the cabinet
Use a soft and dry cloth. If the unit surfaces are extremely
dirty, use a soft cloth lightly moistened with mild detergent
solution.Donotusestrongsolventssuchasalcohol,benzine
or thinner.
Care of CDs
When a CD becomes dirty, wipe it from the centre out with a
cleaningcloth. Afterplaying aCD, storeit inits case.Do not
keep it in hot or humid places.
Troubleshooting
Ifyourunitfailstoperformproperly,checkthefollowingguide
andtherelevant sections of thismanual.
There is no sound
•Are the speakers and AC power cord connected properly?
The unit shuts off suddenly
•Possiblyashortcircuitinthespeakerterminals.Disconnect
theACpowercordfromtheACpowersocketandreconnect
the speaker cords correctly.
All the display lights turn off when the power is off
•Is ECO mode set to on?
Erroneous display
•Reset the unit. (See "Resetting the unit" on this page.)
REFERENCE

19
En
Specifications
MAIN UNIT CX-LX7
TUNER
FM tuning range 87.5 MHz to 108 MHz
FM usable sensitivity (IHF) 16.8 dBf
FM antenna terminal 75 ohms (unbalanced)
MW tuning range 531 kHz to 1602 kHz (9 kHz step)
530 kHz to 1710 kHz (10 kHz step)
MW usable sensitivity 350 µV/m
LW tuning range 144 kHz to 290 kHz
LW usable sensitivity 1400 µV/m
MW/LW antenna Loop antenna
AMPLIFIER
Power output Rated:16 W+16W(6ohms,T.H.D.
1%, 1 kHz/DIN 45500)
Reference: 20 W + 20 W (6 ohms,
T.H.D. 10%, 1 kHz/DIN 45324)
DIN MUSIC POWER
30 W+ 30 W
Input VIDEO/AUX: 400 mV
Outputs SPEAKERS: 6 ohms or more
PHONES: 16 ohms or more
SUPER WOOFER: 1.0 V
DIGITAL OUT (OPTICAL) jack
LINE OUT jack
CD PLAYER
Laser Semiconductor laser (λ= 780 nm)
D/A converter 1 bit dual
Signal-to-noise ratio 85 dB (1 kHz, 0 dB)
Harmonic distortion 0.08% (1 kHz, 0 dB)
Wow and flutter Unmeasurable
GENERAL
Power requirements 230 V AC, 50 Hz
Power consumption 50 W
Power consumption in standby mode
With ECO mode on: 1.2 W
With ECO mode off: 13 W
Dimensions (W ×H ×D) 249 ×92 ×353 mm
Weight 3.5 kg
SPEAKER SYSTEM SX-LX7
Speaker system 2 way, bass reflex (magnetic
shielded)
Speaker units Woofer: 80 mm cone
Tweeter: 25 mm dome
Impedance 6 ohms
Dimensions (W ×H ×D) 98 ×260 ×191 mm
Weight 1.6 kg
Specificationsandexternalappearancearesubjecttochange
without notice.
NOTE
AIWA CO. LTD. - JAPAN - DECLARES UNDER ITS OWN
RESPONSIBILITYTHATTHEPRODUCTDESCRIBEDINTHIS
MANUAL IS IN COMPLIANCE WITH THE DIRECTIVES OF
D.M28.8.95 No.548,ACCORDING TOTHESTIPULATIONS
OFPARAGRAPH3OFATTACHMENTAOFD.M.25.6.85AND
PARAGRAPH 3 OF ATTACHMENT 1 OF D.M. 27.8.87
(REGULATIONS REGARDING FREQUENCIES).
The above information is only for Italy.

ADVARSEL!
Usynlig laserståling ved åbning, når sikkerhedsafbrydereer
ude af funktion. Undgå udsættelse for stråling.
VAROITUS!
Laitteen käyttäminen muulla kuin tässä käyttöohjeessaa
mainitullatavallasaattaaaltistaakäyttäjänturvallisuusluokan
1 ylittävälle näkymättömälle lasersäteiylle.
VARNING!
Omapparatenanvändspåannatsättänidennabruksanvisning
specificerats, kan användaren utsätta för osnylig laser-
strålning, som överskrider gränsen för laserklass 1.
OBSERVERA
Så länge som apparaten är ansluten till nätet flyter en svag
ström genom densamma, även då den är avstängd. Om man
under en längre tid ej har för avsikt att använda den, drag då
ur nätkabeln.
BEMÆRK
Apparatet er stadig forbundet med lysnettet, så længe stikket
er tilsluttet til stikkontakten, selv om afbryteren er slået fra.
Hvis apparatet ikke bruges i længere tid, skal netledningen
trækkes ud.
ADVARSEL!
Lithiumbatteri - Eksplosionsfare ved fejlagtig håndtering.
Udskiftningmåkunskemedbatteriafsammefabrikatogtype.
Lever det brugte batteri tilbage til laverandøren.
ADVARSEL
Lithiumbatteri - Eksplosjonsfare.
Ved utskifting benyttes kun batteri som anbefalt av
apparatfabrikanten.
Brukt batteri returneres apparatleverandøren.
VARNING
Explosionsfara vid felaktigt batteribyte.
Använd samma batterityp eller en ekvivalent typ som
rekommenderas av apparattillverkaren.
Kassera använt batteri enligt fabrikantens instruktion.
VAROITUS
Paristo voi räjähtää, jos se on virheellisesti asennettu.
Vaihda paristo ainoastaan laitevalmistajan suosittelemaan
tyyppiin.
Hävitä käytetty paristo valmistajan ohjeiden mukaisesti.
Other manuals for XR-X7
2
Table of contents
Other Aiwa Stereo System manuals