AJP PR4 User manual

This manual should be considered a permanent part of the motorcycle and should remain with the
motorcycle when resold or otherwise transferred to a new owner or operator. The manual contains
important safety information and instructions that should be read carefully before start operating the motorcycle.
English version • JUNE 2009
OWNER’S MANUAL PR4
SUPERMOTO • ENDURO
Enduring Experience

! VERY IMPORTANT !
WE STRONGLY RECOMMEND YOU READ THIS MANUAL
CAREFULLY AND COMPLETELY BEFORE GOING ON YOUR
FIRST RIDE. IT COINTAINS A GREAT DEAL OF INFORMATION
AND ADVICE, WHICH WILL HELP YOU USE AND HANDLE
YOUR BIKE PROPERLY. IN YOUR OWN INTEREST, PLEASE
PAY ATTENTION TO NOTICES THAT ARE MARKED AS
FOLLOWS:
! WARNING !
IGNORING THESE INSTRUCTIONS CAN ENDANGER YOUR
BODY AND YOUR LIFE, AS WELL AS OTHER PEOPLE`S LIFES.
! CAUTION !
IGNORING THESE INSTRUCTIONS COULD CAUSE DAMAGE TO
PARTS OF YOUR MOTORCYCLE OR THAT THE MOTORCYCLE
IS NO LONGER SAFE TO RIDE ANYMORE.
TAKE SPECIAL CARE TO FOLLOW THE RECOMMENDED RUN IN,
INSPECTION AND MAINTENANCE INTERVALS. FOLLOWING THESE
GUIDELINES WILL SIGNIFICANTLY INCREASE THE LIFE OF YOUR
MOTORCYCLE. BE SURE TO HAVE ANY MAINTENANCE JOBS
PERFORMED BY AN AUTHORIZED AJP DEALER.
PLEASE DON`T FORGET TO WEAR A HELMET, EYE PROTECTION AND
PROTECTIVE CLOTHING WHEN GOING FOR A RIDE.
WE WISH YOU A LOT OF FUN RIDING YOUR AJP!
AJP MOTOS LDA RESERVES THE RIGHT TO MODIFY ANY EQUIPMENT,
TECHNICAL SPECIFICATIONS, COLOURS AND MATERIALS USED
WITHOUT PREVIOUS ANNOUNCEMENT AND WITHOUT GIVING
REASONS, OR TO CANCEL ANY OF THE ABOVE ITEMS WITHOUT
SUBSTITUTING THEM WITH OTHERS. IT SHALL BE ACCEPTABLE TO
STOP MANUFACTURING A CERTAIN MODEL WITHOUT PREVIOUS
ANNOUNCEMENT. IN THE EVENT OF SUCH MODIFICATIONS, PLEASE
CONTACT YOUR LOCAL AJP DEALER FOR INFORMATION. WE SHALL
NOT BE HELD LIABLE FOR ANY PRINTING ERRORS.
i

ii
TABLE OF CONTENTS
CONSUMER INFORMATION 1
COMPONENTS LOCATION 3
CONTROLS LOCATION 4
CONTROLS 4
KEYS 4
IGNITIONSWITCH 4
DIGITAL SPEEDOMETER 5
LEFTHANDLEBAR 5
RIGHT HANDLEBAR 6
FUEL 6
FUELTANKCAP 6
CHOKEKNOB 7
KICK STARTER LEVER 7
GEARSHIFT LEVER 7
REAR BRAKE PEDAL 7
SIDESTAND 8
SUSPENSION SET-UP 8
ENGINE OIL RECOMMENDATION 9
BREAK-IN (RUNNING-IN) 9
INSPECTIONS BEFORE RIDING 9
RIDINGTIPS 11
ENGINESTART 11
STARTINGOFF 12
USINGTHEGEARBOX 12
BRAKING 13
STOPPING AND PARKING 13
INSPECTION AND MAINTENANCE 15
MAINTENANCE SCHEDULE 15
MAINTENANCE SCHEDULE TABLE 16
MAINTENANCE WORK 17
LUBRICATION POINTS 17
DRIVE CHAIN 18
BRAKES 19
FRONT WHEEL REMOVAL 23
REAR WHEEL REMOVAL 24
TIRES 24
SPOKE TIGHTNESS 25
BATTERY 25
FUSE 26
LIGHT BULB REPLACEMENT 26
AIR FILTER 26
FUEL FILTER 27
THROTTLE CABLE 27
IDLING 27
ENGINE OIL 27
MOTORCYCLE CLEANING 28
CONSERVATION FOR WINTER OPERATION 29
STORAGE PROCEDURES 29
TECHNICAL SPECIFICATIONS 30

CONSUMER INFORMATION
ACCESSORY INSTALLATION AND
PRECAUTION SAFETY TIPS
There is some variety of accessories for
AJP motorcycles. AJP cannot have
direct control over the quality or
suitability of accessories you may want
to purchase. The addition of unsuitable
accessories can lead to unsafe
operating conditions. Please contact
your AJP dealer for assist you in
selecting accessories and install them
correctly.
! WARNING !
Improper accessories or
modifications can make your
motorcycle unsafe and can lead to
an accident. Never modify the
motorcycle with improper or poorly
installed accessories. Follow all
instructions in this owner’s manual
regarding accessories and
modifications. Consult your AJP
dealer if you have any questions.
Certain accessories displace the rider
from his normal position. This limits the
freedom of movement and may limit his
control ability.
Additional electric accessories may
overload the electric system. Severe
overloads may damage the wiring
harness or create a dangerous situation
due to the loss of electric power during
the operation of the motorcycle.
When carrying a load on the
motorcycle, mount it as low as possible
to the machine. An improperly mounted
load can create a high center of gravity
that is very dangerous and makes the
motorcycle difficult to handle. The size
of the load can also affect the
aerodynamics and handling of the
motorcycle. Balance the load between
the left and right sides of the motorcycle
and fasten it securely.
SAFE RIDING RECOMMENDATIONS
FOR MOTORCYCLE RIDERS:
WEAR A HELMET
Motorcycle safety equipments starts
with a quality helmet. One of the most
serious injuries that can happen is a
head injury. ALWAYS wear a properly
approved helmet.
You should also wear suitable eye
protection.
RIDING APPAREL
Loose, fancy clothing can be
uncomfortable and unsafe for
motorcycle riding. Choose good quality
motorcycle riding apparel when riding
your motorcycle. Wear gloves, strong
boots that fit over the ankle, long pants
and long sleeve shirt or jacket.
INSPECTION BEFORE RIDING
Review all the instructions in the
“INSPECTION BEFORE RIDING”
section in this manual. Do not forget to
perform an entire safety inspection to
ensure safety of the rider.
FAMILIARIZE YOURSELF WITH THE
MOTORCYCLE
Your riding skill and your mechanical
knowledge form the basis for safe
riding. We recommend you to practice
riding your motorcycle in an open area
without obstacles until you are
familiarize with your motorcycle and its
controls.
KNOW YOUR LIMITS
Always ride within the limits of your
skills. Knowing your limits and keep
within are the foundation to avoid
accidents and injuries.
BE EXTRA SAFETY CONSCIOUS ON
BAD WEATHER DAYS OR BAD
ROAD CONDITIONS
Riding on bad weather days requires
extra attention. Braking distances
double in a rainy day. If you are not
sure about road conditions ride slower
and with double care!
PR4 User’s manual Page
1

MODIFICATION
Modification of the motorcycle or
removal of original equipment may
render the vehicle unsafe or illegal.
SERIAL NUMBER LOCATION
The frame and/or engine serial number
are used to register the motorcycle.
They are also used to assist your
dealer when ordering parts or referring
to special service information.
to assist your
dealer when ordering parts or referring
to special service information.
Chassis numberChassis number
The chassis number is stamped on the
right side of the steering head tube.
The chassis number is stamped on the
right side of the steering head tube.
Chassis
number
Engine numberEngine number
The engine number is stamped into the
left side of the engine below the engine
sprocket, between gearshift lever and
the oil cap.
The engine number is stamped into the
left side of the engine below the engine
sprocket, between gearshift lever and
the oil cap.
Engine
number
PR4 User’s manual Page
2

10 Fuel tank cap
11 Fuel tank
12 Gearshift lever
13 Foot-rest
14 Side rest
1 Rear brake fluid reservoir
2 Air filter
3 Fuse
4 Battery
5 Spark plug
6 Oil dipstick
7 Kick-starter
8 Rear brake pedal
9 Oil level glass
COMPONENTS LOCATION
ENDURO, SUPERMOTO
1
3
2
4
5
6
7
9
8
10
11
12
13 14
PR4 User’s manual Page
3

CONTROLS LOCATION
1 Clutch lever
2 Blinker, lights, horn switch
3 Front brake lever
4 Starter button and On-Off switch
5 Neutral sign
6 Headlight sign
7 Turn light sign
8 Digital speedometer
9 Ignition switch
10 Throttle grip
11 Rear view mirrors
CONTROLS
KEYS
This motorcycle comes with a pair of
keys. Be aware to keep one of the keys
in a safe place, at home for instance, in
order to let you access this key in case
of need.
IGNITION SWITCH
LOCK position – all electrical circuits
are cut off and the engine will not start.
The steering lock is actuated and the
handlebar cannot turn. The key can be
removed. To pass to lock position, the
switch must be in OFF position and the
pushed down and turned to the left. The
handlebar must be turned all the way to
the left.
OFF position - all electrical circuits are
cut off and the engine will not start. The
key can be removed.
ON position – the ignition circuit is on
and the engine can now be started. The
key cannot be removed from the
ignition switch.
! CAUTION !
To activate LOCK position, the
switch must be in OFF position, then
pushed down and turned to the left.
Handlebar should be turned all the
way to the left. If not, the switch will
not pass to LOCK position.
! CAUTION !
Don’t try to ride with the switch on
LOCK position. The steering is
locked and control of the motorcycle
is impossible.
Don’t turn the ignition key to LOCK
position while driving!
.
Note: Start engine as soon as you turn
key to ON position. Otherwise battery
will loose power due to the
consumption of the digital speedometer
and headlight and taillight, if turned on.
LOCK
OFF ON
10
11 11
PR4 User’s manual Page
4

DIGITAL SPEEDOMETER
The digital speedometer is not available
for the MX and MX PRO versions.
It gives information about instantaneous
speed and total or trip distance
travelled. Depending on the selling
market, speed and distance are
indicated in Kilometres or miles. If you
want to switch between these units,
please contact your AJP dealer.
To switch from total to trip distance
push button 1. To reset trip distance the
trip distance must be selected; then
push button 1 until the distance is reset
to zero.
LEFT HANDLEBAR
1 – Clutch lever
The clutch lever is used for disengaging
the drive to the rear wheel when
starting the engine or shifting the
transmission gear. Squeezing the lever
disengages the clutch.
2 – Parking light on
With the light knob in this position,
parking lights in the headlight and
taillight will be switched on.
3 – Lights off
In this position, no lights will be
switched on.
4 – Low beam on
In this position, low beam light will be
on in the headlight and presence light
will be on in the taillight.
1
5 – High beam on
In this position, high beam light will be
on in the headlight and presence light
will be on in the taillight.
6 – Turn sign on
Turning this button left left turn lights
will be on. Turning right, right turn lights
will be on. To switch turn lights off,
place the button in middle position.
7 – Horn
To actuate horn, press this button.
! CAUTION !
In several countries, motorcycle
riding is only allowed with low beam
on! Respect your national
legislation!
! CAUTION !
Turn lights are not switched off
automatically! Be aware to switch
turn lights off after turning or
overtaking! Otherwise you will give
wrong information about your riding
to other drivers!
1
2
3
4
5
7
6
PR4 User’s manual Page
5

RIGHT HANDLEBAR
1 – Throttle grip
Engine speed is controlled by the
position of the throttle grip. Rotate it
toward you to increase engine speed;
turn it away to decrease engine speed.
2 – Front brake lever
Front brake is applied by squeezing
brake lever gently toward the throttle
grip.
3 – Electric start button
This button is used for turning the
starter motor. With the ignition switch in
the ON position, the transmission in
neutral, starter switch on, pull the clutch
lever and push the electric start button
to engage the starter motor and start
the engine.
4 – Emergency switch
This switch has two positions: to the left
enables engine running, to the right
stops engine running. Be aware that
this switch is switched ON for engine
starting.
! CAUTION !
If EMERGENCY SWITCH is not ON,
engine will not start! Start motor will
not be actuated!
! CAUTION !
The EMERGENCY SWITCH should
be used to stop the engine in
emergency situations! Do not use it
to stop the engine when driving
otherwise the ignition system will be
destroyed!
FUEL
PR4 125 and 200 engine needs
unleaded premium gasoline with an
octane number of 95 or higher. Never
use leaded fuel to avoid destroying
catalytic converter and the exhaust
system.
! WARNING !
Using not recommend fuel can
cause severe damages on engine!
Be sure to use only unleaded
gasoline with an octane index equal
or higher than 95!
FUEL TANK CAP
Turn the fuel tank cap counter-
clockwise to open it. Turn clockwise to
close and tighten it securely.
! WARNING !
Gasoline is highly flammable and
poisonous. Extreme caution should
be used when handling gasoline.
- Do not refuel motorcycle near open
flames or burning cigarettes.
- Always switch off engine before
refuelling
- Be careful not to spill gasoline on
the engine or exhaust pipe while the
engine is hot
- Wipe up spills promptly.
- If gasoline is swallowed or
splashed in the eyes, seek a
doctor’s advice immediately.
- Keep children and pets away.
1
23
4
1
PR4 User’s manual Page
6

! CAUTION !
Because of the transparent fuel
tank, there is not fuel indicator or
light warning! Control fuel level
when you start the motorcycle and
when you are riding for some time!
CHOKE KNOBCHOKE KNOB
PR4 125 and 200 carburettor is
equipped with a choke system to
provide easy starting when the engine
is cold. When the engine is cold, pull
the lever up; it has two positions: the
first (1) is for when engine temperature
is more than 20º; the second (2) is for
when engine temperature is below 20º.
Choke works best when throttle is on
closed position. When the engine is
warm- above 40º- you do not need to
use choke for starting (0).
KICK STARTER LEVERKICK STARTER LEVER
PR4 125 and 200 are equipped with a
kick-start lever, just in case electric start
fails. Kick-starter lever is mounted on
the right side of the engine and its
upper part can be swivelled. To be
actuated it should be rotated outside.
PR4 125 and 200 are equipped with a
kick-start lever, just in case electric start
fails. Kick-starter lever is mounted on
the right side of the engine and its
upper part can be swivelled. To be
actuated it should be rotated outside.
! WARNING !
If you want to start engine, make
sure you always wear rigid footwear,
like motorcycle boots, in order to
avoid injuries. You might slip of the
kick-starter or engine may kick back
and hit your leg very strongly!
Always kick kick-starter briskly all
the way without opening the throttle;
if you don’t do it with enough
momentum and with throttle open,
kick back hazard will increase!
! WARNING !
Be sure kick-starter lever is returned
to its home position after starting the
engine.
An improperly retracted kick-starter
lever can interfere with rider control!
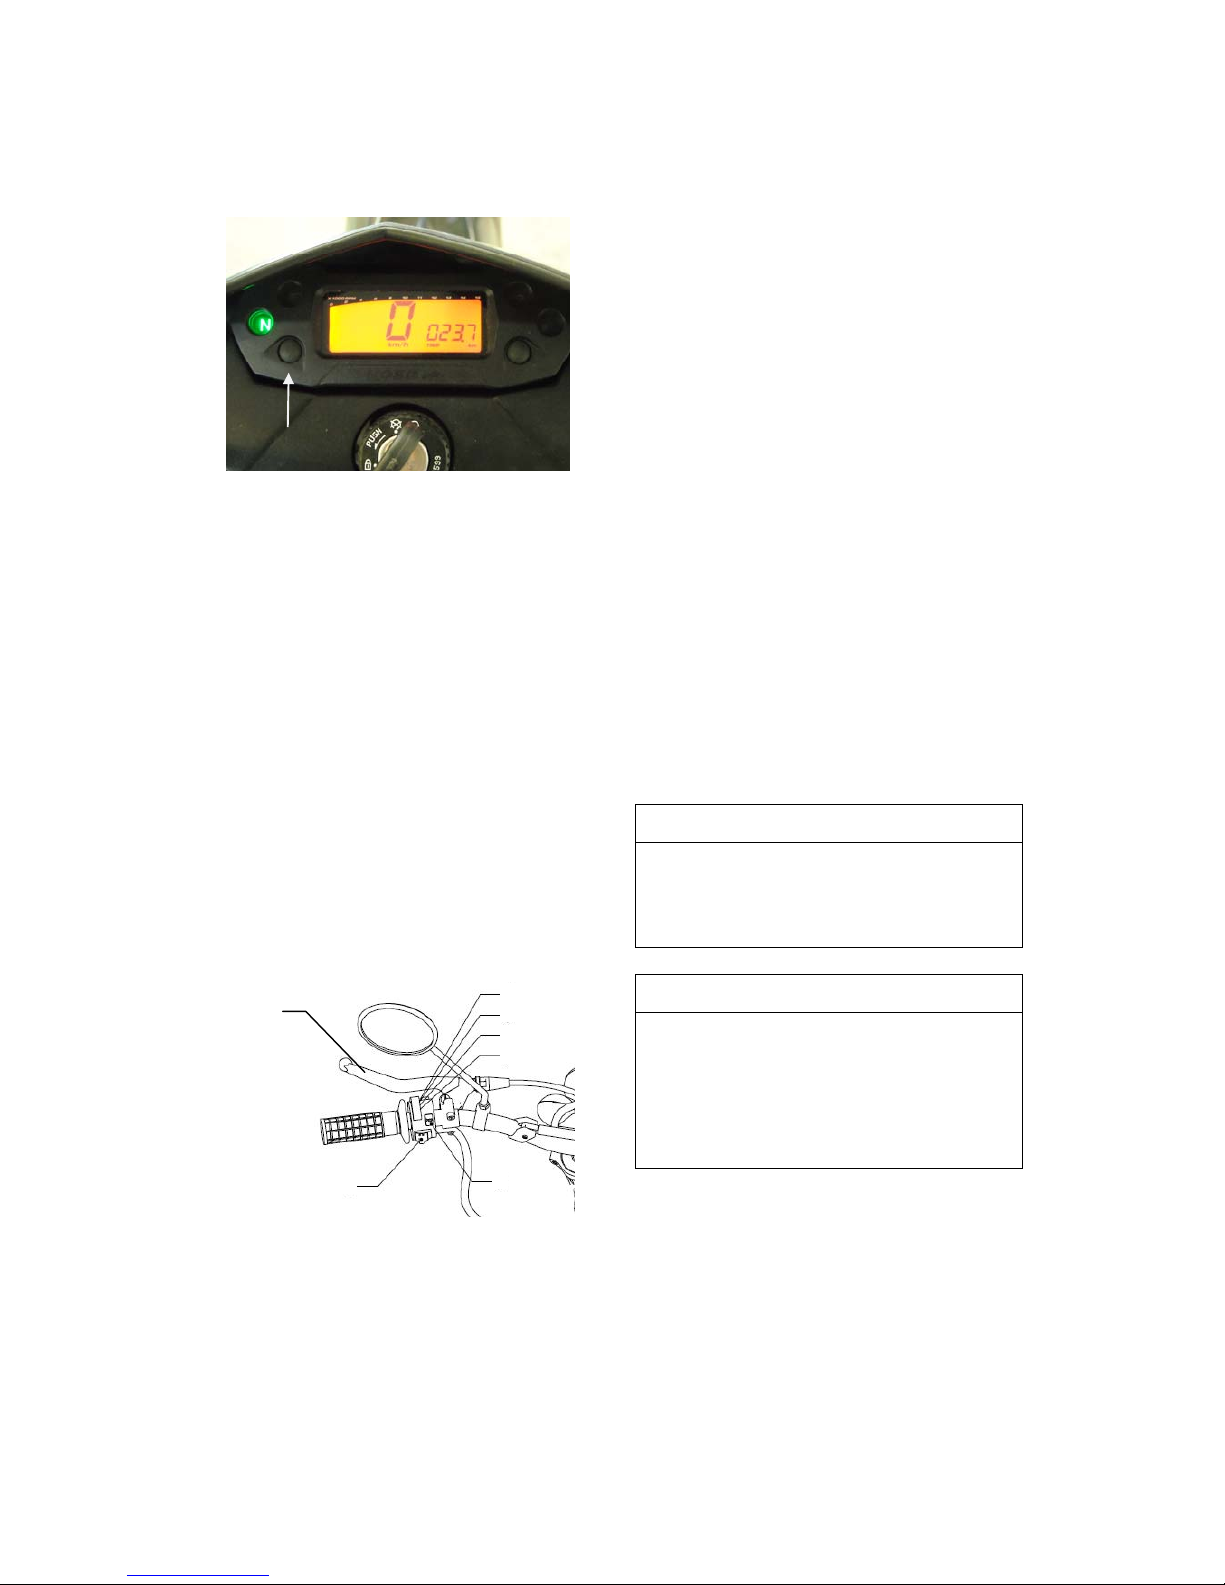
GEARSHIFT LEVER
PR4 125 and 200 have a 5-speed
transmission. Shift lever is mounted on
the left side of the engine. The position
of the gears is shown in the illustration.
Neutral is located between first and
second gear.
2
To shift properly, pull the clutch lever
and close he throttle at the same time
you operate gearshift lever. Lift the
lever to up-shift and depress to
downshift.
1
0
REAR BRAKE PEDAL
The foot brake pedal is disposed in
front of the right footrest. Depressing
the rear brake pedal will apply the rear
brake.
PR4 User’s manual Page
7

! WARNING !
If opposition of hand brake lever or
rear brake pedal fells “spongy” (too
much give), this is an indication that
the brake system is not functioning
well. Don’t ride anymore your
motorcycle without first having the
brake system checked by an AJP
dealer!
SIDE STAND
Push the side stand to the ground with
your foot and load it with the
motorcycle. Make sure that you put the
motorcycle on solid ground and in a
secure position.
! CAUTION !
The side stand was designed only
for the weight of the motorcycle. If
you get on the motorcycle and thus
put additional weight, the side stand
or frame can be damaged and the
motorcycle may fall on the side!
! CAUTION !
Park the motorcycle on solid level
ground to help prevent it from falling
over.
If you must park on an incline, aim
the front of the motorcycle uphill and
put the transmission into 1st gear to
reduce the chance of rolling off the
side stand.
SUSPENSION SET-UP
Front suspension adjustment
PR4 is equipped with a non-adjustable
front fork.
Rear suspension adjustment
PR4 is equipped with a shock absorber
that allows only pre-charge setting.
To adjust pre-charge loose first the
upper nut (1), then turn adjusting nut (2)
clockwise for more pre-charge or
counter clockwise for less pre-charge.
! WARNING !
Improper servicing of the rear shock
absorber assembly is dangerous.
The rear shock absorber contains
high-pressured gas and can explode
if improperly serviced.
! WARNING !
Always check if you have folded
back the side stand before each
ride. If the side stand touches the
ground while you drive, you may
loose control of your motorcycle!
12
PR4 User’s manual Page
8

ENGINE
OIL RECOMMENDATION
Use a premium quality 4-stroke motor
oil to ensure longer service life of your
motorcycle. Use only oils that meet or
surpass quality requirements of API
classes SF or SG:
SAE 10W/40 or 15W/40 API SF or SG
Oil level
Engine oil level can be checked in the
glass in front of rear brake pedal. Oil
level should be between the two lines in
the glass. If oil level is below the lower
line, refill immediately. If your engine is
losing oil, contact an AJP dealer
immediately.
! WARNING !
Insufficient oil or poor quality oil
results in premature wear of the
engine and may cause severe
damages!
BREAK-IN (RUNNING-IN)
The following explains why is so
important proper break-in to achieve
maximum life and performance from
your new AJP.
Even very precisely machined sections
of engine components have rougher
surfaces than components that have
been sliding across one another for
quite some time; therefore, every
engine needs to be broken in during the
first 1,000Kms.
For this reason, do not load engine
more than 50% of its capacity during
the first 500 kilometres, avoiding full-
throttle. In the following 500 kilometres,
you may load the engine up to 75% of
its capacity, using the gearbox
frequently.
Allow sufficient idling time, about 1-2
minutes, after warm or cold engine start
up before applying load or revving the
engine. This allows time for the
lubricating oil to reach all critical engine
components.
Observe your first and most critical
service. The 1000 Kms service is the
most important service your AJP will
receive. All adjustments will be
restored, all fasteners and spokes will
be tightened and dirty oil and oil filter
will be replaced.
Máx
Min ! WARNING !
Incorrect break-in may cause severe
damage to your motorcycle or
significantly reduce your motorcycle
lifetime!
INSPECTIONS BEFORE
RIDING
Check the following before each
start
When you start off, the motorcycle must
be in perfect mechanical condition. For
safety reasons, you should make a
habit of performing an overall check
before each start.
The following checks should be
performed:
1 – Oil level. Insufficient oil results in
premature wear in engine components
and damages in engine itself.
2 - Fuel. Check there is sufficient fuel in
the tank;
PR4 User’s manual Page
9

3 - Drive chain. A loose chain can fall
from the chain wheels; an extremely
worn chain can tear and insufficient
lubrication can result in excessive wear
to the chain and chain wheels.
Excessive tensioning of the chain will
put additional load on the components
of the secondary drive train (chain,
bearings of transmission and rear
wheel). Aside from resulting premature
wear, the chain may even rupture or the
transmission axle may break.
4 - Tyres. Check for cuts or dents and
replace tyres if necessary. The tread
must also comply with legal regulations.
Check air pressure; insufficient tread
and incorrect air pressure deteriorate
driving performance.
5 - Brakes. Check correct functioning
of the braking system and brake fluid
level in both reservoirs. The reservoirs
have been designed in such a way that
brake fluid does not need to be refilled
even when brake pads are worn. If the
level of brake fluid falls below the
minimum value, this indicates a
possible leak or completely worn pads.
Manage for the brake system to be
checked by an AJP dealer, as complete
failure of the system can be avoided.
Also check status of the brake hoses
and the thickness of brake linings, as
well as free travel of hand brake lever
and foot brake pedal.
6 - Electric system. Check correct
functioning of headlamps, taillights,
brake lights, indicators, control lamps
and horn while the engine is running.
7 - Luggage. If you are taking any
luggage with you, check that it is
securely fastened.
8 – Steering – Check for smoothness,
no restriction on movement and no play
or looseness.
9 – Throttle – Check for correct play,
smooth operation and positive return to
the closed position.
10 – Clutch – Check for correct play,
smoothness and progressive action.
11 – Suspensions – Check
suspensions for smooth movement.
12 – Engine stop switch – Check for
correct function.
! WARNING !
Checking maintenance items when
the engine is running can be
hazardous. You could be severely
injured if your hands or clothing get
caught in moving parts!
! WARNING !
Failure to run these inspections and
maintain your motorcycle properly
increases the chance of an accident
or equipment damage
Always perform a pre-ride inspection
before each ride. Refer to the list
behind for check items. For further
details, refer to the INSPECTION
AND MAINTENANCE section.
! WARNING !
Using worn, improperly inflated or
incorrect tires will reduce stability
and can cause an accident.
Follow all instructions in the TIRES
section.
PR4 User’s manual Page
10

RIDING TIPS
Instructions for initial operation
- Verify if your AJP dealer performed a
previous preparation of the motorcycle.
- Read this manual carefully before you
ride.
- Familiarize yourself with all the
operating controls.
- Get used to the handling of the
motorcycle on an empty parking lot or
open space, before going for a longer
ride. Try also to drive as slow as
possible and in sitting position to
improve your feeling of the motorcycle.
- Hold the handlebar with both hands
and leave your feet on the footrests
while driving.
– Remove your foot from the brake
pedal when you are not braking. If the
brake pedal is not released the brake
pads will rub continuously and the
braking system will overheat.
- Do not make any changes to the
motorcycle and use always AJP original
spare parts for safety reasons.
- Motorcycles are sensitive to changes
in the weight distribution. If you are
taking any luggage with you, secure it
as close as possible to the middle of
the motorcycle, in order to distribute the
weight for both wheels.
ENGINE START
Starting when the engine is cold
1- Swing up the side stand and turn
the ignition key on.
2- Put the gear in neutral (the neutral
pilot lamp will light up).
3- Operate the choke lever all the way
up.
4- Check if the emergency switch is
on running position.
5- Operate the electric start button or
kick the kick-starter briskly all the
way without touching the throttle.
! CAUTION !
Never actuate electric starter for
more than 5 seconds and with
lights on. Wait at least 5 seconds
before trying again.
! WARNING !
Before you start off, check the side
stand has been fully swung up. If
the side stand drags on the ground,
the motorcycle goes out of control.
Always turn on the light to make
sure that other drivers become
aware of you as early as possible.
! WARNING !
Never ride your motorcycle with full
load or rev the engine when cold.
Because the piston is warming up
faster than the cylinder, it can
cause engine damage.
Starting when the engine is warm
1- Swing up the side stand and turn
the ignition key on
2- Put the gear in neutral
3- Check if the emergency switch is
on running position.
4- Operate the electric start button or
kick the kick-starter briskly all the
way without touching the throttle.
! WARNING !
- Wear suitable clothing when
driving a motorcycle. Never forget to
wear a helmet, gloves and boots,
even in short trips. Protective
clothing should be brightly coloured
to make you more visible to other
drivers.
- Always turn on the lights to make
sure that other drivers become
aware of you as early as possible.
- Do not drive after having
consumed alcohol or drugs.
- Use only original spare parts and
accessories.
- Front and rear tires are allowed to
be fitted only with tires having the
same original profile type.
PR4 User’s manual Page
11

What to do when the engine is
“flooded”
In the event of a fall, more fuel than
necessary may get into the engine. In
order to “pump the engine free”, fully
rev up the engine, actuate the kick-
starter 5 to 10 times or actuate the
electric starter twice for 5 seconds
each. Then, start the engine as
described above.
If the engine fails to start, unscrew the
spark plug and dry it.
NOTE: PR4 carburettor is equipped
with an acceleration pump (Power Jet).
Each time you open the throttle, extra
fuel is pumped to engine inlet.
Therefore, when starting, you should
take care to open the throttle
progressively (or full) in one time.
STARTING OFF
Pull the clutch lever and put the engine
into first gear. Slowly release the clutch
lever and open the throttle at the same
time.
USING GEARBOX
The first gear is referred as the drive or
uphill gear. Depending on the
conditions (traffic, hill size, etc.), you
can shift to a higher gear. Close
throttle, at the same time you pull clutch
lever and shift to the next higher gear.
Let clutch go again and give gas. If you
turned on the choke lever, make sure
you turn it off again as soon as engine
is warm.
When you reach full speed by opening
the throttle all the way, turn throttle
back to ¾; the speed hardly decreases
and the engine will use less fuel.
Only give as much gas as the engine
can handle. Through quick and high
revving of throttle, the fuel consumption
increases.
By shifting down, use the brakes if
necessary and close throttle at the
same time. Pull clutch lever and shift
down to the next gear. Let clutch lever
go slowly and open throttle or shift
down again.
! WARNING !
- If you want to start the engine with
kick start pedal, make sure you
always put on rigid motorcycle boots
in order to avoid injuries. You might
slip off the kick-starter or the engine
may kick back and hit your foot
upward very strongly.
- Always kick kick-starter briskly all
the way without opening the throttle;
if you don’t do it with enough
momentum and with the throttle
open, kick back hazard will increase.
- Do not start the engine or allow it
to idle in a closed area. Exhaust
gases are poisonous and can cause
loss of consciousness and even
death. Always provide adequate
ventilation while the engine is
running.
- Never leave engine running for a
more than 5 minutes while the
motorcycle is parked: engine will
overheat and severe damage may
occur.
PR4 User’s manual Page
12

BRAKING
Apply both brakes at the same time
with the throttle closed. When driving
on sandy, wet or slippery ground use
mainly the rear brake. Avoid blocking
the wheels, otherwise you may skid or
fall; also you can change down to a
lower gear depending on your speed.
Use the braking effect of the engine
when driving downhill to assist the
brakes; change down one or two gears
but do not over-speed the engine. This
way, you will not need to use the
brakes so much and avoid overheating.
! WARNING !
- In case of rain, after washing the
motorcycle, after rides through water
and wet off-roads tracks, wet or dirty
disc brakes can delay the braking
effect. Brakes must be then
actuated until disc brakes are dry or
clean.
- Dirty brake discs cause increased
wear of brake pads and discs.
! WARNING !
Hard braking while turning may
cause wheel skid and loss of
control.
Brake before you begin to turn.
STOPPING AND PARKING
Apply the brakes fully and put the
engine into neutral. To turn off the
engine, apply the emergency off button
or turn the key to OFF position on the
ignition switch with the engine at idling
speed until the engine stops. Park on
an area where the ground is firm and
lock the motorcycle.
! CAUTION !
- High RPM rates when engine is
cold have an adverse effect on the
life of your engine. We recommend
you to run the engine in a
moderate RPM range for 5/10
Kilometers/miles giving it the
chance to warm up.
- Never have the throttle wide open
when shifting down a gear. The
engine will over-rev, damaging the
valves.
- If any abnormal vibrations occur
while driving, check that the engine
fastening bolts are tight. If it
remains contact an authorized AJP
dealer.
- If you notice any unusual
operation-related noise while riding,
stop immediately, shut the engine
off and contact an authorized AJP
dealer.
- Never start your motorcycle
without air filter in place, otherwise
dust and dirt may enter to the
engine and cause increased wear
or damage.
! WARNING !
Hard braking on wet, loose, rough or
other slippery surfaces can cause
wheel skid and loss of control.
Brake lightly and with care on
slippery or irregular surfaces.
! WARNING !
Each time you brake, brake discs,
pads, callipers and brake fluid heat
up. The hotter these parts get, the
weaker the braking effect; in
extreme cases, the entire braking
system can fail!
! WARNING !
Inexperienced riders tend to under
use front brake. This can cause
excessive stopping distance and
lead to a collision. Using only front
or rear brake can cause skidding
and loss of control.
Apply both brakes evenly and at the
same time.
PR4 User’s manual Page
13

! WARNING !
- Observe traffic regulations and
drive defensively, trying to look
ahead as far as possible so that any
hazards can be recognized as early
as possible.
- Adjust your driving speed
according to the conditions and your
driving skills.
- Drive carefully in unknown roads or
unfamiliar trials.
- When driving off-road, always have
a friend on a second motorcycle to
make you company, so you can help
each other if some problem
happens.
- Replace helmet visor or goggle
lens when scratched or damaged. If
bright light shines through a
scratched, the driver will be blinded.
- In case of a fall, check all functions
thoroughly before start operating the
motorcycle.
- Do not repair twisted handlebar:
Replace it immediately.
Note regarding side stand:
Push the side stand to the ground with
your foot and load it with the
motorcycle. Make sure that you put the
motorcycle on solid ground and in a
secure position. Just in case, you can
shift into first gear.
! CAUTION !
Side stand was designed only for
the weight of the motorcycle. If you
get on the motorcycle and thus put
additional weight, side stand or
frame can be damaged and the
motorcycle may fall on the side.
! WARNING !
- Never leave your motorcycle
without supervision if the engine is
running or with children nearby.
- Motorcycle engines produce a
great amount of heat when running.
Engine, exhaust pipe, muffler, brake
callipers and shock absorber can
become very hot. Do not touch any
of these parts after operating the
motorcycle or allow children to come
nearby.
- Take care to park the motorcycle
where pedestrians are not likely to
touch it and get burned.
- Never park your motorcycle in
places where there is fire hazards,
such as dry grass or other easily
flammable materials.
PR4 User’s manual Page
14

PR4 User’s manual Page
15
INSPECTION AND
MAINTENANCE
MAINTENANCE SCHEDULE
The chart indicates intervals between
periodic services in Kilometres. At the
end of each interval, be sure to inspect,
check, lubricate and service as
instructed. If your motorcycle is used
under high stress conditions such as
continuous full throttle operation or is
operated in a dusty climate, certain
services should be performed more
often to insure reliability of motorcycle
as explained in maintenance section.
Your AJP dealer can provide you with
further guidelines.
Steering components, suspension and
wheel components are key items and
require very special and careful
servicing. For maximum safety we
suggest that you have these items
inspected and serviced by your
authorized AJP dealer.
! WARNING !
Do not start the engine or allow it to
idle in a closed area. Exhaust gases
are poisonous and can cause loss of
consciousness and even death.
Always provide adequate ventilation
while the engine is running.
! WARNING !
It is owner’s responsibility to assure
that motorcycle is serviced within
this periodic maintenance schedule.
AJP does not assume any damage
if maintenance is not performed as
schedule.
! WARNING !
Improper maintenance or failure
performs of recommended
maintenance increases the chance
of accident or motorcycle damage.
Always follow inspection and
maintenance recommendations and
schedules in this owner’s manual.
Ask your AJP dealer to do the
maintenance items marked with an
asterisk (*). You may perform the
unmarked maintenance items by
referring to instructions in this
section, if you have mechanical
experience. If you are not sure how
to do any of the jobs, have your AJP
dealer to do them.
! CAUTION !
Using poor quality replacement
parts or materials can cause your
motorcycle to wear more quickly
and may shorten its useful life.
Use only genuine AJP replacement
parts.

MAINTENANCE SCHEDULE TABLE
1.000 3.000 5.000 7.000 9.000 11.000 13.000 15.000
KMS KMS KMS KMS KMS KMS KMS KMS
ENGINE OIL LEVEL (1) CHECK DAILY
ENGINE OIL (2) R R R R R R R R
OIL FILTER (2) C C C C C C C C
OIL FILTER ROTOR C C
FUEL HOSES I I I I I I I I
FUEL FILTER R I R I R I R I
AIR FILTER (3) I C I C I C I R
CARBURETOR, IDLE SPEED SETTING I C/A I C/A I C/A I C/A
ACCELERATOR CABLE I A/L A/L A/L A/L A/L A/L A/L
SPARK PLUG I R I R I R I
VALVE CLEARANCE I I A I A I A I
DISTRIBUTION CHAIN I A I A I A R
TRANSMISSION CHAIN CHECK, LUBRICATE EACH 500KMS
BRAKE PADS I I I I I I I I
BRAKE FLUID (4) I I I I I I I I
WHEELS, SPOKES A I I I I I I I
TIRES I I I I I I I I
CLUTCH CABLE I A/L I A/L I A/L I A/L
SIDE STAND I I I I I I I I
STEERING BEARINGS I I I I I L I I
FRONT SUSPENSION I I I I R I I I
BOLTS, NUTS, CLAMPS I I I I I I I I
BATTERY I I I I I I I I
EXHAUST SYSTEM I I I I I I I I
ELECTRIC SYSTEM I C I C I C I C
LIGHTS, HORN I I I I I I I I
Note: I = Check, C = Clean, L = Lubricate, A = Set/Adjust, R = Replace
(1) IT IS VERY IMPORTANT TO CHECK THE ENGINE OIL LEVEL DAILY AND TO
ADD IF NECESSARY
(2) ENGINE OIL MUST BE CHANGED EVERY 2,000 KMS AND THE OIL FILTER
CLEANED
(3) CLEAN MORE FREQUENTLY IF THE MOTORCYCLE IS USED IN DUSTY, WET
OR MUDDY CONDITIONS
(4) REPLACE BRAKE FLUID EVERY 2 YEAR
PR4 User’s manual Page
16

MAINTENANCE WORK
! WARNING !
Improper maintenance or failure
performs of recommended
maintenance increases the chance
of accident or motorcycle damage.
Always follow inspection and
maintenance recommendations and
schedules in this owner’s manual.
Ask your AJP dealer to do the
maintenance items marked with an
asterisk (*). You may perform the
unmarked maintenance items by
referring to instructions in this
section, if you have mechanical
experience. If you are not sure how
to do any of the jobs, have your AJP
dealer to do them.
! CAUTION !
- When cleaning your motorcycle,
do not use a high-pressure
cleaning unit, otherwise water will
penetrate bearings, carburettor,
electric connectors, etc.
- When transporting your AJP,
ensure that it is held upright with
restraining straps.
- Use only special screws with an
appropriate thread length supplied
by AJP to fix fuel tank. Using other
screws or longer ones can cause
cracks in the tank through which
fuel can flow out.
- Let your motorcycle cool down
before beginning any maintenance
work in order to avoid get burned.
- Remove oil, grease matters,
filters, fuel, washing detergents,
etc, orderly.
- Under no circumstances may
used oil be disposed off in the
sewage system or in the open
countryside. Remember: 1 litre of
used oil contaminates 1.000.000
litres of water!
LUBRICATION POINTS
Proper lubrication is important for
smooth operation and long life of each
working part of your motorcycle and
also for safe riding. It is a good practice
to lubricate the motorcycle after a long
rough ride and after getting in snow,
wet, mud or after washing it. Major
lubrication points are indicated.
PR4 User’s manual Page
17
Other manuals for PR4
1
This manual suits for next models
2
Table of contents
Other AJP Motorcycle manuals