Derbi Senda DRD Evo 50 SM User manual

1
El logotipo DERBI es marca registrada y propiedad de DERBI - Nacional Motor, S.A. Sociedad Unipersonal.
Prohibida la reproducción total o parcial de cualquier fotografía, gráfico o texto insertado en este manual.
© 2008 DERBI - Nacional Motor, S.A. Sociedad Unipersonal.
Impreso por Gràfiques Morán, S.L. - Palamós (Girona)
CODIGO MANUAL 865230

2
DERBI - NACIONAL MOTOR, S.A.
Sociedad Unipersonal desea agra-
decerle la confianza depositada por
Ud. en la elección del modelo
Senda DRD Evo 50 SM
En este manual se especifican los
principales detalles para el cuidado
de su ciclomotor, para que obtenga
el mejor funcionamiento y la mayor
duración con un mínimo coste.
Bienvenido a DERBI
DERBI - NACIONAL MOTOR, S.A.
Sociedad Unipersonal vous remer-
cie de votre choix et de votre con-
fiance en votre nouveau cyclomo-
teur Senda DRD Evo 50 SM
Ce manuel spécifie les principaux
soins à donner à votre cyclomoteur
pour obtenir le meilleur rendement
et une longue durée au moindre
coût.
Bienvenue à DERBI
ef

3
DERBI - NACIONAL MOTOR, S.A.
Sociedad Unipersonal desidera rin-
graziare la fiducia che Lei ha posto
nella scelta del nuovo modello
Senda DRD Evo 50 SM
In questo manuale si specificano i
dettagli principali per la cura del suo
ciclomotore e cosi ottenere il miglior
funzionamento e maggiore durata
con un costo minimo.
Benvenuto a DERBI
DERBI - NACIONAL MOTOR, S.A.
Sociedad Unipersonal offers you
our thanks for the confidence you
place in us in your purchase of your
new model
Senda DRD Evo 50 SM
In this handbook we outline the
most important items in the care of
your moped to achieve the best pos-
sible service for the longest time
and at the least possible cost.
Welcome to DERBI
DERBI - NACIONAL MOTOR, S.A.
Sociedad Unipersonal möchte Ihnen
für das Vertrauen, das Sie durch die
Wahl des neuen Mokicks Senda
DRD Evo 50 SM entgegenbringen,
herzlichst danken.
In dieser Gebrauchsanweisung
finden Sie Ausführungen zu den
wichtigsten Einzelheiten, die für die
Pflege Ihres Mokick von Bedeutung
sind. Durch Einhaltung derselben
sind optimale Funktionstüchtigkeit
und lange Lebensdauer bei
geringstem Kostenaufwand
gewährleistet.
Willkomen bei DERBI
igd

4
❀Así puede Vd. contribuir a
la conservación del medio
ambiente.
De su estilo de conducir depende
también el consumo de combustible
y, por lo tanto, el nivel de emisión
de contaminantes de su ciclomotor.
Asimismo, la manera de tratar el
vehículo influye en el nivel de ruidos
y en el desgaste del mismo.
En este Manual de Instrucciones se
incluyen una serie de informaciones
sobre una conducción ecológica y al
mismo tiempo económica de su
ciclomotor.
Sírvase tener en cuenta todos los
textos de este Manual marcados
con un ❀
Contamos con Vd.
¡Proteja el medio
ambiente !
Vous pouvez contribuer
à la conservation de
l’environnement.
De votre manière de conduire
dépend également la consommation
de combustible et, donc, du taux
d’émission d’agents contaminants
de votre cyclomoteur.
La manière de traiter votre véhicule
a des répercutions sur le niveau de
bruits et la vie de votre véhicule.
Ce Manuel d’Instructions donne une
série d’informations sur une condui-
te écologique et économique de
votre cyclomoteur.
Voyez tous les textes de ce Manuel
marqués d’une ❀
Nous avons confiance
en vous. Protégez
l’environnement!
ef

5
Così può Lei contribuire
alla conservazione del
medio ambiente.
Dal suo modo di guidare dipende
pure il consumo di combustibile e,
quindi, il livello di emissione di con-
taminanti del suo ciclomotore.
Inoltre, il modo in cui tratta il veicolo
influisce sul livello di rumore e nel
proprio logoramento.
In questo Manuale di Istruzioni si
allegano una serie di informazioni
sulla guida ecologica e contempora-
neamente economica del suo ciclo-
motore.
Voglia tener presente tutti i testi di
questo Manuale contrassegnati con
un ❀
Contiamo su di Lei.
Protegga il
medio ambiente!
This is how you can con-
tribute to preserving the
environment.
The way you ride determines your
fuel consumption and therefore how
much your moped pollutes the
atmosphere.
In the same way, the way you
treat your moped affects its noise
level and wear and tear on the vehi-
cle.
In the Owner’s instruction handbo-
ok you will find a series of points of
information on how to ride in an eco-
logically sound manner, which will
also be the most economic way to
ride your moped.
Please pay attention to all the
points marked with a flower ❀in
this handbook.
We are counting on you!
Protect the
environment!
So können Sie zum
Umweltschutz beitragen
Von Ihrem Fahrstil hängt unter
anderem der Benzinverbrauch und
daher auch die Schadstoffabgabe
Ihres Mokicks ab.
Auch hat die Art und Weise, wie
Sie das Fahrzeug behandeln,
Einfluß auf seinen Geräuschpegel
und auf seine Abnutzung.
Diese Gebrauchsanweisung
enthält eine Reihe von
Anweisungen für einen ökologisch
verantworlichen und gleichzeitig
wirtschaftlichen Fahrstil.
Bitte beachten Sie alle Abschnitte
dieser Gebrauchsanweisung, die mit
dem Symbol ❀versehen sind.
Wir rechnen auf Sie.
Schonen die
die Umwelt!
igd

6
WICHTIG (nur für
Deutschland)
Sehr geehrte Kundin, sehr geehrter
Kunde!
Bitte überprüfen Sie, ob die
Fahrzeugident-Nr. Ihres Fahrzeuges mit
jener der Betriebserlaubnis
übereinstimmt. Um Ihr Fahrzeug
rechtmäßig zum Verkehr zuzulassen,
benötigen Sie unbedingt die
Betriebserlaubnis. Die alleinige
Vorlage des Versicherungsnachweises
ist unzureichend.
NOISE WARRANTY
Manufacturers must assure that the
exhaust system, when installed on a
motorcycle, and both the motorcycle and
exhaust system are properly maintained, will
not allow noise emissions exceeding the
levels specified in the “acoustical assurance
period” of 40 CFR 205, Subpart E for a
period od 1 year or 6,000 Kilometers (3728
miles)
“NOISE EMISSION STATEMENTS”
Derbi Warrants that this exhaust system at
the time of sale meets all applicable U.S.
EPA Federal noise standards. This warranty
extends to the first person who buys this
exhaust system for purposes other than resa-
le. And to all subsequent buyers Warranty
claims should be directed to: (Manufacturer
or distributor in the U.S. - name and address)
TAMPERING WARNING
Tampering whit Noise Control Prohibited
Federal law prohibits the following acts or
causing thereof:
(1) The removal or rendering inoperative by
any person other than for purposes of
maintenance repair or replacement of
any device or element of design incorpo-
rated into any new vehicle for the purpo-
se of while it is user or
(2) The use of the vehicle after such device
or element of designs has been removed
or rendered inoperative by any person.
Among those acts presumed to constitute
tempering are the acts listed below:
(1) Removal of or puncturing the muffler baf-
fles header pipes or any other component
which conducts exhaust gases.
(2) Removal or puncturing of any part of the
intake system.
(3) Lack of proper maintenance.
(4) Replacing any moving part of the vehicle
or parts of the exhaust or intake system,
with parts other than those specified by
the manufacturer.
WARNING STATEMENT:
This should be checked for repair or repla-
cement if the motorcycle noise has increased
significantly through use. Otherwise the
owner may become subject to penalties
under state and local ordinances.
Unless all noise control related items are
maintenance-free. The manufacturer must
provide the purchaser with written instruc-
tions (In the Owner’s Manual) for the proper
maintenance of the motorcycle necessary to
provide reasonable assurance of the elimina-
tion or minimization of noise emission degra-
dation throughout life of the vehicle.
NOTE: If all noise control related items are
maintenance-free, no instructions need de
provided. However, for the example if a muf-
fler requires periodic replacement of absorpti-
ve material (packing) then the purchaser
must be given sufficient instructions to enable
him or her perform this operation.
gd

Datos personales:
Données Personelles:
Dati personali:
Personal details:
Persönliche Angaben:
Nombre / Nom / Nome: / Name / Name
...................................................................
Dirección / Adresse / Indirizzo
Address / Adresse
...................................................................
Teléfono / Téléphone / Telefono
Tel. / Telefon
...................................................................
Compañía de seguros
Compagnie d'Assurances
Compagnia assicuratrice
Insurance Company:
Versicherungsgesellschaft
...................................................................
Póliza de seguros N.º
Police d'assurance n.º
Polizza di assicurazione nº:
Insurance Policy Nº
Versicherungspolice Nr.
...................................................................
Representante DERBI más cercano
Représentant DERBI le plus proche:
Concessionario DERBI più vicino:
Nearest DERBI Agent:
Nächste DERBI-Vertretung:
Nombre / Nom / Nome: / Name / Name
...................................................................
Dirección / Adresse / Indirizzo
Address / Adresse
...................................................................
Teléfono / Téléphone / Telefono
Tel. / Telefon
...................................................................
Jefe de Taller / Chef d'Atelier
Capo Officina Meccanica
Workshop Supervisor
Werkmeister
...................................................................
Teléfono / Téléphone / Telefono
Tel. / Telefon
...................................................................
Datos del Ciclomotor:
Données du cyclomoteur:
Dati del ciclomotore:
Details of your moped:
Angaben zum Mokick:
Designación de modelo
Désignation du modèle
Denominazione del modello
Model Name
Modellbezeichnung
...................................................................
Número de chasis
Numéro du châssis
Numero di telaio
Frame Number
Fahrgestellnummer
...................................................................
Número de motor
Numéro du moteur
Numero del motor
Engine Number
Motornummer
...................................................................
7

8
Modo de orientarse en este libro de
instrucciones:
El sumario está dividido en cinco
capítulos como indica la tabla de mate-
rias adyacente. Dichos capítulos se
localizan mediante los cuadros de color
negro.
En la primera página de cada capítu-
lo hay una introducción y un índice
detallado del capítulo.
Los títulos que encabezan cada
página sirven para localizar determina-
do texto, hojeando rápidamente el libro.
En el índice de la página 116 figura
la página en que se encuentra la infor-
mación que se precisa.
Debido a su criterio de constante mejora en sus
productos, DERBI - NACIONAL MOTOR, S.A.
Sociedad Unipersonal se reserva el derecho de
introducir las modificaciones que crea oportunas,
sin previo aviso.
Comment utiliser ce manuel d’ins-
tructions:
Le sommaire est divisé en cinq cha-
pitres comme indique la table des matiè-
res ci-jointe. Ces chapitres se localisent
au moyen des carrés noirs.
Sur la première page de chaque cha-
pitre il y a une introduction et un index
détaillé du chapitre.
Les titres de chaque page servent à
localiser un texte déterminé, en feuille-
tant rapidement le manuel.
L’index de la page 116 donne l’infor-
mation dont vous avez besoin et la page
où elle se trouve.
Etant donné le critère d’amélioration constante de
ses produits, DERBI / NACIONAL MOTOR, S.A.
Sociedad Unipersonal se réserve le droit
d’introduire les modifications qu’il jugerait
opportunes sans préavis.
Come orientarsi in questo libro di
istruzioni:
Il sommario è suddiviso in cinque
capitoli come indica la tavola di materie
adiacente.
I sopraddetti capitoli si localizzano
mediante i quadri color nero.
Nella prima pagina di ogni capitolo
c’è una introduzione ed un indice detta-
gliato del capitolo.
I titoli che intestano ogni pagina ser-
vono per localizzare un testo determina-
to, sfogliando rapidamente il libretto.
Nell’indice di pagina 116 appare la
pagina dove c’è l’informazione di cui si
ha bisogno.
A causa del suo criterio di miglioramento costante
dei propri prodotti, DERBI - NACIONAL MOTOR,
S.A. Sociedad Unipersonal mantiene il diritto di
introdurre le modifiche che consideri necessarie,
senza avviso previo.
efi

9
How to use this instruction manual:
The summary is divided into five
chapters, as indicated in the adjoining
table of contents. These chapters are
located by means of the black panels.
On the first page of each chapter
there is an introduction and a detailed
index of the chapter.
The titles heading each page serve
to locate a certain text by leafing quickly
through the book.
In the index on page 116 you will find
the page number of the information you
need.
Due to its criterion of constant improvement of its
products, DERBI - NACIONAL MOTOR, S.A.
Sociedad Unipersonal reserves the right to
introduce any modifications it considers suitable,
without prior notice.
Zur Benutzung des vorliegenden
Bedienungshandbuches:
Wie aus dem unten angeführten
Inhaltsverzeichnis hervorgeht, besteht
die Zusammenfassung aus fünf
Kapiteln. Das Auffinden der jeweiligen
Kapitel erfolgt mit Hilfe der schwarzen
Farbfelder.
Die erste Seite eines jeden Kapitels
enthält eine Einleitung und ein
ausführliches Inhaltsverzeichnis.
Die Überschriften auf jeder Seite
dienen dem Auffinden eines bestimmten
Textes, indem man das Buch schnell
durchblättert.
Dem Inhaltsverzeichnis auf Seite 116
ist die Seite mit der gewünschten
Information zu entnehmen.
Im Hinblick auf die ständige Verbesserung ihrer
Produkte behält sich DERBI - NACIONAL MOTOR,
S.A. Sociedad Unipersonal das Recht vor, ohne
vorherige Ankündigung die als zweckmäßig
erachteten Änderungen einzuführen.
Mandos
Commandes
Comandi
Controls
Bedienungselemente
Equipo y accesorios
Équipement et accessoires
Dotazione ed accessori
Equipment and Accessories
Ausstattung und Zubehör
Arranque, conducción y rodaje
Démarrage, conduite et rodage
Avviamento, guida e rodaggio
Starting, Riding and running-in
Anlassen, Fahren und Einfahren
Mantenimiento
Entretien
Manutenzione
Maintenance
Wartung
Especificaciones
Spécifications
Specificazioni
Specifications
Technische Daten
13
29
33
45
107
gd
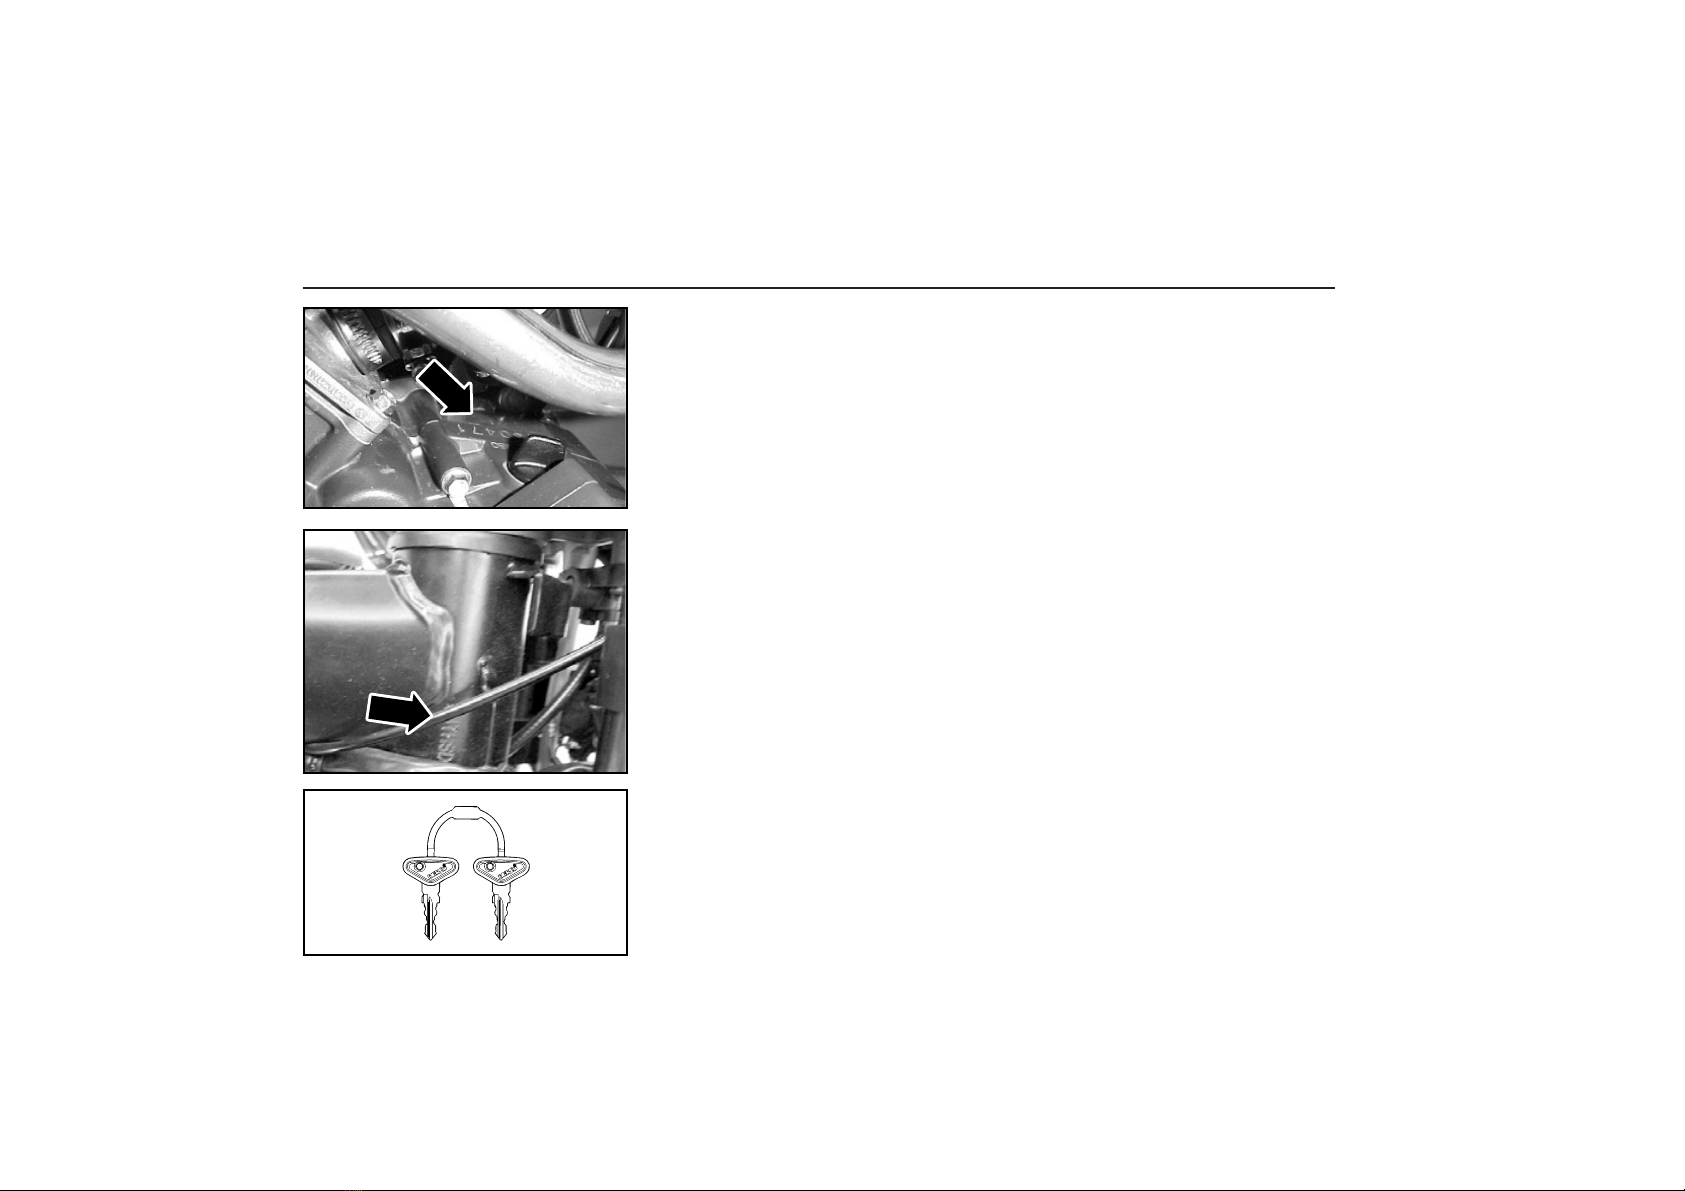
Emplazamiento del número de motor.
El número de motor está grabado en
la parte superior del cárter izquierdo.
Emplazamiento del número del basti-
dor
El número del bastidor está grabado
en el lado derecho del tubo de direc-
ción.
Llaves
Con el ciclomotor se entregan dos
llaves que sirven indistintamente para la
cerradura de contacto y tapa depósito
gasolina.
Atención
Para llamar la atención del lector
sobre puntos importantes se utilizan las
siguientes indicaciones: "observación",
"precaución" y "aviso"...
OBSERVACION:
Las observaciones dan consejos
complementarios o explican el texto.
¡Precaución!
Con este encabezamiento se advier-
te que las maniobras en cuestión pue-
den ocasionar deterioros en el vehículo
o desgaste prematuro.
¡Aviso! 00
Los avisos advierten que la maniobra
es peligrosa y que podría causar lesio-
nes
Situation du numéro du moteur
Le numéro de moteur est inscrit sur
la partie supérieure du carter gauche.
Situation du numéro de châssis
Le numéro de châssis est inscrit sur
le côté droit du tube de direction.
Clés
Deux clés sont remises avec le cyclo-
moteur à utiliser indistinctement pour la
serrure de contact et celle du bouchon
du réservoir à essence.
Attention!
Pour attirer l’attention du lecteur sur
des points importants les indications
suivantes: “observation”, “précaution” et
“avis” sont utilisées.
OBSERVATION:
Les observations fournissent des
conseils complémentaires ou expliquent
le texte.
Précaution!
Il s’agit d’un avertissement indiquant
que les manoeuvres en question peu-
vent provoquer des dommages sur le
véhicule ou une usure prématurée.
Avis! 00
Avertissement d’une manoeuvre dan-
gereuse pouvant provoquer des
lésions.
Número motor, bastidor - Llaves
Numero moteur, châssis - Clés
10
ef

Situazione del numero del motore.
Il numero del motore è inciso nella
parte superiore del carter sinistro.
Situazione del numero
del telaio.
Il numero del telaio è inciso sul lato
destro del tubo dello sterzo.
Chiavi
Col ciclomotore si consegnano due
chiavi che servono indifferentemente
per la serratura d’accensione, e per il
coperchio del serbatoio benzina.
Attenzione !
Per portare l’attenzione dell’amabile
lettore sui punti importanti si usano i
seguenti termini: “osservazione”, “atten-
zione” e “avviso”.
OSSERVAZIONE:
Le osservazoni danno consigli com-
plementari o spiegano il testo.
Attenzione!
Con questa intestazione si avverte
che le manovre in questione possono
provocare panne nel veicolo o logora-
mento prematuro.
Avviso! 00
Gli avvisi avvertono che la manovra è
pericolosa e che potrebbe produrre
lesioni.
Position of the engine number
The engine number is engraved on
the top of the left-hand crankcase.
Position of the chassis number
The chassis number is engraved on
the right-hand side of the steering
column.
Keys
A set of two keys is delivered with the
moped. Either key may be used equally
for the ignition lock and for the fuel tank
cover.
Attention
In order to call the reader’s attention
to important points, the following indica-
tions are used: ‘note’, ‘caution’ and ‘war-
ning’.
Note:
The notes give complementary advi-
ce or explain the text.
CAUTION!
This heading warns that the mano-
euvres in question may cause damage
or premature wear to the vehicle.
WARNING! 00
The warnings indicate that the
manoeuvre is dangerous and may
cause injuries.
Lage der Motornummer
Die Motornummer befindet sich am
oberen Teil der linken Gehäusehälfte.
Lage der Fahrgestellnummer
Die Fahrgestellnummer befindet sich
an der rechten Seite des Lenkrohrs.
Schlüssel
Das Moped wird mit zwei Schlüsseln
geliefert, die beide für das Zündschloß
und den Benzintankdeckel vorgesehen
sind.
Achtung!
Um die Aufmerksamkeit des Lesers
auf bestimmte wichtige Punkte zu
lenken, werden die folgenden Hinweise
verwendet: "Anmerkung", "Vorsicht" und
"Achtung"...
Anmerkung:
Die Anmerkungen geben zusätzliche
Ratschläge oder erläutern den Text.
Vorsicht!
Mit dieser Überschrift wird darauf
hingewiesen, daß die beschriebenen
Vorgänge Fahrzeugschäden oder
vorzeitigen Verschleiß zur Folge haben
können.
Achtung! 00
Diese Warnungen weisen darauf hin,
daß der Vorgang gefährlich ist und
Verletzungen verursachen könnte.
11
Numero motore, telaio - Chiavi • Engine, chassis number - Keys
Motornumber, Fahrgestellnumber - Schlüssel
igd
Instrumentos y mandos • Instruments et commandes • Strumenti e comandi
Instruments and controls • Instrumente und Bedienungselemente
12
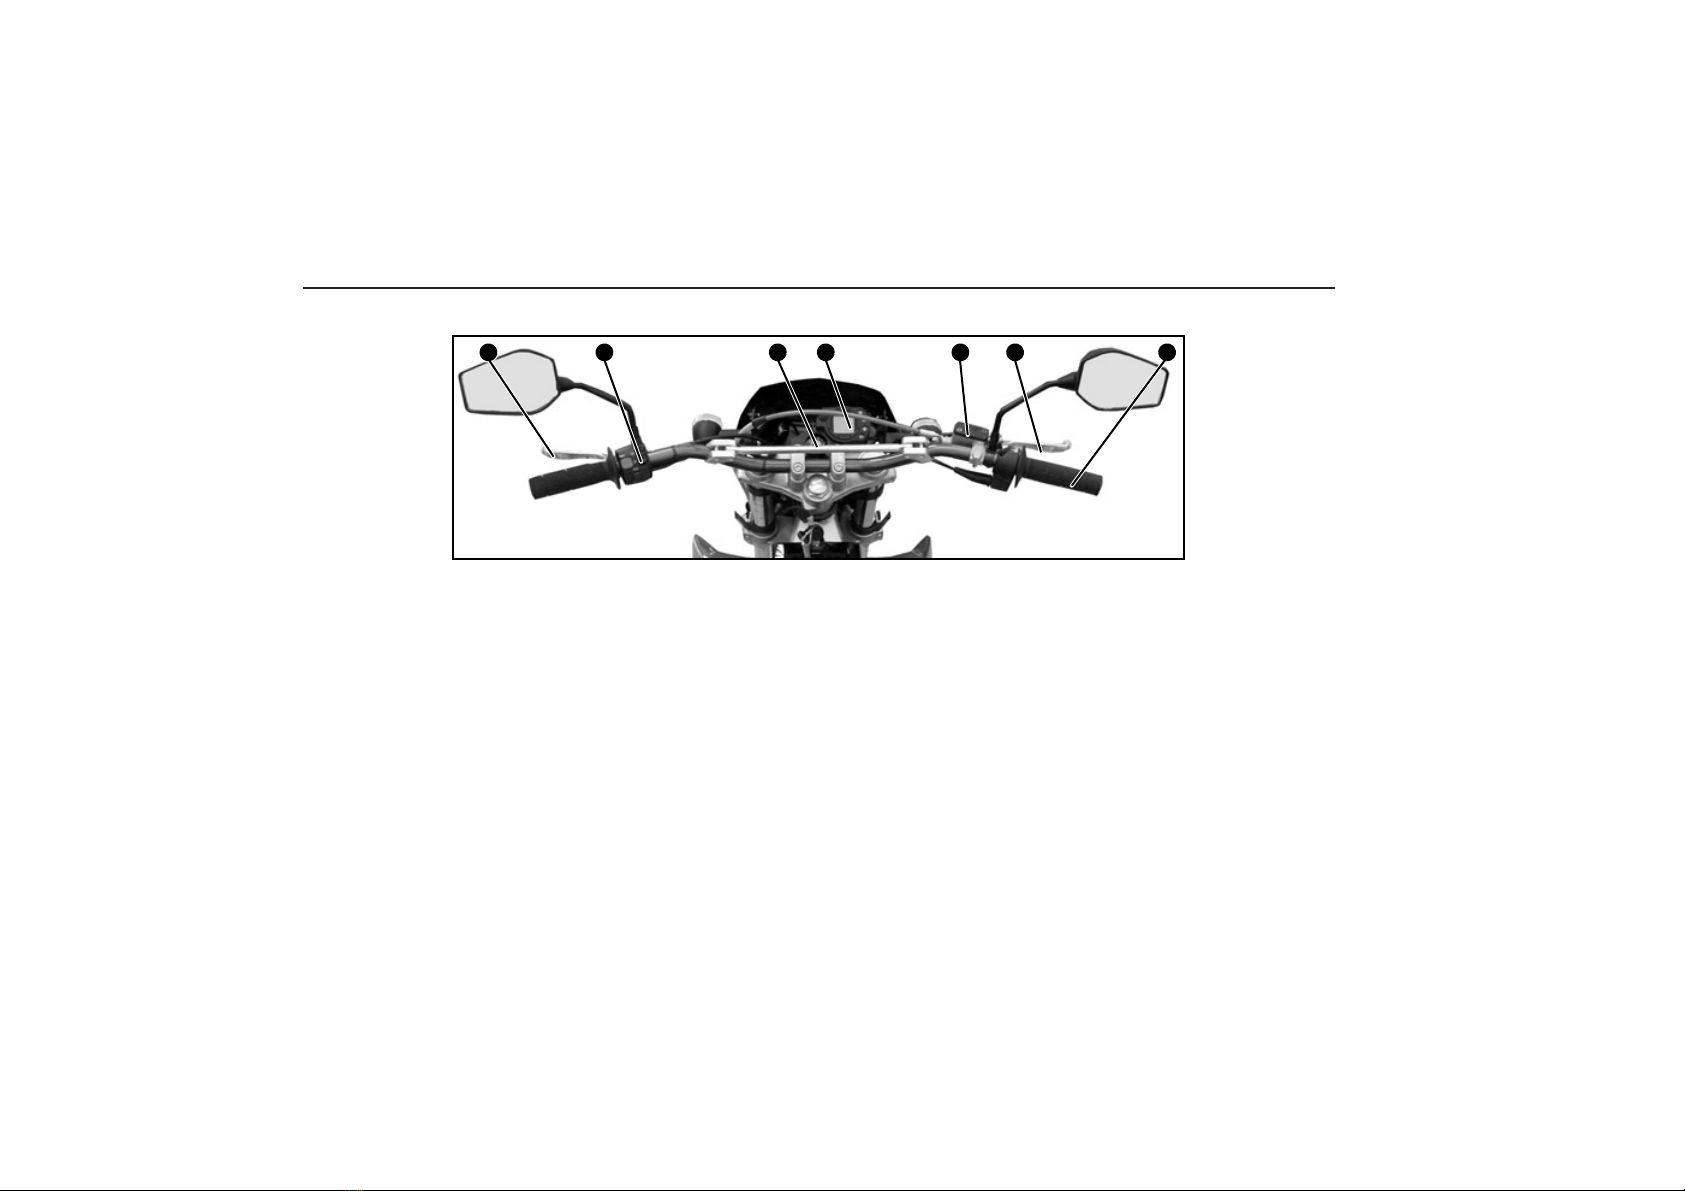
1.- Tablier
2.- Interruptor luces,
claxon y
intermitentes
3.- Mando freno
delantero
4.- Mando de gas
5.- Cerradura
contacto
6.- Mando embrague
7.- Depósito líquido
freno
delantero
1.- Tableau de bord
2.- Commandes
phares, klaxon et
clignotants
3.- Commande frein
avant
4.- Commande gaz
5.- Serrure contact
6.- Commande
embrayage
7.- Réservoir liquide
frein avant
1.- Cruscotto
2.- Interruttore luci,
avvisatore
acustico ed
intermittenti
3.- Comando freno
anteriore
4.- Comando
dell’acceleratore
5.- Serratura
d’accensione
6.- Comando frizione
7.- Serbatoio liquido
freno anteriore
1.- Instrument panel
2.- Turn signals, horn
and light
switches
3.- Front brake lever
4.- Accelerator
5.- Ignition lock
6.- Clutch lever
7.- Front brake fluid
tank
1.- Armaturenbrett
2.- Schalter für
leuchten, hupe
und blikleuchten
3.- Hebel
Vorderbremse
4.- Gasgriff
5.- Zündschloß
6.- Kupplungshebel
7.- Behälter für
Bremsflüssigkeit
Vorderbremse
efigd
126 45 37

13
Mandos
Commandes
Comandi
Controls
Bedienungselemente
Tablier
Tableau de bord
Cruscotto
Instrument panel
Armaturenbrett .........................................14
Interruptor luces, claxon y stop
Commutateur phares, klaxon et stop
Interruttore luci,avvisatore acustico ed stop
Lights, horn and stop switch
Schalter für Lichter, Hupe und Stop..........20
Cerradura contacto
Serrure contact
Serratura d’accensione
Ignition lock
Zündschloß ...............................................20
Mando freno delantero
Commande frein avant.
Comando freno anteriore
Front brake lever
Hebel Vorderbremse ................................22
Mando de gas
Commande gaz
Comando dell’acceleratore
Accelerator
Gasgriff ....................................................22
Mando embrague
Commande embrayage
Comando frizione
Clutch lever
Kupplungshebel ........................................22
Mando freno trasero
Commande frein arrière
Comando freno posteriore
Rear brake pedal
Hebel Hinterbremse ..................................24
Palanca de arranque
Levier de démarrage
Pedale di avviamento
Kick-starter
Kickstarter .................................................24
Palanca del cambio
Levier de la boîte à vitesses
Pedale del cambio
Gear-change pedal
Schalthebel ...............................................26
Mando aire carburador
Commande air carburateur
Comando starter carburatore
Choke
Hebel für Vergaser-Luftzufuhr...................28
Este capítulo contiene una
descripción detallada de todos
los instrumentos y mandos de
especial interés para el
usuario.
Ce chapitre contient une
description détaillée de tous
les instruments et des
commandes particulièrement
intéressantes pour l’utilisateur.
This chapter contains a
detailed description of all the
instruments and controls of
special interest for the user.
Questo capitolo contiene una
minuta descrizione di tutti gli
strumenti e comandi
d’interesse speciale per
l’utente.
Dieses Kapitel enthält eine
ausführliche Beschreibung
aller Instrumente und
Bedienungselemente, die für
den Anwender von Bedeutung
sind.
Indice del capítulo
Index du chapitre
Indice delcapitolo
Index of the chapter
Inhaltsverzeichnis des Kapitels

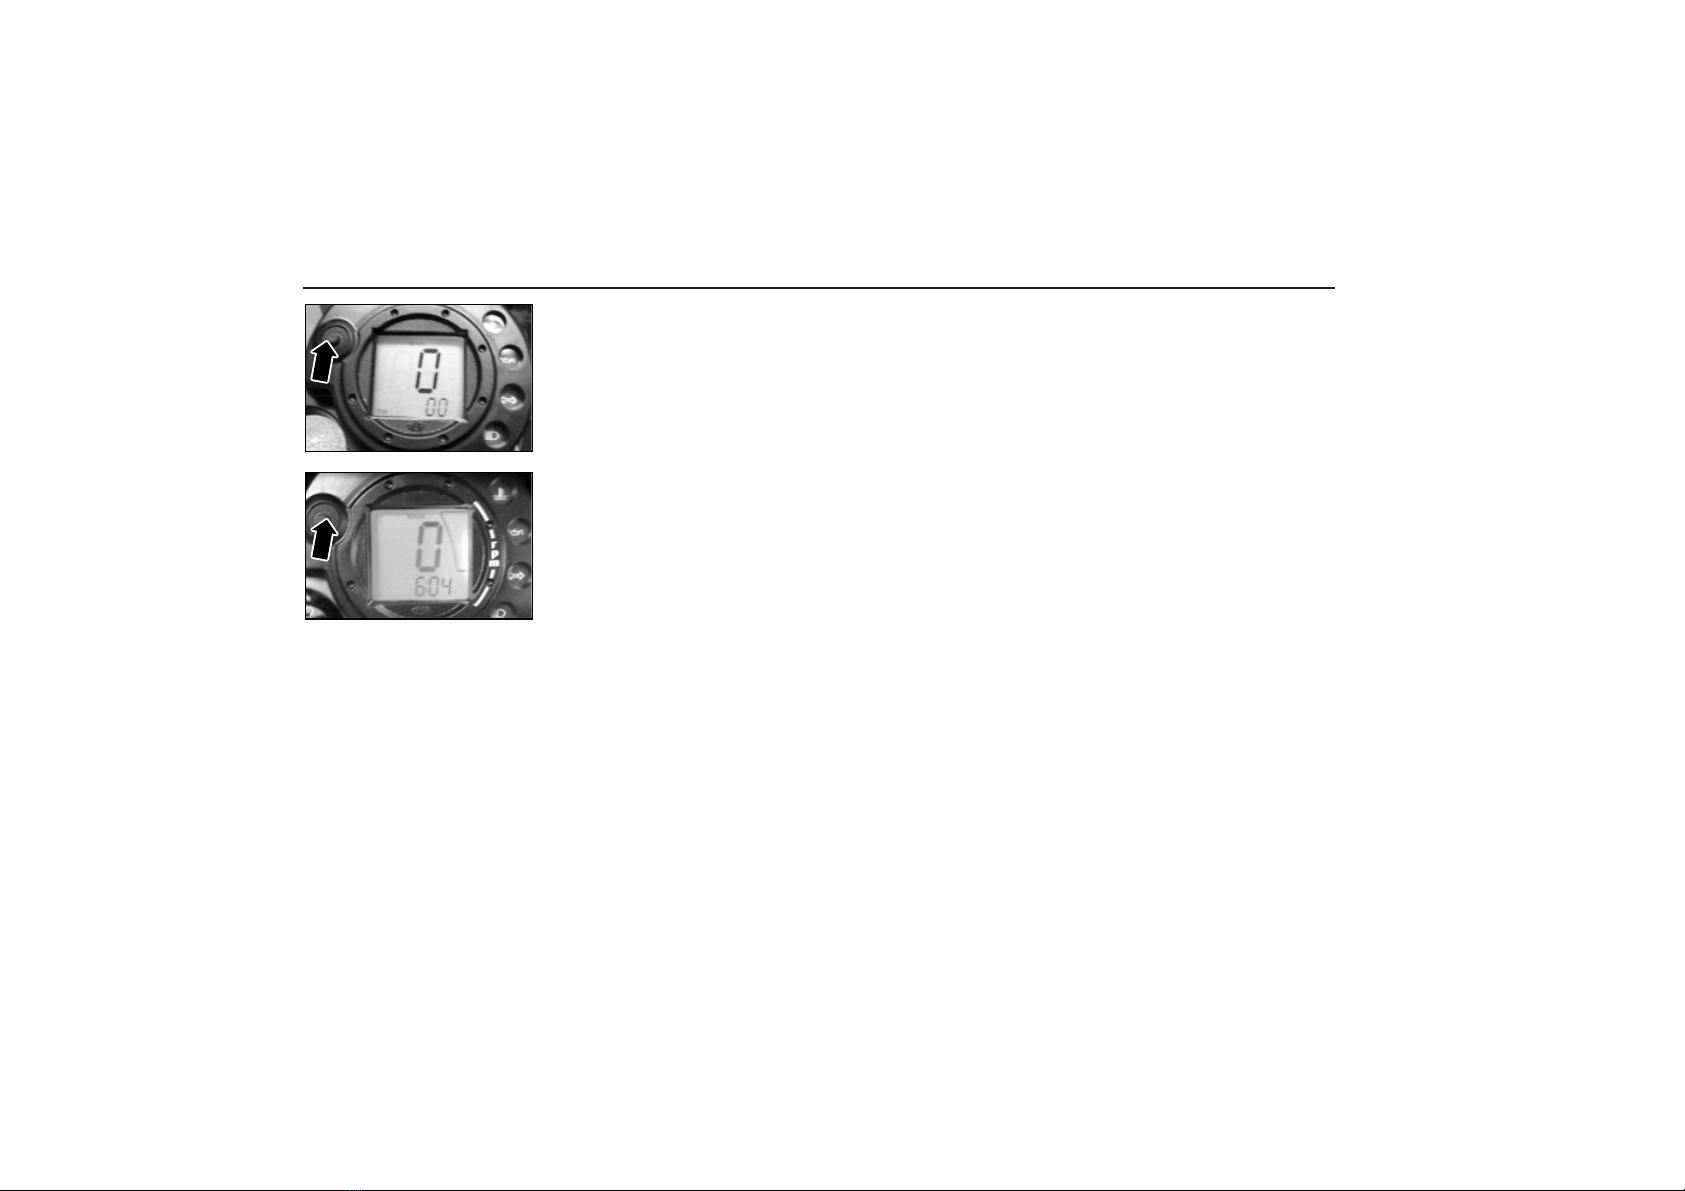
Contacto (1)
Girando la llave de contacto y con la
batería en optimas condiciones, accede-
mos al ajuste del reloj horario.
Reloj Horario (2)
Pulse el botón de la parte izquierda
superior, como muestra la imagen, hasta
que parpadeen los Minutos, podrá así
ajustar la Hora. Esperando unos segun-
dos sin pulsar, parpadearan las horas y
pulsando el botón ajustara los minutos.
Odometer (3)
Pulsando el botón de la parte izquierda
superior, muestra la distancia total que
tiene el vehículo.
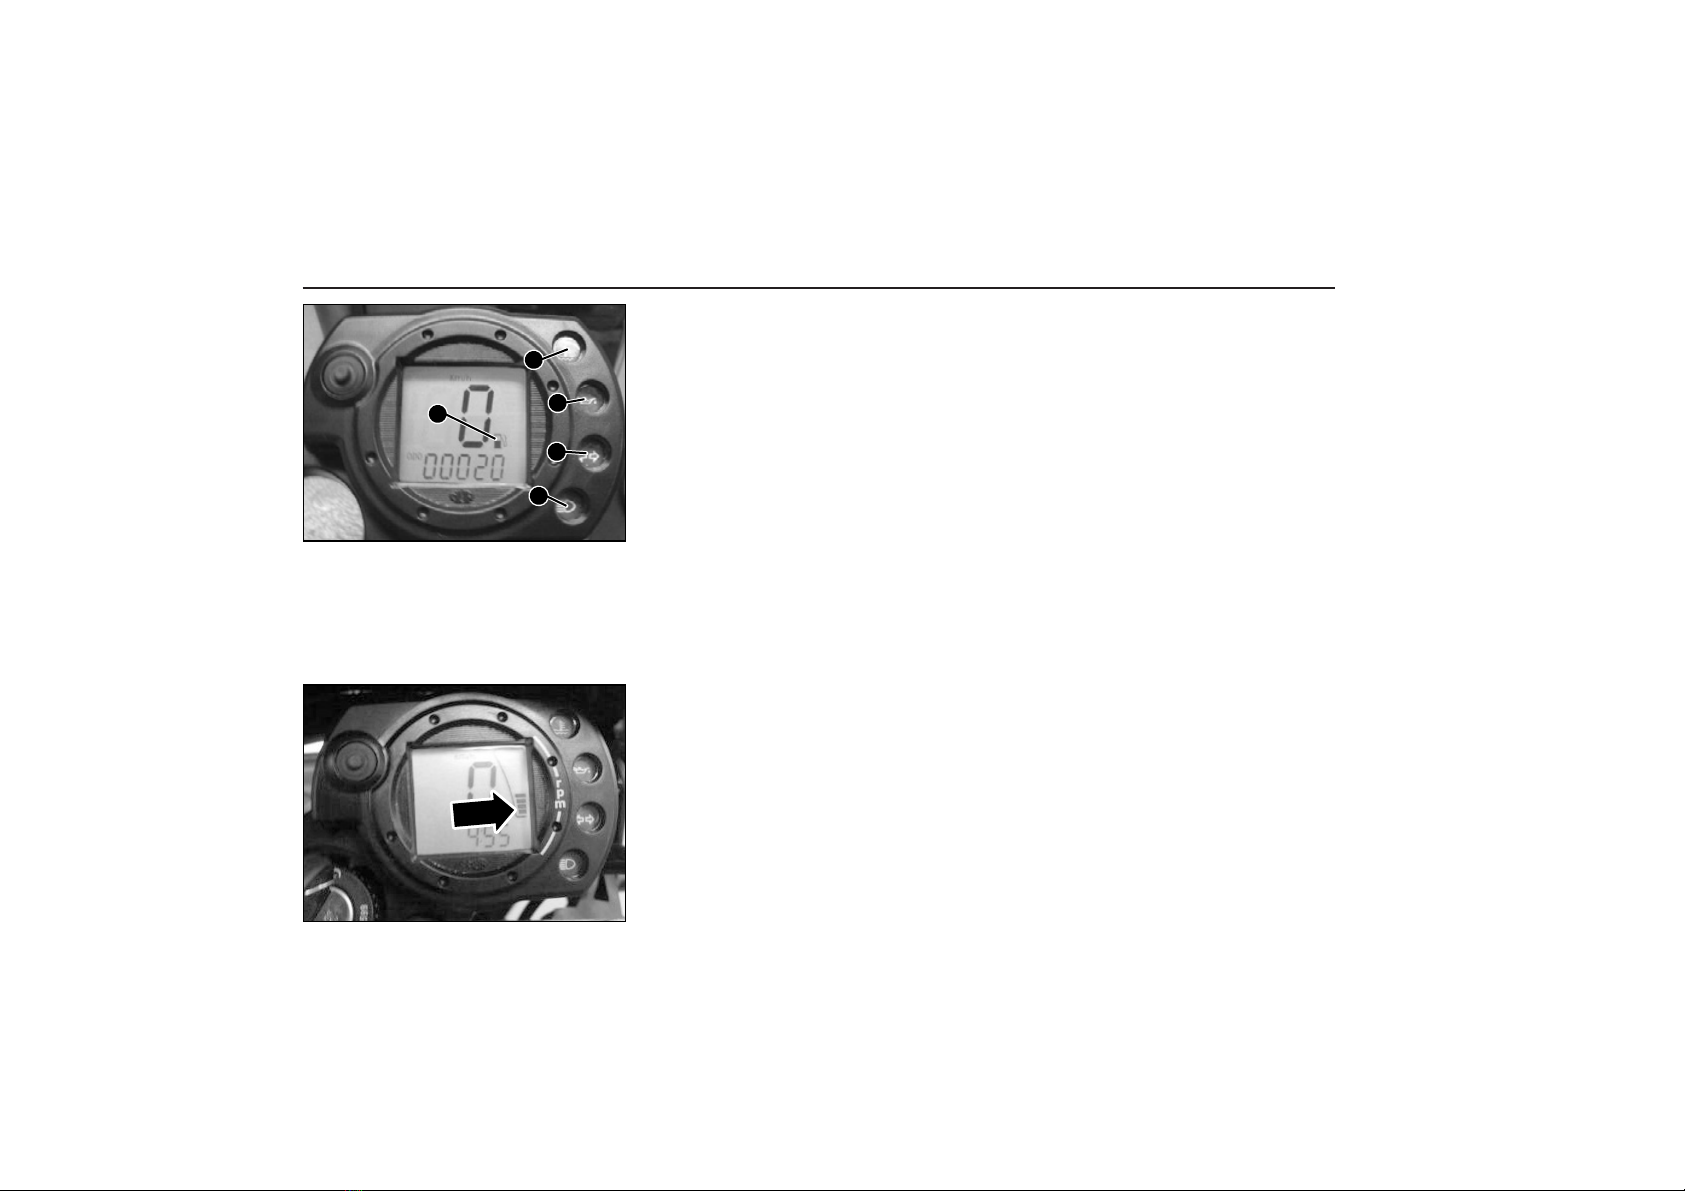
SRV (4)
Contador de servicio:
Pulsando el botón de la parte izquierda,
en la función SRV
Aparece el numero de Kilómetros (o
Millas) que faltan para el próximo servicio
de mantenimiento.
1er servicio: 1.000 Km o 600 Millas.
Siguientes: 5.000 Km o 3100 Millas.
A partir de la puesta a cero.
Puesta a cero del contador de servicio:
- Seleccionar la función SRV
- Girar la llave de contacto en OFF
- Tener pulsado el botón
- Girar la llave de contacto en ON
Después de 3 segundos aparecerá el
nuevo valor (5.000 Km o 3.100 Milllas)
Contact (1)
Avec la batterie en condition optimale,
tourner la clé de contact pour accéder au
réglage de l´horloge,
Montre Horaire (2)
Pour régler l´Heure, appuyer sur le bouton
situé dans la partie supérieure gauche,
comme l´indique l'image, jusqu'à ce que les
minutes clignotent. Pour régler les minutes,
attendre quelques secondes jusqu´à ce que
clignotent les Heures et appuyer sur le bou-
ton.
Compteur kilométrique total (3)
Pour lire la distance totale parcourue par
le véhicule, appuyer sur le bouton situé dans
la partie supérieure gauche
SRV (4)
Compteur de service :
Le nombre de kilomètres (ou de milles) qu’il
reste à parcourir avant le prochain « service
d’entretien » s’affiche en appuyant sur le
bouton situé à gauche, sur la fonction
«SRV».
1er service: 1000 Km ou 600 Milles.
Services suivants: 5000 Km ou 3100 Milles.
À partir de la mise à zéro.
Mise à zéro du compteur de service:
- Sélectionner la fonction SRV
- Placer la clé de contact sur la position OFF
- Maintenir le bouton enfoncé
- Placer la clé de contact sur la position ON
Attendre 3 secondes pour voir s’afficher la
nouvelle valeur (5 000 Km ou 3 100 Millles)
Tablier
Tableau de bord
14
ef

Contatto (1)
Girando la chiave di contatto e con la
batteria in ottima condizione, possiamo
regolare l’orologio.
Orologio Orario (2)
Prema il pulsante nella parte sinistra
superiore, come mostra l’immagine, fino a
che lampeggiano i Minuti, potrà regolare
così l’Ora. Aspettando alcuni secondi prima
di premere, lampeggeranno le Ore e pre-
mendo il pulsante regolerà i Minuti.
Contachilometri totale (3)
Premendo il pulsante nella parte sinistra
superiore, mostra la distanza totale che ha
percorso il veicolo.
SRV (4)
Contatore di servizio:
Premendo il pulsante del lato sinistro nella
funzione SRV appare il numero di
chilometri (o miglia) mancanti per il
prossimo servizio di manutenzione.
1º servizio: 1.000 km o 600 miglia.
Successivi: 5.000 km o 3.100 miglia.
Dall’azzeramento.
Azzeramento del contatore di servizio:
- Selezionare la funzione SRV
- Girare la chiave d’accensione su OFF
- Mantenere il pulsante premuto
- Girare la chiave d’accensione su ON
Dopo 3 secondi apparirà il nuovo valore
(5.000 km o 3.100 miglia).
Lock (1)
Turning on the key and with the battery
in right conditions, we can adjust the clock
time.
Clock time (2)
Push the upper left hand button, until the
minutes blinks. Then you can adjust the
time. Waiting for some seconds whithout
pushing, then the hours will blink and pus-
hing the buttom you will adjust the minutes.
Odometer (3)
Pushing the upper lesft hand buttom, it
shows the total distance that the vehicle
has.
SRV (4)
Service counter:
By pressing the button on the left-hand side
to the SRV function, the number of
kilometres (or miles) left before the next
maintenance service appears.
First service at 1,000 km or 600 miles.
Subsequent services: at 5,000 km or 3,100
miles.
From a zero setting.
Setting the service counter at zero:
- Select the SRV function
- Turn the ignition key OFF
- Keep the button pressed in
- Turn the ignition key ON
After 3 seconds, the new figure will appear
(5,000 km or 3,100 miles)
Kontakt (1)
Mit der ordnugsgemäss geladenen
Batterie kann nach dem Drehen des
Zündschlüssels die Zeituhr des Cockpits
eingestellt werden.
Zeituhr (2)
Nach Drücken des linken, oberen
Einstellknopfes (siehe Bild) blinken die
Minuten-in diesem Modus können die
Stunden eingestellt werden.
Einige Sekunden warten bis die Stunden
blinken um die Minuten einzustellen.
Kilometerzähler (3)
Nach Drücken auf den Einstellknopf
werden die Gesamtkilometer angezeigt.
SRV (4)
Service-Zähler:
Bei Betätigung des Tasters links erscheint
in der Funktion SRV die Anzahl der
Kilometer (bzw. Meilen) bis zum nächsten
Kundendienst-Serice.
1. Kundendienst bei 1.000 Kilometern bzw.
600 Meilen.
Folgende: alle 5.000 Kilometer bzw. 3.100
Meilen.
Gerechnet ab der Nullstellung.
Nullstellung des Service-Zählers:
- Die Funktion SRV auswählen
- Den Kontaktschalter auf OFF stellen
- Den Taster betätigt halten
- Den Kontaktschalter auf ON stellen
Nach 3 Sekunden erscheint der neue Wert
(5.000 Km bzw. 3.100 Meilen)
Cruscotto • Instrument Panel
Armaturenbrett
15
igd
Trip (5)
Cuentakilómetros parcial, pulsando el
botón de la parte izquierda superior muestra
la distancia recorrida desde su puesta a
cero.
Para reponer a cero el cuentakilómetros
parcial, pulse durante unos segundos el
botón de la parte izquierda superior como
muestra la imagen.
Velocímetro (6)
Pulsando el botón de la parte izquierda
superior, muestra la velocidad y reloj horario.
Compteur kilométrique partiel (5)
Compteur kilométrique partiel. Pour lire la
distance parcourue depuis la dernière mise à
zéro, appuyer sur le bouton situé dans la
partie supérieure gauche .
Pour remettre à zéro le compteur kilométri-
que partiel, appuyer pendant quelques
secondes sur le bouton situé dans la partie
supérieure gauche comme le montre l'image.
Compteur de vitesse (6)
Pour lire la vitesse et l´heure, appuyer sur
le bouton situé dans la partie supérieur gau-
che.
Tablier
Tableau de bord
16
ef

Cruscotto • Instrument Panel
Armaturenbrett
17
Contachilometri parziale (4)
Contachilometri parziale, premendo il pul-
sante nella parte sinistra superiore mostra la
distanza percorsa dal suo azzeramento.
Per riporre a zero il contachilometri parzia-
le, prema durante alcuni secondi il pulsante
nella parte sinistra superiore come mostra
l’immagine.
Tachimetro (5)
Premendo il pulsante nella parte sinistra
superiore, mostra la velocità ed orologio.
Trip (4)
Partial odometer, pushing the upper left
hand button it shows the distancce runned
from it´s 0 reset.
To reset the partial odometer, you must
push the upper left hand button during some
seconds, like the picture shows.
Speedometer (5)
Pushing the upper left hand button, it
shows the speed and the clock time.
Trip (4)
Tageskilometerzähler, nach Drücken des
Einstllknopfes werden die Tageskilometer
angezeigt.
Einige Sekunden den Einstellknopf
drücken um den Tageskilometerzähler auf
Null zu stellen.
Tachometer (5)
Einstellknopf drücken um die
Geschwindigkeit und die Uhrzeit anzuzeigen.
igd
(
(1) Indicador de temperatura
Cuando el indicador se enciende, la
temperatura del refrigerante sobrepasa
los 105 ºC.
'(2) Indicador reserva aceite
Cuando se enciende la luz de adver-
tencia, la reserva contiene 0,26 litros.
)
(3) Indicador intermitentes
&
(4) Indicador reserva gasolina
Cuando se enciende la luz indicador
gasolina, en el depósito queda una
reserva de 1,29 litros.
-(5) Indicador luz intensiva
Cuenta-revoluciones
Barra 1: 2.000 RPM Barra 7: 8.000 RPM
Barra 2: 3.000 RPM Barra 8: 9.000 RPM
Barra 3: 4.000 RPM Barra 9: 10.000 RPM
Barra 4: 5.000 RPM Barra 10: 11.000 RPM
Barra 5: 6.000 RPM Barra 11: 11.500 RPM
Barra 6: 7.000 RPM Barra 12: 12.000 RPM
((1) Indicateur de température
Le témoin s'allume lorsque la tempé-
rature du liquide refroidissant dépasse
105º C.
'
(2) Témoin de réserve d’huile
Le témoin s'allume lorsque la réserve
ne contient que 0,26 litres.
)
(3) Témoin des clignotants
&
(4) Témoin de réserve d'essence.
Le témoin s'allume lorsque la réserve
ne contient que 1,29 litres.
-(5) Témoin lumière de phare
Tachymétre
Barre 1: 2.000 RPM Barre 7: 8.000 RPM
Barre 2: 3.000 RPM Barre 8: 9.000 RPM
Barre 3: 4.000 RPM Barre 9: 10.000 RPM
Barre 4: 5.000 RPM Barre 10: 11.000 RPM
Barre 5: 6.000 RPM Barre 11: 11.500 RPM
Barre 6: 7.000 RPM Barre 12: 12.000 RPM
Tablier
Tableau de bord
18
ef
1
2
3
5
4

19
Cruscotto • Instrument Panel
Armaturenbrett
((1) Indicatore di temperatura
Qualora l’indicatore si accende, la tem-
peratura del refrigerante ha superato i
105ºC.
'(2) Spia riserva olio
Qualora si accende la luce indicatore
d'olio, nel serbatoio rimane una scorta
di litri 0,26.
)
(3) Spia indicatori direzione
&(4) Spia riserva benzina
Qualora si accende la luce indicatore
benzina, nel serbatoio rimane una scor-
ta di litri 1,29.
-
(5) Indicatore luce abbagliante
Contagiri
Barra 1: 2.000 RPM Barra 7: 8.000 RPM
Barra 2: 3.000 RPM Barra 8: 9.000 RPM
Barra 3: 4.000 RPM Barra 9: 10.000 RPM
Barra 4: 5.000 RPM Barra 10:11.000 RPM
Barra 5: 6.000 RPM Barra 11:11.500 RPM
Barra 6: 7.000 RPM Barra 12:12.000 RPM
((1) Temperature indicator
When the indicator lights up, the
temperature of the coolant has
exceeded 105 °C.
'(2) Oil Reserve
When this warning light comes on there
are 0,26 litres left in reserve.
)
(3) Indicator switch
&
(4) Reserve fuel tank indicator
When the fuel indicator lights up, a
reserve of 1,29 litres remains in the
tank.
-(5) High-beam indicator
Tachometer
Bar
1: 2.000 RPM
Bar
7: 8.000 RPM
Bar
2: 3.000 RPM
Bar
8: 9.000 RPM
Bar
3: 4.000 RPM
Bar
9: 10.000 RPM
Bar
4: 5.000 RPM
Bar
10: 11.000 RPM
Bar
5: 6.000 RPM
Bar
11: 11.500 RPM
Bar
6: 7.000 RPM
Bar
12: 12.000 RPM
(
(1) Temperaturanzeige
Leuchtet die Anzeige auf, so liegt die
Temperatur des Kühlmittels über 105º C.
'
(2) Ölreserveanzeige
Wenn das Warnlicht aufleuchtet, enthält
die Reserve 0,26 Liter.
)
(3) Fernlichtanzeige
&
(4) Kraftstoffanzeige
Wenn das Warnlicht aufleuchtet, so
verbleibt im Tank eine Reserve von 1,29
Litern.
-
(5) Fernlichtanzeige
Drehzahlmesser
Leiste 1: 2.000 RPM Leiste 7: 8.000 RPM
Leiste 2: 3.000 RPM Leiste 8: 9.000 RPM
Leiste 3: 4.000 RPM Leiste 9: 10.000 RPM
Leiste 4: 5.000 RPM Leiste 10: 11.000 RPM
Leiste 5: 6.000 RPM Leiste 11: 11.500 RPM
Leiste 6: 7.000 RPM Leiste 12: 12.000 RPM
igd
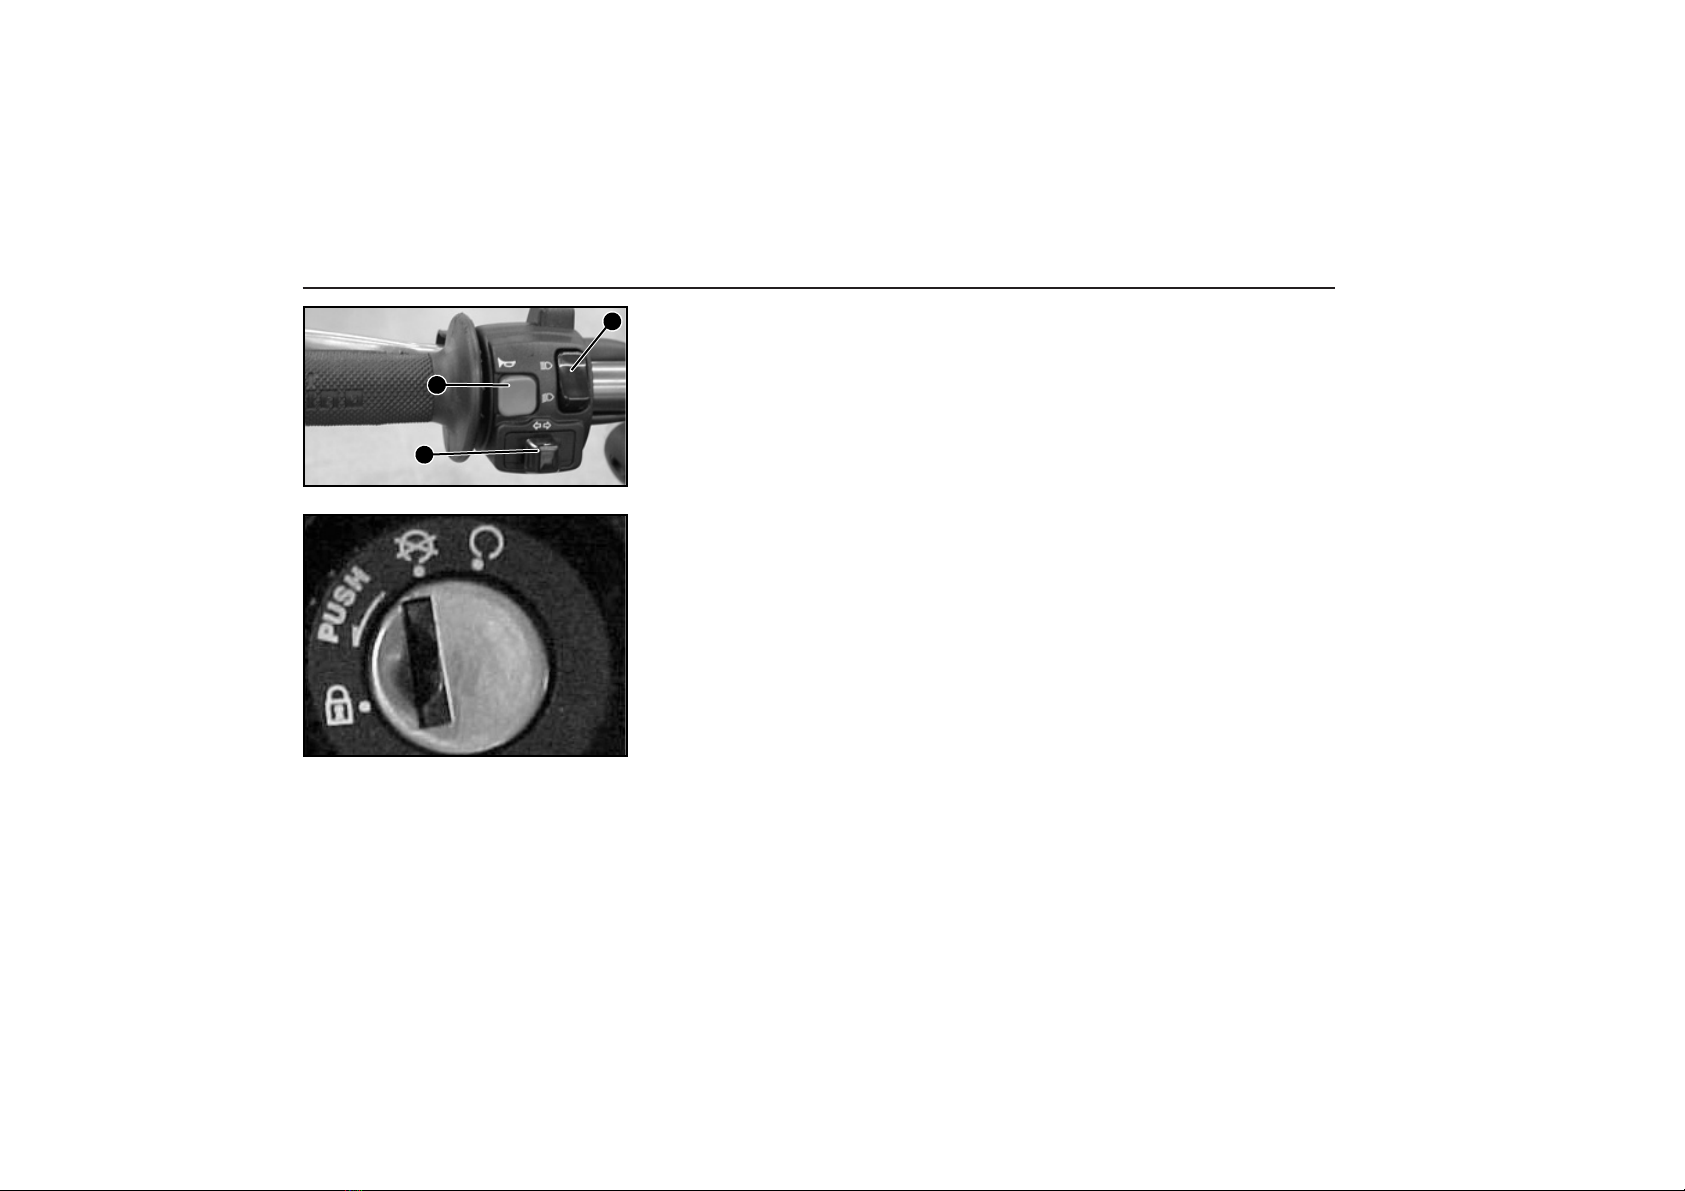
Grupo conmutador, situado en el lado
izquierdo del manillar.
Mando luces (1)
Tiene dos posiciones:
Abajo, luz de cruce
Arriba, luz intensiva.
Para que este mando funcione, poner
antes la llave de contacto en posición !
de arranque
Pulsador acústico claxon (2)
Mando intermitentes (3)
Centro:
Intermitentes apagados
Derecha:
Intermitentes lado derecho
encendidos
Izquierdo:
Intermitentes lado izquierdo
encendidos
Groupe commutateur, situé sur le côté
gauche du guidon.
Commande éclairage (1)
Il existe deux possibles positions:
Vers le bas, feux de croisement
Vers le haut, feux de route.
Pour que cette commande fonctionne, il
est nécessaire de positionner la clef de
contact sur le point de démarrage !
Bouton acoustique Klaxon (2)
Commande clignotants (3)
Centre:
Clignotants éteints
Droite:
Clignotants coté droit allumés
Gauche:
Clignotants coté gauche allumés
Mando luces, claxon y stop - Cerradura de contacto
Commandes lumières, klaxon et stop - Serrure du contact
20
ef
1
2
3
Table of contents
Other Derbi Motorcycle manuals

Derbi
Derbi GPR 125 Racing Instruction manual

Derbi
Derbi SENDA 50 DRD RACING X-TREME User manual

Derbi
Derbi SENDA R/SM 125 4T Baja User manual

Derbi
Derbi RAMBLA 250 i.e. 2008 User manual

Derbi
Derbi GP1 50 cc Instruction manual

Derbi
Derbi X-TREME R/SM User manual

Derbi
Derbi Dirtboy 10 Instruction manual

Derbi
Derbi GPR 125 Racing Instruction manual

Derbi
Derbi GPR 50 2009 User guide

Derbi
Derbi SENDA R DRD PRO 50 c.c. User manual


