Akai A58084 User manual

INSTRUCTION MANUAL
BLUETOOTH KARAOKE MACHINE
WITH LED LIGHT SHOW & 4.3” TFT COLOUR SCREEN
MODEL: A58084
NEED HELP?
FOR ADVICE, SPARES AND RETURNS.
CALL:+44 (0)333 220 6042
8.30AM TO 6.00PM MONDAY-FRIDAY
VISIT: WWW.AKAIONLINE.CO
90 YEARS OF JAPANESE TECHNOLOGY
Wireless
Connectivity
Wired Microphones
Video & Audio Output
Mains Operated
Compatible to
CD/CDG/CDR

2
We declare that this product conforms to the following product legislation in accordance
with the following directive(s):
2014/30/EU Electromagnetic Compatibility Directive.
2014/35/EU Low Voltage Directive.
2011/65/EU Restriction of Hazardous Substances Directive.
2009/125/EC Eco-Design of Energy Related Products.
RK Wholesale LTD Quality Assurance.
DECLARATION OF CONFORMITY
TECHNICAL DATA
GUARANTEE
This product is guaranteed for 12 months
from the date of the original purchase.
If any defect arises due to faulty materials
or workmanship, the faulty product must be
returned to the place of purchase.
Refund or replacement is at the discretion
of the retailer.
The following conditions apply:
The product must be returned to the retailer
with the proof of purchase.
The product must be installed and used in
accordance with the instructions contained
in this instruction guide.
This item is for domestic purposes only.
This guarantee does not cover wear and
tear, damage, misuse or consumable parts.
RK Wholesale LTD has limited responsibility
for incidental or consequential loss or
damage.
Valid in the UK and Eire only.
MODEL NO: A58084
POWER SUPPLY: DC 5.8V - 1500mAh
INPUT: 100-240V ~50/60Hz
OUTPUT: 5.8W
SPEAKER OUTPUT: 2W

3
IMPORTANT INFORMATION - RETAIN FOR FUTURE USE
SAFETY INFORMATION
Important safety instructions – read carefully before use.
It is important that this instruction manual should be retained
with the appliance player for future reference. These warnings
have been provided in the interest of safety. You MUST read them
carefully before installation or use.
WARNING
• Check that the voltage
of the main circuit
corresponds with the
rating of the appliance
before operating.
• Please ensure that the
appliance is used on a
stable, level, and heat
resistant surface.
• DO NOT immerse cords,
plugs or any part of the
appliance in water or any
other liquid.
• DO NOT leave the
appliance unattended
while it is operating.
• Close supervision is
necessary when any
appliance is used by or
near children or pets.
• This appliance can be
used by children aged
from 8 years and above
and persons with reduced
physical, sensory or
mental capabilities or
lack of experience and
knowledge if they have
been given supervision or
instruction concerning use
of the appliance in a safe
way and understand the
hazards involved.
• Children shall not play with
the appliance.
• Cleaning and user
maintenance shall not be
made by children without
supervision.
• Switch off at the wall
socket then remove the
plug from the socket
when not in use or before
cleaning.
• If the supply cord or
appliance is damaged,
stop using the appliance
immediately and
seek advice from the
manufacturer or its
service agent or a similarly
qualified person.

4
• DO NOT let the cord hang
over the edge of a table
or counter or let it come
into contact with any hot
surfaces.
• The use of accessory
attachments is not
recommended by the
appliance manufacturer,
apart from those supplied
with this product. DO NOT
use extension cords with
the appliance.
• DO NOT pull the plug out
by the cord as this may
damage the plug and/or the
cable.
• DO NOT use this product
for anything other than its
intended use.
• This appliance is for
household use only.
• DO NOT carry the appliance
by the power cord.
• DO NOT place anything
containing liquid on top of
the unit
• DO NOT spill liquid onto the
appliance. If this happens,
mop up the liquid and seek
advice from a qualified
technician.
• DO NOT use next to a
swimming pool.
• DO NOT use in wet or damp
surroundings or conditions.
• DO NOT put objects into any
of the openings.
• Keep the unit free from
dust, lint etc.
• DO NOT install near any
heat sources such as
radiators, heat registers,
stoves, or other apparatus
(including amplifiers) that
produce heat.
• Only use attachments/
accessories specified by the
manufacturer.
• Unplug this apparatus
during lightning storms
or when unused for long
periods of time.
• Please ensure that the
appliance has adequate
ventilation and is not
covered.
• Battery shall not be
exposed to excessive heat
such as sunshine, fire or
the like.
• Protect the power cord
from being walked on
or pinched particularly
at plugs, convenience
receptacles, and the point
where they exit from the
apparatus.

5
• DO NOT use a damaged
power cord or plug or a
loose outlet. Doing so may
result in fire or electric
shock.
• DO NOT play music at
excessive level especially
near children.
• WARNING! Keep batteries
out of reach of children.
Swallowing may lead to
serious injury or death in
as little as 2 hours due
to chemical burns and
potential perforation of the
oesophagus. If swallowed,
immediately go to a
hospital emergency room.
Dispose of used batteries
immediately.
• WARNING! To reduce the
risk of electric shock DO
NOT remove the cover or
back of the device. There
are no user serviceable
parts inside. Refer servicing
and repair to qualified
service personnel or the
manufacturer.
• DO NOT plug/unplug the
power plug into/from an
electrical outlet with wet
hands.
• Use replacement parts
which are specified by the
manufacturer.
• Place the unit where there
is good ventilation. Place
the system on a flat, hard
and stable surface. DO NOT
expose to temperatures
above 40°C. Allow at least
10 cm clearance from the
rear and the top of the unit
and 5 cm from each side.
• DO NOT mount this product
on a wall or ceiling.
• DO NOT place the unit
near TVs, speakers and
other objects that generate
strong magnetic fields.
• WARNING! Strong electro-
magnetic interference may
affect the performance
of the unit. If this
occurs, simply follow
the indications in the
instruction manual to reset
the product and resume
normal operation. If normal
operation cannot be
resumed, please move the
product to another location,
away from the electro-
magnetic source.

6
• NOTE: when the system is
switched to standby mode,
it is still consuming some
power. To disconnect the
system completely, remove
the AC power plug from the
wall outlet.
• In the unlikely event the
appliance develops a fault,
stop using it immediately
and seek advice from the
service department:
+44 (0) 333 220 6042

7
1. 4.3” Colour TFT
2. Control panel
3. Built-in speakers & LED light
show
4. Phone/Tablet Stand
5. Video & Audio ports / AC
adaptor ports (back of unit)
6. Microphone holder
7. Light on/off button
8. Screen on/off button
9. 10+/ F+
10. Prog/repeat button
11. Volume dial
12. Back button
13. Forward button
14. Play/Pause button
15. Stop & Pair button
16. Automatic Voice Control (AVC)
dial
17. Power & Function button
18. Line-IN
19. Balance dial
20. USB port
21. Mic input jacks
22. Echo dial
23. Record button
24. Mic volume dial
PACKAGE CONTENTS
FEATURES AND CONTROLS
INSTRUCTION MANUAL
KARAOKE MACHINE
RCA CABLE
AC ADAPTOR
WIRED MICROPHONE
PHONE/TABLET STAND
CDG DISC
1
2
3
4
6
5
16 24
23
17
201918 2121 22
7 8 9 10 11 12 13 14 15

8
USING YOUR APPLIANCE
BEFORE FIRST USE:
1. Remove the product from the box.
2. Remove any packaging from the
product.
3. Please retain all packaging until you
have checked and counted all the parts
and the contents against the parts list.
4. Your appliance is now ready for normal
use.
PLUGGING YOUR MACHINE IN:
1. This device is powered through the
mains socket via the included AC
adaptor. To connect the AC adaptor to
the machine, use the DC-In port located
at the back of the unit.
PLUGGING THE MICROPHONE IN:
1. This machine is complete with a
microphone. To plug the microphone
into the unit, connect it to one of the 2
microphone jacks located on the unit’s
control panel.
TURNING THE MICROPHONE ON AND OFF:
1. You can turn the microphone on and off
at any time, without needing to turn off
the unit.
2. To turn the microphone off
independently, use the ‘On/Off’ switch
located on the body of the microphone.
TURNING THE MACHINE ON/OFF:
1. To turn the machine on or off, press the
Power button on the bottom left-hand
corner of the unit’s control panel.
TURNING THE SCREEN ON/OFF:
1. To turn the TFT screen on or off, press
the ‘Screen On/Off’ button on the unit’s
control panel.
TURNING THE LIGHT SHOW ON/OFF:
1. This karaoke machine features an
attractive multi-coloured LED light
show. This light show automatically
starts up whenever playback begins.
2. The LED light show can be manually
turned on and off using the ‘Light On/
Off’ button on the unit’s control panel.
Press the button once while audio is
playing to turn the light show off. Press
the button again at any time to turn the
function back on.
CONNECTIVITY OPTIONS:
CD PLAYBACK
1. To play audio from a physical CD, insert
it into the CD tray located at the top of
the unit.
2. To open this tray, carefully lift its cover,
using the recessed groove on the
bottom right-hand corner as a grip.
CONNECTING TO A SCREEN
1. You can connect this karaoke machine
to an external screen using the included
RCA cables.
2. To connect this unit to a screen, plug
each of the three ends of the RCA cable
to the port of its corresponding colour,
located at the back of the unit. Plug the
other end of each cable to the port of its
corresponding colour on your television
screen or monitor.
NOTE: You will need to connect the unit to
a screen in order to view lyrics when using
a karaoke CD (CDG) as your chosen form of
playback.
USB CONNECTIVITY
1. To connect a USB device to the karaoke
machine, plug it into the USB port
located at the front of the unit.

9
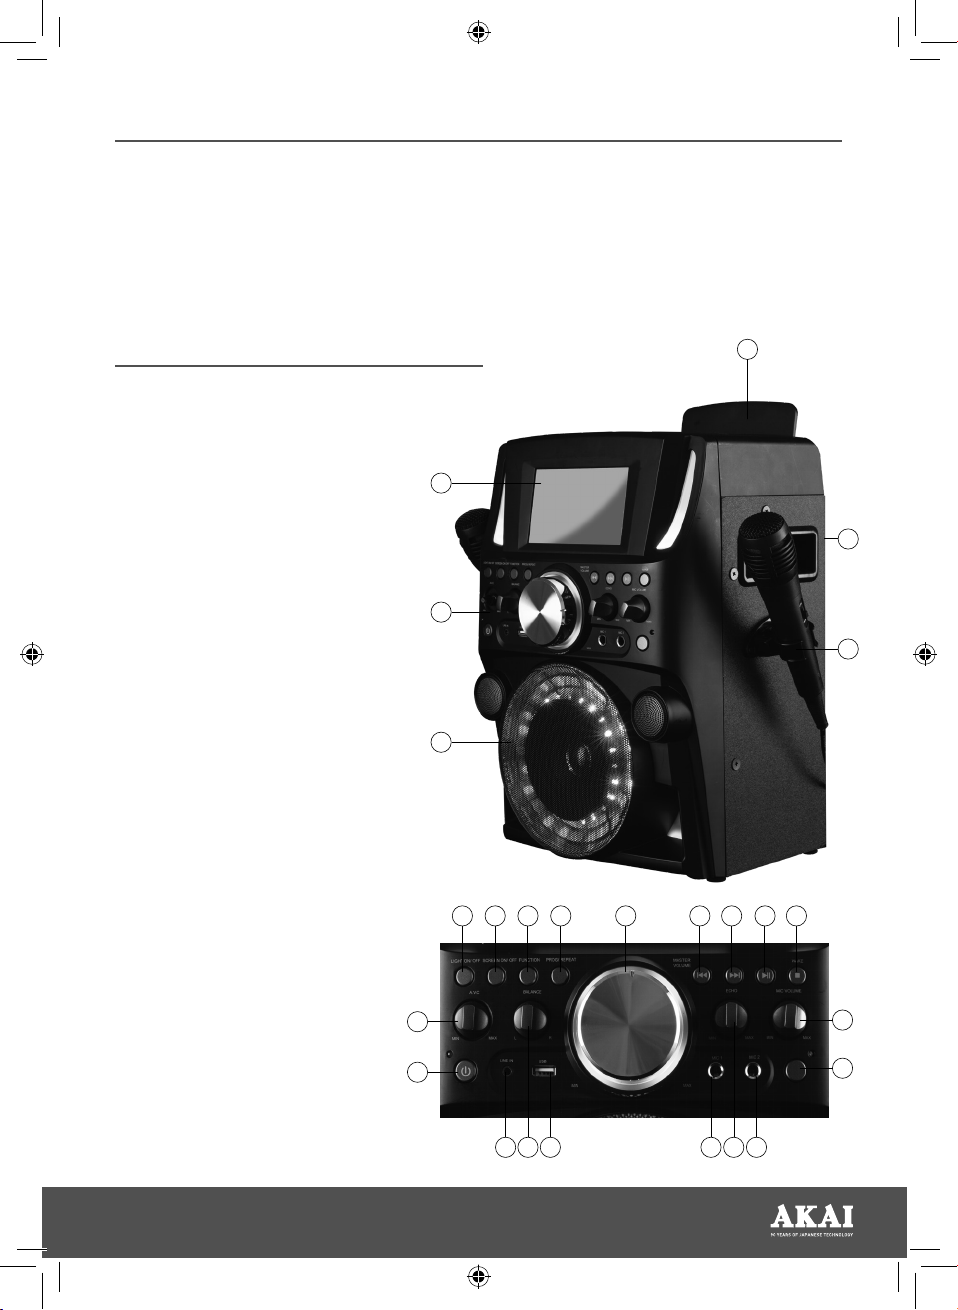
LINE-IN CONNECTIVITY
1. You can connect an external device to
the karaoke machine using a cable
or wire. To do this, plug the relevant
connection cable into the Line-In port
located at the front of the unit.
BLUETOOTH PAIRING
1. You can pair this karaoke machine to
any smart device using the built-in
Bluetooth function.
2. To activate the Bluetooth function, first
press the Power button to turn the
device on.
3. Once the device is on, repeatedly press
the ‘Function’ button until the word
‘Bluetooth’ appears on the screen.
4. Once the Bluetooth function is selected,
press the ‘Pair’ button on the upper
right-hand corner of the unit’s control
panel.
5. Your karaoke machine is now ready to
pair.
6. To pair the device, open the Bluetooth
menu on your smartphone or tablet.
The karaoke machine will appear
as ‘A58054’ on your list of available
Bluetooth devices. Tap this option once
and your device will automatically
attempt to pair to the karaoke machine.
A short ringing sound will play to
indicate the pairing was successful.
NOTE: This device includes a clip-on
stand where you can place your tablet or
smartphone while connected in Bluetooth
mode. To affix this stand to the unit, simply
slot the two hooks at the front of the stand
into the dedicated slots at the back of the
unit. Take care to ensure the stand is firmly
attached to the unit before attempting to use
it, to prevent damage to your smart device.
PLAYBACK OPTIONS:
SELECTING PLAYBACK MODE
This unit supports CD, USB, Bluetooth and
Line In playback.
1. To select your preferred output mode,
press the ‘Function’ button on the unit’s
control panel.
2. Repeatedly press this button to cycle
through the available playback modes.
STARTING / PAUSING / STOPPING
PLAYBACK
1. To start and pause playback on your
unit, press the ‘Play/Pause’ button on
the unit’s control panel.
2. To stop playback, press the ‘Stop’ button
on the unit’s control panel.
SKIPPING TRACKS
1. To skip to the next track on your current
audio selection, press the ‘Forward’
button on the unit’s control panel.
2. To skip to the previous track on your
current audio selection, press the ‘Back’
button on the unit’s control panel.
VOLUME CONTROL
1. To adjust the output or playback volume,
use the volume control dial located in
the centre of the unit’s control panel.
2. Alternatively, when connected to an
external device via Bluetooth or USB,
you can also control the output volume
directly on the source unit using its
volume controls.
USING YOUR APPLIANCE

10
PROGRAMMING TRACK SELECTION
1. This karaoke machine lets you program
the playing order for up to 20 music
tracks.
2. To use the program function, first press
the ‘Stop’ button to stop playback.
3. With playback stopped, press the ‘Prog/
Repeat’ button on the unit’s control
panel. A track selection indicator will
appear on the screen.
4. Using the ‘Forward’ and ‘Back’ button,
select the track you want to program as
the first on your playlist.
5. Once you have selected the desired
track, click the ‘Prog/Repeat’ button
again to program it onto position 1. The
words ‘PROG SET 00:XX’ will appear on
the screen to confirm the process was
successful.
6. Once you have set the first track on
your playlist, repeat this process as
many times as necessary until you have
programmed all your chosen tracks into
the desired order.
NOTE: Please note you can only use the
Program function when playback is fully
stopped. You will not be able to program
tracks while the playback function is in
operation.
TRACK REPEAT FUNCTION
1. This karaoke machine lets you repeat
one or all of the tracks on your playlist
as many times as you desire.
2. To use the track repeat function, press
the ‘Prog/Repeat’ button on the unit’s
control panel while a song or audio file
is playing. A symbol will appear on the
TFT screen to indicate this mode has
been selected.
3. Press this button once to repeat/loop
the current track. A ‘1’ symbol will
appear on the TFT screen to confirm
your selection.
4. Press the button a second time to
repeat/loop your entire playlist. An ‘A’
symbol will appear on the TFT screen to
confirm your selection.
5. To cancel the repeat/loop function,
press the button again.
KARAOKE FUNCTIONALITIES:
AUTOMATIC VOICE CONTROL
1. This karaoke machine is equipped with
an automatic voice control function,
which pushes the recorded vocals in a
track to the background to highlight the
singer’s voice.
2. To regulate the volume of the recorded
vocals on a track, turn the dial marked
‘AVC’ on the unit’s control panel while
the relevant track is playing.
BALANCE
1. To adjust the balance on a track, turn
the dial marked ‘Balance’ on the unit’s
control panel while the track is playing.
ECHO
1. You can regulate the amount of reverb/
echo on a track. To do this, turn the dial
marked ‘Echo’, located on the right-
hand side of the unit’s control panel,
while the track is playing.
MICROPHONE VOLUME
1. To adjust the volume of the microphone,
turn the dial marked ‘Mic Volume’
on the unit’s control panel while the
microphone is plugged into the unit.
USING YOUR APPLIANCE

11
TROUBLESHOOTING THE APPLIANCE
PROBLEM SOLUTION
Power
The system does
not turn on or does
not respond to the
remote control.
• Make sure the AC power plug is properly connected to the
mains outlet and it has power.
• If this does not help, leave the unit unplugged and seek advice
from the manufacturer or qualified repair technician.
Pairing the product
Cannot pair
successfully.
• Check whether the device is in standby or searching mode.
• Check whether there are other Bluetooth receivers around
your Bluetooth device. Turn them off to avoid any disturbance.
Attempt to pair again.
• You can click “Forget this device” and then repair it again if
required. Search for “A58084” on the Bluetooth device and pair
it again.
Cannot play
properly, the music
plays intermittently.
• Check whether the distance between the unit and your
Bluetooth device is out of its working distance (10m), or
whether there are obstacles blocking the communication
between the unit and the Bluetooth device. Move the unit or
the Bluetooth device to get the best reception.
The sound is
distorted. • Check the volume setting on both the unit and your Bluetooth
device, and adjust the volume to a suitable level.
• Decrease the volume.
No sound can be
heard.
No sound can be
heard from the
microphone.
• Turn the volume dial at the front of the unit clockwise to
increase the sound.
• Ensure the microphone is plugged into the unit via one of the 2
microphone ports at the front.
• Check if the switch on the body of the microphone is flicked to
ON.
There is an echo
when using the
microphone.
• Adjust the echo level by turning the ‘Echo’ dial on the unit’s
control panel.

12
WARNING:
Do not attempt to open any part of the power adaptor or plug.
ELECTRICAL SAFETY
WARNING:
This appliance is double insulated.
Do not connect any wire to the earth terminal.
IMPORTANT
As the colours in the mains lead of this
appliance may not correspond with
the coloured markings identifying the
terminals in your plug, please proceed as
follows:
The wires in the mains lead are coloured in
accordance with the following code:
Blue neutral [N] Brown live [L]
Plug Fitting Details (Where Applicable).
The wire coloured blue is the neutral and
must be connected to the terminal marked
[N] or coloured black.
The wire coloured brown is the live wire
and must be connected to the terminal
marked [L] or coloured red.
On no account must either the brown or
the blue wire be connected to the [EARTH]
terminal .
Always ensure that the cord grip is
fastened correctly.
The plug must be fitted with a fuse of the
same rating already fitted and conforming
to BS 1362 and be ASTA approved.
If in doubt consult a qualified electrician
who will be pleased to do this for you.
Non-Rewireable Mains Plug.
If your appliance is supplied with a
non-rewireable plug fitted to the mains
lead and should the fuse need replacing,
you must use an ASTA approved one
(conforming to BS 1362 of the same
rating).
If in doubt, consult a qualified electrician
who will be pleased to do this for you.
If you need to remove the plug – disconnect
it from the mains – and then cut it off of
the mains lead and immediately dispose of
it in a safe manner. Never attempt to reuse
the plug or insert it into a socket outlet as
there is a danger of an electric shock.
Fuse
Neutral
(Blue)
Live
(Brown)

13
CLEANING AND CARE
1. Clean the unit with a soft, damp
cloth. Never use chemicals or hard
abrasives.
2. Keep this unit away from wet or damp
surroundings.
3. Store in a clean, dry place.
4. Do not expose the unit to extremely
high or low temperatures as this will
shorten the life of electronic devices,
destroy the battery and distort certain
plastic parts.
5. Don’t dispose of the unit in fire as it
will result in an explosion.
6. Don’t expose the unit to contact
with sharp objects as this will cause
scratches and damage.
7. Don’t let the unit fall to the floor. The
internal circuit might get damaged.
8. Don’t attempt to disassemble the unit
yourself, as it may get damaged.
CAUTION: Never leave the speaker
in direct sunlight or in hot, humid or
dusty places. Keep the speaker away
from heating appliances and sources of
electrical noise, such as fluorescent lamps
and motors.
RECYCLING
DISPOSAL OF THE UNIT:
Appliances bearing the symbol shown here may not be disposed of in domestic
rubbish.
You are required to dispose of old electrical and electronic appliances like this
separately.
Please visit www.recycle-more.co.uk or www.recyclenow.co.uk for access to information
about the recycling of electrical items.
Please visit www.weeeireland.ie for access to information about the recycling of
electrical items purchased in Ireland.
The WEEE directive, introduced in August 2006, states that all electrical items must be
recycled, rather than taken to landfill.
Please arrange to take this appliance to your local Civic Amenity site for recycling, once it
has reached the end of its life.

14
NOTES

15
NOTES

*REGISTER YOUR PRODUCT ONLINE AT WWW.AKAIONLINE.CO
AND ENJOY 3 YEARS PEACE OF MIND
AKAI CUSTOMER SUPPORT TEAM
+44 (0) 333 220 6042
NEED HELP?
FOR ADVICE, SPARES AND RETURNS.
CALL: +44 (0)333 220 6042
8.30AM TO 6.00PM MONDAY-FRIDAY
VISIT: WWW.AKAIONLINE.CO
DISTRIBUTED THROUGHOUT THE UK BY RK WHOLESALE LTD
0719.V1
90 YEARS OF JAPANESE TECHNOLOGY
Table of contents
Other Akai Karaoke System manuals