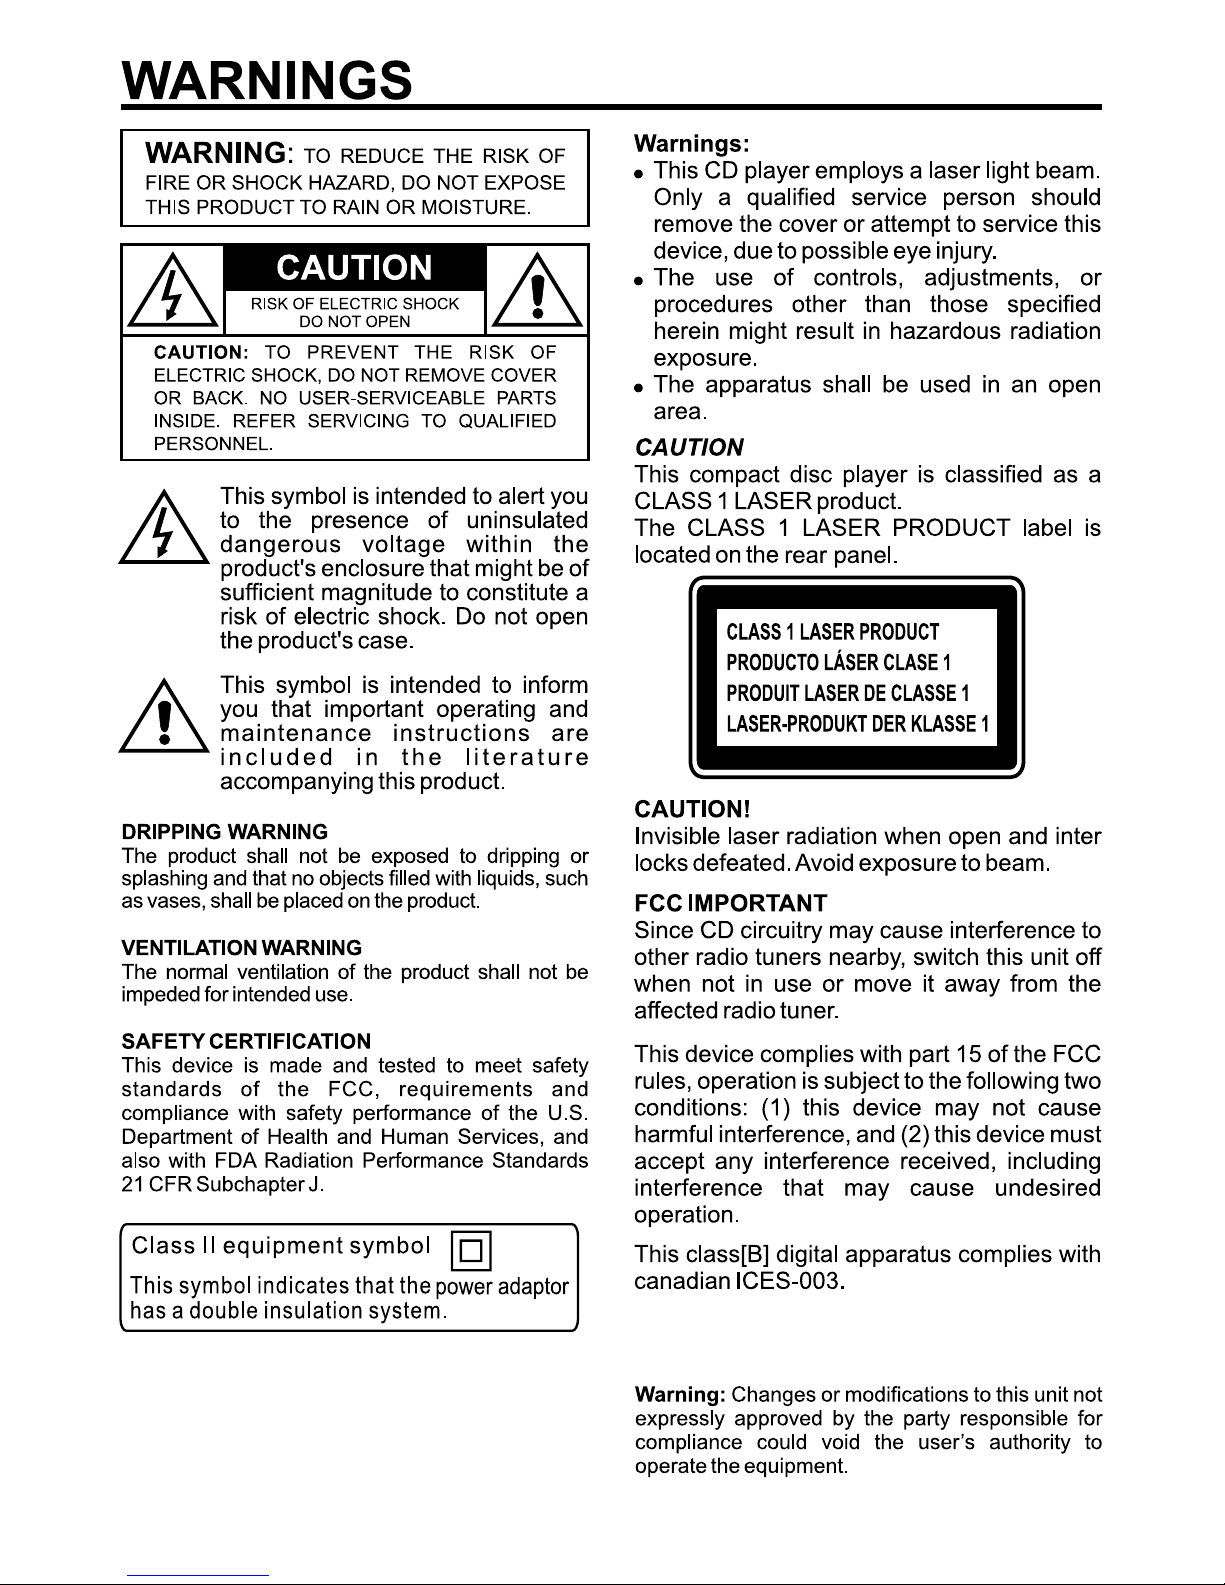
Akai KS808 User manual

INSTRUCTION MANUAL
KS808
CD+G/MP3+G Karaoke System
With Speaker Pedestal
Thank you for purchasing this Karaoke System. Please read this instruction manual carefully before
using this product to ensure proper use. Keep this manual in a safe place for future reference.

1
WHAT’S IN THE BOX
Contents
1. KS808 Karaoke System
Main Unit
3. Pedestal Base
5. Screws
Butterfly head screw for assembling
main unit and speaker pedestal
Round head screw for assembling
pedestal base and speaker pedestal
7. Pre-recorded Karaoke CD+G Disc
9. AC-DC Power Adaptor
11. Audio Connection
Cable (connection
between main unit
and speaker pedestal
13. Warranty Card 14. Screw Driver
If you are missing any parts above, please contact ADT Digital LLC.
Tel: 561 922 6886
Fax: 561 922 6159
2. Speaker Pedestal
4. Screw Covers
(for Pedestal Base)
6. AV Cable
8. Dynamic Microphone
( x 2 pcs)
10. DC Power Connection
Cable (connection between
main unit and speaker
pedestal
12. Instruction Manual
x 4 pcs
x 4 pcs

Cet appareil numérique de la classe B est
conforme à la norme NMB-003 du Canada.
2

NOTE: This digital apparatus does not exceed the Class B limits for radio noise emissions from digital apparatus as
set out in the radio interference regulations of Industry Canada.
Le présent appareil numérique n'émet pas de bruits radioélectriques dépassant les limites applicables aux appareils
numériques de Classe B prescrites dans le règlement sur le brouillage radioélectrique édicté par Industrie Canada.
NOTE: This equipment has been tested and found to comply with the limits for a Class B digital device, pursuant
to part 15 of the FCC Rules. These limits are designed to provide reasonable protection against harmful interfer-
ence in a residential installation. This equipment generates, uses and can radiate radio frequency energy and, if
not installed and used in accordance with the instructions, may cause harmful interference to radio communica-
tions. However, there is no guarantee that interference will not occur in a particular installation. If this equipment
does cause harmful interference to radio or television (which can be determined by turning the equipment off),
the user is encouraged to try to correct the interference by one or more of the following measures:
FCC AND CANADIAN ICES
3

WARNINGS:
• To reduce the risk of fire or electric shock, do not expose this apparatus to rain or moisture.
Avertissement: pour réduire le risque d’incendie ou de choc électrique, ne pas exposer cet appareil sous la pluie
et l’humidité.
• The apparatus shall not be exposed to dripping or splashing and that no objects filled with liquids, such as vases,
shall be placed on apparatus.
L'appareil ne doit pas être exposé aux écoulements ou aux éclaboussures et aucun objet ne contenant de liquide,
tel qu'un vase, ne doit être placé sur l'objet.
• Mains plug /Power adaptor is used as disconnect device and it should remain readily operable during intended use.
In order to disconnect the apparatus from the mains completely, the main plug/ power adaptor should be
disconnected from the mains socket outlet completely.
La prise du secteur ne doit pas être obstruée ou doit être facilement accessible pendant son utilisation. Pour être
complètement déconnecté de l'alimentation d'entrée, la prise doit être débranchée du secteur.
14.
15.
16.
17.
18.
19.
20.
21.
22.
23.
24.
25.
4

CONTROL LOCATION
FRONT SIDE
MAIN UNIT
LEFT SIDE SPEAKER RIGHT SIDE SPEAKER
CD DOOR OPEN AREA
CD DOOR
TFT SCREEN
CONTROL PANEL
BACK SIDE
NOTTUBPOTS/EDOMSNOTTUBPIKS
PLAY / PAUSE BUTTON
BALANCE CONTROL
MASTER VOLUME CONTROL
USB SOCKET
LINE IN JACK
RECORD BUTTON
TFT SCREEN
ON / OFF BUTTON
MIC VOLUME
ECHO CONTROL
POWER ON INDICATOR
ON / OFF BUTTON
A.V.C CONTROL
TRACK BUTTON
BUTTON
BUTTON
KEY / PAGE
PROGRAM/REPEAT BUTTON
VIDEO JACK AUDIO OUT (R) JACK
AUDIO OUT (L) JACK
DC IN JACK (TO CONNECT
TO SPEAKER PEDESTAL)
LINE OUT JACK (TO CONNECT
TO SPEAKER PEDESTAL)
MIC 2 JACK
MIC 1 JACK
5

CONTROL LOCATION
FRONT SIDE
SPEAKER PEDESTAL
MASTER VOLUME CONTROL
W/ POWER ON/OFF CONTROL
DC OUT JACK
(TO CONNECT TO
MAIN UNIT)
BACK SIDE
SPEAKER PEDESTAL
LINE IN JACK
(TO CONNECT TO
MAIN UNIT)
SPEAKERS
DC IN JACK
(TO AC/DC POWER
ADAPTER)
SCREW COVERS
PEDESTAL BASE
POWER ON INDICATOR RING
SPEAKERS
SPEAKER CLOTH
COVERS
6

TFT DISPLAY ICON
CDG TRK 8/8 C 00:16:04
1
A
D
P=
CD=
PLAYING TIME
REPEAT MODE
REPEAT ONE
REPEAT ALL
REPEAT FOLDER
NO REPEAT
PROGRAM MODE
C=
PROGRAM MODE PLAYING
NO PROGRAM MODE PLAY
PLAY / PAUSE / STOP INDICATOR
PLAYING MODE
PAUSE MODE
STOP MODE
PLAYING TRACK NUMBER AND TOTAL TRACK NUMBER
PLAYING DISC MODE
CDG=
CD DISC PLAYING
CD+G DISC PLAYING
CDrom= CD ROM /
MP3+G DISC PLAYING
USB= USB PLAYING
7

SETTING UP THE UNIT
8
CAUTION:
1. Take extra care and safety precautions when fastening screws by screw driver during
assembling the unit.
2. Do not hold / press the speaker cloth covers on both sides of the
speaker pedestal during assembling to avoid damages to the
speakers underneath.
3. Make sure to hold the main unit and speaker pedestal by both hands
during the assembly.
Assembling the Pedestal Unit
1. Insert the speaker pedestal (upper part) onto the recess on the top of the pedestal stand.
2. Fasten the round head screws (supplied) on the both sides of the pedestal stand by the
supplied screw driver.
RECESS
PEDESTAL
STAND
PEDESTAL STAND
SPEAKER PEDESTAL
SPEAKER
PEDESTAL
ROUND HEAD SCREW X 4
(SUPPLIED)

SETTING UP THE UNIT (Cont’d)
9
Assembling the Pedestal Unit and Main Unit
1. Hold the main unit by both hands and place onto the top holder on the top of the speaker
pedestal.
2. After the unit is placed stably on the top holder, fasten the main unit and the top holder
by FOUR butterfly head screws (supplied) by hand underneath the top holder.
NOTE: Please hold the main unit by one hand during fastening the screw.
3. After the screws are fastened, please snap the screw covers onto the slot on both sides
to cover the screws.
MAIN UNIT
SCREW COVER
SPEAKER PEDESTAL
TOP HOLDER
BUTTERFLY
SCREWS
(SUPPLIED)
Note: Make sure all screws are fully driven into the unit before snapping the screw
covers.

MAKING THE CONNECTIONS
CONNECTING POWER
Plug the supplied power adapter small end into the DC IN jack located on the rear bottom of
the speaker pedestal, plug the adapter into the standard AC wall socket.
CAUTION: The unit is designed to operate from a mains supply of AC 120V~60Hz. If the
adapter does not fit properly, turn it over and again. Do not force it.
NOTES: When the unit is not operated by the AC power or unused for long periods of the
time. Please remove the power adapter from the wall outlet and unplug from the main unit.
10

MAKING THE CONNECTIONS
CONNECTING MAIN UNIT TO PEDESTAL UNIT
1. Please follow the steps below to make connection between main unit and pedestal unit.
2. Connect the supplied DC power connection cable between the DC OUT jack at the back
of the speaker pedestal and DC IN jack at the back of the main unit.
3. Connect the supplied audio connection cable between the LINE IN jack at the back of the
speaker pedestal and LINE OUT jack at the back of the main unit.
11
DC CONNECTION CABLE
DC OUT JACK
DC IN JACK
AUDIO CONNECTION CABLE
LINE OUT JACK
LINE IN JACK

MAKING THE CONNECTIONS (Cont’d)
CONNECTING TO YOUR TV OR VCR / HOME THEATER
Your Karaoke machine is designed to connect to your TV the same way you would connect
most video cameras, VCR / Home theater or video games consoles. We have provided
RCA cables to connect your unit to a TV, VCR / Home theater, video device or an external
audio / sound system. The RCA cables have three connections at each end (white and red
are for left and right audio connections and the yellow is for video connections.
VIDEO CONNECTION
Please follow the steps below to display CD+G lyrics on the TV screen:
1. Locate the multi-colored RCA cables.
2. Connect video cable (yellow) to the Video Out of the back of the main unit.
3. Connect the other end of the video cable (yellow) to the video input on your TV or VCR /
Home theater.
12
SELECTING YOUR KARAOKE MACHINE AS YOUR SOURCE/INPUT
Selecting your Karaoke Machine as a source / input on your TV is very similar to connecting
a VCR/DVD or Satellite system.
We’ve listed below the most common ways of selecting the source from your TV or VCR /
Home Theater:
1. In the set up menu of the TV or VCR / Home theater there may be an option for “Input
Select” where you can choose between “Cable/Ant., Video 1, Video 2, etc” as the input
source.
2. Look for a TV channel between the highest and lowest on your TV or VCR / Home
theater (i.e AUX, EXT, LINE 1 or LINE IN)
3. Your remote control for your TV or VCR / Home Theater may have source input
selections as well as detailed below: “Video, Video 1, Game, AUX, EXT or LINE-IN.”
Choosing one of those sources in most cases should display the lyrics from your
Karaoke Machine as well.

MAKING THE CONNECTIONS (Cont’d)
13
AUDIO CONNECTION
Please follow the steps below to connect audio signal from the unit to your TV, VCR/Home
Theater or home audio system.
RCA connection
1. Locate the multi-colored RCA cables (White and Red)
2. Connect audio cables to the Audio Out of the back of the main unit.
3. Connect the other end of the audio cables to the Audio/Auxiliary input on your TV or
VCR/Home Theater or home audio system.
SETTING UP LINE IN CONNECTION
The Line-in jack will allow you to connect external music player or external sound source to
your Karaoke Machine speakers
1. Plug a 3.5mm audio cable (not included) into your external music player and connect the
other end (3.5mm jack) into the LINE IN jack on the front of the main unit.
2. Make sure your external music is turned on.
3. Start music playback on your external music player.
4. Adjust MASTER VOLUME on the main unit and the speaker pedestal to control the sound
level of music playback from the speakers on the Karaoke machine.

MAKING THE CONNECTIONS (Cont’d)
14
SETTING UP YOUR MICROPHONE
1. Plug the microphones (supplied) into the MIC1 and/or MIC2 jacks at the rear of the main
unit. Their output will be mixed with playback from CD/CD+G/MP3+G.
2. Located on the microphone, there is an ON/OFF switch.
3. Ensure you set the ON/OFF switch on the microphone to ON when required for use.
Warning:
Please do not point the microphone head directly to the front of the speaker(s) on the unit
when you are singing, it would cause unwanted feedback sound that may affect the
performance of your unit.
Tapping or dropping the microphone while it is on can permanently damage your
microphone. Resist the urge to swing the microphone around by the cord!
VHF wireless microphones are not recommended to work with this Karaoke system. Some
VHF wireless microphones may cause unwanted noise and interference.

15
CD OR CD+G / MP3+G OPERATION
This unit is designed to play CDs/CD+G/MP3/MP3+G
disc bearing the identification logo respectively. If the
disc does not conform to the standard, it may not play
properly.
NOTE: The unit may not be able to read CDR or CDRW disc correctly. The readability
depends on the quality of recording produced by CD recorder or CD writer.
TURNING POWER ON/OFF
1. To turn on the main unit of the Karaoke Machine, press the ON/OFF
button once, the POWER indicator will light up and TFT screen will
display the OPENING SCREEN and start to read CD. (If no disc is
loaded, it will display “NO DISC”)
2. Turn the master volume knob on the speaker pedestal in clockwise
direction to turn on the speaker pedestal unit. A “CLICK” sound can
be heard once turned on and the power indicator ring will be lighted up.
3. To turn off the system, press the ON/OFF button again. The power
indicator and TFT will turn off and turn the master volume knob on
the speaker pedestal in counter-clockwise direction till a “CLICK”
sound is heard.
LOADING A DISC
1. Pull the CD door on the front from the position close to the CD
Door Open Area. Place a disc in the CD compartment with the
printed side facing toward you.
2. Gently close the CD Door to the CD compartment. The Karaoke
Machine begins to read the disc and “READ” will be displayed.
After that, the operation icon will appear on the top of the TFT
screen.
3. Press PLAY/PAUSE to play the disc. (If no disc is loaded, it will
display “NO DISC”)
PLAY/PAUSE
1. To start playing, press the PLAY/PAUSE button once, the currently track number and
PLAY indicator will appear on the screen. (If a CD+G is loaded, the CDG will be shown
on the screen. If MP3+G is loaded, the CD-rom will be shown on the screen).
2. To temporarily stop playing, press the PLAY/PAUSE button, the PAUSE indicator will be
shown on the screen.
3. To resume play, press the PLAY/PAUSE button again, the PLAY indicator will be shown
on the screen.
NOTE: - Pressing pause when a CD+G/MP3+G is playing may cause distorted lyrics on the screen,
any distortion will remain until the whole screen is refreshed during an instrumental break
or you stop the song and start it from the beginning.
- Never place anything except a compact disc on the disc compartment.
Foreign objects can damage the unit.
- Do not apply excessive force to disc cover.
- Only place one disc on the disc compartment at a time.
- Do not open the disc cover of the CD compartment while it’s playing.

16
CD OR CD+G / MP3+G OPERATION (Cont’d)
STOP
If the STOP button is pressed in the course of playing, the disc will cease to play.
SKIP PLAY (For both CD and CD+G/MP3+G discs)
In stop or playback mode, you can skip up or down to a specific track by pressing the
forward or back SKIP Button.
ENTER A TRACK NUMBER TO PLAYBACK
1. Press the TRACK button once, the track number and total track number will be displayed.
The track number will be blinking for user selection.
2. Press the SKIP or SKIP button to select a desired track.(if the number of tracks is
less than 10)
3. If there are 10 or more tracks on the media, the first digit of track number will be blinking.
4. Press the SKIP or SKIP button to adjust the first digit.
5. Then, press TRACK button again to advance to second or third digit.
6. Press the SKIP or SKIP button to adjust the second or the third digit.
7. Press the PLAY/PAUSE button when you have selected the desired track to play.
SEARCH (For CD disc /MP3 disc only)
When playing a CD disc or MP3 disc, you can press and hold the SKIP buttons ( or ) to
locate a specific point on a track. The system will search at high speed in the forward or
reverse direction. By releasing the button, normal play will be resumed.
REPEAT PLAY (For both CD and CD+G/MP3+G discs)
1. During playback, press PROGRAM/REPEAT button once, the REP ONE indicator will
appear on the TFT screen, it can keep repeat the current track.
2. To repeat the Directory/Folder, press PROGRAM/REPEAT button twice, the REP
FOLDER indicator will appear on the TFT screen.
3. To repeat all tracks in disc, press PROGRAM/REPEAT button again, the REP ALL
indicator will appear on the TFT screen.
4. To clear the REPEAT function, press PROGRAM/REPEAT button again, the NO REP
indicator will appear on the TFT screen.

17
CD OR CD+G / MP3+G OPERATION (Cont’d)
PROGRAMMING CD PLAYBACK
This unit can be programmed to play up to 20 tracks/files in CD mode. Load the music
CD/CD+G or MP3/MP3+G disc onto the CD compartment (without pressing the PLAY/
PAUSE button).
1) Press PROGRAM/REPEAT button once in stop mode. “PRG P01:XX” will be shown on
the screen.
2) Press the SKIP buttons to select the desired track to be programmed.
3) Press PROGRAM/REPEAT button again to save the selected track/files.
4) Repeat steps 2–3 to program up to 20 tracks/files.
5) Press the PLAY/PAUSE button to play the programmed tracks after programming is
completed. The “P” indicator will appear on screen during the programmed playback.
6) To clear program and resume normal playback, press the STOP button twice during
playback, or open the CD door to clear the programmed tracks.
REMARK:
The unit can store up to 20 tracks/files in the programmable memories. During the
programmed playback, user can still select the “repeat one/repeat all” function.
PAGE+ / PAGE-
During the STOP mode, press PAGE+/PAGE- to advance song selection by 10 tracks or to
go to the next page of song list.
KEY+ / KEY-
Your system includes a digital key controller to adjust the audio tone (pitch) of the music.
Key control should be done in the PLAY MODE only. Press the KEY+ button to raise the
key of the music, and press the KEY- button to lower the key. (max. 6 times)
ECHO
Adjust the ECHO control to enhance your voice for a concert hall effect.
BALANCE
Adjust the BALANCE control between the pre-recorded singer’s voice and the music when
using a multiplex karaoke disc.
AUTO VOICE CONTROL
AUTO VOICE CONTROL can be activated and adjusted by the AVC control knob. The
vocals on the Multiplex recording will be muted when the singer starts to sing through the
microphone. When the singer stops singing, the vocals will resume to normal.

18
CD OR CD+G / MP3+G OPERATION (Cont’d)
MASTER VOLUME
There are separated volume controls on the main unit and the speaker pedestal to control
volume levels independently.
Rotate to MASTER VOLUME controls to obtain the desired sound level on the the main
unit and the speaker pedestal.
MIC VOLUME
Adjust the MIC VOLUME control to a desired level and obtain the best performance.
SCREEN ON/OFF
Press the SCREEN ON/OFF button to turn the TFT screen ON/OFF.
SELECTING THE AUDIO SOURCE
Press STOP/MODE button to toggle between DISC and USB modes, the “DISC MODE” or
“USB MODE” will be shown on the TFT screen.
Note: Selecting the audio source should be done in the stop mode only.
RECORDING AUDIO
You can record CD+G video and audio together with the singer’s voice to a USB flash drive.
The recording will be in MP3 format. The stored file name after recording will be
“TRACKXX.MP3”.
• Plug a USB flash drive to USB socket.
• Start the desired track to play on CD/CD+G disc
by pressing the SKIP or SKIP button.
• Press RECORD button to record the CD/CD+G
playback together with your voice.
(The percentage of completion will be displayed.)
• Press RECORD again to stop recording.
• To playback the recording, it is the same as
playing back the MP3 or MP3+G file on the USB
flash drive, please follow instructions in USB
OPERATION.
NOTE: This Karaoke system can only record tracks from CD / CD+G disc.
Should old acquaintance
Be forgot
And never brought to mind
REC 24%
CD TRK 154/229 00:01:29

( SEARCH ) to locate a specific point on a track. The system will search at high speed
19
USB OPERATION
INSERTING USB FLASH DRIVE
1. Insert a USB flash driver into the USB socket on the front of the main unit.
2. Make sure that USB is selected as the audio source.
See "SELECTING THE AUDIO SOURCE”
3. Press PLAY/PAUSE to start playback.
PLAY/PAUSE
1. To start playing, press the PLAY/PAUSE button once, the currently track number and
PLAY indicator will appear on the screen. (“USB” will be shown on the screen).
2. To temporarily stop playing, press the PLAY/PAUSE button, the PAUSE indicator will be
shown on the screen.
3. To resume play, press the PLAY/PAUSE button again, the PLAY indicator will be shown
on the screen.
STOP
If the STOP button is pressed in the course of playing, the USB playback will cease to play.
SKIP PLAY
In stop or playback mode, you can skip up or down to a specific track by pressing the forward
or back SKIP Button.
ENTER A TRACK NUMBER TO PLAYBACK
1. Press the TRACK button once, the track number and total track number will be displayed.
The track number will be blinking for user selection.
2. Press the SKIP or SKIP button to select a desired track.(if the number of tracks is
less than 10)
3. If there are 10 or more tracks on the media, the first digit of track number will be blinking.
4. Press the SKIP or SKIP button to adjust the first digit.
5. Then, press TRACK button again to advance to second or third digit.
6. Press the SKIP or SKIP button to adjust the second or the third digit.
7. Press the PLAY/PAUSE button when you have selected the desired track to play.
NOTE: - Pressing pause when playing on the USB, it may cause distorted lyrics on the
screen, any distortion will remain until the whole screen is refreshed during an instrumental
break or you stop the song and start it from the beginning
SEARCH (For MP3 file only)
When playing a MP3 file on the USB, you can press and hold the SKIP buttons
in the forward or reverse direction. By releasing the button, normal play will be resumed.
Table of contents
Other Akai Karaoke System manuals