Akai DVLX44C1 User manual

AKAI
Rear Pr
oj
ection TV
Service Manual
Prepared
by
Digital Video Lab
s,
Inc.
6185 Paseo del Norte, Suite 200
Carlsbad, CA 92009
10 December 2004
Revision Summary
Sec
tion
Cha
nge
S
ynop
si
s
Re
vision
0.0 -- 32 October 2004
I
In
itial release
Revision
0.1
--
)(](
VVY
2004
I
Revision 0.2 --
xx
.vvv 2004 .
service
ITIIInu
al i
DVLX
Confidential
·1·
11()~r2tlO
4
-

Rear
Projection
TV
Se
rvice Manual
Table
01
Co
ntents
Scope
..
1.1
Important Safety Instructions
..
2 DVLX4xCx Description.
2.1 Product Designation
..
3 Product Architecture ...........
...
.
3.1
Critical Subassemblies
..
. ......
.....
.
3.2 Block Diagram .....
..
..........
..
4 Product Test Environment.
5 Service Procedure.. . ............
..
.
5 1 E-
Box
Disassembly & Board Replacement Procedure
..
5.2 U mp Cartridge Replacement Procedure
..
5.3 Control Board and LED Board Replacement Procedure
..
.
6 DVLX4xCx Diagnostic Software Downloading
and
Operation
..
.
6.1
Downloading the Diagnostic Software into the DVLX4xCx
unn
...
6.2 Running the Diagnostic Software
..
7 Ope,etional Software Downloading and Operation
...
7.1
Downloading the Operational Software
Into
the DVLX4xCx unit .
7.2 Reset Picture Settings
.. ..
.....
....
..
.
7
.3
VGA Scaling and Border Alignment
..
........
...
..
74
Video Fine Tuning adjustment..
7.5 Checking
and
verifying each input
on
the DVLX4xCx unit..
7.6 Running the remote control test.
..
....
.......
..
..
7.7 Running the front panel keypad test..
...
.....
..
..
7.8 Reverting to user mode
and
finishing the test.
8 Load and
Run
Operational Software
..
9
Run
Maintenance Menu BIT
...
10
Run Calibration Procedure
..
Figure 1: DVLX4xCx Product View
..
Figure 2' DVLX4xCx Critical Subassemblies
..
Figure
14
' Maintenance Menu.
Figure
3:
DVLX4xCx Block Diagram
..........
..........
....
.
Figure
4:
Test Environment..
Figure
5:
VGA Test Pattern
..
Figure 6: Service Procedure
FlOWChart
.
Figure 7: Service Procedure Flowchart (Continued) .
Figure 8: Service Procedure Flowchart (Continued)
Figure 9: Maintenance Menu .
Figure
10:
Ma
intenance Menu
and
VGA Submenu
..
Figure
11:
Ma
intenance Menu
and
Video Fine Tuning Submenu.
Figure
12:
Ma
intenance Menu and Input Submenu
Figure
13
: Operational
On
Screen Display (OSD) Menu
..
Table 1: DVLX4xCx Products
...
.................
..
Table 2: Service Checklist . ........
....
.
Table
3:
Service Procedure Number (SPN) Description .
Table 4: Cable Routing Description
..
..
service manual i
OVLX
Confidential
10
OeC"em-bel
2004
-
....
3
.
....
.3
.
...
3
..
.3
............. 4
..
.
...
4
....... ...... 6
.............. ........... 7
..
......
10
. ..... 22
.
...
25
..
26
......
..... .....
26
...
26
. ... 27
.27
.
..
27
..
28
..
28
.......
29
..
...
30
.......30
.....
...
..
.
..
.
..
31
..
31
.31
. ..............32
........ 32
........... 4
.6
.... 7
..
8
.
..
.....
...
9
..
....
12
.
....
13
......... 14
........28
..
...
.
29
..30
...
.30
. ............. 32
.
....
..
.
..
32
. 4
.
10
.
..
...........
..
.
....
........
...
.
15
.
..........
..
22
· 2 .

RearProJection TV Servtce
Man
ual
1
Scope
This Service Manual provides detailed service operations for Digital Video Labs.
Inc.
(DVLX) Digital Light
Processi
ng'"
(D
LP"'
) Rear Projection Television (RPTV). designated DVLX4xCx. This Service Manual
is
intended for the referen
ce
of
qualified maintenance personnel servicing the DVLX4xCx.
1.1
Impo
rtant
Saf
ety
I
nstructions
Please pay attention to the following important safety instructions before carrying out the maintenance
work.
1.
If you want to conduct maintenance work when the set is
in
normal operation or just after the
power is turn
ed
off. you must take proper measures to avoid electric shock from the circuitry or
metal parts. Within a short time after the power
is
turned off, relatively high
vo~age
is
prese
nt
2.
Do
not apply any
VOltages
higher than the specification. If the power supply used deviates from
the values given
in
the specification, there
is
a possibility
of
fire or damage to the TV.
3.
Never operate the TV
in
an
unsuitable environment, such
as
in
the vicinity of water or sources of
fire. Otherwise there
is
a possibility of fire or damage to the
TV.
4.
If
a foreign substance such
as
a liquid, a metal slice, or other accidentally falls into the TV, turn
off the power Immediately. Otherwise there
is
a possibility of fire or damage to the TV.
5.
Ii there
is
smoke, abnormal smell, or abnormal sound from the TV, turn off the power
immediately.
6.
To avoid overheating, do not block any ventilation openings. The TV must
be
located where there
is
adequate ventilation.
7. Guard against static electriCity which can destroy integrated circuits.
8.
Guard against dust during assembling or dismantling lest
IT
should impair the screen image.
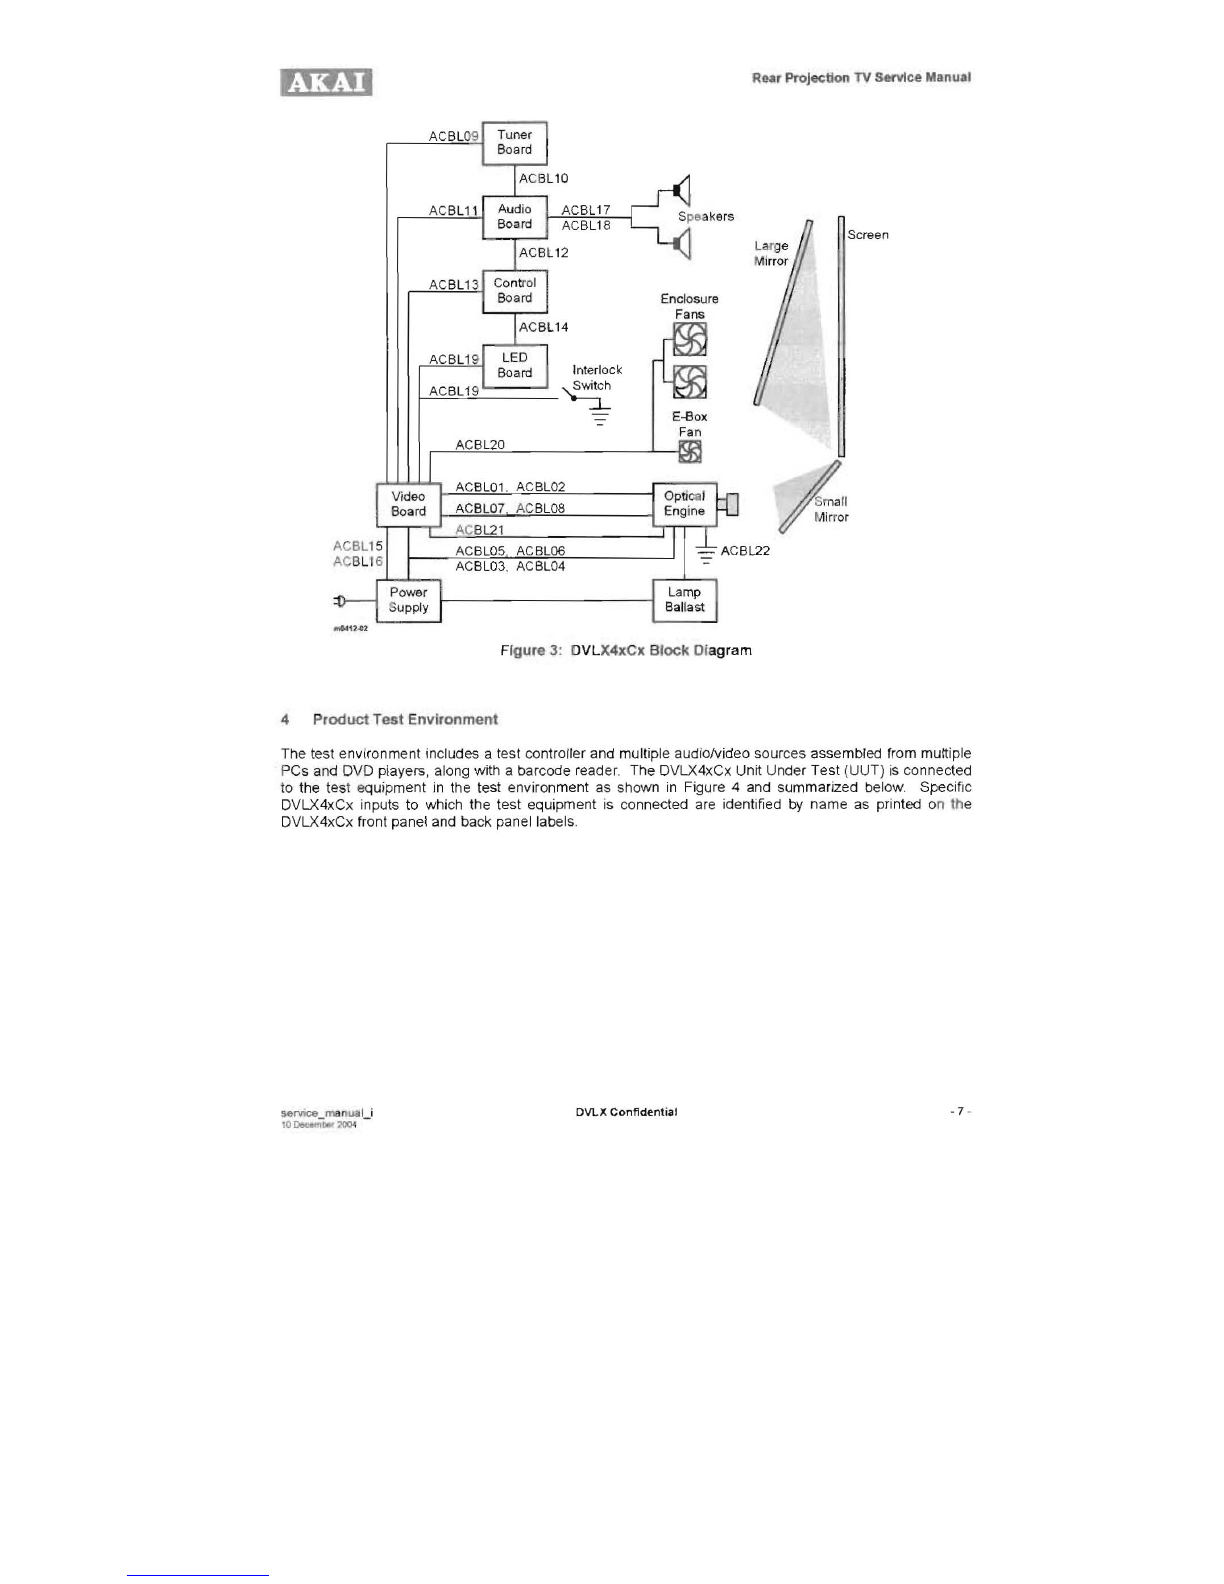
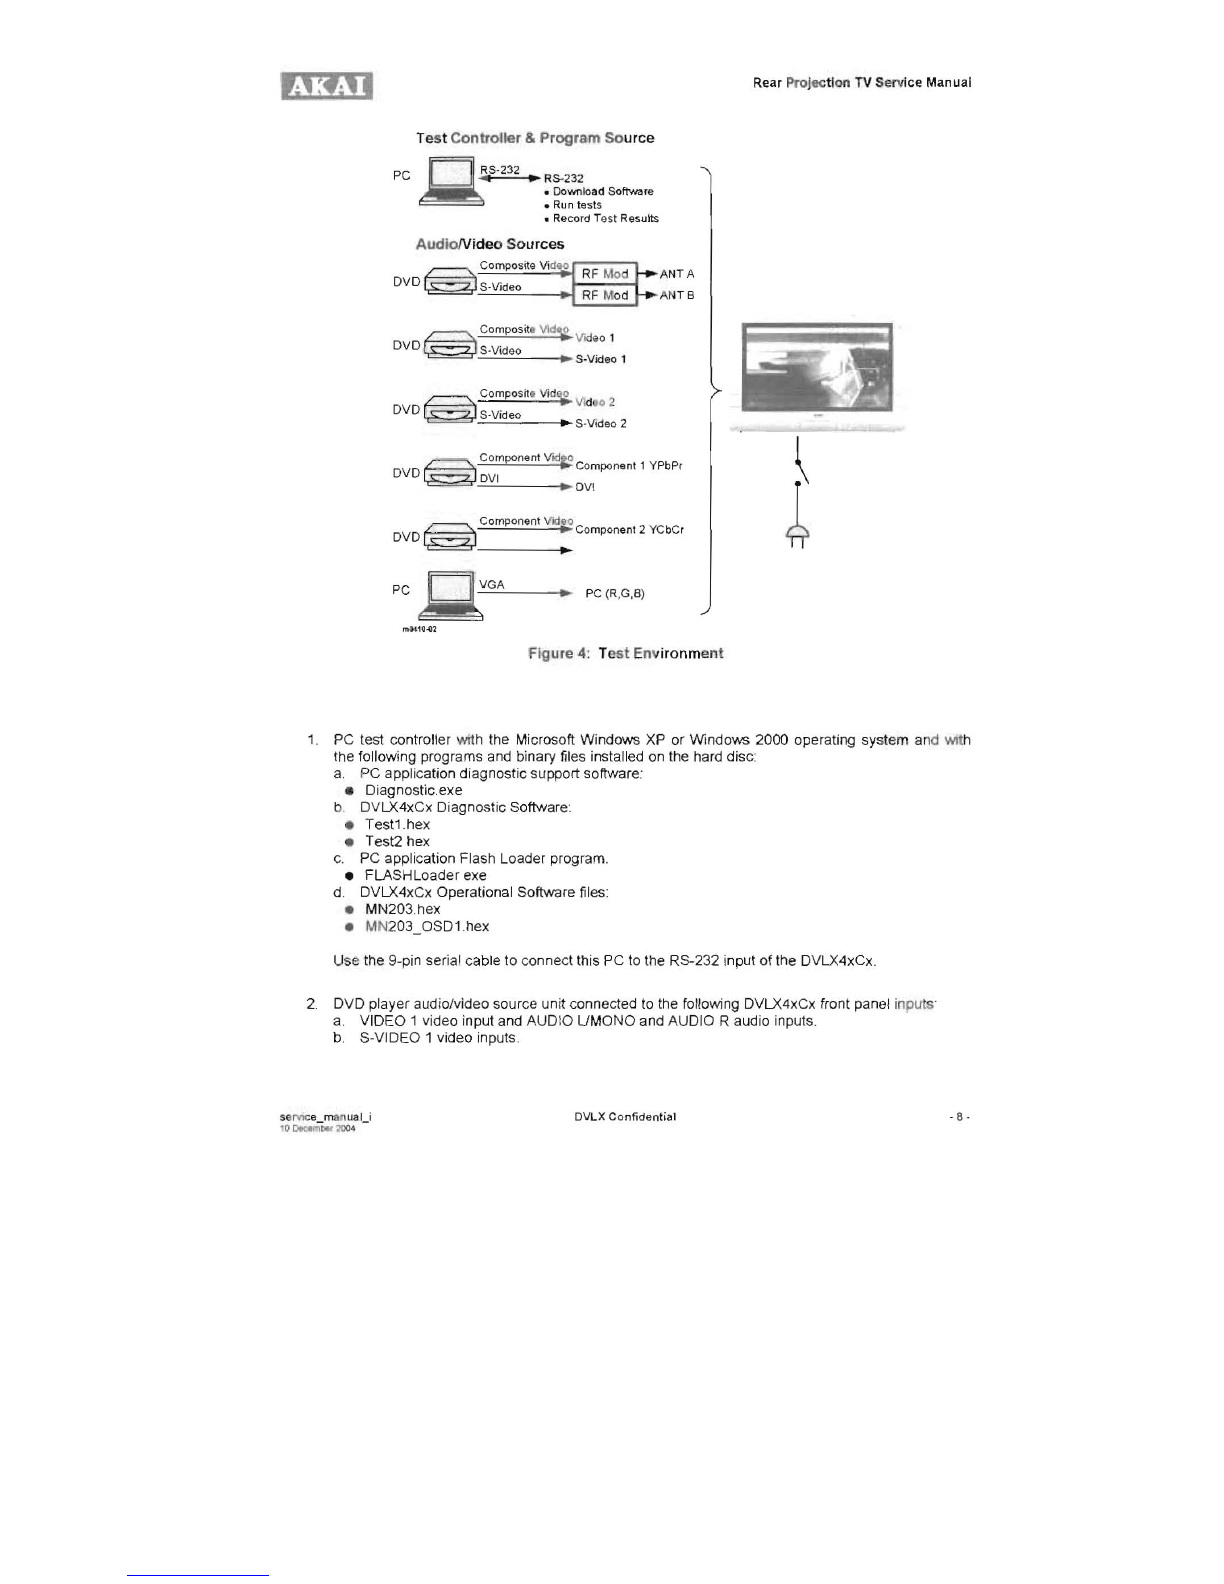
2 DVLX4xCx
Descripti
on
This Section of the specifications provides a general description of the DVLX4xCx RPTV, including the
feature set
of
the product,
as
well
as
the physical characteristics of the product
2,1 Product Designation
The product designation consists
of
four letters preceded
by
DVLX. The first letter identifies the
enclosure size. For this product, the enclosure
is
designed to accommodate screen sizes
in
the 42-46
in
ch
diagonal range, and the enclosure size designation is '
4'
. The first and second letters together
identify the product screen size. The third and
fo
urth letters together identify the bezel/enclosure
configurations
{C
1,
C2 or C3}, since the product main enclosure is designed such that
it
ca
n
be
used with
muniple front-view assemblies. The different products covered by th
is
document have product
designations summarized
in
Table 1 and are depicted in Figure
1.
OLVX4xCx
~
I L Configuration
L-
Screen Size
service manual I
DVLX
Confidentral -
3-
10
Oectcn
-
blof
2004 -

R.ar
ProJec
tton
TV
Servtce
Manua
l
(;'1!1'
T
abl
e 1: DVLX4xCx
Products
Desig
nati
on
Screen
Diaaonal Bezel/E
nclosure
C
onf
iQuratl
on
DVLX44C1 44" C1
- j
:JVLX
44C2 44
01
C2
DV
LX
44C3
44
" C3
DVLX46C1 46" C1
DVLX46
C2
46" C2
DVLX46C3 46" C3
DVLX44C2
DVLX46C2 OllLx
4olC3
OIlLX• •
C3
Fi
gure
1: DVLX4xCx
Prod
uct
View
Predominatel
y,
the entire DVLX4xCx product line
is
composed of common parts. The few parts which
apply on
ly
to specific products are associated with the front bezel to give product differentiation
in
appearance.
3
Produc
t A
fCh
itecture
This section provides details of the DVLX4xCx architecture.
3.1 C
ritical
SubMsomb
lies
Figure 2 shows the Crrtical Subassemblies of the DVLX4xCx.
As
shown in Figure 2, the DVLX4xCx
is
composed
of
the following groups
of
cntical
SUbasse
mbli
es
:
1. Mechani
ca
l Subassemblies:
a.
Main Enclosure
b. Remote Control Enclosure
2.
Optical Subassemblies
a. Light Projection Engine
b. Mirrors
i. Small mirror
Ii
.
Large
mirror
c.
Screen
3.
Electrical Subassemblies:
a. Formatter Board
b. Video Board
c.
Tuner Board
d.
Audio Subsystem:
I. Audio Board
i
i.
Speakers
e.
Control Board
!5ervioe_manUl!llU
DVLX
Confident
ia
l ..
~
.
'O~bMO'OO4

• ,
'.
, I Rear Projection TV Servlce Manual
-;'Yi
f.
1/0 panel
g.
Remote Control Board
h.
Power supply
i.
Lamp and housing
j. Ballast
k. Fans
i, Lamp fan
il.
Enclosure fans
The detailed design specifications of each of these subassemblies are provided
in
SUbsequent
subsections
of
this
document
The most important design archrtecture aspects are:
1.
The light projection architecture utilizes a two-fold configuration that allows for achieving a
minimal depth chassis design.
2. The main enclosure mechanical design concept has as few as possible mechanical components
to hetp in reducing the tooling cost and the assembly cost of the chassis.
3.
The main enclosure mechanical design concept allows the main assemblies
to
be used with
multiple front-view assemblies to offer different aesthetic look industrial designs with different
screen
sIZes.
4.
In
or
der
to allow for competitive procurement of the most costly subassembly, the main enclosure
is
des
igned to allow for the use
of
optical engines from at least two different optical engine
supphers
5.
In
order to provide AKAI with the ability to address different
d~tribution
channels
',·
.•th a different
aesthetic look and screen size designs, the main enclosure
is
designed such
tr
,at
it
allows
mounting of the optical engine platfonm
in
such a way to accommodate the throw distances
fo
r
s
iz
es ranging from a
42"
diagonal screen to a 46" diagonal screen.
S The Formatter Board, which provides the video and graphics for display on the screen, features:
Low-voltage differential signal (LVDS) video input interface for reduced EMI emission.
• Cost effective Single Board Design
Wide-screen format: 1280x720 Texas Instruments HD2 DMD (High-definition)
Support for a variety of color wheel drive solutions.
RDRAM support for compact electronics design.
7. The Video Board
is
designed utilizing highly integrated digital video application specific integrated
circuits (ASIC) and components
service
ma
nual i
DVLX
Confidential -
5-
10
o.r::..nw
2OD4
-

RearProjection
TV
Service Manual
Mecha
ni
c
al
(Encl
os
ure
)
Electrical
Opt
le.al
----
--
---
--
--
-
r-
r-
------
--
--
---
Lamp t
Housing
D D Light Projection
Fotma
nt
r Engine
B
oa
rd
,
,
'"
•
E'
,
, •
~
f
~
i
, D D Integrated
light
,
Ba
llast
lamp
F.
"
Engm
e Sub
sys
te
m .
..
_------------ -
------
...,,
--
-----
-
•
0
~
0
<fJ
r---------------,
A
ud
io 0 '
: Su
bs
ystem I
DDD D
Vid
o-o
Tuner Power
E
n
d
o~t.
.IF
.
I
Spea~
er
I
Bo
,
Nl
Bo
ard Su
pp
ly
Fa
n
:0
:
I Au
di
o I
, Board I
:
0:
I I I
=:J
, ,
1/0
Pa
n
il
l Control Board Speaker ,
I
-
----
---
-
---
- . ~ -
~
I:=J
R
emot
e
Controller
Fi
gure
2: DVLX4xCx
Critical
Subassemblies
3.2 Bl
ock
Diagram
Figure 3 shows a block diagr
am
of the DVL
X4
xCx, wflich highlights the i
nt
e
rn
al
interfaces
be
tween the
critical subassemblies and iden
ti
fies cable IDs.
-6
-

4
Roar Projection
TV
Service Manu.1
ACBL' 5
AC
BLl
6
Interlock
~~Ji==
~
'---
~
Encl
osu
re
Fans
E-<lox
Fan
Figure 3: DVLX4xCx Block
Di
agram
Screen
Large
M
ir
ror
I
II
j"~
~~r
Product Test Environment
The test environment includes a test controller and multiple audiolvideo sources assembled Irom
mu~iple
PC
s and DVD players, along
WITh
a barcode reader. The DVLX4xCx
UnIT
Under Test (UUT)
is
connected
to the test equipment
in
the test environment
as
shown
in
Figure 4 and summarized
below
Specillc
DVLX4xCx inputs to which the test equipment
is
connected are identified
by
name
as
printed on the
DVLX4xCx Iront panel and back panel labels.
!;&I'\ItC8
_ma
nua
U
DVLX
Confidential - 7 -
tO~bM2OGC

Rear
ProJec
ti
on
TV
Service
Man
ual
Test
Controller
&
Program
So
urce
PC
W4
S-232
..
R8-
232
• Download Software
• Run
tests
•
Record
Te
st
Results
Audl
oNideo
Sources
~~~o~mp~o
s
~~=e=V;='
d
:
~
~R~FJ
Mo~
dE
OVD~S_Video
""
AN
TS
RF
M
od
ANTA
~..:C:::o"-m",p",os,,~
,,,
.
.::.
=-<'l:
oV
id
eo
1
'M
...
DVD
I
~
S-Video
-=--:..:.::;'--'----
~
..
~
S-Video
1
~
Compo
site
V
j
d~
Vklo
o
2:
DVO
~
$-Video
-"-=::"'--;"~S-Video
2
Component
VK1&.o
DVD
Component
1 YPbPr
~
DVI • O
VI
Comp
o
nent
Vidl30
DVD
~
..
Component
2 YCbCr
~
.
PC
r===1y,-,G~A~
__
~
~
~
..
PC
(R,G,B)
m1J41Q~1
figure
4: T
est
Env
ironmen
t
1. PC test controller with the Microsoft Windows
XP
or Windows 2000 operating system and with
the following programs and binary files installed
on
the hard disc:
a. PC application diagnostic support software:
• Diagnostic.exe
b DVLX4xCx Diagnostic Software:
• Test1.hex
• Test2 hex
c.
PC
application Flash Loader
program
~
• FLASHLoader exe
d. DVLX4xCx Operational Software files:
• MN203.hex
• MN203_0SD1.hex
Use the 9-pin serial cable to connect this PC to the RS-232 input of the DVLX4xCx.
2.
DVD player audiolvideo source unit connected to the following DVLX4xCx front panel inputs·
a.
VIDEO 1 video input and AUDIO
UMONO
and AUDIO R audio inputs.
b.
S-VIDEO 1 video
inputs
~
s
elV1C
e
man
ual
i
DVLX
Co
nfidential
- B -
'
O~~1OO4
-

9
Rear
ProJecdon
TV
Servtce Manual
Ii':!!"
3. DVD player audiolvideo source unit connected to the following DVLX4xCx rear panel inputs:
a.
VIDEO 2 video input and AUDIO UMONO and AUDIO R audio inputs.
b.
S-VIDEO 2 video inputs
4.
DVD player audio/video source unit connected to the follOwing DVLX4xCx rear panel inputs:
a. COMPONENT 1 (YPbPr) video input and COMP.1-L and COMP.
1-R
audio inputs.
b DVI video input and DVI-L and DVI-R audio inputs.
5. DVD player audiolvideo source unit connected to the following DVLX4xCx rear panel inputs:
a. COMPONENT 2 (YCbCr) video input and CO
MP
.2
-L
and COMP.2-R audio inputs.
6.
DVD player audio/video source
unn
connected through RF modulators to the following
DVLX4xCx rear panel inputs:
a.
The DVD player's S-Video output to the
RF
modulator; the
RF
modulator's output to the ANT
A input with a coaxial cable.
b. The DVD player's Video output to the RF
modulato~
the
RF
modulator's output to the ANT B
IOput
with a coaxial cable.
7.
PC audiolvideo source unn displaying the VGA test pattern shown
in
Figure
5.
,
I
-,
, .
Figure 5:
VG
A T
est
Pattern
Use the VGA cable to connect this
PC
to the
PC
input of the DVLX4xCx
8. Barcode reader to enter the DVLX4xCx Serial Number (S/N) into the PC test controller.
Disconnect switch
on
the 110 VAC powering the DVLX4xCx.
The DVD players
in
the test environment are not exclusive to any specific manufacturer's model.
However, one example
of
a DVD player sunable for the test environment
is
the Samsung Model DVD-
HD841
IXAA
se
rvice
ma
nuaI i
OVlX
Confidential ·
9·
10
o.o.m~
2OI)t
-

5
Rear
ProJOC:Uon
TV
SeMce Manual
After the test equipment
in
the test environment
is
connected to the DVLX4xCx and the 110 V
AC
power
is applied to
th
e DVLX4xCx, the lest procedure proceeds
as
described
in
the following sections.
Service
Procedure
Table 2 is a service checklist showing Ihe most typical repair scenarios when the UUT is capable of
functioning normally but with degraded operation; i.e
.,
is
exhibiting problems while functioning
as
a TV
Ta
b
le
2 lists typical problem symptoms, possible causes,
and
remedy actions. If the problem still
pe
mists
after
fo
llowi
ng
the test checklist remedy actions or if the UUT
is
incapable
of
functioning
as
a TV,
th
en
you ne
ed
to proceed directly to the detailed Service Procedure, which
ad
dresses a more complete set of
repair scenarios. A flowchart
of
the detailed Service Procedure
is
shown
in
Figure 6 through Figure 8.
T
he
references SP-A, SP-C, SP-C1, etc., identified
in
Table 2 correspond to specific positi
on
s
in
Ihe
fl
owchart. Table 3 provides further delails to speCific remedy actions shown in the flowchart. These
details are numbered SPN-1 through SPN-23 corresponding to the numbers
in
the flow
ch
art for
identification wah speCific remedy actions.
Table
2: S
ervice
Checklist
S
ymptom
Possible
Probl
em Remedy A
ction
Reference
Image problems o Section 7
a Settings menu selection
in
t
he
Operational Software
LAMP LED
on
• Reset to factory defaults
• Configuration wrong
o SPN-
21
lifetime
Screen darker and
• Lamp exceeds rated • Replace Lamp
o SPN-
21
less clear • Lamp exceeds rated • Replace Lamp
lifetime
IR
malfunction, • LED Board faun
i>
Run Service Procedure first o SP-A
Keypad OK o SPN-12
• LED Board cable fault •
If
problem pemists, change
Power Suppl
y.
IR
m
a
~ unction,
• Power Supply
• Control Board faun • First replace Control Board and • SPN-5
K
ey
pad malfunction ACBL
14
cable.
• Control Board cable faun • SPN-12
• Power Supply •
If
problem persists, Replace
Power Supply
POWER LED not
on
o SP-A
• Video Board fault • Run Service Procedure
• Power Supply faun
• LED
Boa
rd faun
• LED B
oa
rd
cable fault
Foll
ow
in
g inputs are o SPN-6
not available'
Component2
Video 2
S-Video 2
No
im
age,
• Video Board fault • Replace Video Board
o SPN-6
normal menu
Distort
ed
image,
• Video Board fault • Replace Video Board
o SPN
-5
nor
ma
l menu
Distorted Image,
• Video Board fault • Replace Video Board
o SP-A
distorted menu • LVDS cable connector • Run Service Procedure.
J15 faun ;
• Video Board fault
• LVDS cable faun
• Opti
ca
l Enqine fault
so
rvice
_
man
ua
U DVLX C
onfident
ial -
10-
10
Dllc4H"!DI!!t
20()01
I

Rea
r Projection
TV
Servlc
..
Manual
"':'i'l
Symptom
Possible
Pr
oblem
R
emedv
Actio
n R
eference
Extreme
co
lo
r
domin
ati
on (e g.
extremely green)
• Video Board fault • Repl
ace
Video Boa
rd
• SPN-6
Extre
me
low
brightness • Video Board fault
• Optical Engine
fau~
• First replace Video Board
• If problem persists, Replace
O~!
ical
Engine
• SPN-6
• SPN-23
No
tuner In
pu
t • Tuner Board
fau~
• Tuner Board cab
le
fault • Replace Tuner Boa
rd
• Replace Tuner ACBL09 cable • SPN-6
• Table 4
No
so
und
normal beeper • Audio Board fault
(finer or mux)
• Cable f
au
lt
• Replace Audio Board
• Rep
la
ce
Audio Board ACBL10 &
ACBL
11
cables
• SPN-6
• Table 4
• • •
• • •
Fa
n malfunction • Fan fault
• Cable
fa
ul
t
•
• First repl
ace
fan and ACBL17 or
ACBL18 cable.
• If problem persist,
run
Service
Procedu
re
.
• Table 4
• SP-A
Lampturns on once
but fails
on
several
more attempts
• Power Supply faun
• • First replace Power Supply
•
If
problem persists,
run
Service
Procedure.
• SPN-12
• SP-A
A flowchart
of
the test procedure is shown
in
Figure 6 through Figure 8.
seMce_manuaU
DVLX
Co
nfidential -
11
-
'0
Oea!mb!!t
'2004

R",r
!'Tojactlon
TV
Service
Manua
l
'.'*'1
LNCI
Dl
51ifT1OSacs
Telit
Programinto
WT
lose
PC
rat.h
loodlr
'lJnplug UUT from
"0
V
I4.C
wat ,
I)
r,eoord!I
PlJgWTltilo110VAC
u~
LljT
ttorn
11
0
VAC:
l8I.n::hPC
1=~~
L.oadI!Ir"
Wall 10
MCO/'¥l5
Plug \JUT
lito
110
\lA
C
Unp4
yg
UU'T
fl
om
110
vA
C
lau
nch
pC
·
~fI'ih
LoadIIr'
W81
11
C!
'M!ClOnds
PilJfiJ
!JUT Into 110 VAC
~~
·
~·!?~
~~~~
A
rI
DM~
..
C
)-
--
.-I
I""
l..t1pIug
uur
fr'CIrn
110 V
AG
Opom
~ooJcs
lJnp+ug
l.Jt.tr
from
110 VAC
R
epace
Vid!Io Boatd
Audio Board 9
u~
UUT trom 1
\Ij
V~
~
~!le"""",
-"6oa<d&PS
Auo
I.Af'r
irtD
'10
VAC
Figure
6:
Service
Procedure
F
lowc
hart
sorvice
fT101;
oual i DVLX
Conndent.bl
'O~~-

Unplug
UUT
rrom 110 VAG
Wait
10
:&eeorWis
PlugUUT
Into 1Hl
'.lAC
No
rm
al
Rf;ljOOose
uLIT
~ers
61andboj
M
ode
WTI'OWER.......,
OnSoIkl
Reo
~Ui
POWER
Bvn
on
onWT
Nonn
al
Rnwnoo
lJUT Erters T
t.WJt..O
n M
iXIe
WT
PO\NER
La~
Fl
eshir'IjJ
Gceen
no
N
orma'
Rf!§MOMf
UlJT Tl,ms On
WT
f'(MgO
La""
On
Sold
GfMn
W T
T
IM'IlId
On?
PI.\
t.bm
t
mnnc~
!-'n..o.;:ab
..
Oisccme~
!JUT
fr
om
t
l!'&t
en.llrOf¥neft
F
igure
7: Service Procedure Fl
owchart
(Continued)
se
Mce
_ma
nu.
l_i O
VLX
CO",.dentla~
-
13·
1D~t«~

Rear ProI""lIon
TV
Service
Manua
l
~
Iug
ulJi '
fom
110 I/AC
o.oo~lAHC~10
"",lea
l
E
~
~
9fncf'l
PQw:6f
S~
f(QI1l110
'lAC
COI"ll18G"I
AI
OpIicaJ
EngI
ne
C3bitl
'rom
gen¢h
V-ideo
Boarel
& PI)v,oef
Supply
Pl
ug
Benc:
h Power S4JppIr
intO
110 'lAC
..
Repl"ceCa~
Fi
g
ur
e 8: Service
Procedure
Fl
owchart
(Continued)
5&rvice_TTWonuaU DVLX
Confidential
·
14
-
1D
[)KIt~:i004

-
-
Rear Projection TV
Servt~.
Manual
(;'!J'
T
able
3:
Se<vice
Procedure
Number (SPN)
Description
SPN Oeser
Ipllon
Yo
u wi
ll
s
ee
the menu below.
Wh
en the
UU
T
is
not plugged into 110 VAC, the Brow.;e button
and
Q)
th
e Start button will
be
non-selectable and correspondi
ng
ly
shaded gra
y,
When the UUT is p
lu
gged
into 110 VAC, the Browse button will be selectable and correspondingly not
sh
aded. Use the
Br
owse button to find tile file to be loaded. Once a file
is
selected.
rt
wiHappear in
th
e bottom area
and I
he
Start button
wi
ll
be selectable
and
not shaded.
.~-
®
In
the
PC
Flash Loader, click on browse and select m
es
Te
st1.hex and T
es
t2.he
x.
and then click on
® Start.
The DV
LX
message appearing on the PC
is
shown below.
...
,
__
t.
" I
I
..................
.
.........
.
.......
..
.............
........................
..
DIJl>l
Hone,
1m
OPS'II
c~
,,_
"'-lIttr
-Iw
~I.IS
l~hnalll1illle$
LIU·
•
Cov,irlglll
(d
~.
~
~Itn
T..dY!o]09~M.
lJI::.
~U
Ihdlh:
~~
.
-
........
.
...................
.
.........
.
.....
.
.................
....
..
..
........
..
..
......
_.
hello
-
I.
se
McQ
_man
ua
U OVLX
Co
nfidentla, -
15-
'0
0et:..:nbN" 2004

---
Rut
ProJection
TV Servtce
Manua'
SPN Description
o
Ea
ch time ENTER
is
pressed
on
the
PC
, the Fl
ash
Loader responds with the character > as shown
below.
If\
n._1.........
~
...,
...
-
.....
-Q
~
n
~
'J " •
..
[l.~UI
Mo:.oe:t
-
2tl
OPS\II
-
~
lint
bUor
-
tJ,.l'
Of'tUS
lechIol09ln
I
TO
..
-
CtJpyr.Qt1t
(d 1881-28it3 Oplus
l4!(hnolOlJiotS
UK:.
nil
i.thl"
re-Y~
.
..
~
...
~.,"
.....
.-
.....
,
.........
"
....
,.,
......
...........
-
...............
..
.........
.
"'-
li
n
•
On the
PC,
run
file
Di
agnostic.exe, You will see the
fo
llowing menu, aski
ng
for the U
UT
serial
numbe
r.
DVLXFCT
PN
SN
~
Wh
en
you press
OK,
the followi
ng
menu appears
li
sti
ng
the compon
en
ts
10
be teste
d.
W
hen
yo
u
pr
ess ST
ART
, Ihe test proceeds automa
ti
cally through the list oftested components
an
d stops
wih
en
it reaches a specific component failure.
.
:>".
flO'l"ln
t
l9
fJ..I1'
'--
--
. u
-
.
~
.~
,-
•
......
~
~
-' l
¥lT
..
J -
....
.
....
" t
OO
'j
T '
~
S&
rAee_mIiIInua
U
'ODeatmbs~
-
16·

Rear
ProJecUOCI
TV
Service
Manual
SPN
Description
® A message writt
en
on the
PC
scre
en
identifies whether the components p
as
s
ed
or wheth
er
a
component
fa
il
ure
is
fo
und.
Furthermor
e.
a file is w
ri
tt
en
wit
h the SN as a file name to record
th
is
information. After the failed component is replaced.
th
e
Di
agnosti
cs
test
is
run
again
to
either
completion or
to
Identi
fy
an
other failed component.
ThIS
con~nu
es
until all components pass the
test.
Component
Re
place Procedure
Video Board E-Box Contents Replacement Proaedure, Section
5.1
Audio Board E-Box Contents Replacement ProcedUle, Section 5 1
Tuner Board E-B
ox
Co
ntents Replacement Procedure,
Sea
ion 5.1
C
on
trol
Bo
ald Contr
ol
Board and
LE
D Board Replac
em
ent Procedure, Section 5
.3.
LED Board Control Board and LED
Bo
ard
Re
placement Procedure, Secti
on
5.3.
See E-Box Contents Replacement Procedure, Section
5.
1.
See E-Box Contents Replacement Procedure,
S~on
5.1
,4
th
picture.
S
ee
E-Box Contents
Re
pl
acement
Pr
oCed
ure, Section 5.1.
See E-Box Contents
Re
placement Procedure, Section 5.1. 1st picture
The figure below
is
the pinout ofconne
dors
for the output voltag
es
on
the Power Supply showing the
9-pin connector C
ON1
and the 2-pln con
nedo
r CON2.
§]Ioooooooool
See
E-
Box Contents Replacement P
rOCedur
e, Section 5.
1.
See E-B
ox
Contents
Re
placement Procedure.
Se~on
5.1. 4th picture. Replace cable ACBL16 (see
Table 4)
In t
he
Flash Loader
on
th
e
PC,
click
on
brows
e,
select the files MN203.hex and MN203_0SD1.hex
an
d then click
on
Start.
On
the UUT
Re
mote Control. press the keypad sequence 20496354 to bring up the Maintena
nce
Menu shown below.
See Sec
ti
on 9 for lunnl
ng
Maintenance Menu
servlce_
m;IIn
u
;:I
U
Ov\"X
Conl'idlt'ttJaJ
.
17·
10
o.c:-n~
11)0.1

Rear
ProJecllOfl
TV
Sor;Ice Mall
ual
SPN Description
@
1.
U
se
the remote control or front
pa
ne
l push button switches to tu
rn
th
e
po
wer o
ff.
a
nd
after
waiting several minutes unplug the TV. (The cooling fans will continue to blow for several
minutes afler turning the power off )
2. Use a screwdriver
to
re
mo
ve the six (6]
SCf
ews fastening the lamp door. which
is
the
panel w
ith
louvers located
on
the
b<\ck
ofthe TV, a
nd
remove the
la
mp
door
.
3. Replace the
Intenoe!<
Swrt
ch.
4. Replace the lamp do
or.
Interlock
SWltch
Lamp Door
® Replace cable ACBL19 (see Table 4)
SE
H'\Ito.
_
m3
n~l_
;
DVLX
Confiden1ial
10DDc.mber
2QC.$

Rear Projection TV Servtce Manual
,':«;'1
SPN Description _
@ Disconnect cables from the following connectors of the Optical Engine.
ine
J3 J1 J6
Cable JDSU connector
AC8
L01
J1
ACB
L0
4 J3
ACBL07
J6
Disconnect Ballas! connect from Power Supply.
..
Zeiss Optical
Eng
.i
~
::;..
____
....,
ne
..
J3 J2
J1
Cable Zeiss connector
ACB
l
02
J1
AC8L06 J2
ACBl06
J3
Disconnect Ballast connect from Power Supply.
service tniIInual 1 OV\..X Confidentiill
·19
-
10
o.c.mc.
200'
-

Rut
Projection
TV
SH1IIce
Manua'
S
PN
Oeserl
pIlon
@ Connect the Opltcal Engine to the bench Video Board and the bench Power Supply cables as follows
JDSU Optical
En
gine
Cable JDSU connector Bench Video Boa
rd
Bench Power Supply
ACB
L01
J1
J15
ACBL07
J6
J25
ACBL04
J3
CON1
Connect Ballast to
be
nch Power Supp
ly.
Zeiss Optical Engine
Cable Zeiss connector Bench Video Boa
rd
Bench Power
SUDply
ACBL02
J1
J15
ACBL08 J2 J
25
AC
BL06 J3 J26 CON1
Connect Ballast to
be
nch Power Supply.
See E-B
ox
Contents Replacement Procedure, Section
5.1,
1sl picture.
See L
am
p repl
ac
ement proc
ed
u
re
Section 5 2
Replace the (ollowing cables (see Table 4)
JDSU
ACBL01
ACBL07
Ze
iss
AC
BL02
ACBL08
service_rnanu·U DVLX Confidential) -
20-
lQ
tJeeember
'2O(W
Other manuals for DVLX44C1
1
This manual suits for next models
5
Table of contents
Other Akai TV manuals

Akai
Akai LTA-26C902 User manual

Akai
Akai LEA-19H03P User manual

Akai
Akai PDP42Z5TA - 42" Plasma TV User manual

Akai
Akai PDP4273M User manual

Akai
Akai CT2716 User manual

Akai
Akai PT4250A User manual

Akai
Akai 29CTF05BS User manual

Akai
Akai LTA-26C903 User manual

Akai
Akai PS-4210X User manual

Akai
Akai LTC-16RSX3M User manual

Akai
Akai LT-2605AB User manual

Akai
Akai 14CNT11BB User manual

Akai
Akai LTA-26C902 User manual

Akai
Akai CT-1420ANF User manual

Akai
Akai PDP4210EA1 User manual

Akai
Akai ATE-24014 CNK User manual

Akai
Akai ALED3205TBK User manual

Akai
Akai CT-T29S32S User manual

Akai
Akai 21CTS92FS User manual

Akai
Akai 25CT23FSR User manual