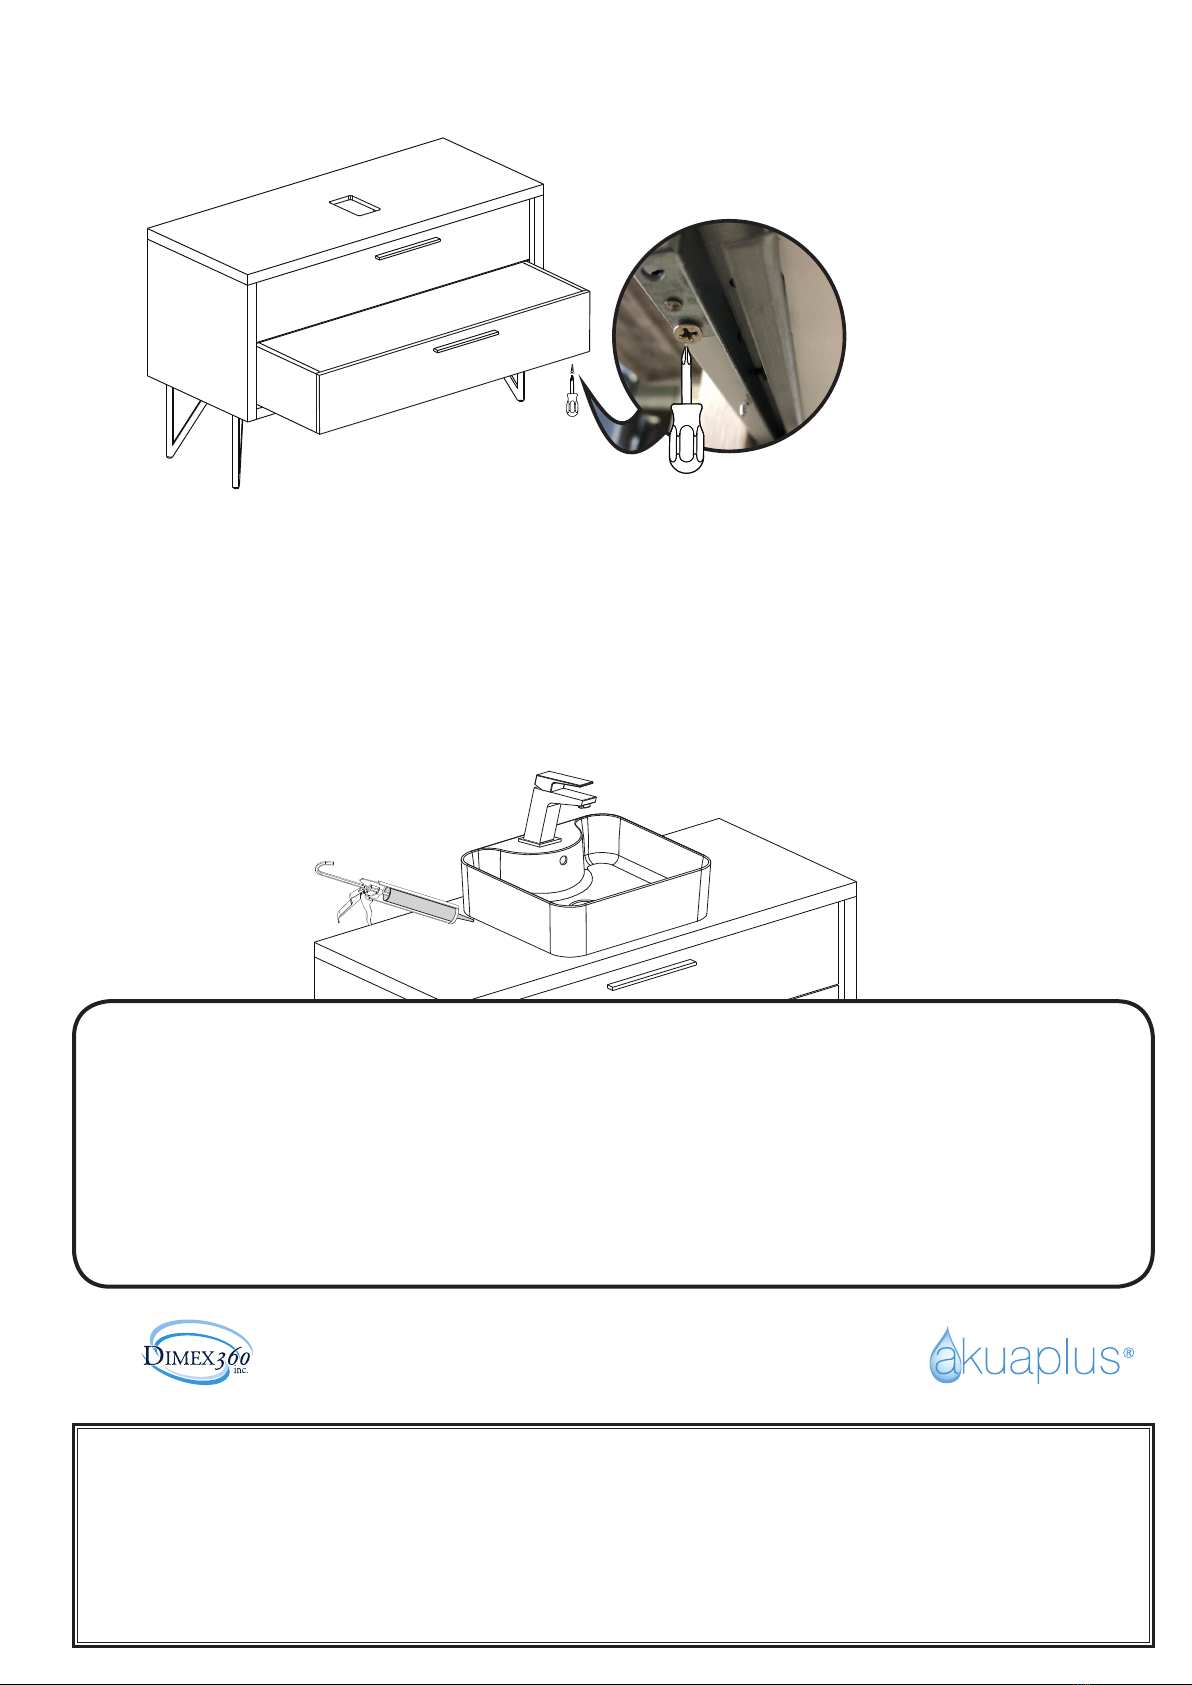
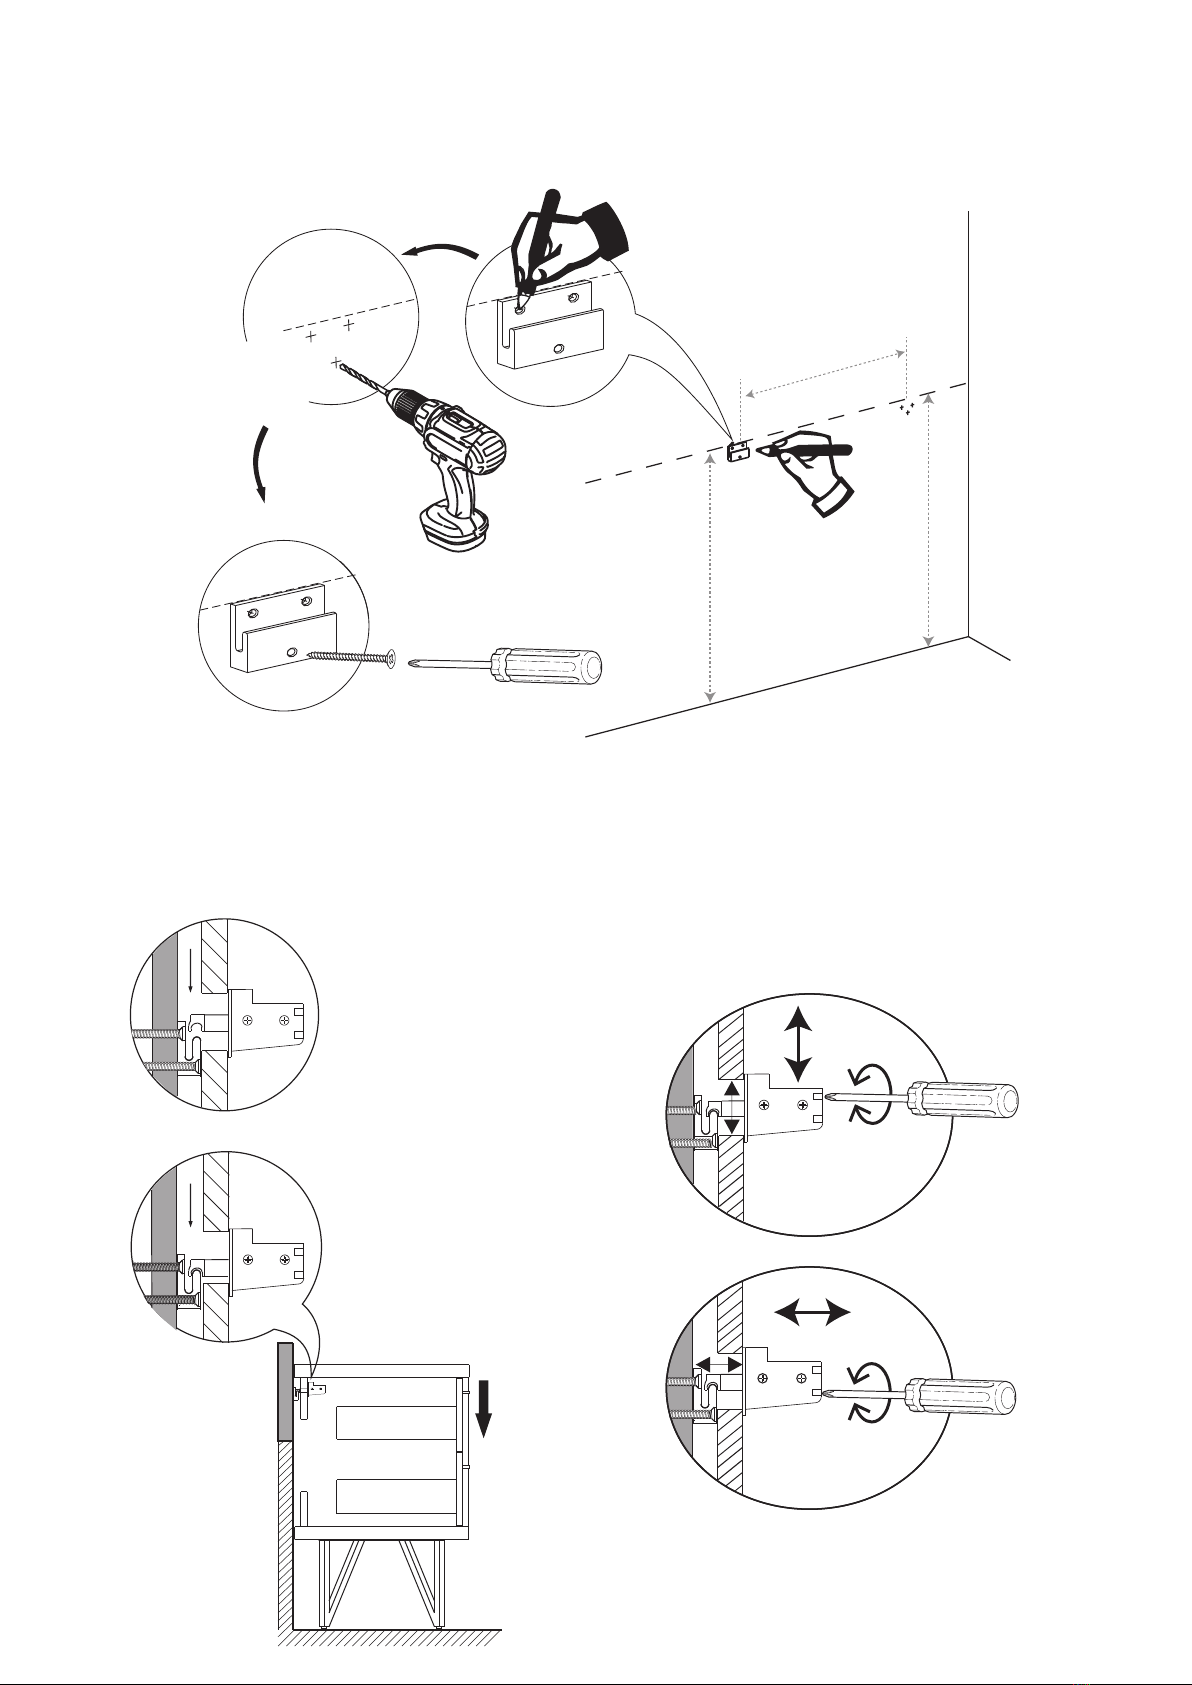
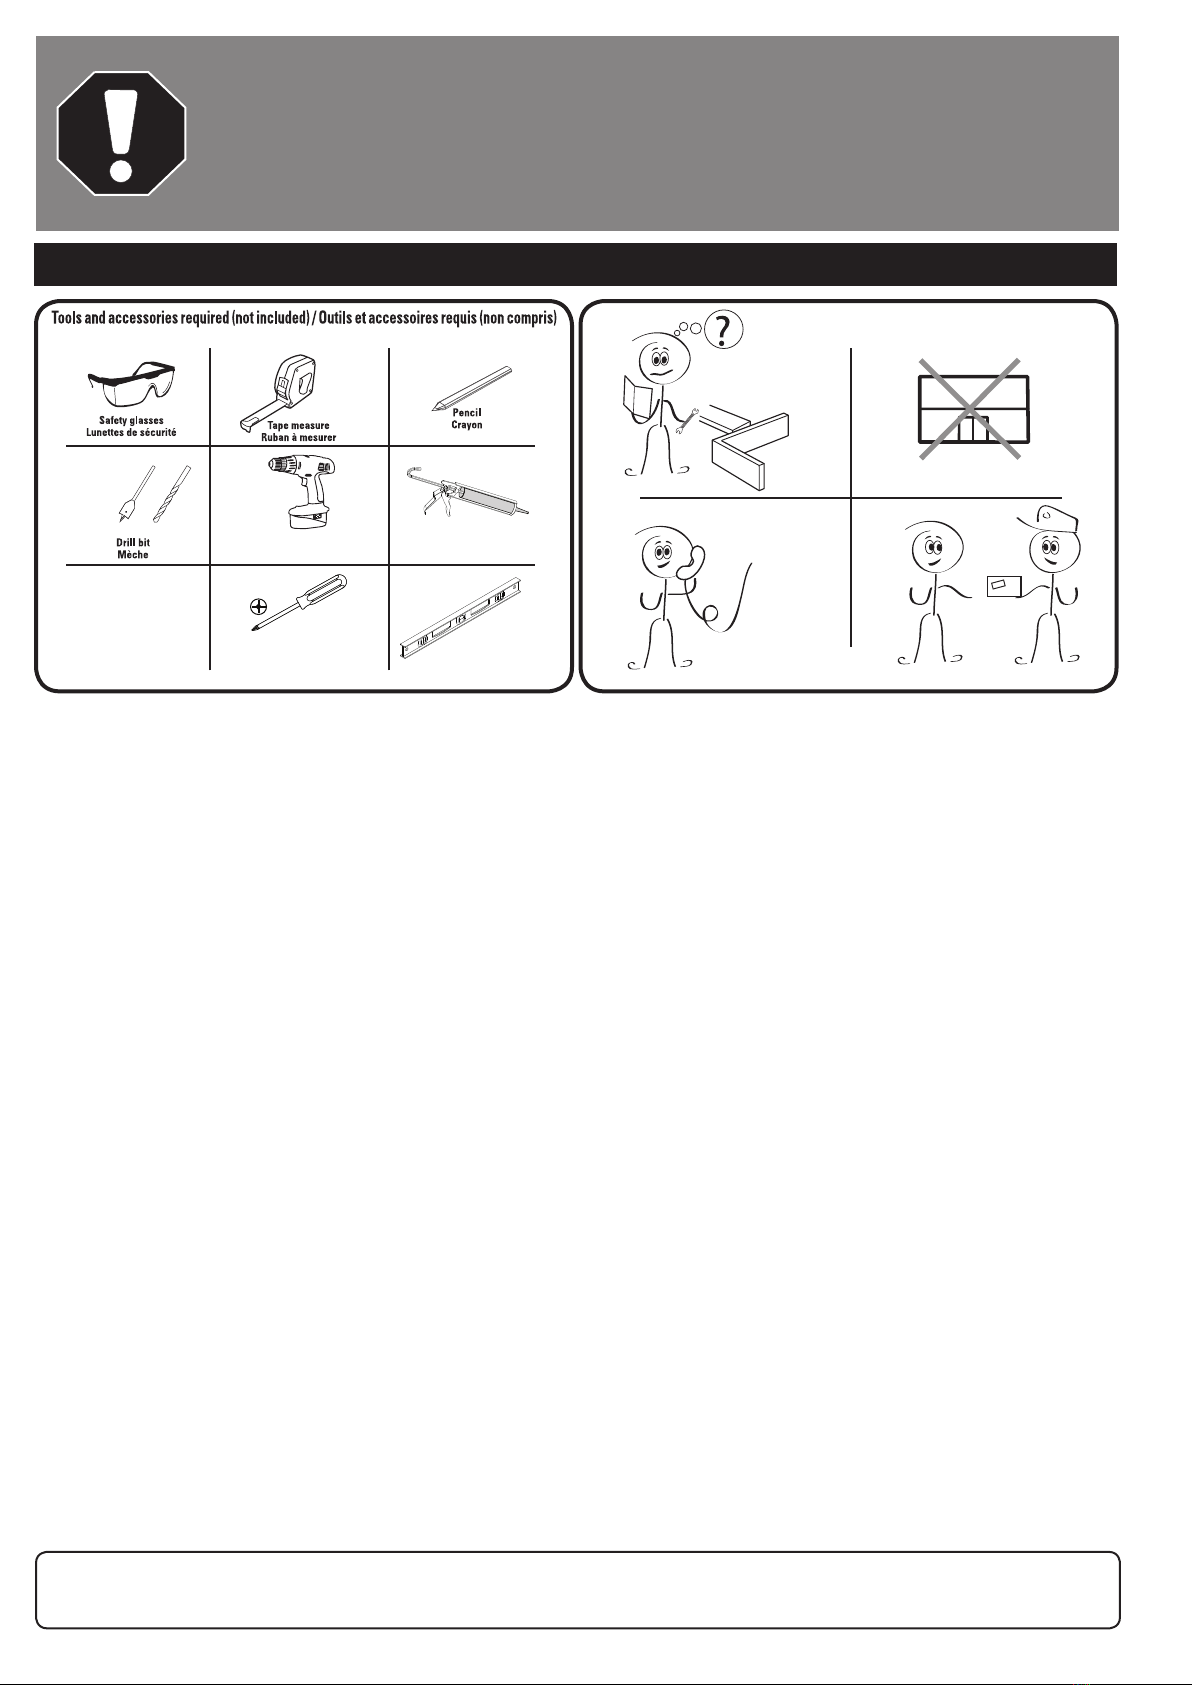
Akuaplus 1248 Series User manual

Store/Magasin
1 844 666-0155
1 2
3 4
Store/Magasin
1 844 666-0155
1 2 3 4
DO NOT RETURN THIS PRODUCT TO STORE, CONTACT US. We’re there if you need help
NE RETOURNEZ PAS CE PRODUIT AU MAGASIN, CONTACTEZ-NOUS.
Nous sommes à vos côtés si vous avez besoin d’aide
1 844 666-0155 • question@dimex360.com
INSTRUCTION MANUAL • MANUEL D’INSTRUCTIONS
1248 SERIES
Nature wood and concrete grey • Bois nature et gris béton
MIR1248
VAN1248

2
Silicone
Level
Niveau
Screwdriver
Tournevis
Drill
Perceuse
SILICONE
CARE INSTRUCTIONS
Dust, light smudges and fingerprints can be removed with either a
simple alcohol based glass cleaner or simply with some soapy water, in
that case, quickly wipe with clean water and a humid microfiber cloth
and dry with a soft cloth.
DO NOT:
1. Use abrasive cleansers, cloths or paper towels.
2. Use any cleaning agents containing acids, polish, waxes, alcohol,
ammonia, bleach, solvents or any other corrosive or harsh chemical
cleansers.
Regular and routine cleaning will reduce the need for heavy cleaning
and polishing. If heavy cleaning is required, the following procedures
are recommended:
DO:
1. Remove dust film and surface dirt with clear water and a soft cotton
cloth.
2. Use any of the following to remove tough surface film and dirt build-
up:
- Soft liquid detergent
- Non-acidic, non-abrasive gentle liquid cleanser
- Non-abrasive liquid polisher
3. Always rinse with clear water to thoroughly remove cleaner or polish
and blot dry with soft cotton cloth.
INSTRUCTIONS D’ENTRETIEN
Les poussières, salissures légères et traces de doigts disparaîtront avec
un simple nettoyant pour vitres à l’alcool ou simplement de l’eau
savonneuse, dans ce cas, rincez rapidement à l’eau claire à l’aide d’un
chiffon microfibre humide puis, séchez avec un chiffon doux.
À NE PAS FAIRE :
1. Utiliser des produits nettoyants, tissus ou essuie-tout abrasifs.
2. Utiliser des produits nettoyants contenant de l’acide, des produits à
polir, des cires, de l’alcool, de l’ammoniaque, de l’eau de Javel, des
solvants ou tout autre produit chimique corrosif.
Un nettoyage régulier et routinier permettra de réduire le recours au
nettoyage ou polissage intensif. Si un nettoyage intensif est requis, les
instructions d’entretien suivantes sont à suivre :
À FAIRE :
1. Retirer la saleté superficielle et le film de poussière avec de l’eau
claire et un tissu doux en coton.
2. Pour retirer tout film de surface ou dépôt de saleté tenace, utiliser un
des produits suivants :
- Détergent liquide doux
- Détergent liquide doux non acide et non abrasif
- Liquide à polir non abrasif
3. Rincez toujours à l’eau claire afin de retirer toute trace de détergent
ou de polisseur et le sécher avec un linge doux en coton.
Store/Magasin
1 844 666-0155
1 2
3 4
Store/Magasin
1 844 666-0155
1 2 3 4
DO NOT RETURN THIS PRODUCT TO STORE, CONTACT US. We’re there if you need help
NE RETOURNEZ PAS CE PRODUIT AU MAGASIN, CONTACTEZ-NOUS.
Nous sommes à vos côtés si vous avez besoin d’aide
1 844 666-0155 • question@dimex360.com
We recommend that you hire a skilled and qualified worker to install and repair this product. Refer to the regulations stipulated in the Canadian Plumbing
Code and inquire about your municipality’s requirements before proceeding to the installation. The Canadian Plumbing Code requires the installation of a
water-hammer arrester to dampen water hammer in pipes. ALLOW PROPER OPENING FOR EASY ACCESS TO CONNECTIONS OR OTHER PLUMBING DEVICES FOR
MAINTENANCE OR REPAIR.
Nous vous recommandons de faire appel à un ouvrier compétent et qualifié pour l’installation et la réparation de ce produit. Veuillez vous informer des différentes
règles du Code canadien de plomberie et des exigences de votre localité avant l’installation. Le Code canadien de plomberie exige l’installation d’un dispositif
anti-bélier afin d’amortir les coups de bélier dans la plomberie. PRÉVOIR UNE OUVERTURE SUFFISANTE POUR FACILITER L’ACCÈS AUX RACCORDEMENTS OU À TOUT
AUTRE DISPOSITIF DE PLOMBERIE EN VUE DE L’ENTRETIEN OU DE LA RÉPARATION.
Reliability tests under practical conditions are randomly performed on selected machines. Some machines can therefore show traces of previous use.
Le modèle illustré dans les étapes d’installation peut différer du produit en boîte, mais les types de connexions et la marche à suivre sont les mêmes.

3
47 1/4 po/in.
120 cm
27 9/16 po/in.
70 cm
1 5/16 po/in.
3.3 cm
19 11/16 po/in.
50 cm
34 11/32 po/in.
87.2 cm
9 17/32 po/in.
24.2 cm
19 11/16 po/in.
50 cm
47 1/4 po/in. • 120 cm
18
1
/
8
po/in. • 46 cm
5 1/8 po/in.
13 cm
16 17/32 po/in.
42 cm
MIR 1248
non inclus

4
500mm
1200mm
500
100
120
637
548
404
320
1128mm
322mm
35
1200mm
35
39 1123mm
742
320
36
120 322
500mm
742mm
242mm

5
Entraxe de
25 7/32 po/in.
64 cm
centerset
Meuble-lavabo
Vanity
Miroir
Mirror
Put the legs in place, always drill a pilot hole before screwing in a piece of wood to
prevent it from cracking. The handles are inside the drawers, put them on the good
side.
Mettre les pattes en place, vous devez absolument prépercer toute pièce de bois avant
d’y introduire une vis afin déviter l’éclatement de celle-çi. Les poignée se trouvent à
l’intérieur des tiroirs, changez les de côté.
To safely install your vanity, mirror or linen cabinet, strengthen your wall with a 2“x 6”.
Pour sécuriser l’installation de votre meuble-lavabo, miroir ou lingerie, il vous faudra
renforcer votre mur avec des pièces de bois de 2 x 6 po.
WARNING
The legs are designed to support the furniture, it is
not recommended to move it by dragging it. You MUST
ABSOLUTELY lift it.
ATTENTION
Les pattes sont conçues pour soutenir le meuble, il est non
recommandé de le déplacer en le faisant glisser. Il vous faut
ABSOLUMENT le soulever.

6
Vis de réglage pour rapprocher
le meuble-lavabo du mur.
Adjustment that allows you to bring
the vanity closer to the wall.
Réglage de la hauteur
Height adjustment
1068mm
637mm
637mm
Screw position
Position des vis
Measure, mark and drill pilot holes where the brackets are to be installed. Consult an expert for the proper screws/bolts to use when attaching to various wall constructions.
Screws provided do not attach to all wall construction type.
Mesurez, marquez et prépercez l’endroit où ils se fixeront. Consulter un expert pour les vis/boulons à utiliser lors de la fixation à votre construction murale. Les vis fournies ne
conviennent pas à tous les types de construction de mur.
Install water ducts and drainage system as required for your sink model. Make sure that these do not interfere with the elements of your piece of furniture.
Hang your furniture on the wall. Make sure the brackets are properly seated.
Installez les conduits d’eau et de drainage. Faites cependant attention à ce que ces éléments soient positionnés correctement par rapport aux éléments du meuble.
Accrochez votre meuble au mur. Assurez-vous que les supports sont bien emboîté.

SILICONE
Pour retirez les tiroirs/To remove the drawers
If you have your faucet, it will be easier for you to install it on the sink before putting it in place. It is recommended to apply silicone all around the lavatory.
Si vous avez votre robinet, il vous sera plus facile de l’installez sur le lavabo avant de le mettre en place. Il est recommandé d’appliquer du silicone tout le tour du lavabo.
Imported and packaged exclusively by/Importé et emballé exclusivement par
Dimex360 Inc.
Customer Service -
Monday to Friday, 9 a.m. to 4:30 p.m. EST:
1 844 666-0155
Our Customer Service staff is available to help you. For assistance with product assembly, to report damaged or missing
parts, or for any other information about this product, please call our toll-free number.
Keep this manual and the original sales invoice in a safe, dry place for future reference.
_____________________________________________________________________________________
Service à la clientèle - Du
lundi au vendredi, 9 h à 16 h 30 HNE :
1 844 666-0155
Notre personnel du service à la clientèle est disponible pour vous aider. Pour obtenir de l’aide pour l’assemblage de
votre produit, pour signaler des pièces endommagées ou manquantes, ou pour toute autre information concernant
ce produit, veuillez composer notre numéro sans frais.
Conservez ce guide avec la facture d’origine dans un endroit sûr et sec pour consultation ultérieure.
LIMITED WARRANTY
akuaplus® products have been designed to meet high-quality standards and come with a limited lifetime warranty
against manufacturing or material defect. The product bought for a commercial purpose does not benefit from any
guarantee. In case of part failure during the warranty period, we will send you a new part free of charge provided
that the product was properly installed and used in a normal way. To get replacement parts, contact Customer Service
at 1 844 666-0155. The customer who purchased the product must include a proof of purchase (original sales slip)
with any claim under the warranty. This product is guaranteed if used in a normal way and the warranty only applies
to the original buyer. Any warranty becomes void if the product was used in a non-recommended way or has been
abused. akuaplus® is not responsible for labour costs, transportation, injuries or any loss or damage incurred during
installation, repair or replacement of the product, including any consequential or indirect damage.
GARANTIE À VIE LIMITÉE
Les produits akuaplus® ont été conçus pour répondre à des normes de haute qualité très strictes et sont assortis d’une
garantie à vie limitée contre tout défaut de fabrication et de matériaux. Le produit acheté à une fin commerciale ne
bénéficie d’aucune garantie. Dans le cas où une pièce ferait défaut, nous vous l’enverrons sans frais pourvu que le
produit ait été installé et utilisé dans des conditions normales. Les pièces de remplacement peuvent être obtenues
en communiquant directement avec le service à la clientèle au 1 844 666-0155. Une preuve d’achat (reçu original
d’achat) du consommateur qui a acheté le produit doit accompagner toute réclamation de garantie. Ce produit est
garanti si utilisé de façon normale et cette garantie est valide pour le premier acheteur seulement. Toute garantie est
invalide si le produit a été utilisé de façon non recommandée ou s’il a fait l’objet de négligence. akuaplus® n’est pas
responsable des frais de main-d’œuvre, de transport, des blessures ou de toute autre perte ou de tout dommage subi
pendant l’installation, les réparations ou le remplacement, incluant tout dommage consécutif ou indirect.
This manual suits for next models
2
Table of contents
Other Akuaplus Indoor Furnishing manuals
Popular Indoor Furnishing manuals by other brands

byLIVING
byLIVING THANATOS 01 Assembly instructions

Mayline
Mayline Safco Twixt 3005 instructions

Naturel
Naturel COUNTRY ZRC80PA Assembly instructions

Santa's Bags
Santa's Bags SB-10181-RS Assembly instructions

Rocheleau
Rocheleau R13 EVO H128 Assembly instructions

Ty Pennington
Ty Pennington Style D71 M20305 Use and care guide