Akura ADVR171S User manual

1
ADVR171S
Callthenumberbelowif you haveanydifficultiesoperatingthis product.
Please Read This Manual.
Werecommendthatyou readthismanual carefully
beforeconnecting yourDVD VideoRecorder and
Keepthe manualin a safeplace forfuture reference.
operatingitforthefirsttime.
AKURAHELP-LINE
01422 263273

2
Important Safety Instructions
16 This appliance shall not be exposed to dripping or
splashing water and that no object filled with liquid such
as vases shall be placed on the apparatus.
17 Power Lines - An outdoor antenna should be located
away from power lines.
CAUTION
******************************************
1Read these instructions.
2Keep these instructions.
3Heed all warning.
4Follow all instructions.
5Do not use this apparatus near water.
6Clean only with dry cloth.
7Do not block any ventilation openings. Install in
accordance with the manufacturer’s instructions.
8Do not install near any heat sources such as radiators,
heat registers, stoves, or other apparatus (including
amplifiers) that produce heat.
9Do not defeat the safety purpose Do not remove the
mains plug fitted. If it is damaged it must be replaced by
a competent engineer. Do not remove the “E arth pin”as
this is central to your safety. If the plug fitted does not fit
the mains outlet, please consult your local dealer.
10 Protect the power cord from being walked on or pinched,
particullarly at plugs, convenience receptacles, and the
point where they exit from the apparatus.
11 Only use attachments/accessories specified by the
manufacturer.
12 Unplug this apparatus both from the mains supply and
aerial connection in the event of a Thunder storm or if
going on holiday.
13 Refer all serving to qualified service personnel.
Servicing is required when the apparatus has been
damaged in any way, such as power-supply cord or plug
is damaged, liquid has been spilled or objects have fallen
into the apparatus, the apparatus has been exposed to
rain or moisture, does not operate normally, or has been
dropped.
14 Battery use CAUTION - To prevent battery leakage which
may result in bodily injury, property damage, or damage to
the unit:
•Install all batteries correctly, observing their polarity.
Ensure they are fitted as marked on the handset.
•Do not mix batteries (old and new or carbon and alkaline,
etc.).
•Remove batteries when the unit is not used for a long
time.
Disposing of batteries. Do not throw onto a fire. Consult
your local authority regarding safe disposal.
•The ventilation holes should not be blocked or covered.
•Keep naked flames and Lighted candles away from the
player.
•Do not place Vases or other vessels filled with water on
the apparatus. Do not use in a high humidity environment.
Do not splash water or other liquids into the player.
•The mains plug is used at the Final connection. Access
should be easily available.
15 To reduce the risk of fire or electric shock, Do not
expose this apparatus to rain or moisture.

3
Table of Contents
Important safety instruction ............................... 2
General information ........................................... 4~5
Features .............................................................. 4
DVD region code ................................................. 4
Discs that may be played..................................... 4
Disc can be recorded .......................................... 4
Glossary of disc terms ........................................ 4
Supplied Accessories.......................................... 4
Inserting batteries into the remote control ............ 4
Notes on disc....................................................... 5
Conventions about this manual ............................ 5
Function Overview .............................................. 6~7
Front panel........................................................... 6
Back panel ........................................................... 6
Remotecontrol..................................................... 7
BasicConnetion .................................................. 8~11
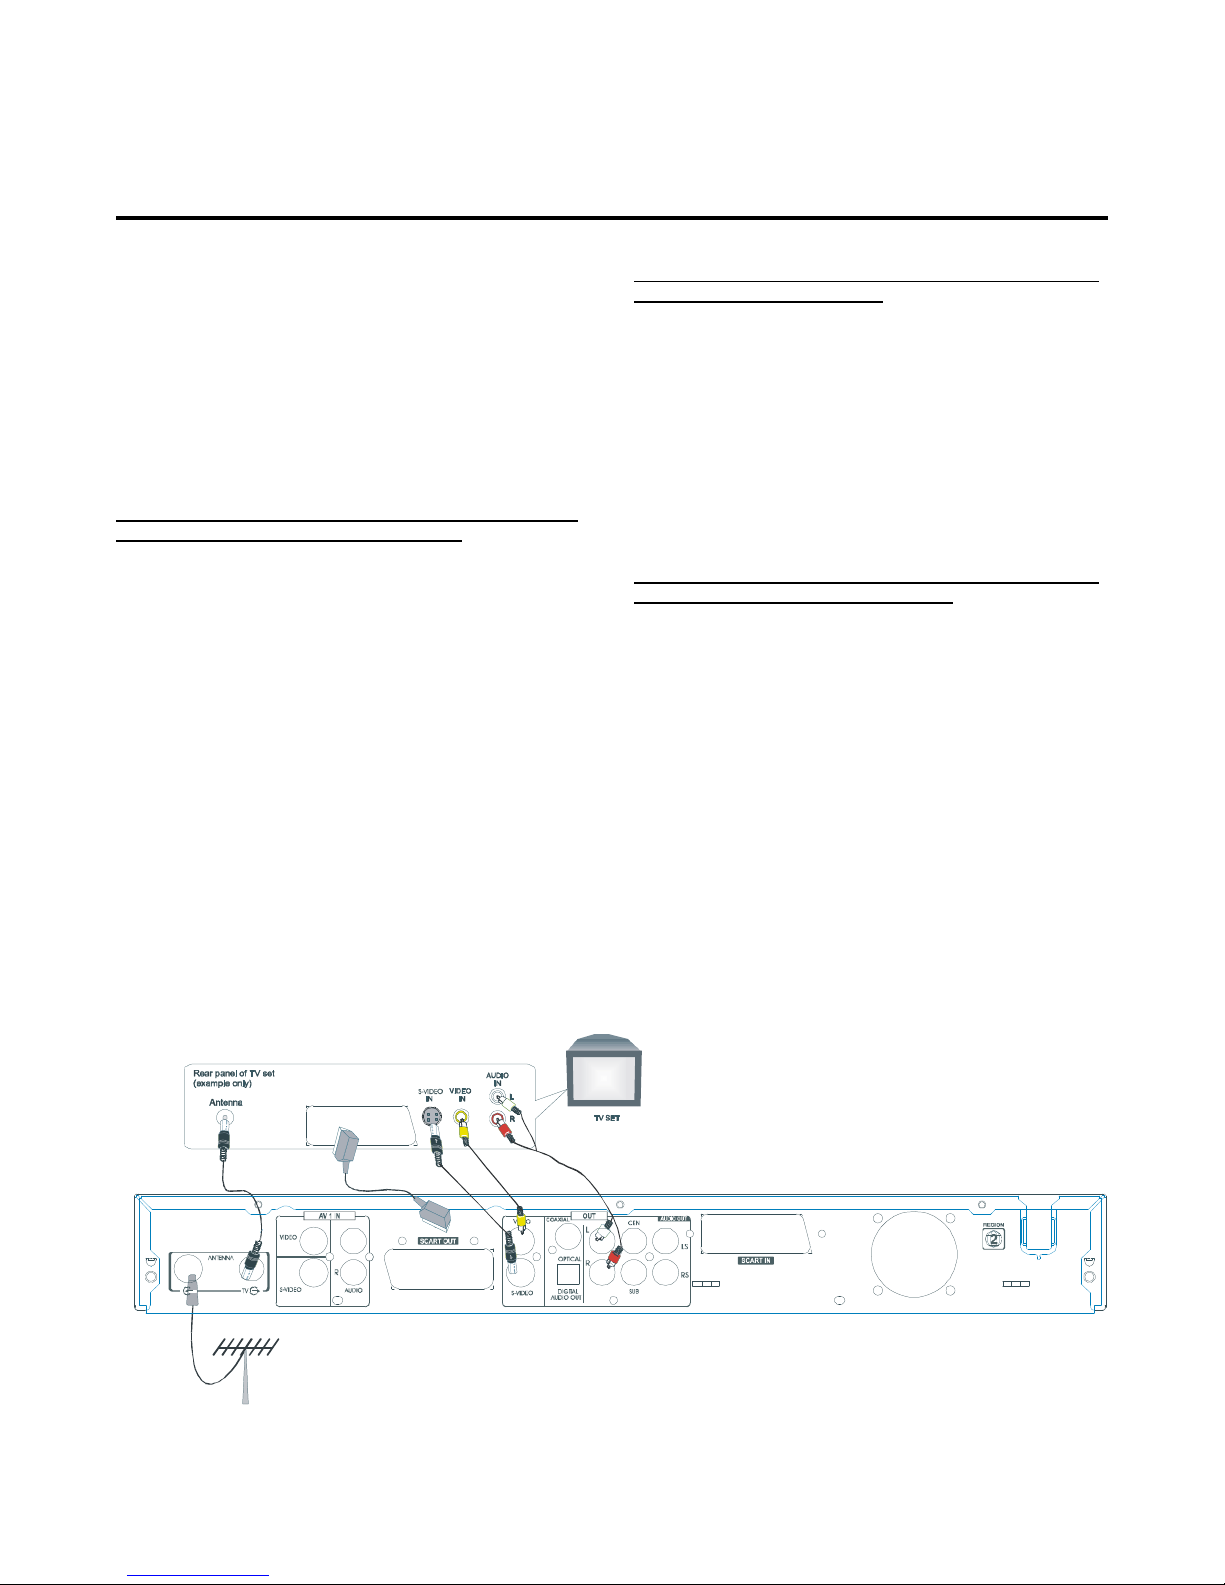
Connect your DVD recorder to TV set................. 8
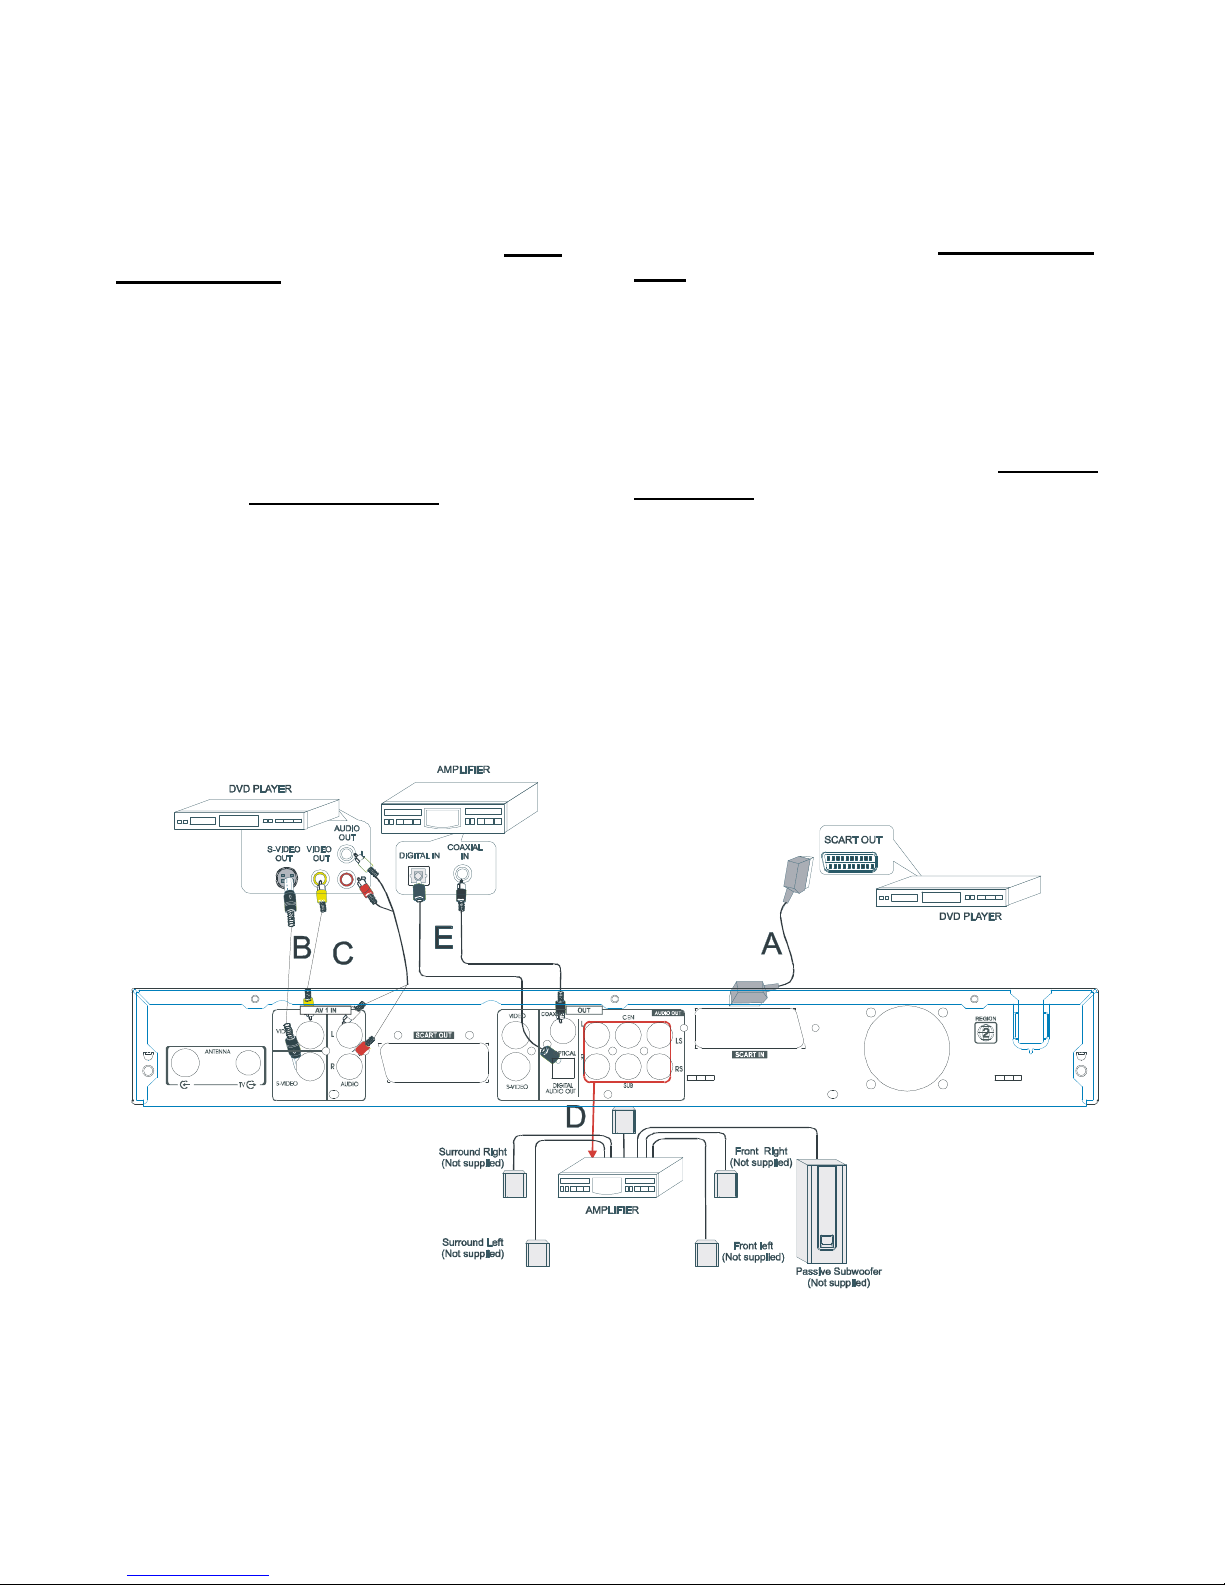
Connect your DVD recorder to Audio devices..... 9
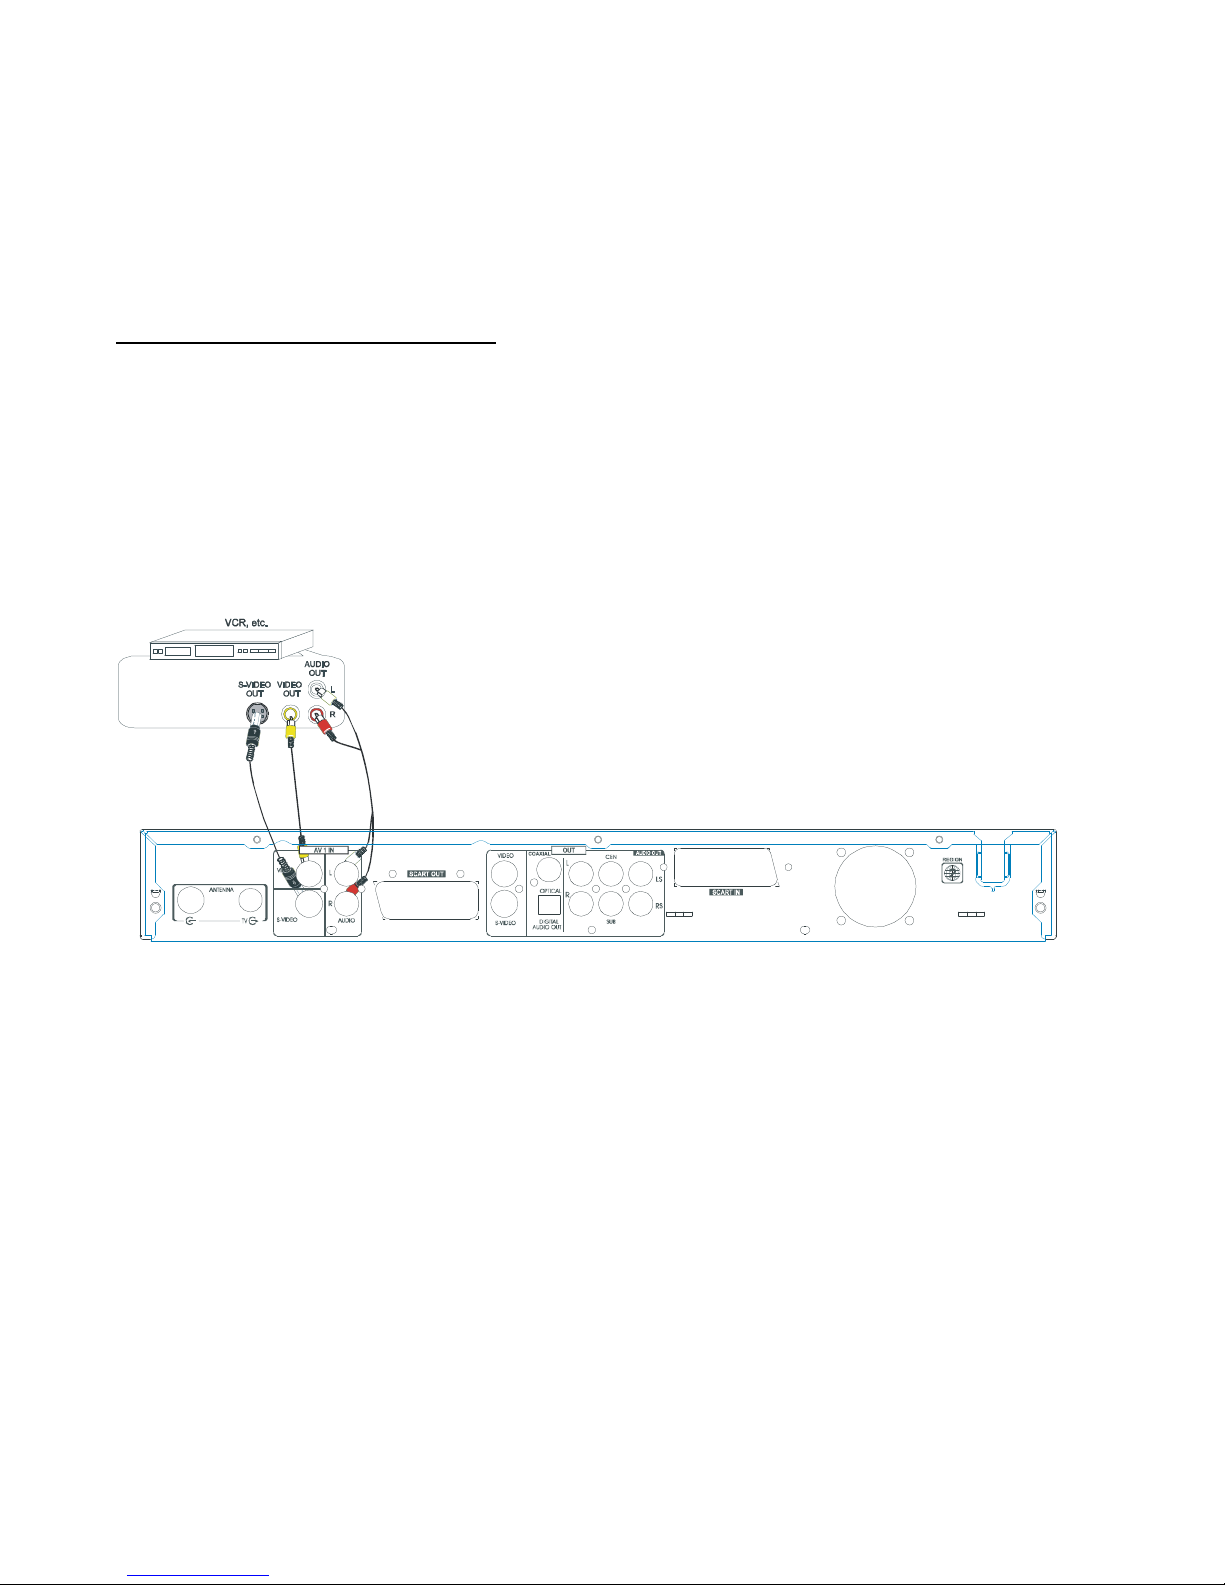
Connect your DVD recorder to VCR or a similar
Recording equipment ........................................... 10~11
Before initial setting ........................................... 12~14
Setting the clock................................................... 12
Setting the channel .............................................. 12
NICAMselect ....................................................... 12
Auto CH Scan ....................................................... 12
Channel List .......................................................... 13
Modify Channel .................................................... 13
Moving the stations.................................................14
Naming stations........................................................14
Initialsettings ...................................................... 15~20
DVD control ......................................................... 15~16
Setting Disc Menu ............................................ 15
Setting Angle Mark ........................................... 15
Setting Audio.................................................... 15
Setting Subtitle ................................................. 15
Setting Parental Control.................................... 16~17
General ................................................................ 17
Setting Menu Language ................................... 17
Video ................................................................... 18
Setting TV Display ........................................... 18
Setting Video Output ........................................ 18
Setting AV1 Select .......................................... 18
Setting AV2 Select ........................................... 18
Speaker ............................................................... 19
Setting Down Mix............................................. 19
Setting Center, Rear, Subwoofer ..................... 19
Setting Center Delay ........................................ 19
Setting Rear Delay ........................................... 19
Speaker Test.................................................... 19
Audio ................................................................... 19
Setting Digital Out ............................................. 19
Setting DRC...................................................... 19
Pro Logic.......................................................... 20
Recording ............................................................ 21~26
Preparations......................................................... 21
Recording setup .................................................. 21~22
Setting Record Mode ............................................ 21
Setting Auto Chapter............................................. 22
Recording TV Programs ...................................... 22
Timer Recording................................................... 23~26
Setting Record Time......................................... 23
Setting Record Day .......................................... 23
Setting Input Source ........................................ 24
Setting Position ................................................ 24
Setting Record Mode........................................ 24
Setting Title ...................................................... 24
Recording List .................................................. 25
Press STANDBY/ON to turn the power off ...... 26
Recording from an External Equipment ............ 26
One Touch Recording ...................................... 26
Playback Features .............................................. 26~30
Preparations ........................................................ 26
Start or Pause Playback....................................... 26
StoppingPlayback ............................................... 26
Fast Playback ...................................................... 26
SkipPlayback....................................................... 27
Slow Motion Playback .......................................... 27
Step Playback ...................................................... 27
RepeatPlayback .................................................. 27
A-B Repeat Playback ........................................... 27
UsingDVDTITLE menu ........................................ 27
UsingMENU/PBC .................................................. 27
Return.................................................................. 27
GOTO .................................................................. 27
Display the playback information ......................... 28
Subtitle ................................................................. 28
AUDIO .................................................................. 28
Language............................................................. 29
Zooming............................................................... 29
Angle ................................................................... 29
Intro play mode .................................................... 29
Shuffle playback.................................................. 29
Programmed playback ......................................... 29
Sleep timer setting ............................................... 29
MP3 CD Playback .................................................. 30
Picture CD Playback.............................................. 30
JPEG CD Playback ................................................ 30
Picture CD/JPEG Picture Zoom .............................. 30
Managing the disc contents ............................... 31~33
Playing/Edittitles .................................................. 31
PLAY TITLE ...................................................... 31
TITLEDELETE ................................................... 31
TITLE RENAME ................................................. 31
Edittitles............................................................... 32
Format Disc...................................................... 32
Erase Disc ....................................................... 32
Finalize Disc..................................................... 32
Rename Disc.................................................... 32-33
Protect Disc ..................................................... 33
Troubleshooting Guide ....................................... 34
Maintenance........................................................ 35
Specifications ...................................................... 35

4
General Information
•Track (Video or audio CD)
Sections of a picture or a music piece on a VIDEO or a CD. Each
track is assigned a track number enabling you to locate the track
you want.
SuppliedAccessories
Check that you have the following items:
•Remotecontrol
•AA batteries
•Owner’s manual
•Scart Cable
Inserting Batteries into the Remote Control
You can control the system using the supplied remote. Insert two AA
batteries by matching the + and - on the batteries. When using the
remote, point it at the remote sensor on the front panel of this system.
Note
•Do not leave the remote in an extermely hot or humid place.
•Donot use a new batterywith an old one.
•Do not drop any foreign object into the remote casing. particularly
whenreplacing the batteries.
•Donot expose the remotesensor to direct sunlightor lighting appa-
ratuses.Doing so many causea malfunction.
•Ifyouwill not use the remoteforan extended period of time, remove
the batteries to avoid possible damage from battery leakage and
corrosion.
Features
·Built-in Dolby Digital decorder, supporting Dolby Pro Logic and
Virtual Surround
·5.1Channel audio out
·TV tuner receiver
·ConformingDVD,SVCD,VCD1.1,VCD2.0,MP3,CDR,CDRW discs
·DVD navigation and SVCD,VCD2.0 PBC controlling functions
·VFD front panel display and OSD menu display
·Full function remote control
DVD region code
DVD players and discs are designed with region numbers which
dictate the region (printed on the rear panel). If the region number
does not match the region number in your DVD player, you will not be
ableto play the disc. Ifyoutry to play the DVD,themessage “WRONG
REGIONNUMBER”willappearonOSD.
The region number for this DVD player is 2
Discs that may be played
•DVDs
Discs are generally recorded with multi-titles.
Titles may be subdivided into chapters.
•VideoCD
Discs are generally divided into tracks.
•Audio CD’s
Discs are divided into tracks.
Note
•Youcannot playCD-G,CD-EXTRA, ,CD-ROMand DVD-ROMdiscs.
•Youcannotplayillegallyproduceddiscs.
•Youcannotplayscratcheddiscs.
•You cannot play disc that are dusty, soiled or marked with finger-
prints.
DISC can be recorded
•DVD+R(DigitalVersatile Disc + recordable)
•DVD+RW (Digital Versatile Disc + rewritable)
Glossary of disc terms
•Title(DVD)
The longest sections of a picture or a music piece on a DVD; a
movie, ect., for a picture piece on a video software; or an album,
etc., for a music piece on and audio software. Each title is as-
signed a title number enabling you to locate the title you want.
•Chapter(DVD)
Sectionsof a pictureor a music piece that are smallerthan titles.A
title is composed of several chapters. Each chapter is assigned a
chapter number enabling you to locate the chapter you want. De-
pendingonthe disc, no chapters may berecorded.

5
Notes on disc
Disc handling precautions
•To keep the disc clean, handle the disc by its edge. Do not touch
the surface.
•Do not stick paper or tape on the disc.
If there is glue (or a similar substance) on the disc, remove the glue
completely before using the disc.
•Do not expose the disc to direct sunlight or sources such as hot
air ducts, or leave it in a car parked in direct sunlight as there can
be considerable rise in temperature inside the car.
•After playing, store the disc in its case.
•Do not write on the label side with a ball-point pen or other writing
utensils.
•Be careful not to drop or bend the disc.
Disc cleaning precautions
•Before playing, clean the disc with a cleaning cloth. Wipe the disc
from the center to out.
•Do not use solvents such as benzine, thinner, commerically
avaiable cleaners or anti-static spray intended for viny1 LPs.
Disc installing precautions
•Do not install more than 1 disc on disc tray.
•Do not place the disc on the tray up-side down.
•Do not try to close the disc tray when the disc is not installed
properly.
Conventions about this manual
•Instructions in this manual describe the controls on the system.
You can also use the controls on the remote control if they have the
same or similar names as those on the system.
•The types of functions and operations that can be used for a par-
ticular disc vary depending on the features of that disc. In some
cases, these functions and operations may differ from the descrip-
tions given in this Operations Manual. In this event, follow the in-
structions given on the screen. This Operations Manual only covers
basic disc operations.
•For some operations, the icon may appear on the the screen.
Thisindicates that the operationdescribed in this OperationsManual
is not permitted for the current disc.
•The drawings about the TV screen and front panel display used in
this Operations Manual are purely for the purposes of explanation.
The actual displays may differ slightly from what are shown here.

6
Front panel
1-STANDBY/ON
To switch the Unit to standby and power on mode
2-OPEN/CLOSE
Press to open/close disc tray.
3-RECORD
Press to record.
4-CHANNEL (-)
Press to select previous TV channel
5-CHANNEL (+)
Press to select next TV channel
6-REC MODE
Select the record mode
7-S-VIDEO
S-video input jack
8- VIDEO
Video input jack
9- AUDIO IN (L)
Audio input jack(left channel)
10- AUDIO IN (R)
Audio input jack(right channel)
11- PREV
Press it to select the previous track or chapter.
12- NEXT
Press it to select the next track or chapter.
13- STOP
Press to stop playback exept for timer recording.
14- PLAY/PAUSE
Press it to play or pause the playback.
1-ANTENNA
Connect RF ANTENNA to TV set
2-S-VIDEO (IN)
S-video input jack
3-AUDIO IN (L and R)
Audio input jacks
4-S-VIDEO( OUT)
S-video output jack
5-OPTICAL OUT
Optical digital audio output
6-SUBWOOFER
Connect the Amplifier Sub terminals
7-SCART IN
S-cart in jack
8- AUDIO OUT
Connect the Amplifier Audio input
9- COAXIAL OUT
Coaxial digital audio output
10- VIDEO OUT
Video input jack
11- SCART OUT
S-cart out jack
12- VIDEO IN
VIdeo input jacks
Back panel
12
3
4
5 6
7
89
10
11
12
1
2
3
4
5
6
7
8
9
10
11
12
13
14

7
Remote control
1 STANDBY :Switches the player “On” and to “standby”.
2 MUTE : Mutes and restores the audio.
3 SHUFFLE : press to play the tracks at random.
4 INTRO :Plays several seconds of each track during
stop mode (CD and VCD only).
5 MENU/PBC : press to select the subtitle(root) menu.
6 LANGUAGE: select a different audio language or direction.
7 Directional arrow buttons: press to select the item you want.
8 AUDIO : changes the audio channels of a VCD or CD if available.
9 STOP : stops play momentarily or completely.
10 FAST BACKWARD : Fast backward search.
11 FAST FORWARD: Fast forward search.
12 GOTO: go to the desired starting title, chapter, track or time.
13 RETURN : return back to the menu (VCD only).
14 NUMERIC KEYS : used in DVD menu and CD track selection.
15 DISPLAY : press to show the playing information about the disc.
16 SLEEP : To set the timer on the unit.
17 SOURCE : press to select your desired source.
18 N/P: Selects PAL,NTSC, MULTI & P-SCAN systems.
19 TV : Switches from DVD to TV.
20 CHANNEL- /+ : press to select lower/upper TV program channel.
21 REC MODE :press to select the record mode before recording.
22 RECORD : press to start record.
23 EDIT : press to edit what you record.
24 CLEAR : press to clear what you select or input.
25 STEP : press to view playback frame by frame
26 ZOOM : press to enlarge the picture.
27 NEXT SKIP : skip to next chapter or track.
28 PREV SKIP: skip to previous chapter or track.
29 PLAY/PAUSE : press to start or pause playback.
30 SLOW : select the forward/backward slow speed playback.
31 PROG : program the tracks in your own order.
32 ENTER : press to enter a command or confirm a selection.
33 SUBTITLE : access various subtitle language in DVD.
34 TITLE : displays the title menu if available (DVD only)
35 SETUP: enter into the SETUP menu.
36 A-B : repeat a certain segment between A and B.
37 REPEAT : allow you to repeat a title,a chapter, a song or all
songs on the disc.
38 ANGLE: access various camera angles on DVD.
39 OPEN/CLOSE: open or close the disc tray.
1
3
4
2
9
8
6
5
16
15
11
17
18
12
14
19
20
39
38
37
36
35
34
33
29
32
31
30
23
24
25
26
27
28
21
22
13
10
7

8
Basic connection
IMPORTANT !
●Before connecting the AC power to the wall outlet, ensure
that all other connections have been made.
●Never make or change any connections with the power
switched on.
ConnectyourDVDrecordertoTVset★
If your TV set has a VIDEO OUT socket , connect your TV
with a Video cable . (Configuration A+C+D )
1. Insert ANTENNA cable into ANTENNA socket at the back of the
DVD recorder.
2. Insert one end of the supplied aerial cable to the ANTENNA OUT at
the back of the DVD recorder and the other end into the aerial
input socket at the back of the TV set.
3. Plug one end of the supplied Video cable into the yellow Video
(CVBS) output socket at the back of the DVD recorder and the
other end into the Video in or AV in socket on the TV set .
4. Insert one end of the supplied Audio cable into the Red/White
socket OUT L AUDIO R at the back of the DVD recorder and the
other end into the Audio input (usually red/white )socket on the TV
set.
If your TV set has a S-Video socket , connect your TV with
a S-Video cable .(Configuration B+C+D)
1. Insert ANTENNA cable into ANTENNA socket at the back of the
DVD recorder.
2. Insert one end of the supplied aerial cable to the ANTENNA OUT at
the back of the DVD recorder and the other end into the aerial
input socket at the back of the TV set.
3. Plug one end of a S-Video cable into the S-Video 1 output socket
at the back of the DVD recorder and the other end into the S-
Video input socket on the TV set .
4. Insert one end of the supplied Audio cable into the Red/White
socket OUT L AUDIO R at the back of the DVD recorder and the
other end into the Audio input (usually red/white )socket on the TV
set.
If your TV set has a SCART socket , connect your TV with
a Scart cable .(Configuration E)
1. Insert ANTENNA cable into ANTENNA socket at the back of the
DVD recorder.
2. Insert one end of the supplied aerial cable to the TV socket at
the back of the DVD recorder and the other end into the aerial
input socket at the back of the TV set.
3. Plug scart cable into the corresponding scart socket at the back of
the TV set and the scart socket (SCART OUT).
A
B
E
DC

9
ConnectyourDVDrecordertoadditional★
devices, using second Scart socket (Con-
figurationA +D)
You can connect additional devises such as decorders,DVD
player,etc. to the Scart In, then you can see the picture from the
additional device on your TV set. At same time, you can recorder the
program from the additional device.
ConnectyourDVDrecordertoanAmpli-★
fier with 5.1 channels and surrounding
audio input. (Configuration D )
T Analogue audio sockets AUDIO OUT are located at the back of the
You can connect additioanl devises such as decorders,
camcorders,etc. to the S-video /Video and Audio in ,then you can see
the picture from the additional device on your TV set. At same time,
you can recorder the program from the additional device.
ConnectyourDVDrecordertothedigital★
audio socket of an Audio devices, (Configu-
ration A+E)
At the back of the DVD decorder there are digital output socket Digital
DVD recorder.
These can be used connect the following:
1) a receiver with Dolby Surround Prologic
2) a receiver with two channel analo stereo
ConnectyourDVDrecordertoadditional★
devices, using Video socket (Configuration
B/C )
DVD recorder.
These can be used connect the following:
1)an A/V receiver or A/V amplifier with digital muti-channel sound
decorder
2) a receiver with two channel digital stereo
Note. Do not connect both audio leads at once.

10
ConnectyourDVDrecordertoVCR or★
a similar recording equipment
You can use this unit as the source player or as the recording
deck.
Connection for recording from other equipment
You can connect additional devices such as decoders, camcorders,
etc. to the S-video /Video/component and Audio in , then you can see
the picture from the additional device on your TV set. At the same
time , you can record the program from the additional device .
1. Connect to the AV IN by a video cable.(configuration A+C)
2. Connect to the AV IN by a s-video cable.(configuration B+C)
3. Connect with component video cable.(configuration C)
AB C

11
Connection for recording from other equipment
Connect a VCR or similar recording equipment to the OUT jacks.
1. Connect to Video IN by a video cable.(configuration A+C)
2. Connect to S-video IN by a s-video cable.(configuration B+C)
3. Connect with component video cable.(configuration C)
A
BC

12
The Setup menu is displayed on the TV screen, this enables you to
customize the DVD system to your paticular requirement. If the
preferred options selected are not available on the disc, then the
discs own preference will be used.
Turn on the TV and select the appropriate video input to suit the
connections made previously. (refer to your TV owners manual.)
Press [ ]before setting if the unit is receiving the TV program.
1. Press [Standby/On]to turn on the unit.
2. Press [SETUP] in no disc mode or full stop mode.
3. Use [3/4/5/6]to select item you want.
4. Press [ENTER]to confirm the selection.
5. To exit setup menu, press [SETUP] again.
Setting the clock
1. Press [SETUP] in no disc mode or full stop mode,“Menu”screen
appears on the TV screen.
2. Press [6]to select “Setup Menu ”, then press [ENTER]or [4],
“recording Setup”is highlighted.
3. Press [ENTER]or [4]again,“Recording Setup ”screen
appears.
4. Press [6]to select “Set Clock ”, then press [ENTER]or [4],
“Set Clock Setup ”screen appears.
5. Press [3/4/5/6]repeatedly (or number buttons) to set the
date and time.
6. Press[4]to select “Done”or “Cancel ”, and then press
[ENTER],“Recording Setup ”returns.
7. To exit, press [SETUP].
8. Press [Standby/On] to turn off the unit, the clock appears on
the FL display.
Setting the channel
1. Open “Recording Setup ”screen (Repeat steps 1 ~ 3 of
“Setting the clock”).
2. Press [6]to select “Channel Setup ”, then press [ENTER]or
[4]to select the sub menu.
3. Press [5/6]to select the item.
NICAM
1. Select “Nicam ”.
2. Press [ENTER]or [4], “Nicam Setup ”screen appears.
3. Press [ENTER]or [4]to select the sub menu, then press [5/6]
to select “AUTO ”or “OFF ”.
4. Press [ENTER], “v ”appears.
5. Press [3] repeatedly to return to “Recording Setup ”screen.
Auto CH Scan
1. Select “Auto CH Scan ”.
2. Press [ENTER]or [4], a message screen appears.
“Yes”is highlighted.
Note: If you want to cancel it, press [4]to select “No”, and
then press [ENTER].
3. Press [ENTER], auto memory channel scanning screen appears
and starts to memorize all the channels available in your area.
BEFOREINITIALSETTING
4:3 PS
4:3 LB
16:9 Wide
Press SETUP to exit Current selection
Menu
Record Program
Setup Menu
Play/Edit Titles
Edit Disc
Press SETUP to exit
Play/Edit Disc
4:3 PS
4:3 LB
16:9 Wide
Press SETUP to exit Current selection
Set Clock Setup
Select a field then use to edit.
Hour Minute Year Month Day
Press SETUP to exit
11 2004 / Jan / 01
Done
Cancel
4:3 PS
4:3 LB
16:9 Wide
Press SETUP to exit Current selection
NICAM Setup
NICAM AUTO
OFF
√
Press SETUP to exit Current selection
√
4:3 PS
4:3 LB
16:9 Wide
Press SETUP to exit Current selection
Recording Setup
Auto Chapter
Record Mode
Press SETUP to exit
Set Clock
Channel Setup
Auto CH Scan
Record Audio
Channel List
Modify Channel
NICAM
Press Yes to continue Auto Scan
press No to exit
Yes No

13
Please wait until the confirmation screen appears.
“Yes ”is highlighted.
Note: If you don't want it, press [4]to select“No”, and then
press [ENTER].
4. Press [ENTER], “Channel List ”screen appears.
5. Press [3] to return to “Recording Setup”screen.
Channel List
1. Select “Channel List ”.
2. Press [ENTER]or [4], “Channel List”screen appears.
Note: If you want to receive or not receive the channel,
press [5/6]to select the channel, and then press [ENTER],
“Enabled ”or “Disabled ”appears.
3. Press [3] to return to “Recording Setup”screen.
Modify Channel
When “A uto tuning”is in operation some stations that are
received may not be of good quality, i.e. noisy or ghosty, probably
signals from another area. Also the stations received will probably
not be in the correct order, i.e. BBC1 may be in location P005
instead of P001. To enable you to delete unwanted stations and
move the wanted ones to the correct location.
1. Select “Modify Channel ”.
2. Press [ENTER]or [4]and the “Modify Channel ”screen will
appear.
3. Press [5/6]to select an unwanted channel. (this is seen in the
background).
4. Press [4], then [6] to select “Delete Channel ”.
ADD Channel : The selected channel is added.
Fine Tuning : “Fine Tuning ”screen appears.
Press [3/4] to adjust it.
Press [6]to select “Done ”and then press
[ENTER].
Delete Channel: The channel is deleted.
5. Press “E nter”. You will notice that that channel has disappeared
and the lightened number has turned to grey.
6. To remove all the unwanted channels, proceed from 3 to 5.
If you want to confirm the channel, open the “Channel List ”
screen(see the below column).
4:3 PS
4:3 LB
16:9 Wide
Press SETUP to exit Current selection
Recording Setup
Auto Chapter
Record Mode
Set Clcok
Channel Setup
Press SETUP to exit
Set Clcok
Tuner Select
Total channels found : 002
Do you want to view the available
channels?
Yes No
4:3 PS
4:3 LB
16:9 Wide
Press SETUP to exit Current selection
Recording Setup
Auto Chapter
Record Mode
Set Clcok
Channel Setup
Press SETUP to exit
Set Clcok
Tuner Select
Scanning for Channels (AIR)
Total Channels Found: 001
…
Please use STOP key to cancel scan
Press SETUP to exit Current selection
Modify Channel
C 002
C 003
C 004
C 005
C 006
C 007
C 008
C 009
C 010
ADD Channel
Fine Tuning
Delete Channel
Done
Press SETUP to exit Current selection
Channel List
Press ENTER to Disable
P001 BBC1 Enabled
Position Program Enabled/Disable
P002 BBC2 Enabled
P003 ITV Enabled
P004 CH4 Enabled
P005 CH5 Enabled

14
Moving the wanted stations to the correct location
All television stations have “C hannel numbers” i.e. in Yorkshire
BBC1 = CH44. In London BBC1 = CH26. It is necessary to determine
which TV station is allocated which channel number.
Your local TV listing guide will give the channel numbers for your
area. If you cannot still find the information, proceed as follows :
1. Access the “M odify Channel” menu.
2. Move the cursor to each highlighted number in turn.
3. By looking at the picture in the background, determine which
station it is, by the programme content. ( a local tv guide will
help).
4. Note all the highlighted numbers and which station it is.
5. Select “B ack”and press “E nter”. This will bring you back to
the “R ecording setup”menu.
(Moving the stations)
1. Move the cursor to “Channel list”and press “Enter”.
2. Using the list you have made, move the cursor to the station
number which had BBC1 as its channel. Press “E nter”.
3. A box will now be displayed , select “Move to”and press
“E nter”. The box will now disappear and the highlighted
selection will turn darker.
4. Using the “5” button, move the cursor to P001, and press
“E nter”. You will notice that the station with BBC1 has now
moved to location P001.
5. Using the” 6”button, move the cursor to the Channel number
that had BBC2 as its station number.
6. Continue to move all programme numbers by repeating 2 to 5
until all the programmes are in their correct locations. In the UK
this is normally P001 = BBC1. P002 = BBC2. P003 = ITV. P004
= CH4. P005 = CH5. If there are other stations you wish to
keep, these are usually kept from P006 upwards.
7. To exit the “Channel list” press “3“button.
NAMINGSTATIONS
When all the stations are in their correct locations, you may wish to
rename them, thus P001 would become BBC1. Proceed as follows:
1. From the “Recording setup”menu select “Channel list? And
press “E nter”.
2. The cursor will now highlight P001. Press “E nter”.
3. A small text box will now be displayed. Select “E dit name?and
press “E nter”.
4. A Box showing the “A lphabet”will be displayed, also a box with
the title “N ew Channel name”. You must delete whatever text is in
that box.
5. Move the cursor to the “Clear” box and press “Enter”.
6. Move the cursor to the first letter that you wish to enter, “B”and
press “Enter”. “B”will now be displayed in the box. When all the
letters and numbers have been selected and entered (BBC1). Now
move the cursor to “D one”.
7. The screen will now revert to “C hannel list”and where“P rogram”
is shown “BBC1” will now be displayed.
8. To rename all the other stations, repeat instructions 2 -7.
9. When all the station have been named, press “S etup” and the
recorder will revert to “TV”.
4:3 PS
4:3 LB
16:9 Wide
Press SETUP to exit Current selection
Channel List
Press ENTER to Disable
Position Program Enable/Disable
Edit Name
Move to
Enable / Disable
EXIT
4:3 PS
4:3 LB
16:9 Wide
Press SETUP to exit Current selection
Channel List
Press ENTER to Disable
P001 BBC1 Enabled
Position Program Enabled/Disable
P003 ITV Enabled
P004 CH4 Enabled
P005 CH5 Enabled
P002 BBC2 Enabled
Press SETUP to exit
Current selection
Channel List
Press ENTER to Disable
Position Program Enable/Disable
Please edit the Channel name
Using the keyboard below
New Channel Name:
Delete Clear Cancel Done
1 2 3 4 5 6 7 8 9 0
A B C D E F G H I
J K L M N O P Q R
S T U V W X Y Z Space

15
DVD Control
This is a setup for playing back DVD-Video discs.
(DVD Control ---> Disc Menu, Angle Mark, Audio, Subtitle &
Parental Control)
1. Press [SETUP] in no disc mode or full stop mode,“Menu”screen
appears on the TV screen.
2. Press [6]to select “Setup Menu”, then press [ENTER]or [4],
“Recording Setup”is highlighted.
3. Press [6]to select “DVD Control ”, then press [ENTER]or [4],
“DVD Control Setup ”screen appears.
4. Press [5/6]repeatedly to select the item.
Setting Disc Menu
1. Select“Disc Menu ”.
2. Press [ENTER]or [4]to select the sub menu, then press [5/6]
to select the desired language.
Note: Disc —The first priority language of the disc.
3. Press [ENTER], “v ”appears, the disc menu language is set.
4. Press [3] to return to “Disc Menu ”.
Setting Angle Mark
To show the angle mark when playing back DVD-Video discs (recor-
ded with multi-angle), select this setting.
1. Select“Angle Mark ”.
2. Press [ENTER]or [4]to select the sub menu, then press [5/6]
to select “ON ”or “OFF ”.
3. Press [ENTER],“v ”appears.
4. Press [3] to return to “Angle Mark ”.
Setting Audio
1. Select“Audio ”.
2. Press [ENTER]or [4]to select the sub menu, then press [5/6]
to select the desired language.
Note : Disc —The first priority language of the disc.
3. Press [ENTER], “v ”appears, the disc audio language is set.
4. Press [3] to return to “Audio ”.
Setting Subtitle
1. Select“Subtitle ”.
2. Press [ENTER]or [4]to select the sub menu, then press [5/6]
to select the desired language.
Note: Disc —The first priority language of the disc.
3. Press [ENTER], “v ”appears, the disc subtitle language is set.
4. Press [3] to return to “subtitle ”.
INITIALSETTINGS
4:3 PS
4:3 LB
16:9 Wide
Press SETUP to exit Current selection
Menu
Record Program
Recording Setup
General
Video
Speaker
Audio
Press SETUP to exit
Play/Edit Disc
Setup Menu
DVD Control
4:3 PS
4:3 LB
16:9 Wide
Press SETUP to exit Current selection
DVD Control Setup
Press SETUP to exit
Disc menu Disc
English
Angle Mark German
Audio
Spanish
Subtitle
French
Parental Control
√
Current selection
√
Italian
4:3 PS
4:3 LB
16:9 Wide
Press SETUP to exit Current selection
DVD Control Setup
Press SETUP to exit
Disc menu Disc
English
Angle Mark German
Audio
Spanish
Subtitle
French
Parental Control
√
Current selection
√
Italian
4:3 PS
4:3 LB
16:9 Wide
Press SETUP to exit Current selection
DVD Control Setup
Press SETUP to exit
Disc menu
Angle Mark
Audio
Subtitle
Parental Control
√
Current selection
√
ON
OFF
4:3 PS
4:3 LB
16:9 Wide
Press SETUP to exit Current selection
DVD Control Setup
Press SETUP to exit
Disc menu Disc
English
Angle Mark German
Audio
Spanish
Subtitle
French
Parental Control
√
Current selection
√
Italian

16
Setting Parental Control
Notes :
“ Password ”is set to “0000 ”before shipping from the factory..
You may need extra instructions during the setting. If a message
appears, please follow the instructions displayed on the TV screen.
1. Select“Parental Control ”.
2. Press [ENTER]or [4]to select the sub menu, then press [5/6]
to select “Choose Rating ”or “Set Password ”.
Choose Rating
1. Select“Choose Rating ”.
2. Press [ENTER]or [4], “Parental Control Set ”screen appears.
Note : If you want to cancel the setting, select “Back ”and
press [ENTER], “DVD Control Setup ”screen returns.
3. Press [3/4/5/6]and press [ENTER] to enter the password.
Note : If you use this unit for first time, enter [0], [0], [0] and [0].
Because the initial password is set to “0000 ”before
shipping from the factory.
4. Press [6]repeatedly to select “OK ”.
5. Press [ENTER], the parental lock level screen appears.
6. Press [ENTER]or [4]to select the sub menu, then press [5/6]
to select the parental lock level.
7. Press [ENTER], “v ”appears.
8. Press [3] twice to return to “DVD Control Setup ”screen.
Parental Control
MPAA (Motion Picture Association of America) Guideline is a ratin-
g system that provides advanced cautionary information to pare-
nt about the content of movie programs.
The parental lock level is equivalent to the following MPAA Rating
System.
1 G (General audiences)
3 PG (Parental guidance suggested)
4 PG-13 (Parents strongly cautioned)
6 PG-R (Restricted)
7 NC-17 (No one 17 and under admitted)
8 Adult
No Parental
Some DVD-Video discs contain a restriction level which enables
parents to prevent playback of discs by children. This unit is eq-
uipped with a password designed to prevent children changing
the level.
You cannot play DVD-Video discs rated higher than the level you
selected unless you cancel the parental lock function.
For example, when you select “5 ”level, the unit will not play di-
scs with ratings of “6 ”,“7 ”,“8 ”.
If you forget the password…
1. Enter [+10],[+10],[+10], and [+10]. (The numbers do not appear
in the box.)
It returns to the original factory setting“0000 ”
2. Enter a new password and set the parental lock level again.
Note:
DVD video discs may or may not respond to the parental lock se-
ttings. Make sure this function works with your DVD video discs.
Set Password
1. Select “Set Password ”.
2. Press [ENTER]or [4], “Parental Control Set ”screen appears.
Note : If you want to cancel the setting, select “Back ”and
press [ENTER], “DVD Control Setup ”screen returns.
4:3 PS
4:3 LB
16:9 Wide
Press SETUP to exit Current selection
Press SETUP to exit
Parental Control Set
Password
0
4:3 PS
4:3 LB
16:9 Wide
Press SETUP to exit Current selection
Parental Control Set
Press SETUP to exit
√
Current selection
√
Choose Rating
Set Password
8 Adult
6 PG-R
4 PG 13
No Parental
7 NC-17
5
4:3 PS
4:3 LB
16:9 Wide
Press SETUP to exit Current selection
DVD Control Setup
Press SETUP to exit
Disc menu
Angle Mark
Audio
Subtitle
Parental Control
Choose Rating
Set Password

17
3. Press [3/4/5/6]and press [ENTER] to enter the password.
Note: If you use this unit for first time, enter [0], [0], [0] and [0].
Because the initial password is set to “0000 ”before
shipping from the factory.
4. Press [6]repeatedly to select “OK ”.
5. Press [ENTER], the parental lock level screen appears.
6. Press [6]to select “Set Password ”.
7. Press [ENTER], the New Password screen appears.
8. Press [3/4/5/6]and press [ENTER] to enter the password.
(maximum 8 characters or numbers).
9. Press [6]repeatedly to select “OK ”.
10. Press [ENTER], the Confirm Password screen appears.
11. Press [5] to return to the character list, then enter the same
password as above.
12. Press [6]repeatedly to select “OK ”, then press [ENTER], the
new password is set.
13. Press [3] to return to “DVD Control Setup ”screen.
Note: If you want to cancel the setting, select “Back ”and
then press [ENTER], “DVD Control Setup ”screen returns.
14. To exit, press [SETUP].
General
This is on-screen language setting. In this instruction manual, the
language in on-screen display is English.
If you change the language, please follow the selected language in
on-screen display.
(General ---> Menu Language)
Setting Menu Language
1. Press [SETUP] in no disc mode or full stop mode, “Menu”screen
appears on the TV screen.
2. Using [6]to select “Setup Menu ”, then press [ENTER]or [4],
“Recording Setup”is highlighted.
3. Press [6]to select “General ”, then press [ENTER]or [4],
“General Setup ”screen appears.
4. Press [ENTER]or [4]to select the sub menu, then press [5/6]
to select the desired language.
5. Press [ENTER], “v ”appears, the menu language is set.
6. Press [3] to return to “Menu Language ”.
7. To exit, press [SETUP].
4:3 PS
4:3 LB
16:9 Wide
Press SETUP to exit Current selection
Menu
Record Program
Recording Setup
Video
Speaker
Audio
Press SETUP to exit
Play/Edit Disc
Setup Menu
DVD Control
General
4:3 PS
4:3 LB
16:9 Wide
Press SETUP to exit Current selection
Press SETUP to exit
Parental Control Set
0
New Password(8 chars)
Done Back
4:3 PS
4:3 LB
16:9 Wide
Press SETUP to exit Current selection
Press SETUP to exit
Set Password
Parental Control Set
Choose Rating
4:3 PS
4:3 LB
16:9 Wide
Press SETUP to exit Current selection
Press SETUP to exit
English
German
Spanish
French
√
Current selection
√
Italian
General Setup
Menu Language

18
4:3 PS(Panscan)
Select when a conventional TV set is connected.
When the wide screen disc is played back, it displays pictures
cropped to fill to your TV screen. The left and right edges are cut
off.
4:3 LB(Letterbox)
Select when a conventional TV set is connected.
When the wide screen disc is played back, the black bands
appear at the top and bottom of screen.
16:9 Wide
Select when a wide screen TV set is connected.
Played in FULL size. ( Setting the wide screen TV to FULL mode
is also necessary.)
Notes:
The screen size may differ depending on the DVD video
discs.
If you select 16:9 Wide to get rid of the black bands on
screen when wide screen disc is played back, picture may
be slightly distorted.
In some discs, even if 4:3 PS is selected, the black bands
may remain on the screen.
5. Press [ENTER], “v ”appears, the TV display is set.
6. Press [3] to return to“TV Display ”.
Video
(Video ---> TV Display , Video Output, AV1 Select, AV2 Select )
Setting TV Display
1. Press [SETUP] in no disc mode or full stop mode, “Menu”screen
appears on the TV screen.
2. Press [6]to select “Setup Menu ”, then press [ENTER]or [4],
“Recording Setup”is highlighted.
3. Press [6]to select “Video ”, then press [ENTER]or [4],
“Video Setup ”screen appears.
4. Press [ENTER]or [4]to select the sub menu, then press [5/6]
to select the appropriate setting for your TV screen size.
Setting Video Output
1. Select “Video Output ”.
2. Press [ENTER]or [4]to select the sub menu, then press [5/6]
to select output mode.
3. Press [ENTER], “v ”appears.
4. Press [3] to return to “Video Output ”.
5. To exit, press [SETUP].
4:3 PS
4:3 LB
16:9 Wide
Press SETUP to exit Current selection
Press SETUP to exit
TV Display
Video Output
Av1 Select
Av2 Select
Video Setup
4:3 PS
4:3 LB
16:9 Wide
Current selection
√
√
4:3 PS
4:3 LB
16:9 Wide
Press SETUP to exit Current selection
Press SETUP to exit
TV Display
Video Output
Av1 Select
Av2 Select
Video Setup
S-Video
Scart
Current selection
√
√
When the 1st AV input ( AV1 IN ) or 2nd AV input ( AV2 IN ) jacks are
connected, you must set as follows:
(AV Select ---> AV1 Select & AV2 Select)
Setting AV1 Select and AV2 Select
1. Press [SETUP] in no disc mode or full stop mode, “Menu”screen
appears on the TV screen.
2. Using [6]to select “Setup Menu ”, then press [ENTER]or [4],
“Recording Setup”is highlighted.
3. Press [6]to select “Video ”, then press [ENTER]or [4],
“Video Setup ”screen appears
4. Press [5/6]to select “AV1 Select ”or “AV2 Select ”.
AV1 Select : When AV1 IN jacks are used
AV2 Select : When AV2 IN jacks are used
5. Press [ENTER]or [4]to select the sub menu.
6. Press [5/6]to select “Video ”or “S-Video ”input jack.
Video: Using VIDEO input jack
S-Video: Using S-VIDEO input jack
7. Press [ENTER], “v ”appears.
8. Press [3]to return to “AV1 Select ”or “AV2 Select ”.
9. Repeat steps 1 ~ 5 as necessary.
10. To exit, press [SETUP].
4:3 PS
4:3 LB
16:9 Wide
Press SETUP to exit Current selection
Press SETUP to exit
TV Display
Video Output
Av1 Select
Av2 Select
Video Setup
Video
S-Video
Current selection
√
√

19
Speaker
(Speaker ---> Down Mix, Center, Rear, Subwoofer,
Center Delay, Rear Delay, Speaker Test)
1. Press [SETUP] in no disc mode or full stop mode, “Menu”screen
appears on the TV screen.
2. Press [6]to select “Setup Menu ”, then press [ENTER]or [4],
“Recording Setup”is highlighted.
3. Press [6]to select “Speaker ”, then press [ENTER]or [4],
“Speaker Setup ”screen appears.
Setting Down Mix
To play a DVD disc recorded with surround multi-channel audio cor
rectly, select either one according to your audio system.
1. Select “Down Mix ”.
2. Press [ENTER]or [4]to select the sub menu, then press [5/6]
to select the desired item.
3. Press [ENTER], “v ”appears, the disc down mix is set.
4. Press [3] to return to “Down Mix ”.
Setting Center, Rear, Subwoofer
1. Select “Center ”, “Rear ”or “Subwoofer”.
2. Press [ENTER]or [4]to select the sub menu, then press [5/6]
to select the “ON ”or “OFF ”.
3. Press [ENTER], “v ”appears .
Setting Center Delay
Selects the center Chanel delay time for Doby Digital audio.the
Options are 5 ft,4 ft,3 ft,2 ft,1 ft off.
Setting Rear Delay
Selects the Rear Chanel delay time for Doby Digital audio .the Options
are 15 ft,12 ft,9 ft,6 ft,3 ft off.
Speaker Test
Selects the Speaker Test and listening to the sound from front right,
center, front left, subwoofer, rear left, rear right speaker.
4:3 PS
4:3 LB
16:9 Wide
Press SETUP to exit Current selection
Menu
Record Program
Recording Setup
Video
Audio
Press SETUP to exit
Play/Edit Disc
Setup Menu
DVD Control
General
Speaker
4:3 PS
4:3 LB
16:9 Wide
Press SETUP to exit
Current selection
Press SETUP to exit
√
Current selection
√
Speaker Setup
Down Mix Lt/Rt
Stereo
Center
OFF
Rear
Subwoofer
Center Delay
Rear Delay
4:3 PS
4:3 LB
16:9 Wide
Press SETUP to exit Current selection
Press SETUP to exit
Current selection
√
Down Mix
Speaker Setup
Center
Subwoofer
Center Delay
Rear Delay
Rear
5 ft
3 ft
1 ft
4 ft
2 ft
OFF
4:3 PS
4:3 LB
16:9 Wide
Press SETUP to exit Current selection
Press SETUP to exit
Current selection
√
Down Mix
Speaker Setup
Center
Subwoofer
Center Delay
Rear Delay
15 ft
9 ft
3 ft
12 ft
6 ft
OFF
Rear
4:3 PS
4:3 LB
16:9 Wide
Press SETUP to exit Current selection
Press SETUP to exit
√
Current selection
√
Center
Rear
Subwoofer
Center Delay
Rear Delay
Speaker Setup
ON
OFF
Speaker Test

20
Audio
(Audio ---> Digital Out & DRC & Pro Logic)
1. Press [SETUP] in no disc mode or full stop mode, “Menu”screen
appears on the TV screen.
2. Press [6]to select “Setup Menu ”, then press [ENTER]or [4],
“Recording Setup”is highlighted.
3. Press [6]to select “Audio ”, then press [ENTER]or [4],
“Audio Setup ”screen appears.
Setting Digital Out
Digital output selection enables you to switch on or off the digital
output. The Default setting is OFF.
1. Select “Digital out ”.
2. Press [ENTER]or [4]to select the sub menu, then press [5/6]
to select “OFF ”or “ON ”.
3. Press [ENTER], “v ”appears.
4. Press [3]to return to “Digital out ”.
4:3 PS
4:3 LB
16:9 Wide
Press SETUP to exit Current selection
Menu
Record Program
Recording Setup
Video
Speaker
Press SETUP to exit
Play/Edit Disc
Setup Menu
DVD Control
General
Audio
4:3 PS
4:3 LB
16:9 Wide
Press SETUP to exit Current selection
Press SETUP to exit
Audio setup
OFF
ON
DRC
√
Current selection
√
Pro Logic
Digital Out
3. Press [ENTER], “v ”appears.
4. Press [3] to return to“DRC ”.
5. To exit, press [SETUP].
Setting DRC (Dynamic Range Control)
Selects the dynamic range control to fit the listening situation
of the audience.
1. Select “DRC ”.
2. Press [ENTER]or [4]to select the sub menu, then press [5/6]
to select “OFF ”, “STD”.
OFF: Off position
STD: When connecting the amplifier to the AUDIO OUT jacks
(not DIGITALAUDIO OUT jacks).
4:3 PS
4:3 LB
16:9 Wide
Press SETUP to exit Current selection
Press SETUP to exit
Audio setup
OFF
DRC
√
Pro Logic
Digital Out
STD
Current selection
√
Setting Pro Logic
1. Select“Pro Logic ”
2. Press [ENTER]or [4]to select the sub menu, then press [5/6]
to select “ON ”or “OFF”or “Auto ”.
4:3 PS
4:3 LB
16:9 Wide
Press SETUP to exit
Current selection
Press SETUP to exit
Audio setup
DRC
√
Current selection
√
Pro Logic
Digital Out
ON
OFF
Auto
3. Press [ENTER], “v ”appears.
4. Press [3] to return to “Pro Logic ”.
5. To exit, press [SETUP].
Table of contents
Other Akura DVD Recorder manuals