Akurat lighting SECTOR User manual

AKURAT SECTOR - General Information
SECTOR is also a light with perfect, close to nature color reproduction with the TLCI 99-100 index.
Akurat SECTOR is a modular RGBWW LED lighting system designed for photography, film and television. Due to its modular design, SECTOR offers an extraordinary range of applications.
Components of Akurat Sector system
1. SECTOR Controller
The high frequency of the PWM signal eliminates the possibility of image flickering at standard FPS speeds(no flicker light).
The controller works in the CV (constant voltage) Fast PWM mode and can control both dedicated SECTOR LED modules and any LED sets, for example LED strips designed to work with constant voltage up to 24V.
The device allows you to control completely independently four sets (sectors) of RGBWW LEDs (Red, Green, Blue, White cold, White warm). The SECTOR Controller connected to four dedicated Akurat SECTOR LED
modules allows you to obtain any white light with a CCT in the range of 2700K-6500K, with GM balance adjustment (green-magenta), or light of any color selected from the RGB or HSV palette ( Hue, Saturation, Value)
otherwise known as HSI (Hue, Saturation, Intensity).
S E C T O R
SECTOR controller design
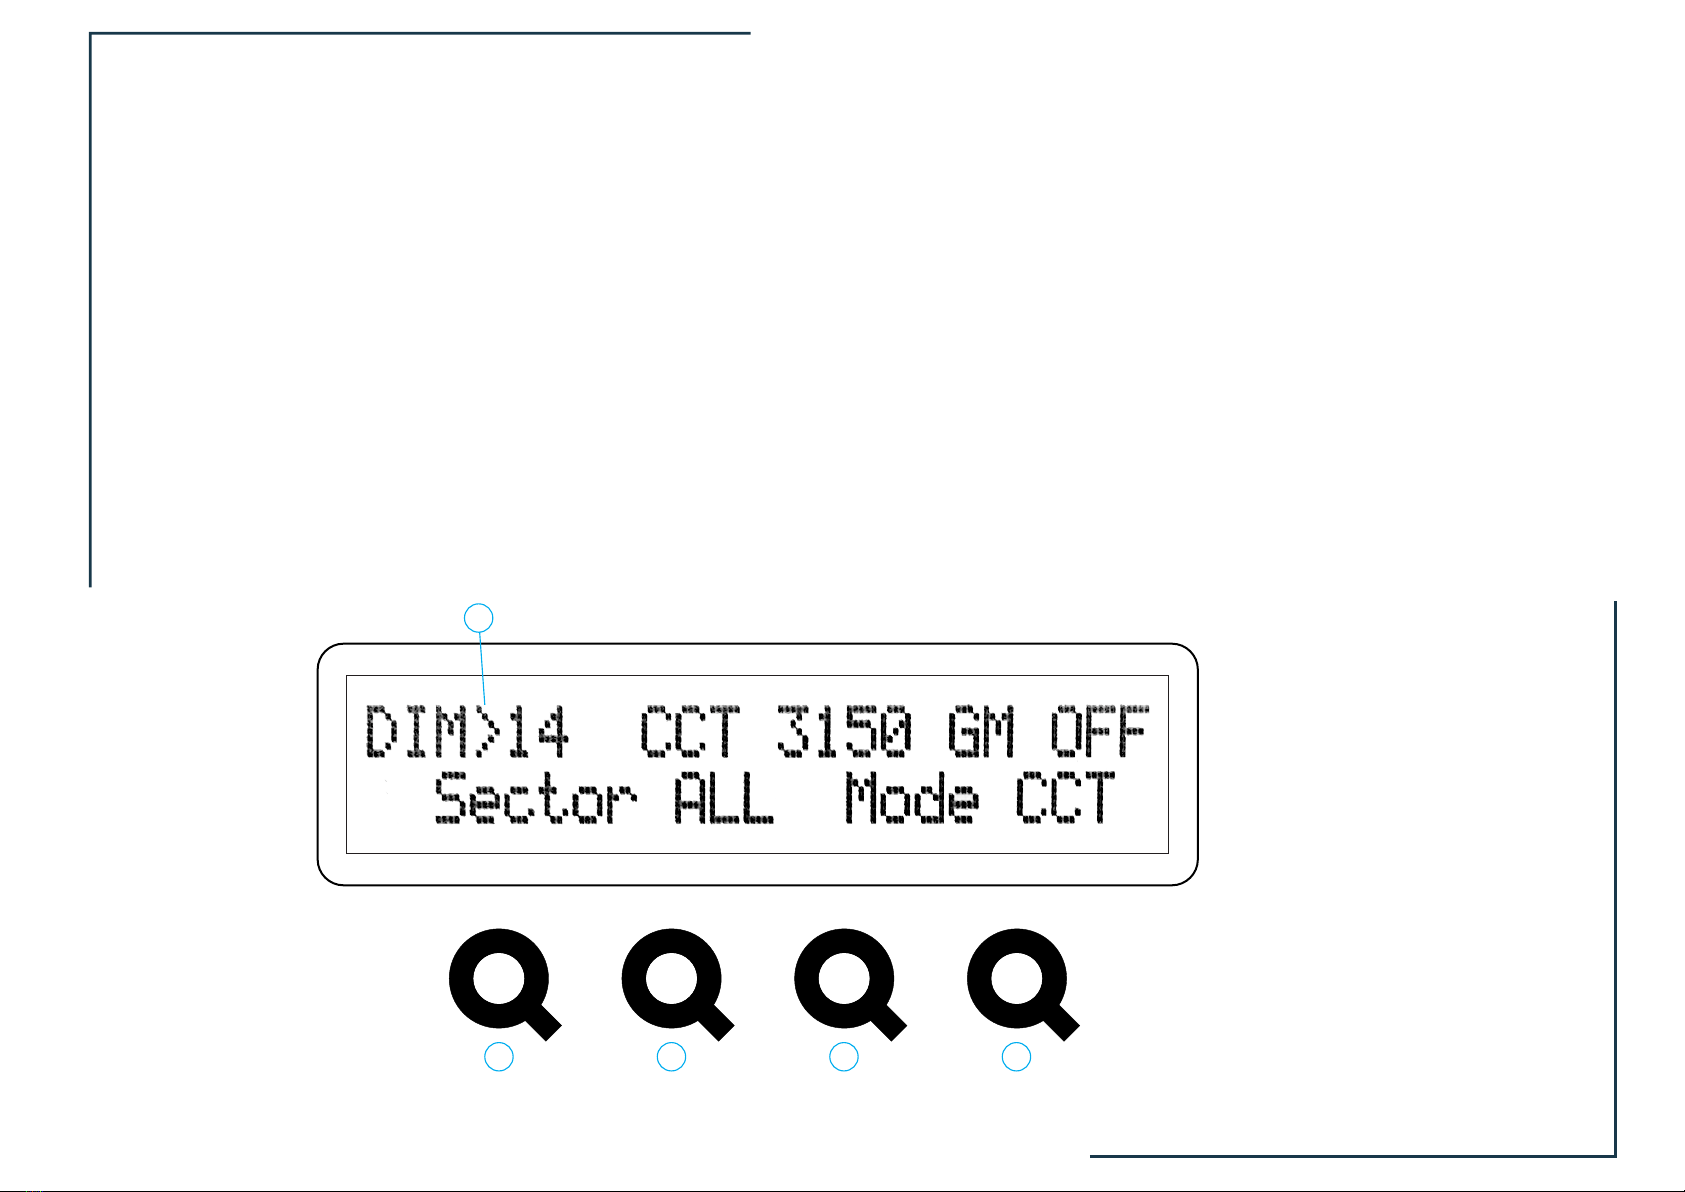
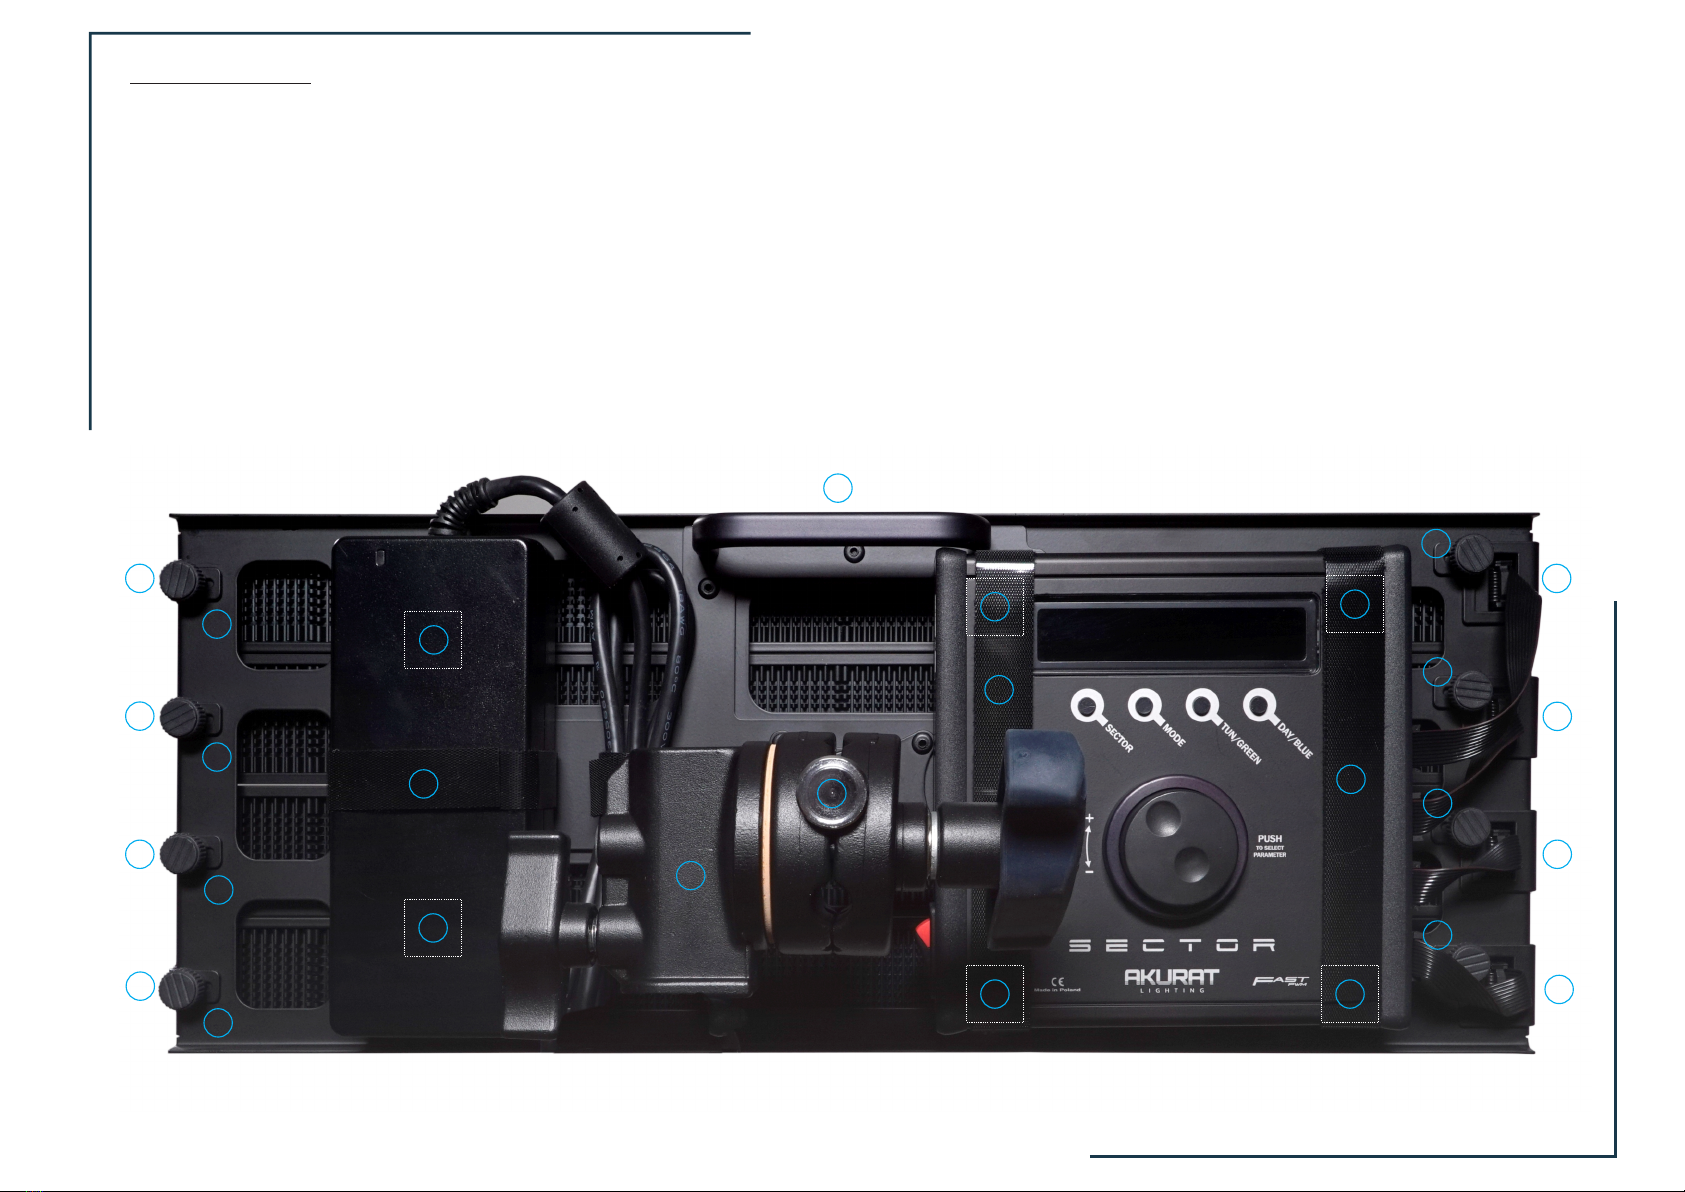
The view of the SECTOR controller is shown on Photo 1 and in Fig. 1 on the next page.
On the left cover of the controller there is a power socket (1), a power switch (2) and a Quick DMX input (3) for remote
control*.
The front panel of the controller has a display, the buttons: SECTOR (4), MODE (5), TUN/GREEN (6), DAY/BLUE (7) and an
encoder multifunction knob (8).
On the right cover of the controller there are four sockets to connect the LED sectors (9).
* (For more information about the DMX input of the SECTOR controller, see www.akurat.lighting or contact the
manufacturer. The Quick DMX input has a 5V/1A USB power port and can be used to power dedicated USB devices. When
the "Overload" diode is lit, the load of the port exceeds its capacity. )
Photo 1
Sterownik SECTOR

Fig.1
SECTOR Controller
POWER
15-24V DC 150W OFF ON
OVERLOAD
1. +5V 2. DATA-
3. DATA+ 4. GND
1-4 V+
2-3 V־
4
3
2 1
1 2 3 4
RGBWW OUTPUTS
12
3
44 CHANNEL RGBWW CV LED DRIVER
in: 15-24V DC 150W MAX
out: 31,25kHz FAST PWM CV 4A/CHANNEL MAX
Use only LED lights adapted for CV
(constant voltage) power supply.
Ensure supply voltage to the nominal voltage of LEDs.
Made in Poland (EU) by:
www.akurat.lighting
Pinout of LED connectors available on the product site
S/N 200501 011
12
3
465 7
8
9
10
S E C T O R
S E C T O R
SECTOR
MODE
TUN/GREEN
DAY/BLUE
+
PUSH
TO SELECT
PARAMETER
FAST
PWM

TUN/GREEN button function (6)::
Faster turning speeds up the regulation, with the number of regulation steps per knob step being dependent on the turning speed. This makes it possible to achieve the desired parameter value with a small
knob stroke and at the same time to set the selected parameter precisely.
Approximately two seconds after stopping turning the knob, the controller switches the automatically adjustable parameter to the default one. In CCT mode, the default parameter to edit is DIM, and in HSV
mode, the VAL parameter. In RGB mode, automatic restore to default parameter does not work.
Turning the dial (8) changes the value of the currently selected parameter. Turning to the right increases the parameter and turning to the left decreases it.
DAY/BLUE button function (7):
The encoder knob (8) has a dynamic precision control. Slowly turning the knob changes the adjustable parameter by one step, for each step of turning the knob.
- in CCT mode, pre-selects light tungsten CCT = 3200K GM = 0 (OFF), DIM - no change
- in RGB mode, it loads blue light: R = 0, G = 0, B - the maximum of the current RGB values
One of the three editable light parameters is selected by pressing the encoder knob (8). The currently selected parameter is marked with ">"(10).
- in HSV mode, it loads the blue light: HUE = 240 °, SAT = 100%, VAL - the current value
- in RGB mode, it loads the green light: R = 0, B = 0, G - the maximum of the current RGB values
- in CCT mode, it preselects daylight CCT = 5650K GM = 0 (OFF), DIM - no change
- in HSV mode, it loads the green light: HUE = 120°, SAT = 100%, VAL- the current value
SECTOR
MODE
TUN/GREEN
DAY/BLUE
10
465 7
Fig.2
SECTOR Controller buttons
S E C T O R

2. SECTOR 4 Panel Grip
This grip allows you to connect four SECTOR LED modules, attach the SECTOR controller and mains adapter, or V-Lock Power Plate for SECTOR, to create an LED panel and attach it to a standard lighting
tripod.
Photo 2 shows a Panel 4X SECTOR assembled using this grip.
The LED sectors are attached to the grip by means of sliders with pins (1), locked with knobs (2).
Advanced two-sided Velcro fasteners were used to attach the power supply and the controller (the position of the Velcro fasteners is shown in Figure 3). Additionally, these components are secured against
accidental disconnection with Velcro straps (4). This method of fastening enables very quick assembly or disassembly of individual components. To dismantle the power supply or controller, disconnect the
Velcro straps and use the tearing force to disconnect the component from the grip. Reassembling requires entering Velcro fasteners on components in their counterparts on the grip, pressing the component
down and securing it with a Velcro strap.
The grip is equipped with a mandrel (5) and a grip head (6) which allows it to be attached to a tripod and the panel to be positioned in any plane and at any angle. It is also equipped with a handle (7) to make
it easy to set up and move the panel.
Photo 2
Panel 4X SECTOR
1
1
1
1
2
2
2
2
1
1
1
1
2
2
2
2
3
3
33
3 3
4
4
4
5
6
7
S E C T O R

Photo 4
SECTOR 8 Omni Grip
1
1
1
1
1
1
1
12
The SECTOR LED modules are fixed by means of movable locks (1) which are locked by means of knobs. To electrically connect the modules to the SECTOR controller, special Sector Ribbon Cables long are
required, which are numbered for easy identification of individual sectors. The cables are sold in sets of 4, numbered from 1 to 4 or 5 to 8.
3. SECTOR 8 Omni Grip
This grip allows up to eight SECTOR LED modules to be connected at a 45° angle to form an omnidirectional panel. Adjusting the light of each LED module separately allows you to differentiate the light in
different directions.
The cable should be connected before placing the SECTOR LED module on the mounting pins of the grip. Securing knobs lock the cables against accidental disconnection.
SECTOR 8 OmniGrip is equipped with a holder (2) for attaching a 60cm paper lantern (3), which is a good diffuser for LED modules, but which can also make such an omnidirectional panel visible in the frame
as a glowing element of the scenery.
Photo 3
SECTOR Ribbon Cables long
3
S E C T O R

The board is equipped with Velcro fastenings (3) which allow to install it to SECTOR 4 Panel Grip in place of the power supply. To secure the plate with Velcro strip, unscrew the V-Lock socket fixing screws (4),
insert and fasten the Velcro strips underneath the socket and then tighten the socket again.
Due to the significant power, we do not recommend using low capacity batteries.
Inside the PCB, there is a slightly warm electronic system which raises the voltage, so it is necessary to ensure free air flow through the ventilation slots (2) in the plate body.
4. SECTOR V-Lock Power Plate for SECTOR Controller
The plate allows the SECTOR controller to be powered from a V-Lock battery. To do this, connect the cable (1) to the SECTOR power supply socket and plug a charged battery into the V-Lock socket.
2
2
Photo 5
SECTOR V-Lock Power Plate
1
3
4
4
4
4
3
tel. +48228636433 • [email protected] • www.akurat.lighting
All components of SECTOR system have been designed and are manufactured in Poland by:
Akurat Lighting Sp. z o.o. • ul. Akurat 6, 02-488 Warszawa, Poland • KRS 0000449843 • VAT PL6342815487 (production and service: ul. Krakusa 11, 05-802 Pruszkow, Poland)
S E C T O R
Table of contents
Other Akurat lighting Lighting Equipment manuals
Popular Lighting Equipment manuals by other brands

Vision & Control
Vision & Control LDLF30x180-G525/24V/-a Instructions for use

Eliminator Lighting
Eliminator Lighting IKON PROFILE PLUS user manual

B-K lighting
B-K lighting ArtiStar Remote ES16 Metal Halide installation instructions

Valcom
Valcom V-998-AM instruction manual

Federal Signal Corporation
Federal Signal Corporation Global Series Installation and maintenance instructions

Chauvet
Chauvet Strike 324 user manual