ALCO TILT AL-83874 User manual

Page | 2
INTRODUCTION
Thank you for purchasing the TILT™ Toilet Incline Lift (TILT). Please read these instructions entirely before
installing or using your new TILT.
After installation, it’s important that you raise and lower the TILT 3-4 times, without sitting on the seat, to
learn its functionality.
TILT™ Standard Seat
TILT™ Elongated Seat
SYMBOL MEANINGS
The WARNING symbol indicates a potentially hazardous condition/situation. The safety warnings throughout
this manual, and on your equipment, if any, are for the protection of people and property. Failure by any
operator to abide by safety warnings will result in a waiver of all liabilities, loss of your warranty, and could
result in equipment damage and or failure, property damage, risk of serious bodily injury, and or death. The
symbol may appear in various colors and in conjunction with other symbols.
The NOTE symbol indicates important information. Failure to obey all notes could result in improper
operation, less-than-optimum equipment performance, and at the sole discretion of the equipment
manufacturer, may void your warranty. The symbol may appear in various colors and in conjunction with
other symbols.
www.alcosales.com 1-800-323-4282

Page | 3
WARNING!
NOTES
Rated load: 325 lbs. NEVER EXCEED RATED LOAD.
Use the TILT only with a qualified helper.
Manufacturer recommends professional installation and maintenance.
Read this manual in its entirety before installation. Understand and learn the location and function of all the
features, safety devices, and labels before operating. Correct installation, proper use, and following of
instructions and obeying safety warnings of the TILT are necessary for safe operation.
For residential use only.
For use with floor mount toilets only.
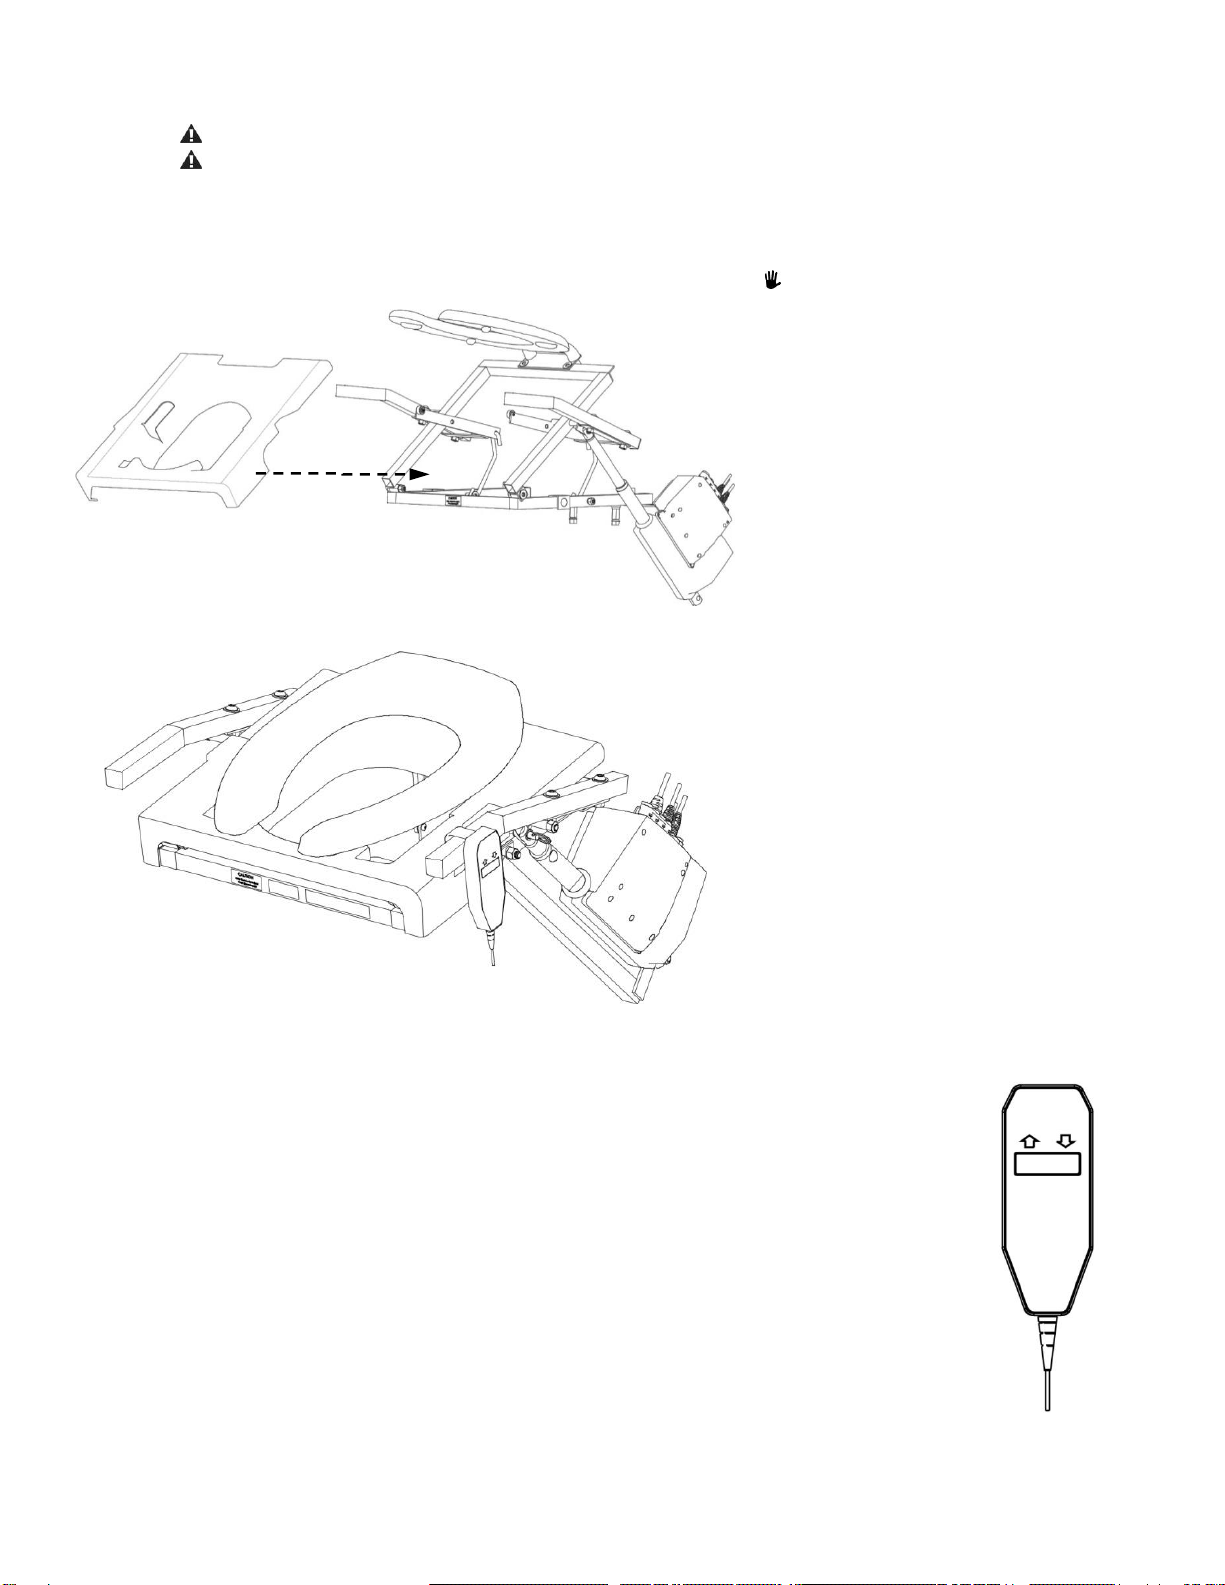
Observe and avoid all pinch points and always keep hands above the seat when operating the TILT.
Ensure that there is no interference within the TILT’s range of movement.
For safety purposes, it is important to wear footwear with firm, non-skid soles when using the TILT.
Ensure floor is not slick. Remove loose rugs and make sure that the area around the TILT is free of all
obstructions and moisture.
The TILT is strictly an assist lift. The patient must have dexterity, strength, and balance in order to use the TILT
safely. Non-responsive or combative patients may not be suited for the TILT.
Never use TILT with clothes on as the seat can be slippery!
Never modify the TILT or any of its components. Padded toilet seats cannot be used.
Periodic inspections by a qualified technician are recommended to help prevent unsafe conditions. Regularly
check that all parts are in good condition and verify all nuts, bolts, screws and other fasteners are undamaged
and secure. If any part of the system is damaged or loose, DO NOT USE until repairs can be made by a qualified
technician.
Do not use TILT for anything other than its intended purpose.
Do not route power cords near anywhere they may become damaged, pinched, create trip hazards, or cause
other safety concerns. Check all TILT cords frequently to be sure they are not worn or frayed. Stop using the
TILT immediately and contact your dealer for inspection, repairs, and service if any defect is suspected. DO
NOT patch a broken or damaged cord.
To reduce risk of shock and or electrical hazard, keep all electrical components free from moisture at all times.
Never play on or near the TILT.
Before and during TILT operation, ensure all hair, jewelry, shirts, ties, shoe laces, and all forms of clothing and
other personal ornamentation are notand do nothang up on anything that may create a hazard.
Maintaining all labels and manuals in legible condition is required by the TILT owner and is essential for safe
operation. Contact your dealer for additional information, replacement labels and manuals, or to schedule
inspections, repairs or service. For additional care, use or safety information, please call 1-800-323-4282 or
visit us at www.alcosales.com.
Information in this document is subject to change without notice. The most current version of this manual is
available on our website at www.alcosales.com.
Before installation, ensure that there is enough space for proper TILT operation.
The TILT warranty is not transferable. Attempting to tamper with or modify any portion of the TILT will void
the warranty. Using the TILT for anything other than its intended purpose will void the warranty.
BOX CONTENTS
Open box and inspect contents for shipping damage before use. In case of damage, DO NOT USE
the Lift. Please call 1-800-323-4282 for further instructions.
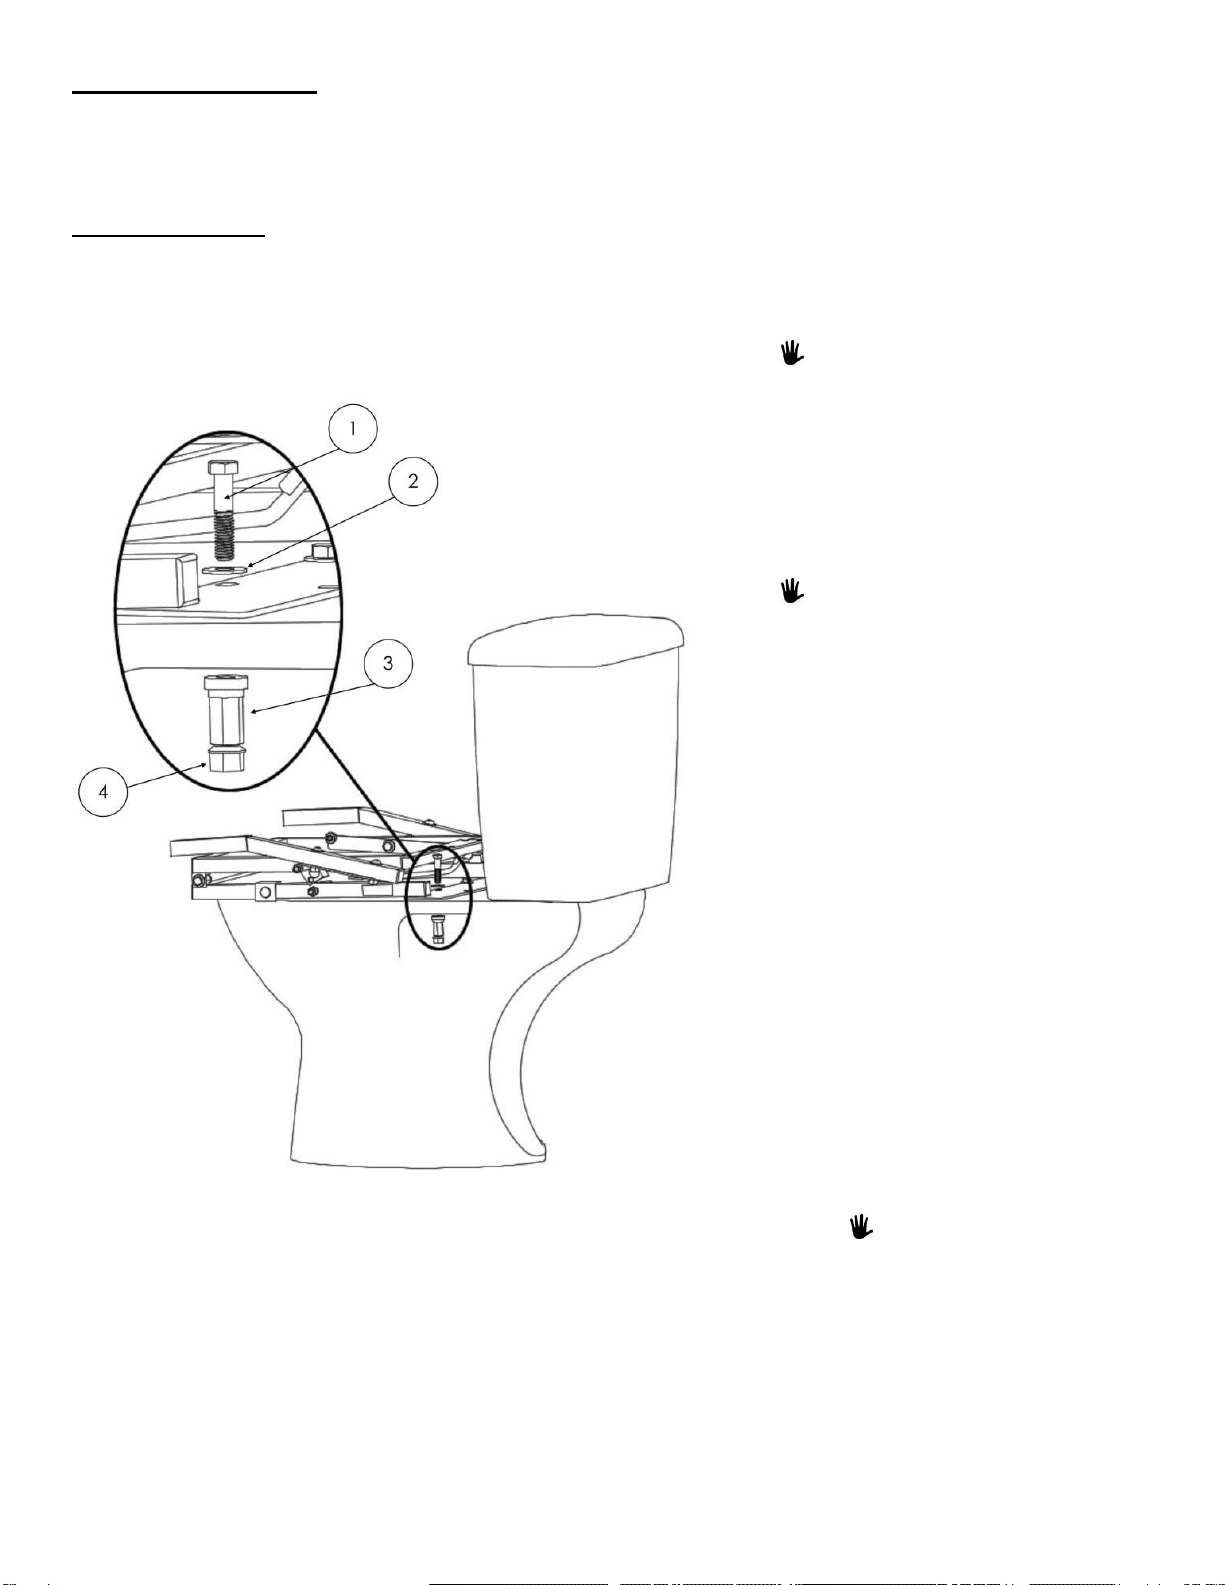
TOOLS NEEDED
5/8” wrench
9/16” wrench
www.alcosales.com 1-800-323-4282

Page | 4
HARDWARE CONTENTS
QTY
DESCRIPTION
VISUAL
2
PLASTIC TOWER NUT
2
WASHER FLAT .375 X .875 X .06 TEFLON
2
BOLT HEX .375-16 X 1.75 GRADE 18-8, PARTIAL THREAD
OVERVIEW
REFERENCE
DESCRIPTION
1
PLASTIC SHIELD - REMOVABLE
2
TOILET SEAT –STANDARD SEAT SHOWN
3
HANDLES WITH FOAM GRIP
4
LINEAR ACTUATOR –MOUNTED TO TILT FRAME
5
120V AC CONTROL BOX
6
PUSH BUTTON CONTROL –HANDHELD DEVICE
www.alcosales.com 1-800-323-4282

Page | 5
GETTING STARTED
1. Before installation, ensure that there is enough space for proper TILT operation. Six inches is needed on either side
of the toilet bowl, and 7-1/2 inches is needed in front of the bowl.
INSTALLATION
2. FRAME INSTALLATION
2.1 Remove the existing seat and lid from the
toilet bowl, and then set aside.
The TILT ships with its own seat,
which will replace your toilet’s
current seat and lid.
2.2 Set the TILT frame on the toilet, in place
of the seat that was previously removed.
Align the holes on the TILT’s mounting
plate with the existing two holes on the
toilet bowl.
The mounting plate front holes are
for a round front STANDARD bowl
and the back holes are for an
ELONGATED bowl.
2.3 Using the hardware provided, place a
mounting screw ① and Teflon washer ②
through each hole in the TILT frame and
into the hole on the toilet bowl. Using a
9/16” wrench, hold the top of the
mounting screw in place, attach the
plastic tower nut ③to the bottom side of
the mounting screw, and finger tighten
until snug. Repeat the process for second
hole.
2.4 Tighten each plastic tower nut ③by
tightening the snap nut ④with a 5/8”
wrench.
2.4.1 The snap nut ④will snap off the
plastic tower nut ③ once the
plastics tower nut is properly
tightened (torqued).
For clarity, image is shown
without Linear Actuator
attached.
www.alcosales.com 1-800-323-4282

Page | 6
3. CONTROL MOUNT
3.1 With the TILT frame bolted to the toilet, pull
the two handles ① forward until the seat is
fully raised and slightly overextend (this will
allow the seat to stay in the “up” position while
the motor is being placed and mounted).
For clarity, image is shown without Linear
Actuator attached.
3.2 Slide control mount ③ over bolt ④ as shown.
With hand on position ⑤ push control mount
down until it slides below and behind frame
bracket ②.
3.3 Ensure that the control mounts rest completely
inside of the frame.
3.3.1 The red dots should align at this point
and when control mount is in proper
position, it will look like the image
below.
www.alcosales.com 1-800-323-4282

Page | 7
4. LINEAR ACTUATOR
4.1 Using the blue dots on upper actuator
bracket ③ and linear actuator ④ as
guides, hold linear actuator ① and
lower the seat to align the control
mount slot with the top of the
actuator bracket ②.
4.2 Once aligned, fully insert the pin into
actuator arm until it stops.
www.alcosales.com 1-800-323-4282

Page | 8
5. TEST TILT ACTION
5.1 Plug the 120VAC TILT cord into a properly grounded GFCI protected outlet.
If you are unsure if you have a properly grounded GFCI outlet, contact an electrician for assistance.
Do not remove the round grounding prong from any plug.
6. INSERT REMOVABLE PLASTIC SHIELD (SHIPS INSTALLED)
Removable plastic shield ships
installed.
6.1 Lift the TILT by using the push button
control to raise it into the “up”
position, then insert the removable
plastic shield as shown.
6.2 Lower the toilet seat.
6.3 Before use, lower and raise the TILT
carefully, ensuring nothing obstructs
the operation of the lift.
6.4 TILT shown lowered with plastic shield
in place.
7. HANDHELD CONTROL
7.1 Using the handheld push button control, raise and lower the TILT 3-4 times, without
sitting on the seat, to learn its functionality.
7.1.1 Push and hold the “up” button to raise the lift.
7.1.2 Push and hold the “down” button to lower the lift.
7.2 For storage and convenient access, hang the handheld push button control onto TILT’s
foam grip handle.
www.alcosales.com 1-800-323-4282

Page | 9
8. CLEANING
8.1 Do NOT use toilet bowl cleaner to clean the TILT or any of its components.
8.2 For hygiene and safety, proper cleaning and inspection of the TILT is essential.
8.3 Carefully remove 120V plug from the wall.
8.4 To access the removable plastic shield, use the push button control to raise the TILT into its “up” position.
8.4.1 Remove the plastic shield by grabbing it from the front and pulling upward then forward until
the shield slides off from the support rollers.
8.5 Clean the TILT components using a soft cloth with warm water and mild soap. Ensure all components are dry
prior to re-assembly and use of the TILT.
9. BEFORE USE INSPECTION
9.1 Inspect the TILT to make sure all components are working properly. Use the handheld control to cycle the
unit up and down, making sure it’s free from obstructions and working properly. For questions or
concerns, please call 1-800-323-4282 or visit us at www.alcosales.com.
Table of contents
Other ALCO Bathroom Aid manuals
Popular Bathroom Aid manuals by other brands

NRS Healthcare
NRS Healthcare Nuvo L71134 User instructions

Pressalit Care
Pressalit Care R5500 Mounting instruction

Moretti
Moretti Mopedia RS921 instruction manual

Symmons
Symmons Carrington 443TB-24 Operation & maintenance manual

Fiamma
Fiamma SECURITY 46 PRO Installation and usage instructions

Pressalit Care
Pressalit Care R7410 Mounting Information

Pressalit Care
Pressalit Care SELECT R4951 Operation and maintenance manual

AKW MediCare
AKW MediCare 2000 Series User & care guide

Mobiclinic
Mobiclinic ARRECIFE instructions

Timago
Timago MASTER-TIM user manual

lopital
lopital Tango XL 5100 5705 Instructions for use

Drive
Drive RTL12026 installation instructions