NOTICE!
Handling the adapter improperly could damage it.
− Never use the adapter to heat up a cigarette lighter.
− The adapter also consumes a small amount of electricity when
in standby. Disconnect the adapter from the on-board electri-
cal system after use.
− Remove the adapter from the on-board electrical system by
gently pulling on the power plug. Never pull on the cable.
− In the event of damage, have a qualified professional repair
the adapter. Never open the adapter yourself.
Assembly
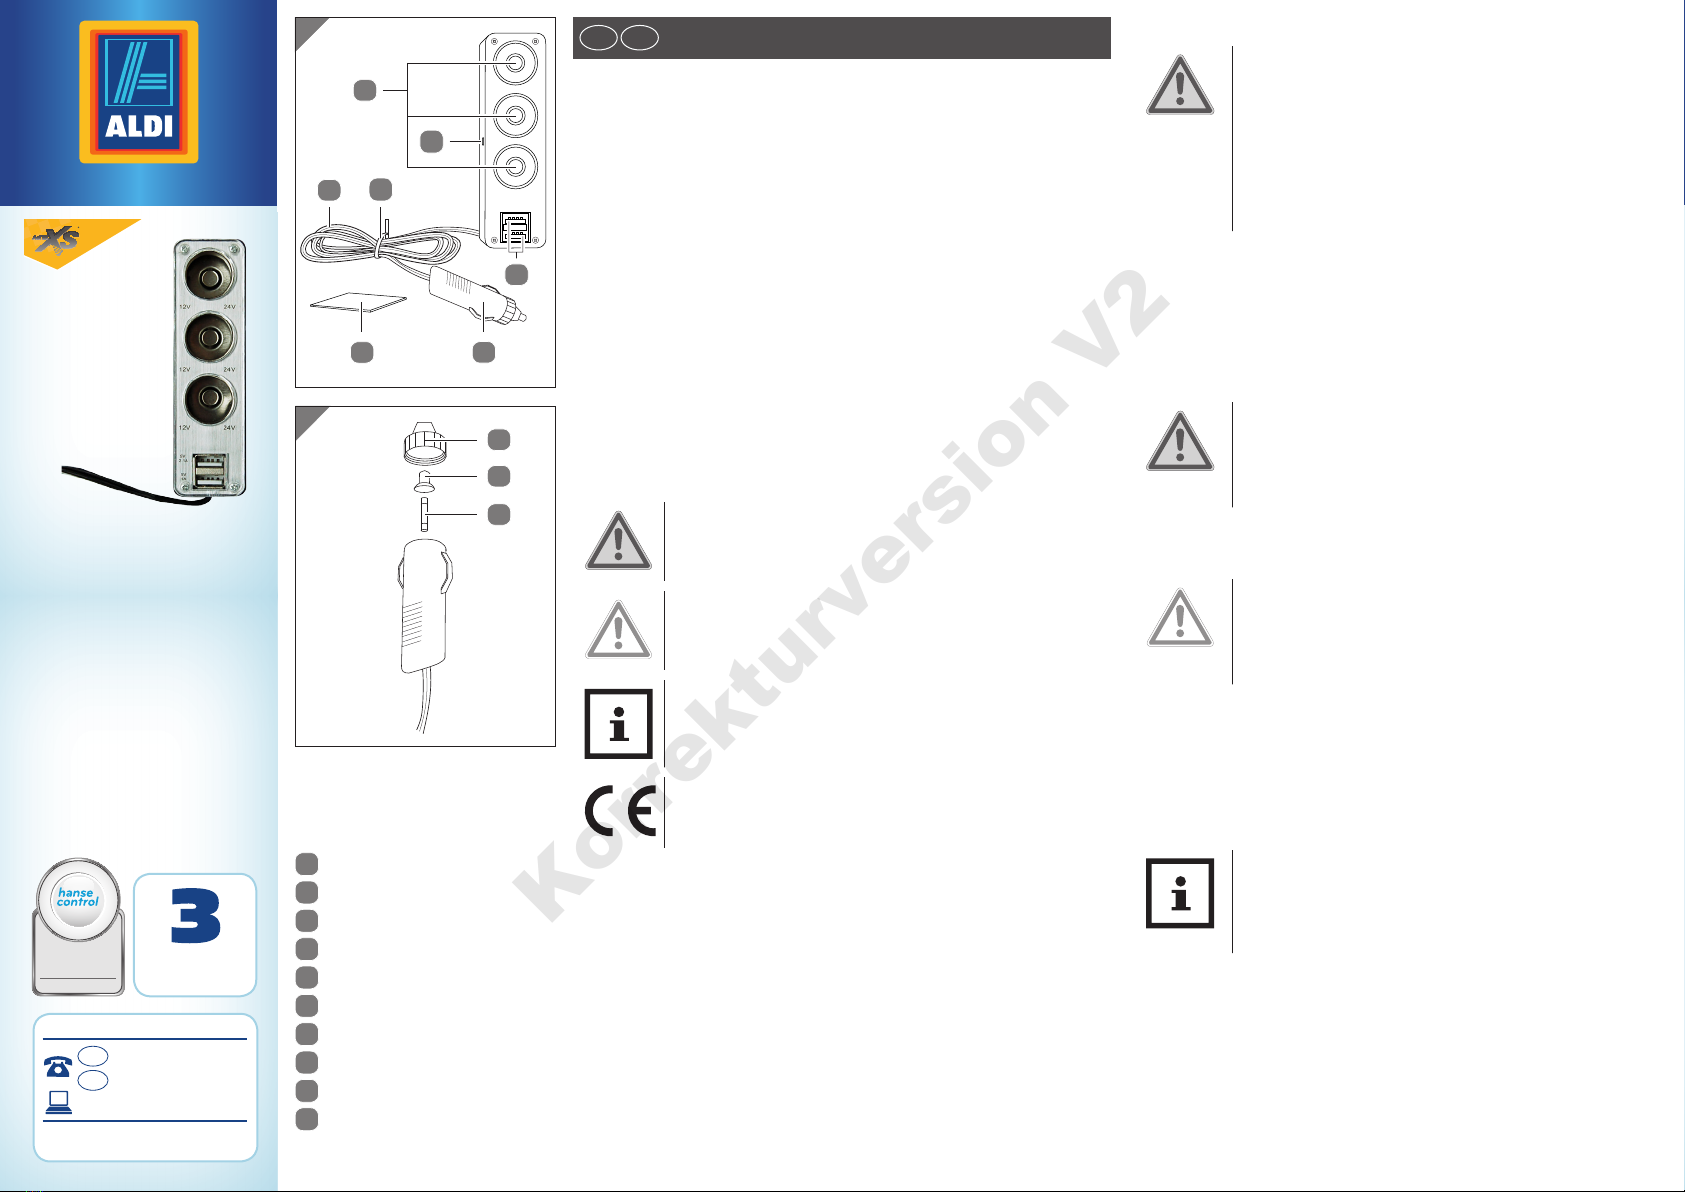
1. Remove the packaging material and check the product contents (see fig. A and B).
2. Clean the areas in the vehicle where you would like to mount the adapter. Make sure
that these areas are free from grease and dust-free.
3. Also clean the area on the adapter where you would like to mount the adapter (see
section “Cleaning and maintenance”).
4. On one side, remove the protective paper from the adhesive strip 5and stick the ad-
hesive strip to the desired area in your vehicle.
5. Remove the second protective paper from the adhesive strip and stick the adapter onto
the adhesive strip. Push the adapter firmly onto the adhesive strip.
You have successfully mounted the adapter.
Handling
Connecting the adapter
1. Connect the adapter to the vehicle's on-board electrical system by inserting the power
plug 4all the way into the board socket of the vehicle.
2. Bundle the cable 6and pull the cable strap 7over the resulting loops. Use the
cable strap to secure the cable.
3. The control light 2will illuminate in red.
You have successfully connected the adapter.
Connecting devices
NOTICE!
The output voltage of the adapter sockets de-
pends on the vehicle configuration.
− If the vehicle is equipped with a board voltage
of 12V, the adapter socket will supply 12V.
− If the vehicle is equipped with a board voltage
of 24V, the adapter socket will supply 24V.
− Insert the power plug of the device you intend to connect all the way into one of the
adapter sockets
1
.
− Insert the USB connector of the device you intend to connect into one of the USB ports
3
.
Cleaning and maintenance
Cleaning the adapter
NOTICE!
Risk of short circuit!
Water that has penetrated the housing may cause
a short circuit.
− Never immerse the adapter in water.
− Make sure that no water penetrates the
housing.
NOTICE!
Risk of damage!
If you clean the adapter improperly, you could
damage it.
− Do not use any aggressive cleaners, brushes
with metal or nylon bristles, sharp or metallic
cleaning utensils such as knives and the like.
They could damage the surfaces.
1. Pull the power plug 4out of the board socket before cleaning.
2. Clean the adapter with a damp cloth.
3. Then let the adapter dry completely.
Inserting⁄changing the fuse
1. Pull the power plug 4out of the board socket.
2. Screw the cap 10 off of the power plug by turning it counter-clockwise.
3. Remove the fuse 9and insert a new, undamaged fuse of the same type (see section
“Technical data”).
4. Screw the cap onto the power plug. In the process, make sure that the fuse enters into
the contact tip 8.
Storage
NOTICE!
Risk of damage!
If the vehicle is parked in the sun for prolonged
periods, extreme temperatures may arise inside
the vehicle and glove compartment.
− Never expose the adapter to extreme stresses
such as heat, cold, moisture and direct sunlight.
1. Remove the adapter from the on-board electrical system.
2. Store the adapter in a clean, dry area.
Make sure the temperatures in the storage location are within a moderate range.
We recommend that you use the original packaging to store it.
Technical data
Type: CSA06
Article number: 92201/2015
Input voltage: 12V / 24V DC (depending on the on-board electrical
system)
Total output: max. 120W at 24V DC or
max. 60W at 12V DC (depending on the on-board
electrical system)
Dimensions (W x H x D): approx. 3.2 x 11.5 x 4.9 cm
Cable length: approximately 130cm including plug
Plug diameter: approx. 20mm
Operating temperature: -30°C to +60°C
Fuse: F, 5A, L, 250V, 5 x 20mm
Adapter socket (3 pieces)
Output voltage: 12V / 24V DC (depending on the on-board electrical
system)
Current rating: max. 5A
Inner diameter: approx. 21mm
USB port (2 pieces)
Output voltage: 5V DC each
Current rating: total of 3.1A (1 x 2.1A and 1 x 1A)
Declaration of conformity
The EU declaration of conformity can be requested from the address
specified on the enclosed warranty card.
Disposal
Disposing of the packaging
Dispose of the packaging separated into single type materials. Dispose
of cardboard and carton as waste paper and foils via the recyclable
material collection service.
Dispose of the packaging in accordance with the applicable laws and
regulations for your country.
Disposing of old devices
(Applicable in the European Union and other European states with systems for the separate
collection of reusable waste materials)
Old devices must not be disposed of with household waste!
If the adapter can no longer be used, every user is required by law to
dispose of old devices separately from their household waste, e.g.
at a collection point in his community/borough. This ensures that old
devices are recycled in a professional manner and also rules out neg-
ative consequences for the environment. For this reason, electrical
devices are marked with the adjacent symbol.