ALDI Auto XS FLX-WH-01 User manual

HYDRAULIC
TROLLEY JACK
Original
Instructions


Contents
Overview������������������������������������������������������������������������������ 4
Use���������������������������������������������������������������������������������������� 5
Total content /parts ������������������������������������������������������������� 6
General information������������������������������������������������������������� 8
Please read and store the instructions����������������������������������� 8
Explanation of symbols ������������������������������������������������������������ 8
Safety ����������������������������������������������������������������������������������� 9
Correct use ��������������������������������������������������������������������������������� 9
Safety instructions �������������������������������������������������������������������� 9
First use ������������������������������������������������������������������������������14
Check the car jack and the total content�������������������������������14
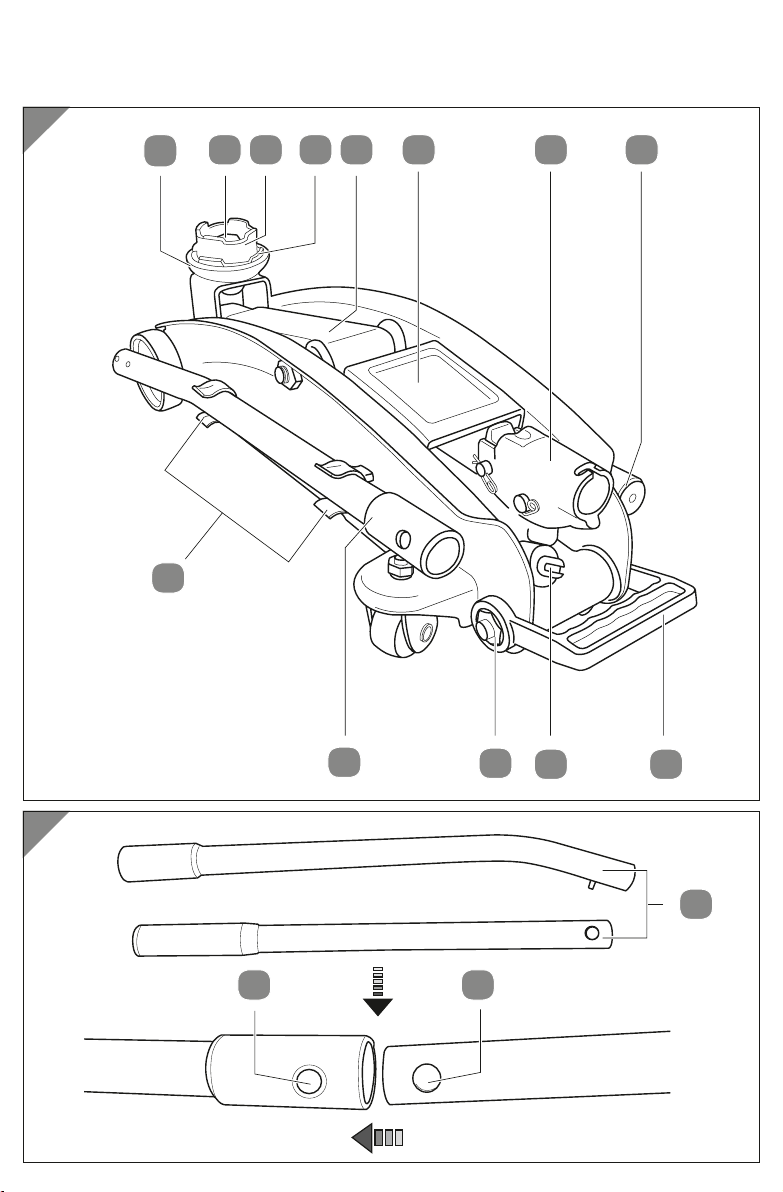
General overview ���������������������������������������������������������������������14
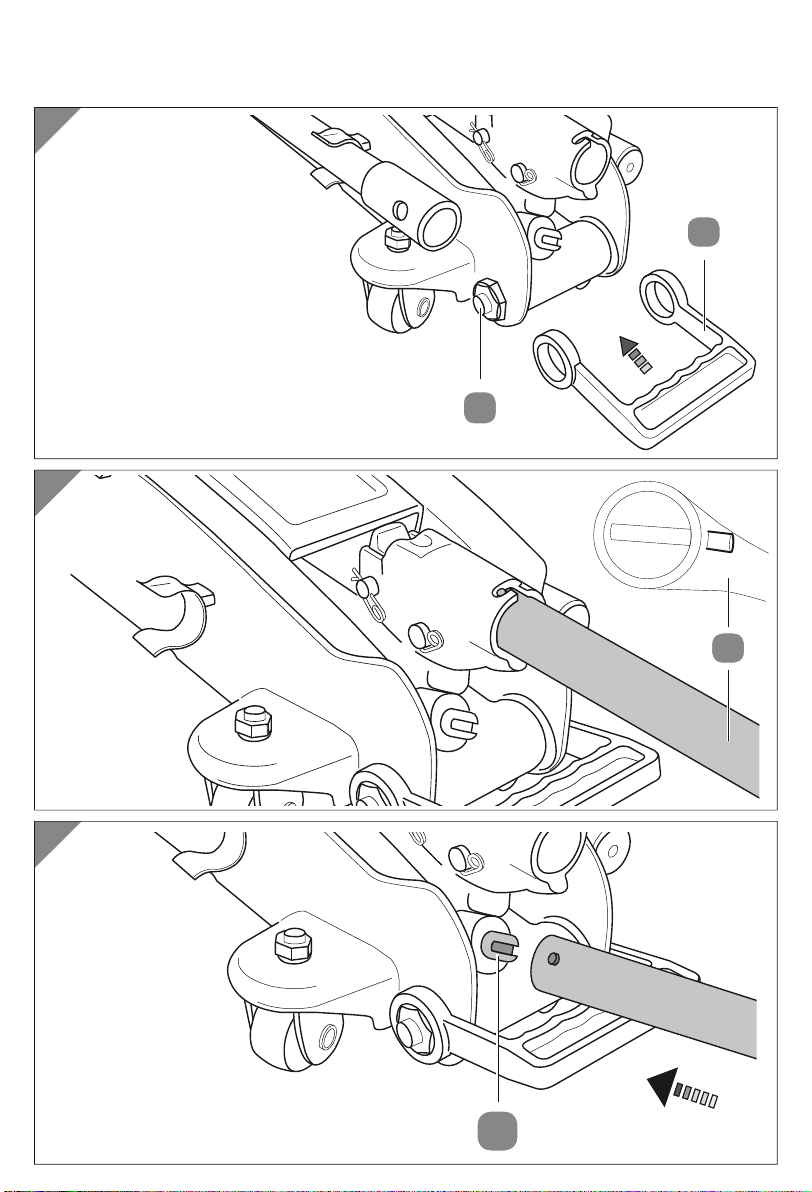
Saddle assembling/dismantling ��������������������������������������������15
Assembling the car jack ������������������������������������������������������16
Fitting the carry handle�����������������������������������������������������������16
Assembling the jack handle ���������������������������������������������������16
Attaching the jack handle�������������������������������������������������������16
Car jack use ������������������������������������������������������������������������� 17
Vehicle preparation������������������������������������������������������������������ 17
Car jack placement������������������������������������������������������������������� 17
Vehicle lifting ����������������������������������������������������������������������������18
Vehicle lowering�����������������������������������������������������������������������19
Troubleshooting����������������������������������������������������������������� 20
Maintenance, repair and inspection����������������������������������� 21
Adding oil����������������������������������������������������������������������������������22
Changing oil������������������������������������������������������������������������������23
Cleaning and storing���������������������������������������������������������� 24
Technical details����������������������������������������������������������������� 25
Waste disposal�������������������������������������������������������������������� 25
Disposal of the packaging�������������������������������������������������������25
Disposal of the car jack ������������������������������������������������������������25
Declaration of conformity �������������������������������������������������� 26

A
12 5 6 7
9
11
12
8
810
3 4
8
14 13
B
4

4 5 6 7
Produktübersicht / Geräteteile
1Sattelhalter
2Schraube für Sattel
3Sattelmanschette
4Sattel
5Tragarm
6Abdeckplatte
7Hebelaufnahme
8Hebelstange (zweiteilig)
9Tragegriff
10 Ablassventil
11 Muttern für Tragegriff
12 Halteclips, 4 Stück
13 Federdruckknopf
14 Bohrung
– Gebrauchsanweisung / Garantiekarte
ALLGEMEINE INFORMATIONEN
Lesen Sie die Anweisungen und bewahren Sie diese auf
Diese Bedienungsanleitung gilt für diesen hydraulischen Ran-
gierwagenheber (nachfolgend als „Wagenheber“ be-
zeichnet) und enthält wichtige Informationen zu seiner
Montage, Inbetriebnahme und Handhabung.
Lesen Sie vor der ersten Benutzung des Wagenhebers diese
Bedienungsanleitung sorgfältig durch.
Dies gilt insbesondere für die Sicherheitshinweise. Die Nichtbe-
achtung kann zu Verletzungen von Personen führen oder
Schäden am Wagenheber verursachen.
Bewahren Sie diese Bedienungsanleitung auf. Bei Weitergabe des
Wagenhebers an Dritte ist diese Bedienungsanleitung unbedingt
auszuhändigen.
Erläuterungen zu den Symbolen
Die folgenden Symbole und Signalworte werden in dieser Be-
dienungsanleitung, auf dem Wagenheber selbst oder auf der
Verpackung verwendet.
Dieses Signalsymbol/-wort bezeichnet eine Ge-
fährdung mit hohem Risikograd, die bei Nichtbe-
achtung zum Tod oder zu schweren Verletzungen führen kann.
Dieses Signalsymbol/-wort bezeichnet eine Ge-
fährdung mit mittlerem Risikograd, die bei Nicht-
vermeidung den Tod oder schwere Verletzungen zur Folge haben
kann.
Dieses Signalsymbol/-wort bezeichnet eine Ge-
fährdung mit geringerem Risikograd; wird sie
nicht gemieden, können leichte oder geringfügige Verletzungen
die Folge sein.
WARNUNG!
GEFAHR!
VORSICHT!
Allgemeine Informationen
8
14 13
A
B
12 5 6 7
9
11
12
8
810
3 4
4
1
2
3
4
5
6
7
8
9
10
11
12
13
14
11
9
10
8
C
D
E
B5DQJLHUZDJHQKHEHUB6¾GB%'$BLQGG
5

Total content / parts
1Saddle holder
2Saddle bolt
3Saddle sleeve
4Saddle
5Lifting arm
6Cover plate
7Handle sleeve
8Jack handle
9Carry handle
10 Release valve
11 Carry handle nut
12 Jack handle clip, 4×
13 Pin
14 Drilled hole
– User Manual / Warranty Card
6

7

8
General information
GENERAL INFORMATION
Please read and store the instructions
These instructions for use are valid for this hydraulic trolley jack for
vehicles (hereafter referred to as “car jack”), and contain important
information of its setup and use�
Before using the car jack, carefully read the instructions�
This applies primarily to the safety instructions� Failure to do so could cause personal
injury or damage to the car jack�
Keep the instructions for future reference� If you are handing over the car jack to a
third party, you must at the same time hand over these instructions�
Explanation of symbols
The following symbols and words of warning are used in these instructions, on the
car jack or on the packaging�
This symbol/warning word indicates danger with
a high level of risk, which will, if not avoided, lead
to death or serious injuries�
This symbol/warning word indicates danger with
a medium level of risk, which will, if not avoided,
lead to death or serious injuries�
This symbol/warning word indicates danger with
a low level of risk, which will, if not avoided, lead
to less serious injuries�
This symbol/warning word warns of the possibility
of material damage�
The symbol provides useful additional information on handling
and use�
WARNING!
CAUTION!
NOTICE
DANGER!

9
www.tuv.com
ID 1111215207
Declaration of conformity (see the “Declaration of conformity” section):
Products marked with this symbol fulfil all of the rules, which they must
adhere to, of the European Economic Area�
The symbol GS confirms that the product is safe when used correctly�
The symbol “GS” means that safety has been checked� Products which
are marked with this symbol meet the requirements of German law
about the safety of products (ProdSG)�
The seal marked ‚Fitness for Use/DEKRA tested‘ confirms that the
product satisfi es the requirements for the properties listed in the logo,
in accordance with the DEKRA test program�
SAFETY
Correct use
The car jack is intended solely for short term lifting and lowering of vehicles, whose
total weight does not exceed 2 tonnes� The car jack is intended solely for personal
use and is not appropriate for commercial purposes�
The car jack is for use only as described in these instructions� Any other use is
incorrect and can lead to material damage or personal injury�
Neither the manufacturer nor the retailer can be held responsible for damage or
injury as a result of improper or incorrect use�
According to DIN EN 1494: 2009-05 (EN 1494:2000+A1)�
Safety instructions
DANGER! Danger of personal injury!
The car jack should not be used to lift people or animals�
This could lead to serious injuries or even death�
Safety

10
– The car jack should only be used for lifting and lowering
vehicles�
DANGER! Danger of personal injury!
To avoid danger, the car jack and the vehicle must always be
monitored during use� Failure to do so could lead to serious
personal injury or even death�
– Ensure that the car jack and the vehicle are stable� The car jack
must be placed on a firm, stable, flat and level surface�
− Ensure that during lifting and lowering the car jack is able to
rotate�
− Never lift a vehicle whose total weight exceeds 2 tonnes, even
for a short length of time�
− Ensure children and animals are kept away whilst the vehicle is
on the car jack�
− Never lift the vehicle if there are passengers inside,
− Make sure the load is supported in the centre of the saddle�
− Support the vehicle with support devices with an adequate
load capacity and before carrying out work on the vehicle,
remove the car jack�
− When the vehicle is supported by only the car jack, no one
should be under the vehicle�
WARNING! Danger of personal injury!
Before use, the car jack user must fully understand how the car
jack functions and the full process for its safe use�
Failure to do so can lead to serious personal injury�
− Before lifting a vehicle, read the vehicle instructions�
− Whilst using the car jack always wear appropriate personal
protective equipment�
Safety

11
– Before each use examine the car jack� If you notice loose parts
or damage, do not use the car jack� In this case, do not use the
car jack; a qualified professional should examine it�
– The car jack should only be used for the lifting and lowering
of vehicles; a lifted vehicle should be supported on a support
device with an adequate load capacity� If the car jack is being
used as a support device for a vehicle, it can be damaged and
lead to personal injury�
− When the vehicle is on the car jack, do not move it� The car jack
cannot handle such a strain, which can lead to personal injury
and/or material damage�
− Do not alter the car jack� Do not open the casing� The car jack does
not have parts which the user can fix or change� If the user fixes
or incorrectly or inappropriately uses the product, the warranty is
not valid� In case of repair, contact the manufacturer through the
authorised repairer detailed on the warranty certificate�
− For repairs, only original parts for the car jack may be used�
The car jack contains mechanical parts which are important
to protect it from damage�
− Do not alter the car jack and do not add parts�
− Only move the car jack when holding the carry handle,
ensuring that it is appropriately attached to the car jack�
− Only use the car jack in dry weather conditions and in a dry
environment�
− Do not use the car jack in humid indoor areas or in the rain�
− Never store the car jack in an area where it may fall�
− Do not put objects in the casing�
− Do not overload the car jack beyond the rated capacity�
− Only use the car jack on firm, level surfaces� Do not place the
car jack on a soft surface (for example on grass)� Such a surface
could cause the vehicle to incline or fall from the car jack, which
can cause damage and/or personal injury�
Safety

12
− Do not approach the vehicle during lifting and lowering�
− Always lower the vehicle slowly�
− Before lifting the vehicle, apply the hand brake and place
wedges under the wheels which will stay on the ground�
− Only raise the vehicle where the manufacturer recommends�
− The car jack is used with a saddle which has a diameter of
approximately 54 mm and a jack handle which is 695 mm long�
− Before each use ensure that the codes and plates are visible
and readable as they contain important information� If they are
missing or are not readable, contact the manufacturer through
the authorised repairer detailed on the warranty certificate�
– Children may not use jack� Cleaning and user maintenance
must not be performed by children�
− Do not leave the jack unattended while in use�
− Keep children away from the jack�
− Do not let children play with the jack�
− Make sure that children do not play with the plastic wrapping�
They may get caught in it when playing and suffocate�
WARNING! Danger of personal injury!
Use of the car jack in exceptional or adverse conditions and
environments can cause personal injury�
– Do not use the car jack in exceptional or adverse weather
conditions (e�g� in very cold or hot areas, in strong winds and in
strong magnetic fields), the car jack will not work properly and
can cause damage� The vehicle can become unstable�
− Do not use the car jack in a potentially explosive area, near
explosives and mines� Oil in the reservoir pump is flammable�
− Do not use the car jack on a ship� The vehicle will become
unstable�
Safety

13
NOTICE Risk of injury!
With inappropriate handling, the car jack can be damaged�
− Always ensure safe placement of the car jack (for the correct
position, study the vehicle instructions)� The base must be hard
(e�g� concrete), stable and flat and must withstand a load of up
to 2 tonnes�
− Never clean the car jack by submerging it in water, this can
damage it� Read the instructions in the “Cleaning and storage”
section�
− Do not use the car jack if the casing is cracked, deformed or
broken (see the “Maintenance, repair and inspection” section)�
Immediately stop using it and contact the manufacturer
through the authorised repairer, detailed on your warranty
certificate�
Safety

14
FIRST USE
Check the car jack and the total content
NOTICE Risk of injury!
Be very careful when opening the packaging�
1� Ensure that all parts and accessories are present
(see picture A)�
2� Remove the car jack from the packaging and check if there
is any damage to it or to any of the parts� If there is any, do
not use the car jack� Contact the manufacturer through the
authorised repairer, detailed on your warranty certificate�
WARNING! Danger of personal injury!
The car jack contains small parts which can be swallowed or
cause suffocation�
– Ensure all small parts are kept out of children’s and animals’
reach�
General overview
− Before each use ensure that the release valve 10 on the car
jack is completely closed (turned clockwise), and check that
there is enough oil in the oil reservoir (see “Maintenance,
repair and inspection“)�
− Before and after each use, press on the jack handle 8several
times to ensure that the oil is evenly spread out�
− Before and after each use, ensure that the saddle 4and/
or the saddle sleeve 3is properly mounted on the saddle
holder 1�
First use

15
Saddle assembling/dismantling
WARNING! Damage and injury risks!
If the saddle is removed from the saddle holder, the load will not
lift equally and stably, which can lead to personal injury and
material damage�
− Never use the car jack if the saddle and/or saddle sleeve are
not attached�
− Before and after each use ensure that the saddle is appropriately
placed in the saddle holder� If necessary, tighten the nut and the
bolt�
For assembling and dismantling the saddle a 19 mm socket
wrench and a 19 mm eye key is needed�
1� With the eye key hold the wing nut of the saddle 15 , whilst
unscrewing the bolt of the saddle
2with the socket wrench�
2� Remove the wing nut of the saddle
and the bolt of the saddle from the
saddle structure�
3� Remove the saddle holder 1from
the saddle 4�
For assembling the saddle follow the
above-mentioned instructions in
reverse order�
Saddle assembling/dismanteling

16
ASSEMBLING THE CAR JACK
Fitting the carry handle
On each side of the jack handle 7sleeve is a nut, where the
carry handle is attached 9�
1� Place one of the “eyes” of the carry handle over the carry hand-
le nut 11 (see picture C)�
2� Carefully extend and adjust the second eye of the carry handle
in the appropriate place� Some force may have to be applied in
order to place the second eye of the carry handle in the correct
position� The carry handle should now fit (see picture A)�
3� Before moving the car jack, ensure that the carry handle is
correctly attached� This is done by pushing the car jack for-
wards and backwards� The carry handle should be safely
attached at this time� Otherwise, reattach the carry handle�
Assembling the jack handle
1� Align two halves of the jack handle 8with the pin 13 on
one part and with the drilled hole 14 on the other part
(see picture B)�
2� Press both parts together until you hear the pin click into place
(see picture B)�
To take apart the jack handle, remove the jack handle from
the car jack� Press the pin down to separate both halves,
then press each half into the jack handle clips
12
on both
sides of the car jack (see picture A and B)�
Attaching the jack handle
1� Take the assembled jack handle 8and align the end with the
hole (see picture D) with the handle sleeve 7(see picture A)�
2� Press the jack handle into the jack handle sleeve and turn it so
as to activate the bayonet closing (see picture D)� Ensure that it
is firmly attached�
Assembling the car jack

17
CAR JACK USE
DANGER! Danger of personal injury!
If the car jack is not properly placed (under a vehicle), it will
not be possible to lift vehicles steadily and they could also fall
suddenly� This can cause serious injury or death�
– For correct use and placement of the car jack, read the vehicle
instructions�
Vehicle preparation
1� Before using the car jack, ensure that the hand brake is fully
applied�
2� If the vehicle is an automatic transmission, place it in “Park”�
3� Place manual transmission vehicles into 1st gear�
4�Safely wedge the wheels (wedges are not included)�
Car jack placement
1� Ensure that the lifting arm 5is fully released�
2� Ensure that the release valve 10 is closed, so that the plug on
the end of the jack handle 8is turned fully in a clockwise
direction (see picture E)�
3� Carefully place the saddle 4of the car jack under the lifting
point recommended by the vehicle manufacturer�
4�Pump the jack handle until the top of the saddle reaches the
lifting point on the vehicle�
Car jack use

18
Vehicle lifting
DANGER! Danger of personal injury!
Never conduct work on, under or around a vehicle which is
solely supported by a car jack� The vehicle is not stable and can
fall suddenly and cause personal injury or even death�
– After lifting a vehicle with the car jack, always use jack stands
(not included)� Do not rely on the car jack to support the
vehicle�
1� Once the car jack is appropriately placed on the lifting point of
the vehicle, pump the jack handle 8with smooth and full
strokes�
2� Raise the vehicle a few centimetres above the desired height�
3� Once the vehicle is lifted, push the jack stand with an appropriate
load capacity (not included) under the lifting point, which can be
found in the vehicle handbook� If you are using two jack stands,
place them on the same point and at the same height on both
sides of the vehicle�
4�The lifting point(s) on the vehicle must be in the middle of
the jack stand(s)� Place the jack stand(s) in accordance with
the manufacturer’s instructions and ensure that they lock
appropriately into place�
5�Slowly turn the release valve 10 anticlockwise with the help
of the plug on the end of the jack handle, to lower the vehicle
onto the saddle(s) of the jack stand(s)� Then firmly turn the
release valve clockwise, to close it (see picture E)�
6�Ensure that the load and the jack stands are stable and safely
placed� Neither the load nor the jack stands should move� If
you are unsure of the stability of the vehicle, use the car jack
again to raise the vehicle and then replace and secure the
vehicle on the jack stands�
Car jack use

19
Vehicle lowering
DANGER! Danger of personal injury!
If there are people, animals or other objects in or under the
vehicle, before lowering, this can cause personal injury or even
death�
− Always ensure that the area under the vehicle is clear, that
there are no people, animals or objects under the vehicle,
before lowering�
− Always use the car jack to lower the vehicle�
1� Place the saddle 4under the lifting point�
2� With the plug on the end of the jack handle 8turn the
release valve 10 clockwise (see picture F)�
3� Pump the jack handle to lift the vehicle somewhat above the
saddle(s) of the jack stand(s) (not included)�
4�Remove the jack stands�
5�Very slowly turn the release valve anticlockwise, to lower the
vehicle to the ground�
6�Remove the car jack and ensure that the lifting arm 8is fully
released�
7� Close the release valve by turning it clockwise�
Car jack use

20
Troubleshooting
Problem Possible reasons Solution
The car jack will
not lift the
vehicle�
– Low on oil� – Add oil (see “Maintenance,
repair and inspection” section)�
– Dirty oil is blocking the
release valve�
– Change the oil (see
“Maintenance, repair and
inspection” section)�
– The release valve 10 is
not fully closed�
– Fully close the release valve�
The car jack will
not lower the
vehicle�
– The release valve is not
fully open�
– Fully open the release valve�
– Too much oil is in the oil
reservoir�
– Release a little oil from the oil
reservoir (see “Maintenance,
repair and inspection“ section)�
– Verschmutztes Öl
blockiert das Ablass-
ventil�
– Change the oil (see
“Maintenance, repair and
inspection” section)�
Visible damage� – Broken or bent parts
due to falls or other
knocks�
– A qualified professional should
look at and/or fix the car jack�
Oil leak from the
car jack�
– The reservoir or the
gaskets are faulty�
– Contact the manufacturer
through the authorised
repairer detailed on the
warranty certificate�
The car jack is
making an
unusual noise
during lifting and
lowering of the
vehicle�
– Movable parts of the car
jack are not fully
greased�
– The reservoir is damaged�
– Oil the affected areas� – Contact the manufacturer
through the authorised
repairer detailed on the
warranty certificate�
Troubleshooting
Table of contents
Other ALDI Jack manuals
Popular Jack manuals by other brands

SFA
SFA Blackhawk Automotive BH2129 Operating instructions & parts manual

QUALITY LIFTS
QUALITY LIFTS Q4P09 Series Installation operation & maintenance

ATD Tools
ATD Tools 7345B owner's manual

BGS technic
BGS technic 9232 instruction manual

AC Hydraulic
AC Hydraulic VL3 user guide

SGS
SGS WS1000 owner's manual