Alien Aircraft Super Dragon AG-501 User manual

SuperDragonGlowConversion
Kit#AG-501
Kit Contents:
WoodBag: Qty.. ... .Name. . ... ... ... ... ... . ... ... ... ... ... . ... ..Description
1... ... .LC-G501-01.. ... ... ... . ... ... ... ... ... . ... ..3mm X6”X24”LaserCutPOPLAR PLY
1... ... .LC-G501-02.. ... ... ... . ... ... ... ... ... . ... ..3mm X4”X24”LaserCutPOPLAR PLY
1. ... ... .LC-G501-03.. ... ... ... . ... ... ... ... ... . ... ..1/8X4”X12”Laser CutBalsa
Misc.LooseParts
Qty... . ... ..Name... ... ... . ... ... ... ... ...Description
1.. ... . ... ..1/4” X4” BalsaTriangle
1.. ... . ... ..3/32”x4”x24” BalsaSheet
1.. ... . ... ..3”X3” X3” BalsaBlock
2.. ... . ... ..1/2” x3” x3”BalsaBlock
1.. ... . ... ..!/4”sq. x2”Spruce
AdditionalItemsRequired(NotIncludedinKit)
Qty... .Name... ... ... ... ... . ... ...Description
1.. ... .Motor.. ... ... ... ... . ... .....40SizeTwoCycleGlowMotor
1.. ... .MotorMount.. ... ... . ... ...Dave Brown4045MotorMount(ormounttofit yourmotor)
4.. ... .MotorMountScrews.. . ... ...6-32x3/4”MachineScrews
4.. ... .MotorScrews.. ... ... . ... ...6-32x1”MachineScrews
1.. ... .Propeller... ... ... ... . ... ...10” x6” Propeller
1.. ... .FuelTank.. ... ... ... . ... ...Sullivan #439 SS8 SlantStyleFuelTank
1.. ... .ThrottlePushrod.. ... . ... ...SigSIGSH559 FlexibleCablePushrod
1.. ... .FuelLine... ... ... ... . ... ...DuBRO#222MediumFuelLin
1.. ... .FoamRubber.. ... ... . ... ...DuBro #513 1/4”FoamRubber
1.. ... .Spinner. ... ... ... ... . ... ...OPTIONALDuBro21/4” Spinner
1.. ... .ThrottleServo.. ... ... . ... ...HiTecHS-81MicroServo orEquivalent
1.. ... .Throttlecabletoservo. . ... ...DuBro EZ ConnectorDuBro #121 EZ Connector Page1

Page2

BuildingInstructions:
Building theGlowpoweredversion oftheSuperDragon isalmostidenticaltobuilding theelectricpoweredversion.
Themaindifference betweenthemodelsisthemotorpylon.Assuch,you shouldfollowtheregularinstruction man
-
ualtobuildthemodelup tostep125 withthefollowing exceptions:
Step21...You do notneedtoglueVelcrotothebatterytray.Intheglowversion you will wraptheradiobatterywith
foamrubberand placeit inthenoseofthemodel. Thefoamrubberwill wedgeit inplaceand it shouldnotmove
around.
Step54...Theholesfortheaileron servo wiresinthebottomofthecentersection shouldbesmallerand fartherfor-
wardthanshowninthephototomakeroomtomountthethrottleservo on thebottomofthewing.
Step60...You do notneedtoremovethemounting holeforthearming switch.Itisnotusedintheglowpowered
version.
Step61 -64...Donotcutoutthehatch.Itis notneededasyou will notbereplacing thebatterybetweenflights.
Steps125 -129...Donotusethese.Thepylon is built using thefollowing steps:
BuildingtheMotorPylon:
1...SecurelygluethetwoGP-01’s,GP-02’s and
GP-05’stogetherasshown.Theisalotof
force and vibration on thepylon soitisbestto
useEpoxy toassembleall oftheplywood parts
on thepylon.
2...Press thefour6-32 blind nutsintotheholesinthebackofthefire-
wall (GP-01). Securethemwithasmall drop ofthinC/Aglue.
.
3...GluetheGP-3’s tothesidesofGP-2.They
shouldbe90 degreestoeachother.
Page3

4...GlueGP-01 and GP-04 tothepylon assembly.
5..Gluethe1/4”triangleintothecornerofGP-01 and GP-03.Use
clearpolyurethaneorcleardopetofuelprooftheinsideofthepylon.
You do notneedtouseenough togetanicefinishon thewood.Athin
application allowedtosoakintothewood willbefine.
6...Assemblethefueltank.Placeit inthepylon assembly.Run the
fueland ventlinesthrough theholes inGP-01.Use1/4”foamrubber
on thebottomand thesidestoholdthetank inplace.
7...Install thethrottlepushrod housing asshownhereand on the
plan(page2oftheseinstructions)Securelygluethehousing
intotheholesinGP-01 and GP-02.
Page4

8...Glue3/32”balsasheettotheoutsideofthepylon.Moisten
theoutsideofthesheetwithanammoniabasedglasscleaner
likeWindextosoftenthewood and allowit tobend around the
curvesbetter.You canuseC/Aglueforthisstep.
Whentheglueis dry,trimthesheetflushwiththefront,back
and bottomofthepylon.
9...Gluethetwo1/2”x3”x3”balsablockstotwosidesofthe
3”balsablock. Thegrainon theseparts shouldbegoing the
samedirection.You canuseC/Aglueforthisstep.
10...Gluethebalsablocktothebackofthepylon.Thebottom
shouldbeflushwiththebottomofGP-02. Thegrainofthe
blocksshouldrun foreand aft. You canuseC/Aglueforthis
step.
11...Trimthetop,bottom&sidesoftheblocktomatchthepro-
fileshownon page2.
Page5

12...Sand theblockround. Sand thepylon smoothall over.
13...GluetheGP-06’s toeachsideofGP-05.Whentheglueis
dry,sand thefront&backedgesround.Donotsand thetop &
bottom.
14...SecurelyglueGP-5/6tothebottomofGP-02.Useepoxy.
15...Testfit thepylon tothewing.Drill aholeinthewing for
thethrottlepushrod housing topassthrough.Donotgluethe
pylon tothewing atthistime.
Page6

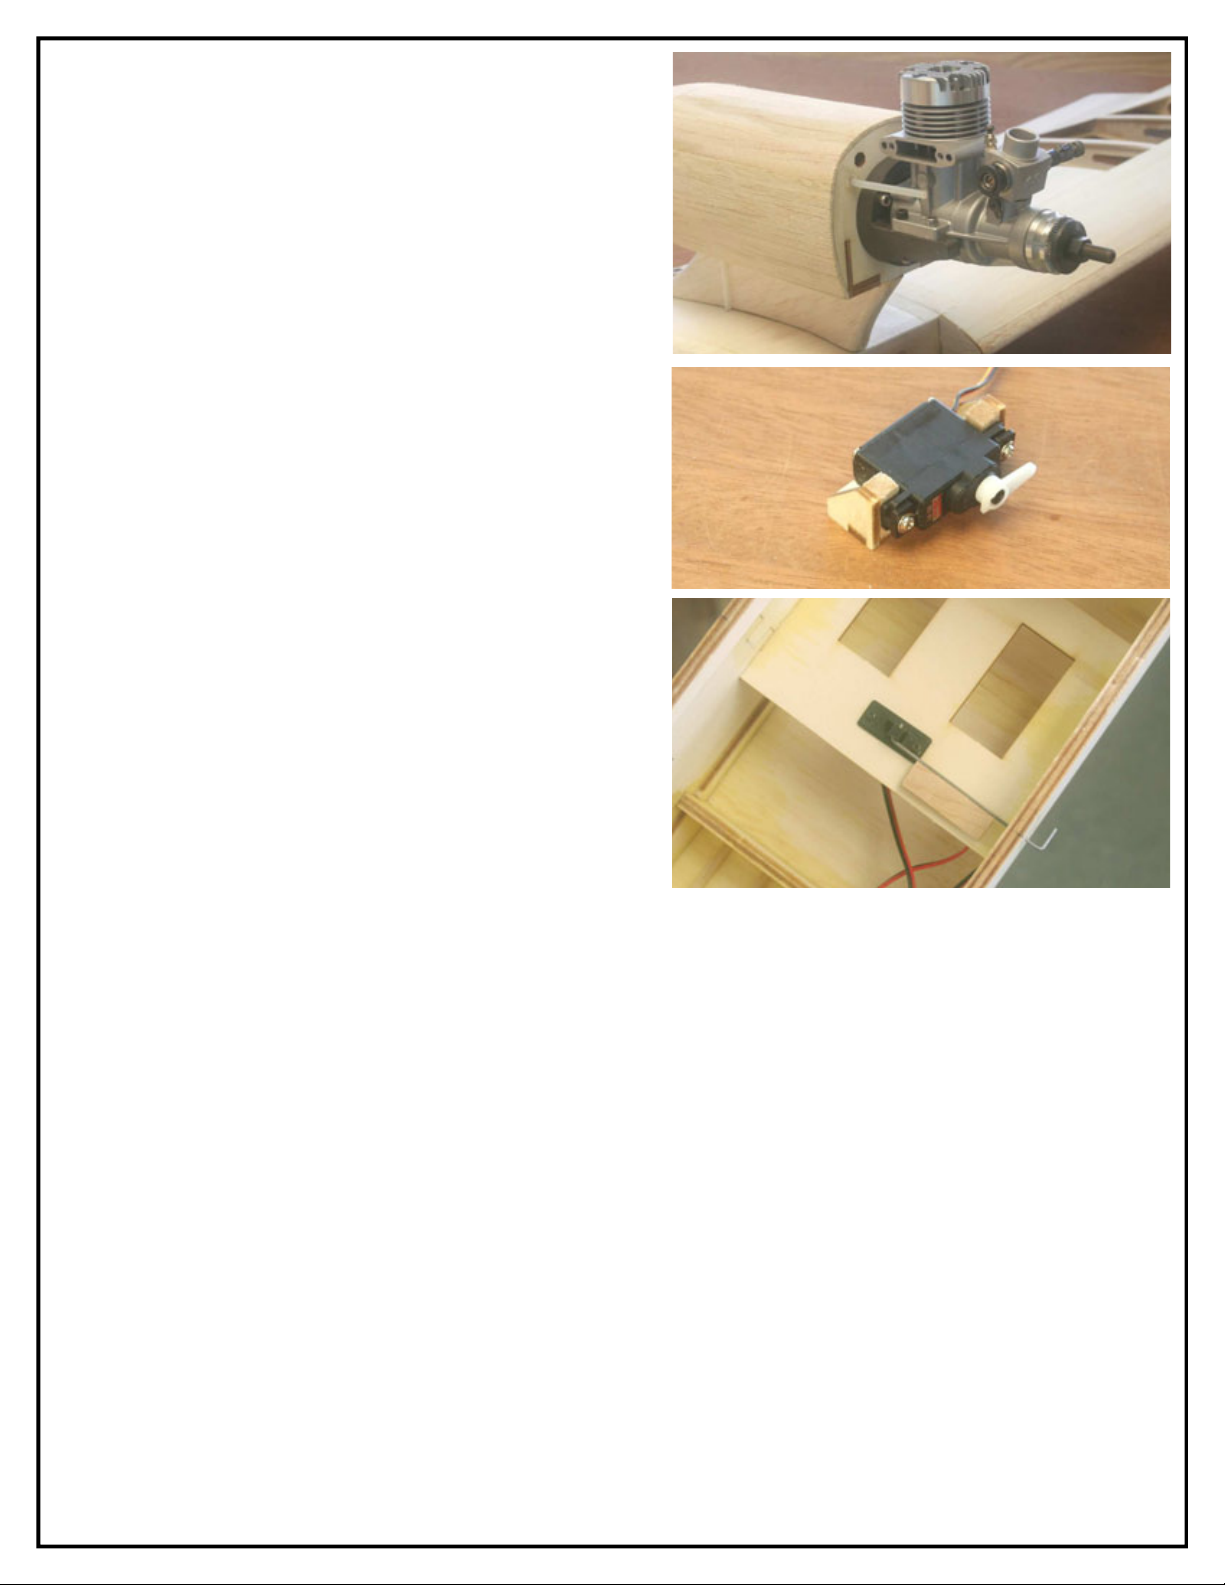
16...Testfit themotormount&motorontothepylon.Remove
them.Useclearpolyurethaneordopetofuelproofthefrontof
thefirewall.You do notneedtouseenough togetanice finish
on thewood. Athinapplication allowedtosoakintothewood
will befine.
17...Makethethrottleservo mountby gluing thetwoGP-8’sto
theendsofGP-07.Gluetwopiecesof1/4”sq.sprucetothe
insidesoftheGP-08’sas shown. Nowmountthethrottleservo
ontothemount.Mounttheservo up sothatthereisatleasta
1/8”gapbetweentheservo and GP-07.
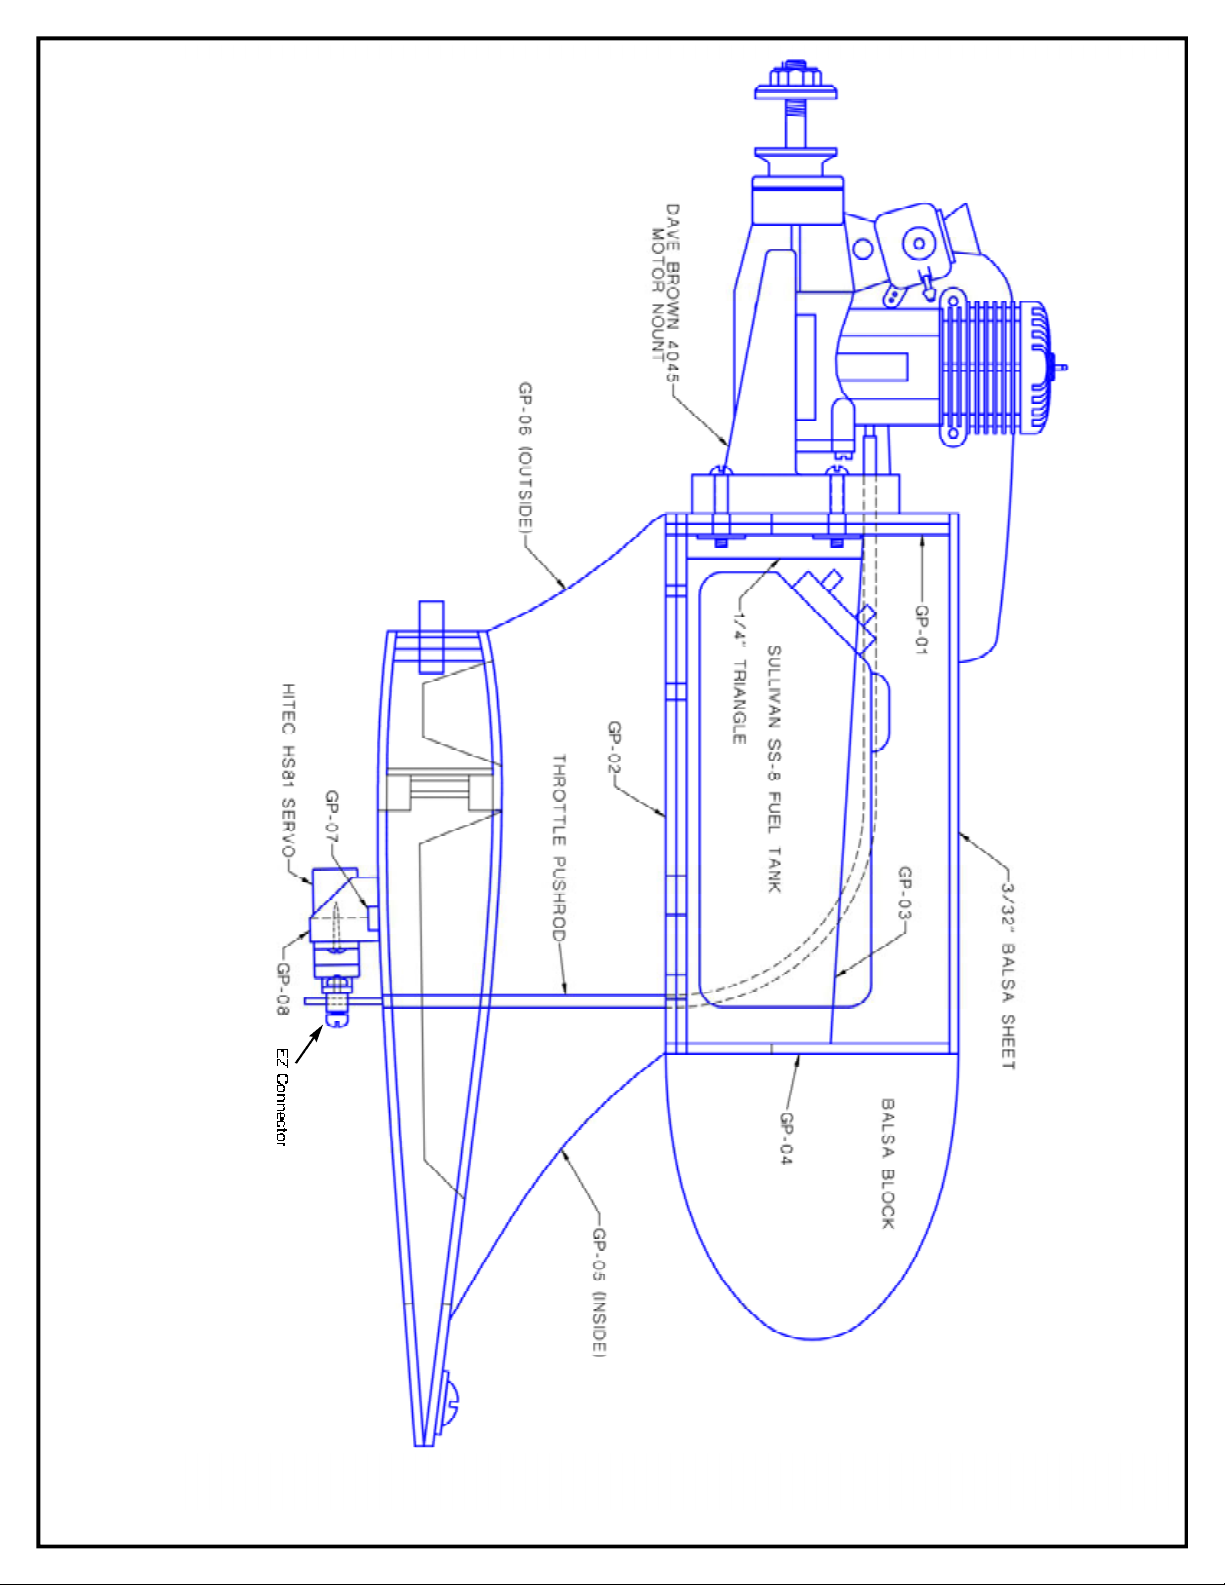
18...Mounttheradioswitchinthecutoutinthefrontofthe
servo tray. Useawireextension fromaholeintheswitchtothe
outsideofthefuselage.Glueapieceofscrapbalsainfrontof
thewiretotrapit intheswitch.
Nowcontinuewiththecovering instructionsinthemainassemblymanual.
Followtheremainderofthefinalassemblysteps inthemainmanualwiththefollowing exceptions:
Step142...You do notneedtomountthearming switch.
Step144...You do notneedtomounttheelectronicspeedcontrol.
Steps145 -148...Notapplicable.
Step149...Dothisstep.
Step150...Dothisstep. Useepoxy.You do nothavetorun themotorwiresbutyou do needtogluethepushrod
housing tothetop &bottomofthewing. Whentheglueisdry,trim thepushrod housing flushwiththebottomof
thewing.
151-154...Notapplicable.
...Mountthemotor&mounttothefirewall.
...Gluethethrottleservo mounttothebottomofthewing.Removethecovering fromthewing atthelocation ofthe
servo mount.
...Install thethrottlepushrod.Useanylon clevis toconnectthepushrod tothemotor.UseanEZ Connectorto
connectthepushrod totheservo.
...Install propeller.
Steps155-161...Dothesesteps.
Step162...Notapplicable.
Steps163-end...Dothesesteps. Page7
Table of contents
Other Alien Aircraft Toy manuals