Alien RAIN SILVER Series Manual

1
set up instructions
Designed, manufactured and distributed by

2
Follow this step by step guide to complete the installation of your system.
SYSTEM SET-UP
Place your pots in the desired location taking care to place them evenly
and on a level surface. There is enough pipe included in the kit for the
15L pots to be 50-60cm plant centres and 30L pots at 60-75cm centres.
Examples:
15L 16 pot system – 2 x 2m (50cm centres) or max 2.4 x 2.4m (60cm centres).
30L 16 pot system – 2.4 x 2.4m (60cm centres) or max 3 x 3m (75cm centres).
Pipe lengths between pots:
15L - 50cm plant centres = 40cm
15L - 60cm plant centres = 50cm
30L - 60cm plant centres = 50cm
30L - 75cm plant centres = 65cm
5
6
7
12
13
15
1
4
to
8
11
to
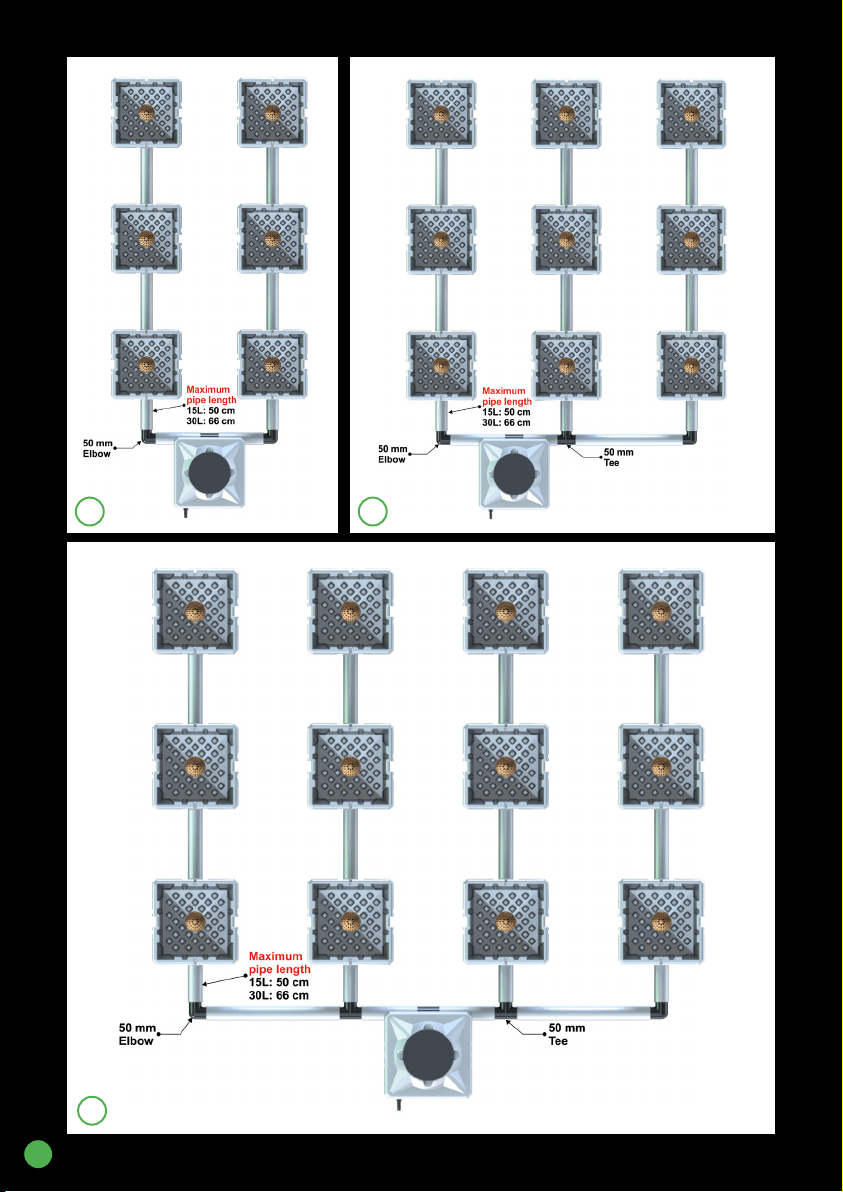
Lay the pots down on their side. Fit the 50mm Dual-Flow™ ttings into
the holes at the bottom of the pots. The rubber washer must be on the
outside. Using the locating slots, slide the collars over the threads then
secure the nut with the spanner provided. Tees are used on all pots
except for the end of line where elbows are used.
Measure the distance between the barbed ttings. Taking note of the
maximum pipe lengths, cut and t the 50mm silver pipe. Use warm
water or a heat gun to make the pipe more pliable.
Place a pair of stands under each pot.
Fit a tee to the header pot. Refer to the bird’s eye images for 2, 3 and 4
row systems. The 48 pot system is a 6 row system. Connect the header
to the pots using 32mm tees & elbows. Locating the header further
away from the system is possible with extra ttings available on the
website. 50mm Dual-Flow straight & 50mm barbed tee.
Place a drain cover in the bottom of each pot.
The copper drain cover will deter the roots from entering the pipework.
The copper will discolour after a period of time, this is a natural
occurrence. We recommend replacing them after 6 months of use to
maintain the performance.
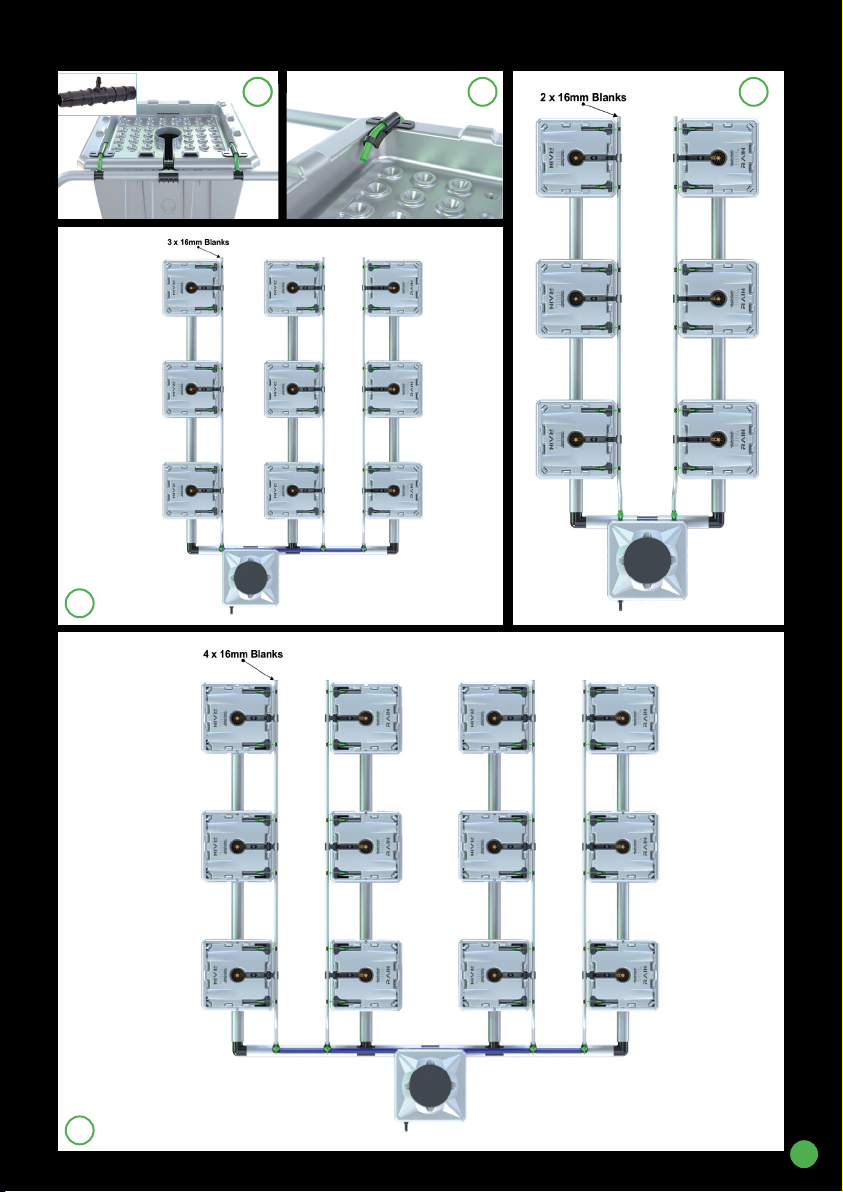
Push-t the pot clips into the slots on the side of the pots.
Push-t the two lid clips into the rectangle holes in the RAIN™ Lids and
place one on top of each pot.
If you have a 2 row system (4, 6, 8 or 10 pots), the valves with green
taps are screwed directly to the header pot. Note: 4 and 6 pot systems
may require the valves to be closed slightly to avoid splashing.
14
14a

3
4
1 2
3
5
7
4
6
8

4
11
109

5
For 3, 4 and 6 row systems, screw the valves on to the threaded
tees and elbows as shown. 9, 12, 15, 16 & 18 pot systems use 19mm
threaded tees & elbows, 21 pot systems upwards use 25mm.
Place the valves as shown and connect them with blue pipe. Use the
smaller size of jubilee clips to secure.
Use silver 16mm pipe to install the reducing tees in line with the lid
clip and attach pieces of 4mm pipe through the slot in the lid clip.
The silver 16mm pipe runs the length of the system from the valves
to the last pot. Fit 16mm blanks at the end of each line.
CAMO®Tank
Assemble the tank using the leaet provided. The tank can be
located inside or outside of the grow room. If located outside,
depending on distance, more pipe may be required.
RAIN™ Pump
Fit the blue pipe to the RAIN™ pump and secure with a Jubilee clip.
4 - 18 pot systems use 25mm pipe. 21 pot systems upwards use
40mm pipe. The pump sizes are shown here.
Place the RAIN™ pump at the bottom of the tank and t the
25mm/40mm siphon tee as shown just underneath the lid. Put a
piece of pipe through the hole in the tank lid and t 2 x elbows.
Use hose clips to secure all connections on the blue feed line.
The drain siphon tee is 19mm and is connected in the same way
but without clips. Black 19mm elbows and pipe are used here.
Connect the blue feed line and black drain line to the ttings on the
header. Secure feed line with clips.
Secure the RAIN™ Brain to a wall, away from possible water contact.
Connections to “Power” and “RAIN™ pump” are shown.
Connect the cable from the red drain pump in the header pot to the
ALIEN®adaptor by pushing the connector in and securing the lock
nut. You may have a dierent style of adaptor than the one shown.
This should remain powered 24/7. Whenever the pump senses
water it will engage and drain the header.
24
27
28
29
19
20
17
18
21
23
to
30
25
25a
25b
26
26a
16

6
12 13
14 14a
15
17
16
18

7
19 20
23
22
2119

8
24
26
27 28
25
26a
29 30
25b
25a
3500lph

9
31 32 33
34
35

10
Planting into the system
The fabric pot sits inside the plastic pot. It is made of a thick composite
material and helps prevent the medium from entering into the system.
We recommend adding the medium to the pot once placed inside the
plastic pot. If lled outside of the pot the weight of the medium can
cause the walls of the pot to swell. The medium should be lled to
30mm below the top of the fabric to allow the tting of the RAIN™ Lid.
Trim lower branches that are growing under the lid cover. If the plant
is not tall enough to protrude the lid cover, run the system without
the lid covers until the plants are tall enough.
SYSTEM OPERATION
Filling the system
Use a hose pipe to ll the tank. Add the required amount of
nutrients. After the rst feed, top up the tank as some water will
remain in the system.
RAIN™ Brain
When you select a “Run -Time” position, the RAIN™ pump will engage.
When the selected “Run-Time” expires, the system will remain idle
until the next feed cycle which is selected by the “Frequency”.
Frequency Dial
This is how often you require a feed cycle. It depends mostly on
the medium being used and the size of the plant. Soil may require
watering once every 1-3 days so the “24 - 72hr” setting would be
selected. Clay pebbles would be more in the range of once every 2-3
hours. Note, the RAIN™ system will require slightly less watering than
hand watering. This is due to the fact that the RAIN™ Lid and cover
purposely slow evaporation.
Run-time Dial
This is the amount of time that the RAIN™ pump will run. These
pumps have a high ow rate so the “Run-Time” is normally around
“30-60 seconds”. This is a guide as mediums, moisture content and
desired run o times could require a slightly dierent setting.
For example, if you want to water the plants at 4pm every day for
60 seconds. At 4pm today, select “Frequency” 24hrs and then
“Run-Time” 60 seconds. The plants will be watered now and then
again tomorrow at 4pm.
32
33
34
31

11
35
11
Use ROOT ROT X™in your system to prevent Pythium,
maintain a healthy white root zone and sterilise water lines.
▪Eliminates Pythium
▪Breaks down biofilm
▪Inhibits biofilm regeneration
▪Roots stay healthy & white
▪Dissolves Nutrient build-up
▪pH Neutral
Uses:
▪CLEAN CUTTINGS
▪FLUSHING STAGE
▪POWDERY MILDEW
▪Sterilise EQUIPMENT
alienhydroponics.co.uk
Available online:
Warning: The ‘ON’ setting should only be used for cleaning
the system. If left on permanently, pots can overll.
Cleaning the system
The lter should be checked regularly. If using mineral based
nutrients the lter should require minimal cleaning. Be aware using
organic based nutrients and additives will require regular cleaning.
Unscrew the lid of the lter and remove the cartridge for cleaning.
At the end of a crop cycle, drain down the system and ll with clean
water. Clean the inside of the pots with a cloth. ROOT ROT X™ can be
used to ush the system through. Run the red drain pump pipe to waste.
The fabric pots can be washed and reused several times. Refer to
the label for cleaning instructions.
Draining the CAMO®Tank
To perform a nutrient change or to drain the system.
Options:
1. Disconnect the pipe from the RAIN™ pump and connect a drain line.
2. Drain from the green tap at the bottom of the tank.
3. Use a separate water pump.
4. Pump the water through the system, use the red water pump to
drain the system.
WARNING: Pots can overll
Check the blog on alienhydroponics.co.uk for further info & updates.

12
Designed, manufactured and distributed by
01403 888276
Don’t forget to check
us out on social media:
@alienhydroponics
Table of contents
Other Alien Industrial Equipment manuals
Popular Industrial Equipment manuals by other brands

Panasonic
Panasonic ERJ A1 Series quick start guide

UNIFILLER
UNIFILLER UNIVERSAL 1000i sv Operating instructions and spare parts list

Miki Pulley
Miki Pulley ETP BUSH instruction manual

Festo
Festo VMPA1-FT-NW 10 Series Assembly instructions

ABB
ABB HT844022 Operation manual

ONTRAK
ONTRAK II CE Series Installation