Alinea 200S GSM Desktop Phone User manual

User’s Manual
200S GSM Desktop Phone
General Type _______________________________________________________________ 2
Phone appearance ___________________________________________________________ 2
The specifications to “the facade of the phone”________________________________________3
The specification to “handset”______________________________________________________3
The specification to “the rear appearance of the phone” ________________________________3
The specifications to “the back of the phone” _________________________________________3
SIM card installation _________________________________________________________ 4
Major Functions_____________________________________________________________ 4
Power on _______________________________________________________________________4
Power off _______________________________________________________________________5
Menu __________________________________________________________________________5
Outgoing Calls___________________________________________________________________5
Receive Incoming Calls ___________________________________________________________6
Inquire the Outgoing Call _________________________________________________________6
Inquire information for received calls _______________________________________________6
Inquire Not Received Calls ________________________________________________________7
Inquire call charge statistics _______________________________________________________7
Read or Delete Short Messages _____________________________________________________8
Phone Book _____________________________________________________________________9
Edit Phone book entries__________________________________________________________________ 9
Dial the number in the Phone book ________________________________________________________ 10
Hot Keys ____________________________________________________________________________ 10
Inquire signal strength and the version of software ___________________________________10
Call divert set-up and cancellation _________________________________________________10
Menu Keypad Tones_____________________________________________________________11
Ringing Tones and Volume Adjustment_____________________________________________11
Appendix 1. Technology characteristics _________________________________________ 11
Appendix 2. Maintenance ____________________________________________________ 11
Appendix 3. Troubleshooting__________________________________________________ 12
Appendix 4. Quick reference __________________________________________________ 13

AlineA Ltd. Users Manual
Page 2 of 18 200S GSM Desktop Phone
General Type
•This phone shall not be used at garage, oil storage
base, chemical plant or inflammable or explosive
substance;
•This phone shall be avoided in the hospital, medical
electronics equipment such as pacemaker or
audiphones gets easily interference by it;
•If the phone is found not successful in login of the
network before the use or after the use, please check
up whether the SIM card is installed well;
•The phone does not identify old SIM card of 5V and
1.8V.
Phone appearance
Facade of the phone
Handset Bottom of the phone

AlineA Ltd. Users Manual
Page 3 of 18 200S GSM Desktop Phone
The specifications to “the facade of the phone”
1status indicator - at standby state, it flashes slow .at working state, it flashes
fast.
2LCD
3Power indicator - When connected to power supply, it stays bright.
4Working indicator - When the phone is working ,it stays bright.
5Pinchcock
6Save - Used to save telephone numbers
7Menu - Enter function menu
8Shift - Used to switch three input modes: ABC, abc and 123
9Back - Back to the up-level menu
10 Up - Used during editing telephone book and reading records, short messages
and menu. It is uses to adjust the volume during a call. Down - Used during
editing telephone book and reading records, short messages and menu. It is
uses to adjust the volume during a call.
11 Keyboard - -Used to input digit 0 to 9 and “*” and “*”
12 Antenna
13 Keys
•Function key - Including Dialed calls key, Received calls key, Missed calls
key, C key, Handfree key, OK key.
•Dialed calls - inquire or redial the dialed telephone numbers
•Received calls - inquire or call the answered telephone numbers
•Missed calls - inquire or call the missed telephone numbers
•C - cancel error input or refuse the incoming call
•Handfree - answer or making calls at handfree status
•OK - make calls or save setting
14 Loudspeaker
The specification to “handset”
1 - earphone
2 - microphone
The specification to “the rear appearance of the phone”
1,4,5,9 - screw holes
2,3,6,8 - cashions
7 - batteries box
10 - SIM card seat
The specifications to “the back of the phone”
1 Power interface connect to 7.5V AC
2 Ring volume switch
3 Power switch

AlineA Ltd. Users Manual
Page 4 of 18 200S GSM Desktop Phone
SIM card installation
1. Push right and raise SIM card seat.
2. Insert SIM card to SIM card seat to ensure that SIM card edge is in the left side,
make the metal side downwards.
3. Close it and slide the SIM card seat to the left, and fix it to the suitable position.
4. Close the card case.
Major Functions
When using, the phone should be power on within network coverage.
Power on
Connect the input end of transformer to Main Power socket, and connect the output
end to the phone power supply port, the phone begins searching for the network login,
and the display shows turn " SEARCHING FOR NETWORK"“INITIALIZATION” ”READ SIM
PHONE BOOK”; When the display shows icons such as operator name, time and the signal,
etc., the phone completes login.
Notice: Please charge when the warnings for batteries appear. Otherwise the phone will
halt. Then all the phone’s functions will be ended. If the phone has halted, please connect
the phone to external power supply and the phone will work in gear.

AlineA Ltd. Users Manual
Page 5 of 18 200S GSM Desktop Phone
Power off
Cut off the Main power, the phone is power off and the display is cleared.
Menu
1.READ MESSAGE
4:PHONE BOOK
5.CALL DIVERT
6.KEYPAD TONES
7.RINGING TONES
9.IMEI-VERSION
BACK:BACK
Notice: In main menu, you can’t enter “SETTING” unless you input correct passwords.
Outgoing Calls
1. Pick the handset or press " Hand Free", the screen shows " PRESS OK TO REDIAL ",
dial upon hearing the dialing tone;
PRESS OK TO REDIAL
2. Dial: dial the called number, the number dialed is shown on the screen in turn, and
the sound for pressing key is heard. If there are any mistakes in dialing, press " Cancel" to
return and input again; Press " OK " to redial the last number;
PRESS OK TO SEND 264145
3. After dialing, press " OK” to send, if there is no dialing for continuous 6 seconds,
and the number dialed is2 digits or is more than 2 digits, the phone will send out the
number automatically, the LCD shows number sending indication; If the number dialed is
less than 2 digits, and it continues for 6 seconds of not dialing, the call will be cut
automatically; If the number dialed is set by the operator as barred number, the LCD
shows " BARRED NO." and returns to standby status;
BARRED NO. 264145
4. After the called party hooks off, the phone starts time calculation and billing: The
display shows the tariff ( The currency type is: Indian rupee. It is the same hereinafter)
“TARIFFXXXX.XX/XXs”, call duration " h:mm:ss" and call charge " INR:XXXXX.XX ";
TARIFF: 3.00/60S
0:00:12 INR: 3.00 26419086
In calling, press the numeral key or " * " or " # “ to output corresponding Dual Tone
Multiple Frequency (DTMF);

AlineA Ltd. Users Manual
Page 6 of 18 200S GSM Desktop Phone
• In calling, press "Up" or " Down” to adjust volume;
5. Flap hook unit or press " Hand Free”, the line is disconnected.
Receive Incoming Calls
1. When there is incoming call, the phone sends out ring and displays the incoming
call number, hook off the phone or press " Hand Free” to receive the call; Also you can
directly press " Cancel” to reject the call;
CALLING . . . 13537584454
2. When the call is connected, the phone begins timing and billing; The display shows
the tariff (The currency type is: Indian rupee. It is the same hereinafter) “TARIFFXXXX
XX/XXs”, call duration " h:mm:ss" and call charge " INR:XXXXX.XX ";
TARIFF: 3.00/60S
0:00:12 INR: 3.00 26419025
In calling, press "Up" or " Down” to adjust the volume;
If there is no number for the incoming call (e.g., IP incoming call), the incoming call
number will be displayed as " 0000".
Inquire the Outgoing Call
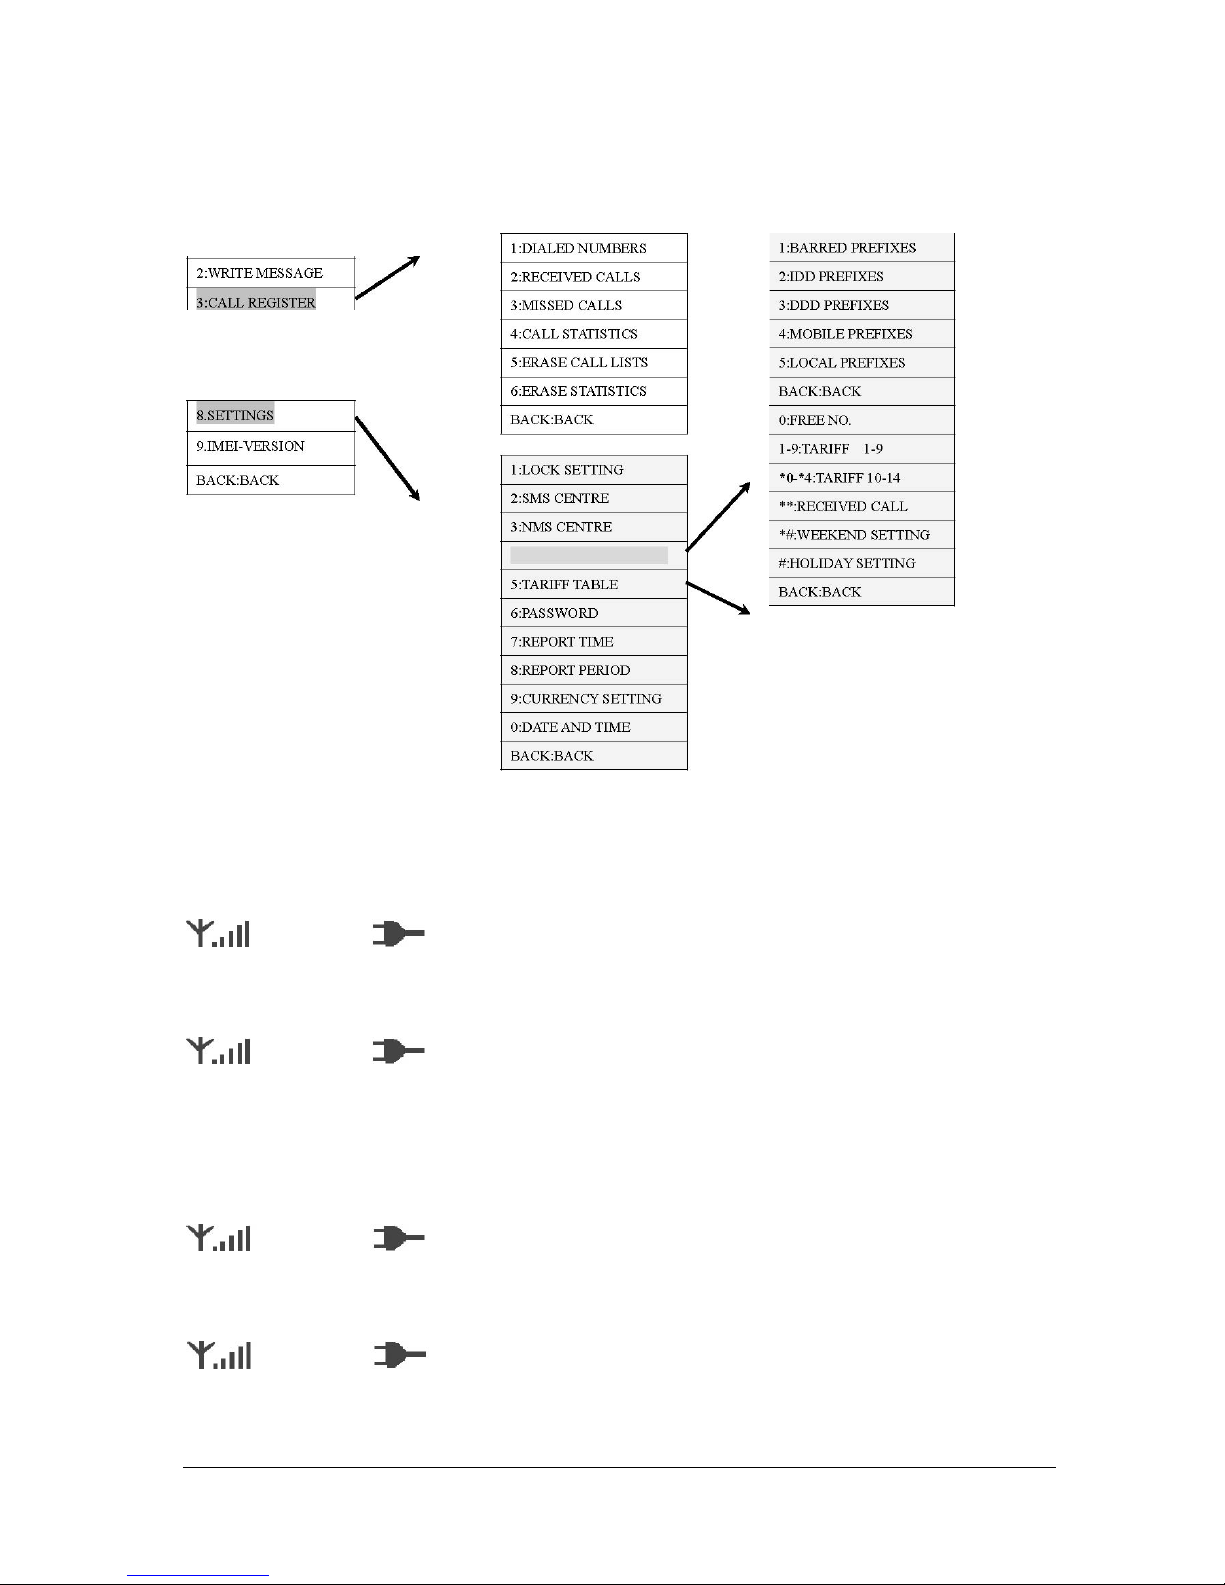
1. Press " Menu” to enter the main menu, select " 3:CALL. REGISTER ".
1:READ MESSAGE 00/02 2:WRITE MESSAGE 3:CALL REGISTER ↓
2. After entering call register menu, select “DIALED NUMBERS"
1:DIALED NUMBERS 2:RECEIVED CALLS 3:MISSED CALLS ↓
3. The display shows the information of last outgoing call: number, calling date, calling
time, call duration and call charge;
01: 05/01/2004 16:59
0:00:12 INR: 0.95 26419025
Press “Up” or “Down” to inquire the latest 40 groups of outgoing call information;
Press “OK” to start the call and press “BACK” to return to up level menu; Press “Dialed
Calls” to inquire outgoing calls.
Inquire information for received calls
1. Press "Menu” to enter the main menu. Select “3:CALL REGISTER”.
1:READ MESSAGE 00/02 2:WRITE MESSAGE 3:CALL REGISTER ↓
2. Select “2:RECEIVED CALLS” after entering call register menu.
1:DIALED NUMBERS 2:RECEIVED CALLS 3:MISSED CALLS ↓
3. The display shows information of last call: number, incoming call date and incoming call
time, call duration and call charge;
01: 05/01/2004 16:59
0:00:12 INR: 0.95 13560712331
Press “Up” or “Down” to inquire information for the latest 20 groups of received calls;
Press “OK” to start the call and press “BACK” to return to up level menu; Press “Received
Calls” to inquire received calls.

AlineA Ltd. Users Manual
Page 7 of 18 200S GSM Desktop Phone
Inquire Not Received Calls
When there is an un-received call in postpaid mode, the display shows "X MISSED CALLS"
(X refers to the count of un-received calls)
1. Press “Menu” to enter the main menu, select “3:CALL REGISTER”
1:READ MESSAGE 00/02 2:WRITE MESSAGE
3:CALL REGISTER ↓
2. Select “3:MISSED CALLS” after entering call register menu.
1:DIALED NUMBERS 2:RECEIVED CALLS 3:MISSED CALLS ↓
3. The display shows phone number, call date and call time for un-received call of last
time;
01: 05/01/2004 16:59
0:00:00 13560712331
Press "Up" or " Down" to inquire the last 10 groups of not received calls;
Press “OK” to start the call and press "BACK” to return to up level menu; Press “Missed
Calls”to inquire missed calls.
Inquire call charge statistics
1. Press “Menu” to enter the main menu. Select “3:CALL REGISTER”
1:READ MESSAGE 00/02 2:WRITE MESSAGE 3:CALL REGISTER ↓
2. Select “4:CALL STATISTICS” after entering call register menu.
2:RECEIVED CALLS ↑
3:MISSED CALLS 4:CALL STATISTICS ↓
The display shows accumulation of call charge and call duration;
Press “Down” or “OK” to switch in order the accumulation of call charge and call duration
for all calls, IDD, DDD, mobile phone, local fixed calls, incoming calls; Press “Up” to switch
to the previous ones display
ALL CALLSCOSTS: 5.64 DURAS: 0000:01:40
5. Press “Back” to return to up level menu.
10. Clear call register
1. Press “Menu” to enter the main menu. Select “3:CALL REGISTER”.
1:READ MESSAGE 00/02 2:WRITE MESSAGE 3:CALL REGISTER ↓
2. Select “5:ERASE CALL LISTS” after entering call register menu.
3: MISSED CALLS ↑
4: CALL STATISTICS
5: ERASE CALL LISTS ↓
3. The display shows “ERASE CALL LISTS? YES1 NO0”
ERASE CALL LISTS? YES:1 NO:0
4. Press " 1" to erase call lists (outgoing calls, incoming calls and un-received calls),
press "0 “ to return to up level menu.
Notes: If the phone bill memory is full, the phone automatically overrides phone bills
generated previously.
11. Clear call charge statistics
1. Press “Menu” to enter the main menu. Select “3:CALL REGISTER”
1:READ MESSAGE 00/02 2:WRITE MESSAGE 3:CALL REGISTER ↓
2. Select “6:ERASE STATISTICS” after entering call register menu
4: CALL STATISTICS ↑

AlineA Ltd. Users Manual
Page 8 of 18 200S GSM Desktop Phone
5: ERASE CALL LISTS
6: ERASE STATISTICS ↓
3. The display shows “ERASE STATISTICYES1 NO0”
ERASE STATISTICS? YES:1 NO:0
4. Press " 1" to erase statistics, press "0” to return to up level menu.
Read or Delete Short Messages
When a SMS is received, the phone will make a short alert tone, and display the new SMS
icon on the LCD.
Press “Menu” to enter phone function selection menu when the phone is in standby status.
The LCD shows ”1Read Messages”Press “1”key to enter the SMS list;
1:READ MESSAGE 00/02 2:WRITE MESSAGE 3:CALL REGISTER ↓
3. Press”UP” and ”DOWN” to select the SMS to be read (the left of order number will be
marked with”
”).
01:SMS UNREAD
02:SMS READ 03:SMS READ ↓
4. Press”OK” to read this SMS.
HELLO,ERIC! From:8613823631205 Time:04/07/03 16:15
Press”UP”or”*”to scroll up, and press”DOWN”or”#”to scroll down the message and related
content such as the sender’s phone number, date and time;
Press”OK” to forward the SMS after input number of the other party;
SEND TO: 8613923760855
7. In SMS listing status or reading status, press “Cancel” to delete the SMS.
13. Edit or Send Short Message
With this function, you can edit a message not longer than 140 English characters.
Press”Menu” to enter main menu when phone is in standby status.
The LCD shows ”2WRITE MESSAGES”Press “2” to enter SMS editing.
1:READ MESSAGE 00/02 2:WRITE MESSAGE 3:CALL REGISTER ↓
The LCD shows “1NO 2SMS F1BACK OKSEND”
1:NO. 2:SMS BACK:BACK OK:SEND
3. Press”1” to input the number to which the message will be sent, press “OK” to save
this number. If message cache is not empty, it indicates whether the sending is done, or
returns to the menu of SMS editing
SEND TO: 8613823631205
4. Press”2” to edit message and input the text with keys, and press” BACK” to save
the message after editing; If message cache is not empty, it indicates whether the sending
is done, or returns to the menu of SMS editing.
ABC HELLO,ERIC!
Press”OK”, the LCD shows”SEND? YES:OK NO:BACK”
SEND?
YES:OK NO:BACK
Press”OK” to send the message, Press” BACK” for not sending the message. Press “OK”,
the LCD shows “SENDING... PLEASE WAIT”,if it is finished.

AlineA Ltd. Users Manual
Page 9 of 18 200S GSM Desktop Phone
SENDING..PLEASE WAIT
The LCD shows”DONE”and return to up level menu, otherwise it shows “FAILED” and
returns to menu of phone function selection.
DONE
When editing short message, press “123/ABC” to switch input methods as follows: letters
(abc), capital letters (ABC), numbers (123). Press key “1” to select punctuation input
under English mode.
Phone Book
The phone book can save 30 entries including name and telephone number.
Enter Phone book
Press”Menu”to enter phone function selection when phone is in standby.
Press “UP” or “DOWN” to search “4PHONE BOOK”.
Press”4”to inquire phone book.
2: WRITE
MESSAGE ↑
3: CALL
REGISTER
4: PHONE BOOK
↓
Edit Phone book entries
At first enter the phone book.
Press “UP” or “DOWN” to select the entry that you want to edit (The entry selected by you
will be marked with a “” on its left).
01:JACK ↑
02:ANNA
03:SMISH ↓
Press ”Menu”, you can edit the entry selected, the LCD shows down level Menu”NAME:
NO: ”
abc

AlineA Ltd. Users Manual
Page 10 of 18 200S GSM Desktop Phone
NAME: JACK NO:13017262235
Press “UP” or “DOWN” to select what you want to editname or telephone number(the
entry selected by you will be marked with a””on its left). Input directly the name or NO.
If you finish, press” SAVE” to save your entry and return to phone book menu.
Dial the number in the Phone book
Press “UP” or “DOWN”, select the entry that you want (The entry you selected will be
marked with a “” in its left).
Press “OK” to dial the number.
01:JACK ↑
02:ANNA
03:SMISH ↓
Hot Keys
If you press an appropriate digit key, you can quickly retrieve and dial the number saved
in the first 10 locations of the phone book;
1) Lift up the handset or press”Hand-Free”.
2) Press the appropriate digit key.
3) Press “OK”, it will dial the number saved in appropriate location of the
phone
book (Digit 0 will dial phone book location 10).
Inquire signal strength and the version of software
The informations about the phone such as IMEI code ,the version of software and
hardware can be inquired if you elect “9—IMEI-VERSION” in the main menu. Press “OK” or
“F1” to back the main menu.
7: RINGING
TONES ↑
8:SETTINGS
9:IMEI -
VERSION ↓
IMEI:351249000337442
SOFTWARE: V01R01 HARDWARE: V1.00
Call divert set-up and cancellation
Before using this service please confirm you have applied for it from the GSM operator. If
not, this set-up is invalid.
1) Press”MENU” to enter the main menu when the phone is in standby status.
Press “UP” or “DOWN” to select “5: CALL DIVERT”.
3: CALL
REGISTER ↑
4:PHONE BOOK
5:CALL DIVERT ↓
2) Set call divert:

AlineA Ltd. Users Manual
Page 11 of 18 200S GSM Desktop Phone
If call divert is not set, press ”5” to set up call divert.
Use the number keys to edit the telephone number which incoming call will be diverted to.
Press “OK”, the LCD shows “SET-UP DONE” if the call divert have been set. 3) Cancel
call divert
Press “UP” or “DOWN” to select “5CALL DIVERT”.
Press”5” to cancel call divert if it is set up.
The LCD shows “DIVERT CANCELED” if call divert is cancelled successfully.
Menu Keypad Tones
1) Press”Menu” to enter the main menu when the phone is in standby status.2) Press “UP”
or “DOWN” to select “6KEYPAD TONES”.3) Press”6” to switch menu keypad tones. 4)
Press”1”, the tone will be ON; Press”0”,the tone will be OFF.5) Press “OK” to return to the
main menu .
KEYPAD TONES 1:ON 0:OFF
1
Ringing Tones and Volume Adjustment
Your phone can select 7 kinds of ringing tones and 5 steps of sound level . 1) Press”Menu”
to enter main menu when phone is in standby status. 2) Press “UP” or “DOWN” to select
“7RINGING TONES”. 3) Press”7”to enter ring tones setting.4) Press “1”, “2”… “7” to
select ring tones, press “UP” or “DOWN” key to change ring tones level. 5) Press “OK” to
return to the main menu .
RINGING TONE(1-7)V ↑↓ 62
Appendix 1. Technology characteristics
•Working condition environment temperature: 0 ~ +50
•Relative humidity: 10%~95%
•Air pressure: 86~106kPa
•Environment yawp: ≤60dB(A)
•working frequency: GSM900/GSM1800 MHz
•stability of frequency: better then 2.5PPM
•delicacy of signal:-94dBM
•emission power:<2w
•220v AC power supply
•Continuous call time duration when using battery: 2-3 hours
•Continuous standby time duration when using battery: 48-72 hours (related to
network condition)
Appendix 2. Maintenance
1)
The phone should save in the desiccant place.
2)
When use the phone, it should not be knocked, avoid breaking the case.
3)
When the face of the case is dirty, please use soft cloth to wipe up. Avoid
using chemical ingredients.
4)
If there is some trouble of the phone, please send it to the repair center.
5)
Storage: the phone that is packed or not should save in cool and dry place,
pile up no more than 10 layers

AlineA Ltd. Users Manual
Page 12 of 18 200S GSM Desktop Phone
Appendix 3. Troubleshooting
Couldn’t Dial-in and
Dial-out Using
batteries
1.The Voltage of battery is low, please recharge
up. 2.Tole of Battery box isn’t connected well.
LCD black screen
1. Power supply isn’t connected well. 2. LCD was
not joined well, please check the line of front
plate and motherboard.
No dial tone
1.Check the joint of handset and phone, please
connect it again. 2.The line of handset or
earphone in handset is broken.
Couldn’t hear of the
sound during call
1.Handset was not joined well with
motherboardplease join it again. 2.The line of
handset or earphone in handset is broken.
Sound is too loud or
has noise 1.Network signal is interfered. 2.Sound sets too
loud, press “UP” or “DOWN” to adjust during call.
Can’t work
1.Press “ON/OFF” to restart. 2.Power supply
doesn’t connect well. 3.Power switch is broken.
No response to
keystroke
The line of keyboard isn’t connected well, please
check the line of front plate and motherboard.
Signal indication is
unstable
1.Network signal is unstable, please pull out the
antenna. 2.Antenna is looseturn the screw to
the right to tighten it.
Can’t login the network
1. SIM card doesn’t fix well. 2. SIM card is
locked, take SIM card out and set it’s PIN to
1234, close PIN yard. 3. Network signal is
unstable.
Ring volume too small
or no sound 1.Turn audio-switch to side of H.

AlineA Ltd. Users Manual
Page 13 of 18 200S GSM Desktop Phone
Appendix 4. Quick reference
1. Press “UP” or “DOWN” to adjust volume loud or small.
Echo during call
2. Network malfunction
Set-up Instructions
This document is not provided to the final user of wireless GSM business phone, it is only
provided to operators distributing the phone. Engineers of related departments shall read
carefully. The password for set-up shall be memorized and confidentiality shall be kept.
I. Enter the set-up procedures
If the customer does not put forward any special requirements, the phone can be set as no
locking of card or no locking of phone when it leaves the factory, And the user insert any
SIM card to login the network and enter standby status.Card locking: add password to SIM
card to limit SIM card’s applications in other types of mobile phone;Phone locking: the
phone only identify SIM card first set up, the phone can not be used when other cards
areapplied;No permit to use other SIM card in this phone;Press " MENU” in hook-on, select
Item 8th " SETTINGS" to enter the set-up procedure.
8 :SETTINGS ↑9:IMEI-VERSION BACK:BACK
II. Set up the phone parameters
1. Hook on, press " MENU”, the display shows main menu list, press “UP” or “DOWN”
to find "8.SETTING", press "8”, the screen shows "ENTER PASSWORD", input 8-digit
password (the initial password for factory leaving is sets up as 30459086). Press "OK”, if
the password is correct, the display shows set-up menu List, otherwise it indicates
"PASSWORD ERROR" and returns to the status of main menu list;
ENTER PASSWORD ********
2. Modify set-up information: Press “1” in set-up menu to select “LOCK SETTING”
1: LOCK SETTING 2:SMS CENTER 3:NMS CENTER ↓
Input 8-digit numbers WXYZCRIJ to set up locking card, locking phone, whether permit to
receive calls, etc. (the default value is 00001111,i.e., no locking card or phone, allow to
receive calls), press " F1” to return to the set-up menu;
LOCK SETTING 00001111
W=0: not locking card, W=1: locking card;
X=0: not locking phone, X=1: locking phone;
I=0: not permit to receive calls, I=1: permits to receive calls;
YZCRJ are backup digits. Only W,X,I are valid now.
Notes: When W is 1 and X is 1 at the same time, it realizes locking phone and locking card
concurrently.
3. Short message center set-up: in the set-up menu, press " 2” to select "SMS
CENTER", the display shows "SMS CENTER", press “#”to clear the input line, press “MENU”
to switch input numbers or characters, press‘1’to input ‘+’in character input status, input
SMS center number by pressing number keys in number input status, press "F1” to return
to the set-up menu;
123 SMS CENTRE +8613800755500
4. Set up Network Management System: In set-up menu, press “3” to select “NMS
CENTRE”, the LCD shows “NMS CENTRE”, press “#” to clear the input line, press “MENU”
to switch input numbers or characters, press ‘1’ to input ‘+’ in character input status, input
NMS center number by pressing number keys in number input status, press “BACK” to
return to the set-up menu;
123 NMS CENTRE +8613923760855
5.Set up prefix for barred NO. and DDD prefix, mobile phone prefix,etc: presses "4” in set-
up menu to select " PREFIXED NO.", the LCD shows menu, press " 1", "2", "3” “4” and
“5”to enter respectively the set-up of barred number prefix (BARRED PREFIXES), IDD
prefix ( IDD PREFIXES ) and a DDD prefix ( DDD PREFIXES ), mobile phone prefixMOBILE

AlineA Ltd. Users Manual
Page 14 of 18 200S GSM Desktop Phone
PREFIXESlocal fixed phone prefix LOCAL PREFIXES; In the set-up of NO., press ‘#’ to
clear the whole NO., press " CANCEL” to delete the last digit of number displayed, press
"OK” to erase a certain number after deleting it, add the number after viewing the last
number, press “OK ”to input the next number after input of a certain number. Each type of
NO. can set up 15 numbers at maximum.
1:BARRED PREFIXES 2:IDD PREFIXES 3:DDD PREFIXES ↓
(i) Barred NO. prefix Set up barred NO. prefixthe phone automatically bar the NO.
starting with the barred prefix.
BARRED PREFIXES
1: 16
(ii) IDD prefix
Set up international long distance matching prefixsuch as“00”. After the set-up of this
prefix, IDD traffic can be calculated correctly.
IDD PREFIXES
1: 00
(iii) DDD prefix Set up domestic long distance matching prefix, such as“0102
09”. After the set-up of this prefix, DDD traffic can be calculated correctly.
DDD PREFIXES
1: 01
(iv) Mobile phone prefix
Set up the mobile phone matching prefixafter the set-upthe mobile phone traffic can be
calculated correctly.
MOBILE PREFIXES
1: 138
(v) Local fixed phone prefix
Set up local fixed phone prefixafter the set-upthe local fixed phone traffic can be
calculated correctly. After the set-up, press “BACK”to return to menu, where you press
“BACK”to return to set-up
menu.
LOCAL PREFIXES
1: 26
6. Set up the FREE NO.: Press"5” in set-up menu to select " TARIFF TABLE", LCD shows
tariff menu, press " 0” to enter the free number. ( FREE NO. ) set-up;
0:FREE NO.
1-
9TARIFF 1-9
*0-
*4:TARIFF
10-
14 ↓
In the free GNP set-up, press " CANCEL” to delete the last digit of number displayed,
press‘#’to delete the whole line, press "OK” to erase a certain number after deleting it,
add the number after viewing the last number of GNP, press “OK” to input the next
number after input of a certain number. The maximum free numbers are 20, press “BACK”
to return to tariff menu after the set-up, press “BACK” in the tariff menu to return to set-
up menu;
TARIFF 00 FREE NO.
NUM01: 110
7. Set up tariff and GNPYou can set up 14 tariffs other than free NO.. In set-up menu
press“5” key to select“TARIFF TABLE”the display shows tariff menu, press“1”-“9”key
respectively to enter the set-up of tariff type 1-9. For tariff type of 10-14, press“*”first,
then press “0-4”keys to
enter set-up.

AlineA Ltd. Users Manual
Page 15 of 18 200S GSM Desktop Phone
1-9TARIFF 1-9 ↑
*0-
*4TARIFF
10-
14
**:RECEIVED CALL
↓
(Tariff Menu)
Tariff set-up adopts unified tariff for holidays and weekend discount period without time
section Time section mode is adopted for charge of working days, it is applied to time
sections of one day, from 0 to 24 O’CLOCKthere are maximum 4 time sections for each
day.
When you enter the tariff set-up, the display shows “T :000000”
“F1:000000000000”,”MUM01:”
TARIFF No.( tariff type)
T000000 F1000000000000 NUM01
first time billing time duration3 digits000-250unitsecondbilling duration after the
first time 3 digits000-250unitsecond
Press “OK”, the LCD will display as follows;
TARIFF No.( tariff type)
D0000000000000000 F1000000000000 NUM01
D stands for holiday and weekend tariff set-upthe format is F0F1F2F3, F0 F1F2F3is
respectively the holiday first time charge rate4 digits0000-9999holiday charge rate
after the first time charge4 digits0000-9999weekend first time charge rate4 digits
0000-9999weekend charge rate after the first time charge4 digits0000-9999 Fn
stands for working day n time section (1<=n<=4) tariff set-upthe format is
hnhnmnmnFn0Fn1hnhnmnmn is the end time for n time sectionamong them, hnhn is
the end hour of time section2 digitsmnmn is the end minute of time section2
digitsFn0 is the first time charge rate for n time section4 digits0000-9999Fn1 is
the first time charge rate for n time section4 digits0000-9999after the first
timePress“CANCEL”key to delete the last digit of this tariffpress“#” to cleartariff can
be set up again after clearing. When the whole tariff shall be deleted without deleting
GNPpress“#”to clear T and then press BACK to return.
Press“OK” to set up another time sectionif 4 time sections are set-up, press“OK” to next
step to set up GNP corresponding to this tariff
Example 1For the whole day of the working day, 500 units/minute is charged for the first
timethen 250 units is charged for each 30 seconds300 units/minute is charged for the
first time of holidaythen 150 units is charged for each 30 seconds hereinafter400
units/minute is charged for the first time of weekend200 units is charged for each 30
seconds hereinafter.
We can set up as follows
TARIFF 01
T060030 F1000000000000 NUM01
T :“060030”press“OK”
TARIFF 01
D0300015004000200 F1: 000000000000 NUM01
D :“0300015004000200”press“OK”
TARIFF 01 D0300015004000200
F1: 240005000250 NUM01
F1:“240005000250”
Press“OK”to next time sectionbut if there is no need of set-up for next time
sectionpress continuously “OK” to next step
Example 2700 to 2020 600 units for the first 60 seconds of the working dayand
300 units for each 30 seconds hereinafter
2020 to2200 400 units for the first 60 seconds of the working dayand 200 units for
each 30 seconds hereinafter
2200 to next day 700300 units for the first 60 seconds of the working dayand 150
units for each 30 seconds hereinafter.
For holiday time sections, 300 units are charged for the first 60 seconds and 150 units for
each 30 seconds hereinafter. For weekend time sections, 400 units are charged for the
first 60 seconds and 200 units for each 30 seconds hereinafter.

AlineA Ltd. Users Manual
Page 16 of 18 200S GSM Desktop Phone
You can set up as follows,
TARIFF 01
T060030 F1000000000000 NUM01
T : “060030”, Press“OK”
TARIFF 01
D0300015004000200 F1: 000000000000 NUM01
D : “0300015004000200”, Press“OK”
TARIFF 01 D0300015004000200
F1: 070003000150 NUM01
1st Time section F1“070003000150”, Press“OK”
TARIFF 01 D0300015004000200
F2: 202006000300 NUM01
2nd Time section F2“202006000300”, Press“OK”
TARIFF 01 D0300015004000200
F3: 220004000200 NUM01
3rd Time section F3“220004000200”, Press“OK”
TARIFF 01 D0300015004000200
F4: 240003000150 NUM01
4th Time section F4“240003000150”, Press“OK” to next step
TARIFF 01 D0300015004000200 F4: 240003000150
NUM011861
After tariff set-up, press“OK”to set up the phone prefix of tariff billing. In GNP set-up
press“CANCEL”to delete the last digit of NO. displayedpress“#”to clear. After clearing a
certain NO., press“OK” to delete this NO., view the last part of the GNP and then add NO.,
press“OK”after input of one NO. and then you can input the next NO., maximum 20 GNP
can be set up for each type of tariffafter set-up of corresponding GNP of this tariff,
press“BACK”to return to tariff menu press“BACK”to return to set-up menu in tariff menu.
8. Set up incoming call tariff: press "5” to select "TARIFF TABLE", LCD shows tariff menu,
press “UP” or ”DOWN”to find "** RECEIVED CALL ", press “*”+“*” keys to enter the
incoming call tariff set-up. The screen shows tariff set-up, the default is free incoming call
( displays “T :000000” “D :0000000000000000”,”F1:000000000000”), the definition for
tariff format is the same as that in Article 8. Press " CANCEL” to delete the last digit of call
charge, press ”#”to reset the tariff for incoming call, whose tariff can be set up after
clearing. When you need to delete the whole tariff, press “#” to delete T, press “BACK” to
return;
TARIFF 15
T000000 F1: 000000000000
TARIFF 15
D000000 F1: 000000000000
Press “BACK” to return to tariff menu after the set-up. Press “BACK” in tariff menu to
return to set-up menu
Example 1: TARIFF LEVEL 15 is set up as “060030”“0100005001000050”,
“240001000050”it shows 100 unit will be charged for the first 60 seconds for a call in
working day, holiday or weekend, 50 units will be charged for each 30 seconds
hereinafter;
TARIFF 15
T060030 F1: 000000000000
TARIFF 15 D0100005001000050
F1: 240001000050
Example 2: TARIFF LEVEL 15 is set up as“060030”,“0100005001500075”,“240002000100:
TARIFF 15
T060030 F1: 000000000000
TARIFF 15 D0100005001500075
F1: 240002000100
It shows that for working days, 200 units will be charged for the first 60 seconds, and 100
units will be charged for each 30 seconds hereinafter;
For holidays, 100 units will be charged for the first 60 seconds, and 50 units will be
charged for each 30 seconds hereinafter;

AlineA Ltd. Users Manual
Page 17 of 18 200S GSM Desktop Phone
For weekend, 150 units will be charged for the first 60 seconds, and 75 units will be
charged for each 30 seconds hereinafter;
Example 3:TARIFF LEVEL 15 is set up as “000000” “0000000000000000”
“000000000000”:
TARIFF 15
T000000 F1: 000000000000
TARIFF 15
D0000000000000000 F1: 000000000000
It shows that it is a free incoming call;
Notice: the above incoming call tariff can be valid when “the bit of whether or not permit
to receive calls “in setting “LOCK SETTING” is equaled to ‘1’,if not, Phone will refuse the
incoming call.
9.Set up weekend discount time section: Press “5”in set-up menu to select “TARIFF
TABLE”the display shows the set-up menu, press “*”+“#”to enter weekend discount
time section, the display shows “WEEKEND”and the parameter format is
“W1h1h1W2h2h2”, among them “W1h1h1” “W2h2h2” is respectively weekend discount
start time and end time, W1 stands for what day is the start time of weekend ( 1 digit, 1-7
corresponds respectively to Monday-Sunday), h1h1is the start hour (2 digits, 00-23), W2
stands for what day is the end time of weekend ( 1 digit, 1-7 corresponds respectively to
Monday-Sunday), h2h2is the end hour (2 digits, 00-24).
Example 1: Set up the whole day of Saturday and Sunday as weekend discount time
section Set it as: 600724
WEEKEND
600724
Example 2: Set up Saturday 1300 to next Monday 0700 as weekend discount time
section Set it as: 613107
WEEKEND
613107
When you set it up, press “CANCEL”to delete the last digit of NO. displayed, press “OK”to
save, press “BACK”to return to tariff menu after set-up. If the user does not set up this
item, the phone recognizes set-up in Example 1 as weekend discount time section.
10. Set up holidays: Press “5”to select “TARIFF TABLE”the display shows tariff menu,
press “#”to enter holiday set-up, the display shows holiday 01, among them ““START
MMDDhh”stands for holiday start time, “ENDMMDDhh” stands for holiday end time, the
time format is: MM is month (2 digits,
01-12 ), DD is the day (2 digits, 01-31), hh is the hour2 digits00-23. When editing,
press “Up”or“Down”to switch start/end time, press “Cancel”to show the last digit of the
NO., Press “#”to clearing, press “OK”to delete one holiday after clearing of a certain
holiday. Only after viewing the last of the holiday can you add the holiday, press “OK”to
input the next holiday after the input of one holiday. You can set maximum 10 holidays,
press “BACK”to return to tariff menu after set-up.
HOLIDAY 01
START: 010100 END : 010200
11. Revise set-up password: press in set-up menu " 6” to select "PASSWORD", screen
shows "CHANGE PASSWORD", press " OK” after input new password, the display shows
"REENTER PASSWORD", input again the new password and press " OK”. If the twice
password input is in compliance, it saves successful, the display shows "CHANGED" to
return to the set-up menu, otherwise the LCD shows " FAILED " and returns to the set-up
menu.
CHANGE PASSWORD ********
12. Set up timely report time: In set-up menu, press “7” to select ”REPORT TIME”, the
LCD shows “REPORT TIME(hhmm)”, in which hh is for hours 00-23mm is for
minutes00-59. After set-up, press ”OK” to save and return. After each successful set-
up, the phone will take automatically the set-up date as the first report date.

AlineA Ltd. Users Manual
Page 18 of 18 200S GSM Desktop Phone
REPORT TIME(hhmm)
1230
13. Set up report interval: In set-up menu, press “8” to select ”REPORT PERIOD”, the
LCD shows ”REPORT PERIOD00-31”‘00’means no report, 01-30 are XX day, 31 means
the report period is one month (e.g., this report date is January 31st, and the next report
date will be February 29th / March 29th /April 29th ). After set-up, press ”OK” to save and
return, the phone will take automatically the set-up date as the first report date.
REPORT PERIOD(00-31) 01
14. Set up currency types: Press "9" in set-up menu to select“CURRENCY
SETTINGS”the display shows “CURRENCY NAME-SYMBOL” and currently-used currency
name, currency standard symbol.
CURRENCY NAME-SYMBOL 0:INDIAN RUPEE
INR
Press“UP”or“DOWN” to select one currency type, and then press“OK”to save and return.
The currency types are as follows:
No. Currency name Symbol
Billing display format
0 INDIAN RUPPEE INR XXXXX.XX
1 U.S. DOLLAR USD XXXXX.XX
2 EURO EUR XXXXX.XX
3 CAF FRANC FCFA XXXXX.X
4 AFC FRANC XOF XXXXX.X
5 NIGERIAN NAIRA NGN XXXXX.X
6 EGYPTIAN POUND EGP XXXXX.X
7 KENYAN SHILLING KES XXXXX.X
8 MAURITANIA OUGUIYA MRO XXXXX.X
9 ALGERIAN DINAR DZD XXXXX.X
10 JORDANIAN DINAR JOD XXXXX.X
11 RUSSIAN RUBLE SUR XXXXX.X
15. Set up time and date
(a) Press “0”key to select“0DATE AND TIME” in the settings menuthe LCD will
display “(YYYYMMDD)(hhmm)”.
(b) Input the correct date and time :Year(2digits),month,day,hour and minute, for
example:2003/5/10,12:30,you should input “200305101230”;
(YYYYMMDD)(hhmm) 200305101230
(c) Press “OK” key to save the input and return to the settings menu Notes:
i. When the phone charges, it searches in turn from tariff 0 to tariff 14 GNP, until the
matching. So when the number of a certain prefix including another prefix but the tariff is
different, the one included need to be defined earlier, for instance: number beginning with
0 includes 00, 01, 02, etc., the prefix of 00 is IDD, so IDD should be defined earlier than
DDD.
ii. In parameter modification or tariff set up, press “OK” to confirm this modification
and then hook on to save.
iii. Number within barred number list or numbers not set up in all tariff tables are in
barred group.
FUTURE CONTACTS
AlineA Limited
BULGARIA, 1303 Sofia
72 Hristo Botev Blvd, fl. 2
Phone: (+359 2) 931 2222; 489 3200
Fax: (+359 2) 931 2384
WEB: http://voip.alinea.bg
Table of contents
Other Alinea Telephone manuals