ALINKER R-volution Small User manual

R-volution
User manualwww.theAlinker.com
AL-RV 1.0 EN
R-volution®


3
Table of contents
Table of contents
1. About this manual........................................................................................................5
2. Guarantee .....................................................................................................................6
3. Safety .............................................................................................................................7
3.1 Intended use...................................................................................................................7
3.1.1 Skills..............................................................................................................................................................................................7
3.1.2 Select the correct model for your physical height..........................................................................................7
3.1.3 Safety instructions..............................................................................................................................................................8
3.2 Misuse.............................................................................................................................8
3.3 Liability............................................................................................................................8
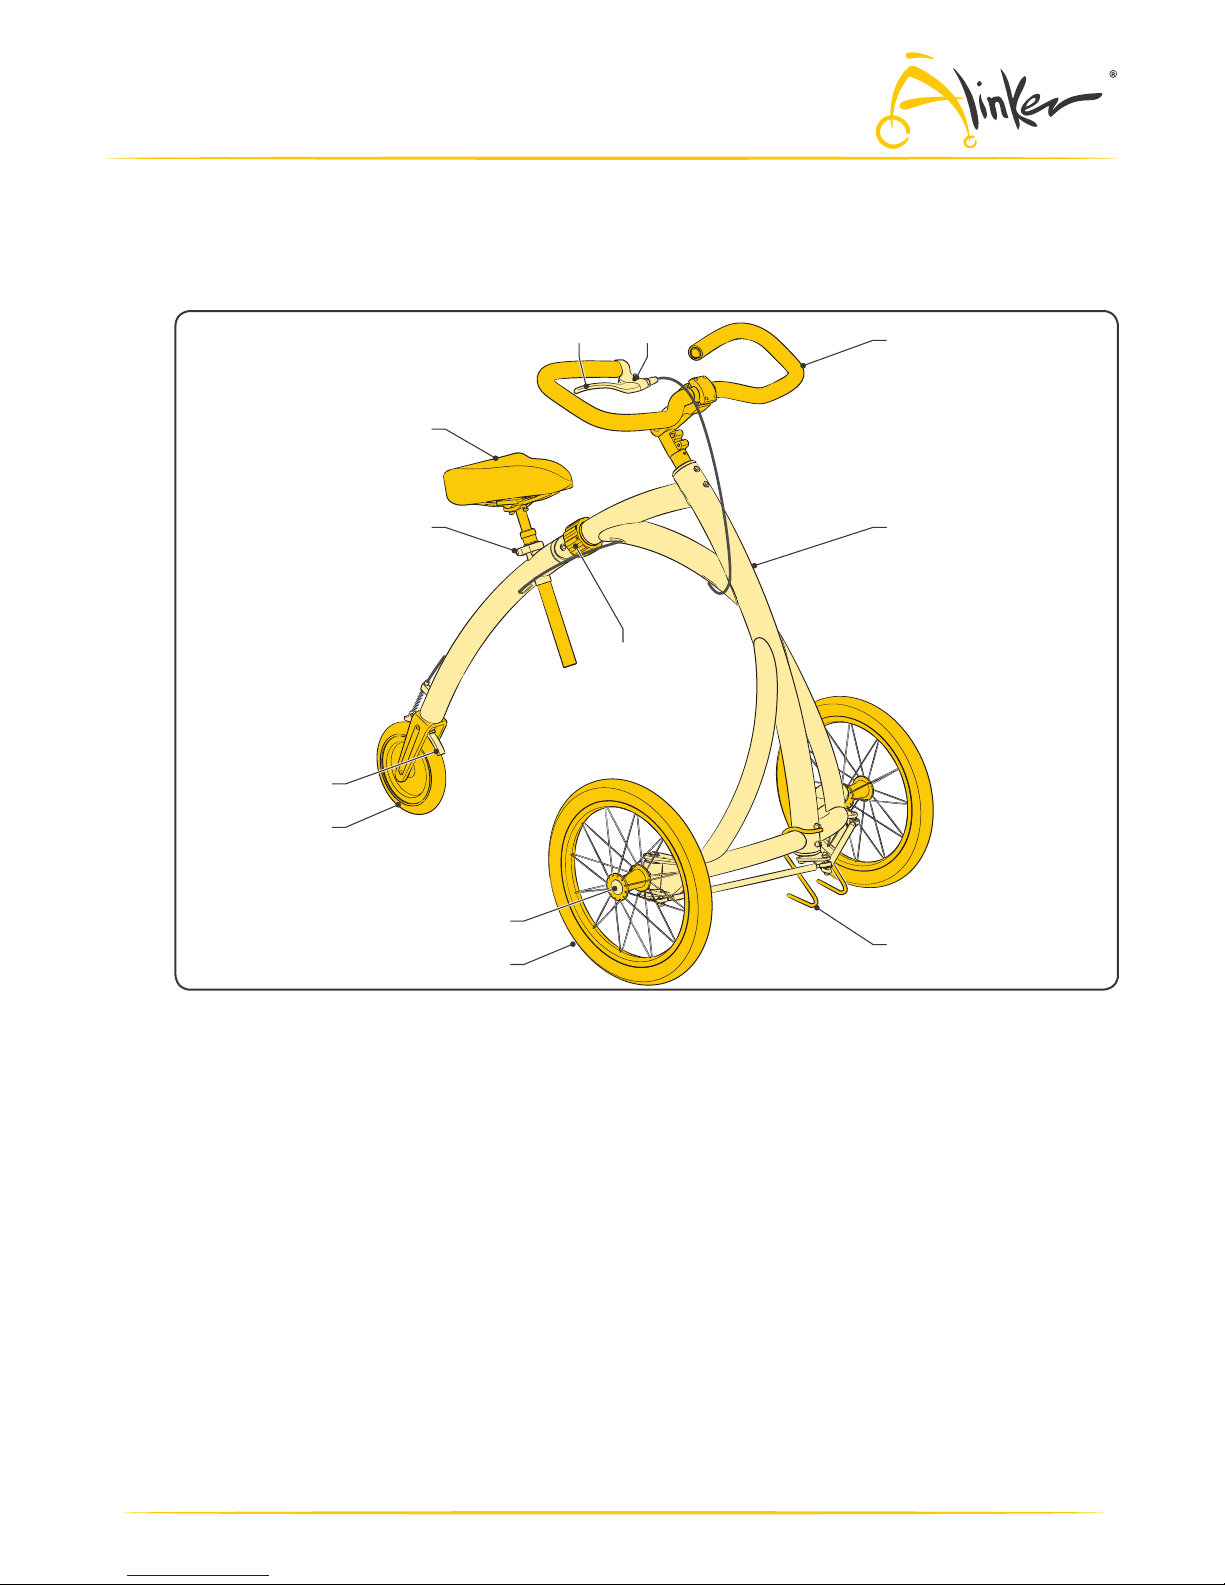
4. Description.....................................................................................................................9
4.1 Overview of the Alinker ................................................................................................9
4.2 Delivery ...........................................................................................................................9
4.3 Options (accessories)....................................................................................................9
5. Adjust the Alinker .....................................................................................................10
5.1 Adjust the saddle........................................................................................................ 10
5.1.1 Choose a saddle ...............................................................................................................................................................10
5.1.2 Height and position of the saddle..........................................................................................................................10
5.1.3 Put the saddle at the correct height.....................................................................................................................11
5.2 Adjust the handlebars ............................................................................................... 11
5.2.1 Select handlebars and a holder .............................................................................................................................11
5.2.2 Position of the handlebars.........................................................................................................................................11
5.2.3 Put the handlebars in the correct position ......................................................................................................11
5.3 Adjust the brake ......................................................................................................... 12
6. Transport the Alinker ................................................................................................13
6.1 Mount/dismount the front wheels.......................................................................... 13
6.1.1 Mount the front wheels................................................................................................................................................13
6.1.2 Dismount the front wheels.........................................................................................................................................14
6.2 Fold the Alinker in/out............................................................................................... 15
6.2.1 Fold in the Alinker.............................................................................................................................................................15
6.2.2 Fold out the Alinker..........................................................................................................................................................15
6.3 Mount/dismount the saddle .................................................................................... 16
6.3.1 Mount the saddle..............................................................................................................................................................16
6.3.2 Dismount the saddle ......................................................................................................................................................16
6.4 Place the Alinker into the car ................................................................................... 16

4
Table of contents
7. Use the Alinker........................................................................................................... 17
7.1 Before first use ........................................................................................................... 17
7.2 Get on/off .................................................................................................................... 17
7.2.1 Get on........................................................................................................................................................................................18
7.2.2 Get off.......................................................................................................................................................................................18
7.3 Put the Alinker on the stand..................................................................................... 19
7.4 Brakes........................................................................................................................... 19
7.5 Use the parking brake................................................................................................ 20
7.5.1 Set the parking brake of the Alinker.....................................................................................................................20
7.6 Ride on a slope............................................................................................................ 21
7.6.1 Ride on or off a step. .....................................................................................................................................................21
7.6.2 Ride up a slope...................................................................................................................................................................21
7.6.3 Ride down a slope............................................................................................................................................................21
7.7 Ride on a sloping surface.......................................................................................... 22
7.8 Make a turn................................................................................................................. 22
7.9 Ride along an obstacle .............................................................................................. 22
8. Maintenance ..............................................................................................................23
8.1 Clean............................................................................................................................. 23
8.2 Repair a puncture....................................................................................................... 24
9. Product specifications .............................................................................................. 27

5
1. About this manual
Congratulations with your purchase of the Alinker R-volution.
This manual contains instructions for adjusting and using the Alinker.
Carefully read these instructions and keep them at an easily accessible place for future reference.
Always observe the advices and tips included in these instructions.
The manual is intended for:
• people using the Alinker.
• people helping other people to use the Alinker.
Explanation of the icons:
Caution: Contact your dealer
Caution / warning
Caution: Risk of getting jammed
About this manual

6
2. Guarantee
Guarantee conditions:
If you want to make use of the Alinker guarantee, you must always be able to hand over the proof
of purchase and the ‘Proof of ownership’ to the dealer or Alinker® Europe bv. For guarantee matters
you can always contact your dealer, who has the knowledge to handle this in conformity with the
guarantee conditions. The guarantee conditions are to be found on the website www.theAlinker.com.
In order to be eligible to guarantee, you will have to register the Alinker on-line:
1. Go to the website: www.theAlinker.com.
2. Click “On-line registration” and follow the instructions on the website.
3. You will receive an e-mail message confirming the registration.
Guarantee

7
3. Safety
3.1 Intended use
The Alinker R-volution is a mobility vehicle for people who want to remain active.
3.1.1 Skills
These are the skills that you must have for using the Alinker:
• Be able to walk to some extent, which means that you must have control of your legs.
• Be able to get on and off.
• Be aware of your surroundings.
• Know your possibilities.
3.1.2 Select the correct model for your physical height
The Alinker must be suitable for your physical height.
Contact your dealer
• Have a dealer take your measurements personally for a Alinker.
Table 1 gives an indication for the suitable model for a certain physical height.
Physical height Model
1.45 - 1.65 meters (4’9” – 5’5”) Small
1.65 - 1.80 meters (5’5” – 5’11”) Medium
1.80 - 2.00 meters (5’11” – 6’6”) Large
Table 1 physical height and model
Safety

8
Safety
3.1.3 Safety instructions
For safe use of the Alinker:
• Properly adjust the saddle and the handlebars of the Alinker. See 5. Adjust the Alinker.
• Observe the traffic rules.
• Stay on the footpath when possible.
• Always be considerate of the other users of the street. People cannot always hear or see you.
You move faster on the Alinker than other people on the footpath.
• Do not go faster than 5 km/hour (3.1 mi/h)
• If you have not got used to the Alinker yet or if you cannot react quickly without loosing your
balance, do not use the Alinker in traffic. You must at least have these skills:
– Use the Alinker and at the same time see your surroundings.
– Make turns without staggering.
– Get on and off steps and slopes in a controlled way.
– Use the handbrake and your feet to slow down when necessary.
• When you put a foot on the fork, this foot can get
between the spokes. The premium dealer can make
modifications to the Alinker, such as special footrests.
Contact your dealer
• In case of defects, make an appointment with the dealer for service.
3.2 Misuse
The Alinker is not intended for use on stairs, uneven terrain and slopes steeper than 5 degrees.
3.3 Liability
The Alinker Europe bv does not accept any liability for improper use, which is any use other than
indicated in the manual or in line with the instructions of the premium dealers.
• Only use the Alinker when you have sufficient skills. The most important of these are given below:
– Use the Alinker and at the same time see your surroundings.
– Make turns without staggering.
– Not go faster than you can handle.
– Get on and off steps and slopes in a controlled way.
– Use the handbrake and your feet to slow down when necessary.
• Regularly check the Alinker for correct operation of parts and do not use the Alinker when you
know that any part is defective. Have the part repaired first.
• Observe the traffic rules.
• As a pedestrian you must not go faster than 6 km/hour and after sunset you must have lighting
with reflectors.

9
Description
4. Description
4.1 Overview of the Alinker
The Alinker consists of:
B
A
C
D
E
F
G
I
J
L
K
H
A. Handlebars G. Rear brake
B. Folding frame H. Quick release for saddle
C. Stand I. Saddle
D. Two large front wheels J. Hinge
E. Quick release hub K. Handbrake
F. Small rear wheel L. Parking brake catch
4.2 Delivery
The Alinker is delivered completely assembled.
4.3 Options (accessories)
There are no accessories for the Alinker yet. Bicycle accessories (e.g. a saddle, saddle pin, steering
bar, handlebars attachment, handlebars basket, lighting, etc.) can be mounted unto the Alinker.
Specific accessories for the Alinker will be developed. Regularly look at the website
www.theAlinker.com for updates and announcements.

10
5. Adjust the Alinker
With the operations given below you can adjust the Alinker for maximum convenience:
• Adjust the saddle.
• Adjust the handlebars.
• Adjust the brake.
5.1 Adjust the saddle
5.1.1 Choose a saddle
The default saddle on the Alinker is a narrow gel saddle with springs.
Contact your dealer
• Any type of saddle can be mounted unto the Alinker.
• Choose the saddle most comfortable for you.
5.1.2 Height and position of the saddle
The saddle is at the correct height if your knees are
slightly bent when you have your feet flat on the
ground. You must have a feeling that you are sitting
just a bit too low.
When you make a large step your feet must still
easily touch the ground. The saddle must be
horizontal.
Caution! When you go faster with
the Alinker, your steps are bigger
and the saddle must be set a bit
lower.
Adjust the Alinker

11
5.1.3 Put the saddle at the correct height.
1. Fold the quick release (A) outward.
2. Bring the saddle (B) at the required height.
Caution! The saddle can be raised
a maximum of 12 cm (4.72 ”)
from the lowest position. The
higher the saddle, the less stable
the Alinker. Better use a lower
saddle on a larger frame than a
higher saddle on a smaller frame.
3. Fold the quick release (A) inward.
x
B
A
5.2 Adjust the handlebars
5.2.1 Select handlebars and a holder
The default handlebars for the Alinker are butterfly handlebars.
Contact your dealer
• Virtually every type of handlebars is suitable for the Alinker.
• Choose the handlebars most comfortable for you.
Choose the correct holder for the handlebars. Every type of holder can be mounted on the Alinker.
There are also holders with a quick release for easily taking the handlebars off the Alinker for
transport in the car.
5.2.2 Position of the handlebars
The handlebars are in the correct position when:
• Your arms are slightly bent when you are sitting up straight,
• Your hands can easily reach the handbrake,
• Walking, using the handbrake and steering feels easy.
Contact your dealer
The correct adjustment of the handlebars may vary dependent on the surrounding area
and your speed. Your dealer can advise you on this. The dealer can make you feel what
happens when you lower the saddle a bit and/or tilt the handlebars. The dealer can
also make you feel what happens when you lean forward and can push off better.
5.2.3 Put the handlebars in the correct position
The handlebars can be adjusted at two places:
1. The handlebars themselves can be turned.
2. The handlebars holder can be turned.
Adjust the Alinker

12
Turn the handlebars themselves
1. Loosen the 4 bolts (A) with a socket head
wrench.
2. Put the handlebars (B) in the correct position.
3. Tighten the 4 bolts (A) with a socket head
wrench.
A
B
Turn the handlebars holder
1. Loosen the bolt (A) with a socket head wrench.
2. Put the handlebars (B) in the correct position.
3. Tighten the bolt (A) with a socket head wrench.
A
B
5.3 Adjust the brake
Tighten the brake
1. Loosen the ring (A).
2. Unscrew the catch (B).
3. Tighten the ring (A) again.
Make the brake less tight
1. Loosen the ring (A).
2. Screw in the catch (B).
3. Tighten the ring (A) again.
A B
+
_
Adjust the Alinker

13
6. Transport the Alinker
The Alinker is foldable. The wheels can be clicked off the Alinker and the saddle can be removed from
the Alinker. This makes the Alinker easy to transport.
6.1 Mount/dismount the front wheels
6.1.1 Mount the front wheels
1. Hold the wheel (A) with one hand at the hub.
2. Press and hold the black button (B) with your
thumb and place your fingers around the
spokes.
3. Click the wheel unto the frame (C).
4. Release the black button (B).
B
A
C
5. Check if the wheel is securely fastened.
When the ball (D) is visible and
the black button (B) does not
stick out, the wheel is correctly
fastened.
D
Contact your dealer
• If you cannot properly fasten the wheel, the dealer can adjust the mechanism.
Transport the Alinker

14
6.1.2 Dismount the front wheels
1. Hold the wheel (A) with one hand at the hub.
2. Press and hold the black button (B) with your
thumb and place your fingers around the
spokes.
3. Remove the wheel (A).
B
A
Transport the Alinker

15
6.2 Fold the Alinker in/out
6.2.1 Fold in the Alinker
1. Turn the black ring (A) on the frame until the
opening of the ring is facing upward. When the
ring is exactly facing upward, the hinge can be
opened.
2. Hold with one hand the saddle and with the
other hand the frame.
Caution: Do not hold the frame by
the hinge.
3. Fold in the Alinker.
A
2
1
6.2.2 Fold out the Alinker
1. Hold with one hand the saddle and with the
other hand the frame.
Caution: Do not hold the frame by
the hinge.
2. Fold out the frame.
3. When the frame is fully folded out, turn the
black ring (A) downward. The ring makes a
clicking sound when the opening is fully turned
downward. The Alinker can only be used when
the ring is closed.
Caution: Do not get on when the
hinge has not been locked.
A
1
2
Transport the Alinker

16
6.3 Mount/dismount the saddle
6.3.1 Mount the saddle
1. Fold the quick release (A) outward.
2. Place the saddle with the saddle pin (B) in the
frame (C).
3. Bring the saddle (B) at the correct height.
See 5.1.2. Height and position of the saddle
4. Fold the quick release (A) inward.
C
A
B
x
6.3.2 Dismount the saddle
1. Fold the quick release (A) outward.
2. Remove the saddle with the saddle pin (B) from
the frame (C).
3. Fold the quick release (A) inward.
A
B
6.4 Place the Alinker into the car
1. Fold in the Alinker.
2. Dismount the wheels.
3. Dismount the saddle, if necessary.
4. Place the frame and the wheels in the car.
Transport the Alinker

17
7. Use the Alinker
When you move slower on the Alinker than 5 km/hour (3.1 mi/h), you are regarded as a pedestrian
in traffic. You may then use the Alinker on footpaths, sidewalks and in public areas.
When you go faster than 5 km/hour (3.1 mi/h), you behave like a cyclist in traffic. Then you have to
ride on the bicycle track and your Alinker must have lighting and reflectors.
7.1 Before first use
• Properly adjust the saddle and the handlebars of the Alinker. See 5. Adjust the Alinker.
• Practice with the Alinker in a quiet area without traffic. Make sure that you are not alone when
you try the Alinker for the first time.
• Practice getting off and on in a safe way. Lock the handbrake while practicing. See 7.2 Get on/off.
• Practice to make turns to the left and to the right. See 7.8. Making a turn.
• Carefully practice on slightly sloping roads and steps. See 7.6. Ride on a slope.
• Practice using the handbrake and your feet to slow down. See 7.4. Brake
• Get used to the speed of the Alinker.
7.2 Get on/off
You get on and off from the rear side of the Alinker to make sure that you do not get out of balance.
Set the parking brake of the Alinker when getting on and off.
Caution: When at getting on you are standing beside the Alinker and lift one leg over
the saddle, you can get off balance.
Use the Alinker

18
7.2.1 Get on
1. Put the Alinker on the parking brake.
See 7.5.1. Set the parking brake of the Alinker.
2. Hold the handlebars and go stand behind the
Alinker.
3. Slightly lift your leg and step over the saddle.
4. Put your full weight on the saddle. Weight on
the saddle gives stability when walking with the
Alinker.
5. When you are stably seated, squeeze the
handbrake.
This takes the Alinker off the parking brake.
3
2
1
7.2.2 Get off
1. Set the parking brake of the Alinker.
See 7.5.1. Set the parking brake of the Alinker.
2. Hold the handlebars and stand up.
3. Slightly lift your leg and step backward over the
saddle.
3
2
1
Use the Alinker

19
7.3 Put the Alinker on the stand
1. Fold in the Alinker.
See 6.2.1 Fold in the Alinker.
2. Put the Alinker on the stand (A).
A
A
7.4 Brakes
Apply the following two methods for braking:
1. Use your feet to brake. Just as with walking,
slow down using your heels.
2. Squeeze the handbrake (A).
A
Caution: When you go faster than 5 km/hour (3.1 mi/h) the functioning of the
handbrake is limited. Combine the handbrake with using your feet.
Use the Alinker

20
7.5 Use the parking brake
The parking brake can be used to block the Alinker. Use the parking brake when getting on and off.
7.5.1 Set the parking brake of the Alinker
1. Squeeze the handbrake (A).
2. Press the catch (B) on the brake and release the
handbrake (A).
1
2
BA
Take the parking brake off the Alinker
1. Squeeze the handbrake (A). The catch will move
up and the Alinker is off the parking brake.
A
Use the Alinker
This manual suits for next models
2
Table of contents