Alkamedi AMS2100 User manual

AMS2100AMS2100S
Operation Manual
Makesureto read this manualto correctly use the unit.
Keepthemanualin an easy-to-find placefor anytime reference.

AMS 210 0
AMS 2100S
Contents
IMPORTANTSAFETYINSTRUCTIONS···························································································3
PACKAGECONTENTS·····················································································································7
APPEARANCEANDFUNCTIONALSTRUCTURE·········································································8
INSTALLATION·······························································································································10
HOWTOOPERATE························································································································14
FILTERREPLACEMENT·················································································································19
FILTERCOMPOSITION··················································································································22
pHVALUETEST······························································································································23
TROUBLESHOOTING····················································································································24
UNITSPECIFICATIONS··················································································································26
WARRANTYCARD·························································································································27
2
CONTENTS

SAFETYINSTRUCTIONS
※Make sure to read the following for your safety and protection.
Warningsymboltoindicateimportanceofdangersuchasfire
andpersonalinjury.
Cautionsymboltoindicateprecautionsanddamagetotheunit.
IMPORTANTDISCLAIMERNOTEABOUTDRINKINGIONIZEDWATER
Disclaimer:
·
TheAMS2100WaterIonizerisawaterpurificationproduct.
·
Pleaseensurecorrectusageofthisproductandthatyouhavereadtheinstructionsfully.
·
Ifyoufeelyouareexperiencingadverseeffectsandpainpersists,pleaseconsultahealthcareprofessional.
·
Thisappliancemustnotbeusedbypersons(includingchildren)withreducedphysical,sensoryormentalcapabilities,
orlackofexperienceandknowledge,unlesstheyhavebeengivensupervisionorinstruction.
·
Childrenmustbesupervisednottoplaywiththisappliance.
Forbetterdrinking:
·
Always discard the initial dispensed water as a precaution. This will ensuretheintegrityofthedesired
"strength"levelselected.
·
Initially, drink a small amount of level 1 Alkaline water, thereafter increasing level relative to personal tolerance and
understandingof personal need.
·
Inorderto not compromise theintegrity of prescribed medicine, ensure "purified water" isselected to
take with any medicine prescribed by an authorized medical practitioner.
·
Ensureto maintainintegrityoutput bytesting pH outputusingreagent method as mentioned
in‘pH ValueTest’ chapter.
·
Optimum drinking levels are based on a normal distribution of the populations needs, it is not recommended
bythe manufacturerto drink higher than pH 10.
3
!
!
!
!
AMS 210 0
AMS 2100S

AMS 210 0
AMS 2100S
①
For electrical safety
If the unit is immersed in water, pull out the power plug
immediatelyand thentake theunit outof the water.
Avoidanelectriccircuitoverloadanoutletorelectricwiring.
Connecttheunit powerplugtothecorrespondingAC voltageoutlet.
▶
Ensuring the unit is connected directlyand solely to a power supply will avoid
overloading the appliance and reduce risk.
Do not touch the power plug with wet hands when plugging or unplugging
fromawalloutlet.
Completelypluginthepowercordforstablefitting.
▶
If the plug-in fitting is not stable, it may cause an electric shock or
firebyoverheating.
▶
Do not use a damaged plug or unstable wall outlet.
If the supplied cord is damaged, it must be replaced by the manufacturer,
itsservice agent,orqualified persons. Pleaserefertothisconditionto
yoursalespersonandenforcemanufacturer'swarrantyasperthewarranty
cardinstructions.
②
For stable installation
Donotinstalltheunitinfreezingtemperaturesornearanyfiresource.
▶
Correctenvironmenttemperaturerange:10°-35°C(50°-95°F)
Correctinflowwatertemperature:5°-30°C(41°-86°F)
Donotinstallthe unitin direct sunlight.
▶
Extremeenvironmental exposure maycausetheexteriorunit bodytodiscolorand
maycause the entire unittowarp/twist the casing. Thismayresultinmechanicalfailure.
Alwaysinstalltheuniton alevelsurface.
Do not place anything heavy on top of the unit.
!
!
!
4
!
!
!
!
!
SAFETYINSTRUCTIONS

SAFETYINSTRUCTIONS
③
Operational safety guidelines
Donotdisassemble,repair,ormodifyinanysituation.
▶
Personalsafetycouldbecompromised.
▶
Forrepair,pleasecontact yourauthorizedsalesagent.
Donotuseany waterotherthansanitarydrinking water.
(municipalwater,etc.)
Letthe unit have water input andoutput for 2-3 minutes before
firstoperationoftheunitafterinstallation.
Never allow hotwater inputintothe unit.
Thismaycauseseveredamagetoitsinterior,especially
thefilterandionizationchamber.
▶
Optimuminputwatertemperature:5°-30°C(41°-86°F)
Neverspraytheunit withwater,norclean the unitwith
waterorotherliquid.
▶
Cleaning with a micro fiber or soft cloth isrecommended.
Donotclog,bend, twist,orkinkthewater inputand outputhoses.
▶
Ensure water hoses are not constricted to ensure correct water flow in and out
oftheunit.
5
!
!
!
!
!
!
AMS 210 0
AMS 2100S

AMS 210 0
AMS 2100S
④
Summary
·
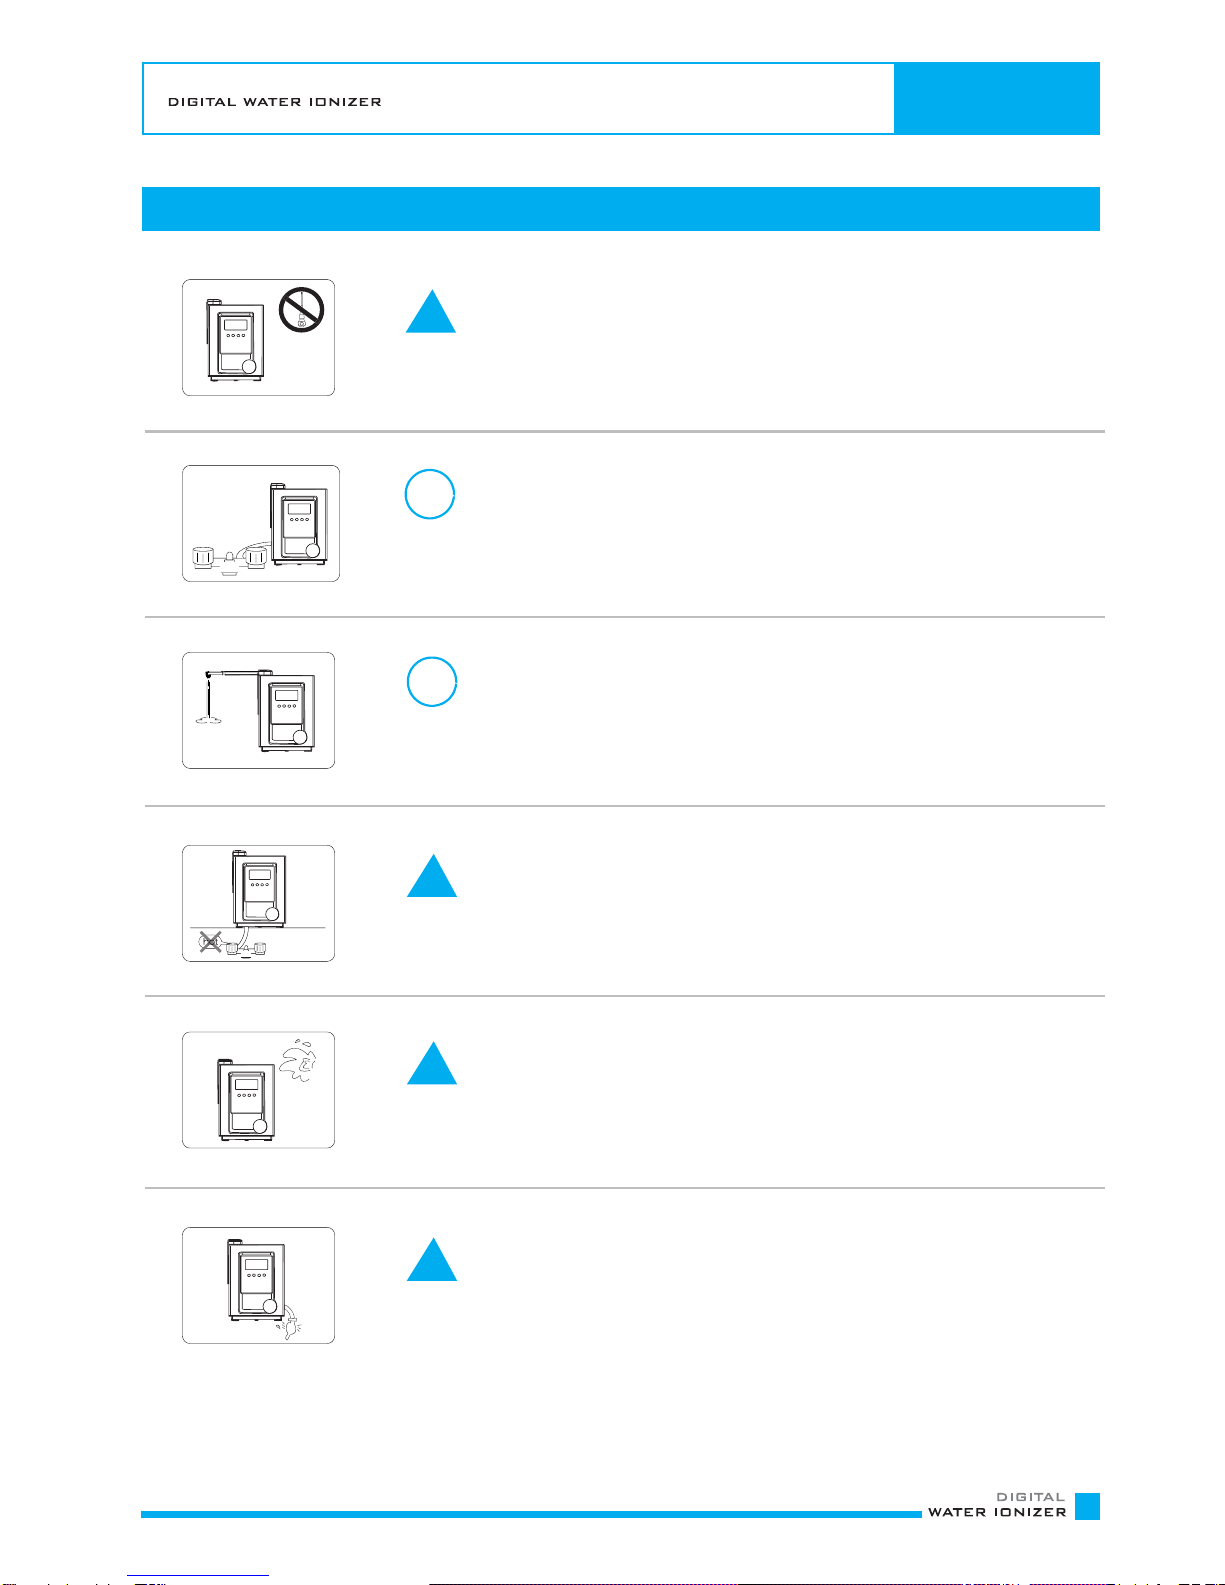
Do not give too high a drawing tension to the power cord when you pull the cord out of a socket.
·
Keepthe unitinadryenvironment.
·
Keepthe unitclean awayfromdust,hot temperature, sunlight, salts, chemicals, etc.
·
Do not attempttomodifythe color, shape, orappearance of the unit.
·
Cleantheunitwith asoft,dry, washcloth.
·
Foroptimum performance, keep the unit inacleancondition.
⑤
Others
Donot placethe pH test reagent / liquid near anopen flame.
▶
ThepHtest reagentisflammable.
Donotusean Aluminum(weakagainstalkalineliquid),
copper(weakagainstacid)orothermetallicreceptacle
tostoreionizedwater.
▶
Glassor ceramic containersarerecommended.
Donotdrinkionizedorpurifiedwaterafter beingstored fora longer
periodthan 3days.
Ionizedwaterisnolongerionized after a period ofstorage.
Ionizedwaterisbestusedfresh.
TakecarewhenhandlingthepHreagent.
▶
Incaseofaccidental consumption ofthetestliquid,inducevomitingand immediately seekmedicaladvice.
▶
Incase of accidental splashing into eyes, wash itoff with clean water, andseek medical assistance.
▶
Incase accidental splashing onskin, wash itoff with water.
▶
Keep the pH test liquid kit out of children
’
sreach.
SAFETYINSTRUCTIONS
!
!
!
!
6

PACKEAGE CONTENTS
AMS2100S
UnitBody
Reagent/TestTube/
ColorimeterPaper
Screwsandholders
WaterOutletDispenserCover(AMS2100only)
•The AMS 2100S will be equipped with the flex
steelhosewith handletypedispenser
※
Accessories are subject to change depending on the product specification.
7
AMS2100
Acidic Water
OutletHose
SourceWaterInletHose
CheckValve
One-touch
FittingSafetyKey
WaterDiverter
Fuse
AMS 210 0
AMS 2100S

APPEARANCE AND FUNCTIONAL STRUCTURE
1. FrontSide
2. AlkalineWaterOutletDispenser
-AMS 2100: Fold-down(hidden) type dispenser
-AMS 2100S: Flexible SUS Tube Dispenser
3. LCDScreen(FunctionIndicator)
4. OperationKnob(WaterSupplyControlValve)
5. TouchButtons
6. MainPowerSwitch
7. FuseHolder
8. FilterCover
9. FilterConnectionTerminal
A filter cartridge must be connected to the
terminalwhenthefilter is replaced witha newone
10. Speaker
11. HolesforWallMount
12. RearSide
13. Label
14. FootSide
15. AcidicWaterOutletPort
16. WaterInletPort
Connect witha water supplyhose
17. AC PowerCord
AMS 21 0 0
AMS 2100S
FRONT FACE
BACK FACE
FOOT FACE
8
ALKALINE PURIFIED ACIDIC MELODY

APPEARANCE AND FUNCTIONAL STRUCTURE
LCDSCREEN(FunctionIndicatorWindow)
Filter Life
Status
lonize
Level
8. AcidicWaterChoiceIndicator
Indicates the choice of acidic water
9. PurifiedWaterChoiceIndicator
Indicates the choice of purified water
10. AlkalineWaterChoiceIndicator
Indicatesthe choiceofalkaline water
11. WaterInflowRateIndicator
Optimumflowrate2.0~2.5liters
perminute
12. InletWaterTemperatureIndicator
Optimumtemperaturerange
5°-30°C(41°-86°F)
6. Waterinletindicator
Itrotates(swirls)when waterflowsintotheunit 13. FilterLifeIcon
Indicator bars decrease from the right
sidewithuse
14. AlkalineWaterButton
Pushthebuttontochoosealkaline wateroutput
15. PurifiedWaterButton
Pushthebuttonto choosepurifiedwateroutput
16. AcidicWaterButton
Push the button to choose acidic water output
17. MelodyButton
The melody automatically plays whentheacidic water output
mode is selected, push the melody button to mute
themelodyprogram
18. OperationKnob
To start / stop the unit's operation by opening / closing the
valveandto adjustwaterinflow rate 9
7. pHlevelindicator
It indicates a selected pH level
CONTROLPANEL
ALKALINE PURIFIED ACIDIC MELODY
Therm/Flow
1. FilterLifeIndicator
Replacefilterwhenitflickers
2. FilterAuthenticityIndicator
Itistoidentifythefilterauthenticity
Itflickers whenanauthenticfilter is not used
3. CheckupIcon
Itflickerswhen theunit requiresservicing
4. Melodyicon
Itindicates the melodyfunctionisworking
5. Ionization
IndicatestheprocessofIonization
Alkaline
Purified
Acidic
AMS 210 0
AMS 2100S

AMS 210 0
AMS 2100S
VIEWOFANINSTALLEDUNIT
Alkalinewater
comesout
Mainbody
Acidic water
comesout
WALL-MOUNTINSTALLATION
①
Vertically attachthe providedinstallationguidepaper on the intended
locationof the wall after slightly pastingthe guide paper with water.
②
Drill holes into the wall on the wallstud position asshown inthe guide
paper and insert the screw holders.
Screw down the studs into the screw holders (1cm length of the studs
over the wall surfaceis needed).
③
Mountthe unitonthe wall,insertingthewallstuds
into the backside holes of theunit.
10
INSTALLATION

AMS 210 0
AMS 2100S
INSTALLATIONPROCEDURE
①
Selecta solidflatsurface withproximity toapower
supply for desired location.
②
ConnecttheSourceWaterInletHosetotheWaterInletPortandtheWaterOutlettotheWaterOutletPort.
Ensurethattheyfitsnugly.
e
DirectConnectiontoPiping(OptionA)
Check Valve
(Caution:Flow Direction)
1/4" Water Inlet Hose
①
Check Valve(refer to the flow direction)
②
Please Connect Water Inlet Hose with Check Valve in accordance with the arrow direction of water flow.
③
Caution: Flow Direction
11
Source Water
Water Diverter
Connect the Source Water Inlet Hose to the Water Inlet
PortandfastenwiththeOne-Touch FittingSafetykey
WaterInletPort
AcidicWater
OutletPort
INSTALLATION
Connect Water Outlet Hose to th
Water OutletPort

AMS 210 0
AMS 2100S
INSTALLATIONPROCEDURE
OR
Connection to Faucet (Option B)
ⓐRemove aerator from faucet.
Note : Pliers may be required.
Faucet Type : External Screwed
ⓑIf reqired, attach adaptor (2 sizes of adaptor are supplied for use supplied for use) before attaching water faucet diverter
to faucet.
ⓒRemovecompressionnutonthesideofwaterfaucetdiverter,attachSourceWaterInletHoseandtightennut.
③
ConnectthehosetoAcidic
WaterOutletPortandcuttheotherend
ofthehosetohavesufficientlengthtoreachthesinkfordraining
awayacidicwaterorforconnectingtoanacidicwaterbucket.
(Option:Hose-fixationholdercanbeusedforconvenience).
Acidic wateroutlethoseholder(option)
▶
Incasetheacidwateroutletissteepedinwaterinareceptacleorthehoseisunnecessarilylong,
anoutflowrateofionizedwatermightbesuspended,Forthisreason,maintainashorterhose
lengthtoallownaturalflowratefordrainage.
▶
Donotlifttheacidicwateroutlethoseuptotheheightoftheinstalledunit. Otherwisethiswill
hinderthedrainagefromtheunitandmaycauseinternaldamagetotheunit.
12
Faucet Type : Internal Screwed
INSTALLATION

INSTALLATION
USAGEOFTHEALKALINEWATEROUTLETDISPENSER
TheAlkalineWater Outletdispenseronthetop of the unitisa fold-down type.
Handlethedispenserasperthefollowingdiagram.
②
The dispenser arm has the two stage
stretch and can be further extended
horizontallyifrequired.
USAGEOFTHEALKALINEWATEROUTLETDISPENSERCOVER
Push and attach the cover onto the position as
showninthepicturebelow.
▶
Whentheunitisnotinregularuse,havethe underneathfaceof thealkalinewateroutlet
dispenser covered by the cover, It protects the dispenser surface and prevents any possible
attachmentofforeignmaterials.
▶In case the unit is not used for a long period of time, fold down the dispenser and relocate
it back to the dispenser holder room for safe storage.
13
①
Lift up the dispenser arm to
the heightoftheunittohaveit
positionedhorizontally.
③
Have the dispenser positioned in
the intendeddirection.Itcanbehorizontally
rotated.
AMS 210 0
AMS 2100S

AMS 210 0
AMS 2100S
TOOPERATE-POWER/WATERSUPPLY
PlugintheAC powerplug firmly.
Turnonthe main power switch on the rightside.
▶
The unit will beep and the LCD screen will display
theinitialmodes.
MainPowerSwitch
Slowlyrotatetheoperationknobclockwisetohave
thewaterinflowinto the unit.
Notice thewater inflow rate asshown in the screenand
adjustifnecessary.
▶
Thewaterinflowrateisindicatedin numericalform.
▶
Theoptimuminflowrateis2.0-2.5liters/min.
▶Adjustthe water inflow rateby using the operation knob.
▶
The screen backlight color will be varied according to the chosen function
and pH level.
< The wheel begins spinning round >
TOSTOPTHEOPERATION
Rotatetheoperationknobcounterclockwise
tothe(OFF)position.
Theunitwillreturntostandbymadestatus.
Filter Life
Indication after water flow direction is changed
Level
Indication of the changing water flow direction
<This is to indicate it’s changing>
※
Occasionally there is a "tick" sounding noise from inside the unit after stopping the operation.
This isnota malfunction, but the normal sound when the drain valve is opened and closed.
Therm/Flow
lnlet water
Temperature
lndcation
Water lnflow
Rate lndication
lonize
Level
lonize
Level
HOW
�
�
�
�
�
�
14
HOW
Filter Life
Therm/Flow
Alkaline
Alkaline
<Standby status>
Therm/Flow
lonize
lonize
Level
Alkaline
<Initialmodes>
Alkaline
Filter Life
ON
Therm/Flow
OFF
FuseHolder
Filter Life
HOW TO OPERATE

HOW TO OPERATE
HOW TO OUTPUT ALKALINE IONIZED WATER
�
Rotatetheoperationknobclockwise
tohave water inflow intotheunit.
�
PushtheAlkalineWaterbuttonandchoosethepHlevelbypushing
thebuttonrepeatedly.
▶
AlkalinewatercomesoutfromtheWaterOutletDispenserandacidicwater
comesoutfromthelowerWaterOutletHose.
▶
pHlevelnumberisalternatedinregularsequenceof
1→2→3→4→1→2→3→4whenyoupushthebutton
▶
Thescreenbacklightcolorwillvary
accordingtothechosenpHlevel.
< Alkaline pH level 3 >
< Alkaline pH level 4 >
Acidic water
comes out
WhenyoupushtheAlkalineWaterbuttonduringthepurifiedwatermode.
▶
Theunitgivethe"AlkalineStrengthlevel1"voicenotice.
▶
Alkalinewaterisgeneratedafterthewaterflowdirectionalterationvalveworks.
▶
AlkalinewatercomesoutfromthetopWaterOutletDispenserandacidicwatercomesoutfromthelowerWaterOutletHose.
▶
pHlevelnumberisalternatedinregularsequenceof1
→
2
→
3
→
4
→
1
→
2
→
3
→
4whenyoupushtheAlkalineWaterButtonrepeatedly.
Indication after water flow direction is changed
< Standby status >
<This is to indicate it’s changing>
TOSTOPTHEOPERATION
RotatetheOperationKnobcounterclockwise(OFF).
Theunitwillreturntostandbymodestatus.
Indication after water flow direction is changed
Indication of the changing water flow direction
< Standby status >
15
HOW
Indication of the changing water flow direction
<This is to indicate it’s changing>
�
�
�
repeatedly.
AMS 21 0 0
AMS 2100S
< Alkaline pH level 1 >
< Alkaline pH level 2 >
Alkaline water
comes out

AMS 210 0
AMS 2100S
TO OUTPUT ACIDIC IONIZED WATER
�
Rotatetheoperationknobclockwise
tohavewater inflow into the unit.
▶
Alkalinewatermodeappearsinitially.
�
PushtheAcidicwaterbuttonforacidicwateroutletmode.
▶
Theunitgivesthe"AcidicStrengthlevel1"voicenotice
(incaseofpHlevel1mode)andmelody.
▶
AlkalinewatercomesoutfromtheWaterOutletHoseand
acidicwatercomesoutfromthetopWaterOutletDispenser.
▶
PHlevelnumberisalternatedinregularsequenceof1→2→1→
2
whenyoupushthebuttonrepeatedly.
▶
ThescreenbacklightcolorwillvaryaccordingtothechosenpHlevel.
< Acidic pH level 1 >
< Acidic pH level 2 >
Whenyoupushthe Acidicwaterbuttonduringthepurifiedwatermode:
▶
Theunit gives the"Acidicstrengthlevel 1" voice notice and melody. 1→2→1→
2
▶
Acidic wateris generated after the water flowdirection alteration valveworks (about 15seconds).
▶
Alkaline watercomesoutfrom the lower Water Outlet Hoseand acidicwatercomes outfrom thetop Water
OutletDispenser.
▶
pHlevel number isalternated in regular sequence of 1→2→1→2 when you push the Acidic Water Button repeatedly.
Indication after water flow direction is changed
< Indication of the changing water flow direction >
HOW TO STOP THE OPERATION
Rotatetheoperationknobcounterclockwise(OFF).
Thentheunitwillreturntostandbymodestatus.
Indication after water flow direction is changed
< Indication of the changing water flow direction >
16
< This is to indicate it’s changing >
�
�
�
Acidic water
comes out
Alkaline water
comes out
HOW
< Standby status >
< This is to indicate it’s changing >
HOW TO OPERATE

HOW TO OPERATE
HOW TO OUTPUT PURIFIED WATER
�
Rotatetheoperationknobclockwise
tohave water inflow into theunit.
▶
Alkalinewatermodeappearsinitially.
�
PushthePurifiedWaterButtonforpurifiedwateroutletmode.
▶
Theunitgivesthe"purifiedwater"voicenotice.
▶
PurifiedwatercomesoutfromWateroutletdispenser.
(PLEASENOTE:NowatercomesoutfromtheWaterOutletHose)
▶
The screen backlight color will be green to indicate the purified water mode.
Indication after water flow direction is changed
< Purified water choice indication : water flow direction
alterationvalveworks>
< Water - purifying operation status : water flow direction
alteration valve stopped >
TOSTOPTHEOPERATION
�
RotateTheoperationknobcounterclockwise(OFF).
�
Thenthe unitwillreturntoastandbymode status.
Indication after water flow direction is changed
< Indication of the changing water flow direction >
AMS 21 0 0
AMS 2100S
< Standby status >
17
HOW
Purified water
comes out
< This is to indicate it’s changing >

AMS 210 0
AMS 2100S
MELODYON/OFF
�
Justpushthemelodybuttontoturnthemelodysoundonoroff.
▶
PushtheMelodyButton,andthemelodysoundwillbemute.
▶
Push the Melody Button once again, and the melody sound will be on with appearance of a melody icon on the LCD
Screen.
▶
Themelodyfunctionworksonlyintheacidicwateroutletmode.
▶
Avoiceguideworksevenincasethemelodysoundisoff.
Icon disappears
�
Melodyvoicespeakervolumeadjustment.
▶
PushingtheMelodyButton and atthe same time push the Alkaline Buttononce,twice, Three time- so one canadjust
themelodysoundvolume.
(The melody, voice volume adjustment can bemade only when the melodyicon appears)
18
Icon appears
HOW TO OPERATE

AMS 210 0
AMS 2100S
FILTERREPLACEMENT
�
ReplacethefilterwhentheFilterLifeIndicatorflickers.
It is the filter replacement timing when the icon flickers.
The icon starts flickering when 3%
of the full filter life remains available
▶
Whenafilterlifeisover,the filter lifeiconfilckersandthere
isa voice guide "please replace with a new fliter".
Shutoffthe water inflow into theunit.
▶
TurnofftheOperationKnob.
Open the FilterCoverasshowninthepictures below.
1. Pushthefiltercoverlock
partin thearrowdirection.
DisconnecttheFilterConnectionTerminal,dragthefilterhandletotheleftdirectionandremove
theusedfiltercartridge.
Disconnect the fliter
ConnectionTerminal
Filterhandle
Remove the used filter cartridge in
thearrowdirection
19
2. Pullthefiltercoverinthe arrow
direction and disassemble it from
theunit body.
�
�
�
Dragthefilterhandle
FILTERREPLACEMENT

AMS 210 0
AMS 2100S
�
Insert the new authorized filter.
2. Pushthefilterdown
andsimultaneously
drag the filter handle.
Filterhandle
1. Insertthenewfilter.
2. push down the filter and drag the filter handle at the same time.
3. ConnectthefiltertopcablewiththeFilterConnectionTerminal.
※
Waterwill leakfromthe filterconnection points when theO-ringisdamaged or taken off.
CarefullyhavetheO-ringpositionedcorrectlywhena filterreplacementismade.
�
Turnoff the main power switchand havewaterinflow intotheunit
for2-3minutes,turning ontheoperationknob
(repeat2or 3 times).
※
After replacing with a newfilter, initial outlet water maybedark colored.
Such a dark color is caused by an outflow of active carbon fines from the new filter.
The carbon fines (fine sizeparticles) are not harmful for drinking and should not appear
after2~3minutesofrunning water throughtheunit when turned off.
�
Checktoensurethere is nowaterleakageafterreplacing the filter. Filterlifeisautomaticallydisplayedwhenthe
unitis turnedon(when youinsert a usedfilter, its remaininglife isdisplayed). Closethefiltercompartmentcover.
Closethefiltercompartmentcover.
20
3. ConnecttheFilter
ConnectionTerminal.
1. Insertthenewfilter
cartridge.
FILTERREPLACEMENT
This manual suits for next models
1
Table of contents
Popular Water Dispenser manuals by other brands

Clean Water Systems
Clean Water Systems 5900-BT Neutralizer Operation & maintenance manual

Proficient H2O
Proficient H2O Pro315 Next Gen TA HE Alternating manual

IBC Water
IBC Water AST1052T-940 Installation & operating instructions

Whirlpool
Whirlpool WHES20 Installation and operation manual

Electrolux
Electrolux EQAXF01BXWT user manual

Monarch Water
Monarch Water Solo Service guide