all-clad EH800D51 User manual

All-Clad Sous Vide Stick
Owner’s Guide - Model No. EH800D51
Guía del usuario - Modelo No. EH800D51
Read and save these instructions - Lisez et conservez ces instructions - Lea y conserve estas instrucciones
www.all-clad.com
EN
ES

2
TABLE OF CONTENTS
IMPORTANT SAFEGUARDS......................................................................................................................... p. 3
DISPOSING OF YOUR APPLIANCE ........................................................................................................... p. 5
CONGRATULATIONS ON YOUR PURCHASE....................................................................................... p. 5
DESCRIPTION.................................................................................................................................................... p. 9
BEFORE FIRST USE.......................................................................................................................................... p. 10
USE.......................................................................................................................................................................... p. 11
COOKING TEMPERATURE AND TIME GUIDELINE........................................................................ p. 13
RECIPES................................................................................................................................................................ p. 17
CLEANING .......................................................................................................................................................... p. 20
DESCALE ............................................................................................................................................................. p. 20
TROUBLESHOOTING..................................................................................................................................... p. 21
LIMITED TWO YEAR WARRANTY........................................................................................................... p. 22

3
EN
IMPORTANT SAFEGUARDS
When using electrical appliances, basic safety precautions should always be followed including the
following:
1. Read all instructions.
2. Do not touch hot surfaces. e cooking pot and the main body of the circulator can get hot when used. Use an
oven mitt when handling. Allow system to cool before emptying the water bath.
3. To protect against electrical shock do not immerse cord, plugs, or entire circulator in water or other liquid.
4. Close supervision is necessary when any appliance is used by or near children.
5. Unplug from outlet when not in use and before cleaning. Allow to cool before putting on or taking o parts.
6. Do not operate any appliance with a damaged cord or plug or after the appliance malfunctions or has been
damaged in any manner. Return the appliance to the nearest authorized service facility for examination, repair,
or adjustment.
7. e use of accessory attachments not recommended by the appliance manufacturer may cause injuries.
8. Do not use outdoors.
9. Do not let cord hang over edge of table or counter, or touch hot surfaces.
10. Do not place on or near a hot gas or electric burner, or in a heated oven.
11. Extreme caution must be used when moving an appliance containing hot oil or other hot liquids.
12. To disconnect, turn the circulator o, then remove plug from wall outlet.
13. Do not use appliance for other than intended use.
14. Intended for countertop use only.
15. WARNING: Spilled water can cause serious burns. Keep appliance and cord away from children. Never drape
cord over edge of counter, never use outlet below counter, and never use with an extension cord.
16. A short power-supply cord is used to reduce the risk resulting from it being grabbed by children, becoming

4
entangled in, or tripping over a longer cord, do not use an extension cord.
17. CAUTION – To ensure continued protection against risk of electric shock, connect to properly grounded
outlets only.
18. Please use caution when removing the food pouches as they are hot - the use of tongs to handle the pouches is
highly recommended.
19. DO NOT ATTEMPT TO DISASSEMBLE.
20. BURN HAZARD - Do not reach into the water bath to retrieve food pouches – use tongs.
21. Firmly lock the product on the bath container with the screw clamp. Place the container on an even surface to
prevent spills and tipping over. If the product is wobbling and not rmly attached to the tank, in doubt, please
change the tank to a more suitable one before using the sous vide circulator as it might not be appropriate.
22. WARNING: If your circulator falls into water disconnect power ASAP to avoid shock and then send back
system to repair. Do not retrieve the unit until you have unplugged the cord. Do not attempt to use the system
if this has happened.
23. Never use deionized water.
24. Sous vides pouches shall never oat. Excess air in the packaging will reduce heat transfer. In both cases, as a
consequence food are not pasteurized even if the cooking time is respected.
Food Safety Warning
e food safety issues in cooking sous vide are dierent from more conventional forms of cooking. Do not start
to cook before you fully understand the specied food handling practices to prevent, eliminate, or reduce the food
biological, chemical, and physical hazards to a safe level.
HOUSEHOLD USE ONLY
SAVE THESE INSTRUCTIONS

5
EN
Your appliance contains many materials which can be recycled.
Consult your local waste collection agency for information on how to properly dispose of your
appliance.
DISPOSING OF YOUR APPLIANCE
CONGRATULATIONS ON YOUR PURCHASE
All-Clad Metalcrafters created the original collection of professional cookware made with a patented metal bonding
process which eliminates uneven heating, an accomplishment that led to All-Clad becoming the product chosen
for the kitchens of more four-star restaurants than any other. Still the only complete line of cookware made by an
American company with materials produced in its own mill, All-Clad has revolutionized the art of cooking since its
introduction.
With ve professional cookware collections featuring a variety of bonded metals and nishes, from high grade
aluminum and stainless steel to copper, All-Clad combines professional design with high performance for all tastes
and cooking styles.
e All-Clad cooking experience now extends to a focused selection of small electrical appliances, each designed
without compromise to make a noticeable dierence in both use and performance. Cooking connoisseurs now have
a wonderful opportunity to complete their kitchen with electrics by All-Clad, the undisputed original. All-Clad
Metalcrafters has an ongoing policy of research and development and may modify its products without prior notice.

6
A
4
3
7 6b 6a
1 2 5 8
B
C
D
E
F
7
Fig. 1 Fig. 2
MIN
MAX
Fig. 3
Fig. 4 Fig. 5 Fig. 6
Fig. 7 Fig. 8 Fig. 9

8
Fig. 10 Fig. 12
Fig. 14 Fig. 15
Fig. 11
Fig. 13

9
EN
A Control panel
B Rotative head
C Shaft
D Shaft release button
E Clamp
F Water level markings
Control panel
1. Temp / Time button
- e temperature set range in between 77°F / 25°C to 194°F / 90°C. Default temperature is: 140°F / 60°C
( if the cooking temperature is reset, the LCD will show the last set temperature).
2. Setting knob
- Adjust temperature, time or nish time setting (+/-); rotate the button clockwise to increase the set temperature
or time, and rotate the button counterclockwise to reduce the set temperature or time.
3. Time display: Displays countdown time or set time.
4. Temperature display: Displays current temperature or set temperature.
5. Start / Stop: Hold button to turn on/o device. Press button once to start / stop.
6. Temperature unit indicator:
a. Celsius temperature indicator.
b. Fahrenheit temperature indicator.
Long press the temperature - Press & hold the button for 2seconds or more to convert between Celsius
andFahrenheit.
7. Low water level indicator
8. Heating indicator
DESCRIPTION

10
BEFORE FIRST USE
CLEANING INSTRUCTION
Before using your Sous Vide Circulator for the rst time, make sure to wipe it with a soft cloth to prevent scratching.
HOW TO SET IT UP
While your All Clad Sous Vide circulator can be used with most containers, we suggest using a container deep
enough (>6.5 inches or 16.50 cm) to ensure the clamp can be xed to the side of the container.
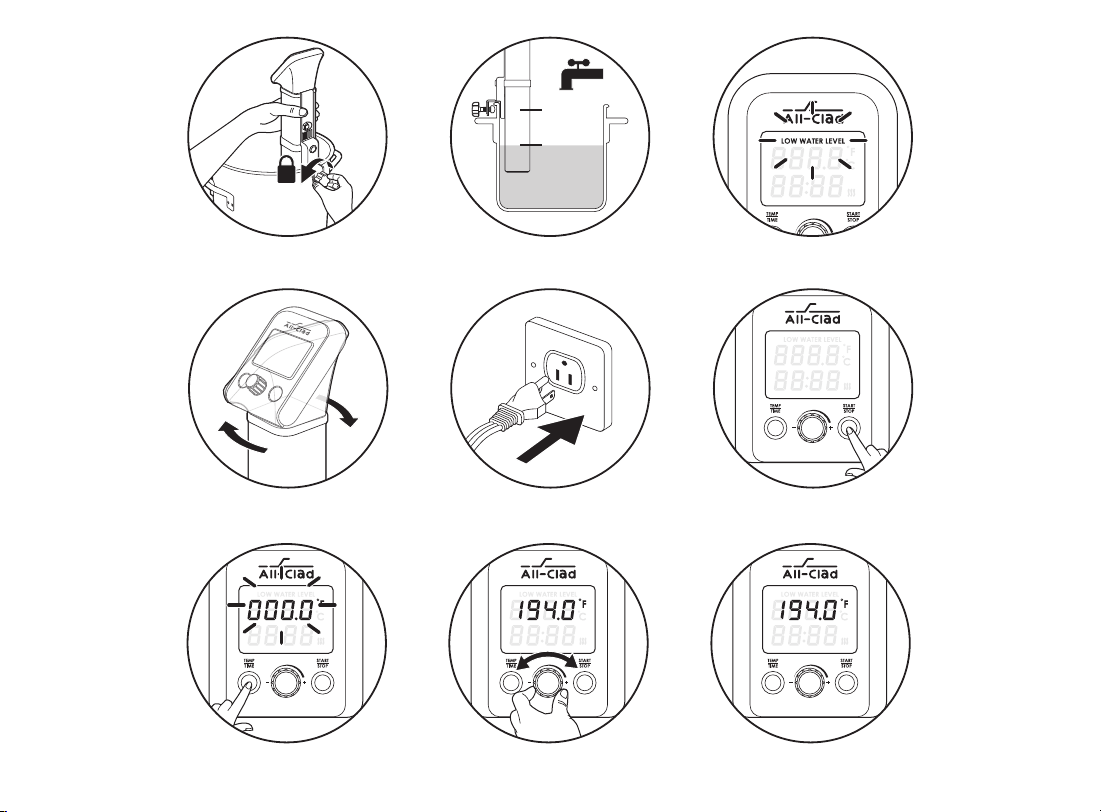
1. Once you have the appropriate container, attach the Sous Vide Circulator to one of the container’s side and make
sure the plug does not go over the water. (Fig. 1)
2. Fill up the container to at least the minimum water requirement. (Fig. 2)
NOTE:
• Do not use a container that you cannot attach the Sous Vide Circulator to its side.
• If there is not enough water in the container, your circulator will start beeping and will display “LOW WATER
LEVEL”. You will not be able to use it until you have enough water in the container. (Fig. 3)
• Your All Clad Sous Vide Circulator is equipped with a rotating head to accommodate you with the best viewing
option during usage. (Fig. 4)

11
EN
USE
1. Plug the Sous Vide Circulator into a power supply, the circulator will beep once. (Fig. 5)
2. Press & hold the Start / Stop button for 1 second to turn on the display; you can now start setting the temperature
and time. (Fig. 6)
SET UP THE TEMPERATURE AND TIMER
1. Press the Temp / Time button, the temperature display will start ashing. (Fig. 7)
2. Turn the knob to adjust the temperature until you reach the desired setting, then press the Temp / Time button
to conrm the cooking temperature. (Fig. 8 & 9)
3. After setting your temperature, you can start setting the Timer, the time display will start ashing. (Fig. 10)
4. Turn the knob to adjust the timer until you reach the desired setting, then press the Temp / Time button to
conrm. (Fig. 11)
5. You can now start the preheat cycle by pressing the Start / Stop button. (Fig. 12)
NOTE:
• If you press the Start / Stop button rst, without setting the temperature and time, the preheat cycle will start,
using the last temperature and timer setting used.
• e temperature unit is displayed in °F by default. If you want to change to °C, press and hold the Temp / Time button.
PREHEAT CYCLE
• Press the Start / Stop button to start heating up the water (Fig. 12), the icon will start ashing and the current
temperature will display. (Fig. 13)

12
COOKING CYCLE
1. Once the water has reached the desired temperature, you will be notied with a continous beep to let you know
you can start the timer and cooking cycle.
2. Add food to the container.
3. Press the Start / Stop button, the icon will stop ashing and the timer will start counting down. (Fig. 14 & 15)
4. Once the countdown is over, you will be notied by a beep. Press the Start / Stop button to stop the appliance
and remove the food.
NOTE:
• During the countdown, the icon will ash until the countdown is complete. (Fig. 15)
• For hygiene concerns, your Sous Vide Circulator will not automatically shut o at the end of the cooking cycle,
you must turn it o manually.
LOSS OF POWER
If power is lost, the All Clad Sous Vide circulator will begin beeping and both the time and temperature on the
display will begin ashing continuously when the power has been restored. e Sous Vide circulator will alert you
that there was a disruption in power. By pressing the START/STOP button, the circulator will then resume at the
same temperature and time that was set prior to power loss.
Warning: Food will not be fully pasteurized due to a disruption in power. For further details, please refer to the
Food Safety section.

13
EN
COOKING TEMPERATURE AND TIME GUIDELINE
FOOD DONENESS TEMPERATURE
°F °C
BEEF, VEAL, LAMB, GAME
Rare 134 57
Medium 140 60
Medium Well 150 66
Well Done 160 and over 71 and over
PORK
Rare 134 57
Medium 140 60
Well Done 160 and over 71 and over
POULTRY, WHITE MEAT
DUCK, WHITE MEAT
POULTRY, DARK MEAT
Medium 140-146 60-63
Medium Rare 134 57
Well Done 176 80
FISH, SEAFOOD
Rare 116 47
Medium Rare 126 52
Medium 140 60
VEGETABLES, FRUITS — 183-190 84-87
EGGS
Soft cooked 147 or 167 64 or 75
Hard cooked 160 71
Scrambled 167 75
Pasteurized 135 57
Caution: Foods are not pasteurized under low temperature (i.e. below 55°c or 131°F) and so may pose a health risk to certain individuals.
ese individuals include pregnant women, young children, the elderly or otherwise immune-compromised. ose individuals should
stick to the FDA food code guidelines instead of this table. For further details please refer to Food Safety section.
Doneness Target Temperatures

14
Recommended Cooking Temperatures and Times
FOOD THICKNESS TEMPERATURE TIME
inch cm °F °C min max
BEEF, VEAL, LAMB, GAME
Tender Cuts
Tenderloin, Rib-eye, T-bone, Chops, Cutlets
0.2 0.5 134 or higher 57 or higher 2 hr 4 hrs
2 5 134 or higher 57 or higher 4.5 hrs 6 hours
Tough Cuts and Grassfed
Bison, Game 1 2.5 134 or higher 57 or higher 8-10 hrs 12-24 hrs
Lamb Roast or Leg 2.75 7 134 or higher 57 or higher 10 hrs 24-48 hrs
Spare Ribs 2 5 134 or higher 57 or higher 24 hrs 48-72 hrs
Flank Steak, Brisket 1 2.5 134 or higher 57 or higher 8 hrs 24 hrs
2 5 134 or higher 57 or higher 12 hrs 30 hrs
PORK
Tenderloin 0.6 1.5 134 or higher 57 or higher 2.5 hr 6-8 hrs
Baby Back Ribs 165 74 4-8 hrs 24 hrs
Chops, Cutlets 1 2.5 134 or higher 57 or higher 3-4 hrs 6-8 hrs
2 5 134 or higher 57 or higher 4.5-6 hrs 8-10 hrs
Roast 2.75 7 160-176 71-80 12 hrs 30 hrs
Spare Ribs 2.75 7 160-176 71-80 12 hrs 30 hrs
Belly (quick) 2 5 185 85 5 hrs 8 hrs
Belly (slow) 2 5 167 75 24 hrs 48-72 hrs
POULTRY
White Meat
Chicken Breast, bone in 2 5 146 or higher 63.5 or higher 2.5 hrs 4-6 hrs
Chicken Breast, boneless 1 2.5 146 or higher 63.5 or higher 1 hr 2-4 hrs
Turkey Breast, bone in 2.75 7 146 or higher 63.5 or higher 4 hrs 6-8 hrs
Turkey Breast, boneless 2 5 146 or higher 63.5 or higher 2.5 hrs 4-6 hrs
Duck Breast 1 2.5 134 or higher 63.5 or higher 90 min 4-6 hrs
Dark Meat
Chicken Leg or igh, bone in 165-176 74-80 4 hrs 6-8 hrs
Chicken igh, boneless 1 2.5 165-176 74-80 2 hrs 4-6 hrs
Turkey Leg or igh 165-176 74-80 8 hrs 10 hrs
Duck Leg 165-176 74-80 8 hrs 18 hrs
Split Game Hen 2.75 7 150 or higher 65.5 or higher 6 hrs 8 hrs

15
EN
Recommended Cooking Temperatures and Times
FOOD THICKNESS TEMPERATURE TIME
inch cm °F °C min max
SEAFOOD
Fish
Tuna, Halibut, Snapper, Sole, Salmon, Trout,
Mackerel
0.5 - 1 1.25 - 2.5 126 or higher 52 or higher 20 min 30 min
1- 2 2.5 - 5 126 or higher 52 or higher 30 min 40 min
Crustaceans, Mollusks
Lobster 1 2.5 140 60 45 min 60 min
Scallops 1 2.5 140 60 40 min 60 min
Shrimp jumbo jumbo 140 60 30 min 40 min
VEGETABLES
Root
Carrots, Parsnips, Potato, Turnips, Celery
Root, Beets
up to 1 up to 2.5 183 84 1-2 hrs 4 hrs
1- 2 2.5 - 5 183 84 2.5 hrs 4 hrs
Tender
Asparagus, Broccoli, Corn, Cauliower,
Eggplant, Onions, Green Beans, Fennel,
Squash, Fresh Peas
up to 1 up to 2.5 183 84 30 min 1.5 hrs
FRUIT
Firm
Apple, Pear up to 1 up to 2.5 183 84 45 min 2 hrs
Soft
Peach, Apricot, Plum, Mango, Papaya,
Nectarine, Berries up to 1 up to 2.5 183 84 30 min 1 hr
EGGS
Soft-cooked in shell (quick) large large 167 75 15 min 20 min
Soft-cooked in shell (slow) large large 146 63.5 45 min 1.5 hrs
Hard-cooked in shell large large 160 71 45 min 1.5 hrs
Pasteurized in shell large large 135 57 1.25 hrs 2 hrs
Scrambled (5 eggs) large large 167 75 20 min 20 min
Caution: Foods are not pasteurized under low temperature (i.e. below 55°c or 131°F) and so may pose a health risk to certain individuals.
ese individuals include pregnant women, young children, the elderly or otherwise immune-compromised. ose individuals should
stick to the FDA food code guidelines instead of this table. For further details please refer to Food Safety section.

16
ickness measurements are based on the thickest section of the food and measured through the vacuum- sealed pouch. Cooking times are for foods
starting at refrigerator temperature. Add 50% of recommended cooking time if starting from frozen.
² Tough cuts of meat will heat through to serving temperature in the same time as tender cuts. We recommend longer cooking times for lean, tough cuts to
tenderize them.
³ Eggs cooked in the shell should not be sealed in cooking pouches.
Food Safety
Food Preparation
• Purchase raw food from approved source or distributor. If the food has visible spoilage, contamination with lth,
discoloration, or bad odors or tastes, it should be disposed immediately.
• Preventing contamination from equipment and utensils, food that comes in contact with equipment and utensils
should be cleaned.
• Food must be vacuum-sealed, heat sealed, or zip locked before use with the circulator.
• If not cooked immediately, chill the food in refrigerator at 37°F / 3°C or below.
• e best way to kill parasites in seafood is to freeze and hold the type of seafood that you plan to cook, or we
recommend buying seafood that has been commercially ash-frozen. Please follow the proper cooking time and
temperature to achieve pasteurization.
e standards for freezing for parasite control are to either cook the sh at:
a. −31°F (−35°C) for 15 hours, or
b. −4°F (−20°C) for 7 days, or
c. frozen at −35°C (−31°F) until solid and stored at −20°C (−4°F) or below at least 1 day.
Cooking
• Recipes are assessed for temperature/time combinations that provide a minimum bacterial destruction for all
pasteurized foods. For combination of temperature/time, please refer the section of “COOKING TEMPERATURE
AND TIME GUIDELINE.”
• e minimum pasteurized temperature is 55°C for all meats and sh , except poultry for which the minimum
pasteurized temperature is 57°C.
• Sous vide cooking below 131°F / 55°C must not exceed a period of 4 hours. Foods cooked at temperatures below
131°F / 55°C for longer than 4 hours must be discarded.
• Raw foods or foods not fully pasteurized may pose a health risk to certain individuals. ese individuals include
pregnant women, young children, the elderly or otherwise immune-compromised.
• After cooking, foods shall be consumed immediately.
• Reaching pasteurization requires to respect the temperature , duration of cooking and max thickness. Any deviation
in at least one of the three parameters will not guarantee to reach pasteurization.

17
EN
Sous Vide New York Strip Recipe
INGREDIENTS
• New York Strip Steaks, 1 inch thick
• Sea Salt
• Cracked Black Pepper
• Avocado Oil (or another high smoke point oil)
SOUS VIDE COOKING RECOMMANDATION
• 136.5°F – 145.5°F (58 - 63°C)
• 2 hours 20 minutes
DIRECTIONS
1. Pre-heat water bath to your ideal temperature (see chart on the side). We prefer 136.5°F (58°C), since the slightly
higher temperature helps render some of the fat on the New York Strip.
2. Generously season with sea salt, cracked black pepper, and any aromatics such as rosemary.
3. Vacuum seal the steak or place it in a heavy-duty Ziploc bag using the water displacement method.
4. Place bagged steak in water bath and cook for 2 hours 20 minutes.
5. Remove steak and pat dry with paper towels.
6. Pre-heat cast iron pan on medium-high heat and add avocado oil (or another high smoke point oil).
7. Sear steak on hot cast iron pan for approximately 1 minute, ipping every 15 seconds.
8. Add butter and any aromatics to the pan for added avor and crispness. Sear for an additional 30 seconds. Make
sure to also sear the strip of fat on the side!
9. (Optional) Use a searing torch for a perfect crust.
10.Before serving, use a spoon to top the steak with the leftover juices and butter from the pan - this will help further
develop the crust and add avor.
11.Cut against the grain. Enjoy!
RECIPES

18
Simple Pan-Seared Sous Vide Halibut Recipe
INGREDIENTS
• 4 (8-oz) pieces of halibut, no more than 1½inchesthick
• Kosher salt to taste
• 2 teaspoon extra virgin olive oil
• 4 lemon wedges
SOUS VIDE COOKING RECOMMANDATION
• 131° F (55°C)
• 0 Hours 15 Minutes
Caution: Foods are not pasteurized under low temperature (i.e. below 55°c or 131°F) and so may pose a health risk to certain individuals.
ese individuals include pregnant women, young children, the elderly or otherwise immune-compromised. ose individuals should
stick to the FDA food code guidelines instead of this table. For further details please refer to Food Safety section.
DIRECTIONS
1. Preheat your water bath to 131°F / 55°C
2. Season halibut with salt and coat with 1 teaspoon of the olive oil (using a brush or your ngers). Vacuum seal the
halibut or place it in a 1-gallon Ziploc bag using the water displacement method.
3. Lower bagged halibut into the water bath and cook for 15 minutes.
4. Remove the bag from your bath. Carefully transfer the cooked halibut to a paper towel-lined plate or tray to blot
away any moisture. (Note: the cooked sh is extremely delicate, so it will ake apart very easily—a sh spatula is
a good tool to use here.)
5. Heat a nonstick pan over medium heat with the remaining 1 teaspoon of olive oil until the oil shimmers.
6. Place the halibut pieces in the pan and sear until light golden brown, about 1-2 minutes.
7. Carefully ip each piece of the halibut, and cook 30 seconds more.
8. Transfer halibut pieces to plates, garnish each with a lemon wedge, and serve with your choice of sides.

19
EN
Chicken Breast Sous Vide Recipe
INGREDIENTS
• 4 boneless skin-on chicken breasts, about 2 pounds
(sometimes sold as “airline” or “frenched” breast with
the drumette attached; if so, remove the drumette and
save for stock/discard) and max. 1.5 inch thick
• Salt to taste
• 1 tablespoon butter or olive oil
• Flakey sea salt, such as Maldon or eur de sel,
tonish (optional)
SOUS VIDE COOKING RECOMMANDATION
• 140° F (60°C)
• 2 hours 25 minutes
DIRECTIONS
1. Preheat water bath to 140°F / 60°C
2. Season the chicken breasts with salt and place in a 1-gallon a freezer zip bag.
3. Vacuum seal the chicken or place it in a 1-gallon Ziploc bag using the water displacement method. Lower the
bagged chicken into your water bath and cook for 2 hours 25 minutes (or up to 5 hours).
4. Remove the bag from the water and transfer the chicken to a plate.
5. Pat the breasts thoroughly dry with a paper towel.
6. Preheat a large sauté pan over medium heat.
7. Add the 1 tablespoon of butter to the pan, swirling it until the foam has subsided. Add the chicken breasts skin
side down to the pan and cook for 2-3 minutes, until the skin is deeply browned and crisped.
8. Once the skin has browned, ip the breasts and cook for 30 seconds more before transferring it to a cutting board.
9. To serve, slice the chicken breasts against the grain and divide between four plates, sprinkle with the akey salt,
and serve with your choice of sides.

20
CLEANING
DESCALE
• Always unplug the Sous Vide Circulator and allow to cool completely before cleaning.
• To remove dirt from the shaft, gently press the release button and slide out the shaft from the body.
• Use soapy water to clean the shaft and circulator.
• Clean the appliance body with a damp cloth.
NOTE: e shaft is dishwashable.
CAUTION: Do not allow debris to accumulate, as this may damage the heater and circulator.
DANGER: Never immerse the circulator in water.
CAUTION: Never use scouring pads, abrasive cleaning agents or aggressive liquids such as petrol or acetone to
clean the circulator.
CAUTION: Any other servicing should be performed by an authorized service representative.
Why descale?
• Limescale naturally builds up around the heating elements if the water you are using is hard. Descaling helps to
maintain your appliance so that it lasts longer and oers constantly oers high quality performance. Limescale
can permanently alter the performance of your appliance. Malfunctions linked to scaling are not covered by the
warranty if the product is returned.
When to descale?
• e descaling frequency depends on the hardness of the water and the number of uses. If you notice the following
signs: longer cycle time, more noise at the end of the cycle, stopping midcycle, your machine needs descaling.
Table of contents
Languages:
Other all-clad Kitchen Appliance manuals


