All Pond Solutions AP-1.5-KIT User manual
AQUARIUM AIR PUMP
AP-1.5-KIT / AP-3-KIT
NON-RETURN VALVE INCLUDED
AIR STONE & HOSE INCLUDED
SINGLE/DUAL OUTLET
MULTI-SPEED CONTROL
HIGH OUTPUT
LOW NOISE OPERATION

To ensure your new aquarium filter is set up and running correctly, and to prevent any
accidental damage or injury, please read and follow the below instructions carefully before
using your product.
SAFETY
IMPORTANT! Disconnect the mains electricity supply before attempting any installation /
maintenance of any kind. Do not attempt to modify this unit in any way and only use the
recommended parts for replacement.
· Always check air pump for any damage prior to use. It is essential that you NEVER
submerge the air pump - the unit must be used in a dry environment.
· All connections must be earthed. Do not connect to any voltage other than that stated.
· The power cord of this appliance cannot be replaced; if the cord is damaged, the
appliance should be discarded. Never cut the cord.
· Do not carry or pull the unit by its electrical cable.
· Do not use this unit if it has a damaged cord or plug, if it is malfunctioning or it is dropped
or damaged in any manner.
· Do not yank cord to pull plug from outlet. Grasp the plug and pull to disconnect. Always
unplug an appliance from an outlet when not in use.
· Do not attempt to modify this unit in any way and only use the recommended parts for
replacement.
· Before installing, maintaining or handling your equipment, or before placing your hands in
your aquarium, ensure that the unit is disconnected from the electricity supply.
· Always unplug any electrical devices when not in use.
· Carefully examine your air pump after installation. Do not plug in the unit into the mains if
there is water on any parts not intended to be wet.
· If the air pump falls into the water, DO NOT reach for it. First unplug the unit and then
retrieve it. If the electrical components of the appliance get wet, unplug the appliance
immediately.

PARTS DIAGRAM
1
6
7
2
34
5
AP-1.5
· The air pump will overheat and become damaged if it cannot operate adequately. Never
shut off any of the air outlets, make sure the airline is not obstructed or blocked and that the
air stones are replaced regularly and are of a suitable standard.
Please note – this appliance can be used by children aged from 8 years and above and
persons with reduced physical, sensory or mental capabilities or lack of experience and
knowledge, provided they are given supervision and instruction concerning use of the
appliance and understand the hazards involved. Children must not play with the appliance.
Any maintenance must not be made by children without supervision.
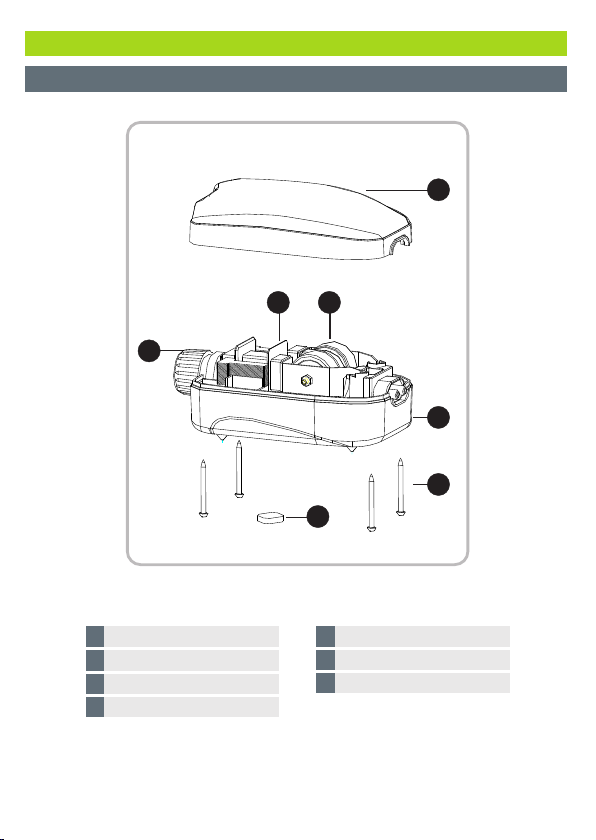
PARTS DIAGRAM
DIAPHRAGM
AIR FLOW CONTROLLER
PUMP CASING
MOTOR COMPONENTS
1
2
3
4
FILTER CASING
10
11
12 AIR COTTON FILTER
PUMP BASE
SCREWS
5
6
7
1
6
7
2
34
5
AP-3

ELECTRIC
This unit comes complete with a generous supply of 3 core cable, however should any
additional cable be required, the use of an approved waterproof cable connector with a
proper rating is essential. A cord rated for less amperes or watts than the appliance rating
may overheat.
Please Ensure:
· The power supply must be earthed and fused at 3amps.
· You regularly inspect the cable for damage and deterioration.
· Do not connect to any voltage other than that stated.
· You consult a qualified electrician if in doubt about any aspects of wiring.
SET UP
1. Attach one end of the air hose to the air outlet(s) on air pump.
2. Connect a non return valve between your air hose a few inches from your air pump.
3. Position your air pipe in your aquarium with or without air stone as required.
4. Plug air pump into outlet. Be sure to allow for a “drip loop”
Decide where you are going to position the air pump. The power cable must have a drip loop
to avoid any condensation build up reaching the mains (see Diagram 1 and 2). If the plug does
get wet, DO NOT unplug the cord. Disconnect the fuse or circuit breaker that supplies power
to the appliance. Then unplug and examine for presence of water in receptacle.
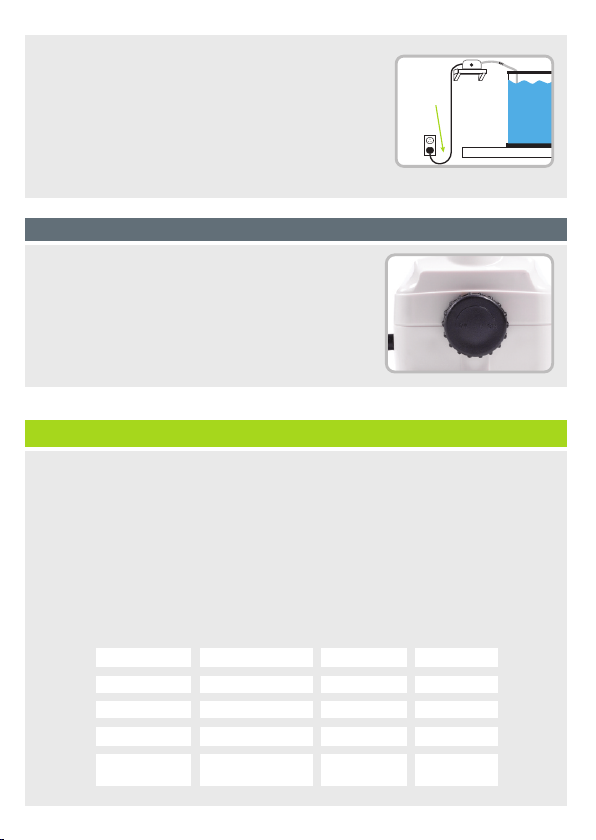
The air pump can be installed by following either of the two
recommended methods:
1. Place the air pump on a surface lower than the water level of
the aquarium. To avoid damage from accidentally spilled
water, do not place the air pump directly below the aquarium
(Diagram 1).
Air Pump
Water
Diagram 1
Drip
Loop
MAINTENANCE
To ensure optimal performance and that your unit functions correctly, regular maintenance is
essential. Failure to do so may result in damage to your unit and may invalidate your warranty.
We recommend that a regular cleaning and maintenance schedule is followed to ensure
responsible fishkeeping. Regular maintenance will help ensure that the product works
efficiently and the aquarium remains healthy.
For further maintenance guidance, please see the table and additional information below:
2. Place the air pump on a surface higher than the water level,
such as a shelf. The surface should be at least 12 inches (30
cm) higher than the water level of the aquarium, but not be
positioned directly above the aquarium. The surface should
have a raised edge to prevent the air pump from sliding off
(Diagram 2).
Diagram 2
Drip
Loop
The All Pond Solutions air pumps incorporate a flow control
knob to control air output.
Turning the knob clockwise increases the air flow and
counter-clockwise reduces the air flow.
Air Flow Adjustment
1 MONTH
3 MONTHS
ANNUALLY
Air Stone
Inspect & Clean
Replace
Diaphragm
Replace
Air Hose
Inspect & Clean
Replace
Non Return
Valve
Replace

Regularly clean your air hose and air stone to ensure maximum output and improved lifespan
of the air pump. The air hose should be inspected at the same time that regular aquarium
maintenance is carried out. Carefully remove any sections that are kinked or pinched and
replace if necessary. Restricting the air flow can result in back pressure.
Ensure the air stones are kept clean from debris or algae build-ups. Blocked air stones will
lead to low air pressure output.
Lubrication is not required on the air pump or any of its parts. Remove dust and grime from
the outer shell with a soft, damp cloth.
This air pump is supplied with an extra diaphragm set. In the event of the pump operating
less efficiently, immediately replace the diaphragms and check the inside of the pump for
signs of dirt, moisture and excessive wear. You replace the diaphragm(s) by unscrewing the
screws to open up the air pump, remove the old diaphragm(s) from the valve housing and
then fit the new diaphragms. Make sure the air pump is correctly put back together and
securely fastened with the screws.
Diaphragm wear is normal and is not covered by the warranty; extra diaphragms may be
purchased from All Pond Solutions online store.
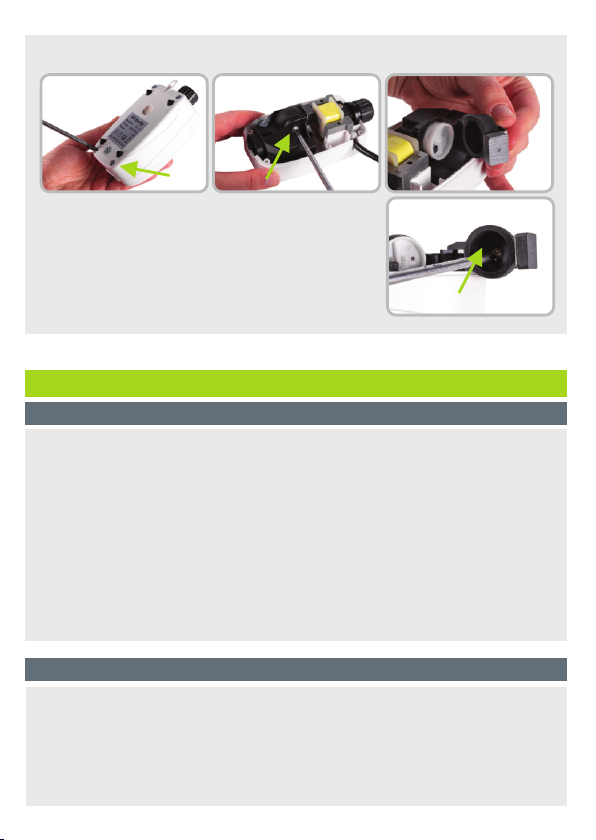
1. Replace the diaphragm(s) by unscrewing the screws to open up the air pump.
Replacing the Diaphragm
Back Pressure
IMPORTANT! Back pressure is the build-up of pressure on the diaphragm due to restricted air
flow. This occurs when excess air is produced by the air pump, or when the air channels (for
example air hose or air driven aquarium ornaments) are inadvertently blocked. Back pressure
over time will cause the diaphragm to expand or rupture.
TROUBLESHOOTING
No Air Is Being Produced
1. Ensure that the air pump is plugged in.
2. Follow the maintenance section. Ensure that there are no blockages in the air hose
assembly and that all valves allow air passage. Check that the air hose is not kinked.
3. Turn the pump up. The control knob is located on the front of the pump.
4. Remove air hose. Unplug appliance and inspect the diaphragm for tears or rips. Any
opening in the diaphragm will make it impossible for the pump to produce air for aeration
purposes.
Noisy Operation
1. Placement of your air pump can greatly affect the amount of noise it makes. Try suspending
the noisy air pump at, or above water level to reduce the resistance of water on the air pump.
IMPORTANT! Ensure the air pump is not positioned so it could either fall in the water or get
splashed. Air pumps are not designed for exposure to water, and touching a wet air pump
2. Remove the old diaphragm(s) from the valve housing and
then fit the new diaphragms.
3. Make sure the air pump is correctly put back together and
securely fastened with the screws.

SPECIFICATIONS
DIMENSIONS
(LxWxH) mm
220V/50Hz
MODEL
VOLTAGE
POWER
PRESSURE
3W
0.02MPa
135x70x55
AP-1.5
OUTPUT
1.5L/min
WEIGHT
0.29kg
220V/50Hz
3W
0.04MPa
135x70x55
AP-3.5
3L/min
0.31kg
could result in an electric shock.
2. Keeping the air hose length to a minimum.
3. Some surfaces can amplify the noise produced. Place the air pump on a vibration-
absorbing surface such as foam.
The diaphragm is a perishable part and might be worn out. Replaced your pump’s diaphragm
every year to keep the air pump operating quietly and efficiently.
CONTENTS
x 1
MODEL
AIR PUMP
AIR STONE
NON RETURN VALVE
x 1
x 1
AP-1.5-KIT
AIR HOSE
2m
x 1
x 2
x 2
AP-3.5-KIT
4m

WARRANTY
The All Pond Solutions AP series is guaranteed against defects in material or workmanship
under normal aquarium usage and comes with 12 months warranty for all electrical parts. The
warranty period commences from the date of purchase.
If you require support on how to use your unit, replacement parts or if your air pump develops
a fault during the warranty period, please contact the supplier of your unit.
Non-replaceable, non-perishable and non-serviceable parts will be repaired or replaced free
of charge, once the unit is returned with all components along with a valid proof of purchase
and postage paid. We reserve the right to replace or repair the unit at our discretion.
Please be aware that perishable parts that are subject to normal wear and tear, such as
diaphragms and air stones are not covered by your warranty and a charge may be required for
replacements of these.
This warranty does not apply to any unit that has been subjected to misuse, accidental
damage, negligence, tampering or customisation. It does not apply to units which have been
assembled incorrectly, improperly maintained, or where the instructions and safety
information in this manual has not been followed correctly.

No liability is assumed with respect to loss or damage to livestock or personal property
irrespective of the cause thereof.
Please ensure that only genuine All Pond Solutions components are used when completing a
replacement or repair. Spare parts are available at our official website or from your local
supplier.
Before returning your unit under warranty terms, check that all setup and maintenance
instructions have been correctly followed. If you are in doubt, please contact your local
aquatic retailer for further advice before returning the product.
This does not affect your statutory rights.

www.allpondsolutions.co.uk
All Pet Solutions Limited Trading as All Pond Solutions
Unit 203 Riverside Way, Uxbridge, Middlesex,
England, UB8 2YF
This manual suits for next models
1
Table of contents
Other All Pond Solutions Water Pump manuals

All Pond Solutions
All Pond Solutions ACP-500 User manual

All Pond Solutions
All Pond Solutions 1400PP User manual

All Pond Solutions
All Pond Solutions 8000PP User manual

All Pond Solutions
All Pond Solutions AP-IS-KIT User manual

All Pond Solutions
All Pond Solutions FPP-3500 User manual

All Pond Solutions
All Pond Solutions FPP-600 User manual


