All Traffic Solutions SpeedAlert 18 User manual

SpeedAlert 18 Quick Start Guide
Thank you for purchasing an All Traffic Solutions SpeedAlert 18 data-enabled radar sign.
This Quick Start Guide will show you how to install, power, and configure your new sign.
NOTE:If your purchase includes the Integrated Solar option,
please refer to either the ATS3 Trailer with Integrated Solar
Setup Guide or Pole Mounting Signs with Integrated Solar
Option that came with your sign and available on
www.alltrafficsolutions.com/support.
Before you begin
If you have a TraffiCloud subscription, the first thing you'll need to get started using your
SpeedAlert is to create a data collection Site in TraffiCloud. Each Site is configured with a
speed limit and the direction of moving traffic. They provide a way to keep traffic data
organized for reporting purposes. If necessary, you can also perform Site setup after you
install your SpeedAlert at a physical location. See "Creating a Site"in Getting Started with
TraffiCloud and SpeedAlert.
If you don't have a TraffiCloud subscription, you have several other options for Site and
sign setup, as described in Step 4:Configuring the SpeedAlert locally on the next page.
Step 1:Unpacking the equipment
Upon receiving your new SpeedAlert, check to ensure that you have all of the items ordered. If you notice any damage
or missing items, contact ATS Technical Customer Support immediately.
Remove the SpeedAlert, batteries, charger, and other optional equipment from the boxes.
If your SpeedAlert includes batteries, they should be fully charged before deployment, as explained in Step 2:Charging
the batteries on the next page. SpeedAlert signs can accommodate up to two lithium batteries internally. Although only
one battery is required, two batteries are recommended to increase average sign runtime. Without a solar panel,
continuous runtime with two batteries is typically between 5 and 8 days.
For all steps involving batteries, repeat for the second battery as necessary.
To remove the batteries:
A. Place the SpeedAlert face down on a flat surface and remove the mounting bracket by unlocking the lock with
the supplied key and lifting up on the bottom of the bracket. Then pull to remove.
B. Next, remove the battery compartment cover by removing the thumb screws. Set the key, bracket, and thumb
screws aside.
C. Slide the battery or batteries out of the battery compartment, as shown in [Figure 1] below.
D. Disconnect the connectors, as shown in [Figure 2] below.
[Figure 1] Slide the battery [Figure 2] Disconnect/connect
ATS | Chantilly, VA | United States | Tel: 1-866-366-6602 | Email: [email protected] | Web: www.alltrafficsolutions.com
Copyright © 2024 | All Traffic Solutions, Inc.® | SpeedAlert 18 Quick Start Guide, ver. 1.05 | PN 4800245 | All rights reserved.

Step 2:Charging the batteries Page 2 All Traffic Solutions
Step 2:Charging the batteries
If your SpeedAlert includes batteries, it arrives with the batteries partially charged and they need to be fully charged
before deployment.
WARNING:RISK OF ELECTRIC SHOCK ANDDAMAGE TO EQUIPMENT The charger is not intended for
outdoor use. Only charge and store the batteries in a controlled environment.
A. Connect a battery to the charger.
B. Plug the charger cable into a power outlet. The light on the charger displays red while charging and changes to
green when charging is nearly complete. A charge can take up to 11 hours for the 12V 16.5Ah LFP batteries
supplied with the sign.
C. When the indicator on the battery charger turns green, repeat for the second battery if applicable, and then
proceed to the next step.
D. Disconnect the battery from the charger.
Step 3:Installing the charged batteries
Follow these steps to install the charged batteries.
CAUTION:Use only the SHORT (3/8"-length) thumb screws to fasten the battery covers. Do NOT use the
longer (3/4"-length) thumb screws supplied for the Your Speed faceplate, as they are too long and can
cause damage to your sign.
A. Place the SpeedAlert face down on a flat surface and remove the mounting bracket and battery cover.
B. Connect the battery wiring harness to the connector inside the battery compartment, as shown in [Figure 2] on
the previous page.
C. Tuck the connector into the space in the top of the battery compartment.
D. Holding the connector in place, slide the battery into the compartment.
E. Replace the cover and fasten it down using the SHORT(3/8"-length) thumb screws.
Step 4:Configuring the SpeedAlert locally
If you have a TraffiCloud subscription, you should use this step only to power on your SpeedAlert, and instead
configure the SpeedAlert online, setting the sign display options, creating messages, and setting up alerts. and
assigning a Site. It's best to perform sign setup in advance, so that your traffic data is captured in TraffiCloud
immediately. See the Getting Started with TraffiCloud guide for your sign.
If you don't have a TraffiCloud subscription, you can do any of the following (see details next page)to perform initial
SpeedAlert configuration locally, either at your office or after the sign is mounted at the roadside.
Use the SpeedAlert mode buttons
»You can configure the SpeedAlert using the Speed Limit and Display Mode buttons.
Use the TraffiCloud Mobile app for Android
»You can configure the SpeedAlert locally using the TraffiCloud Mobile app for Android over a Bluetooth
connection.
Use TraffiCloud Sign Manager
»You can also configure the SpeedAlert locally using TraffiCloud Sign Manager for Windows over the included
USBconnection or optional Bluetooth.
NOTE:Before attempting a Bluetooth connection, make sure the option was purchased for your
equipment.
ATS | Chantilly, VA | United States | Tel: 1-866-366-6602 | Email: [email protected] | Web: www.alltrafficsolutions.com
Copyright © 2024 | All Traffic Solutions, Inc.® | SpeedAlert 18 Quick Start Guide, ver. 1.05 | PN 4800245 | All rights reserved.

All Traffic Solutions Page 3 Step 4:Configuring the SpeedAlert locally
To power up the SpeedAlert:
»Power up the SpeedAlert by pressing the Power button on the back, inside the mounting channel.
The SpeedAlert will go through start-up and self-check sequences. Once the self-check is complete, the sign
is fully operational.
To set up the SpeedAlert using the onboard buttons:
A. Press the Speed Limit button until the desired value displays. The first button press displays the
current speed limit.
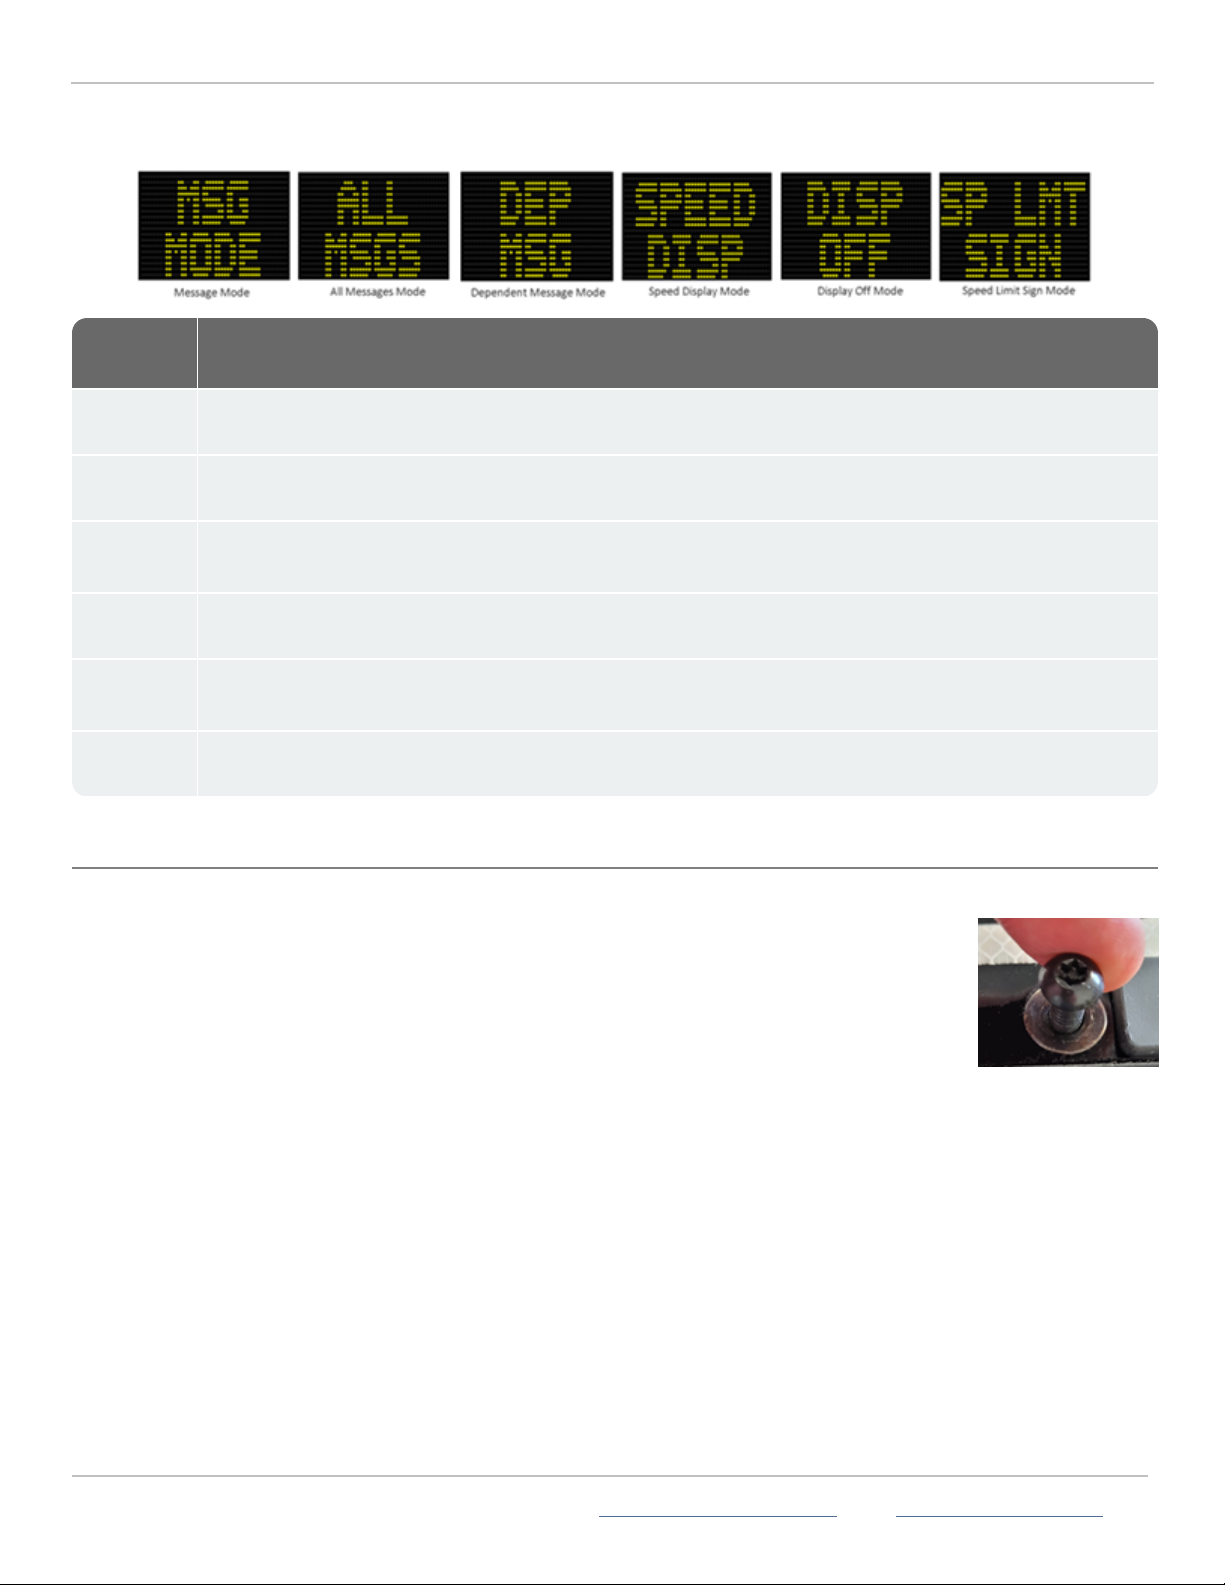
B. Verify or set the display mode on the SpeedAlert. The default is Single Message Mode for message-
enabled signs.
C. To change the mode, press the Display Mode (or Display Settings) button until the desired mode displays
on the sign.
For details about sign modes, see "SpeedAlert Display Modes" on the next page.
NOTE:To reduce the risk of tampering, the buttons deactivate five minutes after you power on the sign.
To reactivate them, press the Power button, wait a few seconds, and press it again.
To configure the SpeedAlert using the TraffiCloud Mobile app for Android:
If you purchased an Android tablet from us, the TraffiCloud Mobile app has been pre-
installed. If you have your own Android device, you can purchase a TraffiCloud Mobile
perpetual license from ATS and then download the app from the Google Play Store. Using
the app you can control a wide range of tasks, such as downloading traffic data, setting
the speed limit and display mode, creating Sites, message display, and checking battery
power.
To connect with the app, do the following:
A. Sign into the TraffiCloud Mobile app on your Android device using your
TraffiCloud credentials.
B. Scan for your SpeedAlert. You can connect to any ATS device registered to your
account within Bluetooth range. Only one connection is permitted at a time.
C. Use the Bluetooth pairing code "ATS" to connect to your SpeedAlert.
To configure the SpeedAlert using TraffiCloud Sign Manager for Windows:
A. First, for TraffiCloud Sign Manager for Windows installation details, please see the TraffiCloud Start-Up
Instructions included with your shipment and available from our Technical Customer Support page at
https://www.alltrafficsolutions.com/support/. For details about using TraffiCloud Sign Manager for Windows,
in the application, click Help > Software User’s Manual.
B. Then, do one of the following:
lPlug the supplied USB-A-to-mini B cable into the back of the sign and then into your computer. The
mini-B port is located above the buttons inside the sign's mounting channel, or
lIf you're connecting from an ATStrailer, connect the supplied USBcable inside the trailer battery box to
your laptop computer, or
lConnect to the SpeedAlert over the optional Bluetooth connection (use pairing code "ATS"). Once the
device is paired, run TraffiCloud Sign Manager and select Bluetooth under the Connection menu.
ATS | Chantilly, VA | United States | Tel: 1-866-366-6602 | Email: [email protected] | Web: www.alltrafficsolutions.com
Copyright © 2024 | All Traffic Solutions, Inc.® | SpeedAlert 18 Quick Start Guide, ver. 1.05 | PN 4800245 | All rights reserved.

Step 5:Installing the Your Speed sign attachment Page 4 All Traffic Solutions
SpeedAlert Display Modes
Here is a summary of the SpeedAlert Display Modes:
Display
Mode Description
MSG
MODE
Single Message mode: Selects from the messages saved in the sign to display.
ALL
MSGS
All Messages mode: Displays all of the messages saved in the sign, in sequence.
DEP
MSG
Dependent Messages mode: Displays a series of messages, with the content depending on how
fast the approaching vehicle is traveling.
SPEED
DISP
Speed Display mode(Radar signs only):Displays the speeds of the approaching vehicle.
DISPLAY
OFF
Display Off mode:Turns off but the display but the sign is still active and gathering traffic and other
data. Also, referred to as "stealth mode".
SP LMT
SIGN
Speed Limit Sign mode: Sets the Speed Limit to display.
Step 5:Installing the Your Speed sign attachment
To save packing space, the Your Speed sign attachment ships in the transport position.
To set the sign attachment in the deployed position:
A. Remove the 3/4" (19 mm)Torx bolts (wrench included) and washers from the Your Speed
sign attachment and set them aside. If there is no concern about tampering, you can use
the long thumb screws in place of the Torx bolts.
B. Reposition the Your Speed sign attachment above the SpeedAlert display.
C. Place a washer over each hole in the sign bracket and push the Torx bolts through the
holes in the Your Speed sign attachment and the brackets and frame, as shown.
D. Reinstall the fasteners to finish installing the Your Speed sign attachment.
ATS | Chantilly, VA | United States | Tel: 1-866-366-6602 | Email: [email protected] | Web: www.alltrafficsolutions.com
Copyright © 2024 | All Traffic Solutions, Inc.® | SpeedAlert 18 Quick Start Guide, ver. 1.05 | PN 4800245 | All rights reserved.

All Traffic Solutions Page 5 Step 6: Mounting the SpeedAlert
Step 6: Mounting the SpeedAlert
Use the instructions in this step for details about mounting the SpeedAlert.
To install the SpeedAlert mounting bracket:
A. If you are mounting the SpeedAlert on a round pole, thread two stainless steel banding
straps (not included)through the sign mounting bracket, and then tighten the bracket and
straps around the pole. Thread the ends of each banding strap together and then tighten
them onto the pole.
B. If you are mounting the SpeedAlert on a U-shaped or square pole, bolt the sign mounting
bracket to the pole using the supplied carriage bolts or U bolts and wing nuts.
The wing nuts will be concealed inside the back of the sign to prevent tampering.
To mount the SpeedAlert:
Before you mount the SpeedAlert, make sure it's turned on. See Step 4:Configuring the SpeedAlert
locally on page2.
A. Set the top channel on the back of the SpeedAlert onto the tab at the top of the mounting
bracket.
B. Rotate the SpeedAlert down until it's flush with the bracket.
C. Push the locking pin up to lock the SpeedAlert into place.
Contacting Technical Customer Support
For support for your All Traffic Solutions products,
»visit the Technical Customer Support page at https://www.alltrafficsolutions.com/support/,
»send email to [email protected], or
»call 1-866-366-6602, Option 2 anytime between 8:00 a.m. and 6:00 p.m. Eastern Time, Monday to Friday.
Technical documentation and training
If you have a TraffiCloud subscription, please visit our ATS Start-Up Guides page at
https://www.alltrafficsolutions.com/get-started/ for links to the most recent versions of our technical
documentation, including the Getting Started with TraffiCloud series. If you don't have a subscription, please visit the
Technical Customer Support page.
Please contact Technical Customer Support to discuss your TraffiCloud training options. For online training
resources, please visit our TraffiCloud Training Videos Hub at https://flow.alltrafficsolutions.com/hub-training-
video-trafficloud-0-0-0-0.
ATS | Chantilly, VA | United States | Tel: 1-866-366-6602 | Email: [email protected] | Web: www.alltrafficsolutions.com
Copyright © 2024 | All Traffic Solutions, Inc.® | SpeedAlert 18 Quick Start Guide, ver. 1.05 | PN 4800245 | All rights reserved.

Table of contents
Other All Traffic Solutions Digital Signage manuals

All Traffic Solutions
All Traffic Solutions InstAlert 24 User manual

All Traffic Solutions
All Traffic Solutions Shield User manual

All Traffic Solutions
All Traffic Solutions InstAlert 18 User manual

All Traffic Solutions
All Traffic Solutions InstAlert 18 User manual

All Traffic Solutions
All Traffic Solutions SpeedAlert 18 User manual

All Traffic Solutions
All Traffic Solutions SpeedAlert 24 User manual

All Traffic Solutions
All Traffic Solutions SpeedAlert18 User manual

All Traffic Solutions
All Traffic Solutions SpeedAlert 24 User manual

All Traffic Solutions
All Traffic Solutions Shield User manual

All Traffic Solutions
All Traffic Solutions ATS 3 User manual