All Weather Inc 6030 User manual

All Weather Inc. • 1165 National Drive • Sacramento, CA 95834 • USA • 800.824.5873 • www.allweatherinc.com
User’s
Manual
Rev. E
Model6030
OpticalRainGauge

Copyright ©2011–2016, All Weather, Inc.
All Rights Reserved. The information contained herein is proprietary and is provided solely for the
purpose of allowing customers to operate and/or service All Weather, Inc. manufactured equipment
and is not to be released, reproduced, or used for any other purpose without written permission of
All Weather, Inc.
Throughout this manual, trademarked names might be used. Rather than put a trademark (™)
symbol in every occurrence of a trademarked name, we state herein that we are using the names only
in an editorial fashion and to the benefit of the trademark owner, and with no intention of
infringement. All Weather, Inc. and the All Weather, Inc. logo are trademarks of All Weather, Inc.
Disclaimer
The information and specifications described in this manual are subject to change without notice.
All Weather, Inc.
1165 National Drive
Sacramento, CA 95834
Tel.: (916) 928-1000
Fax: (916) 928-1165
Contact Customer Service
Phone support is available from 8:00am - 4:30pm PT, Monday through Friday. Call 916-928-
1000 and ask for “Service.”
Online support is available by filling out a request at www.allweatherinc.com/support/online-support/
E-mail your support request to [email protected]

Model 6030 Optical Rain Gauge User’s Manual
Revision History
Revision
Date
Summary of Changes
B
2011 Oct 31
Removed references to OEM part numbers, replaced installation drawing with
diagrams in the Installation chapter, and better explained options and wiring details
C
2015 July 31
Updated electronics enclosure to use UPCM instead of Serial Sensor Interface and
AC Interface Board
D
2015 Sept 22
Updated Figure 1 and corrected responses to poll commands
E
2016 Nov 28
Added alternative cable wire colors for the sensor head in Figures 8 and 9

Model 6030 Optical Rain Gauge User’s Manual
TABLE OF CONTENTS
1. OVERVIEW.................................................................................................................1
1.1 Accessories.........................................................................................................................1
2. SYSTEM DESCRIPTION............................................................................................2
2.1 Major Components .............................................................................................................2
2.1.1 Sensor Head................................................................................................................2
2.1.2 Electronics Enclosure..................................................................................................3
2.1.3 Universal Power and Communication Module (UPCM)............................................3
3. THEORY OF OPERATION.........................................................................................4
3.1 Sensor Head........................................................................................................................4
4. INSTALLATION...........................................................................................................6
4.1 Siting and Installation Guidelines.......................................................................................6
4.2 Mechanical Installation.......................................................................................................8
4.2.1 Preparation..................................................................................................................8
4.2.2 Mount the Sensor Head...............................................................................................9
4.2.3 Install the Electronics Enclosure...............................................................................12
4.3 Electrical Connections......................................................................................................13
4.3.1 Sensor Connections...................................................................................................17
4.3.2 Connecting the Sensor to the AC Power Line..........................................................17
4.4 UPCM Configuration........................................................................................................18
5. OPERATION WITH AN AWOS DATA COLLECTION PLATFORM ..........................19
5.1 Sensor Interface................................................................................................................19
5.1.1 Physical Level...........................................................................................................19
5.1.2 Link Level.................................................................................................................19
5.1.3 Frame Format............................................................................................................19
5.1.4 Protocol.....................................................................................................................19
5.2 Data Format......................................................................................................................20
5.2.1 Weather Codes..........................................................................................................21
5.2.2 Status Codes..............................................................................................................21
6. MAINTENANCE........................................................................................................22
6.1 Triannual Maintenance.....................................................................................................22
7. SPECIFICATIONS ....................................................................................................24
8. WARRANTY..............................................................................................................26

Model 6030 Optical Rain Gauge User’s Manual
1
1.OVERVIEW
The Model 6030 Optical Rain Gauge optically measures precipitation-induced scintillation and
applies algorithms to determine the precipitation occurrence, type, rate, and water equivalent
accumulation automatically.
The Model 6030 Optical Rain Gauge measures precipitation by detecting the optical
irregularities —known as scintillations —induced by particles falling through a beam of
partially coherent infrared light in the sample volume. The induced scintillations are related to
the characteristics to the precipitation, and the precipitation rate is determined based on the
intensity of these scintillations. In turn, the precipitation rate can be used to determine
precipitation accumulation.
The Model 6030 Optical Rain Gauge is not affected by many of the environmental factors that
cause significant errors with traditional rain gauges. Model 6030 Optical Rain Gauge offers these
features.
Easy Installation
High Sensitivity
Low Maintenance
Minimal Wind Effects
Wide Dynamic Range
Works on Ships and Buoys
No Evaporation or Splash Errors
Not Affected by Insects, Debris, Dust
Applications using traditional tipping bucket rain gauges can all be upgraded easily to use the
Model 6030 Optical Rain Gauge.
The electro-optical design provides for an extremely reliable sensor with a calculated MTBF in
excess of 60,000 hours. Unlike mechanical gauges, which collect the precipitation to measure it,
the Model 6030 Optical Rain Gauge has no collectors or buckets to corrode or clog. The sensors
use automatic gain control circuitry to eliminate the effects of LED output power or dirty optics.
In fact, sensor performance is maintained even when over 75% of the light is blocked!
Diagnostics alert the user if the signal strength is too low for normal operation. Preventative
maintenance, suggested every 6 months, is as simple as cleaning the two optical windows on the
unit.
1.1 ACCESSORIES
The following accessories and replacement parts are available for the Model 6030 Optical Rain Gauge.
Part Number
Description
2715
Universal Power and Communication Module
M442089-00
10 A 250 V, 5x20 mm slow blow fuse
M438130-00
Backup Battery

Model 6030 Optical Rain Gauge User’s Manual
2
2.SYSTEM DESCRIPTION
2.1 MAJOR COMPONENTS
2.1.1 Sensor Head
The sensor head frame is an all-aluminum, welded design. The small box (TX) is the transmitter
unit and contains an infrared LED and lens with a disk heater. The large box (RX) contains a
receiver assembly consisting of a photo diode, a lens with an aperture slit, a disk heater,
electronics, an external thermistor probe, and a connector for the signal/power cable. The wiring
between the two heads is inside the welded head frame.
The transmit and receive lenses are heated by self-regulating positive temperature coefficient
(PTC) thermistor disks to a temperature above the ambient temperature to reduce dew and frost
on the lenses. Depending on the ambient temperature, the current drain for the lens heaters can
change more than 200 mA.
The sensor head is completely sealed from water intrusion at the factory. Exercise care should to
avoid drilling or otherwise puncturing the frame.
A 15 m cable is supplied to connect the sensor head frame to the electronics enclosure.
A mounting plate, an integral part of the sensor head cross arm, is provided to install the head to
a user-supplied mast. Two sets of holes in the mounting plate allow the U-bolts supplied with the
head to clamp the head to either a vertical or horizontal pipe up to 50 mm in diameter.
The 6030 sensor head uses a compact optical system to measure precipitation.
N o t e:
The sensor head frame contains no user serviceable
parts - opening the head will void the warranty!

Model 6030 Optical Rain Gauge User’s Manual
3
2.1.2 Electronics Enclosure
The electronics enclosure is a fiberglass NEMA-4X type box with a hinged access door. One
power supply, and AC and RS-485 interface modules with surge protection are mounted to the
base plate of the enclosure. Figure 7 shows the locations of these components inside the
enclosure.
All the units in the enclosure are field-replaceable.
The electronics enclosure is mounted with the supplied fastener hardware using the four (4)
mounting holes on the enclosure.
2.1.3 Universal Power and Communication Module (UPCM)
The Universal Power and Communication Module is built in to the Optical Rain Gauge, and
provides power and a serial interface for the Optical Rain Gauge.
The electronics enclosure contains the processing electronics, power supplies, and
surge protection circuits.
N o t e:
Exercise care to avoid drilling or otherwise puncturing the
electronics enclosure.

Model 6030 Optical Rain Gauge User’s Manual
4
3.THEORY OF OPERATION
3.1 SENSOR HEAD
The sensor measures precipitation by detecting the optical irregularities induced by particles falling
through a beam of partially coherent infrared light (in the sample volume). These irregularities
are known as scintillation. The twinkling of stars is a familiar example of scintillation. By
detecting the intensity of the scintillations which are characteristic of precipitation, the precipita-
tion rate is determined. Precipitation is measured using the sensor head “in-beam” optics.
Figure 1. Optical Rain Gauge Theory of Operation
The Model 6030 Optical Rain Gauge consists of these components.
A transmit modulator and infrared LED (TX)
A transmitter optical lens assembly
A receiver optical lens assembly
A photo detector and preamplifier (RX)
The sensor head is a self-contained unit consisting of electro-optical components,
heaters, a microprocessor, and integral cabling to connect with the electronics
enclosure.

Model 6030 Optical Rain Gauge User’s Manual
5
An Automatic Gain Controlled (AGC) normalizer
A signal processor
A temperature probe
A microprocessor and communications subsystem
The transmitter portion of the sensor head uses an infrared LED as a light source that is modu-
lated to eliminate interference in the system caused by background light. The LED has a very
long life time, has a relatively low power draw, is invisible to the eye, and presents no radiation
hazard to the user.
The LED is housed in the smaller of the sensor head boxes. A lens is used to collimate the LED’s
carrier-wave modulated light into a slightly diverged beam. The transmit and receive lenses are
both heated by self-regulating positive temperature coefficient (PTC) thermistor disks to a tem-
perature just above the ambient temperature to reduce dew and frost on the lenses.
The larger sensor head rectangular box houses receive optics, DC regulator, the AGC, signal
processing electronics, temperature probe, and microprocessor. The receive lens focuses the
transmitted light onto a photo diode. The scintillations in light intensity are thus detected and
amplified. A wide dynamic range Automatic Gain Control (AGC) circuit normalizes the pre-
cipitation-induced scintillation signal to the carrier-wave modulated light. Thus errors from var-
iations in the source intensity caused by LED aging or dirt on the lenses are eliminated. The
demodulated scintillation signal is then further filtered, processed, and averaged. The statistical
average of the measured scintillation signals gives an accurate measurement of instantaneous
precipitation rates.
The microprocessor uses an adaptive baseline technique to optimize the sensitivity of the Optical
Rain Gauge continuously. This technique ensures that the sensitivity is not affected by normal
atmospheric turbulence, and it minimizes the chance of false alarms (such as reporting precipita-
tion when none occurs). The processor uses the scintillation signal and temperature probe data to
determine the precipitation type and calculates the total water equivalent with the following
formula.
RR is the precipitation intensity, and kis a constant that depends on the ambient temperature, T,
as follows.
T> 3°C
k= 1
T< =4°C
k= 0.607
-40°C < T < 30°C
The microprocessor also provides diagnostic data about the condition of the sensor. The output is
an RS-232 data string that is converted to RS-485 by the Serial Sensor Processor in the electron-
ics enclosure.

Model 6030 Optical Rain Gauge User’s Manual
6
4.INSTALLATION
4.1 SITING AND INSTALLATION GUIDELINES
In general, the sensor should be located on level or slightly sloping ground where the sensor site
will be exposed to the same environment as the area around it. Ideally, the area around the site
should be free of buildings, trees, and other obstructions.
All Weather, Inc. recommends that the siting and installation follow the general guidelines
established by the Office of the Federal Coordinator for Meteorology (OFCM). The Federal
Standard for Siting Meteorological Sensors at Airports, OFCM document # FSM-S4-1987,
makes the following recommendations.
1. Distance from Obstructions —The distance between the sensor and obstructions such as
trees or buildings should be at least 2 times the height of the obstruction on all sides. For
example, if a tree20 m high is located alongside the sensor, the sensor should be at least
40 m away from the tree. This restriction reduces the effects of wind turbulence created
by the nearby obstruction and makes the precipitation measurement more representative.
Do not locate the sensor where tree branches or wires will hang over the sensor!
2. Separation from Turbulence and Contamination Sources —Do not mount the sensor near
building exhaust vents, strobe lights, or sources of smoke or steam. Where possible,
locate the unit as far away from runways and roads as possible to reduce optics fouling
from wind-blown road dirt. An ideal minimum distance is at least 30 m.
3. Sensor Height, Rigidity, Verticality, and Orientation —The OFCM recommends that the
Optical Rain Gauge be mounted at a height of 10 ft (3 m). This height is not always
possible because of constraints imposed by the site. Mounting the sensor head lower than
2 m or higher than 5 m is not generally recommended.
4. For AWOS installations, All Weather, Inc. recommends that the sensor head should be
mounted on a mast with a diameter of 50 mm (2") that is set in a concrete foundation is
recommended. The electronics enclosure should be nearby, keeping in mind that the
cable extending from the sensor head is 15 m long.
The installation must be rigid so that wind-induced vibration does not cause false alarms.
This can be accomplished by mounting the sensor to a thick wall pipe such as “Schedule
40” type or to a rigid boom arm 1 m in length or shorter. The Optical Rain Gauge may be
mounted on the top of a building if it located near the center of the building away from
the wind turbulence that may occur near the edges.
The sensor head must be mounted vertical within ±2 degrees so that the line aperture on
the in-beam lens is horizontal.
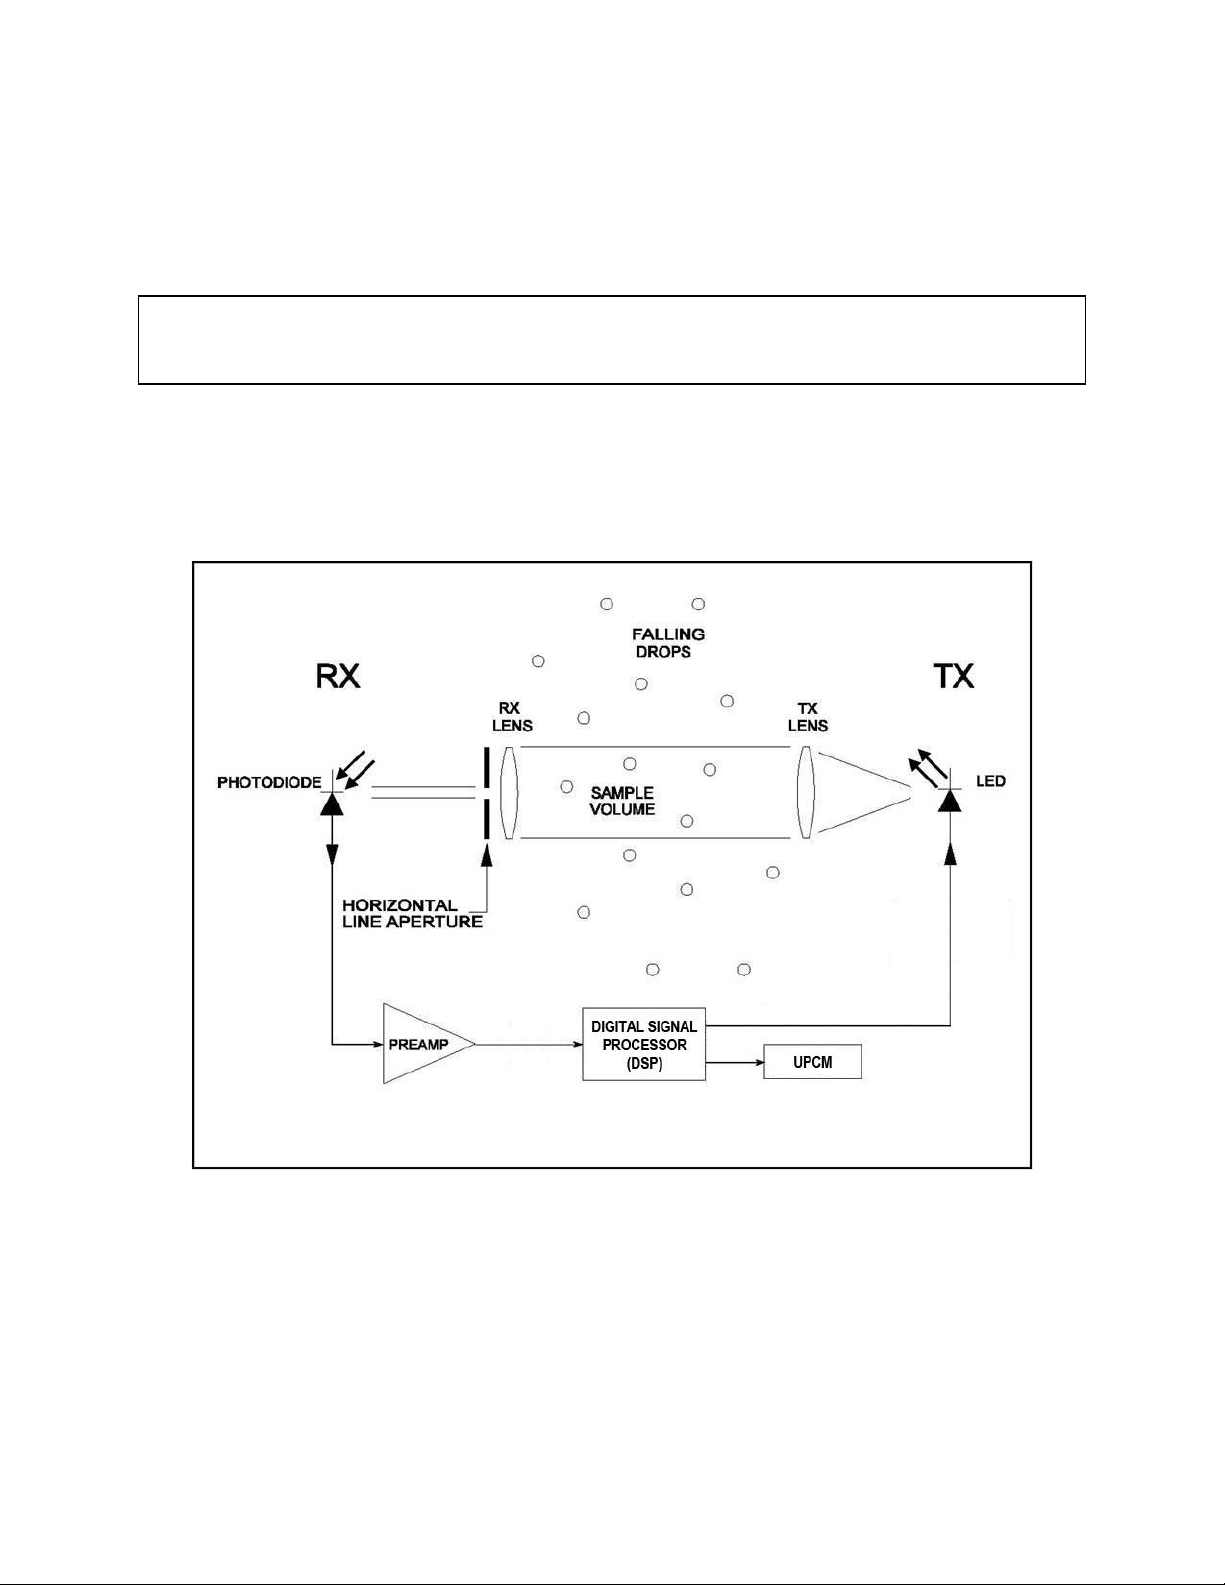
The Model 6030 Optical Rain Gauge may be installed almost anywhere outdoors. An
area free and clear of obstructions and contamination sources will help insure good
sensor performance.

Model 6030 Optical Rain Gauge User’s Manual
7
5. The sensor head is generally oriented with the transmitter head on the north side (in the
Northern hemisphere) so that the receiver optics face north. Align the sensor head so that
the receive lens faces north. If the orientation can be altered to either side of north to
obtain a “view” with fewer or more distant obstructions, it is generally acceptable to alter
the orientation up to ±30 degrees from north.
SUGGESTION: Take a picture at the installation site in each direction (north, east,
south, and west) to record the topography and obstructions for future reference.

Model 6030 Optical Rain Gauge User’s Manual
8
4.2 MECHANICAL INSTALLATION
4.2.1 Preparation
The sensor and site should be readied prior to beginning the installation.
The 6030 Optical Rain Gauge is packed in two heavy-walled corrugated cartons. One carton
contains the electronics enclosure and the larger, narrow carton contains the sensor head and
cables. Also packed in this carton are the sensor head U-bolt mounting hardware, and electronics
enclosure mounting hardware. When opening the cartons, be careful to avoid spilling the
contents.
Report any shortages or shipping damage to All Weather Inc. within 3 days.
Site Preparation
1. Choose the site using the guidelines in Section 4.2.1.
2. Following applicable electrical and building codes, install a concrete mounting base, mast
or tower, AC power cable, RS-485 signal cable, and ground rod.
SITING GUIDELINES
Sensor head mounted 2–5 m above ground
Rigid mounting pole
In-beam lens aperture horizontal to ±2 degrees
Receiving (RX) lens facing away from sun (north in Northern Hemisphere)
No overhanging trees, wires, or roof lines
Distance between sensor and closest obstruction at least 2 times obstruction height
As far from road, runway, and contamination sources as possible
CAUTION!
Do NOT drill holes in any portion of the sensor head or electronics enclosure! Doing so will void
the warranty and may allow water to enter the enclosure!

Model 6030 Optical Rain Gauge User’s Manual
9
4.2.2 Mount the Sensor Head
Figure 2. Mounting Sensor Head
1. Attach the sensor head using the two U-bolts to connect the mounting plate on the sensor
head and the mounting bracket with the ¼-20 hex locking nuts as shown in Figure 2. To
mount the head to a vertical mast or tower section, install the U-bolts and mounting
bracket horizontally. To mount to a horizontal tower section or boom arm, install them
vertically using the same holes.
Note that the metallurgy of the stainless U-bolts will cause the nuts to seize to the U-bolts
and twist them off. Lubricate the threads with anti-seize compound before assembling.
Do not tighten the nuts completely until the sensor head is installed on the mast or tower
and is oriented on the north-south axis as shown in Figure 3.
The sensor must be securely installed and correctly oriented to work properly.

Model 6030 Optical Rain Gauge User’s Manual
10
2. Rotate the sensor head until the receive lens is facing north.
Figure 3. Sensor Head Orientation
When mounting the sensor head on a tower, choose the tower leg that gives the larger
head an unobstructed view to the North without rotating the head assembly into the
tower. The head assembly should be completely outside the tower as much as possible.
3. Tighten the U-bolt nuts when the orientation is correct. (Do not overtighten such that the
mounting plate is bent).
4. Use a large-diameter (8–12 AWG) ground wire to connect the ¼-20 ground stud on the
bottom of the sensor head to a copper-clad ground rod close to the base of the mast (see
Figure 4).
5. Route the cables along the mast or tower to the electronics enclosure and secure them to
the mast or tower every meter using tie-wraps or other straps.

Model 6030 Optical Rain Gauge User’s Manual
11
Figure 4. Installation of Ground Cable

Model 6030 Optical Rain Gauge User’s Manual
12
4.2.3 Install the Electronics Enclosure
The Electronics Enclosure mounts on the mast below the sensor using the mounting hardware
included with the enclosure.
In installations where a non-frangible tower is used, mount the Electronics Enclosure on the mast
with the top of the enclosure 5'6" (167 cm) from ground level, or at least 3 ft (1 m) above
maximum snow level. In installations where a frangible tower is used, mount the Electronics
Enclosure on the mast with the top of the enclosure 3'6" (107 cm) from ground level. Attach the
Electronics Enclosure to the mast using mounting hardware as shown in Figure 5.
Figure 5. Mounting Enclosure on Mast
These additional steps will help keep the mounting secure and corrosion-resistant.
Apply anti-seize compound to all external threaded connections.
Once the installation of the enclosure has been completed, apply a light spray of
corrosion block to all metallic connectors and threaded fasteners.

Model 6030 Optical Rain Gauge User’s Manual
13
4.3 ELECTRICAL CONNECTIONS
Figure 6 shows the external connections at the bottom of the enclosure.
AC power conduit.
Signal cables from sensor head.
Serial connection to DCP.
Figure 6. External Connections at Enclosure Bottom
Route the cable from the sensor head to the bottom of the electronics enclosure. Secure the cable
to the mast using tie-wraps or other straps.
1. Route the cable from the sensor head into the electronics enclosure using the cable gland
and grommet shown in Figure 6.
2. Connect the wires to the connector on the DIN rail shown in Figure 7 according to the
wiring diagram in Figure 8.

Model 6030 Optical Rain Gauge User’s Manual
15
Figure 8 and Figure 9 summarize signal and power wiring for the Model 6030 Optical Rain Gauge.
Sensor Head Heater (UPCM P4)
Function
Color
1
DCOUT
YELLOW
2
POWER GROUND
GRAY
Sensor Head (Serial Output 2 Pin)
Function
Color
1
DCOUT
RED
2
POWER GROUND
BLACK
4
RS-232 Tx
GREEN
5
SIGNAL GROUND
BROWN
7
RS-232 Rx
WHITE
AC Line Input
Function
Color
1
HOT
BLACK or BROWN
2
NEUTRAL
WHITE or BLUE
3
GROUND
GREEN
Figure 8. Optical Rain Gauge Signal and Power Wiring
(non-twisted-pair sensor wiring)

Model 6030 Optical Rain Gauge User’s Manual
16
Sensor Head Heater (UPCM P4)
Function
Color
1
DCOUT
YELLOW
2
POWER GROUND
BLACK
Sensor Head (Serial Output 2 Pin)
Function
Color
1
DCOUT
RED
2
POWER GROUND
BLACK
4
RS-232 Tx
BLUE
5
SIGNAL GROUND
BLACK (2 wires)
7
RS-232 Rx
GREEN
AC Line Input
Function
Color
1
HOT
BLACK or BROWN
2
NEUTRAL
WHITE or BLUE
3
GROUND
GREEN
Figure 9. Optical Rain Gauge Signal and Power Wiring
(twisted-pair sensor wiring)
Table of contents
Other All Weather Inc Weather Station manuals