Alleswolke UCM3310S User manual

1
LTE Smart Dashboard Camera System
Quick Start Guide
Model: UCM3310S

2
What’s Included:
1×Alleswolke Smart LTE Hub
1×Alleswolke Smart Dashboard Camera
1×Alleswolke Smart OBD-II Power/Data Cable
1×Camera USB Type-C Power Cable
1×Emergency Button with Strap
1×Camera Dashboard/Windshield Mount
1×Windshield Clean Wiper
1×Hook-and-Loop Fastener
1×Spare Mounting Sticker
10×Cable/Wire Clips
1×Quick Start Guide

3
Get The App
Download the free Alleswolke LTEdashcam Smartphone
application to start.
You may scan the QR-code and download the smartphone
applications via our download guiding web page.
Please follow the app’s guide to sign-up and log-in to the app.

4
SIM Card
The SIM card has been already installed into your device. In any
circumstance that you wish to check or install a new card
yourself, push the SIM card to lock/unlock, make sure that the
chip side faces down and the odd corner faces outward.

5
Mount Your System
Install camera onto the camera mount, peel the protection cover
from the sticker on the mount, and press the mount firmly onto
the desired place of windshield or the top center of dashboard.
The default lens position is facing toward to the windshield for
capturing road picture during driving. Install near the driver’s
sight of rear view mirror in order to avoid the obstruction of
camera’s lens visual coverage when it rotates toward the inside.
6
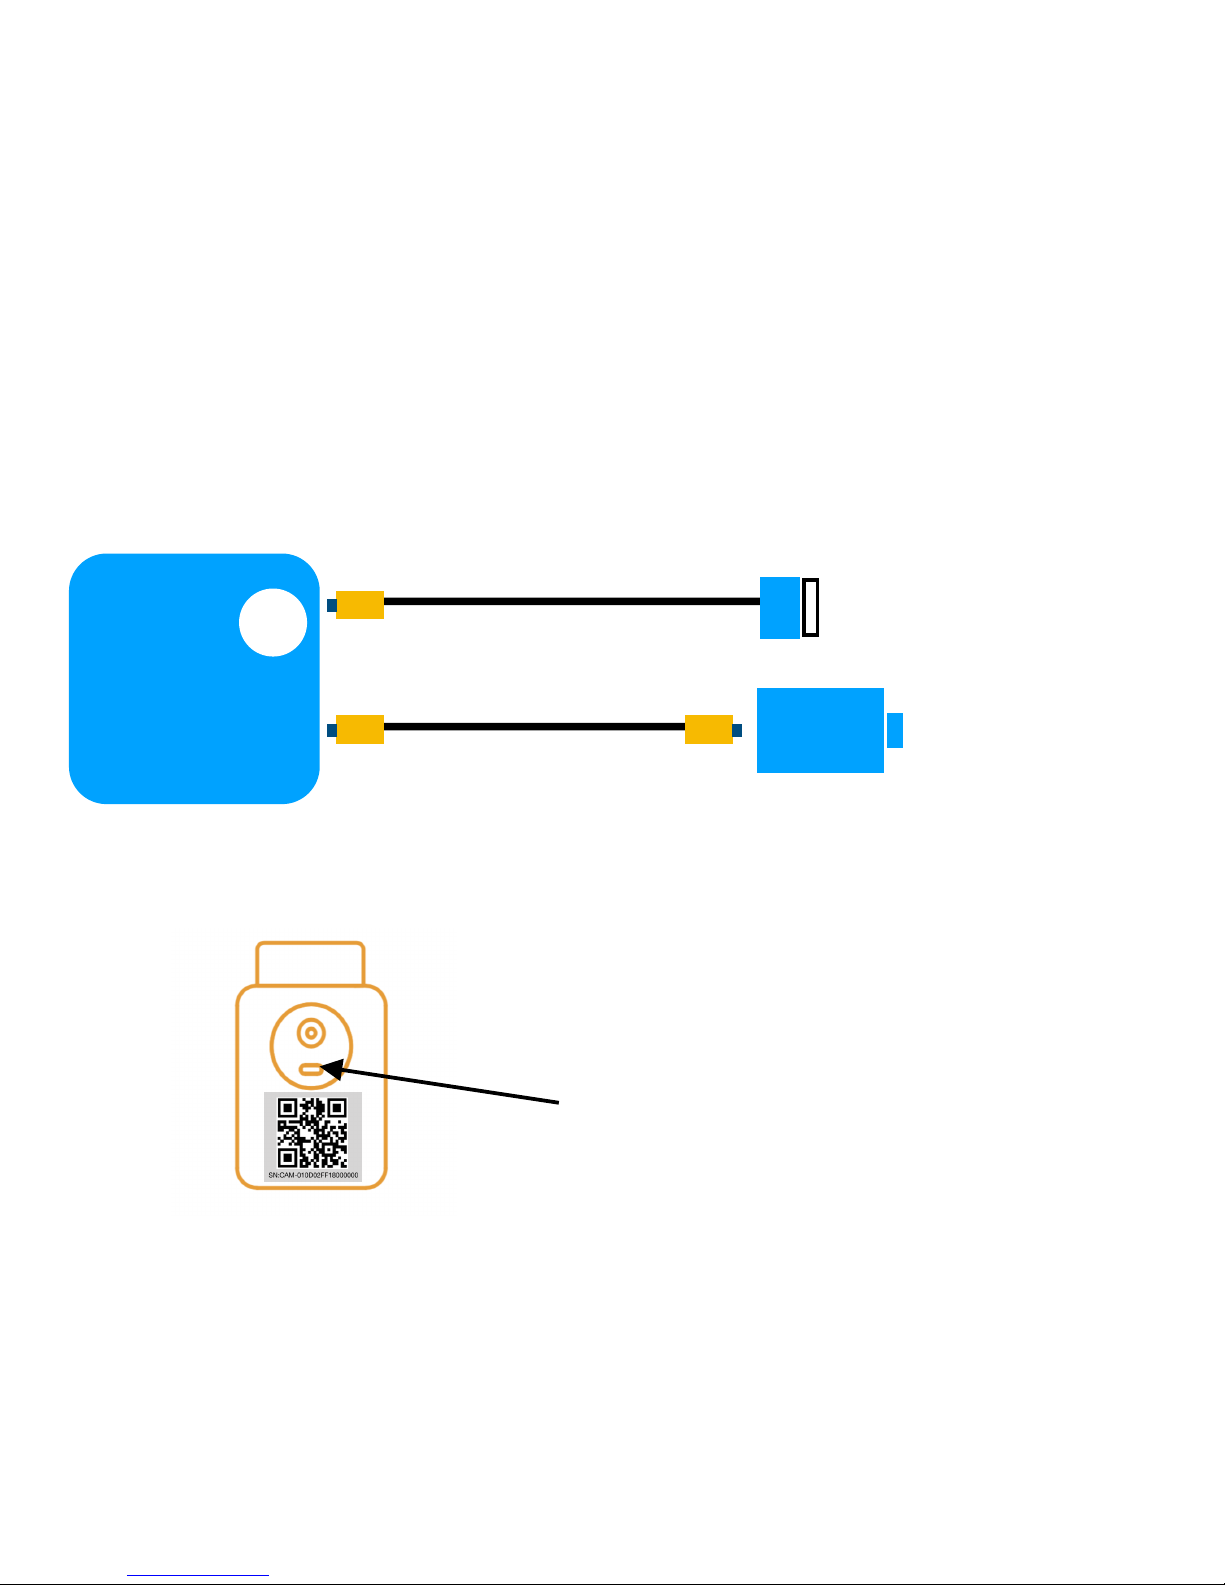
Connect Cables
1. Connect the USB-C
Cable between Hub
and Camera.
2. Connect the OBD-II
Power/Data Cable on
the Hub’s side (Micro-
USB).
3. Insert Micro SD card
into the camera.*
*Micro SD card is not included and
needs to be purchased separately.
Requires Class 10. Supports up to
64GB or 128GB in FAT32 Format.
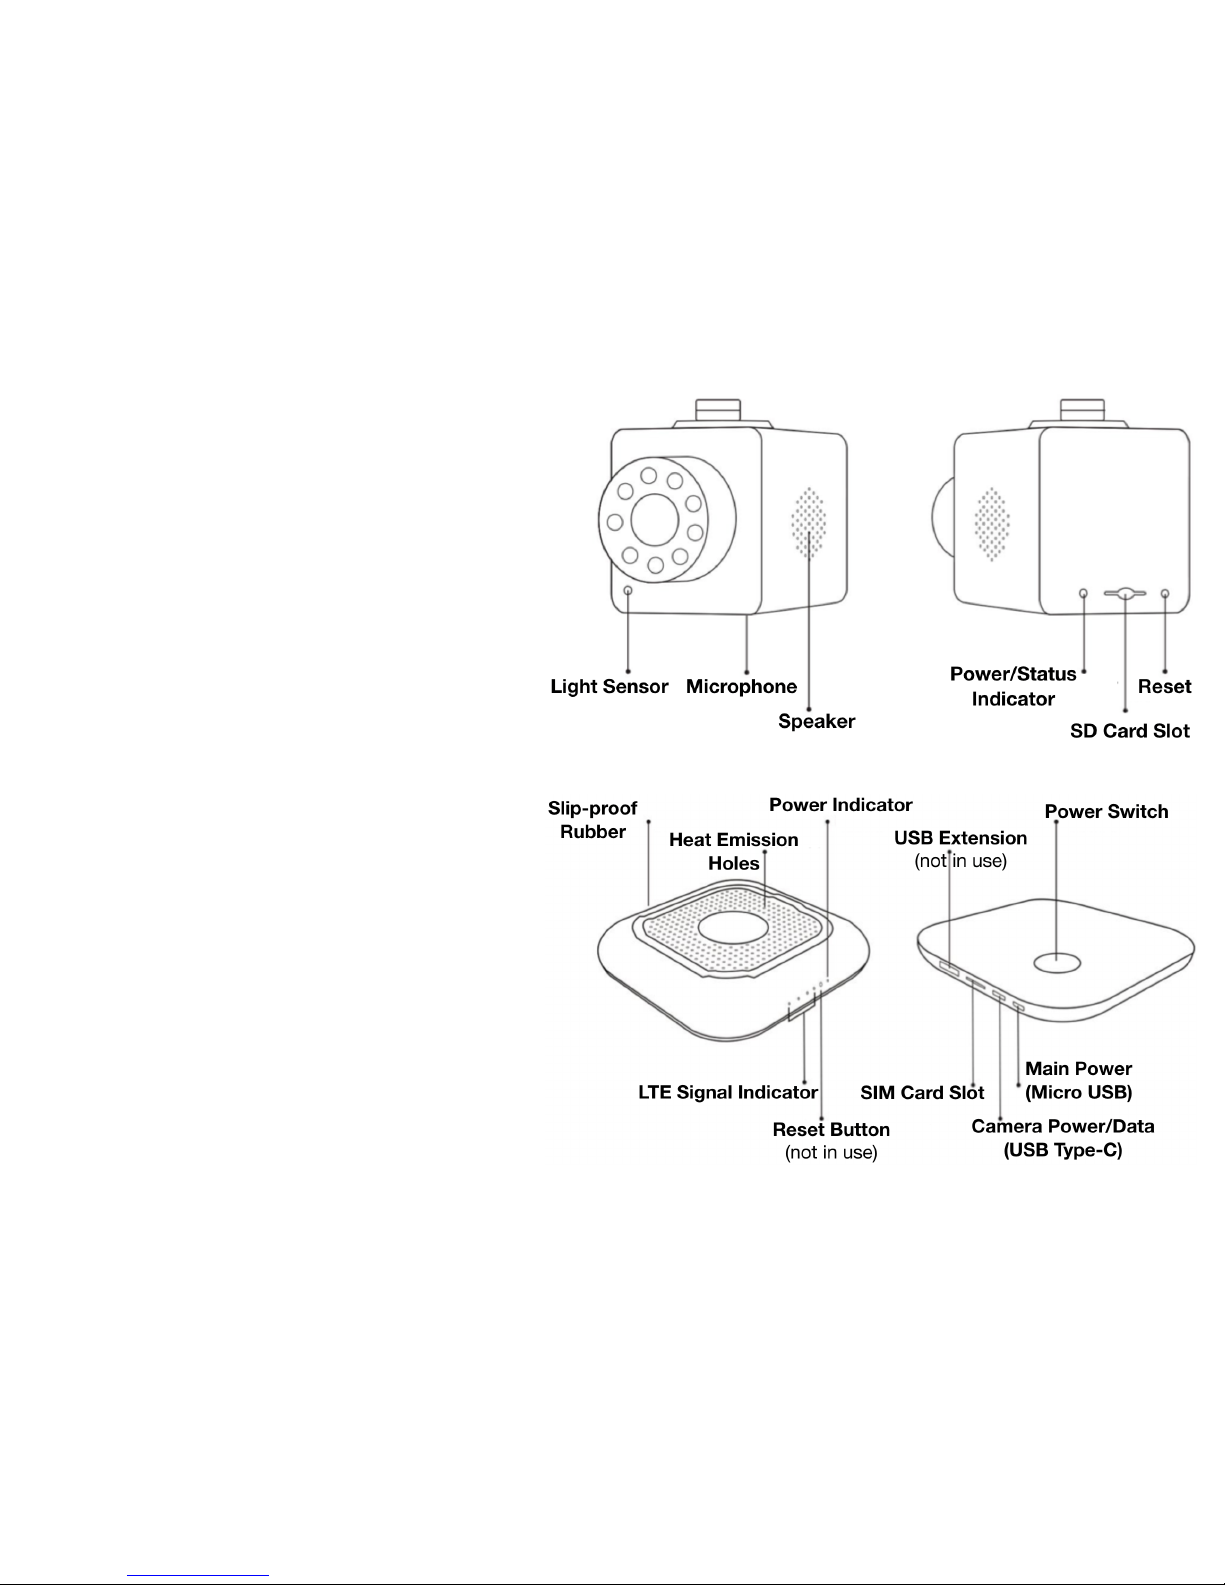
7
Connect Cables (cont.)
Hub
USB Type-C Cable
Micro USB to OBD-II Cable
OBD-II Port
Camera
Wire Connection Diagram
Camera’s USB Type-C port

8
Insert Cable to OBD-II Port
The OBD-II* port of vehicles is usually located underneath of the
dashboard, please check the manual of your vehicle or consult
auto specialists to locate it in your vehicle.
*Smart OBD-II Power/Data Cable supports 9V-36V input and is compatible with
all regular light vehicles and heavy duty commercial vehicles sold in the United
States after January 1, 1996 with OBD-II port equipped.

9
Mount And Turn On The Hub
Wire clips x10
Use the Hook-and-Loop fastener
to mount the hub onto the top of
the dashboard. Make sure that
the car ignition is turned on, and
then press the power switch.
Use adhesive wire clips to keep
your windshield and dashboard
clean and organized.
Peel the protection cover from
the sticker and press the clip
firmly onto the desired place of
windshield or dashboard.

10
System Status LED
After turning on the hub, you
will hear a prompt sound from
camera to indicate that the
system is starting. The signal
LED indicator on the hub will
blink for a few seconds and
stay solid.
If the LEDs keep blinking,
please check the LED status
chart below to identify the
problem or contact our support.
Power LED indicator Signal LED indicator
Normal Running status, LEDs stay solid
Signal LEDs will blink for a few seconds to finish
system boot up and then flash in sequential-loop
order to finish LTE network connection.
Warning: When the system is booted up for the first time, it may take a
longer time for the backend of cellular network to finish the registration
process. Please re-power cycle the Hub to minimize the waiting time.
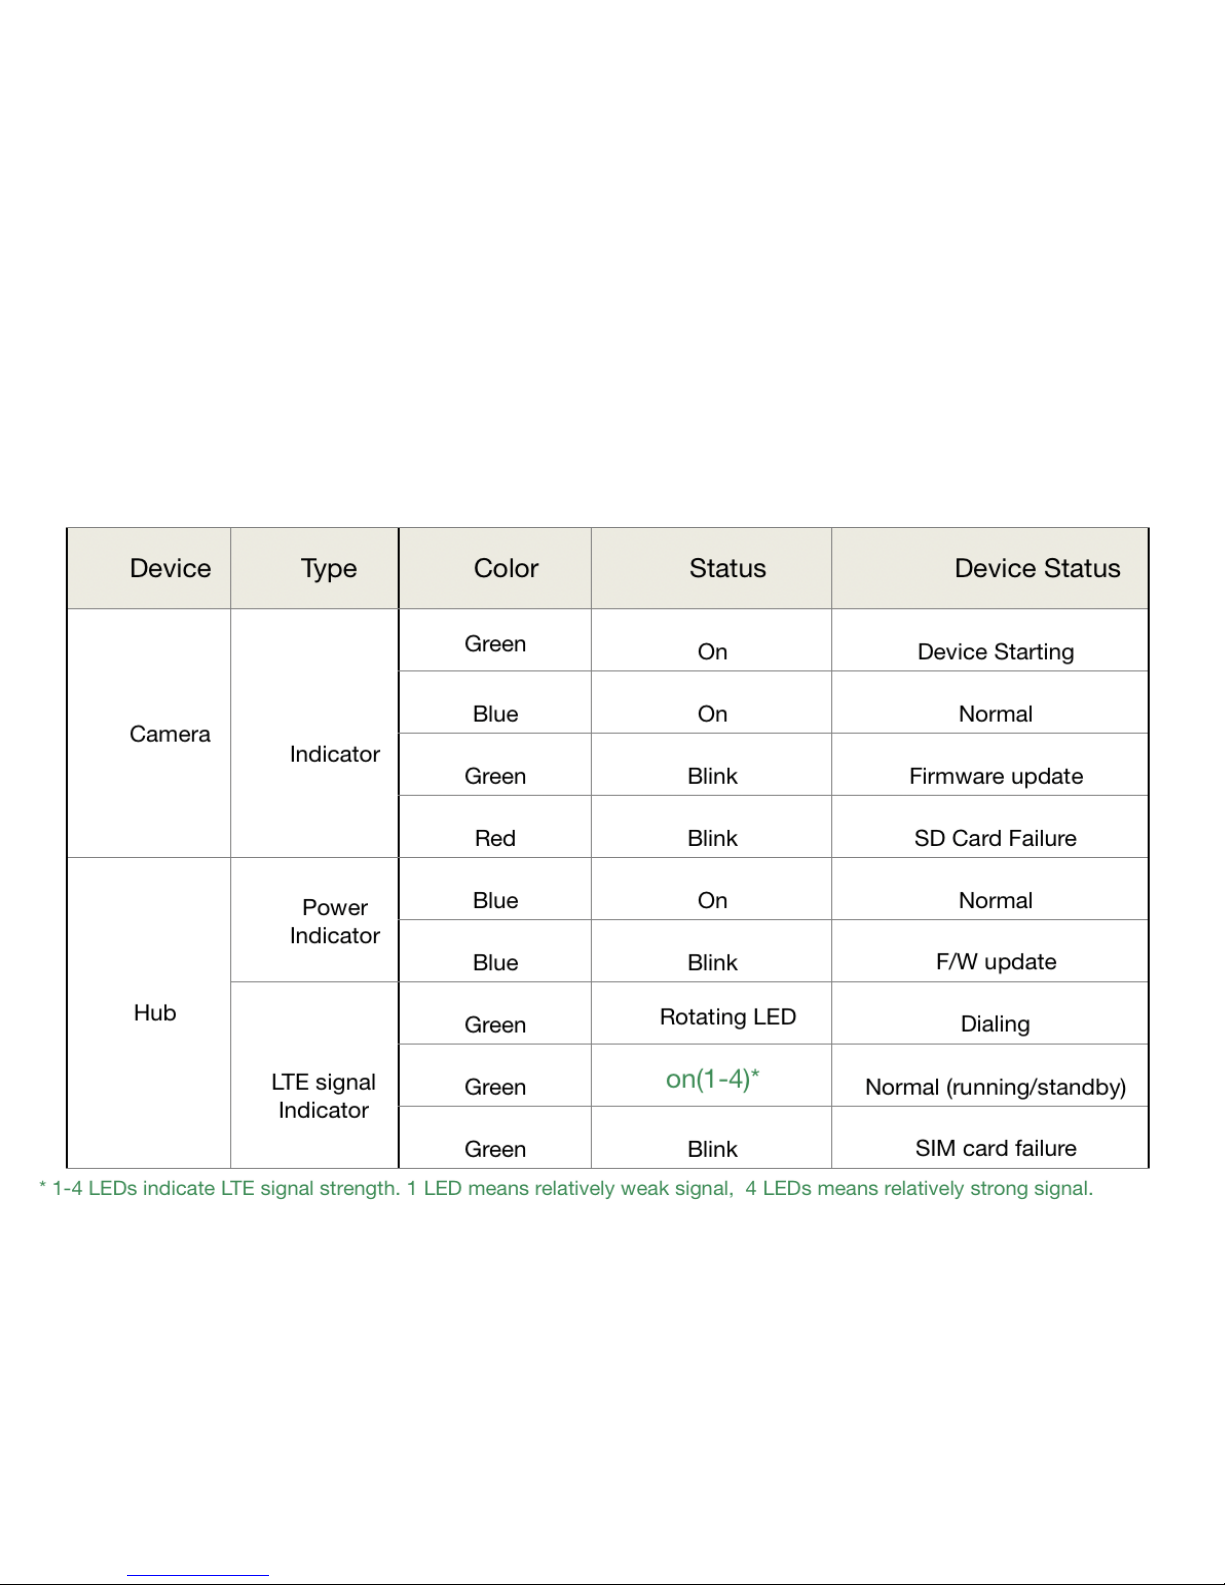
11
LED Status Chart
12
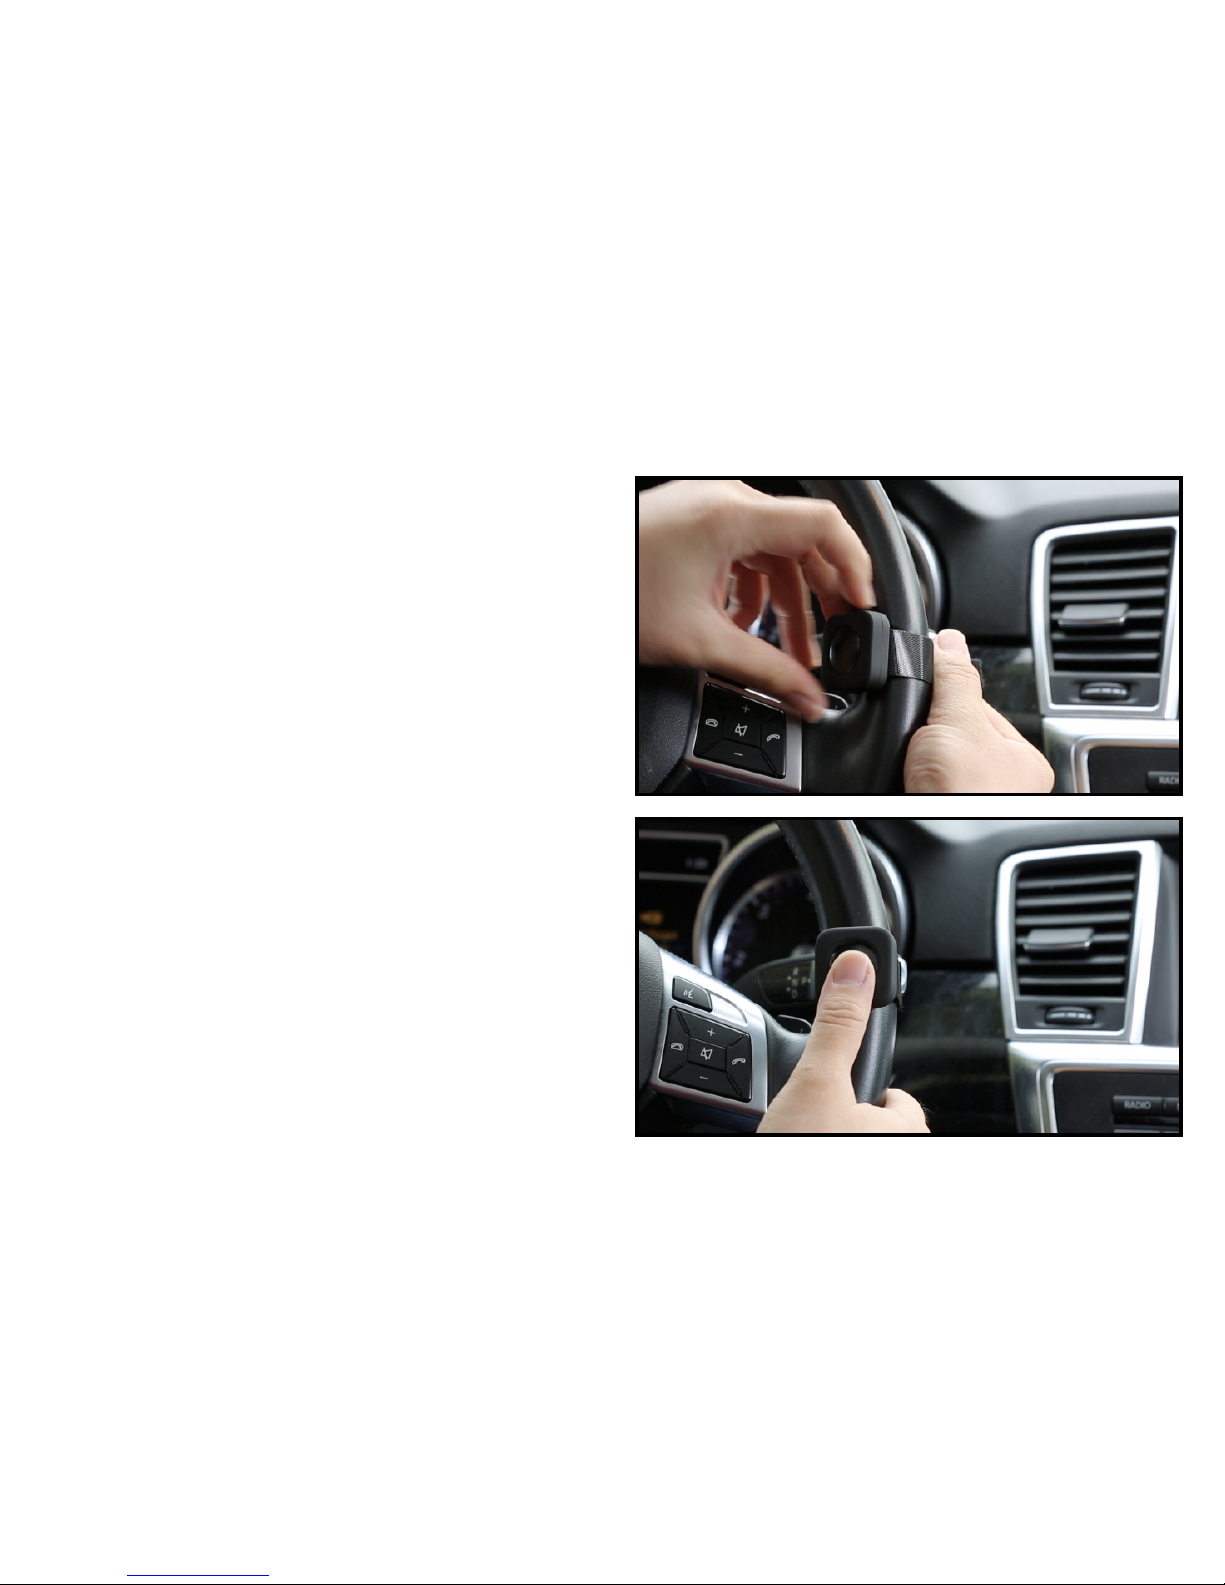
Install Emergency Button
Install the Emergency Button
with the Self-Grip Strap by
tying the panic button around
the steering wheel firmly, or
anywhere else that is firm and
convenient to reach. You can
also use the spare double-side
sticker to mount the button on
the dashboard.
When the engine is on,
pressing the button shortly* will
trigger an emergency event.
Long-pressing* the button will
switch the system into Patrol
Mode.
*See user manual for details

13
Activate a System
Log in the app Tap “add camera” Scan the QR-code on Camera
14
You Are Done!
Congratulations! The
system has been set
up and ready to go.
To view the full user
manual, watch useful
tutorial videos, find
troubleshooting tips,
or get support, please
visit
alleswolke.com/dashc
am_support.html
15
Support Page
For product FAQ, troubleshooting, user
manual, feature introduction, application
notes and overall support, please visit
alleswolke.com/dashcam_support.html or
scan the QR-code.
For watching the installation video and
other introduction tutorial video clips, please
visit alleswolke.com/dashcam_videos.html
or scan the QR-code.
To contact our support team, please
visit alleswolke.com/customersupport.html
or scan the QR-code.
To log into the web-portal,
Please visit myalleswolke.com
Support/Documents
Installation Video
Contact Us

16
©2018 alleswolke Inc. “alleswolke” logo is trademark of alleswolke inc. App Store is a service mark of
Apple inc., Registered in the U.S. and other countries, Google Play and the Google Play logo are trademark
of Google inc. 3M is a trademark and company name of the 3M company or the Minnesota Mining and
Manufacturing Company.
Compliance and FCC document
For Compliance, FCC document and other regulatory information, please visit
alleswolke.com/compliance.html
About alleswolke inc.
For company information including company business address and contact information, please visit
alleswolke.com
Product designed in California, USA
Assembled in China
www.alleswolke.com
October 2018 QSG v1.08
Table of contents


