ALLNIC AUDIO h-1201 User manual

ALLNIC AUDIO
H-1201 PHONO STAGE
OWNER’S MANUAL

ALLNIC AUDIO
H-1201 PHONO STAGE
Thank you for purchasing this Allnic Audio H-1201 Phono Stage. We are
certain your trust in Allnic Audio and Hammertone Audio, as well as your
appreciation for the sound of this high-quality device, will be rewarded by
its excellent operation for years to come.
Please read this entire manual before you connect the H-1201 to the other
components of your system and the wall outlet.
Allnic Audio USA
Albert Porter
Dallas, TX. 75231
Phone: 214-613-6148
Website: www.allnicaudiousa.com
** Information and specifications for the Allnic Audio product described in this manual
are subject to change without notice.

3
TABLE OF CONTENTS:
___________________________________________________________________
INTRODUCING THE H-1201 PHONO STAGE 4
___________________________________________________________________
WHAT’S IN THE BOX? 4
___________________________________________________________________
SAFETY 4
___________________________________________________________________
CLEANING
Chassis
Connectors 4
___________________________________________________________________
INITIAL SET-UP
Location, Location, Location
Power Connection
Inputs
Outputs
Moving Coil (MC) Transformer Controls
5
___________________________________________________________________
INITIAL POWER ON 6
___________________________________________________________________
OPERATION 6
___________________________________________________________________
TUBES 6
___________________________________________________________________
SPECIFICATIONS 6
___________________________________________________________________
WARRANTY 8
___________________________________________________________________
FIGURES 8
Please read about SAFETY before you attempt to use the H-1201 - we care
about our customers and the equipment, and we want you to enjoy this
product for a long time!

4
INTRODUCING THE H-1201 PHONO STAGE
The H-1201 is Allnic Audio’s entry level phono stage
model. Like all Allnic Audio products, it uses Permalloy
(iron and nickel alloy) for its transformer cores. Allnic is
grateful to Mr. G.W. Elmen of Western Electric for
inventing Permalloy for transformer core use, and in so
doing, providing an enormous service to recorded
music listeners everywhere.
The H-1201 has the following features:
High-quality, NOS E180CC twin triode tubes
CR type RIAA equalization, precisely compensated
within +/- 0.3dB
Automatic, semi-conductor voltage regulation
circuit, ensuring exceptionally quiet operation
High quality Moving Coil Step-up Transformers
with Permalloy cores
MC transformers variable gain (+22dB, +26dB,
+28dB and +32dB)
No negative feedback design
Pure Class A operation
New vacuum tube damping technology – Allnic
Audio’s patented "Absorb GEL tube damper"
technology prevents harmful vibrations from
reaching the signal / gain tubes and, therefore,
prevents micro-phonic noise propagation in the
tubes. The Allnic Audio Absorb Gel damper
technology effectively solves a problem that
plagues most tube amplification systems. Provided
other tube components do not introduce micro-
phonic noise into your system, with the Absorb Gel
damping system, you will enjoy a degree of
transparent sound that will surprise and please
you.
As are all Allnic Audio products, the H-1201 is fully
RoHS (EU Reduction of Hazardous Substances
regulation) compliant in construction and materials
WHAT’S IN THE BOX?
Please check that the shipping box contains the
following:
One (1) Allnic H-1201 phono stage – in natural
aluminum or black, depending on your order request
One (1) IEC type power cord
One (1) Owner’s Manual
Note:
1) The H-1201 ships with the tubes installed.
2) The H-1201 will work with most IEC type
aftermarket power cords. Of course, only you can
determine the power cord that works most
synergistically with the H-1201 in your system.
3) Be sure the H-1201 is labeled for the AC voltage of
your location. If it is not, please contact
Hammertone Audio (See Figure 1).
We advise that you keep the box and other packing
materials that your H-1201 came in. It will be useful if you
sell your H-1201 or in the unlikely event you need to ship it
for service.
SAFETY
Remove ALL protective cushioning material inside
the tube chimneys before operation. The tube
chimneys should contain NOTHING except the
tubes. You may experiment with the tube damping
rings, on or off.
Disconnect the power cord by pulling the plug, not
the cable.
Do not attempt any repairs. Do not remove the
unit’s chassis covers without specific authorization
from Hammertone Audio.
Keep the power cord away from heat sources
Keep the unit away from liquids – do not allow any
liquid to enter the interior of the unit.
When the unit is moved from a cold to a warm
environment, allow sufficient time for any condensation
to evaporate before plugging the H-1201 into an AC
connection.
See the notes on “Location, Location, Location”.
CLEANING
A. Chassis
Use only a soft, lint-free cloth dampened slightly with water
only (NO cleaning fluids!) to clean the faceplate and chassis of
the H-1201 and its power supply.
B. Connectors
You may use any good quality contact cleaner recommended

5
for such applications to clean the contacts from time to
time, as you deem appropriate.
INITIAL SET-UP
A. LOCATION, LOCATION, LOCATION
Like all audio products using tubes, the Allnic Audio H-1201
needs to be placed on a solid stand in a location that provides
good air circulation around the phono stage.
DO NOT cover the top of the H-1201 phono stage or
tube chimneys.
DO NOT place the unit on carpet or foam.
DO NOT subject the unit to knocks and shocks as you
move it around. This advice is meant particularly for
those who may want to place the H-1201 on some
kind of after-market isolation feet or similar devices.
Dropping the H-1201 is not a good thing to do and
may void the warranty.
DO NOT place the unit near a strong light or heat.
DO NOT place anything heavy on the unit.
DO NOT allow rubber or vinyl materials to rest on the
unit’s chassis for long periods of time. This could
discolour the metal.
DO place the unit on a shelf or stand that is stable
and not subject to vibration or sudden shock.
DO consider using a high quality power cord and
inter-connects, for both inputs and outputs. The H-
1201 is a highly sensitive piece of electronic designed
for neutrality and will output what you put into it.
DO try to place the H-1201 away from major sources
of RFI and EMI; though well shielded, the H-1201 will
function best away from large power transformers
and other sources of such interference.
B. POWER CONNECTIONS
The H-1201 uses a standard three prong male IEC
connection for AC input. You need to use a power cord with
a female three prong IEC connector at one end (See Figure
1).
The H-1201 power supply you have purchased is set
internally for AC 110/120 volt – 60 HZ operation. There is no
way to change this to another AC setting without return of
the unit to the factory for re-wiring, at the owner’s cost,
including transport both directions.
C. INPUTS
There are two (2) pairs of single-ended (RCA) inputs, one for
Moving Coil (MC) cartridges and the other for Moving Magnet
(MM) cartridges. These two pairs are located in the middle of
the rear of the H-1201 (See Figure 1) and labeled “MC – input –
MM” between the top and bottom connectors. Facing the rear
of the H-1201, the left hand pair of inputs is the moving coil
cartridge input; the right is for moving magnet cartridges. Each
pair of inputs is aligned vertically, with the left channel “left”
labeled input at the top and the “right” labeled input on the
bottom.
To the left and right (facing the rear panel) of the MC and
MM input connections respectively is a screw type ground
connector. Either or both of these may be used for multiple
ground connections.
When you are facing the front of the H-1201, the input
connections are in the centre of the unit, with the MC
connections on the right and the MM connections immediately
to their left.
The H-1201 has been designed and manufactured to work most
synergistically with Allnic Audio preamplifiers, pre-phono stages
and equalization products.
D. OUTPUTS
The H-1201 is equipped with one set of unbalanced or “single-
ended” (RCA) outputs The output connection is just to the left
(facing the rear panel) of the AC IEC power cord connection. The
left channel output connection is the top one and is labeled
“left”; the bottom, “right” (See Figure 1).
E. Moving Coil (MC) Transformer Controls
On the top of each channel’s MC transformer on the centre
rear of the chassis deck of the H-1201 (See Figure 4), there is
a rotating control (See Figure 3). Turn the control knob to
select from four gain factors: +22dB, +26dB, +28dB and
+32dB. Combined with the H1201's 40dB native gain, for MC
there is 62dB, 66dB, 68dB and 72dB of gain available.Each of
the second set of indicators on the top of the transformers
only marks the impedance tied to the gain setting diagonal

6
to it. The impedance and gain relationships are not user
adjustable.
You should experiment with the gain settings to find the
best setting for your cartridge. Use identical settings for
both transformers to avoid channel imbalance.
INITIAL POWER-ON
Once you have your H-1201 in place and all connections have
been made to your turntable and preamplifier, you are ready
to turn on the power for your H-1201. Before you power up
the H-1201, though, be sure you have:
removed ALL the cushion materials from inside the tube
chimneys.
turned the volume down or muted your preamplifier
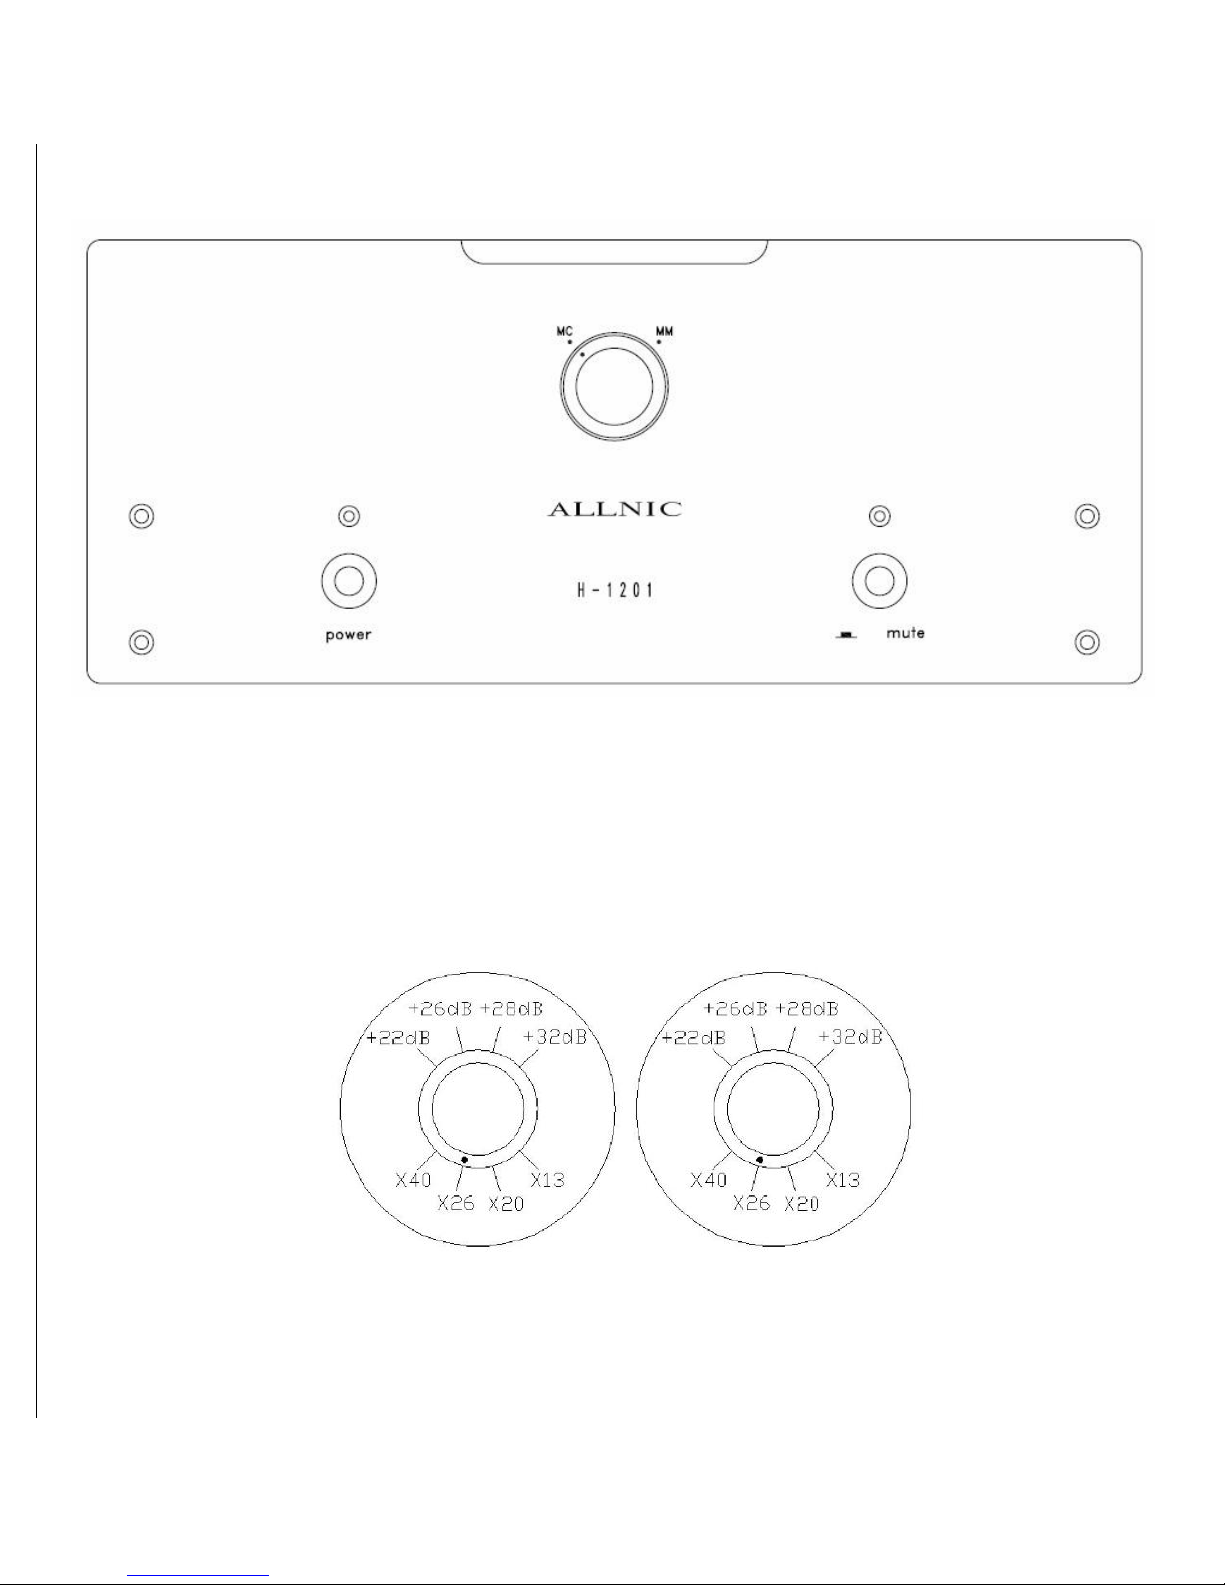
muted the H-1201 by ensuring that the button switch
labeled “mute” on the right hand side of the front panel
of the H-1201 is not “depressed” (i.e., it is “out”) (See
Figure 2)
rotated the single knob on the front of the unit, with MM
and MC labels at its top right and left respectively, to the
appropriate input, corresponding to the input you will
use initially, either MC or MM (See Figure 2)
if you are using a moving coil cartridge, set the MC
transformer controls on the top of the chassis to the
factor that you will try initially (See Figure 3)
checked that all your connections are snug
To turn on the H-1201, press in the button switch on the left
front panel. Pressing the power button again will power down
the H-1201 (See Figure 2).
OPERATION
The H-1201 has a “soft start”. After pushing in the power
button, the H-1201 will take about 40 seconds to be ready for
play. Each time the H-1201 is powered on, the orange light on
its front panel above the power button will illuminate. If the
“mute button is in the “on” position (button “out” – not
depressed) when you power on the H-1201, the light above
the mute button will illuminate red and stay red after the soft
start period. If the mute button is depressed (mute off), when
you power on the H-1201, the mute light will first glow red,
and after the soft start period will change to orange.
NOTE:
Please mute your H-1201, and/or reduce your preamplifier’s
volume control, during transformer gain adjustments. Be aware
if you are increasing gain, that you may hit an uncomfortably
loud volume level.
To avoid surges to the speakers, it is best to switch between the
MM or MC inputs only with the H-1201 in “mute” mode and
with your preamplifier volume down or otherwise muted.
From this point on, operation is straight-forward. All functions
except for MC transformers’ gain selection are controlled from
the front panel. Of course, BE CAREFUL about differences in gain
between your sources. Generally, disc players and tuners will
have greater gain than phono stages. That means the volume
setting for listening to your turntable might be too high for
listening to CD’s.
When you are finished listening, turn off your power amplifier(s);
then turn off your preamplifier and then turn off the H-1201 last
by pressing the power switch on the left side of the unit’s front
panel.
In the case of any failure, please contact Hammertone Audio for
assistance.
TUBES
The H-1201 uses the following tubes (See Figure 4):
Four (4) x NOS E180CC twin triodes
All consequences of changing or attempting to change tubes are
borne by the user unless by express agreement between the
owner and Hammertone Audio. Allnic Audio and Hammertone
Audio are not liable in any way whatsoever for any injury or loss
incurred by the user or for damage to the H-1201, any of its
parts, or tubes or replacement tubes resulting from the user
changing or attempting to change tubes.
SPECIFICATIONS FOR THE ALLNIC AUDIO H-1201 PHONO
STAGE
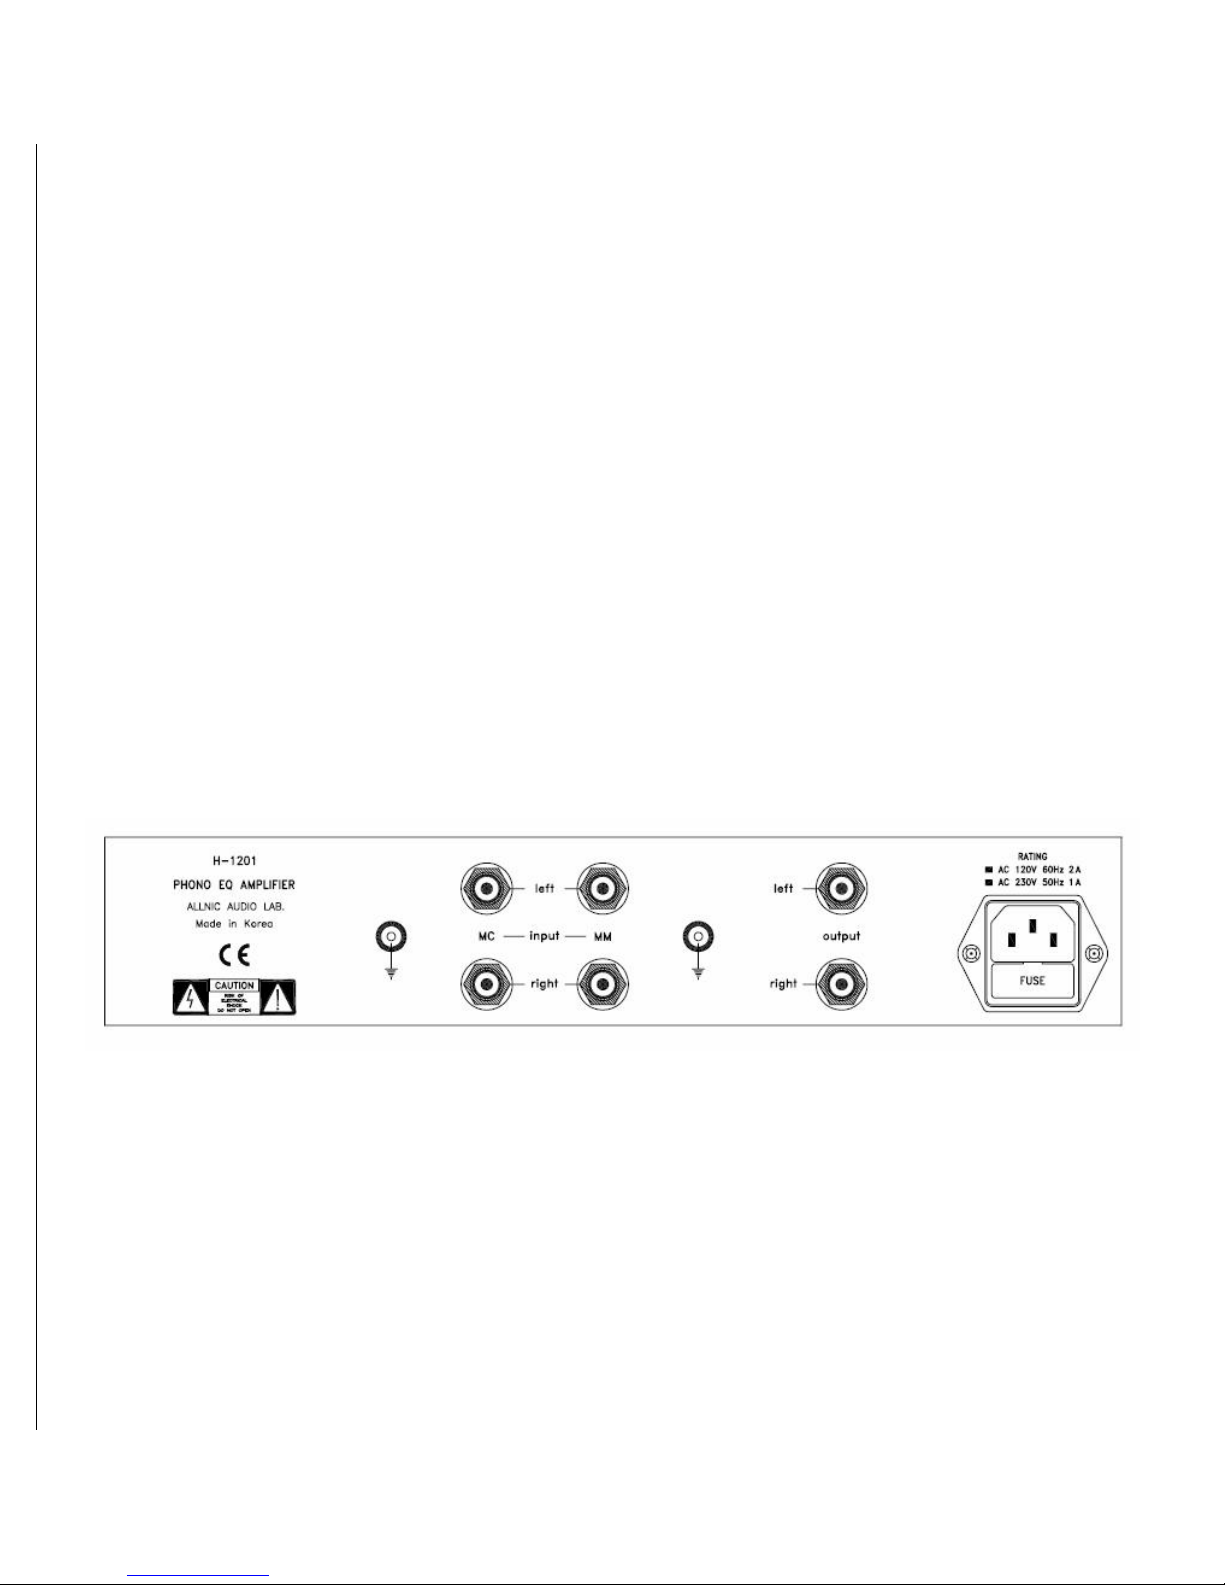
Inputs: One (1) pair Moving Coil (MC)
unbalanced (RCA)
One (1) pair Moving Magnet (MM)
unbalanced (RCA)
Ground: Two (2) x screw type terminal

7
Output: One (1) pair x unbalanced (RCA)
Frequency (RIAA): 20Hz ~ 20KHz (±0.3db)
Voltage Gain: MM: +38db (1KHz)
MC: Variable: +22dB, +26dB,
+28dB, +32dB (1Khz)
Input Impedance: MC up to 280Ω
MM 47kΩ
Maximum Input Voltage
(MM, non-clipping): 20Hz / 30mV
100Hz / 60mV
1KHz / 300mV
10KHz / 500mV
THD
(Total Harmonic
Distortion): Less than 0.3% (1KHz, Output 1V)
Output Impedance: 1.2KΩ (on-off method)
S/N Ratio: -68db (CCIR, 1KHz)
Power Consumption: 20W / 220V @ 60Hz
Tubes: E180CC - New old stock -
approximately electrically (not
sonically) equivalent: CV8431, 7062,
5965, 12AV7, 6414, 6829
Fuse: AC 2A, 250V
Dimensions: 310mm (~12.3 inches) x 230mm
(~9.1 inches) x 140mm (~5.6 inches)
(W x D x H)
Weight:
Unpacked: 4.5 Kg (9.9 lbs)
Packaged: 6 Kg (13.2)

8
WARRANTY
All Allnic Audio amplifier products are warranted against materials and manufacturing defects for parts, excluding tubes, and
labour for two (2) years from date of purchase. Tubes are warranted against materials and manufacturing defects for one (1) year
from date of purchase. The warranty is transferable for the balance of the original purchaser’s warranty period, provided, as
stated below, no unauthorized repairs or modifications have been performed on the product. Date of purchase is the date
indicated on the invoice for the product issued by Hammertone Audio.
For the warranty to be valid, a defective product must be returned to Hammertone Audio for service prior to any unauthorized
attempt to repair. Any repair work on an Allnic Audio product not specifically authorized by Hammertone Audio will void the
warranty on the product.
FIGURES
Figure 1 – H-1201 Rear Panel View

9
Figure 2 – H-1201 Front Panel View
Figure 3 – H-1201 Chassis Top View - MC Transformer Controls

10
Figure 4 – H-1201 Top View

11
Allnic Audio USA
Albert Porter
Dallas, TX. 75231
Phone: 214-613-6148
Website: www.allnicaudiousa.com
** Information and specifications for the Allnic Audio product described in this manual
are subject to change without notice.
Table of contents