Allo.com Shield STM User manual


User Manual
Shield STM Appliance 1.0
Version 1.0

User Manual v1.0
www.shield.com 1
Table of Contents
1. Introduction ..........................................................................................................1
1.1. Overview: .................................................................................................................... 1
1.2. STM Deployment Considerations................................................................................ 3
2. Initial Setup & Configuration...............................................................................4
2.2. Default Configuration................................................................................................... 4
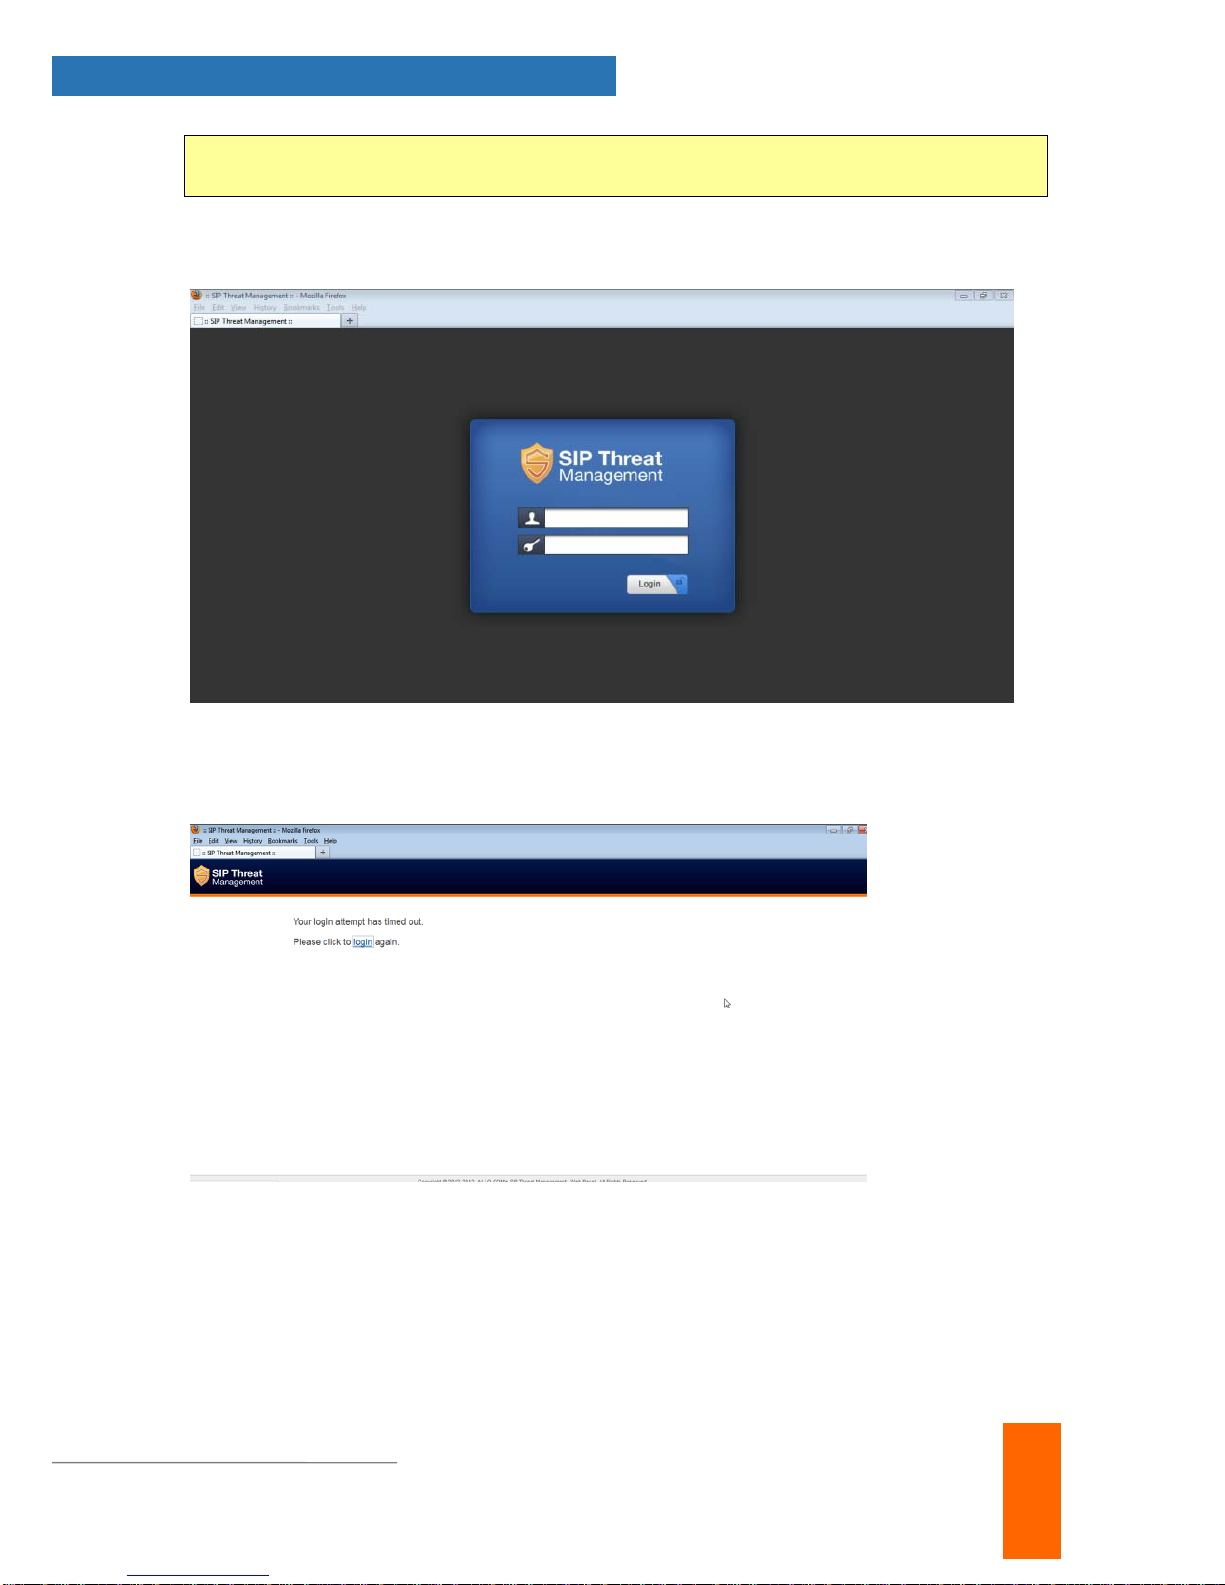
2.3. Accessing the WebUI.................................................................................................. 5
2.4 WebUI Session timeout................................................................................................ 7
2.5 WebUI Settings ............................................................................................................7
2.4 Dashboard.................................................................................................................... 8
3. Configuring the Device........................................................................................9
3.1. General Settings........................................................................................................ 10
3.2. Time Settings ............................................................................................................11
3.3. Management Access................................................................................................. 11
3.4. Signature Update ...................................................................................................... 12
3.5. Logging...................................................................................................................... 13
4. Configuring the SIP Security Policies..............................................................14
4.1. SIP Security Settings................................................................................................. 14
4.2. DPI Signatures.......................................................................................................... 14
4.3. Firewall Rules............................................................................................................ 16
4.4. White list Rules.......................................................................................................... 16
4.5. Blacklist Rules (Static)............................................................................................... 17
4.6. Dynamic Blacklist Rules............................................................................................ 18
4.7. Geo IP Filter.............................................................................................................. 18
5. Status..................................................................................................................19
5.1. Security Alerts........................................................................................................... 19
6. Device Administration .......................................................................................20
6.1. Administration............................................................................................................ 20
6.2. Diagnostics................................................................................................................ 20
6.3. Ping........................................................................................................................... 21

User Manual v1.0
www.shield.com 1
6.4. Traceroute................................................................................................................. 22
6.5.Troubleshooting.......................................................................................................... 22
6.6. Firmware Upgrade..................................................................................................... 23

STM- Introduction
1
User Manual v1.0
www.shield.com
1. Introduction
1.1. Overview:
Shield STM is an appliance based VoIP threat prevention solution dedicated to protect the
SIP based PBX/Telecom Gateway/IP Phones/Mobile devices deployments. The appliance
runs the Real time Deep Packet Inspection on the SIP traffic to identify the VOIP attack
vectors and prevents the threats impacting the SIP based devices. The appliance has been
made to seamlessly integrate with the existing network infrastructure and reduces the
complexity of deployment.
The appliance feature set includes,
•Analyze SIP packets using the Real time Deep Packet inspection engine.
•SIP Protocol Anomaly detection with configurability of detection parameters.
•Detection and Prevention of the following categories of SIP based Attacks.
¾Reconnaissance attacks ( SIP Devices Fingerprinting, User enumeration,
Password Cracking Attempt )
¾Dos/DDos Attacks
¾Cross Site Scripting based attacks.
¾Buffer overflow attacks
¾SIP Anomaly based attacks
¾3rd Party vendor vulnerabilities
¾Toll Fraud detection and prevention
¾Protection against VOIP Spam & War Dialing
•Attack response includes the option for quietly dropping malicious SIP packets to
help prevent continued attacks
•Dynamic Blacklist Update service for VOIP, SIP PBX/Gateway Threats
•Configurability of Blacklist/Whitelist/Firewall rules.
•Support for Geo Location based blocking.
•Provide the option to secure against PBX Application vulnerabilities
•Operate at Layer 2 device thus transparent to existing IP infrastructure - no changes
required to add device to your existing network

STM- Introduction
2
User Manual v1.0
www.shield.com
•Web/SSL based Device Management Access which will allow managing the device
anywhere from the Cloud.
•Ability to restrict the device management access to specific IP/Network.
•Provide System Status/Security events logging option to remote syslog server.
•Provides the SIP throughput up to ~10Mbps.
•Support for Signature update subscription and automated signature update
mechanism.
•The device has been made to operate with default configuration with just powering
on the device. No administrator intervention is required to operate the device with
default configuration.
•USB based power supply
•Optional support for security events logging on the USB based storage.
Technical Specifications
Functional Mode Transparent Firewall with SIP Deep
Packet Engine.
SIP Intrusion/Prevention ~400+ SIP Attack Signatures Support
Throughput ~10Mbps
No of concurrent calls supports 50 concurrent calls
Logging Local Security Event Console, Remote
Syslog
Device Management Web GUI via Https & SSH CLI
Hardware MIPS based 32bit Processor Single core,
300MHz
Primary Storage 16 MB Flash
RAM 64MB
Secondary Storage USB Storage devices support for logging
( Optional)
Interfaces Two Fast Ethernet Interfaces.

STM- Introduction
3
User Manual v1.0
www.shield.com
1.2. STM Deployment Considerations
The STM has been made to protect the SIP based PBX/Gateway Servers against SIP based
network threats and anomalies. Thus it is recommended to deploy the STM along with the
PBX/Gateway deployment as given in the following scenarios based on what is applicable in
the user’s setup.
Deployment Scenario 1
Note:
Some of the PBX/Gateway devices may have an exclusive LAN/Mgmt Interface for device
management purpose other than the Data Interface (also referred as WAN/Public Interface).
In such cases LAN port of the STM should be connected to the Data Interface (WAN/Public
Interface).
Deployment Scenario 2
In the case of PBX deployed in the LAN Setup, the following setup is recommended as it
would help to protect against the threats from both Internal Network as well as the threats
from the Public Cloud penetrated the Non SIP aware Corporate Firewall.

STM – Initial Setup
4
User Manual v1.0
www.shield.com
2. Initial Setup & Configuration
1. Unpack the items from the box
2. Check that you have all the items listed in the package content.
3. Connect the appliance to the power socket using the USB power cable.
4. Connect the LAN port of the STM to the PBX/VOIP Gateway.
5. Connect the WAN port of the STM to the untrusted/public network.
6. The device will take about a minute to come up & will be fully functional with the
default configuration.
Note:
Some of the PBX/Gateway devices may have an exclusive LAN/Mgmt Interface for device
management purpose other than the Data Interface (also referred as WAN/Public Interface).
In such cases LAN port of the STM should be connected to the Data Interface (aka
WAN/Public Interface).
The device operates as transparent bridging firewall with Deep Packet Inspection enabled
on the SIP traffic. By default, the appliance has been made to acquire the IP Address via
DHCP.
The device has been made to be fully functional with the default configuration. However if
the user needs to tune the device settings & the DPI policies, user can tune the configuration
via the Device WebUI.
Important Note:
a) We strongly recommend you to change the Nano2PBX Admin Password from Factory
default to Alpha numeric password to reduce the possibility of a security breach.
b) Use Mozilla Firefox Only!
c) Bootup process of the Nano2PBX takes about 3-4 mins
2.2. Default Configuration
The device operates as transparent bridging firewall with Deep Packet Inspection enabled
on the SIP traffic. By default, the appliance has been made to acquire the IP Address via
DHCP.
The device has been made to be fully functional with the default configuration. However if
the user needs to tune the device settings & the DPI policies, He/She can tune the
configuration via the Device WebUI.

STM – Initial Setup
5
User Manual v1.0
www.shield.com
The device all provides the command line interface accessible via SSH, which will allow to
configure the basic settings and view device status.
Management Access Login Credentials
WebUI admin/admin
SSH CLI admin/stmadmin
2.3. Accessing the WebUI
To access the device WebUI,
1. Connect the serial console the serial port of STM device.
2. Use the following serial console settings to access the Shield CLI
i. Speed : 38400
ii. Parity : None
iii. Data : 8
iv. Stopbits : 1
v. Flowcontrol : No
3. From the Shield command prompt, execute the following command to view the IP
Address acquired by the device.
shield>show ip
Now you can access the device from the browser using the URL as given below
https://<device-ip>
Note:
The WebUI has been made accessible only via HTTPS. The Device WebUI Server has been
made to use Self signed PKI Certificate, Thus the browser will prompt to accept the self
signed certificate generated by the device on accessing the WebUI.
The recommended browser for accessing STM WebUI is Mozilla Firefox.
Note:
If you are not running the dhcp server in your deployment OR device fails to acquire the ip
address, set the ip address from the console CLI using the command line
shield>set ip <ipaddress> <mask> <gateway>

STM – Initial Setup
6
User Manual v1.0
www.shield.com
Verify the address using the ‘show ip’ command.Then use this IP address, to access the
WebUI/SSH to configure the device configuration further.
On launching the STM WebUI, the web application will prompt enter the administrator
credentials to login.
The WebUI login session has been made to time out and if the user does not enter the login
credentials for 30 seconds and will redirect to the informational page. The user can click the
hyperlink named as ‘login’ appearing on the information page, to visit the login page again.
If somebody is already logged in to STM WebUI session, the subsequent attempts to login
will notify the details previous login session as illustrated below and will prompt the user to
override the previous session and continue OR to discard the attempt the login.

STM – Initial Setup
7
User Manual v1.0
www.shield.com
2.4 WebUI Session timeout
After logging into the WebUI, if there is no activity until the WebUI session timeout period (
By default, the WebUI session timeout is set to 900 seconds ), then the login session will
automatically terminated and browser will be redirected to login page again.
2.5 WebUI Settings
To change the WebUI settings, click the settings icon that appears top right corner (below
the Apply Changes button). The WebUI settings dialog will be displayed on the browser and
allow the administrator to configure WebUI session timeout & WebUI login password. To
configure the WebUI login password, the user needs to enter the previously set administrator
password.

STM – Initial Setup
8
User Manual v1.0
www.shield.com
2.4 Dashboard
On logging into the STM WebUI, the dashboard will be shown.
The user can visit dashboard page from the any configuration page in the STM WebUI, by
clicking the STM Product Icon that appears in the left corner of the Top panel.
The status panel that appears below the top panel shows the time settings on the device and
STM firmware version, Page refresh icon and Setting icon.
On clicking the page refresh button, the main content area in the current page will be
refreshed.
On clicking settings icon, the pop menu which contains menu options logout, WebUI settings
will be shown.
System Status Panel shows Device up time, Memory Usage, Flash Usage & CPU Usage.
Sig Update Version Panel shows STM Signature version and Release State.
Network Status Panel shows IP, LAN MAC, WAN MAC and Gateway of the device.
Security Alert Summary Panel shows hyperlinks for viewing of Top 10 Signatures hit, Top 10
Categories hit, Top Attacker IP Addresses & Top 10 target destinations.

STM- Device Configuration
9
User Manual v1.0
www.shield.com
3. Configuring the Device
Configuration pages of the STM WebUI have been made as self- intuitive and easy to
configure.
All the configuration pages have been made to work with the two-phase commit model.
Note:
The two-phase commit model is not applicable to time settings and signature update
settings. In these settings, the changes will be applied directly on clicking the ‘Apply’ in
the content area of the configuration editor.
i.e. When the administrator changes the settings in the configuration pages and click the
Save button, the settings will be saved in a temporary buffer location on the device. On
saving the configuration changes, the ‘Apply Changes’ button that appears in the right top
corner will be enabled & the ‘Ignore Changes’ button will appears next.
The number of configuration changes will appear on the immediate left to the ‘Apply
Changes’ button. To view the details of the configuration changes, the user can click the
number icon, which will open the configuration changes listing.
The user can apply the configuration changes to the device, by clicking ‘Apply Changes’
button. On clicking the ‘Apply Changes’ button, the configuration changes will be applied to
the system and updated configuration will be persisted permanently onto the device.

STM- Device Configuration
10
User Manual v1.0
www.shield.com
In case if the user want abandon the configuration changes made, he can click the Ignore
Changes button. On clicking the ‘Ignore Changes’ button, the configuration changes stored
in the temporary buffer location will be discarded.
Note:
On applying the configuration changes, the ‘Ignore Changes’ button will be disabled, he/she
cannot choose to ignore configuration changes. The ‘Ignore Changes’ button will be
disabled, only when there are pending configuration changes that need to be applied yet to
the device.
Note:
If the administrator tries to configure a configuration element to the inappropriate value, then
the tooltip icon that appears next to each configuration element will provide the details on the
error.
On clicking the help icon that appears next to the configuration title, the help section
corresponding the current configuration page will be launched.
3.1. General Settings
The General settings page will allow configuring the host/network settings of the STM
appliance. The device that has been made to work in bridging mode can either choose to
work with static ip assignment or to acquire the device ip via dhcp .
The page also allows to enable/disable the SSH Access to the device. The ‘Allow ICMP’
option will configure the device to respond to the ICMP ping messages sent to STM
appliances or not.
By the SSH Access and ICMP Ping messages are allowed to the STM appliance.

STM- SIP Security Policy Configuration
11
User Manual v1.0
www.shield.com
3.2. Time Settings
The administrator can choose to set the manual time settings on the device or configure the
device to sync the time settings from a ntp server. Appropriate time settings/timezone
should be set on the device for the correct timestamp to appear on the SIP security alerts
generated by the device.
3.3.Management Access
The access the STM Device management (SSH CLI / WebUI Access) can be restricted with
the management access filters. By default, the access has been allowed to any global
address and management vlan network configuration configure on the device. The
administrator can override these settings.

STM- SIP Security Policy Configuration
12
User Manual v1.0
www.shield.com
The administrator needs to configure the IP Address or the IP Network or the Range of IP
Addresses from with management access to the device should be allowed in the
management access filter rule. The IP Type ‘ANY’ indicates global network ( Any network/ip
address ).
The search option in the management access filters table will help in selectively viewing the
management access filter rules whose name/address values that match with the search
criteria.
3.4. Signature Update
To enable the automatic signature update, select the checkbox ‘enable update’ on the
device and configure the signature update schedule. The valid subscription key and correct
signature update url should be configured for the signature update to happen.
To update the signatures on the device instantaneously, Click ‘Update Signatures now’
button.
Note:
When the user buys the STM appliance, the device will be shipped with the SIP signatures
that will help in protecting against the SIP based attacks known as of date.
However, if the user wants to ensure that his/her SIP Deployments gets the protection
against the newer attack vectors, it is recommended to enable the signature update on the
device. Please check with Allo Shield Sales representative on getting the details of
purchasing the STM signature subscription key.

STM- SIP Security Policy Configuration
13
User Manual v1.0
www.shield.com
3.5. Logging
The administrator can configure the STM appliance to send the security alerts generated on
detecting the SIP based attacks, to the remote syslog server.
The logging page will allow enable/disable the remote logging of security alerts and to which
syslog server the security alerts are to be forwarded.

STM- SIP Security Policy Configuration
14
User Manual v1.0
www.shield.com
4. Configuring the SIP Security Policies
4.1. SIP Security Settings
The SIP Deep packet inspection engine running the STM appliance has been made to
inspect the SIP traffic with the SIP Security Compliance rules in built into the SIP DPI
engine.
The SIP Security Compliance parameters are configurable from the SIP Security settings
page. The page also allows configuring the SIP ports on which the SIP DPI happens & RTP
ports in use in the target deployment.
4.2. DPI Signatures
The SIP DPI Configuration page allows toe configure the SIP Deep packet Inspection rules
categories. The administrator can enable/disable the inspection against particular category
of rules, action to be taken on detecting attacks matching the rules in the categories.
The possible actions that the STM can execute are log the alert, block the packets
containing the attack vector and blacklist the ip for the given duration. The blocking duration
of how long the attacker up needs to be blocked is also configure per category level.

STM- SIP Security Policy Configuration
15
User Manual v1.0
www.shield.com
The table given below lists the SIP Deep packet Inspection rules categories supported in
STM and configuration parameters in each category.
Category Possible Actions User Configurable options
SIP Reconnaissance Attacks Log the alert/Block the
attack/Blacklist attacker ip -
SIP Devices Scanning Log the alert/Block the
attack/Blacklist attacker ip
SIP Dos Attacks Log the alert/Block the
attack/Blacklist attacker ip Threshold/Intervel
SIP DDos Attacks Log the alert/Block the
attack/Blacklist attacker ip Threshold/Intervel
SIP Anomaly attacks Log the alert/Block the
attack/Blacklist attacker ip -
SIP Buffer overflow attacks Log the alert/Block the
attack/Blacklist attacker ip -
SIP Cross site scripting Log the alert/Block the
attack/Blacklist attacker ip
3rd Party vendor
vulnerabilities
Log the alert/Block the
attack/Blacklist attacker ip

STM- SIP Security Policy Configuration
16
User Manual v1.0
www.shield.com
4.3. Firewall Rules
The firewall rules configuration will allow the administrator in configuring what traffic should
be allowed to protected SIP PBX/Gateway network from untrusted wan zone, besides DPI
enabled SIP traffic and RTP traffic. The administrator needs to specify the source and
destination networks and port numbers and protocol that will be used as the matching
criteria in the filtering rule and action to be taken on matching the filtering rule. The possible
actions are to block the traffic and allow the traffic on matching the filtering rule. The rules
precedence will be in the order in which the rules configured on firewall rules table.
4.4. White list Rules
This page allows to configure the white listed ip addresses in the untrusted wan zone from
which the access to communicate with the protected SIP network will be allowed by the STM
firewall.
This page will also allows configuring whether the white rules take precedence over the
blacklist rules (both static and dynamic) configured on the device at any instant.
Table of contents
Other Allo.com Telephone Accessories manuals
Popular Telephone Accessories manuals by other brands

Polycom
Polycom Vortex EF2241 Brochure & specs

Hama
Hama DISPLEX EASY-ON 195524 instructions

Grandstream Networks
Grandstream Networks UCM6100 Series Configuring permission

Comelit
Comelit FT CT 05 Technical sheet

Bridgesecure Technologies
Bridgesecure Technologies BridgeSecure quick start guide

Krown
Krown Phone Flasher None datasheet