AllSee AB49HD7 Instructions for use

Digital Android Battery A-Board –Standalone
Hardware User Manual
Manual Version ABHD7.1

Digital Android Battery A-Board (Standalone) Hardware User Manual
Page 1
Safety Instructions
Please keep the display away from any heat sources. Place the display in a
stable and well-ventilated place.
Please handle with extreme care, especially when moving, as product
contains glass.
The holes or openings on the display are designed for ventilation. Do not
cover or block the ventilation holes or openings with any objects.
Remove protective covering from the screen before you use the display.
Shut off the power supply before cleaning. Use a soft lint-free cloth
instead of a tissue to wipe the screen.
You may use a glass cleaner to clean the product as required. However,
never spray the cleaner directly onto the display surface.
Do not attempt to repair this product yourself! Improper disassembly of
the product may invalidate the warranty and lead to possible danger
If you have a problem that cannot be solved using the "Troubleshooting"
guidelines, please contact your supplier.

Digital Android Battery A-Board (Standalone) Hardware User Manual
Page 2
Quick Start Guide –Part 1. Moving the Display
This section of the guide is to allow swift set up and use of the unit. Please refer to the main part of
the User Guide for full information on use of the unit.
1. Holding the handle on the rear of the unit, wheel the display into position.
2. Keeping hold of the handle carefully lean the display forward so that all of the weight is on
the feet and the castors are off the ground.

Digital Android Battery A-Board (Standalone) Hardware User Manual
Page 3
3. Extend the castor legs out until the supporting hinge locks, keeping the legs extended.
4. Carefully lower the display back down until the castors touch the ground. You can then
apply the brakes on the castors to fix the display in position if required.
5. To move the display again, reverse these steps.
NOTE: Please see next page for steps on how to update the content of the display.

Digital Android Battery A-Board (Standalone) Hardware User Manual
Page 4
Quick Start Guide –Part 2. Updating the Display
Unpack unit and place in desired location.
1Power the screen on using the rocker power switch on the rear of the unit, next to the charge
level indicator.
2Collect the files you wish to display and make sure they are supported by the unit (see Section
2.1)
3On a PC copy the files you want to play onto an empty USB drive. These should be in the root
directory (without putting them into a folder). Remove USB from PC.
4Insert USB drive into the one of the USB ports located inside the locker of the unit (see Figure
1).
The screen should indicate that it is copying the files onto the unit. Please note that all files
currently stored in the unit will be deleted. Once completed, the screen will display a message
to remove the USB drive.
5Remove the USB drive and the unit will reboot and play the stored files in a loop.
Figure 1 Position of Screen Inputs

Digital Android Battery A-Board (Standalone) Hardware User Manual
Page 5
Contents:
1. Introduction................................................................................................................................7
1.1 Box Contents ...................................................................................................................7
1.2 Product Overview............................................................................................................7
1.3 Remote Control ...............................................................................................................8
1.4 Replacing the Remote Control Battery ...........................................................................9
1.5 Moving the Display........................................................................................................10
1.5.1 Initial Positioning....................................................................................................10
1.5.2 General Moving......................................................................................................12
1.6 Battery...........................................................................................................................16
1.6.1 Charging the Battery ..............................................................................................16
1.6.2 Powering Directly from Mains ...............................................................................17
1.6.3 Charge Level Indicator............................................................................................17
1.7 Home Screen.................................................................................................................18
1.8 System Menu Operation ...............................................................................................19
1.8.1 System Settings ......................................................................................................19
1.8.2 System Control .......................................................................................................25
1.8.3 Date & Time ...........................................................................................................28
1.8.4 Power On/Off .........................................................................................................30
1.8.5 Timer Strategy........................................................................................................31
1.8.6 File Management ...................................................................................................34
1.8.7 Exit..........................................................................................................................34
1.9 Display Settings .............................................................................................................35
2. System Operation .....................................................................................................................38
2.1 Supported Media Files ..................................................................................................38
2.2 Steps to Load Media Files .............................................................................................39
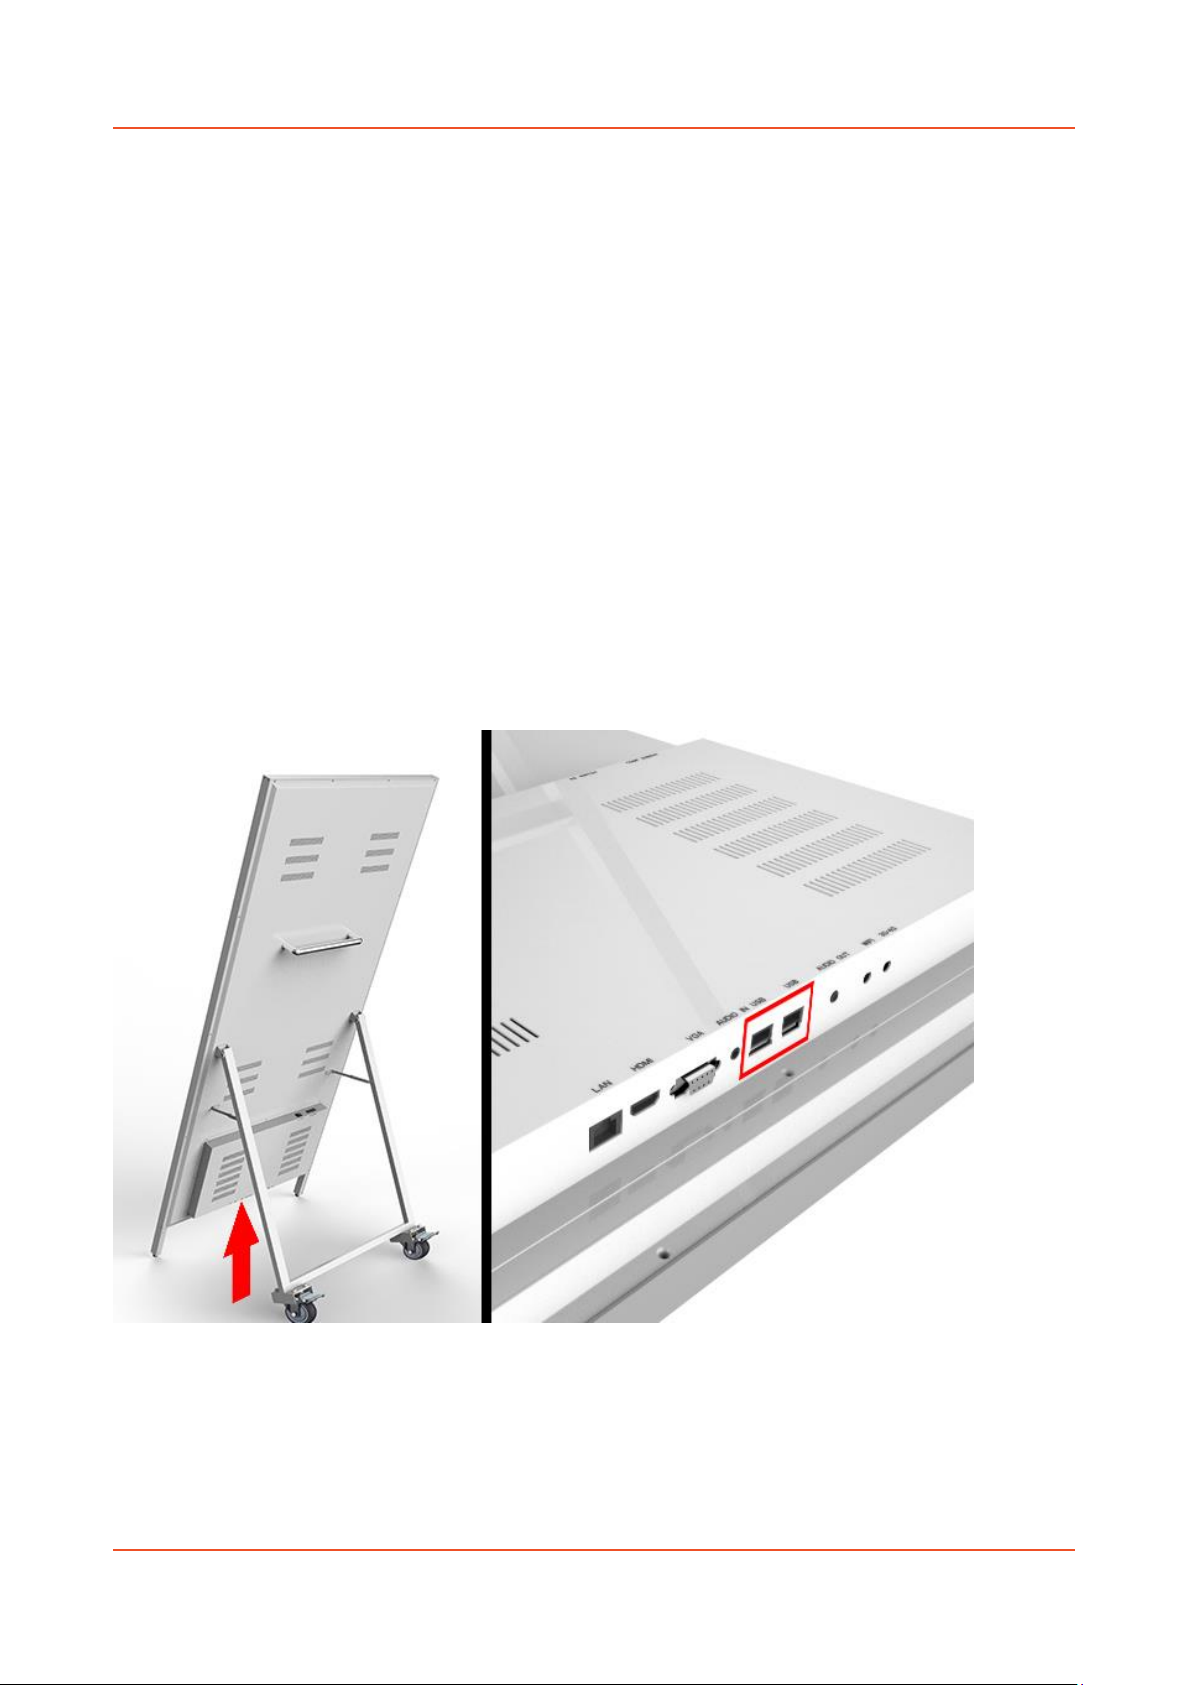
2.3 Inputs ............................................................................................................................41
3. Advanced Guide........................................................................................................................42
3.1 Main Menu....................................................................................................................42
3.2 Creating Playlists ...........................................................................................................42

Digital Android Battery A-Board (Standalone) Hardware User Manual
Page 6
3.2.1 Add Schedule..........................................................................................................42
3.2.2 Add Selected Items.................................................................................................44
3.2.3 Saving .....................................................................................................................47
3.3 Editing Playlists..............................................................................................................48
3.3.1 Deleting Items ........................................................................................................48
4. F.A.Qs and Troubleshooting Guide ...........................................................................................49
4.1 How do I play PowerPoint presentations on my display?.............................................49
4.1.1 Option 1 (for plain slides with no animation): .......................................................49
4.1.2 Options 2 (for presentations with animation): ......................................................50
4.2 Video Format Conversion .............................................................................................50
4.3 Connecting screen to PC ...............................................................................................54
4.4 My media file does not fit properly on the screen .......................................................54
4.5 My media file will not display or is missing from the playlist .......................................54
4.6 My media files will not update......................................................................................54
4.7 My moving GIF files will not move................................................................................54
Table of Figures
Figure 1 Position of Screen Inputs .......................................................................................................4
Figure 2 Product Overview...................................................................................................................7
Figure 3 Charging Point Location .......................................................................................................16
Figure 4 Power Cable Notch...............................................................................................................16
Figure 5 Home Screen........................................................................................................................18
Figure 6 Position of Screen Inputs .....................................................................................................39
Figure 7 Screen Inputs........................................................................................................................41

Digital Android Battery A-Board (Standalone) Hardware User Manual
Page 7
1.Introduction
Congratulations on your purchase of our product. Please read carefully and follow all instructions
in the manual before first use.
The product should not be exposed to liquids dripping or splashing and no objects filled with
liquids, such as vases, should be placed on the product.
For user convenience, a number of operations can be performed through the remote control.
Attention:
1. Do not change any default setting when it is unnecessary.
2. Keep the product far away from water during installation and use.
1.1Box Contents
1 x Digital Android Battery A-Board.
1 x CD (User Manual and Software).
1 x Remote Control (with 2xAAA batteries).
1 x Charger and mains cable.
1.2Product Overview
Figure 2 Product Overview

Digital Android Battery A-Board (Standalone) Hardware User Manual
Page 8
1.3Remote Control

Digital Android Battery A-Board (Standalone) Hardware User Manual
Page 9
1.4Replacing the Remote Control Battery
1. Slide the battery cover off, as shown below.
2. Remove the used batteries.
4. Insert the two new AAA batteries with their terminals corresponding to the indicators.
5. Put the cover back on.

Digital Android Battery A-Board (Standalone) Hardware User Manual
Page 10
1.5 Moving the Display
1.5.1 Initial Positioning
When you first unpackage the unit please follow the below steps to move and position your
display.
1. Holding the handle on the rear of the unit, wheel the display into position.
2. Keeping hold of the handle carefully lean the display forward so that all of the weight is on
the feet and the castors are off the ground.

Digital Android Battery A-Board (Standalone) Hardware User Manual
Page 11
3. Extend the castor legs out until the supporting hinge locks, keeping the legs extended.
4. Carefully lower the display back down until the castors touch the ground. You can then
apply the brakes on the castors to fix the display in position if required.

Digital Android Battery A-Board (Standalone) Hardware User Manual
Page 12
1.5.2 General Moving
When you need to move the display from one place to another please follow the below steps to
move and position your display.
1. Remove the brakes from the castors by lifting them up. While holding the handle on the
rear of the unit carefully lean the display forward so that all of the weight is on the feet and
the castors are off the ground.
2. Keeping hold of the handle, collapse both supporting hinges upwards and carefully lower
the castor legs.

Digital Android Battery A-Board (Standalone) Hardware User Manual
Page 13
3. While holding the handle carefully lean the unit back until the castors touch the ground.
4. You can now wheel the display into position.

Digital Android Battery A-Board (Standalone) Hardware User Manual
Page 14
5. Once in position, keeping hold of the handle, carefully lean the display forward so that all of
the weight is on the feet and the castors are off the ground.
6. Extend the castor legs out until the supporting hinge locks, keeping the legs extended.

Digital Android Battery A-Board (Standalone) Hardware User Manual
Page 15
7. Carefully lower the display back down until the castors touch the ground. You can then
apply the brakes on the castors to fix the display in position if required.

Digital Android Battery A-Board (Standalone) Hardware User Manual
Page 16
1.6Battery
1.6.1 Charging the Battery
This display has a rechargeable internal lithium-polymer battery. When the display arrives there
will be some charge in the battery however to charge the battery to full capacity you will need to
connect the charger/mains power cable to the display and the mains socket. The charging point of
the display is located next to the AV inputs.
Figure 3 Charging Point Location
When inserting the power cable into the display it is important that the notch on the cable
connecter lines up with the notch on the charging point of the unit.
Figure 4 Power Cable Notch

Digital Android Battery A-Board (Standalone) Hardware User Manual
Page 17
1.6.2 Powering Directly from Mains
The screen can be powered directly from the mains by leaving the charger/mains power cable
connected to the screen and the mains.
NOTE: by keeping the display connected to the mains constantly the natural life of the battery
will be reduced over time.
1.6.3 Charge Level Indicator
Located next to the power rocker switch on the rear of the unit is a charge level indicator;
underneath this will be a small button:
Using the button you can toggle between displaying the following options:
Percentage (%) –displays the battery’s remaining charge in for form of a percentage.
Ampere (A) –displays the current being used by the battery at any given time.
Voltage (V) –displays the voltage being supplied to the display from the battery.
Ampere Hour (Ah) –displays the battery’s remaining charge in for form of a percentage
amp hours.

Digital Android Battery A-Board (Standalone) Hardware User Manual
Page 18
1.7 Home Screen
Once your screen has powered up and begins to play content press the “STOP” button on the
remote control to go back to the Home Screen (pictured below).
Figure 5 Home Screen

Digital Android Battery A-Board (Standalone) Hardware User Manual
Page 19
1.8System Menu Operation
From the Home Screen you can bring up the Main Menu by pressing the “SETUP” button the
remote control. The Main Menu includes following sub-menus: System Settings, System Control,
Date & Time, Power On/Off, Timer Strategy, File Management and Exit.
Press ↑ & ↓to select the right item, press “PLAY” to confirm selection. To get back to the side
menu press the “LEFT” navigation button on the remote control.
If any settings are changed you must select “BACK” then “EXIT” on the on screen menu to save.
1.8.1 System Settings
The sub-menus within this section are: Display Language, Screen Mode, Screen Resolution, On
Screen Clock, USB, Scrolling Text, Sync Settings, Restore to Factory Settings and Auto Start. To exit a
sub-menu please press the “LEFT” navigation button the remote control, you can now navigate
though the Main Menus sub-menus.
Table of contents
Popular Industrial Monitor manuals by other brands

Siemens
Siemens INOX PRO SIMATIC IFP1900 Quick install guide

BenQ
BenQ TL650 user manual

Allen-Bradley
Allen-Bradley 6156 Product data and installation instructions

Atlas
Atlas ATM1700 Quick installation guide

Blue Corvus
Blue Corvus baby Bird user guide

Contemporary Research
Contemporary Research FeatherTouch FT6 product manual