Allterco Robotics Shelly Plug S User manual

User Guide
Smart WiFi Plug
Allterco Robotics EOOD
Sofia, Bulgaria © 2018

1
Shelly
®
Plug S by Allterco Robotics is intended to be placed
into a standard Plug Type F (IEC) in order to control the
electric power through it. Shelly may work as a standalone
device or as an accessory to a home automation controller.
Specication
Power supply:
110-230V ±10% 50/60Hz AC
Max load:
12A / 230V, 50/60Hz
Complies with EU standards:
• RE Directive 2014/53/EU
• LVD 2014/35/EU
• EMC 2004/108/WE
• RoHS2 2011/65/UE
Working temperature:
-20° ÷ 40 °C
Radio signal power:
1mW
Radio protocol:
WiFi 802.11 b/g/n
Frequency:
2400 – 2500 MHz;
Operational range:
• up to 50 m outdoors
• up to 30 m indoors
Dimensions (HxWxL):
70 x 44 x 44 mm.
Electrical consumption:
< 1 W
SAR:
1.15 W/Kg
USER GUIDE
WiFi Smart Plug Shelly®

2
• Control via WiFi from a smart phone, PC, automation system
or any other device supporting HTTP and/or UDP protocol.
• Microprocessor management.
CAUTION! Danger of electrocution. Connecting the de-
vice to the power grid has to be performed with caution.
CAUTION! Do not allow children to play with the device,
especially with the Power Button. Keep the devices for re-
mote control of Shelly (mobile phones, tablets, PCs) away
from children.
Introduction to Shelly®
Shelly® is a family of innovative devices, which allow remote
control of electric appliances through mobile phone, PC or
home automation system. Shelly® uses WiFi to connect to
the devices controlling it (mobile phones, tablets etc.). They
can be in the same WiFi network or they can use remote
access (through the Internet - Shelly Cloud). Shelly® has an
integrated web server, through which the User may adjust,
control and monitor the Device. An API can be provided by
the Manufacturer. The User can register and access the Shelly
Cloud, using either Android or iOS mobile applications, or any
internet browser and the web site: https://my.shelly.cloud/.
Technical Information
3
Installation Instructions
CAUTION! Danger of electrocution. Even when the device
is turned off, it is possible to have voltage across its clamps.
CAUTION! Do not connect the Device to appliances
exceeding the given max load!
CAUTION! Before beginning the installation please read
the accompanying documentation carefully and completely.
Failure to follow recommended procedures could lead to
malfunction, danger to your life or violation of the law. Allter-
co Robotics is not responsible for any loss or damage in case
of incorrect installation or operation of this device.
CAUTION! Use the Device only with power grid and
appliances which comply with all applicable regulations.
Short circuit in the power grid or any appliance connected
to the Device may damage it.
RECOMMENDATION: The Device may be connected to
and may control electric circuits and appliances only if they
comply with the respective standards and safety norms.
Factory Reset
You can return your Shelly Plug to its Factory Settings by
pressing and holding the Button for 10 seconds. Upon suc-
cessful factory reset Shelly’s WiFi LED will flash Red/Blue.

4
Initial Inclusion
Place Shelly into the power socket without any device/load
connected to the Shelly.
Press the Power Button. The LED should flash red/blue. This
means that Shelly is in AP mode. Press the Button again and
the LED will turn off. This means that Shelly is turned off.
LED States
• Blue flashing quickly - AP Mode
• Blue flashing slowly - STA Mode (no cloud)
• Blue still - STA Mode (connected to cloud)
• Red still - Relay On
• Red & Blue flashing quickly - FW Update
Some of the features of the Shelly Cloud mobile application
are available at https://my.shelly.cloud/ as well.
Control your home with your voice
All Shelly devices are compatible with Amazons’ Alexa and
Googles’ Assistant.
Please see our step-by-step guides on:
https://shelly.cloud/compatibility/Alexa
https://shelly.cloud/compatibility/Assistant

Allterco Robotics EOOD
Sofia, Bulgaria © 2018
5
MOBILE APPLICATION FOR SHELLY®

6
The Shelly Cloud mobile application
Shelly Cloud gives you opportunity to control and adjust all
Shelly® devices from anywhere in the world. The only thing
you need is connection to the Internet and our mobile applica-
tion, installed on your smartphone or tablet.
To install the application please visit Google Play or App Store.
7
Registration
The rst time you open the
Shelly Cloud mobile app, you
have to create an account
which can manage all your
Shelly® devices.
Forgotten Password
In case you forget or lose
your password, just enter
the e-mail address you have
used in your registration.
You will then receive instruc-
tions on how to change your
password.
WARNING! Be careful
when you type your e-mail
address during the registra-
tion, as it will be used in case
you forgot your password.
After registering, create your
rst room (or rooms), where
you are going to add and use
your Shelly devices.
Shelly Cloud allows easy
control and monitoring using
a mobile phone, tablet or PC.
Device Inclusion
To add a new Shelly device,
connect it to the power grid
following the Installation
Instructions included with
the Device.
8
Step 1
Place your Shelly into the
socket and wait for the WiFi
LED light to ash red/blue.
WARNING: If the LED
does not ash red/blue,
press and hold the Button
for at least 10 seconds. The
LED should then ash red/
blue. If not, please repeat or
contact our customer sup-
port at:[email protected]
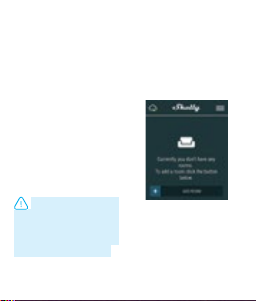
Step 2
Choose “Add Device”.
In order to add more devices
later, use the Menu at the
top right corner of the main
screen and click “Add Device”.
Type the name and password
for the WiFi network, to which
you want to add Shelly.
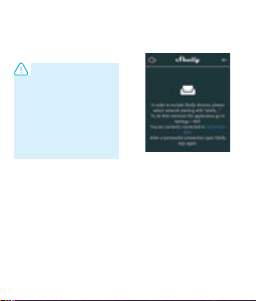
Step 3
If using iOS: you will see the
following screen:
On your iOS device open
Settings > WiFi and con-
nect to the WiFi network
created by Shelly, e.g. Shelly-
PlugS-35FA58.
If using Android: your de-
vice will automatically scan
and include all new Shelly
devices in the WiFi network
that you dened.

9
Upon successful Device In-
clusion to the WiFi network
you will see the following
pop-up:
Step 4:
Approximately 30 seconds
after discovery of any
new devices оn the local
WiFi network, а list will be
displayed by default in the
“Discovered Devices” room.
Step 5:
Select Discovered Devices
and choose the Device
you want to include in your
account.

10
Step 6:
Enter a name for the Device.
Choose a Room, in which
the device has to be posi-
tioned. You can choose an
icon or upload a picture to
make it easier to recognize.
Press “Save Device”.
Step 7:
To enable connection to the
Shelly Cloud service for re-
mote control and monitoring
of the Device, press “YES”
on the following pop-up.
11
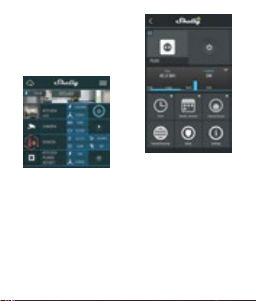
Shelly Devices Settings
After your Shelly device is in-
cluded in the app, you can con-
trol it, change its settings and
automate the way it works.
To switch the device on and
off, use the Power button.
To enter the details menu of
the device, click on it’s name.
From there you may control
the device, as well as edit its
appearance and settings.
Timer
To manage the power supply
automatically, you may use:
Auto OFF: After turning
on, the power supply will
automatically shutdown
after a predened time (in
seconds). A value of 0 will
cancel the timer.
12
Auto ON: After turning off,
the power supply will be
automatically turned on
after a predened time (in
seconds). A value of 0 will
cancel the timer.
Weekly Schedule
This function requires
Internet connection.
Shelly may turn on/off au-
tomatically at a predened
time.
Sunrise/Sunset
This function requires
an Internet connection.
Shelly receives actual infor-
mation about the time of sun-
rise and sunset in your area.
Shelly may turn on or off auto-
matically at sunrise/sunset, or
at a specied time before or
after sunrise/sunset.
Internet/Security
WiFi Mode - Client: Allows the
device to connect to an avail-
able WiFi network. After typing
the details in the respective
elds, press Connect.
WiFi Mode - Acess Point: Con-
gure Shelly to create a Wi-Fi
Access point. After typing the
details in the respective elds,
press Create Access Point.
Cloud: Enable or Disable con-
nection to the Cloud service.
Restrict Login:
Restrict the
web interface of Shely with
a Username and Password.
After typing the details in
the respective elds, press
Restrict Shelly.

13
Safety
Max Power Protection:
Con-
gure Shelly to turn off when
a dened power consumption
is reached. Range: 1-2500W.
After typing the desired power
consumption, press Save.
Settings
Power On Default Mode
This sets the default output
state when Shelly is powered.
ON: Congure Shelly to turn
ON, when it has power.
OFF: Congure Shelly to turn
OFF, when it has power.
Restore Last Mode: Congure
Shelly to return to last state it
was in, when it has power.
Firmware Update
Update the rmware of Shelly,
when a new version is released.
Time Zone and Geo-location
Enable or Disable the
automatic detection of Time
Zone and Geo-location.
Factory Reset
Return Shelly to its factory
default settings.
Device Information
Here you can see the:
• Device ID - Unique ID
of Shelly
• Device IP - The IP of Shelly
in your Wi-Fi network
Edit Device
From here you can edit:
• Device Name
• Device Room
• Device Picture
When you are done, press
Save Device.

14
The Embedded Web Interface
Even without the mobile app Shelly can be set and controlled
through a browser and connection of a mobile phone or tablet.
ABBREVIATIONS USED:
Shelly-ID –
consists of 6 or more characters. It may include
numbers and letters, for example 35FA58.
SSID – the name of the WiFi network, created by the de-
vice, for example ShellyPlugS-35FA58.
Access Point (AP) –
in this mode in Shelly creates its own
WiFi network.
Client Mode (CM) –
in this mode in Shelly connects to
another WiFi network.
Installation/Initial inclusion
Step 1
Place Shelly into the socket and wait the WiFi LED to flash red/blue.
CAUTION! If the WiFi LED does not flash red/blue, press and
hold the Button for 10 seconds. After the LED begins to flash red/
blue, release it.
Step 2
When the LED is flashing red/blue, Shelly has created a WiFi
network, with name such as ShellyPlugS-35FA58. Connect to it.

15
Step 3
Type 192.168.33.1 into the address field of your browser to load
the web interface of Shelly.
General - Home Page
This is the home page of the embedded web
interface. Here you will see information about:
• Current electrical consumption
• Current state (on/off)
• Power Button
• Connection to Cloud
• Present time
• Settings
Timer
To manage the power supply automatically, you may use:
Auto OFF: After turning on, the power supply will automatical-
ly shutdown after a predened time (in seconds). A value of 0
will cancel the automatic shutdown.
Auto ON: After turning off, the power supply will be automati-
cally turned on after a predened time (in seconds). A value of
0 will cancel the automatic power-on.

16
Weekly Schedule
This function requires an Internet connection. To use In-
ternet, a Shelly device has to be connected to a local WiFi
network with working Internet connection.
Shelly may turn on/off automatically at a predened time.
Sunrise/Sunset
This function requires an Internet connection. To use In-
ternet, a Shelly device has to be connected to a local WiFi
network with а working Internet connection.
Shelly receives actual information through the Internet about
the time of sunrise and sunset in your area. Shelly may turn
on or off automatically at sunrise/sunset, or at a specied time
before or after sunrise/sunset.
Safety
Max Power: You can limit the maximum power the socket will
supply. If the pre-set current draw is exceeded, Shelly will turn
the socket off. Allowable power can be set between 1 to 2500W.
WARNING! If you have entered incorrect information (wrong
settings, usernames, passwords etc.) you will not be able to
connect to Shelly.
17
Internet/Security
WiFi Mode - Client: Allows the device to connect to an available
WiFi network. After typing the details in the respective elds, press
Connect.
WiFi Mode - Acess Point: Congure Shelly to create a Wi-Fi Access
point. After typing the details in the respective elds, press Create
Access Point.
Cloud: Enable or Disable connection to the Cloud service.
Restrict Login:
Restrict the web interface of Shely with a
Username and Password. After typing the details in the
respective elds, press Restrict Shelly.
Advanced - Developer Settings: Here you can change the action
execution:
• Via CoAP (CoIOT)
• Via MQTT
ATTENTION: To reset the device, press and hold the Button
for at least 10 seconds. After the Button begins to ash in red/
blue, release it.

18
Settings
Power On Default Mode
This sets the default output state when Shelly is powered.
ON: Congure Shelly to turn ON, when it has power.
OFF: Congure Shelly to turn OFF, when it has power.
Restore Last Mode: Congure Shelly to return to last state it was
in, when it has power.
Firmware Upgrade: Shows present rmware version. If a newer
version is available, you can update your Shelly by clicking Upload
to install it.
Time Zone and Geo-location
Enable or Disable the automatic detection of Time Zone and
Geo-location.
Factory reset: Return Shelly to its factory settings.
Device Reboot: Reboots the device.
Additional Features
Shelly allows control via HTTP from any other device, home auto-
mation controller, mobile app or server.
For more information about the REST control protocol, please visit:
www.shelly.cloud or send a request to developers@shelly.cloud.

You can find the latest version of
this User Guide in .PDF
by scanning the QR code
19
Table of contents
Other Allterco Robotics Accessories manuals

Popular Accessories manuals by other brands

Omron
Omron E3JK-T series instruction manual

BriskHeat
BriskHeat SRL-ADJ Series instruction manual

Orion
Orion SkyLine 5696 instruction manual

LIVARNO
LIVARNO KH 4238 HANDRAIL SET Assembly instructions

Honeywell
Honeywell Lyric W1Ax installation instructions

Leuze electronic
Leuze electronic HTU430B Series quick start guide

S+S Regeltechnik
S+S Regeltechnik HYGRASGARD Modbus-T3 Series Operating Instructions, Mounting & Installation

Contours
Contours ZY011 instructions

Dorner
Dorner SmartSlot DustPruf 2300 Series Installation, maintenance & parts manual

Lightolier
Lightolier Lytespan 8102 specification

IFM
IFM KB operating instructions

MICRO-DESIGN
MICRO-DESIGN Levelcon F100M Operator's manual


