MICRO-DESIGN Levelcon F100M User manual

F100M
Operator’s Manual.
This manual belongs to : _________________________________
Company : ____________________________________________
Page 1

Introduction 3
Key Monitor Features 3
Technical Specifications 4
Unit Installation 5
Basic Hardware 5
Installation procedure. 5
Basic Device configurations and First report generation. 5
Basic configuration options 6
Time Zone 6
Daylight Sav 7
Report Rate(s) 7
Wake Alarm # 7
Off Hrs Start 7
Off Hrs End 7
Advance configuration options 7
Mode 7
Sensor Type 8
ADC Wait(s) 8
Digital Wake 8
Force LCD On 8
GPS Timeout(s) 8
Pulse Counter 9
Digital Output 9
APN 9
TCP Server 9
Port 9
Servicing the Batteries 9
Web interface. 12
Basic Troubleshooting and Error codes. 12
Page 2

Introduction
The F100M is a wireless sensing node utilized in a wide range of vertical industry applications.
Utilizing the extremely efficient CatM1 cellular network or BLE 5.0, the F100M transmits asset /
truck data directly to the LevelCon secure cloud. Users receive reported tank levels, asset
locations, asset health, and current assignments directly from any phone, tablet, or PC. Within
the LevelCon Cloud portal, users easily configure email, voice or text alerts for low / high levels
and/or fill events, geo fencing etc.
Key Monitor Features
1 Analog Input & 1 Digital Grounding Input- Alarm Capable.
Multi-sensor RS485 deployment /UART Modbus, I2C
Compatible with Indian CatM1 LTE Carriers and GSM Fallback
BLE 5.0
GPS enabled for mobile asset tracking
Integrated temperature and barometric pressure sensor
24/7 access to data on LevelCon Cloud
3x AA battery with optional solar power assistance /
6V to 24V DC power supply ( Optional )

Technical Specifications
Dimensions
Height
155 mm
Width
96 mm
Depth
37 mm
Input / Outputs
1 Analog input, configurable for 0-5V or 4-20mA. Multiple RS485
sensor daisy chaining capable
1 Digital grounding input, alarm capable or 1 digital output software
configured
Power Requirements
3 AA size Batteries, Energizer Lithium recommended and solar power
harnessing
Can also be powered using 6.5 ~ 36 Vdc
Battery Life
Upto 6+ years of Battery life with solar augmentations
Wireless Connectivity
Cellular
CAT M1, NB-IOT and GPRS *
BLE
4.0 and above compatible
Satellite
Iridium satellite connectivity * **
Data Security
AES 128 bit encryption
Data Packet
JSON formatted data packet
Software updates
Over the air (OTA) firmware updates are provided as new features are
introduced.
Temperature range
Operating -40C->65C, Storage -50C->80C
Certification
Environment
Class 1 Division 1 Group D Certification for
hazardous area deployment
IP66 rated enclosure
* Data charges billed monthly
** Module addon sold separately
Page 4

Unit Installation
Basic Hardware
● Philips Head screwdriver
● Zip ties
Installation procedure.
1. Unbox the F100M.
2. Inspect the associated sensor if provided within the shipment.
3. Lower the sensor in the tank and secure the sensor with the supplied 2’ NPT bushing.
4. Route the remaining sensor cable using the supplied zip ties and secure it to the tank.
5. Insert the male sensor (chogori) connector at the end of the sensor cable to the
matching female connector on the F100M.
6. Lock the connector into place by twisting the bezel clockwise.
7. Attach the F100 to the tank via 4x high power neodymium magnetic feet.
8. Push the power icon located on the face of the monitor lid and follow the LCD
screen instructions.
Basic Device configurations and First report generation.
F100M Ver.H and above are BLE (bluetooth low energy) enabled devices. They come pre
configured from the factory and you can generate your first report by pressing the button on
the lid.
If the device configuration needs to be altered you can do so using any Bluetooth enabled
laptop, phone or tablet with Google Chrome installed. Please follow the steps below to perform
various configurations.
1. Go to settings on your PC, Laptop, tablet or phone and make sure bluetooth is enabled
on your device.
2. Open chrome on your device and navigate to https://one.levelcon.com
Page 5

3. Sign in with your username and password. If you do not have a username and password
please contact us via email at [email protected]
4. On the top left of the window there are three horizontal lines. Click on this and scroll
down to and select F100 Bluetooth Connect.
5. In this new window, click on connect F100
6. A new pop up window will open, as shown below
7. Click on the F100 that matches your device ID#. F100-XXXXXX ( XXXXXX are the last
six characters of the device ID ) Your device number can be found in the open window
of the lid of your F100 Device.
8. Once you have established a successful pairing, you will be able to set basic
configurations of time zone, alarm times, set report rates and the device off and on
hours. For detailed information regarding each option please review advanced
configuration options section.
Basic configuration options
For F100M devices you might be required to provide basic configurations such as alarm times,
timezone details device on and off schedules. These can be done from the basic tab of BLE
configuration tab
Remember to hit Save before you close the window for the changes to load to the
memory.

Time Zone
This option lets you select the appropriate time zone from the drop down menu. This helps in
maintaining time locally on the device and is used as a reference for setting time alarm.
Daylight Sav
This option lets you enable or disable daylight saving time settings. Please select appropriate
time zone for this feature to work properly.
Report Rate(s)
This option configures the device to report after a specified number of seconds. The allowable
input range for this input is ??
Wake Alarm #
These alarms enable the end user to setup specific timings during the course of the day at
which the unit should report its parameters. You can set upto 9 alarms using the basics menu.
The time period needs to be setup in the 24 hour format. As an example, if you want the device
to report at 3:45 PM please enter 1545 in the text space available next to Wake Alarm.
Off Hrs Start / Off Hrs End
This option allows you to set the time from when the device goes to sleep. As an example if you
want the device to go to sleep at 8:00 PM and start reporting at 6:00 AM, please enter 2000 in
Off Hrs Start and enter 600 in Off Hrs End.
Advanced configuration options
F100M provides advanced configuration options such as apn, adc wait, gps enable etc. under
the advanced tab of BLE configurations page. The following options available under Advanced
tab are explained below.
Caution : Making uninformed changes in the “Advanced” tab might cause
unrecoverable errors in the device configuration and void any warranty. Users take
utmost care while modifying these parameters. Contact Levelcon in case you need
assistance

Remember to hit Save before you close the window for the changes to load to the
memory.
Mode
TBT
Sensor Type
The device is capable of communicating with 0-5 V and 4-20 mA type analog sensors. If you are
using an analog sensor with the device, please select the appropriate sensor type. By default,
the device is configured for 0-5 V type sensors.
ADC Wait(s)
This parameter enables you to set the number of seconds the device queues up the sensor for
a reading before it collects the sensor level data from the sensor. The Default value is 3
seconds. This should only be increased if using a non-contact sensor such as a radar gauge,
sonic sensor or laser sensor.
Digital Wake
This feature is associated with digital input such as a high level float gauge for overfill protection
or other types of normally open/normally closed contacts. If enabled, the input device will close
its circuit and engage the no/nc on the digital input of the F100m forcing the monitor to turn on
and report. The Digital Wake value is set in seconds and correlates to the number of seconds
that NO/NC waits after triggered to force the F100 to report, i.e. if set to 3 seconds, when the DI
is triggered for more than 3 seconds, the unit will force a report. The default value of this
parameter is Off.
Force LCD On
The F100 turns on the LCD only when a user forces a report. In other scenarios, the LCD is off
while the monitor performs normal tasks in the background, i.e. regular scheduled reporting. If
Force LCD is enabled, the LCD will turn on everytime the device conducts any action. Default
Value of this parameter is off.
Warning : Enabling the option, Force LCD ON, will cause the device to use much more
power and may drain the batteries much sooner than expected. Use this option

carefully. If you have questions about this option, please contact LevelCon.
GPS Timeout(s)
This option enables device location reporting via GPS. This option should only be used for units
that are deployed outdoors. Set the number of seconds the unit should wait before it obtains a
GPS fix. The preferred value for this parameter is 100 seconds. A zero value means the unit will
not attempt to obtain a GPS fix. By default the value of this parameter is zero.
Warning : Location reporting via GPS is a battery intensive operation and should only
be enabled if the unit is outdoors. When installed, the F100’s solar panel must be
oriented towards the sky to enable faster GPS fix and solar charging.
Pulse Counter
This parameter enables pulse counting on the digital input to the F100M. This feature is
normally associated with a monitor connected to a Flow meter.
Digital Output
This is a normally open, normally closed feature.
Off(Float)
On(low
APN
This parameter enables you to set apn for the sim card that is inserted in the sim card slot of
the F100M. By default, the F100M devices are programmed to the specific APN to report data to
the LevelCon Cloud
Warning : Modifying the apn setting may lead to permanent network disconnection
causing the device to stop reporting over Cellular connectivity. This parameter should
only be modified with the assistance of a LevelCon representative.
TCP Server
This parameter is used to modify the endpoint at which data is to be sent to and set to the
LevelCon Cloud by default. This parameter should not be modified without the assistance of a
LevelCon representative. The default value for this parameter is f100.levelcon.com
Page 9

Port
This parameter refers to the port on which the device communicates. This parameter should not
be modified without the assistance of a LevelCon representative. The default value for this
parameter is 8181
Servicing the Batteries
Follow the procedure below to service the batteries.
Warning : Do not use power tools to perform this service!!!
1. Remove the 4 phillips head screws marked by the 4 arrows.
2. Remove the FFC cable by pulling it out and set the lid aside
Page 10
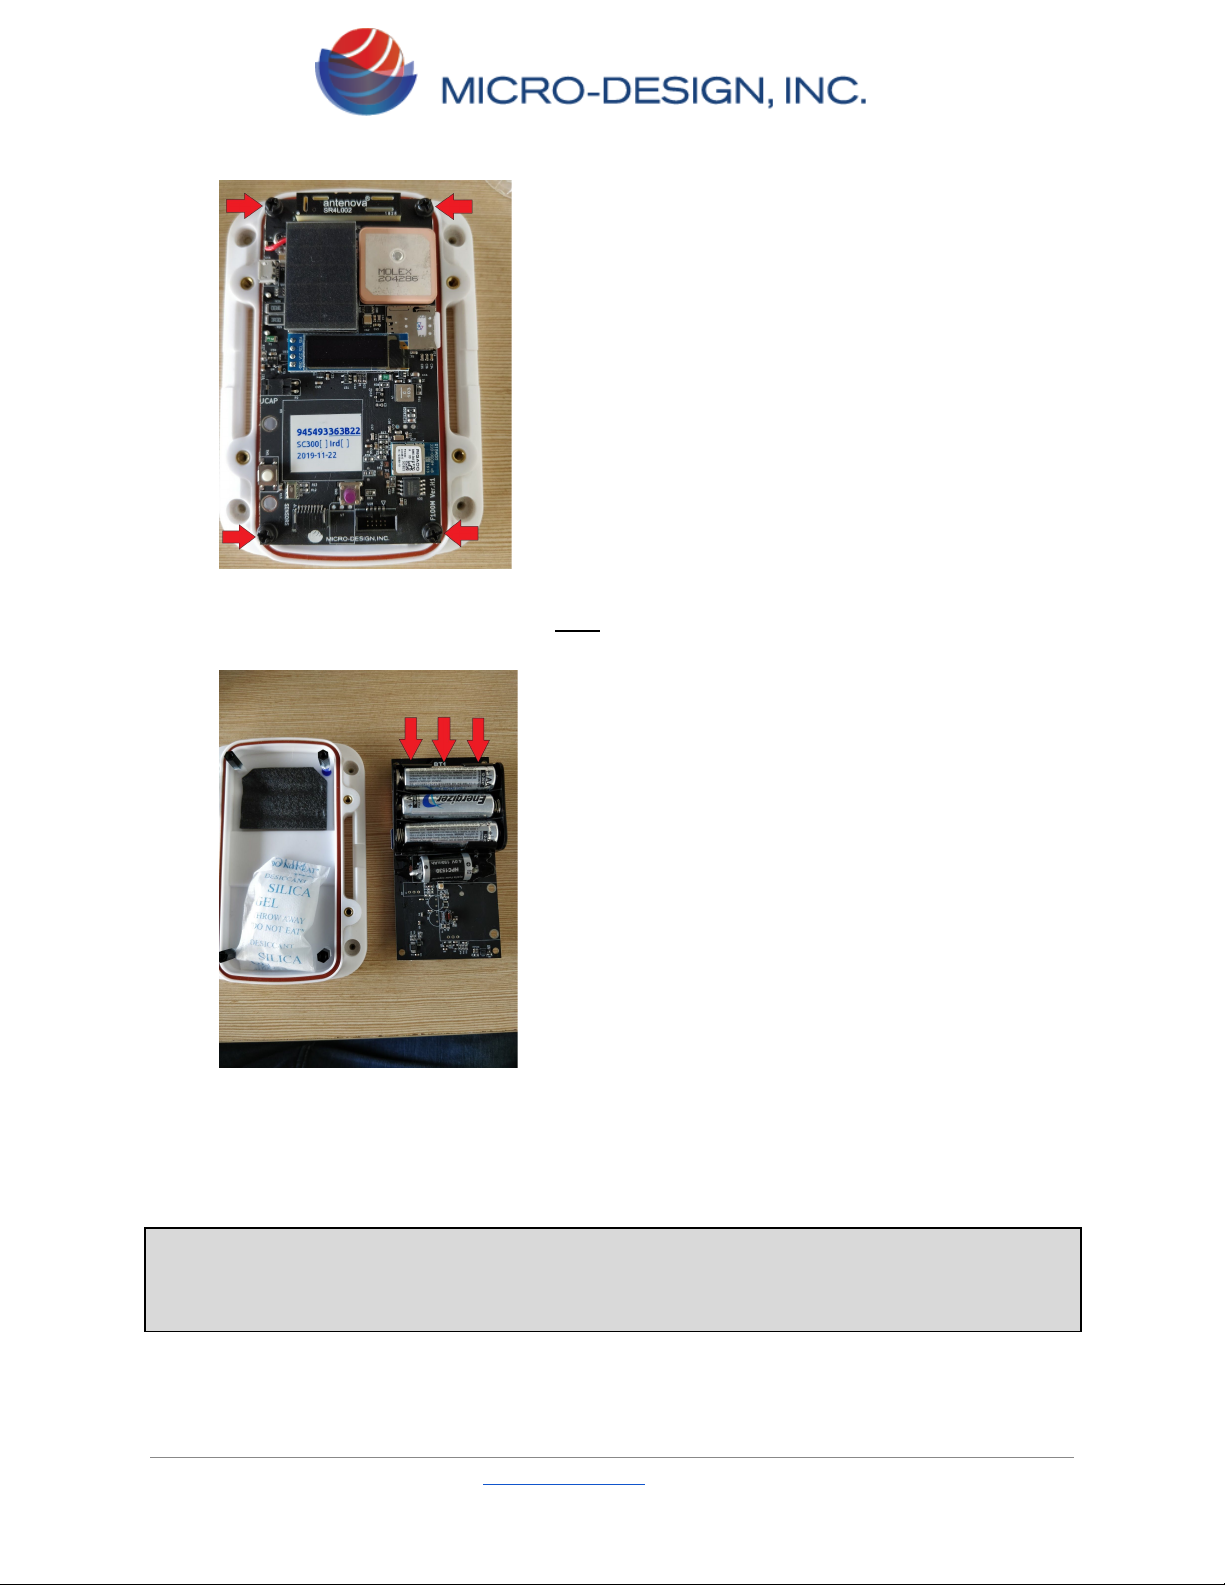
3. Remove the 4 screws that secure the board to the base of the enclosure.
4. Remove the board from the enclosure and flip it over to access the battery holder.
Remove the existing batteries and only replace them with AA Energizer Lithium
batteries.
5. Once the batteries are replaced, reinstall the board to the base with the 4x black nylon
screws. Connect the FFC cable back in the sensor header. Be sure not to pinch the FCC
cable between the base and the lid when reinstalling the lid. Secure the lid back to the
base with the 4 screws. The device is now ready for redeployment.
Warning : Please take utmost care that the board does not come in contact with any
metal or liquid during this process. The board may be rendered undeployable and will
void any warranty. If you have any questions please contact Levelcon

Web interface.
The data from the F100M is immediately displayed on the LevelCon secure cloud portal. You
can access this data at https://one.levelcon.com.Follow the steps mentioned below to access
your data. You can also view our online tutorial videos at:
https://drive.google.com/drive/u/0/folders/0B7H0S78DpOhhdmE0cW1ZZzluYlk
** If you do not have a username and password, please see your company’s account manager
or request an account at [email protected]
1. Navigate to https://one.levelcon.com and input your username and password.
2. After a successful login, you will be directed to the Home Pate. Here you see any alerts
associated with your assets. Click on the navigation menu to access the options
associated with your security level.
Page 12

3. Click on the Dashboard option to go to the dashboard from the main menu.
4. If you are logging in for the first time click on update to see all your assets.
Page 13

5. Once your view has been updated, you should be able to see all your assets on the single
map view of the dashboard.
6. To view the assets on the gridview, click on the grid icon on the top right of the
window. You can switch back to the map view by clicking on the map icon on the
same dashboard view.
Page 14

Basic Troubleshooting and Error codes.
Page 15
Table of contents


