Almax Air Patrol 90L User manual

For your safety and correct usage please read manual carefully and keep it so
you can refer to it at any time. We recommend that any repairs are carried out by
a suitably qualied person.
INTRODUCTION
The CQ Air Patrol Dehumidier is an industrial unit, designed for reducing air
humidity in an enclosed space.
- Removes up to 90L of moisture per day.
- Mobile on easy to roll castors.
- Digital controls for easy operation.
- Airow 1000m3 per hour
- Weight 48kg
USER MANUAL
Item Code: SEL-901DP
Air Patrol 90L Dehumidifier with Pump

IMPORTANT SAFETY INSTRUCTION
1. Make sure the power supply is 230V 50Hz AC. The appropriate power
switch should be grounded.
2. Please ensure equipment is in good condition and no oil leakage during
transportation. The machine must be transported upright and not tilted
more than 45º during transportation or operation. The machine should
be standing upright for at least 2 hours before use if it has been
tilted.
3. Do not pull the power cord out to stop dehumidier working.
4. Do not put ngers or sticks into the dehumidier.
5. It is dangerous to climb or stand on the machine and children should not
touch the dehumidier.
PRODUCT INSTALLATION & PRECAUATIONS
1. Environmental Requirements:
Indoor use only
Designed for ambient temperatures between 5 to 38°C.
At low temperatures the device will start automatically defrosting and
the Automatic Defrost will be shown on display panel. During this phase
cooling fan will continue to work but compressor will switch o.
Avoid use of machine in environment of strong explosives, ammable
substances, and areas with a lot of dust.
2. There should be no obstacles within 600mm of the machine.
3. Check that dehumidier is in level position.
4. When machine is not being used, t the supplied dust cover to prevent
dust and overspray entering machine.

KEY OPERATING INSTRUCTIONS
KEY OPERATING INSTRUCTION
POWER
- Press once to turn dehumidier on.
- To turn dehumidier o, press again - fan will run for 60
seconds as it cools down the compressor.
FUNCTION
- Normal Running – Press to set timer for dehumidier to
shut down. Then use +/- keys to set number of hours.
- Shutdown state – Set timer to open and start dehumidier
Hr.+
Huml. +
- Normal Running – Press to increase the humidity set value
(range 10-95%)
- Timer Setting – Set/Increase the timing (hours)
Hr. –
Huml. –
- Normal Running – Press to reduce the humidity set value
(range 10-95%)
- Timer Setting – Set/Decrease the timing (hours)
+Press both for two seconds to lock dehumidier and display,
press for two seconds again to unlock.
+Press both for two seconds to enter and check temperature
of coil pipe.

OPERATING INSTRUCTIONS
1. Attach the clear discharge tube (5 metres supplied) to the outlet by
removing the nut and sliding it back over the tubing. Then push nut and
tube over the tting and tighten,
2. Tubing should then be piped to a drain or container.
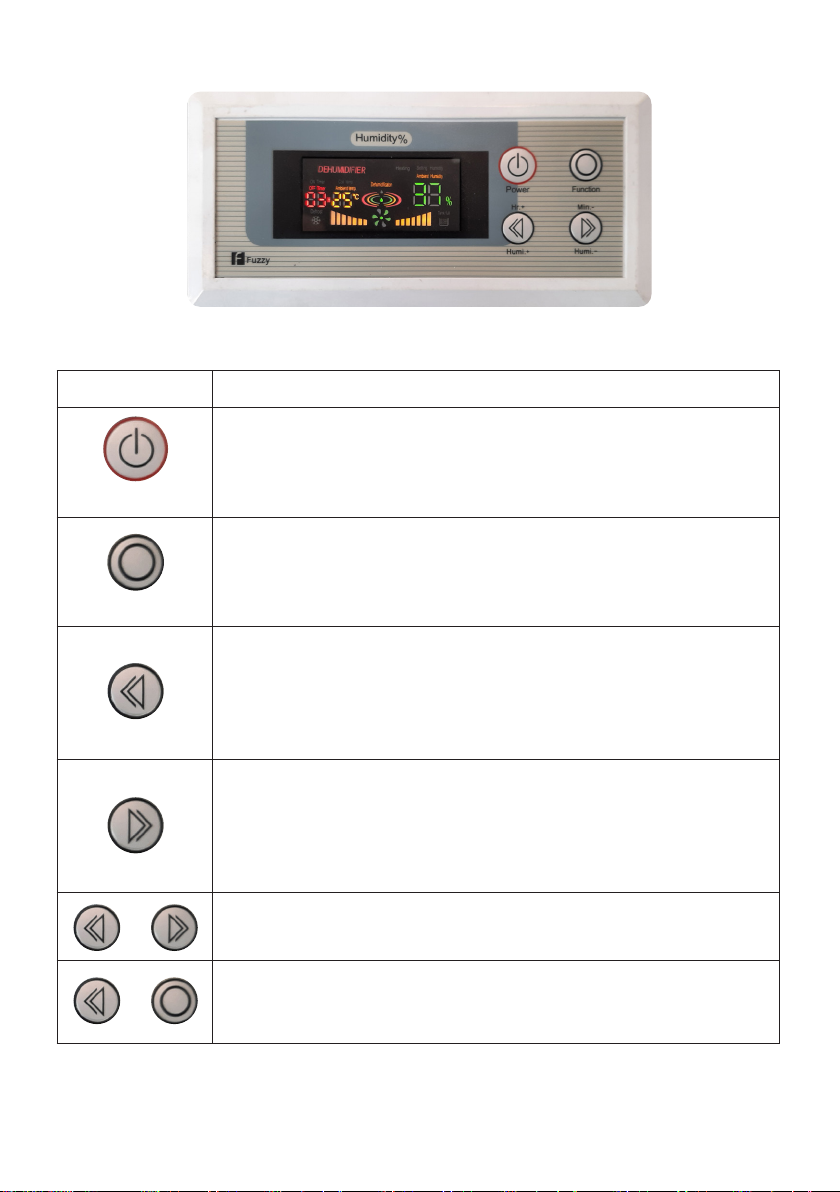
3. Plug dehumidier into the wall and turn on at switch.
If the unit has not been used recently it will start operating within a few
seconds. Screen will show ambient (current) room temperature and
humidity.
4. Set desired humidity using the plus and minus buttons. Humidity
percentage will ash for a few seconds then set. The panel will then
revert to current room humidity.
5. If the unit has recently been used it will not start up until the Power button
is pressed. There is then a 3 minute delay before fan starts. This is to
protect the compressor.
The desired humidity must be less than the current room humidity,
otherwise the dehumidier will register as reaching optimum and not
operate.
6. When the dehumidier is operating, the orange dehumidication light will
be showing, fan symbol spinning and the water droplet symbol pulsing.
(Dynamic display)
7. If required, you can set a timer to turn the dehumidier o after a set
number of hours. This can be done while the unit is operating. Press the
Function button once and then the plus or minus button to set the run
time in hours. The display will show TIMER OFF and number of hours
remaining until unit will automatically turn o.
8. There is a small holding tank in the dehumidier – once this is full the
pump sensors will register it as being full and discharge the water through
the clear tubing.
9. To turn the unit o, press Power button. There is a time delay for 60
seconds, during which time fan will run to allow machine to cool down.
10. Once the fan has stopped you can then turn it o at the wall.
11. When machine is not being used, cover with supplied dust cover to
prevent dust and overspray entering machine.

DISPLAY PANELS & SYMBOLS
DISPLAY ILLUSTRATION
Rapid blinking – Panel keyboard is locked.
Light – Keyboard unlocked.
Dehumidication
Dehumidier On – When compressor is working, it is pulsing
light. When compressor stops, dehumidication is blinking
and there is no pulsing light.
O State – Light is o
Defrost
Automatic Defrost Mode – Light is on.
O State – Light is o
Fan
Dehumidier On – When fan is turned on, it is dynamic
display. When the fan is stopped, it is xed display.
O State – Light is o
Humidity
Under Normal Condition – Displays current humidity.
Set Humidity – Flashing display with setting data.
Fault – Fault code displaying every 30 seconds.
Temperature
Under Normal Condition – Displays current temperature.
Checking Coil Pipe Temperature – Flashing display of coil
pipe temperature.
Fault – Fault code displaying every 30 seconds.
Timing
Under Normal Condition – No display
Setting Timer On/O – Flashing settings
After Timer Set – Shows remaining time
Water Full
Light is on – The pump tank is full and not draining and
machine will stop working. Check pump connections and
sensors.

EQUIPMENT ROUTINE MAINTENANCE
Weekly
1. Clean lter. The lter must be cleaned regularly to remove accumulation
of dust, otherwise it will aect the eciency of the dehumidier. To
remove lter, open latch at top and pull away. Then lift lter door out of
the locating pins. Use warm water to clean and then dry.
Monthly
1. Clean condenser. Use duster brush or compressed air. DO NOT USE
WATER.
Quarterly
1. Inspect electrical cord for any sign of damage.
* Image shows lter
removed from unit

COMMON TROUBLE SHOOTING
Malfunction Check Solution
No Operation Power o Connect power
Plug not inserted Make sure plug inserted
No Eect
Dust accumulated Clean lter net
Obstacle in front of grill Remove obstacles from
around machine
Humidity not set Set desired humidity
below ambient humidity
Area too big or not sealed Adjust space and seal
well
Abnormal Filter blocked Clean lter net
Leakage
Machine incline not level Ensure machine is level
and hose is draining away
from machine
Tube blocked Remove the panel to get
rid of object inside tube
Tube not connected Remove panel to check
tube is correctly attached
to pump and outlet.
Reconnect if needed.

MALFUNCTION CODE DESCRIPTION
Code Cause Solution
E1 Coil Pipe Sensor Fault Machine will
automatically attempt to
defrost otherwise set a
timed defrost. Replace
sensor if needed.
E2 Humidity Sensor Fault When humidity sensor
fails, machine reverts to
continuous dehumidify
mode. Replace humidity
sensor.
E3 Temperature Sensor Fault Replace the sensor
E4 System Failure Leakage of uorine/
refrigerant, pipeline
blockage – assessment
and repair by
professional personnel.
E5 Room Temp is too high Decrease room
temperature to below
38°C which is maximum.
Repower to restore to
working state.
E8 Low Voltage Fault Ask professional
personnel to check.
E9 High Voltage Fault Ask professional
personnel to check.
This manual suits for next models
1
Table of contents
Popular Dehumidifier manuals by other brands

Dimplex
Dimplex DXDH10N Installation and operating instructions

Sonnenkonig
Sonnenkonig SECCO FORTE 450 manual

thermastor
thermastor Phoenix R200 owner's manual

Calorex
Calorex Variheat AA600 Owners & installation manual

Frigidaire
Frigidaire Gallery FGAC7044U1 use & care

Kooper
Kooper 5902518 User instructions