manuals.online logo
Brands
  1. Home
  2. •
  3. Brands
  4. •
  5. Alpine
  6. •
  7. Cables And Connectors
  8. •
  9. Alpine KWE-901G7MIC User manual

Alpine KWE-901G7MIC User manual

Popular Cables And Connectors manuals by other brands

StarTech.com ST124HD20 quick start guide

StarTech.com

StarTech.com ST124HD20 quick start guide

Philips SWV4543S/10 Features

Philips

Philips SWV4543S/10 Features

Larson Electronics 10-50C instruction manual

Larson Electronics

Larson Electronics 10-50C instruction manual

Grip MEK-PM Assembly and operating manual

Grip

Grip MEK-PM Assembly and operating manual

Ultra Products Travel Pack #3 ULT31436 Specifications

Ultra Products

Ultra Products Travel Pack #3 ULT31436 Specifications

Surpass QCH-F Operation manual

Surpass

Surpass QCH-F Operation manual

Philips SWA6310 Specifications

Philips

Philips SWA6310 Specifications

StarTech.com CRJ4550PK quick start guide

StarTech.com

StarTech.com CRJ4550PK quick start guide

Nohau EMUL-IP2K-PC user guide

Nohau

Nohau EMUL-IP2K-PC user guide

Foxun SX-SP144E-HD4K2K operating instructions

Foxun

Foxun SX-SP144E-HD4K2K operating instructions

Philips SWA3305W Specifications

Philips

Philips SWA3305W Specifications

opticis Stretch DVIM1-1P0x user manual

opticis

opticis Stretch DVIM1-1P0x user manual

Volkswagen VAS 6558A operating manual

Volkswagen

Volkswagen VAS 6558A operating manual

NEXIBO N-13 user manual

NEXIBO

NEXIBO N-13 user manual

CYP PU-1H3HBTL Operation manual

CYP

CYP PU-1H3HBTL Operation manual

Allen-Bradley 1784-u2dhp installation instructions

Allen-Bradley

Allen-Bradley 1784-u2dhp installation instructions

Global Caché Flex Link Blaster quick start

Global Caché

Global Caché Flex Link Blaster quick start

Hauppauge USB-Live2 Quick installation guide

Hauppauge

Hauppauge USB-Live2 Quick installation guide

manuals.online logo
manuals.online logoBrands
  • About & Mission
  • Contact us
  • Privacy Policy
  • Terms and Conditions

Copyright 2025 Manuals.Online. All Rights Reserved.

KWE-901G7MIC
CABLE FOR OPTIONAL MICROPHONE*
FOR PREMIUM INFOTAINMENT SYSTEM X901D-G7**
*
ANSCHLUSSKABEL FÜR OPTIONALES MIKROFON KWE-901G7MIC
CORDON POUR MICROPHONE OPTIONNEL KWE-901G7MIC
CABLE PARA MICRÓFONO OPCIONAL KWE-901G7MIC
CABLAGGIO OPTIONAL PER MICROFONO KWE-901G7MIC
**
FÜR PREMIUM-INFOTAINMENT-SYSTEM X901D-G7
POUR LE SYSTÈME PREMIUM X901D-G7
PARA SISTEMA INFOTAINMENT PREMIUM X901D-G7
PER IL SISTEMA AUDIO VIDEO NAVI X901D-G7
1 2 3 4
5 6 7 8
9 10 11 12
13
14
15
16
1
Quadlock-PIN 35
Quadlock-PIN 29
included
inklusive
inclus
incluido
incluso
oponal
oponal
oponnel
opcional
oponal tramite VW
included
inklusive
inclus
incluido
incluso
oponal
oponal
oponnel
opcional
oponal tramite VW
included
inklusive
inclus
incluido
incluso
oponal
oponal
oponnel
opcional
oponal tramite VW
1
1
1
1
1
2
1
21
1 2
EN:
Condion for installaon of KWE-901G7MIC:
The original equipped radio and the Golf VII glove box are already removed.
See X901D-G7 Installaon Manual, pages 10 to 26.
Figure 1-4: Carefully remove the cover of the interior lighng panel and the ambient lighng part
of the roof liner using a plasc wedge.
Figure 5-6: Posion the Microphone Extension cable (1) as shown.
Figure 7-9: Remove the cover of the A-pillar on the passengers side using a plasc wedge.
Disconnect the plug of the tweeter.
Figure 10-11: Pull out the blue 12 pin connector from the vehicle's quadlock.
Unlock the plug as shown.
Figure 12-13: Route the Microphone Extension cable (1) as shown. Make sure not to obstruct the airbag.
Figure 14: Connect the wires of the Microphone Extension cable (1) as indicated.
White cable to PIN 29, black cable to PIN 35.
Figure 15-16: Connect the Microphone Extension cable (1) with the original VW Golf VII Microphone (2).
Ask your VW Golf VII dealer for further informaon in case
DE:
Voraussetzung für die Installaon des KWE-901G7MIC:
Das original Golf VII Radio und das Golf VII Handschuhfach sind bereits ausgebaut.
Siehe X901D-G7 Installaonshandbuch, Seite 10 bis 26.
Abbildung 1-4: Enernen Sie vorsichg die Abdeckungen der Innenraum- und Ambientebeleuchtung
im Dachhimmel mithilfe eines Kunststoeils.
Abbildung 5-6: Posionieren Sie das Mikrofon-Verlängerungskabel (1), wie abgebildet.
Abbildung 7-9: Enernen Sie die A-Säulenverkleidung auf der Beifahrerseite mit einem Kunststoeil.
Ziehen Sie den Stecker des Hochtöners ab.
Abbildung 10-11: Enernen Sie den blauen 12-poligen Stecker des Quadlock-Anschlusses im Fahrzeug.
Entriegeln Sie den Stecker wie abgebildet.
Abbildung 12-13: Verlegen Sie das Mikrofon-Verlängerungskabel (1), wie abgebildet.
Achten Sie darauf, nicht den Airbag zu blockieren.
Abbildung 14: Stecken Sie die Kabel des Mikrofon-Verlängerungskabel (1), wie angezeigt ein.
Weißes Kabel an PIN 29, schwarzes Kabel an PIN 35.
Abbildung 15-16: Verbinden Sie das Mikrofon-Verlängerungskabel (1) mit dem Original VW Golf VII Mikrofon (2).
Fragen Sie Ihren VW-Händler für weitere Informaonen für den Fall,
dass Ihr Fahrzeug nicht mit einem original VW-Mikrofon ausgestaet war.
KWE-901G7MIC
CABLE FOR OPTIONAL MICROPHONE
FOR PREMIUM INFOTAINMENT SYSTEM X901D-G7
ALPINE ELECTRONICS OF AMERICA, INC.
19145 Gram ercy Place, Torrance
California 90501, U.S.A.
Tel. 1-800-ALPINE-1 (1-800-257-4631)
ALPINE ELECTRONICS OFASIA PACIFIC CO., LTD
555 Rasa Tower 1, Unit 2601-2602, 26th floor
PhaholyothinRoad,Chatuchak
Bangkok 10900, Thailand
Tel. +662-937-0505
ALPINE ELECTRONICS OFAUSTRALIA PTY. LTD.
161-165 Princes Highway, Hallam
Victoria 3803, Australia
Phone 03-8787-1200
ALPINE ELECTRONICS GmbH
Wilhelm-Wagenfeld-Straße 1-3
80807 München, Germany
Tel.089-3242640
ALPINE ELECTRONICS DE ESPAÑA, S.A.
Portal de Gamarra 36, Pabellón 32
01013 Vitoria (Álava). APDO. 133, Spain
Tel.945-283588
ALPINE ELECTRONICS FRANCE S.A.R.L.
(RCS BOBIGNY B 338 101 280)
184 Allée des Erables, Z.I.Paris Nord Il
C.S.52016 Villepinte
95945 Roissy Charles de Gaulle Cedex, France
Tel.+ 33 (0)1-48-63-89-89
ALPINE ITALIA S.p.A.
Viale C. Colombo 8,
20090 TrezzanoSul Naviglio (MI),Italy
Tel.02-484781
ALPINE ELECTRONICS OF U.K. LTD.
Alpine House
Fletchamstead Highway, Coventry CV4 9TW
United Kingdom
Tel. 0870-33 33 763
ES:
Condición para la instalación del KWE-901G7MIC:
Se ha tenido que desmontar previamente el equipo de radio original y la guantera del Golf VII.
Ver el manual de instalación del X901D-G7, de las páginas 10 a la 26.
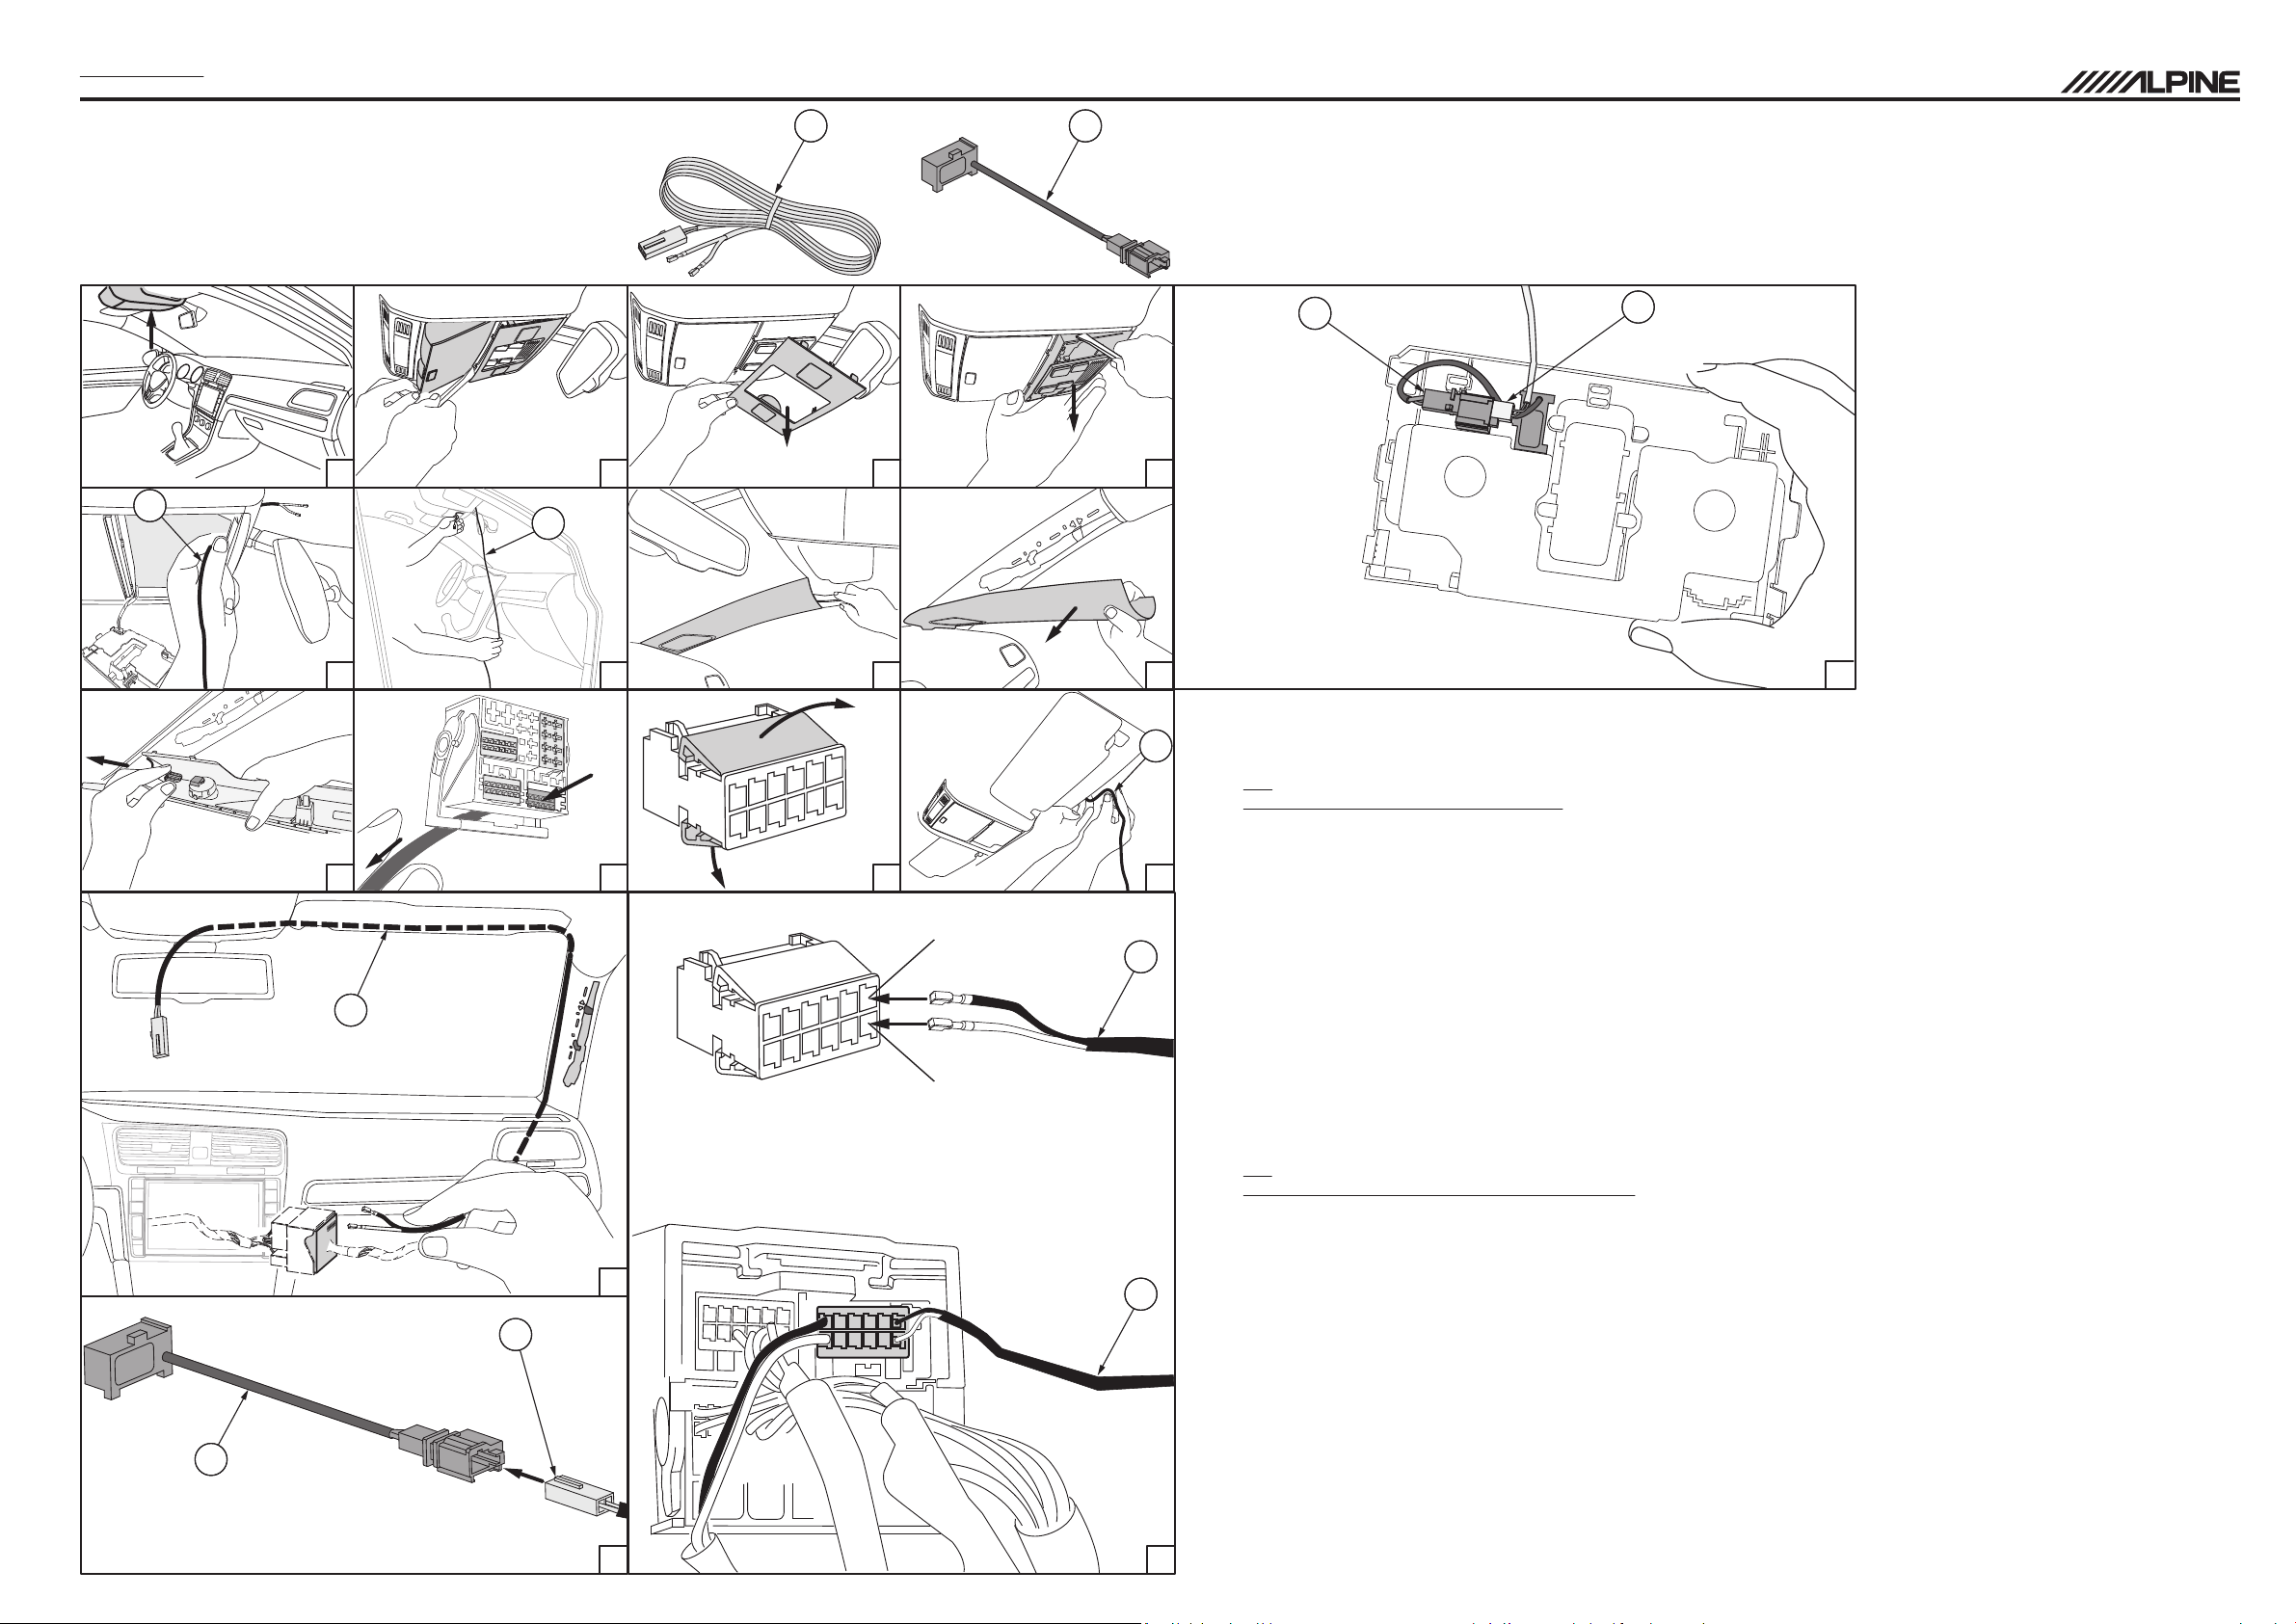
Figura 1-4: Rere con cuidado la tapa del plafón de iluminación interior,
y la parte de la iluminación ambiental del revesmiento interior del techo ulizando un sacagrapas de plásco.
Figura 5-6: Coloque el cable (1) de extensión del micrófono como se muestra.
Figura 7-9: Rere la cubierta del pilar A del lado pasajero ulizando un sacagrapas de plásco.
Desconecte la clavija del tweeter.
Figura 10-11: Extraiga el conector azul de 12 vías del conector quadlock del vehículo como se muestra.
Figura 12-13: Pase el cable (1) de extensión del micrófono como se muestra.
Asegúrese de no obstaculizar el Airbag.
Figura 14: Conecte los cables del cable (1) de extensión del micrófono como se indica.
Cable blanco al PIN 29, cable negro al PIN 35.
Figura 15-16: Conecte el cable (1) de extensión del micrófono con el micrófono (2) original del VW Golf VII.
Pregunte a su concesión VW para obtener más información,
en caso que el vehículo no esté equipado con el micrófono original de VW.
FR:
Condions d'installaon du KWE-901G7MIC :
la radio d'origine et la boite à gant de la Golf VII ont été rerés.
Voir le manuel d'instrucons du X901D-G7, pages 10 à 26
Image 1-4: Rerez délicatement le couvercle du panneau d'éclairage intérieur et la garniture de toit
(où se trouve l'éclairage d'ambiance) à l'aide d'une cale en plasque.
Image 5-6: posion du cordon microphone (1) tel que décrit
Image 7-9: Rerez le couvercle vercal du montant de pare-brise côté passager en ulisant une cale plasque.
Déconnectez le connecteur du tweeter.
Image 10-11: Tirez sur le connecteur bleu à 12 broches du connecteur FAKRA du véhicule.
Déverrouillez le connecteur comme illustré
Image 12-13: Acheminez le cordon microphone (1) tel que le montre le schéma.
Image 14: Connectez les cordons du microphone (1) tel que décrit.
Fil blanc à la posion 29, fil noir à la posion 35.
Image 15-16: Connectez le cordon du microphone (1) avec le microphone d'origine de la Golf VII (2).
Renseignez vous auprès de votre concession VW si votre véhicule n'est pas équipé d'un microphone d'origine.
IT:
Condizione per l'installazione del KWE-901G7MIC:
La sorgente originale e il casseno portaogge devono essere già sta rimossi.
Consultare il manuale di installazione, dalla pagina 10 alla 26.
Figura 1-4: Rimuovere con cautela la plasca di copertura delle luci interne, aiutandosi con un cuneo di plasca.
Figura 5-6: Posizionare il cavo di prolunga (1) del microfono come da figura.
Figura 7-9: Rimuovere la copertura del montante anteriore destro ulizzando un cuneo di plasca. Disconneere il tweeter.
Figura 10-11: Estrarre il conneore BLU a 12 PIN dal grosso conneore Quadlock del veicolo, come mostrato in figura.
Figura 12-13: Passare la prolunga (1) del microfono come mostrato.
Assicurarsi di non ostruire l'airbag.
Figura 14: Conneere i cavi della prolunga (1) come indicato.
Cavo bianco al PIN 29, cavo nero al PIN 35.
Figura 15-16: Conneere il cavo di prolunga del microfono(1) con il microfono originale VW della Golf VII (2).
Chiedere al proprio concessionario VW di zona in caso il veicolo non sia equipaggiato con il microfono originale.