Alpine CVA-1003E User manual

ENGLISH
Contents
Operating Instructions
WARNING
WARNING .................................................. 3
CAUTION ................................................... 3
PRECAUTIONS ......................................... 3
Basic Operation
Detaching the Front Panel................................. 6
Attaching the Front Panel ................................. 6
Initial System Start-Up ..................................... 6
Turning Power On and Off ............................... 7
Raising the Monitor .......................................... 7
Lowering the Monitor ....................................... 8
Selecting the Monitor's Opening Position ........ 8
Adjusting the Monitor Viewing Angle .............. 8
Adjusting
Volume/Balance (Between Left and
Right)/Fader (Between Front and Rear) ........ 9
Turning Loudness On and Off .......................... 9
Audio Mute Function ........................................ 9
Radio Operation
Manual Tuning ................................................ 10
Automatic Seek Tuning .................................. 10
Manual Storing of Station Presets .................. 11
Automatic Memory of Station Presets ............ 11
Tuning to Preset Stations ................................ 11
CD Player/Changer Operation
(Optional)
Playing Optional CD player or Changer ......... 12
Music Sensor (Skip) ........................................ 12
Fast Forward and Backward ........................... 12
Repeat Play ..................................................... 13
M.I.X. (Random Play) .................................... 13
Scanning Programmes .................................... 13
Titling Discs .................................................... 14
Erasing Disc Title ............................................ 15
Controlling CD Changer ................................. 15
Multi-Changer Selection ................................. 16
MD Player Operation (Optional)
Playing Mini-Disc (MD) ................................. 17
Music Sensor (Skip)........................................ 17
Fast Forward and Backward ........................... 18
Repeat Play ..................................................... 18
M.I.X. (Random Play) .................................... 18
Cassette Player Operation (Optional)
Controlling Cassette Player ............................ 19
DVD/Video CD/CD Player Operation
(Optional)
Playing DVD/Video CD/CD ........................... 20
Still/Pause ....................................................... 20
Chapter (DVD)/Track (Video CD) Sensor ...... 20
Fast Forward/Backward .................................. 21
Repeat Play ..................................................... 21
Controlling DVD Changer .............................. 21
Other Useful Features
Displaying the Title/Text................................. 22
Setting the Bass control .................................. 24
Setting the Treble control ................................ 25
Switching Phase .............................................. 26
Turning Defeat Mode On and Off ................... 26
Illumination Control ....................................... 27
Adjusting Brightness of Picture ...................... 27
Adjusting Colour of Picture ............................ 27
Adjusting Tint of Picture................................. 28
Switching the Background Screen .................. 28
CD Text/MD Title Scroll Setting .................... 29
Setting Automatic Opening
/Closing of Monitor ..................................... 29
1-EN

Turning Sound Guide Function On or Off ...... 30
Setting the Clock Display ............................... 30
Displaying Time .............................................. 30
Setting Time .................................................... 31
Selecting Rear Monitor ................................... 31
Setting the External Input ............................... 32
Switching NTSC/PAL Setting ........................ 32
Adjusting Source Signal Levels ...................... 33
Switching the Tuner Mode .............................. 33
Subwoofer Control On and Off ....................... 34
Setting the External Expansion Box ............... 34
Switching Disc Mode...................................... 35
Recalling Stored Settings ................................ 35
Simultaneous Operation .................................. 35
Switching Display Modes ............................... 36
Operation with the monitor display closed ..... 37
Information
In Case of Difficulty ....................................... 38
Specifications .................................................. 40
Installation and
Connections
Warning ........................................................... 41
Caution ............................................................ 41
Precautions ...................................................... 41
Installation ...................................................... 42
Connections .................................................... 44
2-EN

3-EN
CAUTION
This symbol means important instructions.
Failure to heed them can result in injury or
material property damage.
HALT USE IMMEDIATELY IF A PROBLEM APPEARS.
Failure to do so may cause personal injury or damage to
the product. Return it to your authorized Alpine dealer or
the nearest Alpine Service Centre for repairing.
PRECAUTIONS
Temperature
Be sure the temperature inside the vehicle is between
+45°C (+113°F) and 0°C (+32°F) before turning your unit
on.
Maintenance
If you have problems, do not attempt to repair the unit
yourself. Return it to your Alpine dealer or the nearest
Alpine Service Station for servicing.
Installation Location
Make sure the CVA-1003E will not be installed in a
location subjected to:
• Direct sun and heat
• High humidity and water
• Excessive dust
• Excessive vibrations
Handling the Detachable Front Panel
• Do not expose to rain or water.
• Do not drop or apply shock.
WARNING
This symbol means important instructions.
Failure to heed them can result in serious
injury or death.
DO NOT OPERATE ANY FUNCTION THAT TAKES
YOUR ATTENTION AWAY FROM SAFELY DRIVING
YOUR VEHICLE.
Any function that requires your prolonged attention
should only be performed after coming to a complete stop.
Always stop the vehicle in a safe location before
performing these functions. Failure to do so may result in
an accident.
KEEP THE VOLUME AT A LEVEL WHERE YOU CAN
STILL HEAR OUTSIDE NOISE WHILE DRIVING.
Failure to do so may result in an accident.
DO NOT DISASSEMBLE OR ALTER.
Doing so may result in an accident, fire or electric shock.
USE THIS PRODUCT FOR MOBILE 12V
APPLICATIONS.
Use for other than its designed application may result in
fire, electric shock or other injury.
USE THE CORRECT AMPERE RATING WHEN
REPLACING FUSES.
Failure to do so may result in fire or electric shock.
DO NOT BLOCK VENTS OR RADIATOR PANELS.
Doing so may cause heat to build up inside and may result
in fire.
DO NOT PLACE HANDS, FINGERS OR FOREIGN
OBJECTS IN INSERTION SLOTS OR GAPS.
Doing so may result in personal injury or damage to the
product.
KEEP SMALL OBJECTS SUCH AS BATTERIES OUT
OF THE REACH OF CHILDREN.
Swallowing them may result in serious injury. If
swallowed, consult a physician immediately.
USE ONLY IN CARS WITH A 12 VOLT NEGATIVE
GROUND.
(Check with your dealer if you are not sure.) Failure to do
so may result in fire, etc.
WARNING

4-EN
WARNING
Operation of some of the functions of this unit is very
complex. Because of this, it was deemed necessary to
place these functions into a special screen. This will
restrict operation of these functions to times when the
vehicle is parked. This ensures the focus of the driver's
attention will be on the road and not on the CVA-1003E.
This has been done for the safety of the driver and
passengers.
The Title Input and SETUP screens cannot be made while
the car is moving. The car must be parked and the parking
brake must be engaged for the procedure described in the
Owner's Manual to be valid. The warning "CAN'T
OPERATE WHILE DRIVING," will be displayed if any
attempts are made to perform these operations while
driving.
This operation is the same as when selecting sources
using the remote control (Optional). When the car is
parked, the selection is made as described in the Owner's
Manual.
Alpine products equipped with the Ai-NET bus,
connected to the CVA-1003E, can be operated from the
CVA-1003E. Depending on the products connected, the
functions and displays will vary. For details, consult your
Alpine dealer.

5-EN
Introduction
You can operate most of the functions of this unit with the monitor display
open or closed (except some operations). For operations with the monitor
display closed, refer to page 37.
THE MONITOR DISPLAY IS OPEN
THE MONITOR DISPLAY IS CLOSED
displayed in the sub display
displayed in
the monitor
display

6-EN
Basic Operation
Detaching the Front Panel
1Press and hold the PWR (Power) button for more
than 2 seconds to turn off the power.
2Press the (Release) button at lower left side
until the front panel pops out.
3Grasp the left side of the front panel and pull it out.
NOTES
•The front panel may become hot in normal usage
(especially the connector terminals), this is not a
malfunction.
•To protect the front panel, place it in the supplied
carrying case.
Attaching the Front Panel
1First, insert the right side of the front panel into
the main unit. Align the groove on the front panel
with the projections on the main unit.
2Push the left side of the front panel until it locks
firmly into the main unit.
NOTE
Before attaching the front panel, make sure that there is
no dirt or dust on the connector terminals and no foreign
object between the front panel and the main unit.
•Compatibility with Factory Steering Wheel
Radio Controls
If your vehicle has steering wheel controls for the
radio, an optional steering wheel control
interface may be available to connect your Alpine
radio. For details, contact your Alpine dealer.
•Controllable to with Remote Control
This unit can be controlled with an optional
Alpine remote control. For details, consult your
Alpine dealer.
Point the optional remote control transmitter at
the remote control sensor.
•You can use the remote control even when the
monitor display is closed.
Initial System Start-Up
Immediately after installing or applying power to the
unit, it should be initialized. To do this, first, remove
the detachable front panel. Behind the front panel, to
the right of the connector, there is a small hole.
Using a pencil or other pointed object, press the
reset switch mounted behind this hole to complete
the initialization procedure.
1
2
1
OPEN/CLOSE
PWR
RESET switch
When the monitor
display is closed.
Remote control
sensor
Remote control
sensor
When the monitor
display is open.

7-EN
Basic Operation
Turning Power On and Off
Some of this unit's functions, cannot be performed
while the vehicle is in motion. Be sure to stop your
vehicle in a safe location and apply the parking
brake, before attempting these operations.
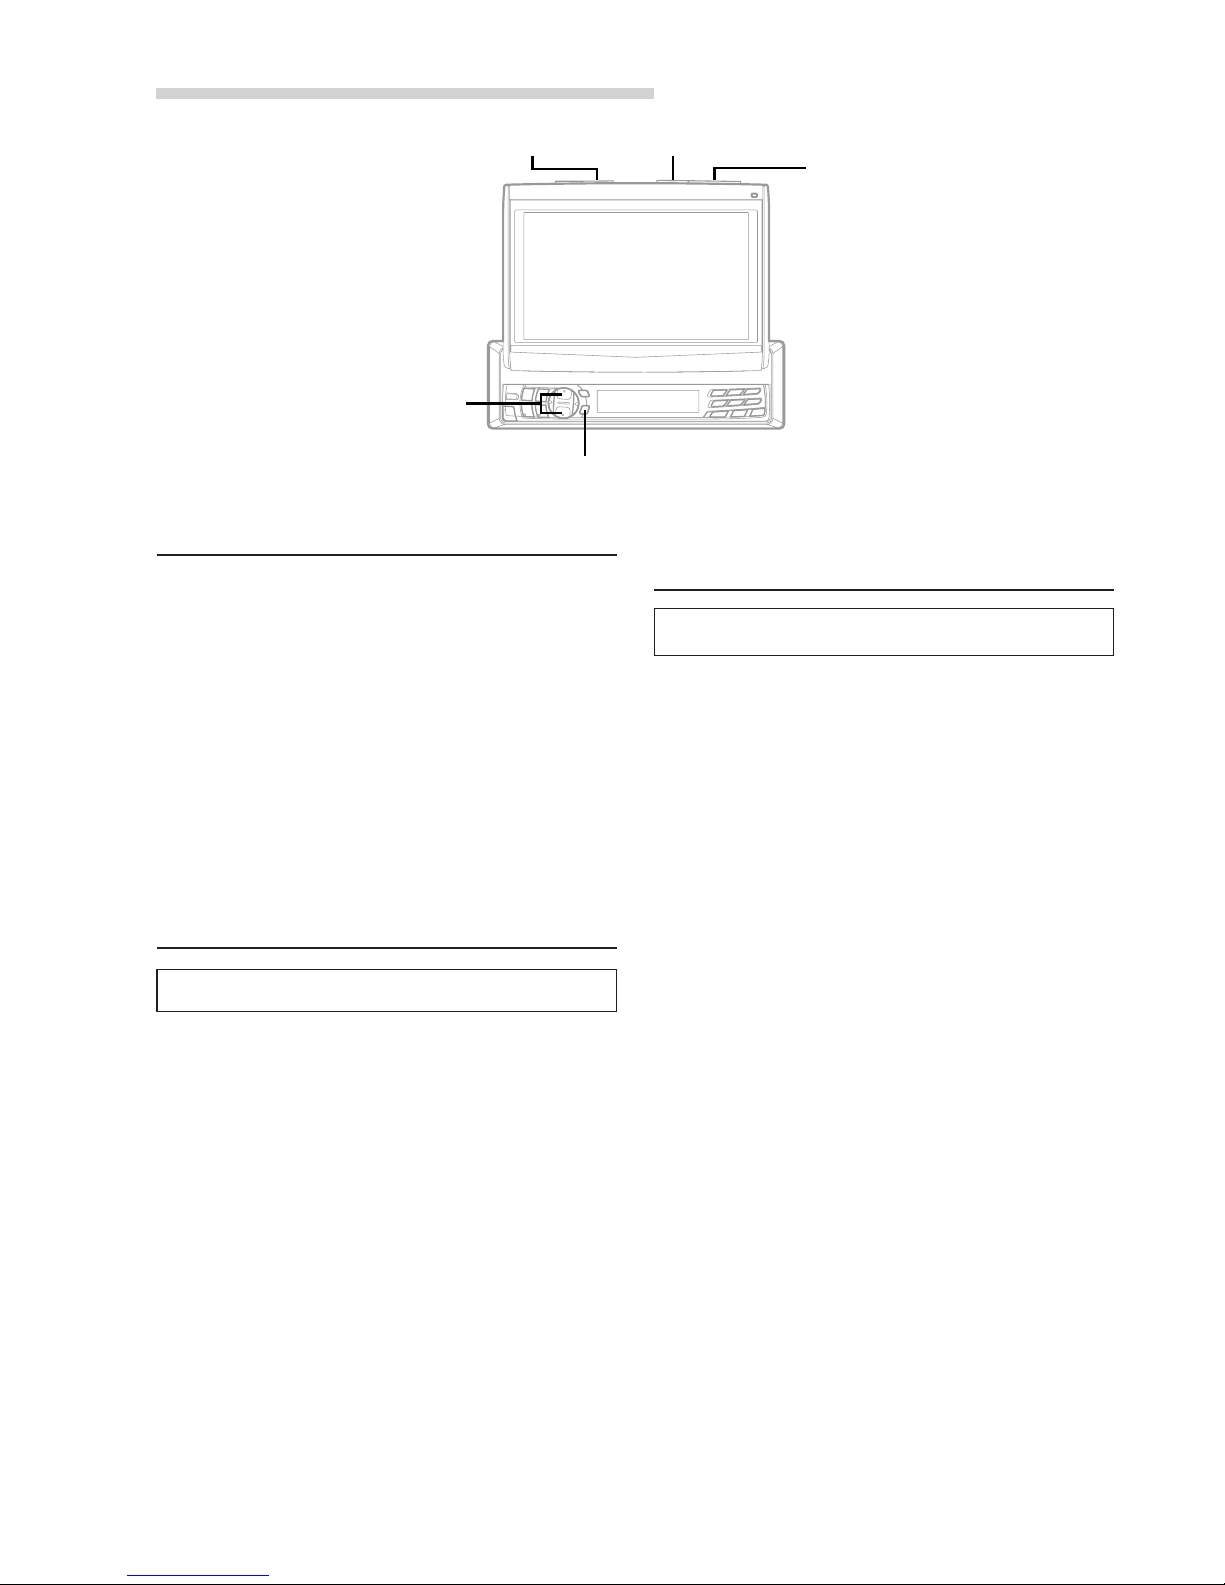
1Press the PWR (Power) button to turn on the
unit.
The opening screen appears automatically on
the monitor display.
NOTE
The unit can be turned on by pressing any other buttons
except the OPEN/CLOSE and ANGLE 78button.
The volume level gradually increases to the previous
level you were listening to before the unit was turned
off. Press and hold the PWR (Power) button for at
least 2 seconds to turn off the unit.
NOTES
•After turning the system off, a slight ghost of the image
will remain temporarily. This is an effect peculiar to
LCD technology and is normal.
•Under cold temperature conditions, the screen may
lose contrast temporarily. After a short warm-up
period, it will return to normal.
•The CVA-1003E draws minimal current even when its
power switch is turned off. If the switched power
(ignition) lead of the CVA-1003E is connected directly
to the positive (+) post of the vehicle's battery, the
battery may be discharged. If this lead is unswitched,
it must be disconnected from the battery post should
the vehicle be left unused for an extended period of
time.
An SPST (Single-Pole, Single-Throw) switch (sold
separately) can be added to simplify this procedure.
Then, you can simply place it in the OFF position
when you leave the vehicle. Turn the SPST switch back
ON before using the CVA-1003E. For connecting the
SPST switch, refer to "Connection Diagram of SPST
Switch" on page 43.
•Some operation of the unit cannot be performed while
the vehicle is in motion. In this case, be sure to first
stop your vehicle and apply the parking brake, then
perform the operation.
Raising the Monitor
1Press the OPEN/CLOSE button.
The unit beeps 3 times and raises the monitor
automatically.
NOTES
•The CVA-1003E is a precision device. With gentle
handling, its unique capabilities can be enjoyed for a
long time.
•If the monitor touches an obstacle while it is being
raised, the unit will stop raising the monitor
immediately. Should this occur, remove the obstacle
and press the OPEN/CLOSE button again to raise the
monitor.
•When the movable monitor is opened, do not place any
object on the monitor and be careful not to bump or
apply any pressure to the monitor while it is open. This
can cause damage to the mechanism.
•Under low ambient temperature conditions, the
display may be dark for a short period of time
immediately after the power is turned on. Once the
LCD has warmed up, the display will return to
normal.
•For your safety, some operation of the unit cannot be
performed while the vehicle is in motion. In this case,
first stop the vehicle and engage the parking brake,
then perform the operation.

8-EN
Basic Operation
MUTE OPEN/CLOSE
ANGLE 7 87 8
7 87 8
7 8
MODE/LOUD
Lowering the Monitor
1Press the OPEN/CLOSE button.
The unit will beep 3 times and lower the monitor
automatically.
NOTES
•The CVA-1003E is a precision device. With gentle
handling, its unique capabilities can be enjoyed for a
long time.
•If the monitor touches an obstacle while it is being
lowered, the unit will stop lowering the monitor
immediately.
Should this occur, remove the obstacle and press the
OPEN/CLOSE button again to lower the monitor.
Selecting the Monitor's Opening
Position
The monitor's opening position has 2 settings.
1Press and hold the OPEN/CLOSE button for at
least 2 seconds while the monitor is being raised.
Each press changes the monitor position back or
forth.
Adjusting the Monitor Viewing
Angle
Adjust the monitor's angle for better visibility.
1Press the ANGLE 77
77
788
88
8buttons to adjust the
monitor's angle so the screen will be in the best
viewing position. Each press of the buttons
produces a beep and changes the screen angle
between 40 and 105 degrees.
When you press and hold the 77
77
7or 88
88
8(ANGLE)
button for at least 2 seconds, the monitor's angle
keeps moving until you release the button.
NOTES
•If the monitor touches an obstacle while the angle is
being adjusted, the unit will stop the screen
immediately.
Should this happen, remove the obstacle and press the
ANGLE 7 or 8button again.
•The screen colour will vary when viewed at certain
angles. Adjust the screen angle for the best viewing
position.
•If the voltage of the vehicle's battery power is low, the
screen may blink when the screen angle is changed.
This is normal and not a malfunction.
CAUTION
Keep hands (or any other object) away from the display
while it is opening or closing to avoid damage or injury.
The back of the movable display will get very warm
under normal operating conditions. This is not a
malfunction. Do not touch.
77
77
788
88
8

9-EN
Basic Operation
Adjusting Volume/Balance
(Between Left and Right)/Fader
(Between Front and Rear)
1Press the MODE button repeatedly to choose
the desired mode.
Each press changes the modes as follows:
NOTES
•If the 55
55
5or 66
66
6button is not pressed in 5 seconds after
selecting the BALANCE, or FADER mode, the unit
automatically returns to the VOLUME mode.
•If the subwoofer is ON, its level can also be adjusted
using the MODE button.
2Press the 7and 8buttons until the desired
sound is obtained in each mode.
Turning Loudness On and Off
Loudness introduces a special low- and high-
frequency emphasis at low listening levels. This
compensates for the ear's decreased sensitivity to
bass and treble sound.
1Press and hold the LOUD button for at least
2 seconds to activate or deactivate the loudness
mode.
The display shows "LOUD" when the loudness
mode is activated.
NOTE
When connecting an external audio processor to the unit,
you cannot use this function.
→VOL →BAL →FAD
Audio Mute Function
Activating this function will instantly lower the
volume level by 20 dB.
1Press the MUTE button to activate the MUTE
mode. The audio level will decrease by about
20 dB.
Pressing the MUTE button again will bring the
audio back to its previous level.
NOTE
When an external interruption (e.g., vehicle phone)
happens, the display shows as follows:
The monitor display: INT.
The sub display: INTERRUPT
This function is only available when the Interrupt lead of
the Auxiliary device is connected to the unit.

10-EN
Radio Operation
A.ME/TUNE
BAND
SOURCE
gg
gg
gDN
ff
ff
fUP
Preset buttons
(1 through 6)
Manual Tuning
1Press the SOURCE button until a radio band and
frequency appears in the display.
2Press the BAND button repeatedly until the
desired radio band is displayed.
Each press changes the band:
→FM1 →FM2 →AM
3Press the TUNE button repeatedly until "DX
SEEK" and "SEEK" disappear from the display.
NOTE
The initial mode is DX SEEK.
4Press the g DN or fUP button to move
downward or upward one step respectively until
the desired station frequency is displayed.
NOTE
The STEREO indicator appears on the monitor display
when a Stereo FM station is tuned in.
Automatic Seek Tuning
1Press the SOURCE button until a radio band and
frequency appears in the display.
2Press the BAND button repeatedly until the
desired radio band is displayed.
Each press changes the band:
→FM1 →FM2 →AM
3Press the TUNE button to illuminate the DX and
SEEK indicators in the display.
With the DX (Distance) mode activated, both
strong and weak stations will be tuned in the
Auto-Seek operation.
Press again to return to the local mode. The DX
indicator will turn off and the SEEK indicator will
remain illuminated. Now, only strong stations will
be tuned.
4Press the g DN or fUP button to
automatically seek for a station downward or
upward respectively.
The unit will stop at the next station it finds.
Press the same button again to seek the next
station.
Example of Radio mode Screen
Volume Level Current Time
Frequency of the current
station
Selected Source
Preset button number for
the stored station
The current setting status

11-EN
Radio Operation
Manual Storing of Station Presets
1Select the radio band and tune in a desired radio
station you wish to store in the preset memory.
2Press and hold any one of the Preset buttons (1
through 6) for at least 2 seconds until the station
frequency (sub display) or preset number
(monitor display) on the display blinks.
3Press the Preset button into which you wish to
store the station while the frequency (sub
display) or preset number (monitor display) is
blinking (within 5 seconds).
The display stops blinking once the station has
been memorized. The display shows the band,
preset No. with a triangle (9*) and station
frequency memorized.
*displayed in sub display
4Repeat the procedure to store up to 5 other
stations onto the same band.
To use this procedure for other bands, simply
select the band desired and repeat the
procedure.
A total of 18 stations can be stored in the preset
memory (6 stations for each band; FM1, FM2,
AM.)
NOTE
If you store a station in a preset memory which already
has a station, the current station will be cleared and
replaced with the new station.
Automatic Memory of Station
Presets
1Press the SOURCE button to select the radio
mode.
2Press the BAND button repeatedly until the
desired radio band is displayed.
3Press and hold the A. ME button for at least 2
seconds.
The frequency on the display continues to
change while the automatic memory is in
progress. The tuner will automatically seek and
store 6 strong stations in the selected band. They
will be stored into presets 1 to 6 buttons in order
of signal strength.
When the automatic memory has been
completed, the tuner goes to the station stored in
the preset location No. 1.
NOTE
If no stations are stored, the tuner will return to the
original station you were listening to before the auto
memory procedure began.
Tuning to Preset Stations
1Press the SOURCE button to select the radio
mode.
2Press the BAND button repeatedly until the
desired band is displayed.
3Press the station Preset button that has your
desired radio station in memory.
The display shows the band, preset number with
a triangle and frequency of the station selected.

12-EN
CD Player/Changer Operation (Optional)
::
::
:/JJ
JJ
J
SOURCE
gg
gg
gDN
ff
ff
fUP
Example of CD mode Screen
Volume Level Current Time
Elapsed playing time
Selected Source
Playing Optional CD Player or
Changer
When an optional Alpine CD player or CD
changer is connected, you can control it from the
CVA-1003E. This section describes operation
assuming that an Alpine CD player is connected.
(When a CD changer is connected, see page 15
to select your desired disc.)
You can directly select the CD Changer mode by
pressing the CHG (changer) button on the CVA-
1003E.
1Press the SOURCE button until the "CD"
appears in the display.
Insert a CD into the CD player, the player starts
playing.
2To pause playback, press the :/Jbutton.
Pressing the :/Jbutton again will resume
playback.
3To eject the CD, press the eject (c) button on
the CD player.
Music Sensor (Skip)
1Momentarily press the g DN button once
during CD play to return to the beginning of the
current track. If you wish to access the beginning
of a track further back, repeatedly press until you
reach the desired track.
Press the fUP button once to advance to the
beginning of the next track. If you wish to access
the beginning of a track further ahead, press
repeatedly until the desired track is reached.
NOTE
The music sensor feature is functional in the play or
pause mode.
Fast Forward and Backward
1Press and hold the gDN or fUP button to
quickly move backward or forward until you
reach the desired section of the track.
Track number
(DISC number in the
Changer Mode)
The current setting status
CHG SCANM.I.X.
RPT

13-EN
CD Player/Changer Operation (Optional)
Repeat Play
1Press the RPT (Repeat) button to play back
repeatedly the track being played.
The track will be played repeatedly.
Press the RPT button again and select OFF to
deactivate the repeat play.
NOTES
•If a CD Changer is connected and the RPT
(REPEAT) ALL mode is selected, the unit
repeatedly plays back all tracks on the disc
selected.
Displayed in the monitor display:
Displayed in the sub display:
When the monitor display is open: displayed in the
monitor display
•In case a 6-disc CD changer is connected:
In CD changer mode, press the FUNC button to light
the "FUNC" indicator in red and go to step 1.
•In case a 12-disc CD changer is connected:
In changer mode, press the FUNC button twice to light
the "FUNC" indicator in red and go to step 1.
When the monitor display is closed: displayed in the
sub display
•In case a 6-disc CD changer is connected:
In CD changer mode, press the FUNC button to
illuminate the "FUNC" indicator and go to step 1.
•In case a 12-disc CD changer is connected:
In changer mode, press the FUNC button twice to
illuminate the "FUNC" indicator and go to step 1.
→ REPEAT → REPEAT ALL →(off)
M.I.X. (Random Play)
1Press the M.I.X. button in the play or pause mode.
The tracks on the disc will be played back in a
random sequence. After all the tracks on the disc
have been played back once, the player will begin
a new random sequence play until the M.I.X.
mode is cancelled.
To cancel M.I.X. play, press the M.I.X. button
again to turn off the M.I.X.
→ M.I.X. → ALL M.I.X. → (off)
NOTES
•If a CD Changer equipped with the ALL M.I.X. function
is connected, ALL M.I.X. will also be selectable.
In this mode, the tracks on all the CDs in the current
magazine will be included in the random playback
sequence.
When the monitor display is open: displayed in the
monitor display
•In case a 6-disc CD changer is connected:
In CD changer mode, press the FUNC button to light
the "FUNC" indicator in red and go to step 1.
•In case a 12-disc CD changer is connected:
In changer mode, press the FUNC button twice to light
the "FUNC" indicator in red and go to step 1.
When the monitor display is closed: displayed in the sub
display
•In case a 6-disc CD changer is connected:
In CD changer mode, press the FUNC button to
illuminate the "FUNC" indicator and go to step 1.
•In case a 12-disc CD changer is connected:
In changer mode, press the FUNC button twice to
illuminate the "FUNC" indicator and go to step 1.
Scanning Programmes
1Press the SCAN button to activate the Scan mode.
The first 10 seconds of each track will be played
back in succession.
To stop scanning, press the SCAN button and
deactivate the Scan mode.
NOTES
When the monitor display is open: displayed in the
monitor display
•In case a 6-disc CD changer is connected:
In CD changer mode, press the FUNC button to light
the "FUNC" indicator in red and go to step 1.
•In case a 12-disc CD changer is connected:
In changer mode, press the FUNC button twice to light
the "FUNC" indicator in red and go to step 1.
When the monitor display is closed: displayed in the sub
display
•In case a 6-disc CD changer is connected:
In CD changer mode, press the FUNC button to
illuminate the "FUNC" indicator and go to step 1.
•In case a 12-disc CD changer is connected:
In changer mode, press the FUNC button twice to
illuminate the "FUNC" indicator and go to step 1.
→ RPT → RPT ALL →(off)

14-EN
CD Player/Changer Operation (Optional)
1When the monitor display is open, press the
TITLE button and select the title display mode.
For details, see "Displaying the Title/Text" (page
22).
2Press and hold the TITLE button for at least 3
seconds. The first character will blink.
3Press the gDN or fUP button to select
the desired letter/numeral/symbol available for
naming.
4Press the :/Jbutton to store the first character.
The first character will stop blinking and the
display will automatically advance to the next
character. When that character begins to blink,
you may choose the next letter or symbol of your
title.
5Repeat the steps 3 and 4 above to complete the
titling. Pressing the :/Jbutton after entering the
8th character, automatically stores the title into
memory.
When entering a title of less than 8 characters
(for example, 3 character title):
After entering 3 characters to complete your title,
the 4th character space will be blinking. Go to
step 6 to complete the title.
Titling Discs
It is possible to title your favourite CD's.
NOTE
The Parking Brake must be engaged to access the Title
display mode screen. Attempting to access this screen
while driving will display the warning-CAN'T OPERATE
WHILE DRIVING.
::
::
:/JJ
JJ
J
gg
gg
gDN
ff
ff
fUP
TITLE
SOURCE
Disc Select buttons
(1 through 6)
6Press and hold the TITLE button for at least 3
seconds to record the title.
NOTES
•The memory can store up to 150 titles for CD changer.
If you try to store beyond the limit, the display will
show "FULL DATA." At this point, no more titles can
be stored.
•The CD Changer title length or memory capacity
varies depending upon the model being used.
•When you want to erase a title, enter the " "
symbol into all spaces.
•The operations described in steps 3 to 5 must be made
within 10 seconds. The input mode will be cancelled if
no action is taken for over 10 seconds.
•Removing power from the unit may delete these titles.
Use caution when manipulating the power cord.

15-EN
Erasing Disc Title
1When the monitor display is open, press the
TITLE button to select the disc titling mode.
Then, press and hold the button for at least 3
seconds.
2Press and hold the -/Jbutton for at least 2
seconds to activate the title scanning mode. The
title in the display will blink.
3Press the g DN or fUP button repeatedly
until the disc title you want to erase is displayed.
4Press and hold the -/Jbutton for at least 2
seconds to erase the disc title displayed.
5Press and hold the TITLE button for at least 3
seconds to cancel the disc title erasing mode.
NOTE
You cannot erase a CD-TEXT.
CD Player/Changer Operation (Optional)
Controlling CD Changer
An optional 6-disc or 12-disc CD Changer may be
connected to the CVA-1003E if it is Ai-NET
compatible. With a CD Changer connected to the
Ai-NET input of the CVA-1003E, the CD Changer
will be controllable from the CVA-1003E.
Using the KCA-400C (the Multi-Changer
Switching device) multiple changers can be
controlled by the CVA-1003E.
See the Multi-Changer Selection section on page
16 for selecting the CD Changers.
NOTE
The controls on the CVA-1003E for CD Changer
operation are operative only when a CD Changer is
connected.
1Press the SOURCE button to activate the CD
changer mode. The display shows the disc
number and track number.
NOTE
The source indicator varies depending on the connected
source.
2Press the Disc Select buttons (1 through 6)
corresponding to one of the discs loaded in the
CD Changer. The selected disc number appears
in the display and CD playback starts.
NOTES
•After selecting the desired disc, you can operate in the
same way as for the CVA-1003E CD player.
For details, please see the CD Operation section.
•When the "FUNC" indicator is lit in red in the monitor
display, or is lit in the sub display, the disc select
buttons become nonfunctional.
When a 12-disc CD Changer is connected:
To select discs numbered from 1 to 6, the
procedure is the same as for the 6-disc CD
Changer. To select discs numbered from 7 to 12,
first press the FUNC button. In the sub display,
this changes the "D" indicator to "d." The "FUNC"
indicator is lit in yellow on the monitor display.
Then press the desired Preset button. With the
FUNC button activated, the Preset buttons 1 to 6
will represent discs 7 to 12 respectively.

16-EN
CD Player/Changer Operation (Optional)
3The CD Changer Selection mode remains active
for 3 seconds after step 2 is performed. Press
the BAND button until the desired CD Changer
indicator appears on the display.
NOTE
If the selected CD Changer is not connected, the display
will show "NO CHANGER."
Alternatively press the BAND button on the
Remote Control until the desired changer
indicator appears on the display.
4To operate the selected changer, see "CD Player
Operation" section.
NOTE
If an optional CD/MD/DVD player is connected to the
unit, the disc mode can be switched each time you press
the BAND button (see "Switching Disc Mode" on page
35.)
Multi-Changer Selection
Alpine's Ai-NET system will support up to 6 CD
Changers. When operating two or more changers,
the KCA-400C (Multi-Changer Switching device)
must be used. If you use 1 Switching device, you
can connect up to 4 CD Changers. If you use 2
Switching devices, you can connect up to 6 CD
Changers.
1Press the SOURCE button on the CVA-1003E to
activate the CD Changer mode.
Alternatively, press the SOURCE button on the
Remote Control (optional) to activate the CD
Changer mode. Proceed to step 3 below to
select the desired CD Changer.
2Press the BAND button on the CVA-1003E or
the Remote Control to activate the CD Changer
Selection mode.
SOURCE
BAND

17-EN
MD Player Operation (Optional)
Playing Mini-Disc (MD)
When an optional Alpine MD player is connected
to the CVA-1003E, you can control the player from
the CVA-1003E.
(When the MDA-5051 is connected, MDs can be
played back only.)
1Press the SOURCE button until the "MD"
appears in the display.
Insert an MD into the MD player, the player starts
to play the MD.
NOTE
Before inserting an MD, use your finger to feel around
the MD cartridge. If you feel any small bumps or
irregularities, remove them because these may cause a
malfunction or damage to the player.
2Press the :/Jbutton to temporarily pause play.
To resume play, press the :/Jbutton for a
second time.
3Press the eject (c) button on the MD player
when you want to eject the MD.
Music Sensor (Skip)
1Momentarily press the gDN button once to
return to the beginning of the current track. If you
wish to access the beginning of a track further
back, repeatedly press until you reach the
desired track.
2Press the fUP button once to advance to the
beginning of the next track. If you wish to access
the beginning of a track further ahead, press
repeatedly until the desired track is reached.
::
::
:/JJ
JJ
J
gg
gg
gDN
ff
ff
fUP
SOURCE
Example of MD Mode Screen
Volume Level Current Time
Elapsed playing time
Selected Source
Track number
The current setting status

18-EN
MD Player Operation (Optional)
Fast Forward and Backward
1Press and hold the gDN or fUP button to
quickly move backward or forward until you
reach the desired section of the track.
When you reach the desired section, release the
button. The player starts playing from that
section.
Repeat Play
1Press the RPT button to play back repeatedly the
track being played. The RPT (Repeat) indicator
appears and the track plays repeatedly.
Press the RPT button repeatedly until the RPT
(Repeat) indicator disappears to deactivate the
repeat play.
M.I.X. (Random Play)
1Press the M.I.X. button in the play or pause
mode. The M.I.X. indicator will illuminate and the
tracks on the disc will be played back in a
random sequence. After all the tracks on the disc
have been played back once, the player will
begin a new random sequence play until the
M.I.X. mode is deactivated.
To stop the M.I.X. play, press the M.I.X. button
repeatedly until the M.I.X. indicator disappears.
gg
gg
gDN
ff
ff
fUP M.I.X. RPT

19-EN
Cassette Player Operation (Optional)
Controlling Cassette Player
If an optional Alpine cassette player is connected
to the CVA-1003E, it can be controlled from the
CVA-1003E.
1Press the SOURCE button until the "TAPE"
appears in the display.
Insert a cassette tape into the cassette player.
The player starts playing.
2To stop tape play and eject the cassette tape,
press the eject (c) button on the cassette player.
SOURCE

20-EN
DVD/Video CD/CD Player Operation (Optional)
Playing DVD/Video CD/CD
If an optional Alpine DVD/video CD/CD player is
connected to the CVA-1003E, you can control it from
the CVA-1003E.
WARNING
It is dangerous (and illegal in many states) for the
driver to watch the TV/Video while driving the
vehicle. The driver may be distracted from looking
ahead and an accident could occur.
Install the CVA-1003E correctly so that the driver
cannot watch TV/Video unless the vehicle is
stopped and the emergency brake is applied.
If the CVA-1003E is not installed correctly, the
driver will be able to watch the TV/Video while
driving the vehicle and may be distracted from
looking ahead causing an accident. The driver or
other people could be severely injured.
Still/Pause
1Press the :/Jbutton during DVD/video CD/CD
play to freeze frame or pause. To resume normal
play, press the :/Jbutton for a second time.
Chapter (DVD)/Track (Video CD)
Sensor
1Lightly press the gDN or fUP button
during DVD/video CD/CD play to return to the
beginning of the chapter/track being currently
played or advance to the beginning of the next
chapter/track respectively.
NOTE
The word "chapter or track" means a division of the
recorded picture/sound on a DVD/video CD/CD
respectively.
::
::
:/JJ
JJ
J
SOURCE
gg
gg
gDN
ff
ff
fUP
1Press the SOURCE button to select the DVD
mode.
Insert a disc into the DVD/video CD/CD player,
the player starts playing.
CHGRPT
Disc Select buttons
(1 through 6)
Table of contents
Other Alpine Car Receiver manuals

Alpine
Alpine IDA-X100 User manual

Alpine
Alpine CTA-1502R User manual

Alpine
Alpine TDA7556R User manual

Alpine
Alpine RUX-C701 User manual

Alpine
Alpine ICS-X7 User manual

Alpine
Alpine IDA-X305 User manual

Alpine
Alpine ICS-X7HD User manual

Alpine
Alpine CDE-182R User manual

Alpine
Alpine CDE9852 - Radio / CD User manual

Alpine
Alpine CDE-102 User manual

Alpine
Alpine TDA-7638R User manual

Alpine
Alpine CDE-122 User manual

Alpine
Alpine DVA-5205 User manual

Alpine
Alpine CDA-7878 User manual

Alpine
Alpine CDE-134BT User manual

Alpine
Alpine TDM-7555R User manual

Alpine
Alpine CDE-178BT User manual

Alpine
Alpine CDE-9845RB User manual

Alpine
Alpine CDE-171R User manual

Alpine
Alpine CDA-9847 User manual