6-EN
01GB04iXA-W404E.fm
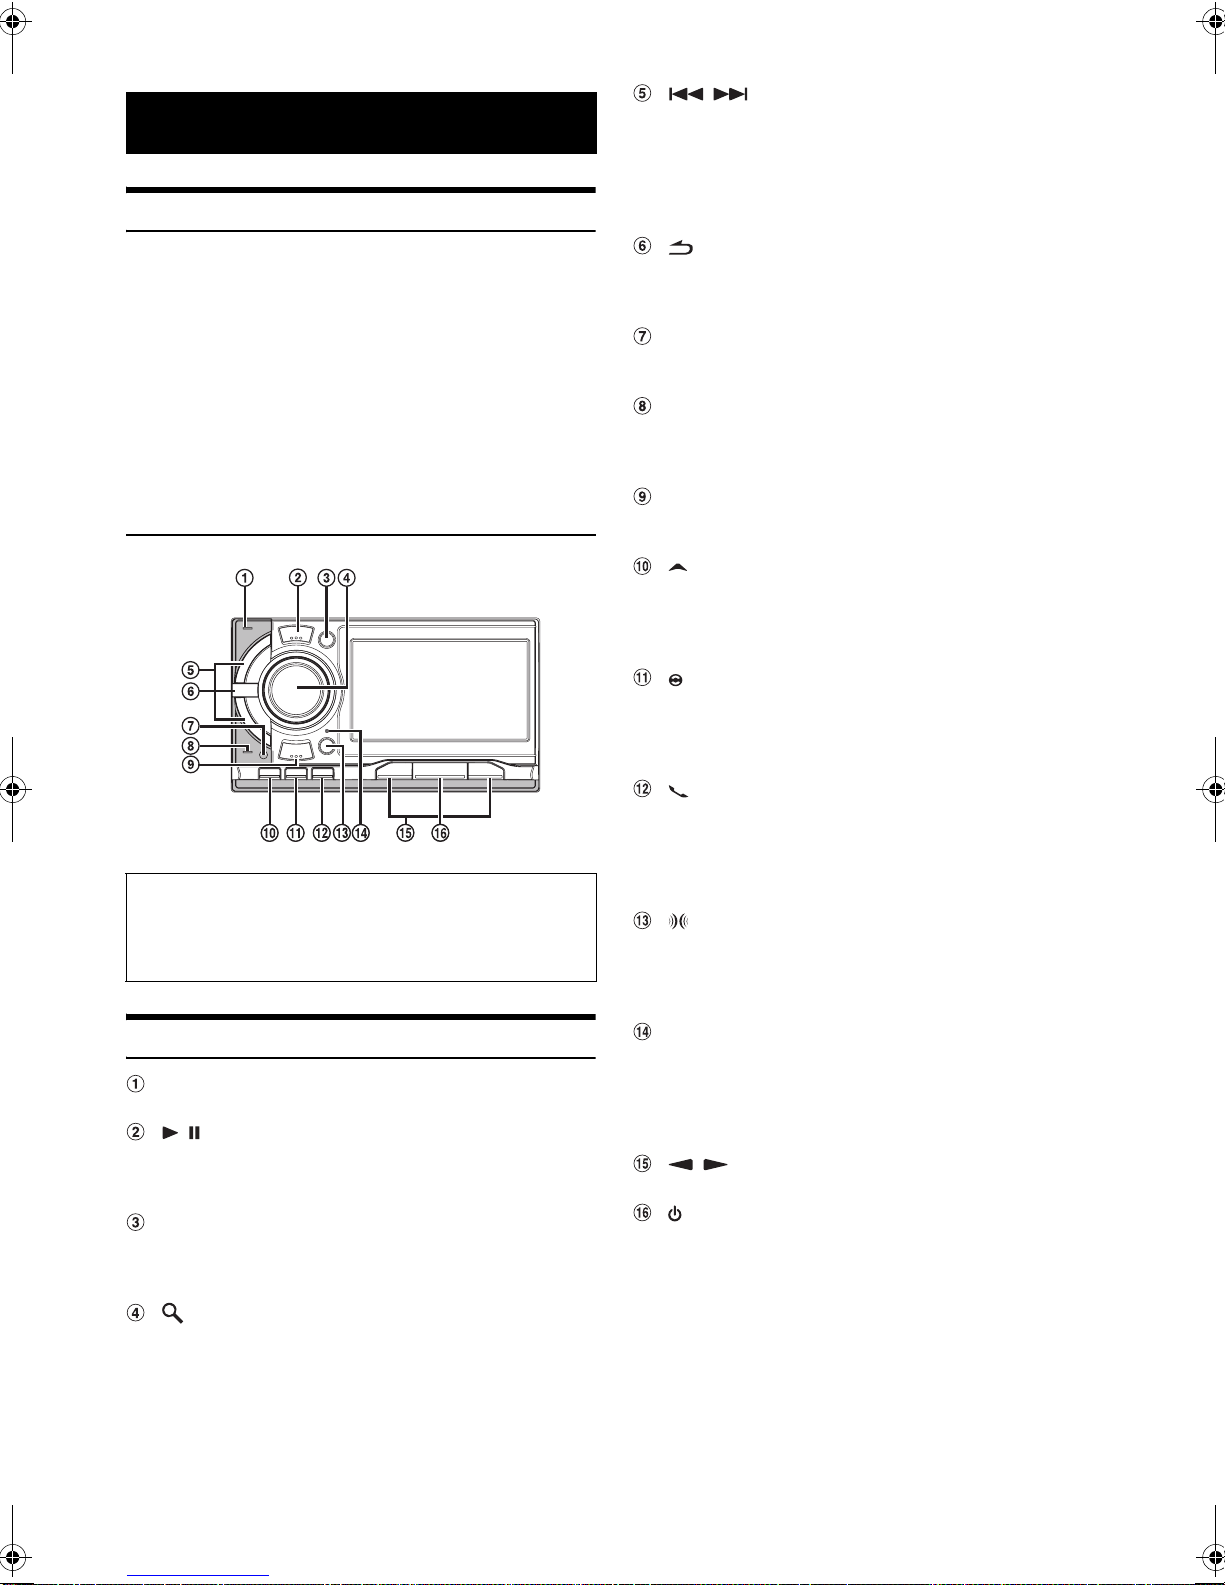
ALPINE iXA-W404E 68-14470Z14-A (EN)
• Files protected by DRM (Digital Rights Management), cannot be
played back on this unit. These include AAC, WMA or other
files with some form of copyright protection.
• USB memory may take time to start playback. If there is a
particular file other than audio in the USB memory, it may take
considerable time before the file is played back or searched.
• The unit can play back “mp3”, “wma” or “m4a” file extensions.
• Do not add the above extensions to a file other than audio data.
This non-audio data will not be recognised. The resulting
playback may contain noise that can damage speakers and/or
amplifiers.
• It is recommended to back up important data on a personal
computer.
• Do not remove the USB device while playback is in progress.
Change SOURCE to something other than USB, then remove the
USB device to prevent possible damage to its memory.
On Handling Portable audio player
• The unit can control a Portable audio player with the USB
interface. Playable audio file formats are MP3 and WMA.
• Portable audio player function is not guaranteed. Use Portable
audio player according to the terms of agreement. Read the
Portable audio player Owner’s Manual thoroughly.
• Avoid usage or storage in the following locations:
Anywhere in the car exposed to direct sunlight or high
temperatures.
Anywhere the possibility of high humidity or corrosive
substances are present.
• Fix the Portable audio player in a location where driver operation
will not be hindered.
• Portable audio player may not function correctly at high or low
temperature.
• Depending on the settings of the Portable audio player type,
memory state or encoding software, the unit may not play back
or display properly.
• If the Portable audio player has an MSC/MTP setting, set to
MTP.
• A Portable audio player in which data is stored by USB Mass
Storage may not be playable on the unit.
• Depending on the Portable audio player settings, USB Mass
Storage may be supported. For setting, refer to the Owner’s
Manual of the player.
• The unit can play back MP3/WMA files synchronised by
Windows Media Player (Ver. 10 or 11), and are then forwarded
to the player. The “mp3” or “wma” extensions are playable.
• If data is not synchronised by Windows Media Player and is
forwarded in another way, the unit may not be able to correctly
play back the files.
• WMDRM10 is supported by the unit.
• A file that is copy-protected (copyright protection) cannot be
played back.
• It is recommended to back up important data on a personal
computer.
• Do not remove the USB device while playback is in progress.
Change SOURCE to something other than USB, then remove the
USB device to prevent possible damage to its memory.
•This product incorporates copyright protection technology that
is protected by U.S. patents and other intellectual property
rights. Use of this copyright protection technology must be
authorized by Macrovision, and is intended for home and other
limited viewing uses only unless otherwise authorized by
Macrovision. Reverse engineering or disassembly is prohibited.
•Windows Media and the Windows logo are trademarks, or
registered trademarks of Microsoft Corporation in the United
States and/or other countries.
•iPod is a trademark of Apple Inc., registered in the U.S. and
other countries.
•iPhone is a trademark of Apple Inc.
•“Made for iPod” means that an electronic accessory has been
designed to connect specificallyto iPod and has been certified by
the developer to meet Apple performance standards.
•“Works with iPhone” means that an electronic accessory has
been designed to connect specifically to iPhone and has been
certified by the developer to meet Apple performance standards.
•Apple is not responsible for the operation of this device or its
compliance with safety and regulatory standards.
•The Bluetooth word mark and logos are owned by the Bluetooth
SIG, Inc. and any use of such marks byAlpine Electronics,Inc. is
under licence. Other trademarks and trade names are those of
their respective owners.
•“MPEG Layer-3 audio coding technology licensed from
Fraunhofer IIS and Thomson.”
•“Supply of this product only conveys a licence for private, non-
commercial use and does not convey a licence nor imply any
right to use this product in any commercial (i.e. revenue-
generation) real time broadcasting (terrestrial, satellite, cable
and/or any other media), broadcasting/streaming via internet,
intranets and/or other networks or in other electronic content
distribution systems, such as pay-audio or audio-on-demand
applications. An independent licence for such use is required.
For details, please visit http://www.mp3licensing.com”
•Audyssey MultEQ XT is a registered trademark of Audyssey
laboratories Inc.
01GB00iXA-W404E.book Page 6 Tuesday, March 3, 2009 5:01 PM