Alpinespas SPA POOL User manual

1
SPA POOL
MANUAL

2

3
1 Introduction........................................................................................................................................................
2 Welcome / Spa Pool Record....................................................................................................................
3 Important Safety & Operating Instructions.............................................................................
Placing the spa pool........................................................................................................................................
4 Installation Instructions...........................................................................................................................
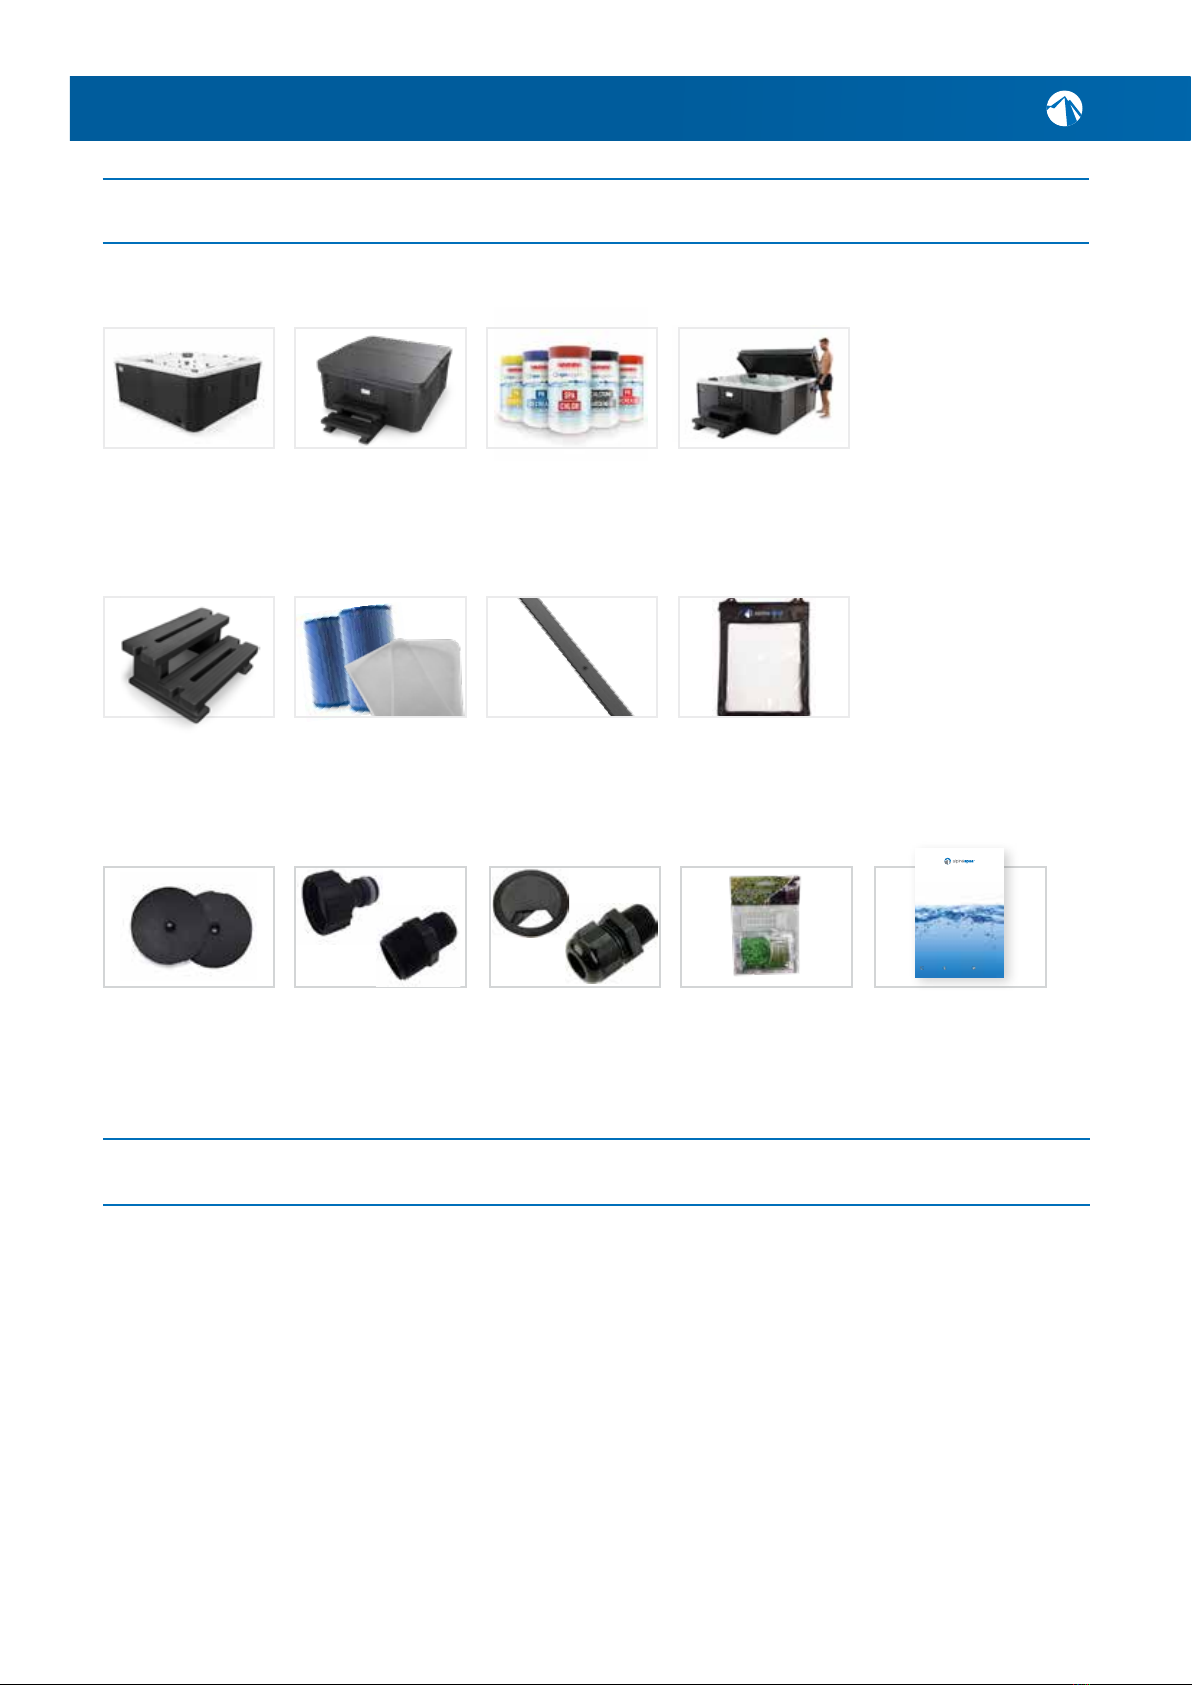
Spa pool contents.............................................................................................................................................
Assembling the accessories......................................................................................................................
Pre-llprocedure.............................................................................................................................................
Filling the spa pool...........................................................................................................................................
Electricalwiring/poweringup.................................................................................................................
5 Startup & Rell Procedure.....................................................................................................................
Installingtheltercartridges....................................................................................................................
Switchingon&heatingup..........................................................................................................................
Balancing & sanitizing the water.............................................................................................................
6 Spa Pool Usage Guide & Tips................................................................................................................
Topsidecontrolpanelquickguides......................................................................................................
Spa pool operation - SpaNet control systems...............................................................................
7 Getting to Know Your Spa Pool...........................................................................................................
Spapooloverviewbymodel......................................................................................................................
Spapoolpartslabelled...................................................................................................................................
Pressurediverter&airventurivalves..................................................................................................
Waterfall control................................................................................................................................................
Air blower & Aromatherapy.......................................................................................................................
LED lights...............................................................................................................................................................
Jets.............................................................................................................................................................................
Soundsystem.....................................................................................................................................................
8 Spa Pool Care & Maintenance..............................................................................................................
Draining the spa pool......................................................................................................................................
Cleaningthelters...........................................................................................................................................
Cleaning the acrylic shell...............................................................................................................................
Cleaning & maintaining the cabinet......................................................................................................
Caring for the spa pool cover.....................................................................................................................
Performing a pipe clean.................................................................................................................................
Leaving the spa pool short term.............................................................................................................
Leaving the spa pool long term...............................................................................................................
Cleaningschedule/checklist....................................................................................................................
9 Service Information......................................................................................................................................
Pumpmaintenance.........................................................................................................................................
Barrelunionmaintenance...........................................................................................................................
U.Vbulbreplacement......................................................................................................................................
Technicalsupportcontact...........................................................................................................................
Troubleshooting.................................................................................................................................................
4
5
6
9
10
10
10
11
12
14
16
16
19
20
21
21
26
30
30
74
78
78
79
80
81
82
84
84
85
85
86
86
87
88
89
90
91
91
91
92
92
93
TABLE OF CONTENTS

4
1. INTRODUCTION
YouaretheproudnewownerofanAlpineSpa!Itisourpleasuretowelcomeyou
totheAlpineSpafamily.Luxurioushourssoakingunderthestarswhilstenjoying
goodcompanyandhydrotherapymassage,isnowreadyandwaitingforyouevery
day,allwithintheconnesofyourownbackyard!
Wetakeexceptionalprideinourproductandhaveworkedhardtoensureallour
spapoolsincludenotonlythelatestinspapooltechnology,butalsotheabsolute
bestindesign,qualityandconstruction.Soyoucanrestassuredourproductswill
lastyouformanyrelaxingyearstocome.
Cheers,
The Alpine Spas Team
Congratulations!

5
Please ll in this information below and keep on hand for future
reference. Alpine Spas may request this information upon the
submission of a service or technical request.
Your Name....................................................................................................................................................
Spa Pool Model........................................................................................................................................
System Controller SpaNet. SV3 or SVSMART................................................................
Serial Number (found on silver cabinet plaque).............................................................
Date of purchase.....................................................................................................................................
Date of installation.................................................................................................................................
2. WELCOME / SPA POOL RECORD
Spa Pool Details
Your Personal Record
Welcome
Pleasetakethetimetoreadthisentiremanualbeforeoperatingthespapool.This
manualcontainsimportantinformationfortheownerandwesuggestkeepingitin
asafeplaceforfuturereference.
Everyefforthasbeenmadetoensuretheaccuracyofthismanual,howeverAlpine
Spasreservestherighttochangeorimprovetheirproductsandthespecications
withoutnotication.
Ifyouhaveanyquestionsaboutthismanualorthespapool,pleasecontactAlpine
Spas for assistance.
Thisownersmanual,alongwithotherhelpfulmaterialcanbe
downloadedfromoursupportpage:http://alpinespas.co.nz/support/

6
3. IMPORTANT SAFETY INSTRUCTIONS
WHENINSTALLINGANDUSINGTHISSPAPOOLANDITSELECTRICALCOMPONENTS,
BESURETOFOLLOWBASICSAFETYPRECAUTIONSINCLUDINGTHEFOLLOWING:
1. WARNING:
Toreducetheriskofinjury,donotpermitchildrentousethisproductunlesstheyareclosely
supervisedatalltimes.
2. DANGER:
Riskofaccidentaldrowning.Extremecautionmustbeexercisedtopreventunauthorizedaccess
bychildren.
3. DANGER:
Riskofinjury.Neveroperatethespapoolifsuctionttingsarebrokenormissing.
4. DANGER:
Riskofelectricalshock.Donotpermitanyelectricalappliancesuchasalight,radio,television,etc.
within1.5mofaspapoolunlesssuchappliancesareinstalledandbuilt-inbythemanufacturer.
5. ELECTRICAL SUPPLY:
Theelectricalsupplyforthisproductmustincludeasuitablyratedswitch&RCDto
openallungroundedsupplyconductorstocomplywiththenationalelectricalstandards.This
disconnectmustbereadilyaccessibleandvisibletothespapooloccupantbutinstalledatleast
1.5m from the spa pool’s water.
6. WARNING:
Toreducetheriskofinjury:
a)Watertemperaturebetween38°Cand42°Cisconsideredsafeforahealthyadult.Lowerwater
temperaturesarerecommendedforyoungchildrenandwhenthespapooluseexceeds10minutes.
b)Sinceexcessivewatertemperatureshaveahighpotentialforcausingfetaldamageduring
earlymonthsofpregnancy,pregnantwomenshouldlimitspapooluseandwatertemperaturesto
nomorethan38°C.
c)Donotusealcohol,drugs,ormedicationbeforeorduringspapoolusage.
d)Personswithahistoryofheartdisease,loworhighbloodpressure,
circulatorysystemproblems,ordiabetesshouldconsultaphysicianbeforeusingaspapool.
e)Personsusingmedicationshouldconsultaphysicianbeforeusingthespapoolassome
medicationmayinducedrowsiness,whileothermedicationmayaffectheartrate,bloodpressure,
andcirculation.
7. WARNING:
Topreventelectrocution,donotmodifyorconnectanyadditionalauxiliarycomponents(for
examplecable,speakers,headphones,additionalaudio/videocomponents,etc)tothesystem.
READ AND FOLLOW ALL INSTRUCTIONS!

7
8. CAUTION:
Riskofelectricalshock.Donotservicethespapoolcontrolleryourselfasopeningormodifyingthe
controllermayexposeyoutodangerousvoltageorotherriskofinjury.Referallservicingto
qualiedservicepersonnelunlessadvisedotherwisebytheretailer.
9. CAUTION:
Riskofelectricalshock.Ifthepowersupplyconnectionsorpowersupplycord(s)are
damaged,ifwaterisenteringtheaudio/videocompartmentoranyelectricalequipment
compartmentarea,iftheprotectiveshieldsorbarriersareshowingsignsofdeterioration,orif
therearesignsofotherpotentialdamagetotheunit:turnofftheunitandrefertheservicingto
Alpine Spas.
10. Thespapoolshouldbesubjecttoperiodicroutinemaintenanceandcareaccordingtothe‘SpaPool
Care&Maintenance’and‘ServiceInformation’sectionsofthismanual.
11. Installationofthespapoolforanythingotherthanaresidentialdwellingmayresultinvoidingthe
manufacturer’swarranty.Pleasecontactthedealertoconrm.
12. Donotbringanyobjectintothespapoolthatcoulddamagethespapoolshell.
13. Neverinsertanyobjectintoanyopening.
14. WARNING:
Donotsitonthespapoolcoverorplaceobjectsonit.
15. Removeanywaterordebristhatmaycollectonthespapoolcover.
16. WARNING:
Donotusethespapoolimmediatelyafterstrenuousexercise.
17. Ifyoufeelpainordizzinessatanytimewhileusingthespapool,discontinueuseandcontactaphysician.
18. WARNING:
Observereasonabletimelimitswhenusingthespapool.Longexposuresathightemperaturescan
causehighbodytemperatures.Symptomsmayincludedizziness,nausea,fainting,drowsiness,
andreducedawareness.Theseeffectscouldpossiblyresultindrowningorhypothermia.
19. WARNING:
Thespapool’sjetsproduceastreamofwaterwithrelativelyhighpressure.Prolongedexposureto
localizedareasofthebodymaycausebruisestotheskin.
20. WARNING:
Toavoidriskofdrowning,thespapoolcovershouldbeinplaceandproperlylatchedwhenspapool
isnotinuse.
21. IMPORTANT:
Readandunderstandthewarningsonthespapoolcover.

8
3. IMPORTANT OPERATING INSTRUCTIONS
DO NOT leavethespapoolemptyandexposedtodirectsunlightwithoutit’scover
-doingsomaydamagetheacrylic.
DO NOT powerthespapoolwithoutrstllingwithwater.
DO NOT allowthewaterleveltofallbelowthelter/skimmerbox.Thewaterlevel
shouldbekeptinlinewiththeperimeterLEDsoratleast50mmabovethebottom
oftheskimmerboxatalltimes.
DO NOT allowanypersonstoplacetheirheadunderthewater.
DO NOT rollorslidethespapoolonitsside.
DO NOT useanychemicalsorwaterbalancingproductsinthespapool,otherthan
thosesoldbyAlpineSpasLtd,PureSpasLtdorSpaSuppliesLtd.
FAILING TO READ AND UNDERSTAND THE BELOW
INSTRUCTIONS MAY VOID YOUR SPA POOL WARRANTY.
DO ensureawatermaintenanceregimeisusedandfollowedregularly.Failingto
balancewaterorsanitizecorrectlycandamagespapoolcomponentsandvoid
warranty.Aguideisprovidedwhichshouldbefollowedcarefully.
DO ensurethespapoolcoverisplacedonthespapoolandlockedwhennotinuse.
DO performaregularspapoolcleaningscheduleasinstructedbythismanual.
DO drainandrellyourspapoolatleastevery3-4monthsormorefrequentlyif
required.
DO ensureatleast4hoursofltrationisperformedbythespapooleachday(this
issetasadefault:2hours,twiceperday).
DO ensurethespapoolcoverisopenedeveryfewdaysforafewminutes(if
unused)toavoidbuildupofgassesunderthecover.

9
Choosing the Best Position
Whenchoosingwheretopositionyourspapool,therstthingyoushouldconsider
iswhatisgoingbeneathit.Yourspapoolisveryheavy,weighinganythingbetween
1000kgand2500kgwhenlled.Itisthereforeveryimportantyouchoosean
adequatefoundationthatisstrongandleveltoensurethereisnoshiftingorstrain
on the spa pool shell or framing.
Thebasewerecommendyouuseiseithera100mmconcretepad,orareinforced
deck.Ifyouchooseadeckasabase,pleasecheckthatitcomplieswithallNZ
buildingstandardsandthatitsmaxloadratingwilladequatelywithstandyourspa
pool’sweight,plusthetotalbatherloadweight.
Check Drainage
Youneedtobesuretheareainwhichthespapoolisplacedhasenoughdrainage
capacitytohandletheentirewatercontentofthespapool.Intheeventofspillage,
areasaroundthespapoolmaybecomewet;therefore,allooring,furniture,walls
andadjacentstructuresshouldbemoisture-resistant.
Check Service Access
Itisimportanttoconsidertheaccesstothecabinetsurroundingthespapool.In
theunlikelyeventofaleakorissuewithcomponents,aserviceagentmayrequire
accesstoaparticularcabinet.Weadviseleavinga600mmperimeterofspace
aroundtheentirespapool,otherwisethespapoolmayneedtobemovedbythe
customerintoapositionsuitableforatechnicianatthetimeofservice.
Detailed Installation Guide
Formoredetailedinformationandtipsonpositioningandinstalling,wehighly
recommendyoureadthroughour‘Pre-DeliveryGuide’.Theguidewasemailedto
youupon/afterpurchase.Acopycanbedownloadedfromthelinkatthebottomof
this page.
Placing/Installing the Spa Pool
Downloadthe‘Pre-DeliveryGuide’fromoursupportpage:
http://alpinespas.co.nz/support/
FAILURE TO FOLLOW THE INSTRUCTIONS IN THE PRE-DELIVERY
GUIDE MAY RESULT IN VOIDING YOUR SPA POOL WARRANTY.

10
4. INSTALLATION INSTRUCTIONS
Separate Items:
Items Packaged Inside the Spa Pool:
Items Packaged Inside the iPack:
SPA POOL CONTENTS
1-2 Filter/s &
Two Filter Mesh
(SelectModels)
Spa Pool
Safety Cover
Spa Pool
2-Tier Steps
Spa Pool
1 Spare
Vertical Slat
(SelectModels)
iPack
Spa Pool Water
Care Kit
Cover Lifter
(Optionalextra)
TwoFilterLid
Cover Caps
(Selectmodels-
GrateSkimmer)
Drain Valve to
GardenHose
Attachments
Spa Pool Cover
Thecoverrequiresminimalinstallationotherthanunpackingandplacingontop
ofthespapool.Thereare8safetylockshangingoffthesidesofthecoverwhich
needtobescrewedintothespapoolcabinetbythecustomer.Fullinstructions,
screwsandcoverkeyscanbefoundattachedtooneofthehangingsafetylocks.
Spa Pool Steps
Assemblingthetwo-tierstepsisself-explanatory.Simplypresstogether-no
screwsortoolsrequired.Thestepsmeasure890x600mm(WxL).
Note:TheYukonSpausescombinationlocksratherthankeylocks.Thestepsarea
pre-assembled3-4tierladder.Screwsarenotincludedwiththecover.
ASSEMBLING THE ACCESSORIES
CableExit
Grommet &
ControllerGland
(SelectModel)
Aromatherapy
(Selectmodels)
Important
Documents
Spa Pool
Water Care
Handbook
Easy to use illustrated guide to water maintenance.
CopyrightAlpine Spas Ltd - 2017 - Ver 1.3

11
Spa Pool Cover Lifter (Optional Extra)
Thecoverlifterneedstobeassembledontothespapool,pleaseseethe
instructionsinthecoverlifterboxandfollowthemcarefully.Twobracketsneedto
besecuredintooppositesidesofthespapoolcabinet.Certainsetupsmayhave
restrictions-seeour‘CoverLifterInstallationGuide’forconrmation.
Downloadthe‘CoverLifterInstallationGuide’fromoursupportpage:
http://alpinespas.co.nz/support/
Steps to Prepare for Filling:
PRE-FILL PROCEDURE
BEFORE FILLING, START HERE!
FAILING TO FOLLOW THIS PROCEDURE MAY RESULT
IN ISSUES STARTING UP THE SPA POOL OR VOIDING WARRANTY.
Checkthesilverplaqueonthe
sideofspapoolcabinet(orsee
yourinvoice)tondyourspapool
model’sname.Seepages34-77
formorespecicinfoaboutyour
spa pool.
Checktheexternaldrainvalve
isinthe‘ow-locked’position
(extended)withtheinnertwistcap
screwedintight.
As the spa pool has been water
testedduringmanufacture,
excesswaterresiduemayhave
splashedoutfromwithinthe
pipesduringtransportandmay
requireaquickwipe.
Openallofthespapooljetsby
turningthemanti-clockwise.This
willallowwatertoowthroughall
pipeswhenllingandhelpavoid
air-locks.
Removethe3M™blueprotective
lmfromthestainlesssteelstrip
thatsurroundstheedgeofthe
acrylic.
1
4
23
5

12
4. INSTALLATION INSTRUCTIONS
FILLING THE SPA POOL - FLOATING WEIR SKIMMER
DUO,NOVA,CUB,FRONTIER,OASIS,YUKON,ARCTIC&GLACIERSPA
POOLS
Placeyourhosethroughagapin
theskimmerboxlidtosecureit
andbeginlling.
Filluntilthewaterlinereachesjust
below the perimeter LED lights
thatsurroundtheacrylic(select
models)oraimforaninchbelow
theheadrests.
1 2
Removetheskimmerlidcaps(if
installedalready)andunthreadthe
twoplasticscrewstotakeoffthe
wholeskimmerlid.
Placeyourhoseinsidethe
skimmerboxandbeginlling(you
maywanttoplacetheskimmerlid
backontoptosecurethehosein
place).
Filluntilthewaterlinereachesjust
below the perimeter LED lights
thatsurroundtheacrylic(select
models)oraimforaninchbelow
theheadrests.
FILLING THE SPA POOL - GRATE SKIMMER
MONTBLANC,WHISTLER,MAKALU,SUMMIT,MATTERHORN,LUCANIA,
MCKINLEY,VANCOUVER,MUNRO,EVEREST&K2SPAPOOLS.
1 2 3
DO NOT POWER SPA POOL BEFORE COMPLETELY FILLED!

13
Placeyourhoseinsidethe
skimmerboxandtuckbehindthe
lteraptosecure.
Filluntilthewaterlinereachesjust
below the perimeter LED lights
thatsurroundtheacrylic(select
models)oraimforaninchbelowthe
headrests.
FILLING THE SPA POOL - STANDARD WEIR SKIMMER
ENTERTAINER X80 & ENTERTAINER X90 SPA POOLS.
DO NOT POWER SPA POOL BEFORE COMPLETELY FILLED!
1 2

14
ELECTRICAL WIRING / POWERING UP
Electrical Information for Standard Series and Platinum Models:
MODEL AMP CABLE/PLUG TECH INFO / WIRING
DUO 15A 15A CABLE INCLUDED See Page 30
NOVA 15A 15A CABLE INCLUDED See Page 32
MONT BLANC 15A 15A CABLE INCLUDED See Page 34
WHISTLER 15A 15A CABLE INCLUDED See Page 36
BLACKBURN 15A 15A CABLE INCLUDED See Page 38
YUKON 15A 15A CABLE INCLUDED See Page 40
MAKALU 15A 15A CABLE INCLUDED See Page 42
SUMMIT 15A 15A CABLE INCLUDED See Page 44
MATTERHORN 15A 15A CABLE INCLUDED See Page 46
LUCANIA 15A 15A CABLE INCLUDED See Page 48
MCKINLEY 25A HARDWIRE REQUIRED See Page 50
VANCOUVER 25A HARDWIRE REQUIRED See Page 52
MUNRO 25A HARDWIRE REQUIRED See Page 54
EVEREST 25A HARDWIRE REQUIRED See Page 56
K2 25A HARDWIRE REQUIRED See Page 58
CUB 32A HARDWIRE REQUIRED See Page 60
FRONTIER 32A HARDWIRE REQUIRED See Page 62
OASIS 45A* HARDWIRE REQUIRED See Page 64
ARCTIC 45A* HARDWIRE REQUIRED See Page 66
GLACIER 45A* HARDWIRE REQUIRED See Page 68
X80(Entertainer) 45A* HARDWIRE REQUIRED See Page 70
X90(Entertainer) 45A* HARDWIRE REQUIRED See Page 72
How to Check The Model of Your Spa Pool:
Themodelnameisimprintedonasilverplaque,
usuallylocatedalongthebottomedgeofthespa
poolcabinet.Checkaroundthewholeperimeter
of the spa pool to locate.
ANY ELECTRICAL WIRING WORK MUST BE PERFORMED
BY A LICENSED ELECTRICIAN.
4. INSTALLATION INSTRUCTIONS
Silver Plaque

15
Setting Up a 15A Model:
BydefaultthesespapoolswillNOTdrawmorethan15Aatanyonetime.Thisis
thedefaultfactorysetupwhichdisablestheheaterwhenthepumps(jets)are
turnedon*.
A15ampcablewith3-pinplughasbeenpre-wiredtothespapool’ssystem
controllerandcanbefoundcoiledupinsidethecabinet.Tondoutwhichcabinet
toremove,seeyourspapool’scorrespondingtechinfo/wiringpage(usingthe
tableonthepreviouspage).
Setting Up a 25A/32A/45A Model:
A15Aspapoolrequiresa15Asocketandresidualcurrentdevice
(RCD)forthedefaultsetup.
A25A/32A/45Aspapoolrequiresadedicatedfeedfromyourcircuit
boardandappropriateResidualCurrentDevice&Isolationswitch.
Anelectricianisrequiredtosetupandconnecttheappropriatewiring.Tolocate
thesystemcontroller,seeyourspapool’scorrespondingtechinfo/wiringpage
(usingthetableonthepreviouspage).
Thecableshouldbefedthroughthecabinetwall(acablegrommetissupplied
intheiPackshouldyouwishtousethis)andadrillwitha60mmhole-saw
attachmentwillprovidetherightsizeforthegrommet(seeaboveimage).
Alternatively,atightertcanbeachievedwithoutthegrommetbyjustusingadrill
bitthesamesizeastheexdiameteranddrillingthroughthecabinetwall.
Ifa45Aconnectioncannotbeachieved,loadshedding/limitingcanbeappliedto
restrictthetotalampdrawnbythespapool,allowingyoutofeed25-32A.
Informationforloadshed&changing15Ato25Acanbedownloaded
fromoursupportpageat:http://alpinespas.co.nz/support/
*NOTE: Customers generally prefer the default 15A factory setting, however it is possible
to wire a dedicated 25A electrical feed for both the heater and pump to run simultaneously.
A guide for your electrician can be downloaded from our support page.
Thecablecanbeexitedthroughthecabinetwall(acable
grommetissuppliedintheiPack).Adrillwitha60mm
hole-sawattachmentwillprovidetherightsizeforthe
grommet.
Cable grommet after installation

16
5. STARTUP & REFILL PROCEDURE
INSTALLING THE FILTER CARTRIDGES - FLOATING WEIR SKIMMER
DUO,NOVA,CUB,FRONTIER,OASIS,YUKON,ARCTICANDGLACIERSPA
POOLS.
Filter(s)arefoundattachedtothestepbox.
Grabthetoplidwithtwohands
andtwistanti-clockwisetodetach
(canbequitestiff).
Insertthelterandplaceitover
thecircularholdingpiecesoitsits
tight.
Liftoffthelidtorevealthebasket
grillunderneath.
Insertthebasketgrillintothetop
ofthelter,liningupthecircular
hole.
Liftoutthebasketgrillandplace
aside.
Pressthebasketdowngentlyto
ensureatightt.
Insidetheskimmerbox,seethe
circularholdingpiecethatthe
ltercartridgewillsitover.
Replacethetoplidbygently
puttingdownwardspressurewhile
turningclockwise,untilitsnaps
backintoplace.
1
4
7
2
5
8
3
6
AVOID DAMAGE TO SPA POOL & VOIDING WARRANTY - ONLY
USE FILTER CARTRIDGES PURCHASED FROM ALPINE SPAS.

17
INSTALLING THE FILTER CARTRIDGES - GRATE SKIMMER
MONTBLANC,WHISTLER,BLACKBURN,MAKALU,SUMMIT,MATTERHORN,
LUCANIA,MCKINLEY,VANCOUVER,MUNRO,EVERESTANDK2SPAPOOLS.
Filter(s)arefoundattachedtothestepbox.
NOTE:MontBlanc&Blackburnusea‘singulargrateskimmer’withadifferent
designlid(noremovablecaps)andonlyhaveone‘threadhole’foronelter.
Removethetwodrinkholdercaps
fromthetopoftheskimmerlid.
Whileliftinguptheblackgrillap,
threadinthetwoltersgently
(clock-wise).
Unscrew the two plastic screws
eithersideoftheskimmerlid.
Laytheblackgrillapbackdown
ontopofthelters.
Liftofftheskimmerlidtoreveal
theinnerskimmerbox.
Optional:Ifyoundyougetlarge
debrisinthewater(leaves,grass
etc),installthetwomesh
pre-ltersasshowninimage.
Replacetheskimmerlidby
threadingtheplasticscrewsback
inandplacingthelidcapsbackon.
Locatethetwothreadholesatthe
bottomoftheskimmerbox.
1
1
4
7
2
5
8
3
6
AVOID DAMAGE TO SPA POOL & VOIDING WARRANTY - ONLY
USE FILTER CARTRIDGES PURCHASED FROM ALPINE SPAS.

18
5. STARTUP & REFILL PROCEDURE
INSTALLING THE FILTER CARTRIDGES - STANDARD WEIR SKIMMER
ENTERTAINER X80 AND ENTERTAINER X90 SPA POOLS.
Filtersarefoundattachedtothestepbox.
Makesuretheinnerskimmerap
islayingdownasperphoto.
Pullthegrilltrayouttowardsyou.
Gripfrontlidasperphoto,and
gentlyliftupwards(donotpullout
at this stage).
Thesetwoholeshavethreads
atthebottomforyourltersto
screw into.
Whentheinneraphitsthetopof
theskimmerbox,pullthefrontlid
outwards.
Placebothltersintothe
correspondingholesandndthe
threadtoscrewinto.
Gentlytwistclockwiseuntilthe
lterislockedinplace(donot
useexcessiveforce).Replacethe
slidinggrilltray.
Replacethefrontlidbypositioning
theapinthemiddleofthe
skimmerbox,andpressingthe
frontlidintowardstheskimmer
whileusingdownwardspressure.
Locatetheslidinggrilltray.
Takenoteofhowitsitsinsidethe
skimmerforlaterreplacement.
1
4
7
2
5
8 9
3
6
AVOID DAMAGE TO SPA POOL & VOIDING WARRANTY - ONLY
USE FILTER CARTRIDGES PURCHASED FROM ALPINE SPAS.

19
SWITCHING ON & HEATING UP
Automatic Startup Procedure
Uponactivatingpower,thespapool’stopsidecontrolpanelshouldlightupandthe
screenwilldisplayaseriesofspecicsequencesandnumbers.Resetyourspa
poolifthescreenisblank.
Priming
Thespapoolwillentera‘primingmode’wheneveritisrstinitiatedorrestarted.
Thisisstartupfunctionwhichwillrunthecirculationpumptoclearanyairinthe
plumbing(primingwillnishandexitautomaticallyafter5-10minutes).
Thetopsidecontrolpanelwilldisplay“PRIMING”orsimilartoindicatethepriming
modestate.
Checkthatthecirculationpumphasengagedbyvisuallysightingmoving/rippling
waterinsidespapool.Watermayowfromthewaterfall(ifopenandequipped).
Iftheprimingfunctionfails,anerrormessagewilldisplayonthetopsidecontrol
panel-checkthetroubleshootingguideatthebackofthismanualforassistance.
AVOID PRESSING BUTTONS ON THE TOPSIDE CONTROL PANEL
UNTIL SPA POOL HAS FINISHED HEATING. SPA POOL WILL HEAT
AUTOMATICALLY TO 38 OC.
HEAT-UP PROCESS
Automatic Heating
Afterpriminghasnished,thespapoolisautomaticallyconguredtobegin
heating to 38 OC.Thecirculationpumpwillengageandbeginlteringandheating
automatically.
Installing the Cover
Placeyourspapoolcoverontopofthespapoolandlockitdownbyinstallingthe
clips.Fullinstructionscanbefoundwiththeclipsandscrews,whichareattached
to one of the 8 hanging cover straps.
Heat Up Time
Dependingonenvironment,itcantakeupto12-18hourstoheatthespapoolto
thedefault38OC.

20
5. STARTUP & REFILL PROCEDURE
BALANCING & SANITIZING THE WATER
Just like a car, your spa pool needs care and general maintenance to keep it looking good
and running smoothly. An integral part of this maintenance is managing the water
quality.
To ensure your spa pool is ready to be used at all times, the water needs to be sanitized
and balanced to keep it clean and fresh.
You may have received a Water Care Startup Kit with your spa pool (please purchase one
if you have not). Follow the ‘WaterCareHandbook’ found in your iPack or download a
copy from our support page link at the bottom of this page.
Only use Alpine Spas, PureSpas or Spa Supplies approved products (including lter
cartridges) in your spa pool. Use of unapproved products may result in your warranty
becoming void, please contact us if in doubt.
FAILING TO BALANCE AND SANITIZE YOUR SPA POOL
CORRECTLY MAY RESULT IN CORROSION OR DAMAGE TO
COMPONENTS, WHICH IS NOT COVERED UNDER WARRANTY.
Downloadour‘SpaPoolWaterCareHandbook’fromoursupport
page:http://alpinespas.co.nz/support/
Your rst steps in treating the spa pool water will require the use of the topside control
panel. See the quick reference guides on the following pages.
Table of contents
Other Alpinespas Hot Tub manuals
Popular Hot Tub manuals by other brands

Bestway
Bestway Lay-Z-Spa 54112 manual

Dimension One Spas
Dimension One Spas Dynamic Massage Sequencer owner's manual

Aquatica Digital
Aquatica Digital Maya Preinstallation manual

Jacuzzi
Jacuzzi alimia instructions

Sundance Spas
Sundance Spas Camdenl Certa owner's manual

BWT
BWT ST 2.18 Installation and operating instructions

Sundance Spas
Sundance Spas ALTAMAR 880 Limited warranty

Dimension One Spas
Dimension One Spas Arena Specifications

American Standard
American Standard Cadet Elite Whirlpool 2774E parts list

Sunrise spas
Sunrise spas 670 EZ owner's manual

Kohler
Kohler K-1106 Homeowner's guide

AquaTerra
AquaTerra Fairfax owner's manual