Alpitronic Hypercharger HYC 150 User manual

hypercharger - hypercharger User Guide
Version 1-5
Content
All rights reserved. The reproduction of this document, also partially, is allowed only with authorization by alpitronic s.r.l.
hypercharger User Guide
hypercharger HYC_150 / HYC_300
(75kW –300kW)
ultra-fast charging system for electric vehicles

hypercharger - hypercharger User Guide
Version 1-5
Content
All rights reserved. The reproduction of this document, also partially, is allowed only with authorization by alpitronic s.r.l.
hypercharger User Guide
Version
Version 1-5 of hypercharger User Guide
Original English version
© 2021 alpitronic S.r.l.
All rights reserved. The reproduction of this document, also partially, is allowed only with authorization
by alpitronic S.r.l. The information in this document is subject to change without notice.
Although the content of this release was carefully checked for accuracy, errors cannot be entirely ruled
out. If you discover an error, please notify us at info@hypercharger.it. alpitronic S.r.l. assumes no
responsibility for any errors that may appear in this document. This document is originally written in
English. Other language versions are a translation of the original document and alpitronic S.r.l. cannot
be held liable for errors in the translation.
alpitronic S.r.l. shall in no event be liable for any direct, indirect, special, incidental or consequential loss
or damages or damages of any other kind (including, without limitation damages for lost profit or loss of
data) arising out of the use of this document.
Attention
If the installation instructions described in this document are not adhered
to, any warranty claim will be void.
Manufacturer
alpitronic S.r.l.
Via di Mezzo ai Piani, 33
39100 Bolzano (BZ)
ITALY
Tel.: +39 0471 096450
Fax: +39 0471 096451
Homepage: http://www.hypercharger.it
E-Mail: [email protected]
Service
alpitronic S.r.l.
Via di Mezzo ai Piani, 33
39100 Bolzano (BZ)
ITALY
Tel.: +39 0471 096333
Fax: +39 0471 096451
Homepage: http://www.hypercharger.it
E-Mail: [email protected]

hypercharger - hypercharger User Guide
Version 1-5
Content
All rights reserved. The reproduction of this document, also partially, is allowed only with authorization by alpitronic s.r.l.
Version History
Version
Date
Author
Description
1-1A
30.07.2020
M. Hofer
First version
1-2
11.11.2020
M. Hofer
Customization Overlay
1-3
15.12.2020
M. Hofer
Chapter 5.9 + 6 inserted
1-4
28.05.2021
Dr.-Ing. M. Hörter
Chapter 1 + 2.1 inserted | Chapter 5.9 + 6
deleted
1-5
15.06.2021
Dr.-Ing. M. Hörter
Customization of:
•Chapter 1.2 (KKT + adjoining. AC-K.)
•Chapter 2.2 (Authentication State)
Table 2: Charging interfaces
Content
1.Product description..........................................................................................................5
1.1. Charging interfaces................................................................................................. 6
1.2. Exterior view ........................................................................................................... 7
1.2.1. Nameplate........................................................................................................ 8
2.Start charging session.....................................................................................................9
2.1. Authentication options............................................................................................. 9
2.2. Authentication ........................................................................................................10
2.3. Select the charging plug.........................................................................................13
2.4. Connect the plug....................................................................................................15
3.During the charging process..........................................................................................16
3.1. Charging overview .................................................................................................16
4.Terminate charging session ..........................................................................................18
4.1. Leaving screen saving mode..................................................................................18
4.2. Charging stop.........................................................................................................18
4.3. Write down Public Key (German calibration law)....................................................19
5.Error messages.............................................................................................................21
5.1. Authorization failed.................................................................................................21
5.2. No connector available...........................................................................................21
5.3. Connector damaged...............................................................................................22
5.4. Communication error with vehicle...........................................................................22
5.5. Failed to lock connector .........................................................................................23
5.6. The car signalized an error.....................................................................................23
5.7. Emergency Stop.....................................................................................................24
5.8. Charging station temporarily unavailable................................................................24

hypercharger - hypercharger User Guide
Version 1-5
Content
All rights reserved. The reproduction of this document, also partially, is allowed only with authorization by alpitronic s.r.l.
List of figures
Figure 1: Sequence of charging points HYC_150 and HYC_300....................................... 5
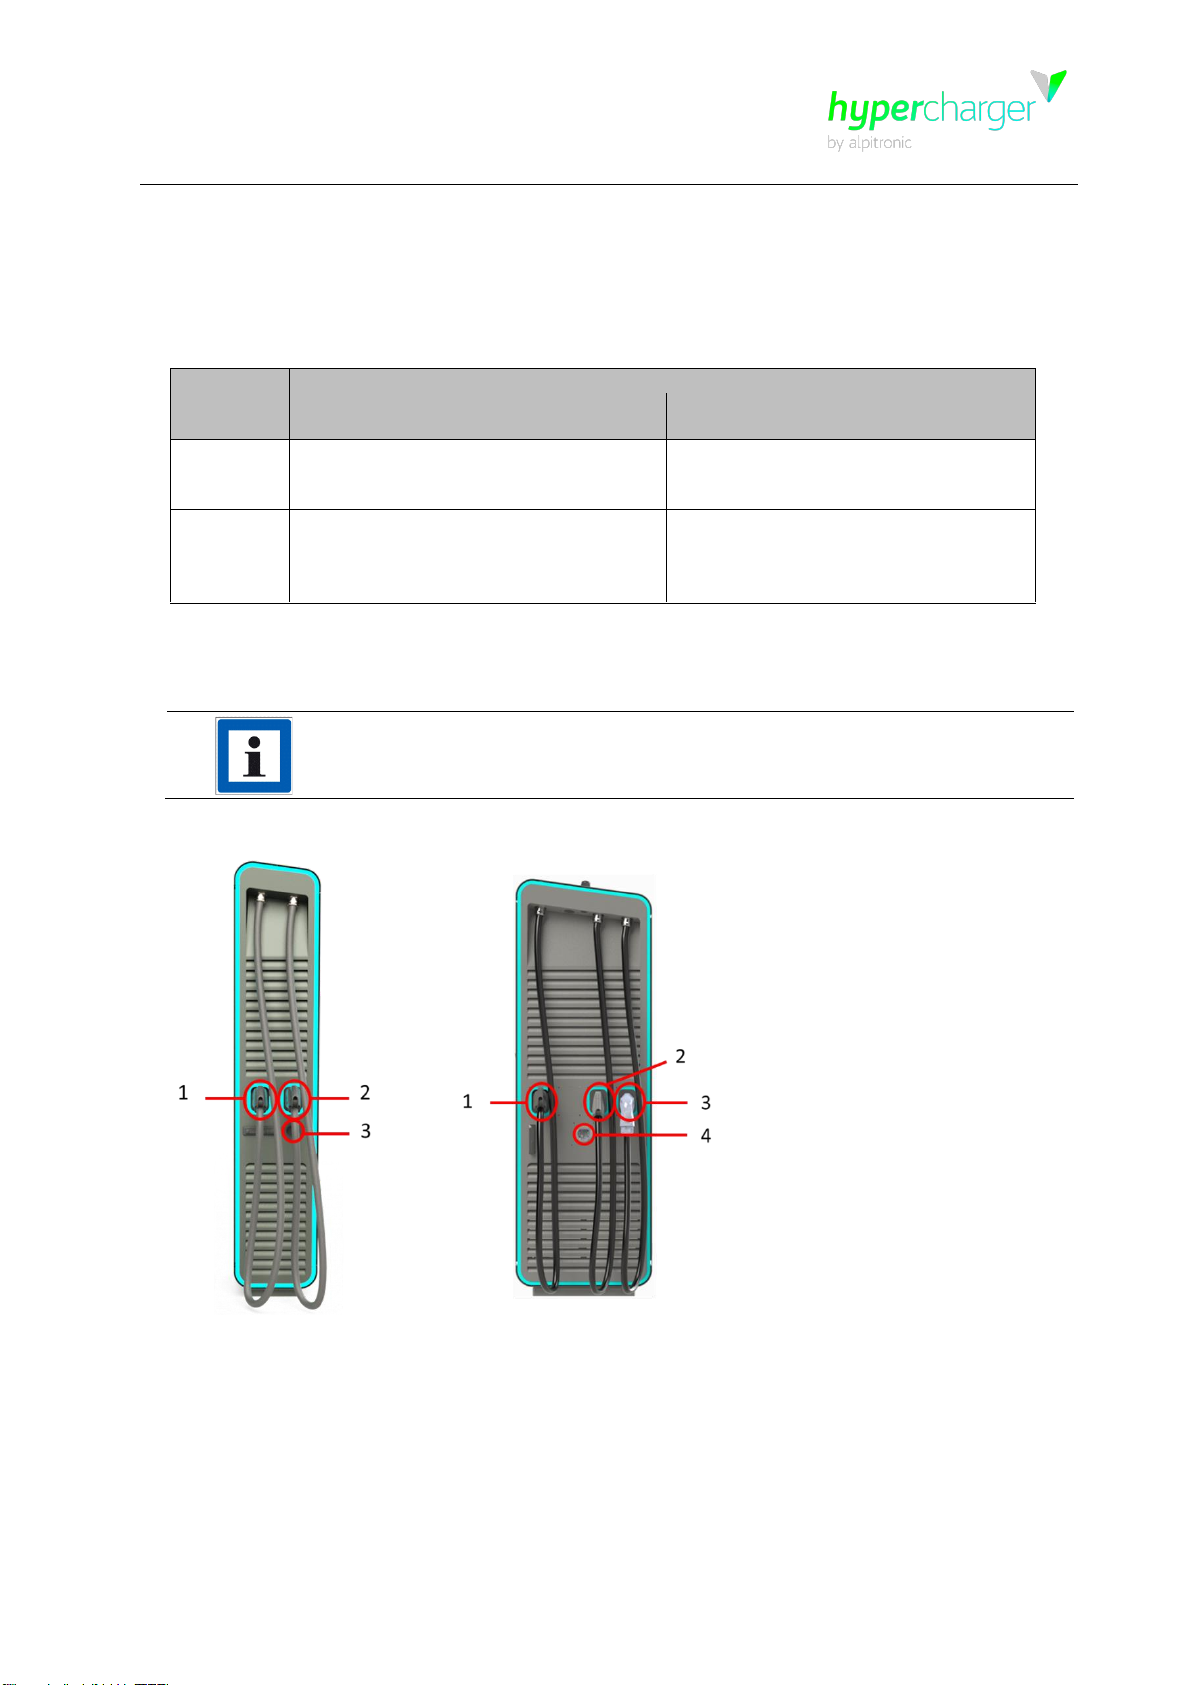
Figure 2: Elements of the HYC_150 and HYC_300 charging stations................................ 7
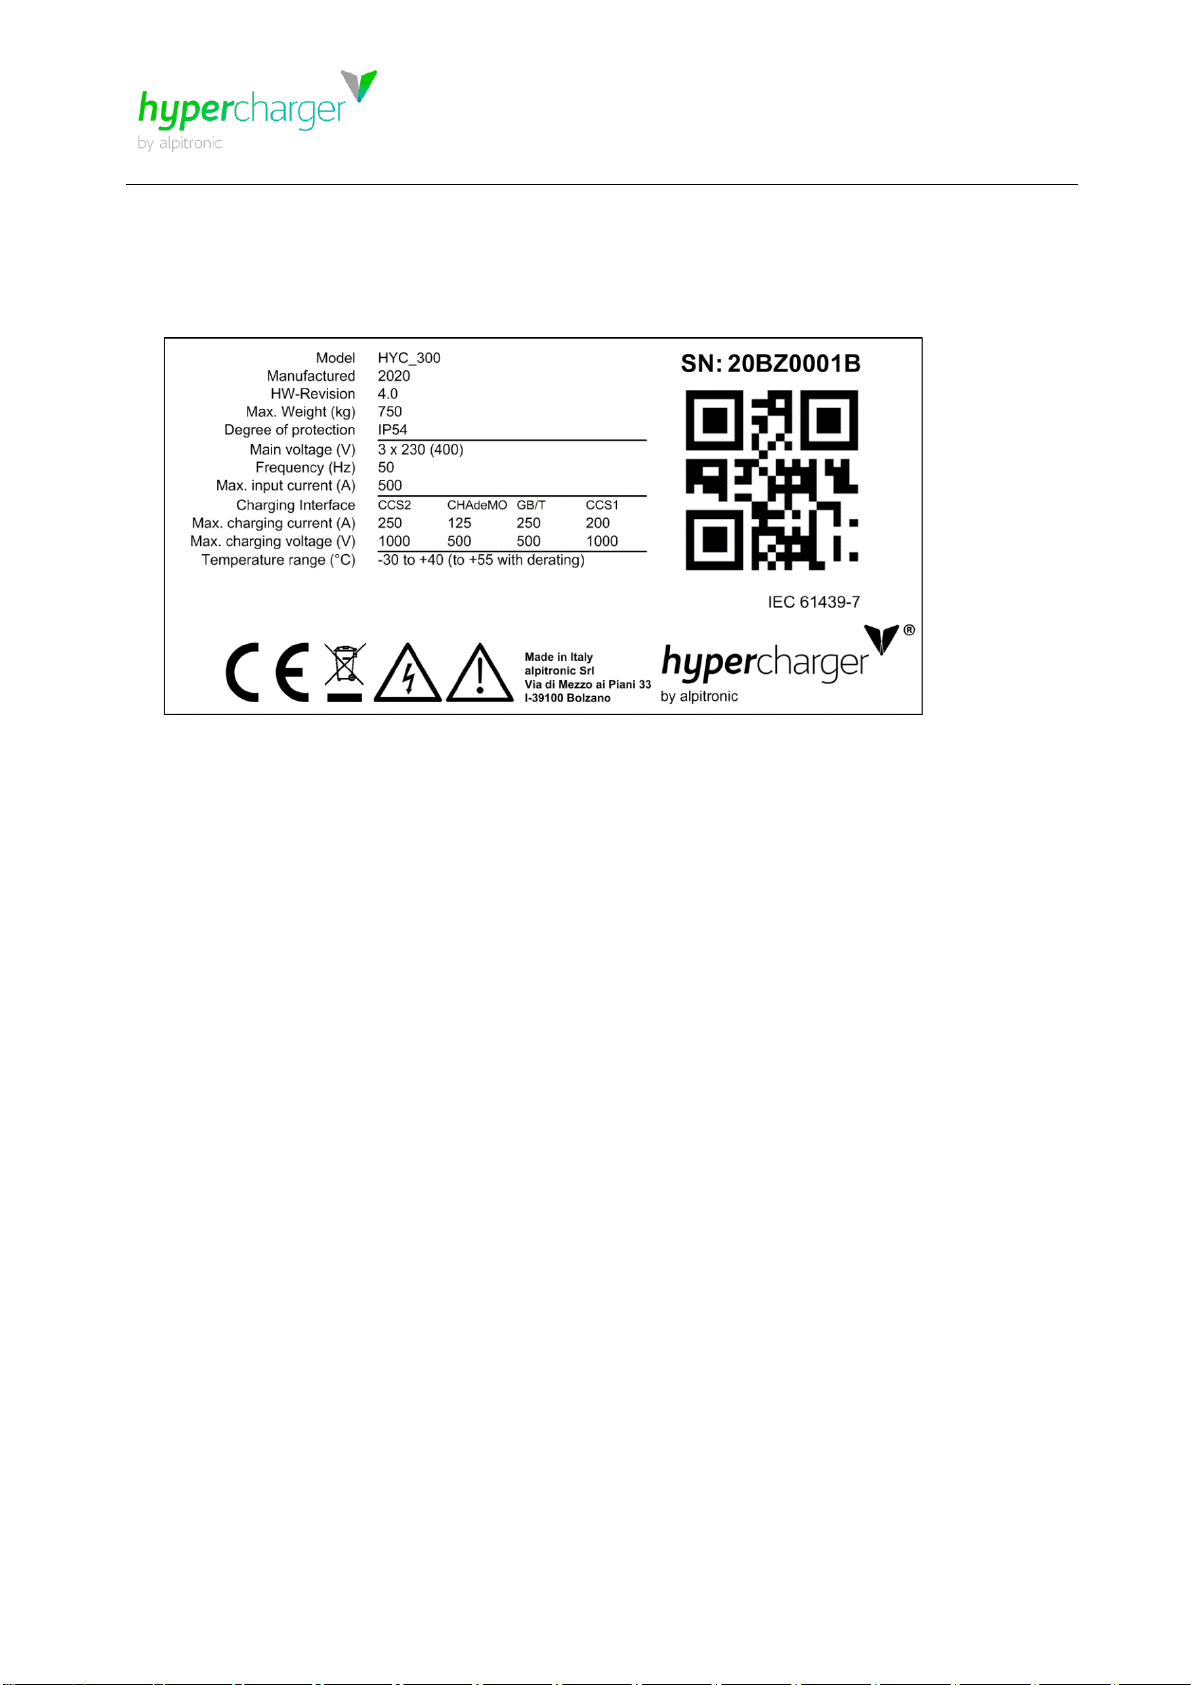
Figure 3: Example of nameplate for hypercharger HYC_300............................................. 8
Figure 4: Overview of the authentication options................................................................ 9
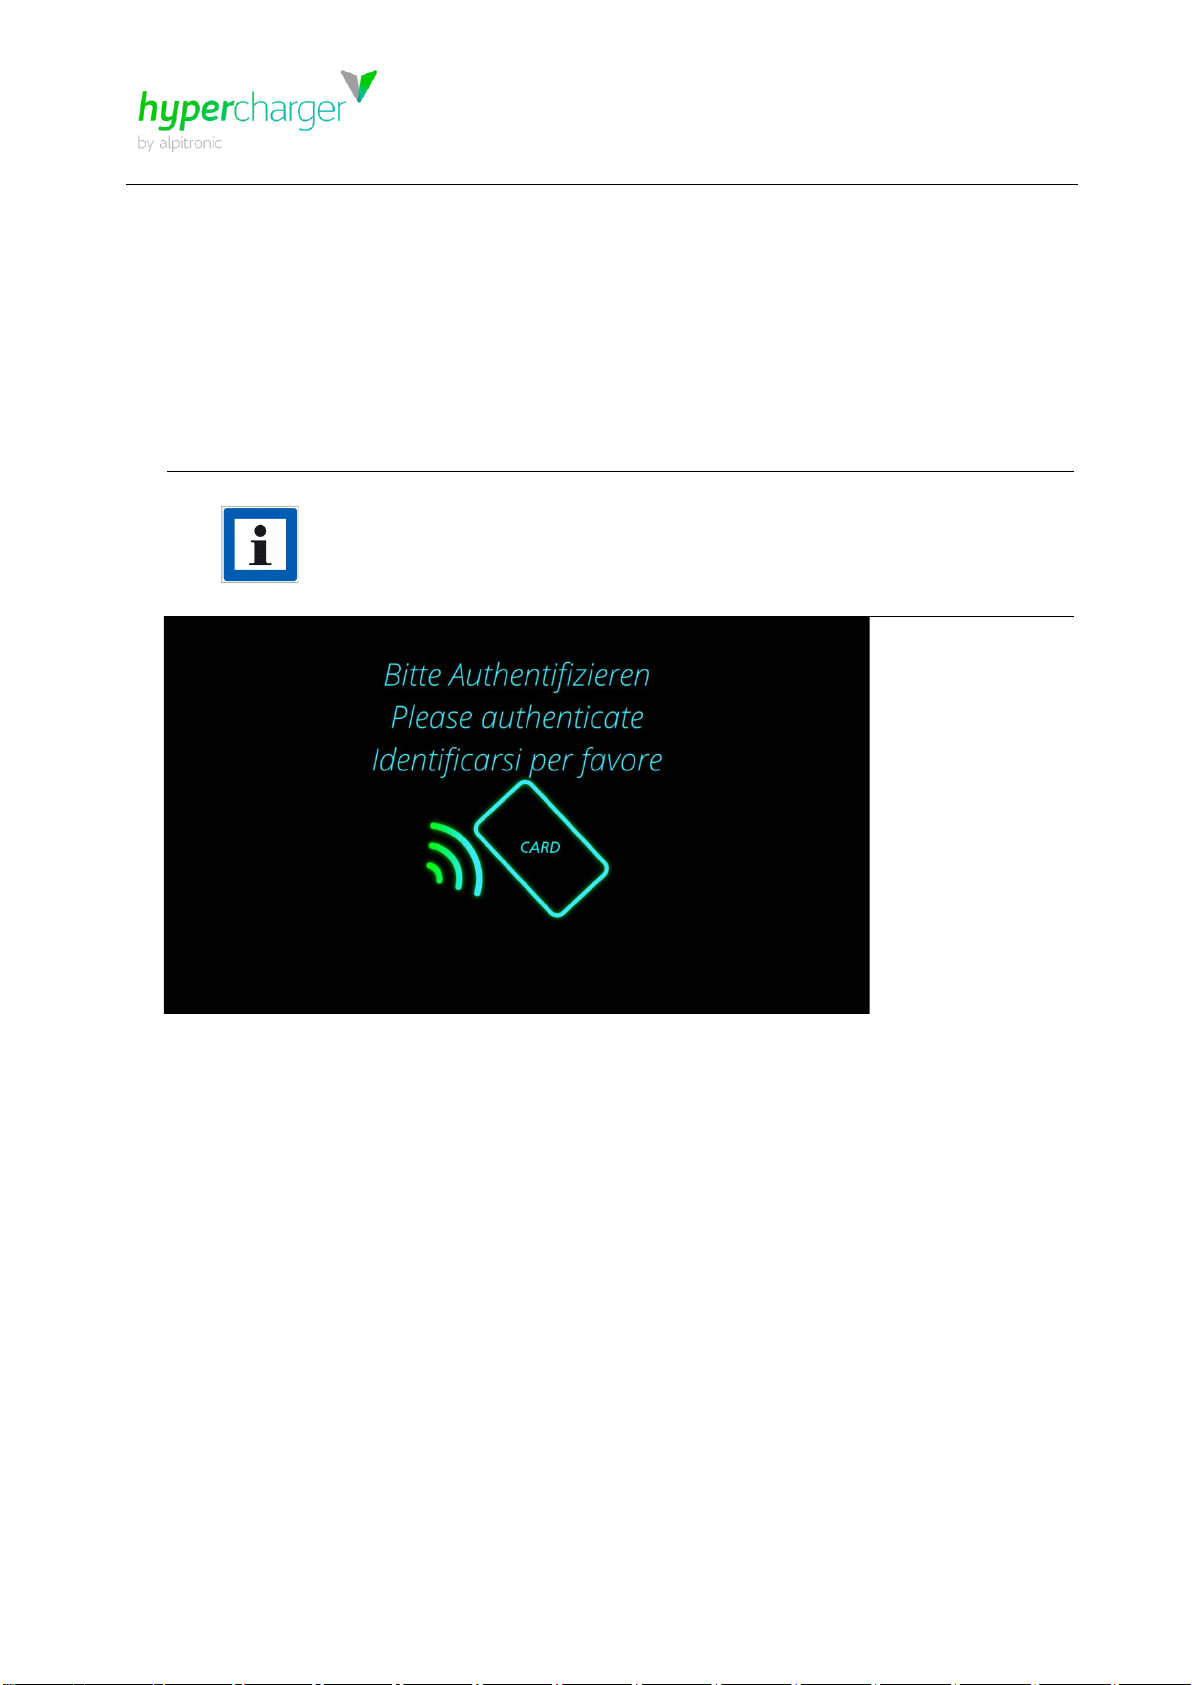
Figure 5: Authentication....................................................................................................10
Figure 6: Position of RFID reader......................................................................................11
Figure 7: Position of credit card terminal...........................................................................11
Figure 8: Kiosk Mode........................................................................................................12
Figure 9: Checking ID.......................................................................................................12
Figure 10: Select plug.......................................................................................................13
Figure 11: Buttons for navigation ......................................................................................13
Figure 12: Language selection..........................................................................................14
Figure 13: Plug connection ...............................................................................................15
Figure 14: Charging overview...........................................................................................16
Figure 15: Charge overview with two active charging processes ......................................17
Figure 16: Charging stop ..................................................................................................18
Figure 17: Disconnect Plug...............................................................................................18
Figure 18: Charging data overlay......................................................................................19
Figure 19: Public key overlay............................................................................................19
Figure 20: Error overlay....................................................................................................20
Figure 21: Authorization failed ..........................................................................................21
Figure 22: No connector available.....................................................................................21
Figure 23: Connector damaged ........................................................................................22
Figure 24: Communication error .......................................................................................22
Figure 25: Failed to lock connector...................................................................................23
Figure 26: Vehicle Error....................................................................................................23
Figure 27: Emergency Stop ..............................................................................................24
Figure 28: Maintenance ongoing.......................................................................................24
List of tables
Table 1: Overview DC power and options for the hypercharger product family .................. 5
Table 2: Charging interfaces.............................................................................................. 6

hypercharger - hypercharger User Guide
Version 1-5
1Product description
Page 5 of 24
All rights reserved. The reproduction of this document, also partially, is allowed only with authorization by alpitronic s.r.l.
1. Product description
The hypercharger product line allows you to choose between two different housings, which
can be configured with various options as shown in the following table:
Model
Options
DC Power
Charging interfaces
(see chapter 1.1)
HYC_150
- 1 power stack →75 kW
- 2 power stacks →150 kW
- 1 DC charging cable
- 2 DC charging cables
- AC socket or AC cable
HYC_300
- 1 power stack →75 kW
- 2 power stacks →150 kW
- 3 power stacks →225 kW
- 4 power stacks →300 kW
- 1 DC charging cable
- 2 DC charging cables
- 3 DC charging cables
- AC socket or AC cable
Table 1: Overview DC power and options for the hypercharger product family
Note
The sequence of the charging points (when facing the charging cable
door) is always from left to right, AC –if available –is in last place.
Figure 1: Sequence of charging points HYC_150 and HYC_300

hypercharger - hypercharger User Guide
Version 1-5
Page 6 of 24
1Product description
All rights reserved. The reproduction of this document, also partially, is allowed only with authorization by alpitronic s.r.l.
1.1. Charging interfaces
The following charging interfaces are available for the hypercharger:
Charging interfaces
Charging interface
Voltage capability [V]
Current capability [A]
Min.
Max.
Min.
Max.
CCS Combo 2
(not liquid-cooled)
150V DC
1,000V DC
6.5 A
200 A / 250 A /
400 A (500 A
Boost) DC
CCS Combo 2 HPC
(liquid-cooled)
150V DC
1,000V DC
6.5 A
500 A DC
CHAdeMO
(not liquid-cooled)
150V DC
500V DC
6.5 A
125 A DC /
200 A DC
22 kW type 2 AC
socket (with shutter)
or AC cable
3 x 230 / 400 V AC
0.25 A
20 A AC (1 phase)
32 A AC (3 phase)
Table 2: Charging interfaces
Depending on the configuration of the hypercharger, both DC charging and AC charging are
available. Both charging processescan also takeplace at the sametime. If the hypercharger
is configured with at least two power stacks and two charging cables, two vehicles can be
charged with DC at the same time, with one power stack being assigned toeach vehicle and
charging cable. If at least two power stacks are available, more than one power stack can
be assigned to one vehicle.

hypercharger - hypercharger User Guide
Version 1-5
1Product description
Page 7 of 24
All rights reserved. The reproduction of this document, also partially, is allowed only with authorization by alpitronic s.r.l.
1.2. Exterior view
The following figure shows the different elements of the device from the outside.
Figure 2: Elements of the HYC_150 and HYC_300 charging stations
A DC charge outlet 1
B DC charge outlet 2 (optional)
C DC charge outlet 3 (optional)
D DC charge outlet 4 (optional)
E AC charging socket | attached AC cable (optional)
F Air inlet
G Air outlet
H Display / HMI
I RFID card reader
J GSM / LTE antenna
K Door handle
L Nameplate
M Credit card terminal (optional)

hypercharger - hypercharger User Guide
Version 1-5
Page 8 of 24
1Product description
All rights reserved. The reproduction of this document, also partially, is allowed only with authorization by alpitronic s.r.l.
1.2.1. Nameplate
The nameplate is locatedopposite the display door in the lower right-hand corner. It includes
the CE marking, serial number and electrical properties of the charger.
Figure 3: Example of nameplate for hypercharger HYC_300

hypercharger - hypercharger User Guide
Version 1-5
2Start charging session
Page 9 of 24
All rights reserved. The reproduction of this document, also partially, is allowed only with authorization by alpitronic s.r.l.
2. Start charging session
2.1. Authentication options
Figure 4: Overview of the authentication options

hypercharger - hypercharger User Guide
Version 1-5
Page 10 of 24
2Start charging session
All rights reserved. The reproduction of this document, also partially, is allowed only with authorization by alpitronic s.r.l.
2.2. Authentication
You can use, for example, your user card / credit card / operator app (connected via backend
system) / vehicle for authorization by doing one of the following:
oTap your user card on the RFID reader (contactless symbol below the screen).
oTap your credit card on the credit card reader.
oStart your operator app and follow the instructions on your smart device.
oConnect your vehicle to the charging station (plug in charging plug).
Note
Detailed user instructions for the charging process will appear on the
charging station’s screen for the chosen authentication medium and
charging cable.
Figure 5: Authentication

hypercharger - hypercharger User Guide
Version 1-5
Page 12 of 24
2Start charging session
All rights reserved. The reproduction of this document, also partially, is allowed only with authorization by alpitronic s.r.l.
Note
If the charging station runs in the so-called kiosk mode, no authentication
is necessary. In this case you can directly start a new charging process by
pressing the buttons below the new session label on the screen.
Figure 8: Kiosk Mode
Figure 9: Checking ID

hypercharger - hypercharger User Guide
Version 1-5
2Start charging session
Page 13 of 24
All rights reserved. The reproduction of this document, also partially, is allowed only with authorization by alpitronic s.r.l.
2.3. Select the charging plug
Please select the charging plug with which you would like to charge your electric vehicle. You
can navigate in the menu by pressing the four buttons below the display window.
Figure 10: Select plug
Figure 11: Buttons for navigation

hypercharger - hypercharger User Guide
Version 1-5
Page 14 of 24
2Start charging session
All rights reserved. The reproduction of this document, also partially, is allowed only with authorization by alpitronic s.r.l.
Note
Depending on the configuration of the charging station, other symbols may
be displayed, as other charging plugs are installed.
"HPC" refers to a liquid-cooled charging cable.
If you want to change the language, press the button on the far left. You
will then be taken to the language selection.
Figure 12: Language selection

hypercharger - hypercharger User Guide
Version 1-5
2Start charging session
Page 15 of 24
All rights reserved. The reproduction of this document, also partially, is allowed only with authorization by alpitronic s.r.l.
2.4. Connect the plug
After you have selected the plug type, the display will ask you to connect the appropriate
charging cable. Connect the charger cable, which begins to flash blue,to thesocket provided
on your vehicle.
Figure 13: Plug connection
Note
When using CHAdeMO cables, make sure that they engage correctly.

hypercharger - hypercharger User Guide
Version 1-5
Page 16 of 24
3During the charging process
All rights reserved. The reproduction of this document, also partially, is allowed only with authorization by alpitronic s.r.l.
3. During the charging process
3.1. Charging overview
Now an overlay of the active charging process appears.
Figure 14: Charging overview
On the left half of the screen you will find information about the charging current, the voltage
and the resulting charging power.
On the right half of the screen you can see the current state of charge (SoC) and the energy
and charging time already charged as well as the estimated time until you reach the bulk SoC
(80%) or full SoC (100%).
In the upper area you can see the overlay to the German calibration law, which is described in
chapter 4.3.

hypercharger - hypercharger User Guide
Version 1-5
3During the charging process
Page 17 of 24
All rights reserved. The reproduction of this document, also partially, is allowed only with authorization by alpitronic s.r.l.
If two vehicles are charged simultaneously, the overlay is displayed as follows.
Figure 15: Charge overview with two active charging processes
Note
Please note that the display may vary from operator to operator. Some
operators hide this information. In this case you can check the SoC inside
your vehicle.

hypercharger - hypercharger User Guide
Version 1-5
Page 18 of 24
4Terminate charging session
All rights reserved. The reproduction of this document, also partially, is allowed only with authorization by alpitronic s.r.l.
4. Terminate charging session
4.1. Leaving screen saving mode
After a certain time the screen saver of the display is activated. To leave this mode, hold
your user card again against the RFID reader (see chapter 2.2)
4.2. Charging stop
You can terminate the ongoing charging session at any time by pressing the Stop button at
the bottom of the overlay.
Figure 16: Charging stop
Once you’ve pressed the button, you need to unplug the charging cable from your car.
Please reconnect it properly to the cable plug holder of the charging station.
Figure 17: Disconnect Plug

hypercharger - hypercharger User Guide
Version 1-5
4Terminate charging session
Page 19 of 24
All rights reserved. The reproduction of this document, also partially, is allowed only with authorization by alpitronic s.r.l.
4.3. Write down Public Key (German calibration law)
In Germany, the billing of EV-charging is regulated by the Measurement and Calibration Act
(MessEG). The hypercharger ultra-fast charging system is in conformity with this law. The
law guarantees consumption-based cost accounting for the charging of electric vehicles, i.e.
users are only charged for exactly the amount of power they actually take. The charging
station can thus be used for billing by the kWh in accordance with German calibration
law.
After the charging process is completed, the charging station generates a digitally signed
data record from the start and end values, which enables the often time-delayed invoice to
be checked afterwards. This signature confirms that the measured values were collected in
conformity with German calibration law.
In the upper part of the screen all relevant information is displayed (see Figure 14 and Figure
15). Two “pages” of the overlay are shown alternately, switching every 10/5 seconds. Once
the charging process is complete, the overlay remains on the display until the charging cable
is disconnected (however, at least for five seconds).
The “charging data” overlay shows the following information:
- ENERGY: Energy used in kWh
- USER ID: Identification number of the authentication medium. For reasons of data
protection, only the first and last digits are displayed in plain characters.
- CHARGE POINT ID: ID of the charging station. The letter Y at the end is a placeholder
for the charging interface number (e.g., charging cable 2).
- Date and time of the charging process.
Figure 18: Charging data overlay
The “public key” overlay shows the public key of the AC adapter or DC meter. You should
note this down so that you can check the readings later on.
Figure 19: Public key overlay

hypercharger - hypercharger User Guide
Version 1-5
Page 20 of 24
4Terminate charging session
All rights reserved. The reproduction of this document, also partially, is allowed only with authorization by alpitronic s.r.l.
In the case of an error, a third overlay is activated:
Figure 20: Error overlay
You can check the charging session with a so-called transparency software. As part of the
S.A.F.E. initiative
1
, a manufacturer-independent transparency software has been developed
for electromobility. With this application, you can carry out the signature checks for digital
measured values in conformity with calibration law.
The transparency software is currently only available as a desktop version
2
and can be
downloaded together with the operating instructions from the S.A.F.E. website:
https://www.safe-ev.de/de/transparenzsoftware.php
1
The S.A.F.E. initiative is an association of various German and international manufacturers, charging station
operators and mobility service providers with the aim of achieving a uniform solution for ensuring legal
compliance with German calibration law. You can find more information on https://www.safe-ev.de/en/.
2
The currently permissible and certified version of the transparency software by the S.A.F.E. initiative is version
1.0 (as of 1 June 2021).
Other manuals for Hypercharger HYC 150
1
This manual suits for next models
1
Table of contents
Other Alpitronic Batteries Charger manuals
Popular Batteries Charger manuals by other brands

BaByliss PRO
BaByliss PRO FX870BASE-GA operating instructions

BENDIXKing
BENDIXKing AeroPower installation instructions

I-GO
I-GO EVERYWHERE MAX manual

CO/Tech
CO/Tech QC 18 KF15L-18V2500G-UK Original instructions

Ultra Power
Ultra Power UP1200+ instruction manual

Tripp Lite
Tripp Lite U442-DOCK40-6 owner's manual