manuals.online logo
Brands
  1. Home
  2. •
  3. Brands
  4. •
  5. Alvin
  6. •
  7. Indoor Furnishing
  8. •
  9. Alvin Vanguard VAN48 User manual

Alvin Vanguard VAN48 User manual

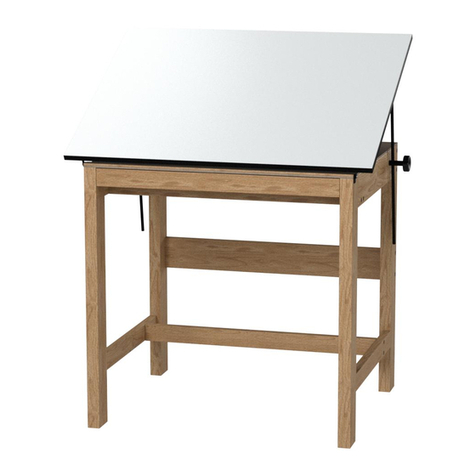
Vanguard™Table
Assembly Instructions
VAN48
www.alvinco.com
©2010 ALVIN & COMPANY, INC., Bloomeld, CT 06002
Vanguard™ Drawing Room Table
Tools required: Phillips screwdriver, slotted screwdriver, pliers, or small wrench.
Assembly Instructions
Wood Parts:
For VAN48
Important notes:
2
A 1pc Tabletop
B 1pc Front Crosspiece
C 1pc Left Leg Frame
D 1pc Right Leg Frame
E 1pc Upper Back Crosspiece
F 1pc Lower Back Crosspiece
G 1pc Footrest
H 1pc Drawer Support, Center
I 2pcs Drawer Supports, Side
J 1pc Drawer
K 1pc Drawer Face
L 1pc Pencil Ledge
M 2pcs Drawer Dividers
A C D
H I J
K L M
Hardware:
1 16pcs Barrel Nuts
2 16pcs Bolts for Frame (2¼")
3 4pcs Leg Levelers
4 1pc Drawer Knob and Bolt Set
5 2pcs Bolts for Center Drawer Support (7/8")
6 6pcs Nuts for Drawer Supports
7 4pcs Bolts for Side Drawer Support (1½")
8 4pcs Bolts for Drawer Face (1")
9 9pcs Screws for Hinges
(5/8")
10
8pcs Screws for Tilt Mechanism (3/4")
11
3pcs Screws for Drawer Slide (1/2")
12
2pcs Tilt Mechanisms
13
1pc Drawer Slide
14
12pcs Wood Hole Plugs
15
4pcs Screws for Pencil Ledge (3/4")
Thank you for purchasing this Alvin®table
Need assistance with assembly? Call customer service at 1-800-444-2584. Visit us on-line at www.alvinco.com.
1. Power tools for assembly are not recommended. Great care must be taken to avoid
over-tightening screws so that holes are not stripped accidentally.
2. Wood products can be easily scratched if not handled carefully. Please use care
when unpacking and assembling to prevent damage.
12345
6 7 8 9
10
Barrel Nut
16 pcs
Bolt, 2¼"
16 pcs
Leg Leveler
4 pcs
Drawer Knob and Bolt
1 set
Bolt, 7/8"
2 pcs
Nut
6 pcs
Bolt, 1½"
4 pcs
Bolt, 1"
4 pcs
Screw, 5/8"
10 pcs
Screw, 3/4"
8 pcs
Screw, 1/2"
3 pcs
Tilt Mechanism
2 pcs
Drawer Slide
1 pc
Wood Plug
12 pcs
11 12 1413
Tabletop
1 pc
Front Crosspiece
1 pc
Left Leg Frame
1 pc
Right Leg frame
1 pc
Upper Back Crosspiece
1 pc
Lower Back Crosspiece
1 pc
Footrest
1 pc
Drawer Support, Center
1 pc
Drawer Supports, Side
2 pcs
Drawer
1 pc
Drawer Face
1 pc
Pencil Ledge
1 pc
Drawer Dividers
2 pcs
EB
F G
15
Screw, 3/4"
4 pcs
3
How To Install Bolts and Barrel Nuts
Insert barrel nut in pre-drilled hole.
Use slotted screwdriver to align long slot in
barrel nut with bolt.
Tighten bolt with Phillips screwdriver.
1
2
3
Step 2
Attach left and right leg frames (C)and (D) to front
crosspiece using bolts (2) and barrel nuts (1). Leg posts
with beveled tops go in front. Keep bolts slightly loose
for now.
Place upper back crosspiece (E) between leg frames and
attach at both ends using bolts (2) and barrel nuts (1). Be
sure plywood pads face in and finished edge faces tabletop.
Keep bolts slightly loose for now.
Place lower back crosspiece (F) between leg frames and
attach at both ends using bolts (2) and barrel nuts (1). Be
sure finished edge (of F) faces tabletop and barrel nut holes
face back. Keep bolts slightly loose for now.
Place footrest (G) between leg frames and attach at both
ends using bolts (2) and barrel nuts (1). Be sure rounded
edge (of G) faces tabletop and barrel nut holes face back.
Tighten all bolts securely.
Screw leg levelers (3) into bottom of each leg.
1
2
3
4
5
6
Step 1
Unwrap and lay out parts to be certain all
are present.
Place tabletop (A) on a carpeted or otherwise
protected floor (to prevent scratches) with the
plywood pads and pre-drilled holes facing up.
Attach front crosspiece (B) to tabletop using
3/4" screws (9) through hinges into pre-
drilled holes. Be sure screws are in all the way
to avoid interference with hinge action.
Attach tilt mechanisms (12 ) to tabletop (A)
using 3/4" screws (10 ) into pre-drilled holes.
Tighten firmly but use care not to strip.
1
2
3
4
9
A
B
12
10
2
3
2
1
1
C
D
G
F
E
©2009 ALVIN & COMPANY, INC.
Step 3
Step 4
Lift back of tabletop into an elevated tilt position.
(See directions for adjusting tilt on the last page of
these instructions.)
Attach center drawer support (H) to front and
back crosspieces using 7/8" bolts (5) and nuts (6)
through pre-drilled holes. Notch in center support
should be closest to back.
Attach side drawer supports (I) to front and back
crosspieces using 1½" bolts (7) and nuts (6)
through pre-drilled holes.
Tighten all drawer support bolts securely.
1
2
3
4
4
1
2
Attach tilt mechanisms (12 ) to back crosspiece
using 3/4" screws (10 ) into pre-drilled holes.
Tighten firmly but use care not to strip.
Carefully return table to the upright position.
This may require two people.
HINT Grasp entire assembly by the tabletop,
not the legs, so that the tilt mechanisms do
not open during this procedure.
12
10
6
7
7
6
I
I
H
6
5
©2009 ALVIN & COMPANY, INC.
Step 6
Insert drawer slide (13) into notch in center drawer
support piece and slide forward until it meets the
back of the drawer. Attach slide to drawer using 1/2"
screws (11 ) into pre-drilled holes.
1
Step 5
Attach drawer knob and bolt set (4) to drawer face
(K) through pre-drilled hole in center. Tighten firmly.
Attach drawer face to drawer (J) using 1" bolts (8)
into threaded inserts.
Slide drawer dividers (M) into desired slots in drawer.
Slide drawer into opening in front of base frame.
1
2
3
4
5
8
4K
J
M
11
13
©2009 ALVIN & COMPANY, INC.
6
Step 7
Return tabletop to flat position.
Pencil ledge has two functions, depending on which
edge faces up. The raised position prevents materials
from sliding off the tilted surface. The flush position
provides a comfortable, rounded edge to rest
forearms against.
Attach pencil ledge (L) to front edge of tabletop
using 3/4" screws (15) into pre-drilled holes.
Use care not to over-tighten or strip screws.
Now that the table assembly is nearly complete, go
back and tighten all the leg bolts and screws one
more time. This will ensure that the table remains
strong, sturdy, and stable for years of use.
Insert the wood plugs (14 ) into each of the bolt
holes. Gently tap into place. Since wood products
have a tendency to expand and contract from season
to season, remove the wood plugs and re-tighten the
bolts every six months or so.
1
2
3
4
5
©2010 ALVIN & COMPANY, INC. • P.O. Box 188, Windsor, CT 06095-0722
Phone: 860-243-8991 • Toll-Free: 800-444-2584 • Fax: 860-242-8037 • Toll-Free Fax: 800-777-2896
www.alvinco.com
LIT-A9106 6/10
USAGE INSTRUCTIONS
Adjust Tilt
The ratcheted tilt mechanisms allow the tabletop to be set to a variety of comfortable working angles. Simply lift the tabletop
from the back edge until it clicks into the desired position. To return the top to the flat position, raise the back edge as high as
it will go, releasing the ratchet mechanism allowing the top to be lowered gently.
Pencil Ledge
Pencil ledge has two functions, depending on which edge faces up. The raised position prevents materials from sliding off the
tilted surface. The flush position provides a comfortable, rounded edge to rest forearms against.
Reposition Drawer Dividers
The drawer has numerous slots for the dividers, for a variety of storage options. It is easiest to reposition the dividers from
the back of the table. Close the drawer fully and lift the tabletop to its highest tilt position for easiest access.
Care Instructions
Clean like any other piece of fine wood furniture. Use a soft cloth and avoid harsh or abrasive cleansers.
Seasonal Adjustments
Since wood products have a tendency to expand and contract from season to season, remove wood plugs and re-tighten all
the bolts and screws at least one time each year.
L
14
Please recycle as much of the packaging materials as possible. Thank you.
15

Other Alvin Indoor Furnishing manuals

Alvin Vanguard User manual

Alvin

Alvin Vanguard User manual

Alvin Comfort CH777 User manual

Alvin

Alvin Comfort CH777 User manual

Alvin CH750 User manual

Alvin

Alvin CH750 User manual

Alvin X-3-XB User manual

Alvin

Alvin X-3-XB User manual

Alvin WTB42 User manual

Alvin

Alvin WTB42 User manual

Alvin WOB42 User manual

Alvin

Alvin WOB42 User manual

Alvin PRESTIGE User manual

Alvin

Alvin PRESTIGE User manual

Alvin DC204 User manual

Alvin

Alvin DC204 User manual

Alvin Portable Parallel Straightedge Board PXB User manual

Alvin

Alvin Portable Parallel Straightedge Board PXB User manual

Alvin DC778-34 User manual

Alvin

Alvin DC778-34 User manual

Alvin DC724 User manual

Alvin

Alvin DC724 User manual

Alvin Parallel Straightedge 1101 User manual

Alvin

Alvin Parallel Straightedge 1101 User manual

Alvin Monarch DC555-40 User manual

Alvin

Alvin Monarch DC555-40 User manual
Alvin CraftMaster CM40-3-WBR User manual

Alvin

Alvin CraftMaster CM40-3-WBR User manual

Alvin Armrest CH25A User manual

Alvin

Alvin Armrest CH25A User manual

Alvin Office Stool DC207B User manual

Alvin

Alvin Office Stool DC207B User manual

Alvin Onyx User manual

Alvin

Alvin Onyx User manual
Alvin Onyx User manual

Alvin

Alvin Onyx User manual

Alvin CH555 User manual

Alvin

Alvin CH555 User manual
Alvin MiniMaster User manual

Alvin

Alvin MiniMaster User manual

Alvin Standart CH728 User manual

Alvin

Alvin Standart CH728 User manual

Alvin PREMO CH444 User manual

Alvin

Alvin PREMO CH444 User manual

Alvin Onyx ONXB-4 User manual

Alvin

Alvin Onyx ONXB-4 User manual

Alvin MiniMaster II User manual

Alvin

Alvin MiniMaster II User manual

Popular Indoor Furnishing manuals by other brands

Forte Cadixo CDXS82 Assembling Instruction

Forte

Forte Cadixo CDXS82 Assembling Instruction

Better Homes and Gardens Modern Farmhouse Coffee Table Assembly instructions

Better Homes and Gardens

Better Homes and Gardens Modern Farmhouse Coffee Table Assembly instructions

Argos 457/2156 Care & instruction manual

Argos

Argos 457/2156 Care & instruction manual

OVE Nelly 60 installation manual

OVE

OVE Nelly 60 installation manual

Hailey Home CT1238 Assembly instructions

Hailey Home

Hailey Home CT1238 Assembly instructions

Cooper Lighting LV2060ISMulti-Lamp Luminaire LV2060IS Specification sheet

Cooper Lighting

Cooper Lighting LV2060ISMulti-Lamp Luminaire LV2060IS Specification sheet

Lightolier Lighting Systems LP-5 Specification sheet

Lightolier

Lightolier Lighting Systems LP-5 Specification sheet

Politorno Verona Desk 1055 Assembly instructions

Politorno

Politorno Verona Desk 1055 Assembly instructions

IKEA BISSA manual

IKEA

IKEA BISSA manual

Otto HORSENS 3 DRAWER PEDESTAL OTHOR3DWE Assembly instructions

Otto

Otto HORSENS 3 DRAWER PEDESTAL OTHOR3DWE Assembly instructions

Sauder Boulevard Cafe 420645 manual

Sauder

Sauder Boulevard Cafe 420645 manual

Ceriotti Easy 7216 quick start guide

Ceriotti

Ceriotti Easy 7216 quick start guide

Trinity TBFLWH-1424 owner's manual

Trinity

Trinity TBFLWH-1424 owner's manual

World Market 44917 Assembly instructions

World Market

World Market 44917 Assembly instructions

Dauphin Indeed mesh automatic owner's manual

Dauphin

Dauphin Indeed mesh automatic owner's manual

Mocka Dakota Assembly instructions

Mocka

Mocka Dakota Assembly instructions

Videnov AUTO 180 Assembly instructions

Videnov

Videnov AUTO 180 Assembly instructions

skram furniture Tigris Bed Assembly instructions

skram furniture

skram furniture Tigris Bed Assembly instructions

manuals.online logo
manuals.online logoBrands
  • About & Mission
  • Contact us
  • Privacy Policy
  • Terms and Conditions

Copyright 2025 Manuals.Online. All Rights Reserved.