alvita Plus User manual

0473
ALV263
2011
The Boots Company PLC, Nottingham, England
Alvita® UK, 43 Cox Lane, Chessington, Surrey KT9 1SN
Alvita® Kundenservice Deutschland, Telefon 0800-1258482
Blood Pressure Arm Monitor – Plus
Fully Automatic
Comfort Inflation Technology
Hypertension Risk Indicator
Irregular Heartbeat Detector
60 x 2 users
Average Reading for last 3 Memories
Date/Time Function
Blood Pressure Measurement Reminder Function
Oberarm-Blutdruckmessgerät – Plus
Vollautomatisch
Bequemes Aufpumpen
Anzeige des Bluthochdruckrisikos
Arrhythmie-Sensor
Je 60 Speicherplätze für 2 Benutzer
Mittelwert der letzten 3 Messungen
Anzeige von Datum/Uhrzeit
Erinnerungsfunktion für
das Blutdruckmessen

2 3
Contents:
Introduction ......................................................................................................... 3
About Blood Pressure ...............................................................................3-5
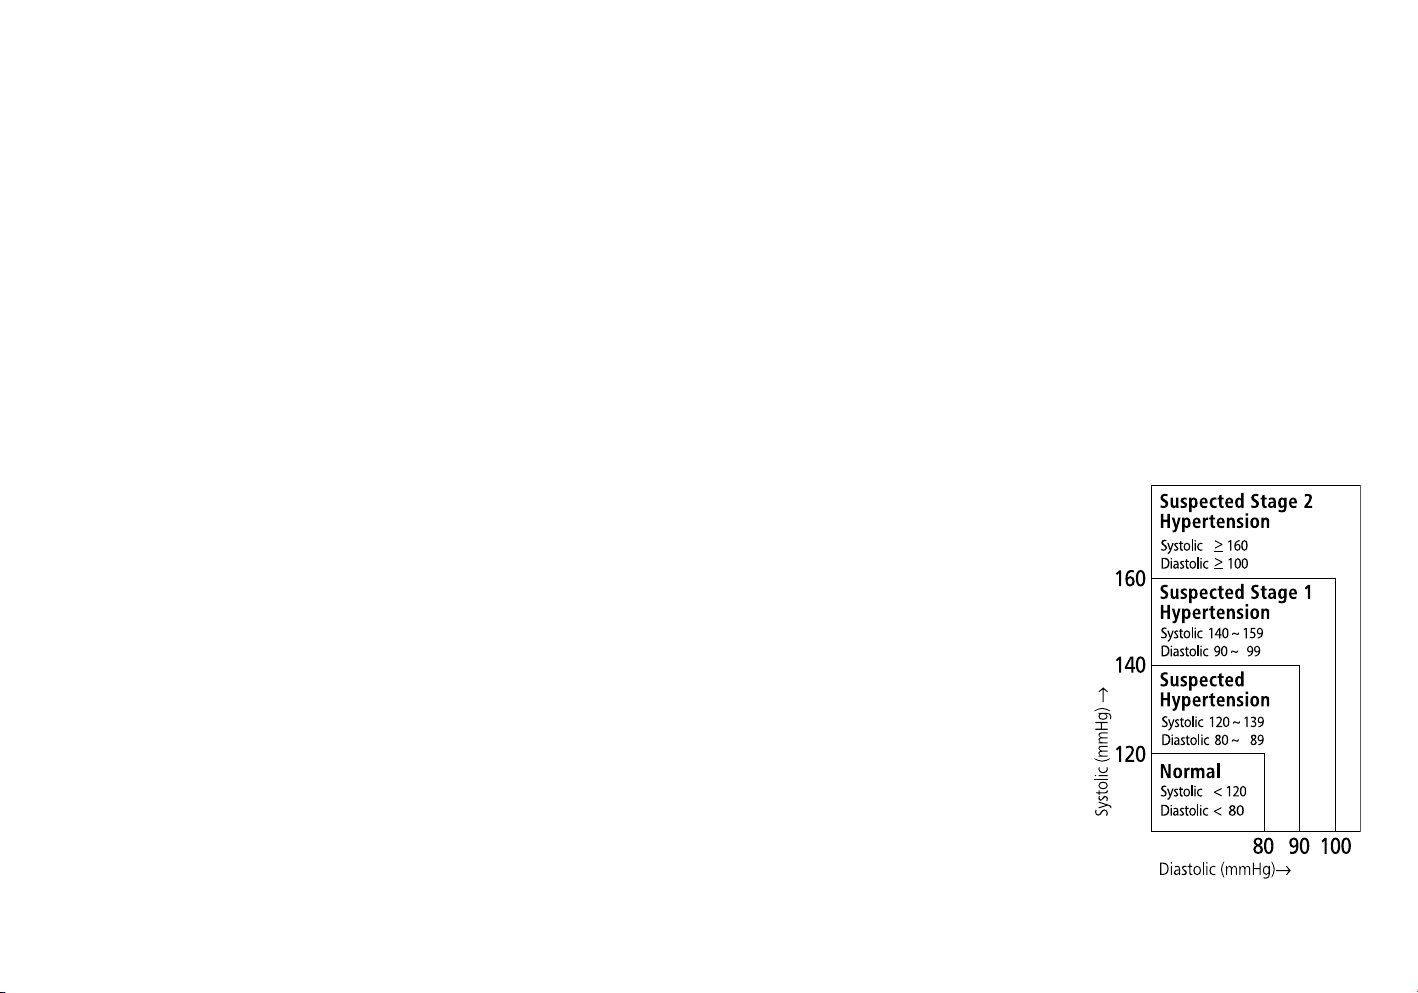
Blood Pressure Standard ............................................................................. 5
Blood Pressure Fluctuation .......................................................................... 6
Features of the device
Parts Identification ....................................................................................... 6
LCD Display & Symbols ............................................................................... 7
Hypertension Risk Indicator .......................................................................... 8
Irregular Heartbeat (IHB) Detector ................................................................. 8
Comfort Inflation Technology ........................................................................ 9
How to Use:
Installing Batteries ....................................................................................... 9
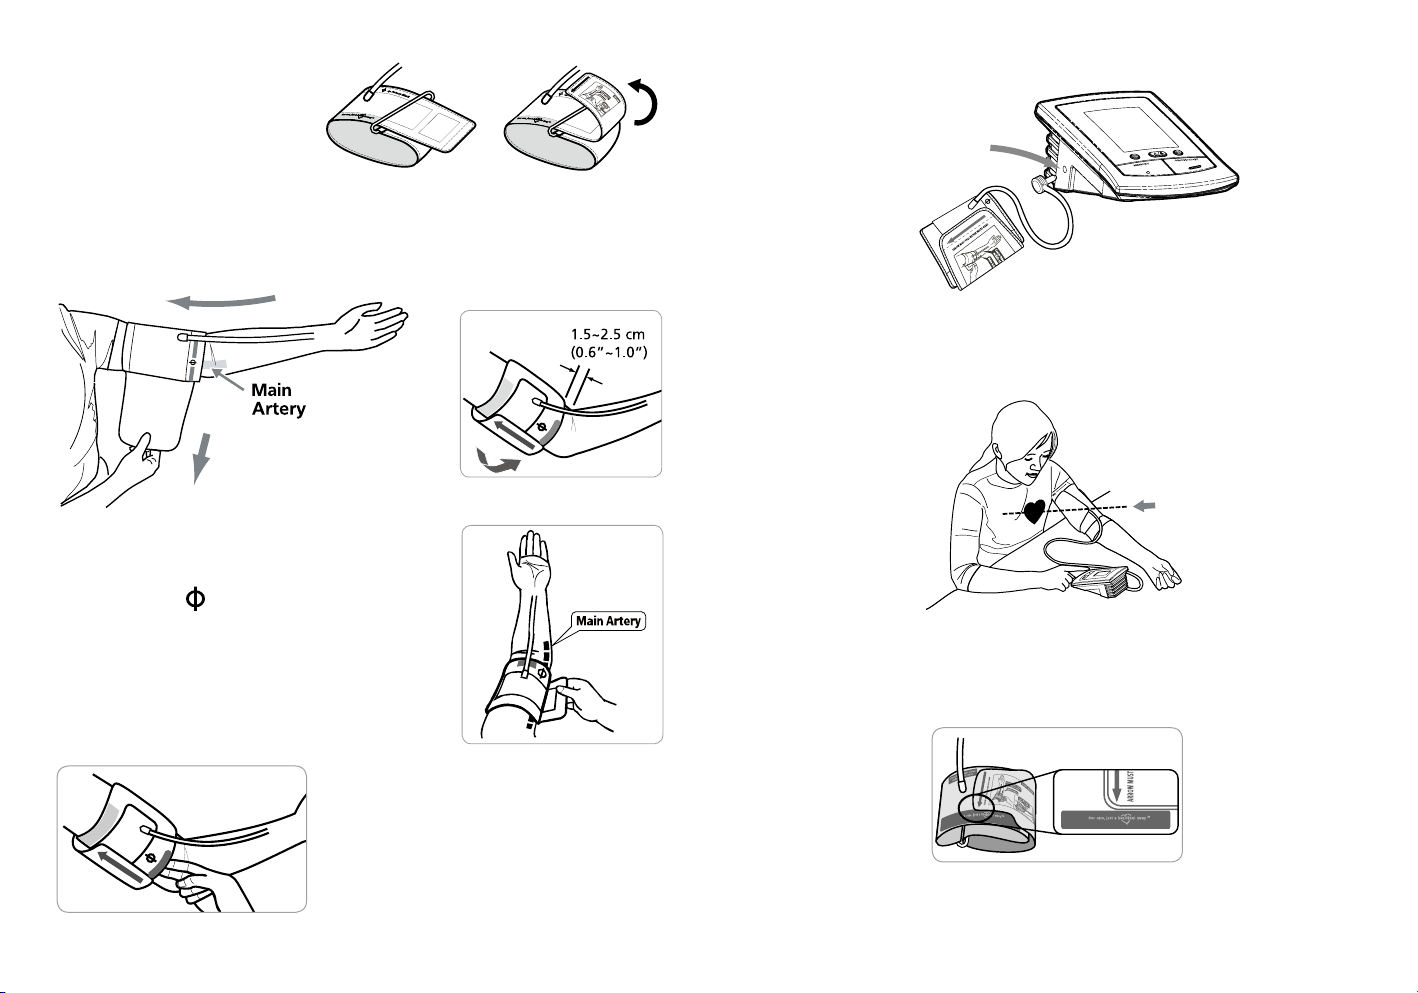
Applying the Cuff ..................................................................................10-12
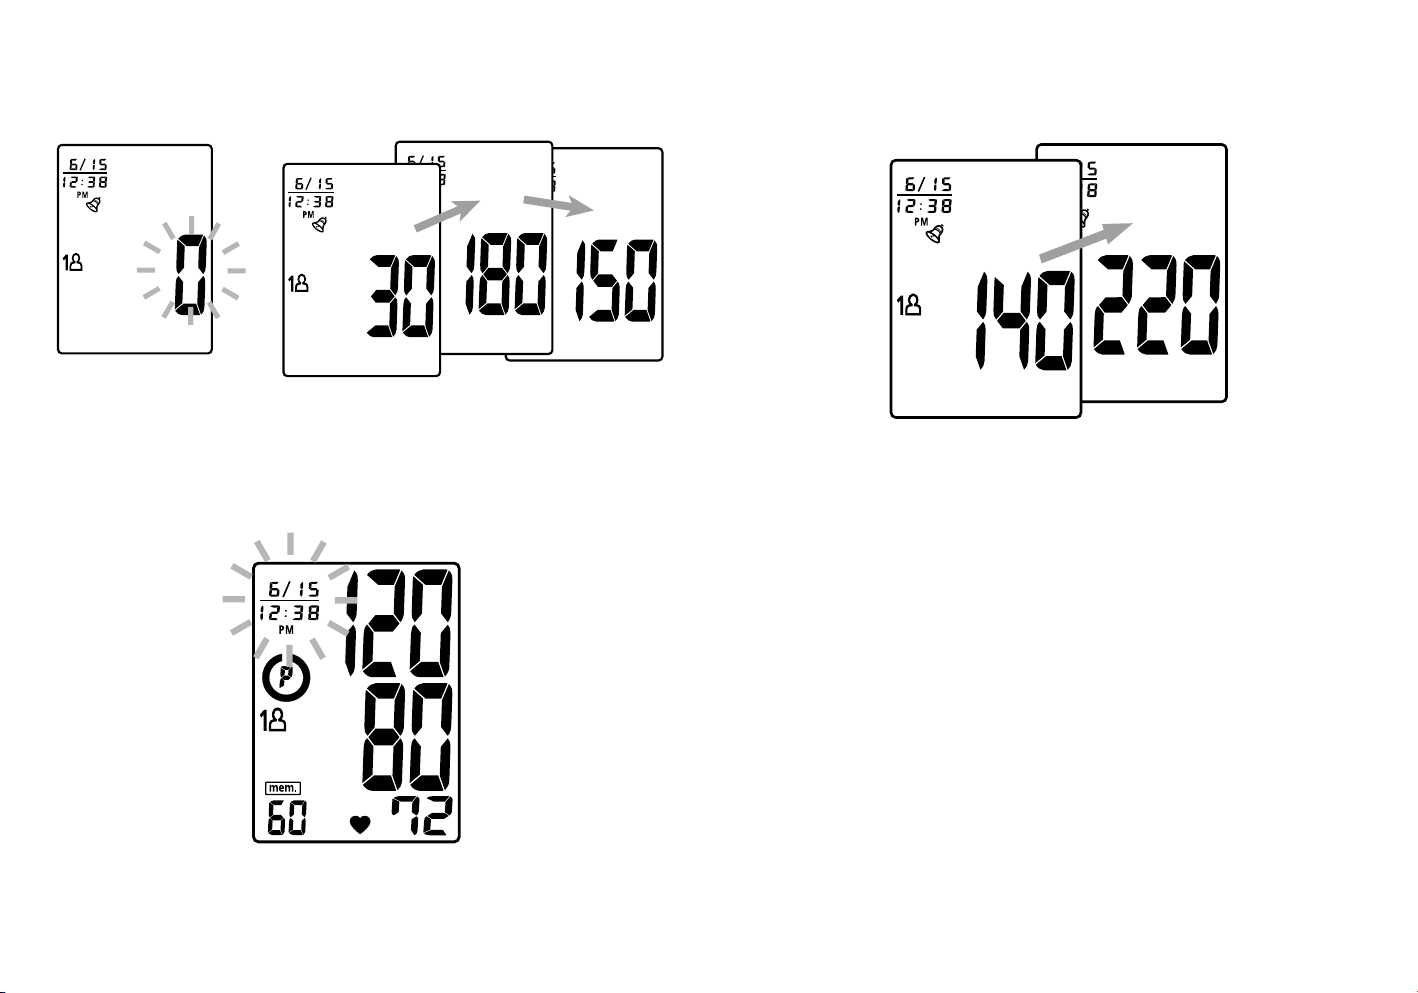
Measurement Procedures .....................................................................13-15
Recalling Results from Memory .................................................................. 16
Clearing Results from Memory ................................................................... 17
How to Adjust the Date and Time ................................................................ 17
Blood Pressure Measurement Reminder ................................................18-19
Technical Data:
Possible faults, causes and rectification ...................................................... 20
Cautionary Notes ....................................................................................... 21
Guarantee ................................................................................................. 22
Specifications ........................................................................................... 22
Blood Pressure Log ..............................................................................23-24
EMC guidance and manufacturer’s declaration .......................................25-27
Introduction
What is blood pressure?
Your heart acts as a pump to circulate blood around your body and help supply it with
oxygen. Blood pressure is the force needed for the heart to push blood through the
arteries. The highest pressure in this cycle is when the heart contracts, this is called
the SYSTOLIC BLOOD PRESSURE. Between contractions, the heart relaxes and blood
flows into it since it is at its lowest pressure, which is called DIASTOLIC BLOOD
PRESSURE.
Both blood pressure readings, the systolic and diastolic, are necessary to enable a
doctor to evaluate the status of a patient’s blood pressure.
Many factors such as physical activity, anxiety, or simply the time of day, can influence your blood
pressure.
Drinking caffeine (in tea or coffee) can also temporarily raise your blood pressure, as can the
nicotine in cigarettes.
Blood pressure can also follow a daily pattern, varying from minute to minute and typically
being at its lowest while we are asleep.
These variations are even more pronounced in patients with high blood pressure.
Blood pressure is measured in millimetres of mercury (mmHg) and measurements are written
with the systolic pressure before the diastolic e.g. a blood pressure written as 120/80 is
referred to as 120 over 80.
High Blood Pressure
The discovery that you have high blood pressure is more often than not a chance
finding.
People with high blood pressure usually feel well and there may be no external signs or
symptoms of the condition – unless the blood pressure has been high for some time or
complications have occurred. Such complications may affect the heart, kidney, brain and other
important organs. They may bring on ill health and affect your enjoyment of life. It is because
of these complications, rather than the high blood pressure itself, that this condition is taken so
seriously today.
UK

4 5
It is important to remember that the higher your blood pressure the higher the risk of heart
disease or stroke.
High blood pressure is sometimes referred to as raised blood pressure, elevated blood pressure
or hypertension.
Some people with this condition may require long-term drug treatment, usually in the form of
tablets. However, others can lower their blood pressure by other means, such as changing their
diet and/or lifestyle.
What causes high blood pressure?
Blood pressure is only classed as high if it does not go down when you rest.
Permanently raised blood pressure can be caused by several factors and is linked to other
medical conditions such as diabetes, kidney disease and heart disease. Your blood pressure is
affected by your lifestyle and important contributing factors are:
• Being overweight
• Having a high cholesterol level
• Drinking too much alcohol
• Eating too much salt
• Not eating enough fruit and vegetables
• Not exercising enough
Smoking also increases the risks associated with high blood pressure.
Pulse Rate
This blood pressure monitor also measures your pulse rate. Your pulse reflects your heart rate
and is measured in terms of the numbers of beats per minute. Pulse rate varies from minute to
minute, and is affected by many things, including exercise, stress, anxiety, certain medicines and
some foods. Pulse rate is normally between 60 and 100 beats per minute.
Why is it beneficial to measure your blood pressure at home?
Monitoring your blood pressure at home gives you the advantage of taking blood pressure
measurements at fixed times of the day, in familiar surroundings, without external influences.
As a variety of conditions affect blood pressure, a single measurement is not sufficient for an
accurate diagnosis. Home monitoring enables readings to be taken over the course of weeks
and helps to identify an ongoing trend.
IMPORTANT INFORMATION BEFORE USE
Blood pressure measurements should be interpreted by a doctor or trained health
professional who is familiar with your medical history.
When measuring your own blood pressure there are some basic rules to follow. These are easy
to learn and so applying them at home will quickly become a routine.
As much as possible, conditions before and during measurement should always be the same.
Therefore, choose the same time of day to measure your blood pressure.
It is also important that your bladder is empty before taking a measurement, as a full bladder may
increase the reading.
Although such cases are rare, for people having an extremely weak or irregular pulse, error
readings may result which prevent proper measurement. If extreme differences are found in
blood pressure readings over a period, consult your doctor or pharmacist.
Blood Pressure Standard
The United States National High Blood Pressure
Education Program Coordinating Committee
has developed a blood pressure standard,
according to which areas of low and high-risk
blood pressure are identified. This standard is a
general guideline as individual’s blood pressure
varies among different people and different age
groups.
This blood pressure classification is based
on historical data, and may not be directly
applicable to any particular patient.

6 7
Blood Pressure Fluctuation
Blood pressure changes over the month and even throughout the day. It is also influenced by
season and temperature.
For reliable monitoring and reference of blood pressure, keeping long-term records is
recommended. Please use the blood pressure log in the back of this manual for recording and
tracking crucial information: date, time, blood pressure, pulse rate and body condition etc.
Parts Identification
LCD Display
Enter key
Arm Cuff
LCD Display
User-Switching Key
ON/OFF/START Key
Memory Key
Air Tube and
Connector Battery Cover
(Located on back
of unit)
4“AA”(R06) size,
1.5V batteries.
Mode-Switching Key
Hypertension
Risk Indicator
Memory Zones
Weak Battery Symbol
Systolic Pressure
Diastolic Pressure
Pulse Rate
Pulse Symbol
Symbols
Irregular Heartbeat (IHB)
Detector
Hypertension Risk Indicator: This compares the blood pressure measurement
against preset guidelines to give general guidance on the risk of hypertension.
Irregular Heartbeat (IHB) Detector: This symbol signifies that an irregular
heartbeat was detected.
Memory Zone 1: Appears when the device is operated in memory zone 1.
Memory Zone 2: Appears when the device is operated in memory zone 2.
Pulse Symbol: This shows the pulse rate per minute.
Weak Battery Symbol: Appears when the batteries should be replaced.
Blood Pressure Measurement Reminder Symbol:
This appears on the LCD display once the reminder function has been activated.
Memory Average: Displays average of the last 3 readings.
Memory Symbol: Shows the memory reading number.
Date/Time
Indicator
Blood Pressure (BP)
Measurement
Reminder Symbol
Memory Average
Memory Symbol

8 9
Irregular Heartbeat (IHB) Detector
This device is equipped with an Irregular Heartbeat
(IHB) Detector, which detects an irregular heartbeat. If
you see this symbol frequently, you should discuss with
your doctor.
Hypertension Risk Indicator
The United States National High Blood Pressure Education Program Coordinating Committee
has developed a blood pressure standard, which classifies blood pressure ranges into 4 risk
stages:
Normal / Suspected Pre-Hypertension /Suspected Stage 1 Hypertension / Suspected Stage 2
Hypertension. This device is equipped with an indicator, which gives a guide to the assumed
risk level after each blood pressure measurement. It is important that you consult with your
doctor regularly. Your doctor will advise you of your personal blood pressure range as well as the
point at which you will be considered at risk.
Suspected Stage 2 Hypertension
Suspected Stage 1 Hypertension
Suspected Pre-Hypertension
Normal (No Symbol)
Comfort Inflation Technology
This device uses the oscillometric method to detect your blood pressure. It will determine
the appropriate inflation level based on pressure oscillations and will only inflate as high as
necessary, providing greater comfort.
Installing batteries
1. The device requires 4 x AA (LR6) alkaline 1.5V batteries
2. When replacing batteries, ensure all 4 are replaced at
the same time.
3. Ensure that the batteries are all fitted the right way
around, observing the + and - signs on the
battery compartment.
4. Remove the batteries if the device is not intended
to be used for extended periods.
Replace the batteries when:
1. The low battery symbol appears on the display.
2. The ON/OFF/START key is pressed and nothing appears on the display.

10 11
4.
Plug in the air tube into the device (Fig.5).
3. Position the tube over the middle of the arm. Fasten
the cuff with the fabric fastener. Allow space for 2
fingers to fit between the cuff and your arm. Position
the artery mark ( ) over the main artery (on the
inside of your arm Fig.3).
Note: Locate the main artery by pressing 2 fingers
approximately 2cm above the bend of your elbow on the
inside of your left arm. Identify where the pulse can be
felt the strongest. This is your main artery (Fig.4).
Fig.1 Fig.2
Fig.3
Fig.4
Fig.6
Fig.5
2. Put your left arm through the cuff loop, with the air tube pointing down your arm towards
your wrist (Fig.1). Turn your left palm upwards and place the edge of the arm cuff
approximately 1.5cm to 2.5 cm above the inside of your elbow. (Fig.2). Tighten the cuff by
pulling the end of the cuff.
Applying the Cuff
1. Unwrap the arm cuff, leaving the
end of the cuff with the arrow
printed on it through the D-ring.
Fig.7
5. Lay your arm on a table (palm upwards) so the cuff is at the same height as your heart.
Make sure the tube is not bent or trapped (Fig.6).
6. This cuff is suitable for use if the arrow falls within the OK range, as shown in Fig.7.
If the arrow falls outside this area, you will need to purchase a different sized cuff.
Contact your local retailer.

12 13
Important Notes:
Helpful tips to help you to obtain a more accurate reading:
• Blood pressure changes with every heartbeat and is in constant fluctuation throughout the
day.
• Blood pressure recording can be affected by the position of the user, his or her physiologic
condition and other factors. For greatest accuracy, wait one hour after exercising, bathing,
eating, drinking beverages with alcohol or caffeine, or smoking to measure blood pressure.
• Your physical state should also be the same for each measurement, in a relaxed, sitting
position with your legs uncrossed – at least half an hour after your last cup of coffee or tea,
your last cigarette, physical exertion or a stressful situation.
• Do not take a measurement if you are under stress or tension.
• During measurement, do not talk or move your arm or hand muscles.
• Take your blood pressure at normal body temperature. If you are feeling cold or hot, wait a
while before taking a measurement.
• If the device is stored at very low temperature (near freezing), place it in a warm location for at
least one hour before using.
• Wait about 5 minutes before taking the next measurement.
Measurement Procedures
1. Press the User-Switching Key to select Memory Zone 1 or Memory Zone 2. After a memory
zone has been selected, press the ON/OFF/STOP Key to reset the device so it can start the
measurement in the chosen memory zone.
2. Press the ON/OFF/STOP Key to turn the device on. All digits will light up, checking the display
functions. The checking procedure will be completed in 2 seconds.
OR

14 15
3. After all of the symbols have appeared, the LCD screen will show a flashing “0.” The device is
ready to work and will automatically inflate the cuff slowly to start the measurement.
4. When the measurement is complete, the cuff will deflate entirely. Systolic pressure, diastolic
pressure and pulse will be shown simultaneously on the LCD screen. The memory sequence
number will flash and depending on the result, the Hypertension Risk Indicator symbol will
appear on the display, along with the time and date. The measurement is then automatically
stored in the memory.
Date/Time
Display
Note: The cuff will automatically re-inflate to approximately 220 mmHg if the device detects
that your body needs more pressure to measure your blood pressure.
1. The device automatically switches off approximately 1 minute after last key operation.
2. To interrupt the measurement, simply press the ON/OFF/STOP or Memory key; the cuff will
deflate immediately.
3. During the measurement, do not talk or move your arm or hand muscles.

16 17
Recalling Results from the Memory
1. The device has two memory zones (1 and 2). Each zone can store up to 60 measurements.
2. To read the memory values from a selected memory zone, use the User-Switching Key to
select a memory zone (1 or 2) from which you want to recall the values. Press the Memory
Key. The first reading displayed is the average of the last 3 measurements stored in memory.
3. Continue to press the Memory key to view previously stored measurements. Every
measurement comes with an assigned memory sequence number.
Note: The memory bank can store up to 60 readings per memory zone. When the number of
readings exceeds 60, the oldest data will be replaced with the new record.
Press and hold
for 5 seconds
Clearing Results from the Memory
1. Press the User-Switching Key to select memory zone 1 or memory zone 2.
2. Continue to press and hold the Memory Key for approximately 5 seconds, the data in that
memory zone will be erased automatically.
How to adjust the Date and Time
1. To adjust the date/time within the device, press the Mode-Switching key once. The display will
show a flashing number, this is the month.
2. Change the month by pressing the Memory key. Each press will increase the number by
one. Press the Enter key to confirm the entry and the screen will show a flashing number
representing the day.
3. Change the date and time as described in Step 2 above, using the Memory key to change and
the Enter key to confirm the entries.
4. A “0” will reappear, as the Blood Pressure Device is ready for measurement again.
Press the key
flashing month
increasing month
confirm the entry
repeat process to set date and time
(Once)

18 19
Blood Pressure Measurement Reminder
This device is equipped with a reminder function. 3 short beeps sound at the selected time.
Four sets of reminders can be programmed.
Press the Mode-Switching key twice to enter Blood Pressure Measurement Reminder Setting.
The Enter key allows you to switch from program AL1 to AL4. Press the Memory key to select the
hour and press the Enter key to confirm the entry, repeat this procedure to select the minutes.
A symbol will appear on the LCD display once the reminder is set successfully. Press the ON/
OFF/START key to turn the device off.
Note: This function can also be used as an alarm clock.
(Twice)
Note: Once you have set up the reminder function, it will only be activated when the device is in
the OFF mode. The reminder function will not be activated when the device is working, including
taking measurement, checking previous data and adjusting date and time.
To remove the reminder / alarm times that have been set, press the Mode-Switching key twice
to enter the Blood Pressure Measurement Reminder Setting. Press the Memory key to select
the hour, continue to press this key until you see the flashing line (-) and press the Enter key
to confirm the entry. The minutes will now flash, press the Memory key until you see the two
flashing lines (- -) press the Enter key to confirm the entry and the symbol will disappear.

20 21
Possible faults, causes and rectification
If any abnormality should arise during use, please check the following points.
No display when the ON/OFF/START key is pressed: Have the batteries run down or have
the polarities (+ -) been positioned correctly? Replace the batteries with new ones, ensuring they
are in the correct position.
EE Measurement Error Make sure the Air tube connector is securely connected to the air
socket on the device and the cuff is fitted correctly. Keep your arm steady and measure again. If
the error keeps occurring, return the device to your local retailer.
E1 Air Circuit Abnormality: Make sure the Air tube connector is securely connected to the air
socket on the side of the device and measure again. If the errors still occur, return the device to
your local retailer.
E2 Pressure Exceeding 300 mmHg: Switch the device off and start again. If the error keeps
occurring, return the device to your local retailer.
E3 Data Error: Remove the batteries, wait for 60 seconds, and then reload. If the error keeps
occurring return the device to your local retailer.
Er Exceeding Measurement Range: Measure again quietly. If error keeps occurring, return
the device to the local retailer.
Note: If the device still does not work, return it to your retailer. Under no circumstance should you
dismantle and repair the device by yourself.
Cautionary Notes
1. The device contains high-precision components. Therefore, avoid extreme temperatures,
humidity, and direct sunlight. Avoid dropping the main device and protect it from dust.
2. Clean the blood pressure device body and the cuff carefully with a slightly damp, soft cloth.
Do not press hard. Do not wash the cuff or use chemical cleaner on it. Never use thinner,
alcohol or petrol (gasoline) as cleaner.
3. Leaky batteries can damage the device. Remove the batteries when the device is not used
for a long period of time.
4. The device should not be operated by children, to avoid hazardous situations.
5. If the device is stored near freezing temperatures, allow it to acclimatise at room
temperature before use.
6. This device is not serviceable. You should not use any tool to open the device nor should you
attempt to adjust anything inside the device. If you have problems, please contact the
retailer.
7. For users diagnosed with common arrhythmia (atrial or ventricular premature beats or atrial
fibrillation), diabetes, poor circulation of the blood, kidney problems, or those who have
suffered from a stroke, or for unconscious users, the device may have difficulty in
determining the correct blood pressure measurement
8. To stop a measurement at any time, press the ON/OFF/START key, and the air in the cuff will
deflate immediately.
9. Once the inflation reaches 300 mmHg, the device will start deflating rapidly for safety
reasons.
10. Please note that this is a home healthcare product only and it is not intended to serve as a
substitute for the advice of a physician or medical professional.
11. Do not use this device for diagnosis or treatment of any health problem or disease.
Measurement results are for reference only. Consult a healthcare professional for
interpretation of pressure measurements. Contact your physician if you have or suspect
any medical problem. Do not change your medication without the advice of your physician or
healthcare professional.
12. Electromagnetic interference: The device contains sensitive electronic components. Avoid
strong electrical or electromagnetic fields in the direct vicinity of the device (e.g. mobile
telephones, microwave ovens). These may lead to temporary impairment of measurement
accuracy.
13. Dispose of the device, batteries, components and accessories according to the local
regulations. Batteries should be disposed of at a battery collection facility to minimise
hazards to health and the environment and to enable materials to be recycled.
This symbol is marked on the batteries and the packaging to remind you
14. This device may not meet its performance specification if stored or used
outside temperature and humidity ranges specified in Specifications.

22 23
Guarantee:
In addition to your statutory rights, Alvita agrees that if any defect in materials or workmanship
appears in the product within two years after the original date of consumer purchase, it will
repair, or at its option, replace the product free of charge. This applies only if the product has
been used for domestic purposes and has not been damaged through misuse, accident or
neglect and has not been modified or repaired by anyone other than Alvita or its authorised
agents.
If a defect appears, please check that the article is being used in accordance with the
instructions. If so, please return it with this warranty and proof of the date of purchase to the store
you purchased it from, as soon as possible.
Specifications
Measurement Method : Oscillometric
Measurement Range : Pressure: 40~250mmHg;
Pulse: 40~199 beats/minute
Pressure Sensor : Semi conductor
Accuracy : Pressure: ±3mmHg; Pulse: ±5% of reading
Inflation : Pump Driven
Deflation : Automatic Pressure Release Valve
Memory capacity : 60 memories for each zone x 2 zones
Auto-shut-off : 1 minute after last key operation
Operation Environment : 10°C~40°C (50°F~104°F); 40%~85% RH
Storage Environment : -10°C~60°C (14°F~140°F); 10%~90% RH
DC Power Source : DC 6V four R06 (AA) Batteries
Dimensions : 156 (L) X 110 (W) X 71 (H) mm
Weight : 470g (G.W.) (w/o Batteries)
Arm circumference : 24~36 cm (9.4”~14.2”)
Limited users : Adult users
: Type BF
Device and cuff are designed to provide special protection
against electrical shocks.
*Specifications are subject to change without notice.
Blood Pressure Log
Store the reading in memory zone:
Name: Age: Weight:
Date
Time
mmHg
Pulse
Body
Condition
220
200
180
160
140
120
100
80
60

24 25
Blood Pressure Log
Store the reading in memory zone:
Name: Age: Weight:
Date
Time
mmHg
Pulse
Body
Condition
220
200
180
160
140
120
100
80
60
EMC guidance and manufacturer’s declaration
Guidance and manufacturer’s declaration – electromagnetic emissions
The MV801f is intended for use in the electromagnetic environment specified below. The customer or the user of the
MV801f should ensure that it is used in such an environment.
Emission test Compliance Electromagnetic environment – guidance
RF emissions CISPR 11 Group 1 The MV801f uses RF energy only for its internal
function. Therefore, its RF emissions are very
low and are not likely to cause any interference
in nearby electronic equipment.
RF emissions CISPR 11 Class B The MV801f is suitable for use in all
establishments, including domestic
establishments and those directly connected to
the public low-voltage power supply network
that supplies buildings used for domestic
purposes.
Harmonic emissions IEC 61000-3-2 Class A
Voltage fluctuations/flicker emissions
IEC 61000-3-3 Compliance
Guidance and manufacturer’s declaration – electromagnetic immunity.
The MV801f is intended for use in the electromagnetic environment specified below.
The customer or the user of the MV801f should ensure that it is used in such an environment.
Immunity test IEC 60601 test level Compliance level
Electromagnetic environment – guidance
Electrostatic
discharge (ESD)
IEC 610004-2
± 6kV contact
± 8 kV air ± 6 kV contact
± 8 kV air Floors should be wood, concrete or ceramic
tile. If floors are covered with synthetic
material, the relative humidity should be at
least 30%.
Electrical fast
transient/burst
IEC 61000-4-4
± 2kV for power supply
lines
± 1kV for input/output
lines
± 2kV for power supply
lines
Not applicable
Mains power quality should be that of a
typical commercial or hospital environment.
Surge
IEC 61000-4-5 ± 1kV line(s) to line(s)
± 2kV line(s) to earth
± 1kV differential mode
Not applicable
Mains power quality should be that of a
typical commercial or hospital environment.
Voltage Dips, short
interruptions and
voltage variations on
power supply input
lines
IEC 61000-4-11
<5% UT(>95% dip in
UT) for 0,5 cycle
40% UT(60% dip in
UT) for 5 cycles
70% UT(30% dip in
UT) for 25 cycles
,5% UT(95% dip in UT)
for 5 s
<5% UT(>95% dip in
UT) for 0,5 cycle
40% UT(60% dip in UT)
for 5 cycles
70% UT(30% dip in UT)
for 25 cycles
,5% UT(95% dip in UT)
for 5 s
Mains power quality should be that of a
typical commercial or hospital environment.
If the user of the MV801f requires continued
operation during power mains interruptions, it
is recommended that the MV801f be powered
from an uninterruptible power supply or a
battery.
Power frequency
(50/60 Hz) magnetic
field IEC 61000-4-8
3 A/m 3 A/m Power frequency magnetic fields should be at
levels characteristic of a typical location in a
typical commercial or hospital environment.
NOTE: UT is the a.c. mains voltage prior to application of the test level.
EMC guidance and manufacturer’s declaration

26 27
EMC guidance and manufacturer’s declaration
Guidance and manufacturer’s declaration – electromagnetic immunity
The MV801f is intended for use in the electromagnetic environment specified below.
The customer or the user of the MV801f should ensure that is used in such an environment.
Immunity test IEC 60601 test level Compliance level
Electromagnetic environment – guidance
Conducted RF
IEC 61000-4-6
Radiated RF
IEC 61000-4-3
3 Vrms
150 KHz to 80 MHz
3 V/m
80MHz to 2,5 GHz
3 Vrms
3 V/m
Portable and mobile RF communications
equipment should be used no closer to any
part of the MV801f including cables, than the
recommended separation distance calculated
from the equation applicable to the frequency
of the transmitter.
Recommended separation distance:
d= 1,2 νP
d= 2.2 νP 80Hz to 800MHz
d= 2,3 νP 800Hz to 2,5 GHz
Where P is the maximum output power rating
of the transmitter manufacturer and (d) is the
recommended separation distance in metres (m).
Field strengths from fixed RF transmitters, as
determined by an electromagnetic site survey,
a
should be less than the compliance level
in each frequency range. B Interference may
occur in the vicinity of equipment marked with the
following symbol:
NOTE 1: At 80 MHz and 800 MHz, the higher frequency range applies.
NOTE 2: These guidelines may not apply in all situations. Electromagnetic propagation is affected by absorption and
reflection from structures, objects and people.
a: Fields strengths from fixed transmitters, such as base stations for radio (cellular/cordless) telephones and land mobile
radios, amateur radio, AM and FM radio broadcast and TV broadcast, cannot be predicted theoretically with accuracy.
To assess the electromagnetic environment due to fixed RF transmitters, an electromagnetic site survey should be
considered. If the measured field strength in the location in which the MV801f is used exceeds the applicable RF
compliance level above, the MV801f should be observed to verify normal operation. If abnormal performance is observed,
additional measures may be necessary, such as re-orientating or relocating the MV801f.
b: Over the frequency range 150 kHz to 80 MHz, field strengths should be less than 3 V/m.
EMC guidance and manufacturer’s declaration
Recommended separation distance between portable and mobile RF communications equipment
and the MV801f
The MV801f is intended for use in an electromagnetic environment in which radiated RF disturbances are controlled. The
customer or the user of the MV801f can help prevent electromagnetic interference by maintaining a minimum distance
between portable and mobile RF communications equipment (transmitters) and the MV801f as recommended below,
according to the maximum output power of the communication equipment.
Rated maximum
output power of
transmitter
W
Separation distance according to frequency of transmitter
m
150 kHz to 80 MHz d = 1,2 νP
80 MHz to 800 MHz d = 1,2 νP
800 MHz to 2,5 GHz d = 2,3 νP
0,01 0,12 0,12 0,23
0,1 0,38 0,38 0,73
1 1,2 1,2 2,3
10 3,8 3,8 7,3
100 12 12 23
For transmission rated at a maximum output power not listed above, the recommended separation distance d in metres
(m) can be estimated using the equation applicable to the frequency of the transmitter, where P is the maximum output
power rating of the transmitter in watts (W) according to the transmitter manufacturer.
NOTE 1: At 80 MHz and 800 MHz, the separation distance for the higher frequency range applies.
NOTE 2: These guidelines may not apply in all situations. Electromagnetic propagation is affected by absorption and
reflection from structures, objects and people.
Preliminary Remarks
This Blood Pressure Monitor complies with the European regulations and bears the CE mark
“CE 0473”. The quality of the device has been verified and conforms to the provisions of the
EC Council directive 93/42/EEC (Medical Device Directive), Annex 1 essential requirements and
applied harmonized standards.
EN 1060-1: 1995/A1: 2002 Non-invasive sphygmomanometers
- Part 1 – General requirements
EN 1063-3: 1997/A2: 2009 Non-invasive sphygmomanometers
- Part 2 – Supplementary requirements for electro-mechanical blood pressure measuring
systems.
EN 1064-4: 2004 Non-invasive sphygmomanometers
- Part 4 – Test Procedures to determine the overall system accuracy of automated non-
invasive sphygmomanometers.

28 29
Inhaltsverzeichnis:
Einleitung .......................................................................................................... 29
Was versteht man unter „Blutdruck“? ....................................................29-31
Der „Blutdruckstandard“ ............................................................................ 31
Blutdruckschwankungen ............................................................................ 32
Gerätemerkmale
Geräteteile ................................................................................................ 32
LCD-Display und Symbole.......................................................................... 33
Anzeige des Bluthochdruckrisikos .............................................................. 34
Arrhythmie-Sensor .................................................................................... 34
Bequemes Aufpumpen .............................................................................. 35
Bedienungsanleitung:
Einlegen der Batterien ............................................................................... 35
Anlegen der Manschette .......................................................................36-38
Messen ...............................................................................................39-41
Aufrufen von Ergebnissen aus dem Speicher .............................................. 42
Löschen von Ergebnissen aus dem Speicher ............................................... 43
Einstellen von Datum und Uhrzeit ............................................................... 43
Erinnerungsfunktion für das Blutdruckmessen ........................................44-45
Technische Daten:
Mögliche Fehler, Fehlerursachen und Fehlerbehebung ................................. 46
Sicherheitshinweise ................................................................................... 47
Überprüfung.............................................................................................. 48
Technische Daten ...................................................................................... 48
Blutdruckprotokoll ................................................................................49-50
EMV-Leitlinien und Herstellererklärung ..................................................51-53
DE Einleitung
Was versteht man unter „Blutdruck“?
Das Herz ist eine Art Pumpe, die das Blut durch den Körper pumpt und auf diese
Weise zu dessen Sauerstoffversorgung beiträgt. Der Blutdruck ist die Kraft, mit der
das Herz das Blut durch die Arterien presst. In diesem Kreislauf herrscht der höchste
Druck, wenn das Herz sich zusammenzieht (kontrahiert); dieser Blutdruck wird
SYSTOLISCHER BLUTDRUCK genannt. Zwischen den Kontraktionen entspannt sich
das Herz wieder, der Druck im Herzen nimmt stark ab, und neues Blut strömt in das
Herz. Dieser Blutdruck wird DIASTOLISCHER BLUTDRUCK genannt.
Nur durch die Messung beider Blutdruckwerte, des systolischen und des
diastolischen Blutdrucks, kann der Arzt den Blutdruck eines Patienten beurteilen.
Viele Faktoren, wie körperliche Aktivität, Unruhe oder auch einfach die Tageszeit, können den
Blutdruck beeinflussen.
Auch die Aufnahme von Koffein (aus Kaffee oder Tee) kann zu einem vorübergehenden Anstieg
des Blutdrucks führen, Gleiches gilt für das Nikotin aus Zigaretten.
Der Blutdruck kann auch im Tagesverlauf schwanken oder sich von Minute zu Minute ändern. In
der Regel ist der Blutdruck am niedrigsten, wenn wir schlafen.
Bei Patienten mit Bluthochdruck sind diese Schwankungen sogar noch ausgeprägter.
Der Blutdruck wird in Millimeter Quecksilbersäule (mmHg) gemessen; angegeben wird zuerst
der systolische und danach der diastolische Blutdruck. So entspricht ein Wert von 120/80
(„120 zu 80“) 120 mmHg systolischem und 80 mmHg diastolischem Blutdruck.
Bluthochdruck
Bluthochdruck wird häufig eher zufällig entdeckt.
Viele Menschen mit Bluthochdruck fühlen sich gut und zeigen keinerlei äußere Anzeichen oder
Symptome ihrer Erkrankung – es sei denn, ihr Blutdruck ist bereits seit längerer Zeit zu hoch
oder hat bereits zu Beschwerden geführt. Bluthochdruck, der über längere Zeit besteht, kann
zu Schäden an Herz, Nieren, Gehirn und anderen wichtigen Organen führen. Die negativen
Folgen für die Gesundheit können erheblich sein und die Lebensqualität stark beeinträchtigen.
Das Problem ist also nicht der Bluthochdruck an sich, sondern die mit diesem einhergehenden
Folgeerkrankungen. Daher wird Bluthochdruck heutzutage sehr ernst genommen.

30 31
Bedenken Sie: Je höher Ihr Blutdruck ist, desto höher ist auch Ihr Risiko für Herzerkrankungen
und Schlaganfall.
Bluthochdruck wird manchmal auch als „erhöhter Blutdruck“ oder „Hypertonie“ bezeichnet.
Einige Menschen mit dieser Erkrankung müssen langfristig medikamentös, in der Regel
mit Tabletten, behandelt werden. Anderen Menschen gelingt es, ihren Bluthochdruck ohne
Unterstützung durch Medikamente zu senken, zum Beispiel durch eine Ernährungsumstellung
oder Änderung Ihres Lebensstils.
Was verursacht Bluthochdruck?
Von „Bluthochdruck“ spricht man nur dann, wenn der Blutdruck in Ruhe nicht sinkt.
Dauerhaft erhöhter Blutdruck kann unterschiedliche Ursachen haben und mit anderen
Erkrankungen wie Diabetes, Nierenerkrankungen oder Herzerkrankungen zusammenhängen.
Der Blutdruck wird durch den Lebensstil beeinflusst. Folgende Faktoren spielen hierbei eine
wichtige Rolle:
• Übergewicht
• Erhöhter Cholesterinspiegel
• Übermäßiger Alkoholkonsum
• Übermäßiger Salzkonsum
• Nicht ausreichender Verzehr von Obst und Gemüse
• Bewegungsmangel
Rauchen erhöht ebenfalls das Bluthochdruckrisiko.
Pulsfrequenz
Das Blutdruckmessgerät misst auch Ihre Pulsfrequenz. Ihr Puls entspricht Ihrer Herzfrequenz
und wird als Anzahl der Herzschläge pro Minute gemessen. Die Pulsfrequenz ändert sich von
Minute zu Minute und wird von vielen Dingen beeinflusst, zum Beispiel körperlicher Aktivität,
Stress, Unruhe, bestimmten Medikamenten und einigen Lebensmitteln. In der Regel liegt die
Pulsfrequenz zwischen 60 und 100 Schlägen pro Minute.
Warum ist es nützlich, den Blutdruck zu Hause zu messen?
Das häusliche Messen des Blutdrucks hat den Vorteil, dass Sie die Messungen zu festen
Tageszeiten, in vertrauter Umgebung und ohne äußere Störungen durchführen können. Da der
Blutdruck von einer Vielzahl von Faktoren beeinflusst wird, reichte eine einzige Messung nicht
aus, um eine zuverlässige Diagnose stellen zu können. Den Blutdruck zu Hause zu überwachen
bedeutet, über Wochen täglich den Blutdruck zu messen; diese Messungen können helfen,
bestimmte Trends zu erkennen.
WICHTIGE HINWEISE VOR DEM GEBRAUCH
Die Ergebnisse von Blutdruckmessungen sollten immer von einem Arzt oder einer
Gesundheitsfachkraft ausgewertet werden, der bzw. die mit Ihrer Krankengeschichte
vertraut ist.
Beim Messen des eigenen Blutdrucks sollten Sie einige Grundregeln beachten: Diese Grundregeln sind
leicht zu merken und täglich anzuwenden, so dass das Messen des Blutdrucks für Sie schnell zur
Routine werden wird.
Sie sollten Ihren Blutdruck möglichst immer unter denselben Bedingungen messen. Das heißt, Sie
sollten Ihren Blutdruck immer zur gleichen Tageszeit messen.
Außerdem ist es wichtig, vor der Messung zur Toilette zu gehen, da eine volle Blase die Messung
verfälschen kann (der gemessene Wert ist dann zu hoch).
In seltenen Fällen kann es bei Menschen mit einem sehr schwachen oder unregelmäßigen
Puls zu Messfehlern kommen, die eine ordnungsgemäße Messung verhindern. Ergeben die
Blutdruckmessungen über einen bestimmten Zeitraum sehr unterschiedliche Werte, sollten Sie mit
Ihrem Arzt oder Apotheker darüber sprechen.
Der „Blutdruckstandard“
Der Koordinierungsausschuss des
Schulungsprogramms zum Thema Bluthochdruck
der Vereinigten Staaten (United States National
High Blood Pressure Education Program
Coordinating Committee) hat einen Standard für
den Blutdruck („Blutdruckstandard“) entwickelt,
der dazu dienen kann, Bereiche zu ermitteln,
die mit einem Risiko für Bluthochdruck oder
zu niedrigem Blutdruck verbunden sind. Dieser
Standard gibt allgemeine Richtlinien vor, an
denen man sich orientieren kann, da der
Blutdruck zwischen verschiedenen Menschen
und unterschiedlichen Altersgruppen stark
variieren kann.
Die Kategorien des Blutdruckstandards wurden
aus gesammelten Daten ermittelt und sind nicht
unbedingt auf jeden Patienten anwendbar.
Verdacht auf
Bluthochdruck der Stufe 2
Verdacht auf
Bluthochdruck der Stufe 1
Verdacht auf
Bluthochdruck
Normal
Systolisch
Diastolisch
Systolisch
Diastolisch
Systolisch
Diastolisch
Systolisch
Diastolisch
Systolisch (mmHg)
Diastolisch (mmHg)

32 33
Blutdruckschwankungen
Seien Sie nicht beunruhigt, wenn zwei oder drei aufeinanderfolgende Messungen des Blutdrucks
einen zu hohen Wert zeigen. Der Blutdruck schwankt im Laufe eines Monats und sogar während
eines Tages. Der Blutdruck hängt auch von der Jahreszeit und der Umgebungstemperatur ab.
Für eine zuverlässige Überwachung und aussagefähige Werte sollte der Blutdruck über
einen längeren Zeitraum gemessen werden. In das Blutdruckprotokoll am Ende dieser
Bedienungsanleitung können Sie alle wichtigen Werte eintragen, d. h. Datum, Uhrzeit,
gemessenen Blutdruck, gemessene Pulsfrequenz, körperliche Verfassung usw.
Geräteteile
Taste „Enter“ (Eingabe)
Oberarmmanschette
LCD-Display
Taste zum Auswählen des Benutzers
Taste „ON/OFF/START“
Taste „MEMORY“ (Speicher)
Luftschlauch
und Stecker Batterieabdeckung
(auf der Rückseite
des Geräts)
4 1,5 V-Batterien,
AA (R06)
Taste „Mode“ (Betriebsart)
LCD-Display
Bluthochdruckrisiko-
Symbol
Speicherbereiche
Symbol für schwache
Batterien
Systolischer Blutdruck
Diastolischer Blutdruck
Pulsfrequenz
Pulssymbol
Symbole
Arrhythmie-Sensor
Bluthochdruckrisiko-Symbol: Der gemessene Blutdruck wird mit den auf
dem Blutdruckstandard basierenden, voreingestellten Werten verglichen, um das
Bluthochdruckrisiko zu ermitteln.
Arrhythmie-Sensor: Dieses Symbol weist darauf hin, dass eine Arrhythmie
(unregelmäßiger Herzschlag) festgestellt wurde.
Speicherbereich 1: Wird angezeigt, wenn das Gerät im Speicherbereich 1
betrieben wird.
Speicherbereich 2: Wird angezeigt, wenn das Gerät im Speicherbereich 2
betrieben wird.
Puls: Symbol: Zeigt die Pulsfrequenz pro Minute an.
Symbol für schwache Batterien: Wird angezeigt, wenn der Ladezustand der
Batterien nicht mehr ausreicht und die Batterien ausgetauscht werden müssen.
Erinnerungssymbol für das Blutdruckmessen:
Wird auf dem LCD-Display angezeigt, wenn die Erinnerungsfunktion aktiviert wurde.
Gespeicherter Mittelwert: Anzeige des Mittelwerts der letzten 3 Messungen.
Speichersymbol: Anzeige der Nummer der gespeicherten Messung.
Anzeige von
Datum/Uhrzeit
Erinnerungssymbol
für das
Blutdruckmessen
Gespeicherter Mittelwert
Speichersymbol

34 35
Arrhythmie-Sensor
Das Gerät verfügt über einen Sensor, der einen
unregelmäßigen Herzschlag (Arrhythmie) feststellen
kann. Wird dieses Symbol nach Ihren Messungen
häufig angezeigt, sollten Sie sich an Ihren Arzt wenden.
Anzeige des Bluthochdruckrisikos
Der Koordinierungsausschuss des Schulungsprogramms zum Thema Bluthochdruck
der Vereinigten Staaten (United States National High Blood Pressure Education Program
Coordinating Committee) hat einen Standard für den Blutdruck („Blutdruckstandard“) entwickelt,
der 4 Risikostufen umfasst:
Normal / Verdacht auf Vorstufe zum Bluthochdruck / Verdacht auf Bluthochdruck der Stufe 1
/ Verdacht auf Bluthochdruck der Stufe 2. Das Gerät verfügt über eine spezielle Funktion, die
nach jeder Blutdruckmessung darauf hinweist, ob ein Bluthochdruckrisiko besteht. Es ist sehr
wichtig, dass Sie regelmäßig Ihren Arzt aufsuchen. Ihr Arzt wird Sie über Ihren persönlichen
Blutdrucknormalbereich informieren und Ihnen auch sagen, ab welchem Wert für Sie ein
Bluthochdruckrisiko besteht.
Verdacht auf Bluthochdruck der Stufe 2
Verdacht auf Bluthochdruck der Stufe 1
Verdacht auf Vorstufe zum Bluthochdruck
Normal (kein Symbol)
Bequemes Aufpumpen
Das Gerät misst den Blutdruck mithilfe der Oszillometrie. Das bedeutet, dass das Gerät
automatisch feststellt, wie weit die Manschette aufgepumpt werden muss. Auf diese Weise
erfolgt das Aufpumpen sehr bequem und die Manschette wird nicht zu weit aufgepumpt
Einlegen der Batterien
1. Das Gerät benötigt 4 alkalische 1,5 V-Batterien vom
Typ AA (LR6).
2. Bei einem Austausch der Batterien müssen immer alle
4 Batterien auf einmal ausgetauscht werden.
3. Achten Sie beim Austauschen der Batterien darauf,
diese richtig herum einzulegen (orientieren Sie
sich dabei an den Plus- und Minuszeichen auf den
Batterien und im Batteriefach).
4. Soll das Gerät längere Zeit nicht benutzt werden,
entnehmen Sie bitte die Batterien.
Ersetzen Sie die Batterien, wenn
1. auf dem Display das Symbol für zu schwache Batterien angezeigt wird.
2. Sie die Taste „ON/OFF/START“ gedrückt haben, und auf dem Display nichts angezeigt wird.

36 37
Hauptschlagader
Hauptschlagader
Abb.1
, ,
, ,
Hauptschlagader
Abb.2
Abb.3
Abb.4
2. Stecken Sie Ihren linken Arm durch die Manschette. Der Luftschlauch muss dabei auf der Innenseite
Ihres Arms liegen und nach unten und in Richtung Ihres Handgelenks zeigen (Abb. 1). Drehen
Sie den Arm mit der Manschette so, dass die Handfläche nach oben zeigt, und verschieben Sie
die Manschette so auf Ihrem Arm, dass der untere Rand der Manschette ungefähr 1,5 cm bis
2,5 cm oberhalb des Ellbogengelenks liegt (Abb. 2). Ziehen Sie die Manschette fest.
Anlegen der Manschette
1. Öffnen Sie die Manschette und
achten Sie dabei darauf, dass das
Ende der Manschette mit dem
aufgedruckten Pfeil nicht aus dem
Metallring rutscht.
3. Positionieren Sie den Schlauch in der Mitte des
Arms. Schließen Sie die Manschette mit dem
Klettverschluss. Zwischen die Manschette und Ihren
Arm sollten noch zwei Finger passen. Verschieben
Sie die Manschette, bis die Markierung ( ) für die
Hauptschlagader über der Hauptschlagader (auf der
Innenseite des Arms; Abb. 3) liegt.
Hinweis: Hinweis: Die Hauptschlagader finden Sie,
indem Sie mit zwei Fingern ungefähr 2 cm oberhalb des
Ellenbogengelenks auf die Innenseite Ihres linken Arms drücken.
Suchen Sie nach der Stelle, an der Sie den Puls am stärksten fühlen.
An dieser Stelle verläuft die Hauptschlagader (Abb. 4).
4.
Stecken Sie den Luftschlauch in das Gerät
(Abb. 5).
Abb. 6
Abb. 5
Abb. 7
5. Legen Sie Ihren Arm (mit der Handfläche nach oben) auf einen Tisch, so dass die Manschette
auf gleicher Höhe mit Ihrem Herzen ist. Achten Sie darauf, den Schlauch nicht zu knicken oder
zu blockieren (Abb. 6).
6. Die Manschette sitzt richtig, wenn der Pfeil am Verschluss der Manschette in den mit “OK”
gekennzeichneten Bereich zeigt. (siehe Abb. 7). Zeigt der Pfeil nicht in diesen Bereich, ist die
Manschette zu groß oder zu klein, und Sie müssen eine andere, passende Manschette
kaufen. Wenden Sie sich dazu bitte an Ihren Apotheker.

38 39
Wichtige Hinweise:
Die folgenden Tipps sollen dazu beitragen, eine möglichst genaue Messung zu erzielen:
• Der Blutdruck ändert sich mit jedem Herzschlag und im Tagesverlauf.
• Die Blutdruckmessung wird durch die Körperhaltung und die körperliche Verfassung des
Benutzers sowie andere Faktoren beeinflusst. Für eine möglichst genaue Messung sollten
Sie nach körperlicher Anstrengung, dem Baden, dem Essen, dem Konsum alkohol- oder
koffeinhaltiger Getränke und nach dem Rauchen mindestens eine Stunde lang warten, bevor
Sie Ihren Blutdruck messen.
• Außerdem sollte Ihre körperliche Verfassung bei jeder Messung möglichst gleich sein, d. h.
Sie sollten entspannt sitzen, die Beine sollten nicht übereinandergeschlagen sein, und es sollte
mehr als eine halbe Stunde seit der letzten Tasse Kaffee oder Tee, der letzten Zigarette, der
letzten körperlichen Anstrengung oder einer aufregenden Situation vergangen sein.
• Sie sollten Ihren Blutdruck ebenfalls nicht messen, wenn Sie sich gestresst oder angestrengt
fühlen.
• Während der Messung den Arm still halten, d. h. weder den Arm noch die Hand bewegen und
die Muskeln nicht anspannen.
• Messen Sie Ihren Blutdruck bei normaler Körpertemperatur, d. h. nicht, wenn Sie frieren
oder schwitzen. Warten Sie in diesem Fall mit der Messung, bis Ihr Körper wieder seine
Normaltemperatur erreicht hat.
• Wurde das Blutdruckmessgerät an einem sehr kalten Ort (nahe dem Gefrierpunkt)
aufbewahrt, das Gerät mindestens eine Stunde lang an einen wärmeren Ort legen, bevor der
Blutdruck gemessen wird.
• Warten Sie zwischen einzelnen Messungen mindestens 5 Minuten.
Messen
1. Drücken Sie die Taste zum Auswählen des Benutzers, um Speicherbereich 1 oder
Speicherbereich 2 auszuwählen. Drücken Sie nach der Auswahl des gewünschten
Speicherbereichs die Taste „ON/OFF/START“, um das Gerät auf Null zurückzusetzen, damit
die Messung im ausgewählten Speicherbereich beginnen kann.
2. Die Taste „ON/OFF/START“ drücken, um das Gerät einzuschalten. Alle Anzeigelemente
leuchten einmal kurz auf, um die Anzeigefunktionen zu testen. Der Test dauert ungefähr
2 Sekunden.
OR
Table of contents
Languages:
Other alvita Blood Pressure Monitor manuals
Popular Blood Pressure Monitor manuals by other brands

HoMedics
HoMedics THERA P BPW-051DDM manual

Omron
Omron SYSDRIVE MX2 SERIES instruction manual

HoMedics
HoMedics BPW-360BT manual

Omron
Omron BP9300T instruction manual

uebe
uebe visomat comfort 20/40 instruction manual

Hangzhou Hua'an Medical & Health Instruments
Hangzhou Hua'an Medical & Health Instruments MW-300C Operation guide