manuals.online logo
Brands
  1. Home
  2. •
  3. Brands
  4. •
  5. Amada
  6. •
  7. Indoor Furnishing
  8. •
  9. Amada AMFS17 User manual

Amada AMFS17 User manual

Other Amada Indoor Furnishing manuals

Amada AMFS07 User manual

Amada

Amada AMFS07 User manual

Amada AMFS14 User manual

Amada

Amada AMFS14 User manual

Amada AMFS02 User manual

Amada

Amada AMFS02 User manual

Amada AMFS15 User manual

Amada

Amada AMFS15 User manual

Amada AMFS01B1 User manual

Amada

Amada AMFS01B1 User manual

Amada AMFS02 User manual

Amada

Amada AMFS02 User manual

Amada AMFS07 User manual

Amada

Amada AMFS07 User manual

Popular Indoor Furnishing manuals by other brands

Regency LWMS3015 Assembly instructions

Regency

Regency LWMS3015 Assembly instructions

Furniture of America CM7751C Assembly instructions

Furniture of America

Furniture of America CM7751C Assembly instructions

Safavieh Furniture Estella CNS5731 manual

Safavieh Furniture

Safavieh Furniture Estella CNS5731 manual

PLACES OF STYLE Ovalfuss Assembly instruction

PLACES OF STYLE

PLACES OF STYLE Ovalfuss Assembly instruction

Trasman 1138 Bo1 Assembly manual

Trasman

Trasman 1138 Bo1 Assembly manual

Costway JV10856 manual

Costway

Costway JV10856 manual

moss DESIGN Caisson Credenza Assembly instructions

moss DESIGN

moss DESIGN Caisson Credenza Assembly instructions

Aquaglide FULL DECK 15.0 owner's manual

Aquaglide

Aquaglide FULL DECK 15.0 owner's manual

AREBOS AR-HE-SW30 user manual

AREBOS

AREBOS AR-HE-SW30 user manual

Till-Hilft Fulda 87005.330 Assembly instructions

Till-Hilft

Till-Hilft Fulda 87005.330 Assembly instructions

Twoey Outside 2010 quick start guide

Twoey Outside

Twoey Outside 2010 quick start guide

Hettich Easys 200 operating instructions

Hettich

Hettich Easys 200 operating instructions

The bedboss RELAX 404 Series owner's manual

The bedboss

The bedboss RELAX 404 Series owner's manual

Oeseder Möbelindustrie Bern 991 720 Assembly instructions

Oeseder Möbelindustrie

Oeseder Möbelindustrie Bern 991 720 Assembly instructions

Costway HW68469 user manual

Costway

Costway HW68469 user manual

Next ALIX A27743 Assembly instructions

Next

Next ALIX A27743 Assembly instructions

BROSA Hans Assembly guide

BROSA

BROSA Hans Assembly guide

Prodigg MINIKA PBA015T-FUR installation manual

Prodigg

Prodigg MINIKA PBA015T-FUR installation manual

manuals.online logo
manuals.online logoBrands
  • About & Mission
  • Contact us
  • Privacy Policy
  • Terms and Conditions

Copyright 2025 Manuals.Online. All Rights Reserved.

Thank you for choosing this AMADA product! At AMADA we
strive to provide you with the best quality products and services
in the industry. Should you have any issues, please don't
hesitate to contact us at [email protected].
Floating Shelf Instruction Manual V1.0
Model: AMFS17
04
Wood Board
• Check package contents against supplied parts and hardware list to assure that all
components were received undamaged. Do not use damaged or defective parts. lf you
require replacement parts, please contact customer service at
[email protected].
• Carefully read all instructions before attempting installation. If you do not understand
the instructions or have any concerns or questions, please contact customer service at
[email protected].
• Not all parts and hardware included will be used.
• Do not use this product for any purpose that is not explicitly specified in this manual.
• Do not exceed weight capacity. We cannot be liable for damage or injury caused by
improper mounting, incorrect assembly or inappropriate use. Thank you for your
understanding.
IMPORTANT SAFETY INFORMATION
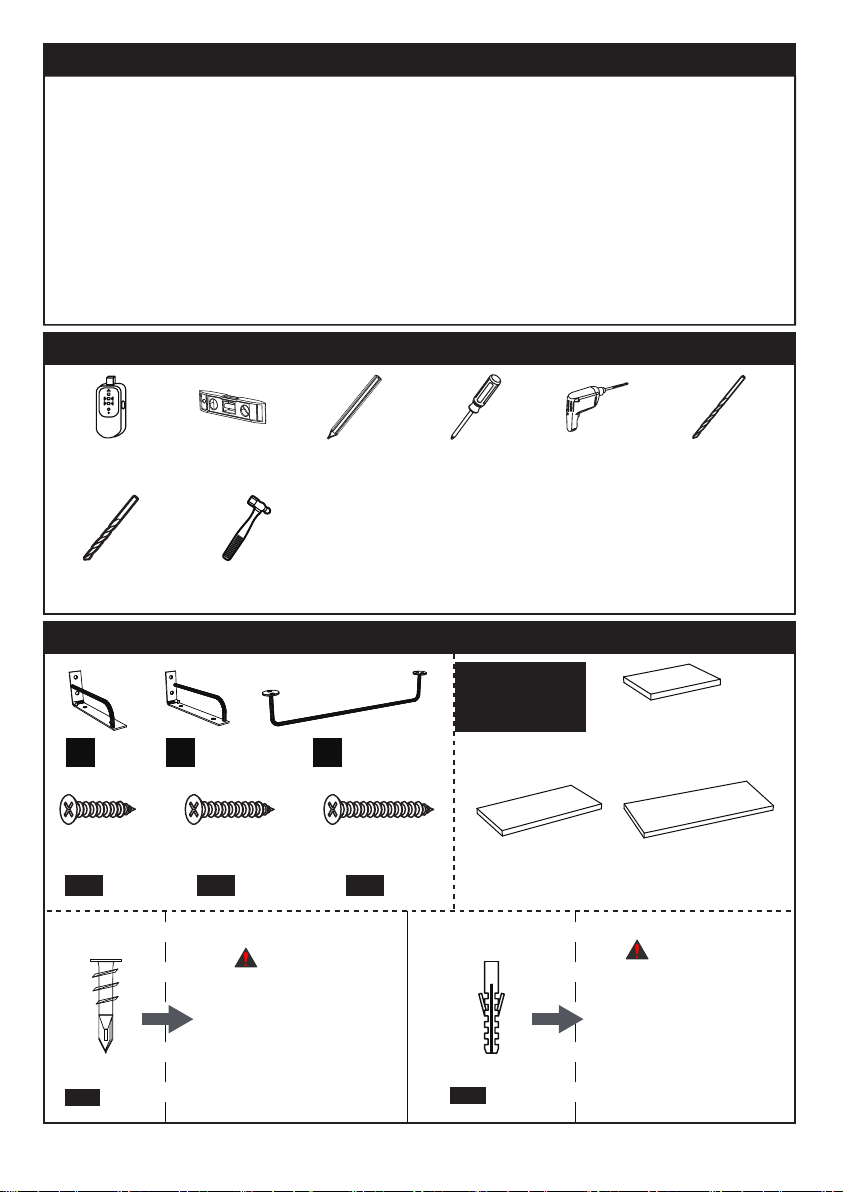
Tools Needed (Not lncluded)
Stud Finder Pencil Phillips
Screwdriver
Level Drill 5/64 in.(2mm)
Wood Drill
13/64 in.(5mm)
Concrete Drill Hammer
Supplied Parts and Hardware
Wall Anchor
M13x42mm
x12
D
CAUTION!
This wall anchor [D] is
for drywall ONLY. DO
NOT use them in
concrete / brick / wood
studs wall.
CAUTION!
This wall anchor [E]
is for concrete or
brick walls ONLY. DO
NOT use them in
drywall or wood
studs.
x12
E
Wall Anchor
ø5x30mm
Screw
M4X15mm
x16
A
Long Lag Screw
M4x50mm
x12
C
Short Lag Screw
M4x30mm
x12
B
01 (x3) 02 (x3) 03 (x1)
Small
Middle Large
01
Caution:
The metal frame [01] and [02] should be
secured along the side of the wood board.
Otherwise the towel rack [03] can not be
fixed on the large wood board.
Option A-1:
Step 1 Secure the Metal Frame [01], [02] and [03] to the Wood Board [04]
C
01
C
04
C
A
There are 2 installation options while attaching the metal frame on the
wood board, you can choose the installation method according to your
needs.
Option A: Option B:
For Option A Installation
C
01
C
02
Electric screw driver
is recommended
[Not Included]
02
Option A-2:
Note:
The towel rack [03] is only suitable for the
largest wood board. For better to install the
wood board on wall, you need to attach the
towel rack [03] on the center location of
the largest wood board.
C
01
C
A
C
04
Option B-1:
For Option B Installation
C
A
C
01
C
03
C
04
Please refer to method of the
Option A-1 to secure the towel
rack [03] on the wood board
Electric screw driver
is recommended
[Not Included]
C
02
C
03
C
01
C
01
C
02
03
Note: The thickness of the
drywall must greater than
25/32in.(20mm)
Option B-2:
Step 2 Secure Metal Frame with Wood Board on Wall
Before installation, please identify your wall type.
For wood stud installation, follow the step 2A.
For drywall installation, follow the step 2B.
For solid concrete and concrete block walls installation, follow the
step 2C
Step 2A For Wood Stud
For wood stud mounting, wall
anchors [D] and [E] are not
necessary.
WARNING:
X X
D E
Please refer to method of the
Option B-1 to secure the towel
rack [03] on the wood board
C
04
C
A
C
03
C
03
C
01
C
02
04
Note: The thickness of the
drywall must greater than
25/32in.(20mm)
[Not Included]
[Optional]
For Long Lag Screw
1 31/32 in.(50mm)
ø5/64 in.(ø2mm)
For Long Lag Screw
Step 2B For Drywall
The anchor [D] is
for dry wall only! CC
C
B
C
D
05
C
D
C
D
Step 1C For
Solid Concrete and Concrete Block Walls
C
B
C
B
06
13/64 in.(ø5mm)
2 11/64 in.(55mm)
C
E
C
E
C
C
C
C
07