Amano A-VAC 12 07212A User manual

Model: 07212A
Operator’s Manual

2
***This product is intended for commercial use only***
READ THIS BOOK
This book has important information for the use and safe operation of this machine. Failure to
read this book prior to operating or attempting any service or maintenance procedure to your
American Sanders machine could result in injury to you or to other personnel; damage to the
machine or to other property could occur as well. You must have training in the operation of
this machine before using it. If your operator(s) cannot read this manual, have it explained fully
before attempting to operate this machine.
All directions given in this book are as seen from
the operator’s position at the rear of the machine.
WARNING!
The Products sold with this Manual contain or may contain chemicals that are known to certain
governments (such as the State of California, as identied in its Proposition 65 Regulatory Warning Law)
to cause cancer, birth defects or other reproductive harm. In certain locations (including the State of
California) purchasers of these Products that place them in service at an employment job site or a publicly
accessible space are required by regulation to make certain notices, warnings or disclosures regarding the
chemicals that are or may be contained in the Products at or about such work sites. It is the purchaser’s
responsibility to know the content of, and to comply with, any laws and regulations relating to the use of
these Products in such environments. The Manufacturer disclaims any responsibility to advise purchasers
of any specic requirements that may be applicable to the use of the Products in such environments.
WARNING!
To reduce the risk of fire, electric shock, or injury:
lDo not use where explosive vapors, such as gas, solvents, alcohol, fuels, or combustible materials
such as grain, wood dust, are present in the air. Keep the work area well ventilated.
lDust produced from sanding wood or varnish could self ignite causing injury or damage. If this
material has been picked up, empty it immediately after use in a metal container.
lDo not use to pick-up health endangering dust.
lDo not use unless machine is fully assembled. Do not modify the machine. Read all instructional
labels on the machine. Replace damaged labels.
lDo not allow to be used as a toy. Close attention is necessary when used around children.
lUse extra care when cleaning on stairs.
lConnect to properly grounded outlet. See “grounding Instructions”.
lDo not use unless all filtering elements are present. Clean filtering elements frequently.
SAVE THESE INSTRUCTIONS

Contents
Symbols Used in the Manual....................................................................4
Purpose and Content of the Manual.........................................................4
Target Group..............................................................................................4
Storing the Use and Maintenance Manual...............................................4
On Delivery of the Machine.....................................................................5
Introductory Comment..............................................................................5
Identification Data.....................................................................................5
Technical Description...............................................................................5
Intended Use............................................................................................5
Safety..................................................................................................5
Serial Number Plate.................................................................................5
Technical Data..........................................................................................6
General Safety Regulations.....................................................................7
Preparation of the Machine....................................................................9
Handling the Packed Machine......................................................9
How to Unpack the Machine........................................................9
How to Transport the Machine........................................................9
Machine Components - Main..........................................................10
Machine Components - Tank...........................................................10
Machine Components - Float..........................................................10
Machine Components - Vacuum Head..............................................11
Machine Safety...............................................................................11
Inserting the Filter / Collection Bag (Optional)..................................12
Preparing to Work....................................................................................13
Machine Operation...................................................................................14
Using the Machine - Dry.................................................................14
Using the Machine - Wet................................................................15
Improving the Vacuum Performance..............................................16
Post Operation.........................................................................................17
Daily Maintenance....................................................................................18
Emptying the Collection Tank...........................................................18
Remove Paper Collection Bag.......................................................19
Cleaning the Vacuum Accessories...............................................20
Weekly Maintenance................................................................................21
Cleaning the Collection Tank...........................................................21
Cleaning the Foam Filter................................................................22
Replacing the Foam Filter...............................................................22
Cleaning the Cartridge Filter...........................................................23
Replacing the Cartridge Filter.........................................................23
Cleaning the Float...........................................................................24
Troubleshooting...................................................................................25
The Machine Will Not Turn On.......................................................25
Insufficient Vaccum.........................................................................25
Disposal................................................................................................26
Choosing an Accessory...........................................................................27
Parts Manual............................................................................................28
Electrical Schematic........................................................................29
Vacuum Motor & Cover Assembly...................................................30
Filter Assembly................................................................................32
Tank Assembly................................................................................34
Accessories...........................................................................36
Warranty..................................................................................................37
3

4
Purpose & Content of the Manual
The aim of this manual is to provide customers with all the information needed to use the appliance in the safest,
most appropriate and most autonomous way. It includes information concerning technical aspects, safety, operation,
appliance downtime, maintenance, spare parts and scrapping. Operators and qualified technicians must read the
instructions in this manual carefully before carrying out any operation on the appliance. If in doubt about the correct
interpretation of instructions, contact your nearest Customer Service Center to obtain the necessary clarifications.
Target Group
This manual is aimed at operators and qualified technicians responsible for appliance maintenance. Operators must
not perform operations that should be carried out by qualified technicians. American Sanders cannot be held liable
for damages resulting from failure to comply with this prohibition.
Manual Storage
The Use and Maintenance Manual must be stored, protected from liquids and anything else that could compromise
its legibility.
Symbols Used in the Manual
Open book symbol:
Tells the operator to read the manual before using the appliance.
Open book symbol:
Tells the operator to read the manual before using the appliance.
Covered place symbol:
the operations preceded by this symbol must always be carried out in a dry, covered area.
Warning symbol:
Carefully read the sections marked with this symbol and observe the indications, for the safety of the
operator and the appliance.
Disposal symbol:
carefully read the sections marked with this symbol for disposing of the appliance.
Protective gloves symbol:
Always wear protective gloves, to avoid the risk of serious injury to your hands caused by sharp objects.
Protective gloves symbol:
Always wear protective gloves, to avoid the risk of serious injury to your hands caused by chemical agents.
Information symbol:
Indicates additional information for the operator, to improve the use of the device.
The descriptions contained in this document are not binding. The company therefore reserves the right to make any
modications at any time to elements, details, or accessory supply, as considered necessary for reasons of improvement
or manufacturing/commercial requirements. The reproduction, even partial, of the text and drawings contained in this
document is prohibited by law.
American Sanders reserves the right to make any technical and/or supply modications. The images are
shown as a reference only, and are not binding as to the actual design and/or equipment.

Machine Delivery
When the machine is delivered to the customer, an immediate check must be performed to ensure all the material
mentioned in the shipping documents has been received, in addition to verifying that the equipment has not been
damaged during transportation. If this is the case, the carrier must ascertain the extent of the damage at once,
informing our customer service office. It is only by prompt action of this type that the missing material can be
obtained, and compensation for damage successfully claimed.
Introduction
The AVac12 is a vacuum cleaner for dusts and liquids. The appliance must be used only for this purpose. Even the
best appliances will only work well if used correctly and kept in good working order. We therefore suggest you read
this instruction booklet carefully and read it again whenever difficulties arise while using the machine. If necessary,
remember that our assistance service (organised in collaboration with our dealers) is always available for advice or
direct intervention.
Identification Data
For technical assistance or to request replacement parts, always give the model, the version and serial number
written on the serial number plate.
Technical Description
The AVac12 is a vacuum cleaner which uses the vacuum created inside the collection tank by the fan (enabled by
the electric motor) to pick up dust and dry solid elements at ambient temperature, using the accessories in contact
with the floor and the furnishings. The vacuum hose conveys inside the collection tank the air with dust and solid
residues that are retained and collected using the collection bag and the filter. The appliance must only be used for
this purpose.
Intended Use
The dust/liquid vacuum appliance has been designed exclusively for the professional cleaning of surfaces and
floors in industrial, commercial and public environments. The appliance is only suitable for use in closed - or at least
covered - environments.
The appliance is not suitable for use in the rain, or under jets of water. IT IS FORBIDDEN to use the
appliance for picking up dangerous dusts or inflammable liquids in places with an explosive atmosphere.
In addition, it is not suitable as a means of transport for people or objects. This appliance should only use
for the purpose for which it was constructed, namely: cleaning inert surfaces, the aspiration of solid non-
flammable and non explosive substances. Any other use is considered improper and dangerous. When the
appliance is operating do not bring it close to delicate organs like ears, mouth, eyes, etc.
Safety
Operator cooperation is paramount for accident prevention. No accident prevention programme can be effective
without the full co-operation of the operator who is directly responsible for machine operation. The majority of
occupational accidents that happen both in the workplace or whilst moving are caused by failure to respect the most
basic safety rules. An attentive, careful operator is most effective guarantee against accidents and is fundamental in
order to implement any prevention programme.
Serial Number Plate
The serial number plate is located at the rear of the vacuum cleaner head,
and indicates the general characteristics of the appliance, in particular the
appliance’s serial number. The serial number is a very important piece of
information and should always be provided together with any request for
assistance or to purchase spare parts.
5

6
Technical Data Unit of
Measure AVac12
Power Supply Volts (V) 115
Frequency Hertz (Hz) 50-60
Rated Power Watts (W) 1100
Quantity of Vacuum Motors Number 1
Type of Vacuum Stage / Discharge Single / Peripheral
Maximum Vacuum Inches of Water (inH20)
Kilopascal (kPa)
96 inH20
24 kPa
Maximum Air Flow Rate Cubic Feet per Minute (CFM)
Cubic Meters per Minute (CMM)
114 CFM
3.5 CMM
Collection Capacity Gallon (gal) / Liter (L) 15.9 gal / 60 L
Tank Material N/A Polyethylene
Cord Length Feet (ft) / Meters (m) 50 ft / 15 m
Dry (Empty) Weight Pounds (lbs)
Kilograms (kg)
41.9 lbs
19 kg
Dimensions (Length X Height X Width) Inches (in)
Centimeters (cm)
17.9 in X 31.5 in X 15.8 in
43 cm X 80 cm X 40 cm
Hose Diameter Inches (in)
Millimeters (mm)
1.50 in
40 mm
Sound Level (ISO 11201) dB(A) 70
Machine Specications

7
CAUTION:
lCarefully read the warnings contained in this booklet and take care of it for further consultations.
lSince the packaging elements (plastic bags, staples, etc.) are a source of danger they should not be left within
the reach of children, disabled persons, etc.
lThis appliance should only use for the purpose for which it was constructed, namely: cleaning inert surfaces, the
aspiration of solid non-flammable and non-explosive substances. Any other use is considered incorrect and hence
dangerous.
l When the appliance is operating do not bring it close to delicate organs like ears, mouth, eyes, etc.
lThis appliance should not be used by people (including children) with physical, sensory or mental disabilities, or
by people with little experience or know-how, unless they have been controlled and instructed in the use of the
appliance by people responsible for their safety.
lChildren must be supervised to ensure they do not play with the appliance.
lCarefully read the labels on the appliance. Do not cover them for any reason and replace them immediately if
they become damaged.
lThe appliance must be only used by authorised, trained personnel.
lDo not use the appliance on surfaces with an inclination greater than the one shown on the serial number plate
lThe appliance is not suitable for cleaning rough or uneven floors. Do not use the appliance on slopes.
lIt is necessary to make sure that the power supply cable or the extension cable do not suffer any damage caused
by the vehicle wheels when moving, by crushing, tearing or the like. Protect the cable from heat, oil and sharp
edges. Regularly check the power cable for any damage such as the formation of cracks, or ageing. If you notice
any damage, the cable must be replaced before using the machine.
lIn the event of danger, immediately remove the plug from the electrical outlet or socket.
lFor maintenance work, switch off the appliance using the main switches and remove the power cable plug from
the electrical outlet.
lWhen using the appliance, pay attention to other people and especially to children.
lUse only the accessories recommended by American Sanders Authorized Distributors. The use of other
accessories could compromise the safety of the appliance.
lWhen the appliance is not being used, it should not be left connected to the electrical outlet and/or power supply.
lBefore doing any maintenance work on the appliance pull out the plug from the electrical outlet and/or power
supply.
lDo not immerse the appliance in water, do not use solvents.
lFor scrapping, follow the regulations in force in the country.
lDo not use the appliance with the power cable twisted around any part of the appliance.
lBefore connecting the appliance to the electricity socket, make sure the electrical information on the serial
number plate corresponds to that of the electrical supply. The appliance must only be powered with a voltage
equal to that shown on the serial number plate.
lWhen the accessory is operating do not bring it close to delicate organs like ears, mouth, eyes, etc.
lThe manufacturer cannot be held liable for any damage to persons, animal or objects deriving from improper and
unreasonable use, and in any event not complying with the instructions mentioned above.
GENERAL SAFETY REGULATIONS
The regulations below must be carefully followed in order to avoid harm to the operator and damage to the appliance.

GROUNDING INSTRUCTIONS:
This appliance must be grounded. If it should malfunction or breakdown, grounding provides a path of least
resistance for electric current to reduce the risk of electric shock. This appliance is equipped with a cord that has
an equipment- grounding conductor and grounding plug. The plug must be inserted into an appropriate outlet that is
properly installed and grounded in accordance with all local codes and ordinances.
WARNING!: Improper connection of the equipment-grounding conductor can result in a risk of electric shock. Check
with a qualified electrician or service person if you are in the doubt as to whether the outlet is properly grounded. Do
not modify the plug provided with the appliance-if it will not fit the outlet, have a proper outlet installed by a qualified
electrician.
Make sure that the appliance is connected to an outlet having the same configuration as the plug. No adapter should
be used with this appliance. If the appliance must be reconnected for use on a different type of electric circuit, the
reconnection should be made by a qualified service personnel.
WARNING:
lThe appliance is not suitable for use by children and persons with reduced physical, mental and sensory
capabilities, or people who lack the required experience and knowledge.
lThe appliance must not be used or kept outdoors, in damp conditions or directly exposed to rain
lThe storage temperature must be between -13°F and 131°F (-25°C and +55°C).
lConditions of use: room temperature between 32°F and 104°F (0°C and 40°C), with relative humidity between
30% and 95%.
lThe power supply cable outlet must have an earth connection in compliance with the regulatory standards.
lDo not use the appliance as a means of transport for people or objects.
lThe appliance does not cause harmful vibrations.
lNever vacuum gas, liquids or explosive or inflammable powders, nor non-diluted acids and solvents! These
include gasoline, paint thinners and fuel oil (which, when mixed with the vacuum air, can form explosive vapours
or mixtures), and also non-diluted acids and solvents, acetones, aluminium and magnesium powders. These
substances may also corrode the materials used to construct the appliance.
lThe appliance must never be used in environments with a potentially explosive atmosphere.
lDo not place any liquid containers on the appliance.
lIn the event of a fire, use a powder extinguisher. Do not use water.
lDo not knock against shelving or scaffolding, where there is a danger of falling objects. The operator using the
appliance should always be equipped with suitable safety devices (gloves, shoes, helmet, goggles, etc.).
lIf the appliance does not work properly, ask for intervention of the authorized technical assistance center.
lIf you need to replace any components, request the ORIGINAL spare parts from an authorized dealer and/or
Retailer.
lRestore all electrical connections after any maintenance interventions.
lBefore using the appliance, check that all the hatches and covers are positioned as shown in this Use and
Maintenance Manual.
lDo not remove the guards that can only be removed with the aid of tools, except for maintenance work (see the
relevant paragraphs).
lDo not wash the appliance with direct water jets or with pressurised water, nor with corrosive substances.
lHave the appliance checked by an authorised technical assistance center every year.
lWhen disposing of consumable materials, observe the laws and regulations in force.
lDust produced from sanding wood or varnish could self ignite causing injury or damage. If this material has
been picked up, empty it immediately after use into a metal container. Never leave sanding dust of any amount
supervised.
lWhen, after years of valuable work, your appliance needs to be finally decommissioned, dispose of the materials
contained within it appropriately, bearing in mind that the appliance is made of fully recyclable materials.
8

Handling the Packaged Machine
Since the packaging elements (plastic bags, staples, etc.) are a potential
source of danger, they should not be left within the reach of children, disabled
persons, etc. The gross weight of the appliance, including packaging, is 36
lbs (16 Kg).
WARNING: Move the packaged product in accordance with legal
legislation requirements regarding accident prevention, the size and
the mass of the packaging itself.
Unpacking the Machine
The procedure for removing the device from its packaging is the following:
1. Open the outer box.
2. Remove the accessories from the box.
3. Remove the vacuum head from its support and rest it carefully on the ground.
WARNING: you are advised to always wear protective gloves, to avoid the risk of serious injury to your hands.
4. Remove the cardboard holding the vacuum head in position.
5. Remove the vacuum hose from the collection tank.
6. Take the machine out of the box, taking care not to damage either of them.
NOTICE: You are advised to keep all the packaging elements for any future transportation of the machine.
Transport Machine
To transport the machine, proceed as follows:
1. Check that the collection tank is empty, and empty it if necessary (see
section “EMPTYING THE COLLECTION TANK”).
2. Press the button (1) in the vacuum nozzle and pull on the vacuum
hose (2) to remove it from the collection tank.
WARNING: Users are advised to always wear protective gloves, to
avoid the risk of serious injury to hands.
3. Insert the machine in the box, taking care not to damage either of
them. Remember to place the machine wheel restraint in the bottom
of the box.
4. Wind the vacuum hose around the collection tank.
5. Close the box.
A16.9 in (430 mm)
B17.9 in (455 mm)
C35.8 in (910 mm)
9

Machine Components - Main
The basic components of the machine are as follows:
1. Collection Tank
2. Float Kit
3. Vacuum Head
4. Nylon Filter Bag (Not Pictured)
Machine Components - Tank
The components of the collection tank are as follows:
1. Rear Wheels 4. Vacuum Hose Release Button
2. Swivel Casters 5. Collection Tank
3. Vacuum Nozzle 6. Vacuum Head Latches
Machine Components - Float
The float kit components are:
1. Float
2. Foam Filter
10

11
Machine Components - Vacuum Head
The basic components of the vacuum head are as follows:
1. Main Switch 4. Power Supply Cable
2. Handle 5. Power Cable Hook
3. Filter Cleaning Button 6. Vacuum Filter
Machine Safety
The stages for making the appliance safe, and thereby allowing all the operations to be carried out in complete safety,
are as follows:
1. Make sure that the collection tank is empty, and empty it if necessary (read the section “EMPTYING THE
COLLECTION TANK”).
WARNING: The place this operation is carried out should comply with current environmental protection
regulations.
2. Make sure the main switch (1) is in the idle “0” position; if not, turn it to this position
3. Check that the plug (2) on the power cable (3) has been taken out of the socket (4) of the electrical outlet and/or
power supply, and if not, disconnect it.
WARNING: To prevent any damage to the electrical outlet and/or power socket, pull out the plug (2) from the
electrical outlet and/or power socket (4) by pulling the plug (2) directly instead of the power cable (3).

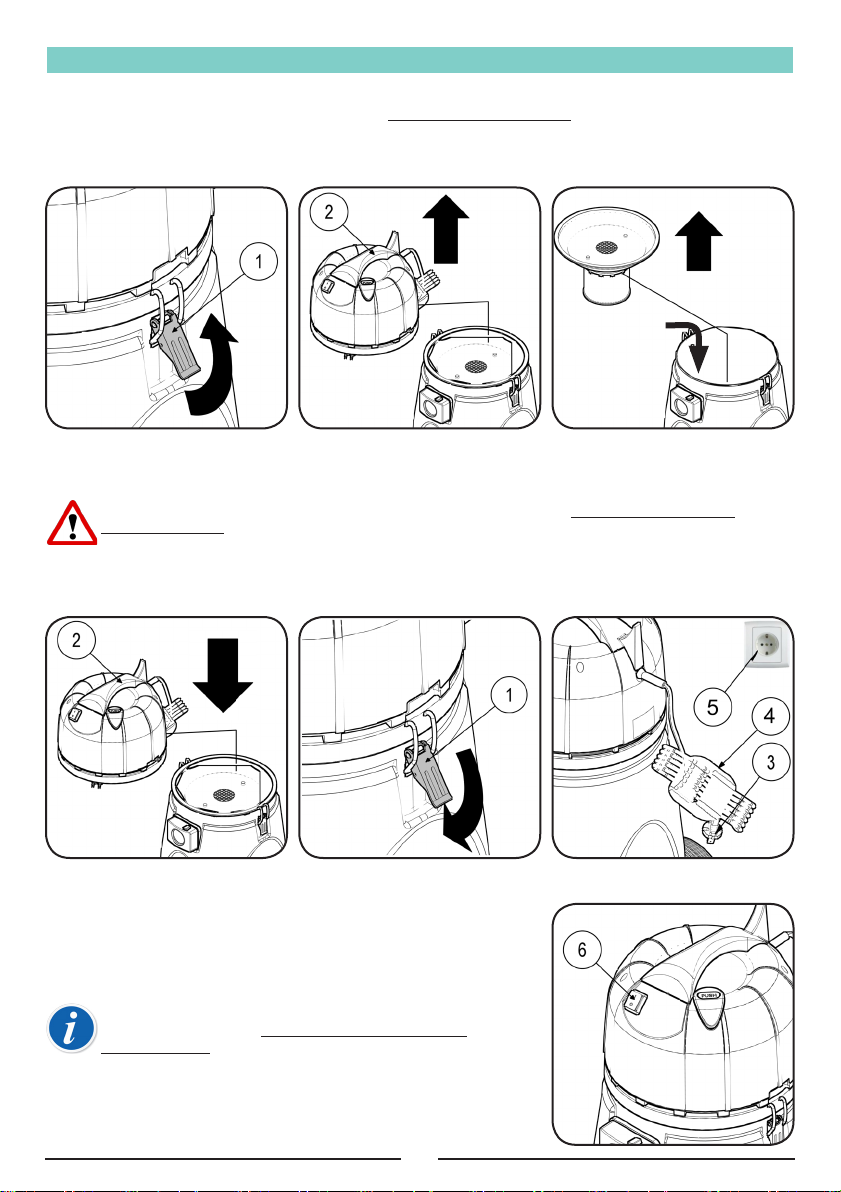
Inserting the Filter / Collection Bag (Optional)
To insert the filter – collection bag inside the collection tank, proceed as follows:
1. Take all necessary steps to ensure that the device is in a safe condition (see “MACHINE SAFETY”).
WARNING: Users are advised to always wear protective gloves, to
avoid the risk of serious injury to hands.
2. Free the vacuum head from the collection tank by releasing the hooks
(1) on the side of the tank. Rotate the levers as shown by the arrow in
the picture on the right.
3. Use the handle (2) on the vacuum head unit to remove it from the
collection tank.
4. Rest the head carefully on the ground.
5. Insert the filter/collection bag in the collection tank, taking care to
insert the filter correctly in the vacuum nozzle without damaging the
cardboard support inside the bag itself.
WARNING: The paper filter/collection bag must only be used for
collecting solid waste.
WARNING: Dust produced from sanding wood or varnish could self ignite causing injury or damage. If this
material has been picked up, empty it immediately after use into a metal container. Never leave sanding dust
of any amount supervised.
12

Preparing the Machine
Before beginning to work, it is necessary to:
1. Before using, the appliance must be in order and safe to use with the work equipment, especially the power
cable and the extension cable. If everything is not in order, the appliance must not be used.
2. Take the necessary steps to secure the machine (see the section “MACHINE SAFETY’”).
3. Press the button (1) on the vacuum nozzle.
4. Insert the vacuum hose (2) in the hole (3) on the vacuum nozzle.
5. Select the most suitable accessory for the task to be carried out (see the section “CHOOSING AND USING
THE ACCESSORIES”).
6. Select the most suitable extension for the type of work to be carried out.
7. Insert the extension in the nozzle on the vacuum hose.
8. Connect the female part of the extension to the male part.
9. Insert the accessory.
WARNING: Never use the machine without the right filter for the type of work being carried out.
WARNING: Do not use an extension cord with the AVac12 or you will experience a loss in performance.
Should an extension cord be necessary, use one sized 12 AWG and no longer than 50 feet (15 meters)
in length. An extension cord sized smaller than 12 AWG or greater than 50 feet (15 meters) in length will
overheat and potentially cause a fire.
WARNING: This appliance must be grounded. Should an electrical malfunction occur, the grounding
conductors provide a path to harmful current. Do not connect this appliance to any other wall outlet than one
of those shown in figure 4. Consult an electrician if there is reason to doubt that the wall outlet is not wired
correctly. Do not remove the grounding pin on the power cord. Do not use this appliance with a damaged
power cord or plug.
13
14
Using the Machine - Dry
To start working, proceed as follows:
1. Perform all the checks indicated in the section “PREPARING THE MACHINE”.
2. Free the vacuum head from the collection tank by releasing the hooks (1) on the side of the tank. Rotate the
levers as shown by the arrow in the picture on the right.
3. Use the handle (2) on the vacuum head unit to remove it from the collection tank.
4. Rest the head carefully on the ground.
5. Remove the float unit from the collection tank and install the nylon filter bag around the top of the collection
tank.
WARNING: If you are using the paper filter/collection bag, see the section “INSERTING THE FILTER/
COLLECTION BAG”.
6. Place the float unit back into the collection tank, on top of the nylon filter bag to hold it in place.
7. Use the handle (2) on the vacuum head unit to position it above the collection tank. Make sure the machine’s
power supply cable is in the rear part of the tank.
8. Fix the vacuum head to the collection tank by coupling the hooks (1) on the side of the tank. Rotate the levers
as shown by the arrow in the picture on the right.
9. Insert the plug (3) of the power supply cable (4) in the electrical outlet
and/or power socket (5).
10. Switch on the machine by bringing the main switch (6) to the work
position “I”.
11. Carry out the cleaning work.
NOTICE: If the vacuuming intensity diminishes while you are
working, see the section “IMPROVING THE VACUUMING
PERFORMANCE”.
Nylon
Filter Bag

15
Using the Machine - Wet
To start working, proceed as follows:
1. Perform all the checks indicated in the section “PREPARING THE MACHINE”.
2. Free the vacuum head from the collection tank by releasing the hooks (1) on the side of the tank. Rotate the
levers as shown by the arrow in the picture on the right.
3. Use the handle (2) on the vacuum head unit to remove it from the collection tank.
4. Rest the head carefully on the ground.
5. Make sure the float unit is inserted in the collection tank. If this is not the case, position it correctly.
WARNING: There must be no solid waste residue inside the collection tank.
6. Use the handle (2) on the vacuum head unit to position it above the collection tank. Make sure the machine’s
power supply cable is in the rear part of the tank.
7. Fix the vacuum head to the collection tank by coupling the hooks (1) on the side of the tank. Rotate the levers
as shown by the arrow in the picture on the right.
8. Insert the plug (3) of the power supply cable (4) in the electrical outlet and/or power socket (5).
9. Switch on the machine by bringing the main switch (6) to the work
position “I”.
10. Carry out the cleaning work.
NOTICE: If the vacuuming intensity diminishes while you are
working, see the section “IMPROVING THE VACUUMING
PERFORMANCE”.
The machine is fitted with a mechanical device (float) under the vacuum
lid. When the collection tank is full, this device shuts off the air to the
vacuum motor to protect it; you will recognise this condition by the deeper
noise made by the motor. When you hear this sound, you must empty the
collection tank (see the section “EMPTYING THE COLLECTION TANK”)

Improving the Vacuum Performance
If the vacuuming performance diminishes while you are working, proceed as
follows:
1. With the accessory in contact with the ground, quickly press the button
(1) on the vacuum head 3 or 4 times.
2. Continue working.
If the above procedure doesn’t produce a good result, proceed as follows:
1. Switch the machine off via the main switch (2) on the vacuum head (bring the switch to “0”).
2. Press the button (3) on the vacuum nozzle (4).
3. Remove the vacuum hose from the hole (6) on the vacuum nozzle.
4. Switch the machine on via the main switch (2) on the vacuum head (bring the switch to “I”).
5. Close the hole on the vacuum nozzle (4) with one hand, and quickly press the button (1) on the vacuum head 3
or 4 times.
6. Switch the machine off via the main switch (2) on the vacuum head (bring the switch to “0”).
7. Press the button (3) on the vacuum nozzle (4).
8.. Insert the vacuum hose in the hole (6) on the vacuum nozzle
9. Continue working.
If the above procedure doesn’t produce a good result proceed as indicated in the section “INSUFFICIENT
VACUUM” in the chapter titled “TROUBLESHOOTING”.
16

Post Operation
At the end of the work, and before carrying out any type of maintenance, perform the following operations:
1. Take the necessary steps to secure the machine (see the section “MACHINE SAFETY”).
2. Take the appliance to the designated place for emptying the collection tank.
3. Empty the collection tank (see the section “EMPTYING THE COLLECTION TANK”).
WARNING: The place this operation is carried out should comply with current environmental protection
regulations.
4. Remove the accessory from the extension. Clean it under running water and place it in the object-holder pocket.
5. Remove the female part of the extension from the male part. Clean it under running water and place it in the
object-holder pocket.
6. Remove the extension from the nozzle in the vacuum hose. Clean it under running water and place it in the
object-holder pocket.
7. Press the button (5) on the vacuum nozzle.
8. Remove the vacuum hose from the hole (6) on the vacuum nozzle. Clean it under running water and wind it
around the handlebar.
9. Take the machine to its designated storage place.
WARNING: Park the machine in an enclosed place, on a flat surface. There must be no objects nearby that
could either damage it, or be damaged through contact with it.
WARNING:To reduce the risk of fire, electric shock, or injury:
lDo not use where explosive vapors, such as gas, solvents, alcohol, fuels, or combustible materials such
as grain, wood dust, are present in the air. Keep the work area well ventilated.
lDust produced from sanding wood or varnish could self ignite causing injury or damage. If this material
has been picked up, empty it immediately after use in a metal container.
lDo not use to pick-up health endangering dust.
17

DAILY MAINTENANCE
PERFORM ALL MAINTENANCE OPERATIONS IN SEQUENCE
Emptying the Collection Tank
To empty the collection tank of solid waste, proceed as follows:
1. Take the appliance to the designated place for emptying the collection tank.
2. Take the necessary steps to secure the machine (see the section “MACHINE SAFETY”).
WARNING: You are advised to always wear protective gloves, to avoid the risk of serious injury to your hands.
3. Free the vacuum head from the collection tank by releasing the hooks (1) on the side of the tank. Rotate the
levers as shown by the arrow in the picture on the right.
4. Use the handle (2) on the vacuum head unit to remove it from the collection tank.
5. Rest the head carefully on the ground.
6. Using the handle, rotate the collection tank until the handle is touching the ground.
7. Remove the dirt from the collection tank.
NOTICE: Remember to place the dirt collection container on the ground before emptying out the dirt.
8. Repeat the operations in reverse order to reassemble all the parts
WARNING: Dust produced from sanding wood or varnish could self ignite causing injury or damage. If this
material has been picked up, empty it immediately after use into a metal container. Never leave sanding dust
of any amount supervised.
18

Remove Paper Bag
To remove the paper filter/collection bag, proceed as follows:
1. Take the appliance to the designated place for emptying the collection tank.
2. Take the necessary steps to secure the machine (see the section “MACHINE SAFTEY”).
WARNING: You are advised to always wear protective gloves, to avoid the risk of serious injury to your hands.
3. Free the vacuum head from the collection tank by releasing the hooks (1) on the side of the tank. Rotate the
levers as shown by the arrow in the picture on the right.
4. Use the handle (2) on the vacuum head unit to remove it from the collection tank.
5. Rest the head carefully on the ground.
6. Taking care not to tear the paper bag, remove it from inside the collection tank.
WARNING: The filter/collection bag must only be changed when it is half full.
WARNING: Dust produced from sanding wood or varnish could self ignite causing injury or damage. If this
material has been picked up, empty it immediately after use into a metal container. Never leave sanding dust
of any amount supervised.
19

Cleaning the Vacuum Accessories
Accessories in a good condition guarantee better suction and cleaning of the floor as well as a longer vacuum motor
life. To clean the accessories, proceed as follows:
1. Take the machine to the maintenance area.
2. Take the necessary steps to secure the machine (see the section “MACHINE SAFETY”).
WARNING: You are advised to always wear protective gloves, to avoid the risk of serious injury to your hands.
3. Remove the accessory from the extension. Clean it under running water and place it in the object-holder
pocket.
4. Remove the female part of the extension from the male part. Clean it under running water and place it in the
object-holder pocket.
5. Remove the extension from the nozzle in the vacuum hose. Clean it under running water and place it in the
object-holder pocket.
6. Press the button (1) on the vacuum nozzle.
7. Remove the vacuum hose (2) from the hole on the vacuum nozzle (3).
8. Clean the vacuum hose under running water to remove any objects that might prevent the accessory from
working properly.
9. Repeat the operations in reverse order to reassemble all the parts.
20
Table of contents
Other Amano Vacuum Cleaner manuals


