AMAZONAS Carry Sling User manual

CARRY Sling
Wickelkreuztrage
Wrap Cross Carry
Croisé enveloppé
Portabebé cruzado
Incrociato fasciante
Kietaisuristi
A[h[ipjačjđXWXW^ehZepċA_[ipedaW3cmYb]Yù_eYfgÇbT_eYfgJ_dWcW_iib_d]i32
1
5B 6a
10
6b
11 12
4a
7
13
4b
8
14 15
16 17 18 19
5a
9

Nehmen Sie das Tuch, falten Sie es auf und suchen Sie sich die Mitte. Fassen Sie mit beiden Händen die obere Kante und legen Sie das Tuch von vorne nach hinten wie eineSchürze um Ihren Bauch. Das Tuch hinter Ihrem Rücken mit der linken Hand greifen und fassen Sie mit der rechten Hand von unten in den entstandenen Rock, um die Tuchbahnen zu kreuzen und diese breit auseinander ziehen. Die obere Kante mit den Händen umgreifen.Nun die Tuchbahnen von hinten nach vorne über die Schulter zu legen. Raffen Sie auf beiden Seiten die gesamte Stoffbreite zum Hals hin, ohne das Tuch dabei zu verdrehen. Die am Bauch entstandene Schärpe von den Oberschenkeln nach oben raffen, so dass die Tuchbahn imBereich des Bauchnabels körpernah verläuft. Kontrollieren Sie ob beide Tuchenden gleich lang sind undkorrigieren Sie entsprechend. Lockern Sie die geraffte Tuchbahn um Ihren Bauch etwas, nehmen Sie Ihr Baby auf und legen es auf eine Schulter. Die über Ihre Schultern verlaufenden Tuchbahnen jeweils nach links und rechts außen schieben, so dassdiese nicht unter dem Baby festgeklemmt werden. Lassen Sie Ihr Baby nun bis zur sogenannten „Kopfkusshöhe“ in die Tuchbahn um Ihren Bauch rutschen. Raffen Sie an der unteren Tuchkante beginnend die Überlänge des Stoffs mit der rechten Hand in dieKniekehlen Ihres Babys, so dass seine Füßchen frei liegen, und schieben Sie den dann nach oben Richtung Bauchnabel des Babys. Ziehen sie die obere Tuchkante über Arme und Kopf Ihres Babys so nach oben, dass eine Mütze ent-steht. Bei Babys, die ihren Kopf bereits selbständig halten können reicht es, das Tuch bis unter die Armedes Kindes nach oben zu ziehen. Anschließend den Stoff zurück in den Nackenbereich schieben.Nehmen Sie die Tuchbahn auf ihrer linken Schulter mit der linken Hand an der Innenkante und ziehensie das gesamte Tuch schrittweise in drei bis fünf Phasen fest, so dass sich das Tuch individuell an denRücken Ihres Babys anpasst. Halten Sie diese Tuchbahn unter Spannung und ziehen Sie auch auf der anderen Seite das Tuch schrittweise in drei bis fünf Phasen fest. Nun ziehen Sie beide Tuchbahnen unter Bewegung Ihrer Hüften nach oben und legen diese über dieSchultern nach vorne wie es für Sie angenehm ist. 6b
6a
5b
5a
16
4b
15
14
13
12
11
10
9
8
7
4a
3
2
1
„Wickelkreuztrage“ CarrySling
www.amazonas-online.de
D

Kreuzen Sie beide Tuchbahnen unterhalb des Babypopos und führen sie zwischen Babys Beinchen undIhrem Körper nach hinten auf den Rücken. Fixieren Sie die beiden Tuchenden mit einem doppelten Knoten. Überprüfen Sie nun noch einmal, ob für Sie beide alles angenehm gebunden ist und schieben Sie dieKnie Ihres Babys nach oben, so dass sie in Höhe des Bauchnabels Ihres Babys zum liegen kommen.Zum Ausziehen des Tuches jeweils die flache Hand von hinten durch die über die Schulter verlaufendenTuchbahnen hindurch schieben und den Stoff nach unten gleiten lassen. Im Anschluss daran die waagrechtverlaufende Tuchbahn nach unten schieben, bis die Füße Ihres Babys frei liegen. Sollte Ihr Baby eingeschlafensein, beugen Sie Ihren Oberkörper nach vorne, legen Ihr Baby ab und decken es ggf. zu. So wird Ihr Babynormalerweise weiterschlafen. Erst jetzt das gesamte Tuch nach vorne drehen um den Knoten zu öffnenund das Tuch komplett auszuziehen. 17
19
18
www.amazonas-online.de

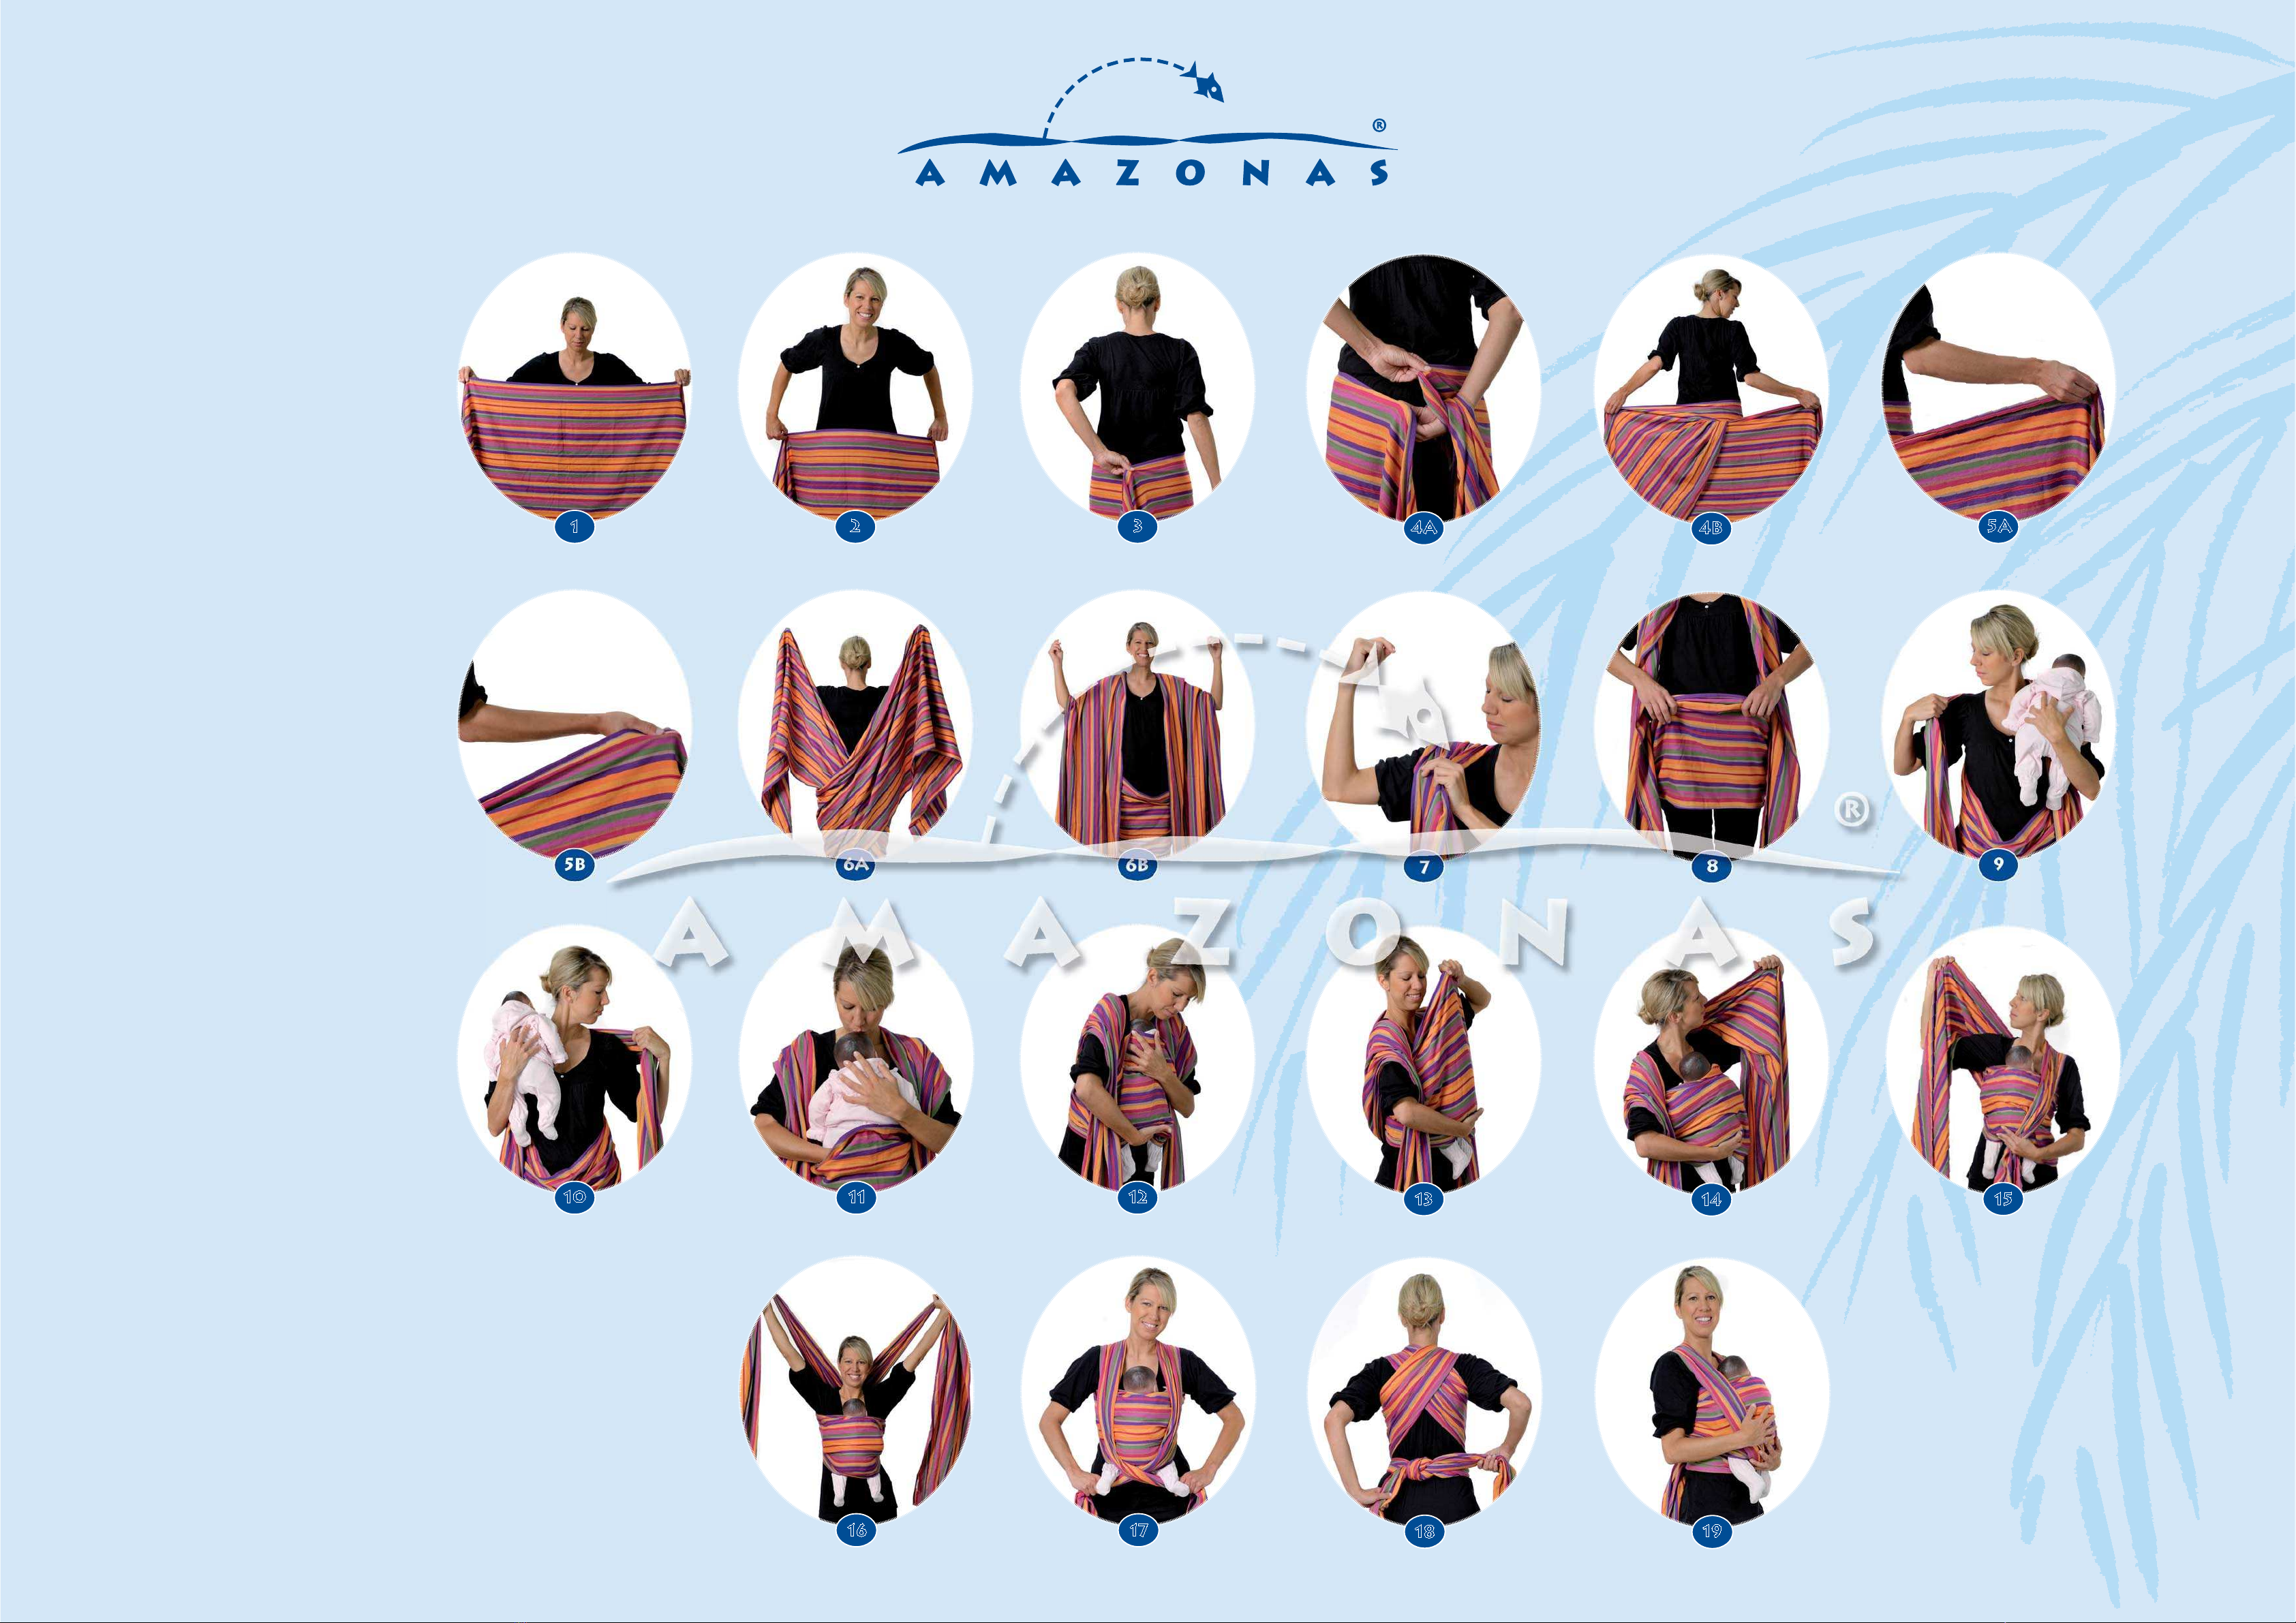
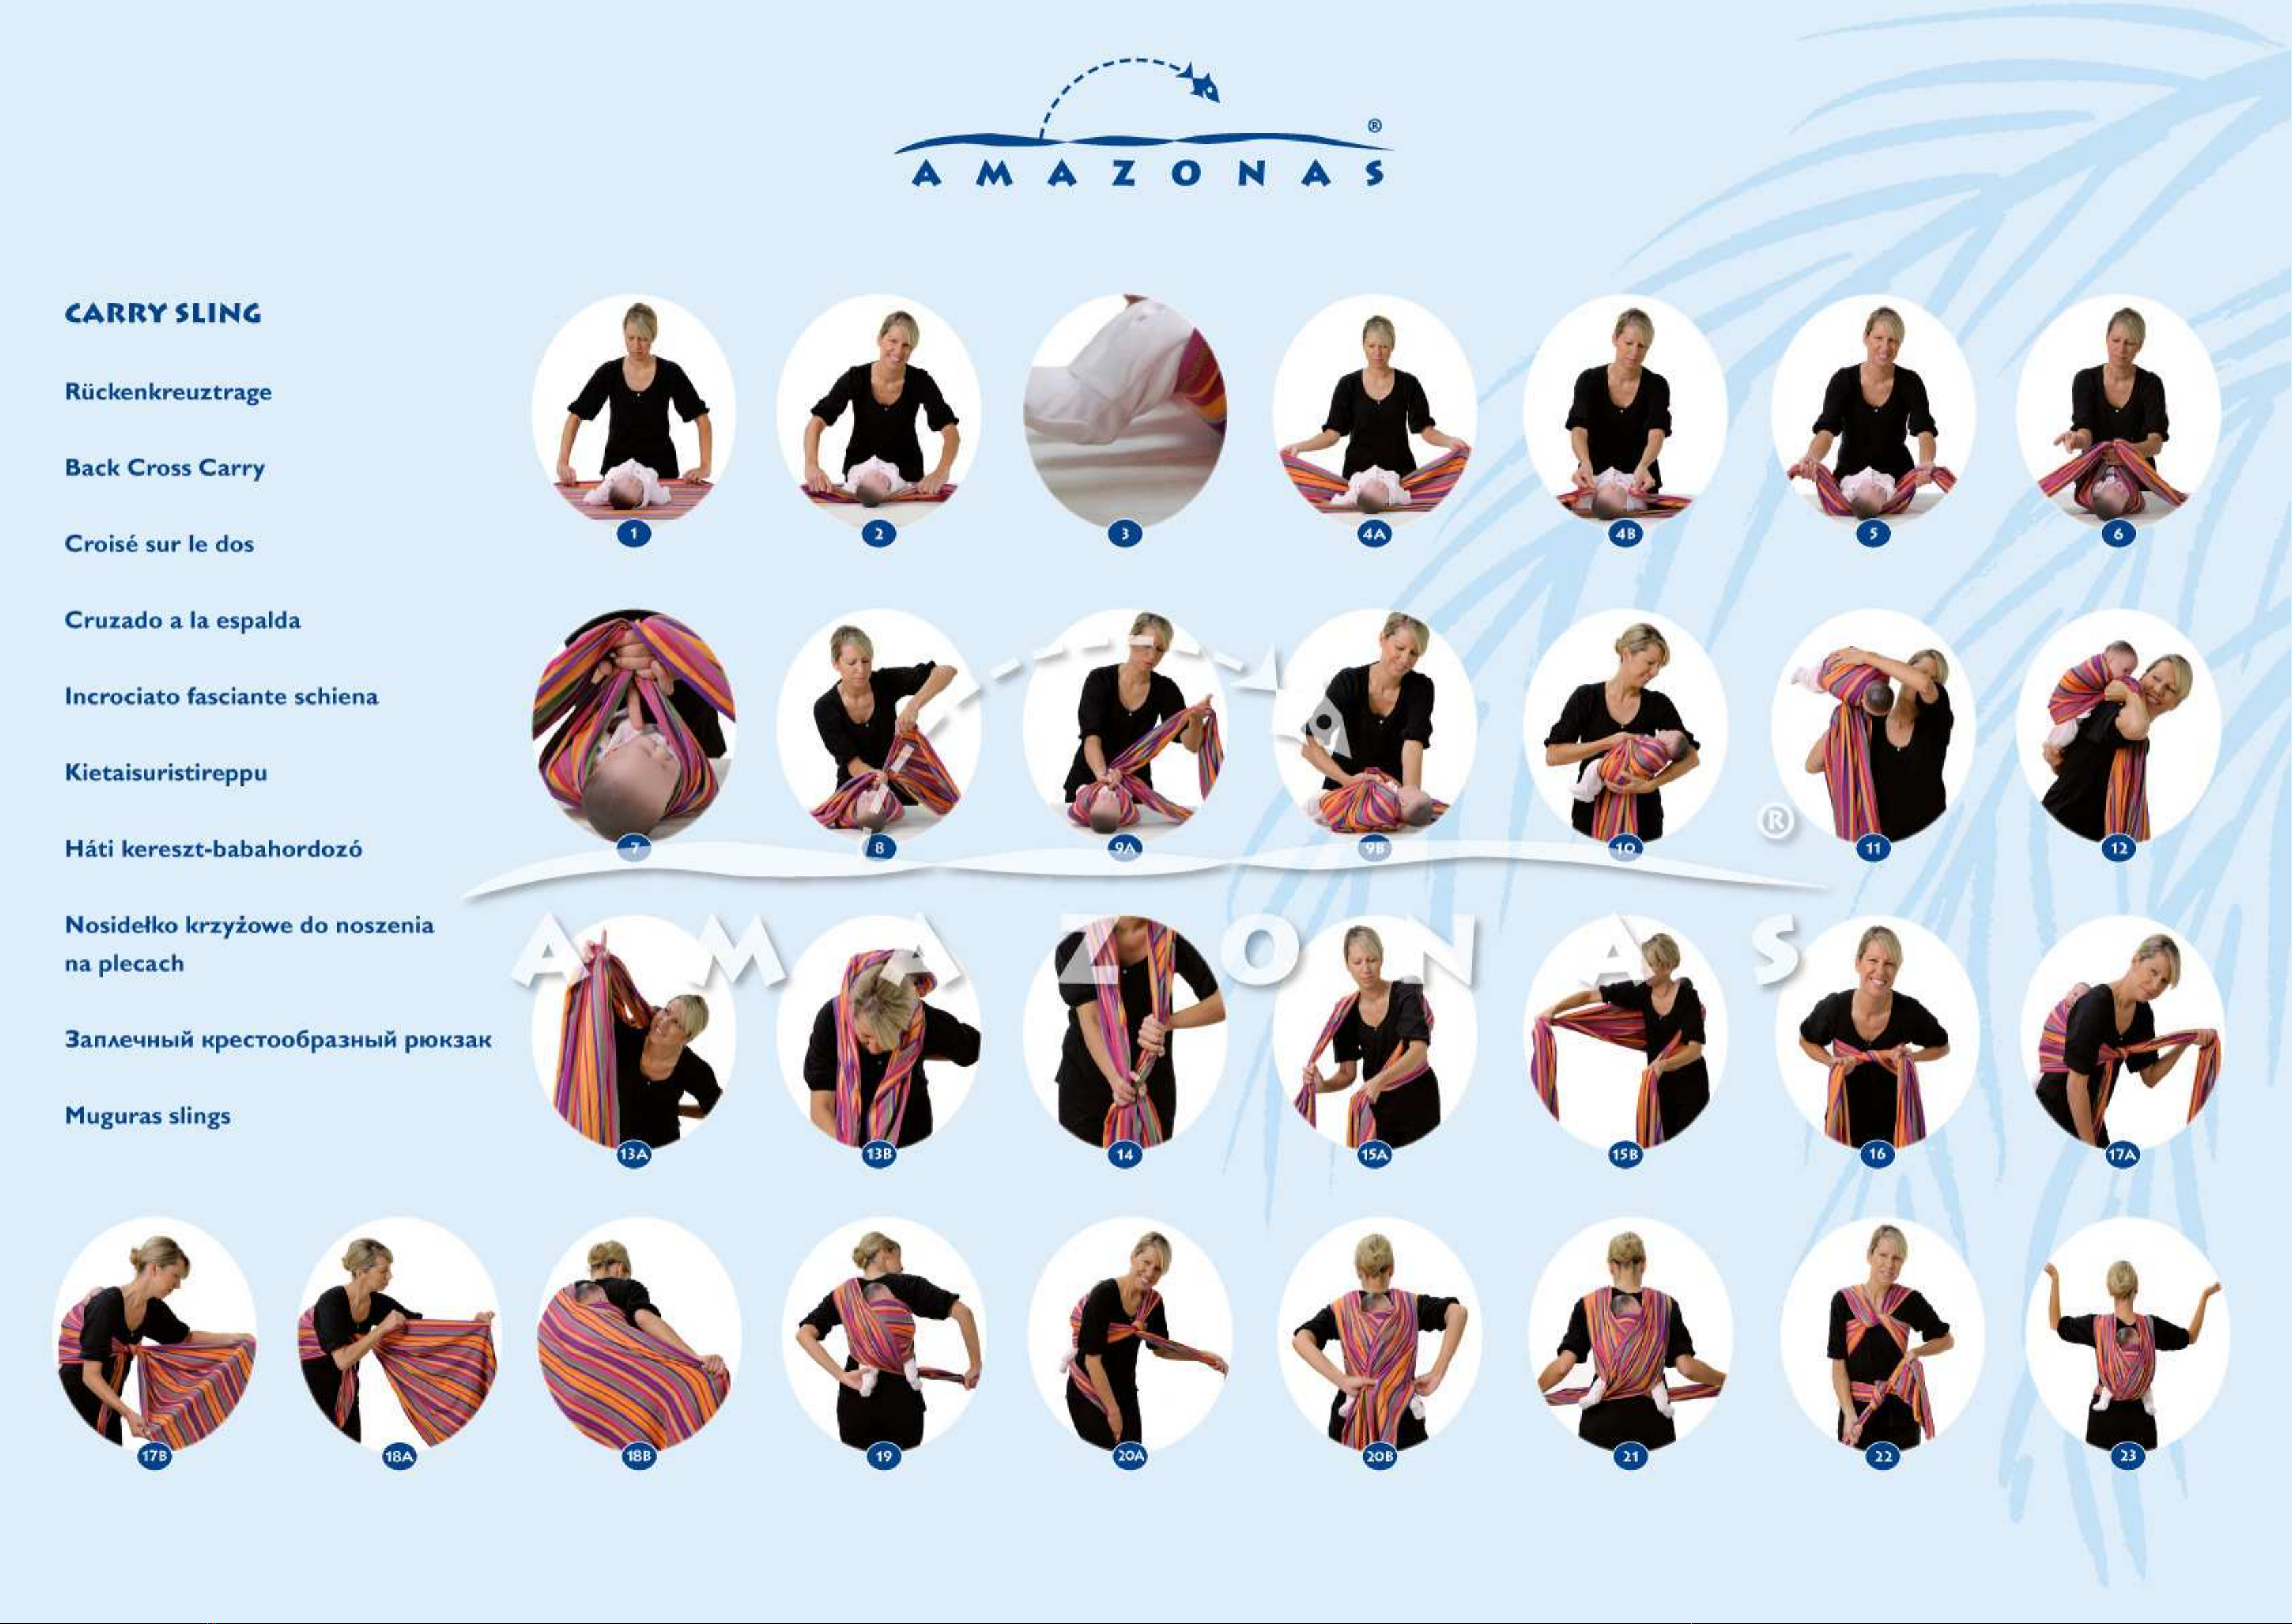
Take the cloth, unfold it and look for the middle. Take the upper edge with both hands, and place the cloth around your belly from the front to the rear,like an apron. Hold the cloth with the left hand behind your back, and……with the right hand pull from below into the emerging skirt in order to cross the cloth strips andpull these widely apart. Grasp the upper edge with the hands. Now place the cloth strips from the rear forward over the shoulder. Gather the entire width of material on both sides up towards the throat, without twisting the clothwhile doing so. Gather the emerging sash from the thighs upwards so that the cloth strip runs near the body in thearea of the navel. Check whether both cloth ends are the same length and correct them accordingly. Loosen the cloth strip gathered around your belly a bit. Pick up your baby and place it on a shoulder. Always push cloth strips running around your shoulders outwardly to the left and right so that thesewill not be jammed under the baby. Now let your baby slide to the so-called “head kiss height” in the cloth strip around your belly. Starting with the over-length of the material, gather the lower cloth edge with the right hand in thehollows of your baby’s knees so that its feet are exposed, and then stuff it upwardly in the direction ofthe baby’s navel. Pull the upper cloth edge upwardly over the arms and head of your baby so that a cap is formed. Withbabies which can already hold up their head on the own, it is enough to pull the cloth upwardly underthe child’s arms. Afterwards, move the material back into the neck area. Take the cloth strip on your left shoulder with the left hand on the inner edge, and tighten the entirecloth gradually in three to five phases so that the cloth adjusts individually to your baby’s back. Keep this cloth strip under tension, and also tighten the cloth on the other side gradually in three tofive phases. Now pull both cloth strips upward by moving your hips, and place these forward over the shoulders, as it is pleasant for you. Cross both cloth strips underneath the baby’s bottom, and guide them between the baby’s legs and behind your body on the back. 17
16
15
14
13
12
11
10
9
8
7
6b
6a
5b
5a
4b
4a
3
2
1
“Wrap Cross Carry” CarrySling
www.amazonas-online.de
gb

Fasten the two cloth ends with a double knot. Check once again whether everything is pleasantly tied for both of you, and shove your baby’s kneesupward so that they come to rest at the height of your baby’s navel. To take the cloth off, always take the flat hand from behind through the cloth strips running over the shoulder and let the material glide downward. Afterwards, move the horizontally running cloth stripdownward until your baby’s feet are exposed. If your baby has fallen asleep, bend your upper body forward, lay your baby down and cover it up if necessary. Your baby will normally continue to sleep. Onlynow should you turn the entire cloth forward in order to open the knot and to completely take off thecloth. 18
19
www.amazonas-online.de


Legen Sie das Tuch auf den Boden oder einen Tisch (Fläche ca. 1,50m) in der ganzen Breite mittig vorsich und legen Sie Ihr Baby mittig auf das Tuch.Raffen Sie an der oberen Tuchkante beginnend die Überlänge des Stoffs in den Nacken Ihres Babys. An der unteren Tuchkante beginnend raffen Sie die Überlänge des Stoffs in die Kniekehlen Ihres Babys. Fassen Sie in der Breite links und rechts von Ihrem Baby die untere Tuchkante so, dass sie mit der Tuchbahn bis nach oben zu den Ohren des Babys greifen können. Raffen Sie auf beiden Seiten die gesamte Stoffbreite in Ihre Hände. Nehmen Sie nun beide Tuchbahnen in Ihre linke Hand und kontrollieren Sie, dass es keine Verdrehungen in dem Tuch gibt. Greifen Sie mit der rechten Hand, Handfläche nach oben und Zeigefinger Richtung Gesicht des Babyszwischen die beiden Tuchbahnen. Eine Tuchbahn soll somit zwischen dem Daumen und dem Zeigefingerliegen. Die andere soll zwischen den restlichen drei Fingern und dem Zeigefinger zum Liegen kommen.Ziehen Sie beide Tuchbahnen phasenweise fest und achten Sie darauf, dass die untere Tuchkante straffin den Kniekehlen des Babys verläuft, da diese Ihr Baby später halten wird. Legen Sie die beiden Tuchbahnen auf die linke Körperseite Ihres Babys und kontrollieren Sie mit derlinken Hand ob die Knie Ihres Babys gemäß der Anhock-Spreiz-Haltung angezogen sind. Heben Sie mit der rechten Hand Ihr Baby auf den linken Unterarm. Ihr Baby mit den Füßchen voraus über die rechte Schulter legen und mit der linken Hand hinter IhremRücken nach den Füßchen greifen. Führen Sie Ihr Baby nach unten zwischen die Schulterblätter und lassen Sie dabei mit dem Zeigefingerder rechten Hand die beiden geteilten Tuchbahnen nachrutschen. Lassen Sie Ihr Baby keinesfalls los undsichern Sie es mit Ihrer linken Hand auf dem Rücken! Tauchen Sie mit Ihrem Kopf durch die Lücke der beiden Tuchbahnen, so dass eine Tuchbahn auf Ihrerlinken und eine auf Ihrer rechten Schulter zum Liegen kommt. Halten Sie das Tuch unter Spannung und greifen Sie mit dem Daumen nach unten und der Handinnenfläche nach außen jeweils eine Tuchbahn von der Innenseite. Führen Sie diese Tuchbahn nach außen und unterhalb Ihres Armes wieder zurück nach vorne. Wiederholen Sie diesen Vorgang auf der anderen Seite. Es ist wichtig, dass Sie das Tuch dabei auf Spannung halten, damit Ihr Baby nicht unter der Tuchbahn rausrutschen kann. Fixieren Sie die beiden Tuchenden mit einem einfachen Knoten vor Ihrer Brust. Klemmen Sie die rechte Tuchbahn zwischen Ihre Beine und fächern Sie die linke Tuchbahn auf.
17b
17a
15b
16
15a
13b
9b
4B
14
13a
5
12
11
10
9a
8
7
6
4A
3
2
1
„Rückenkreuztrage“ CarrySling
www.amazonas-online.de
D

Umschließen Sie die innere Tuchkante mit der linken Hand. Diese Tuchkante als obere Kante nehmenund mit der linken Hand die Tuchbahn nach hinten um den Körper herum führen, um sie dort mit derrechten Hand zu übernehmen und wie eine Jacke über die linke Schulter zu ziehen. Achten Sie darauf,dass die Tuchbahn am Kopf Ihres Babys vorbeiläuft. Straffen Sie die Tuchbahn in Höhe der Kniekehlen Ihres Babys, um eine gleichmäßige Spannung zu erzeugen und führen Sie die Tuchbahn unterhalb des rechten Beinchens an Ihrem Körper vorbei nach vorne. Diese Tuchbahn nun zwischen Ihren Beinen fixieren und mit der anderen Tuchbahn spiegelverkehrt verfahren, d.h. breiten Sie die rechte Tuchbahn auf und umschließen Sie die innere Tuchkante mit Ihrerrechten Hand. Diese Tuchkante als obere Kante nehmen und mit der rechten Hand die Tuchbahn nach hinten um den Körper herum führen um sie dort mit der linken Hand zu übernehmen und wie eine Jacke über die rechte Schulter zu ziehen. Achten Sie darauf, dass die Tuchbahn am Kopf Ihres Babys vorbeiläuft.Straffen Sie die Tuchbahn in Höhe der Kniekehlen Ihres Babys, um eine gleichmäßige Spannung zu rzeugen und führen Sie die Tuchbahn unterhalb des linken Beinchens an Ihrem Körper vorbei nach vorne. Die beiden Tuchbahnen vor Ihrem Körper mit einem doppelten Knoten fixieren. Überprüfen Sie noch einmal, ob für Sie beide alles angenehm gebunden ist und es keine Verdrehungengibt, denn diese können Druckstellen verursachen. Bei Bedarf den Knoten etwas weiten.Zum Ausziehen des Tuches den Knoten vor Ihrem Bauch öffnen und das Tuch unter Vorlehnen Ihres Körpers soweit ausziehen, dass Sie nur noch den einfachen Knoten vor Ihrer Brust geschlossen haben.Greifen Sie diesen Knoten mit einer Hand um Ihr Baby unter der Schulter und um den eigenen Körperherum nach vorne zu ziehen. Im Anschluss daran die um Ihr Baby verlaufende Tuchbahn nach unten schieben, bis die Füße Ihres Babys frei liegen. Sollte Ihr Baby eingeschlafen sein, beugen Sie Ihren Oberkörper nach vorne, legen Ihr Baby ab und deckenes ggf. zu. So wird Ihr Baby normalerweise weiterschlafen. Erst jetzt das gesamte Tuch nach vorne drehen,um den Knoten zu öffnen und das Tuch komplett auszuziehen.
20b
20a
18b
18a
23
22
21
19
www.amazonas-online.de

Place the cloth in front of you (centred in the entire width) on the floor or a table (area ca. 1.50 m),and place your baby in the middle of the cloth. Gather the upper cloth edge, starting with the over-lengths of material in the area of your baby’s neck. Starting on the lower cloth edge, gather the over-lengths of material in the hollows of your baby’s knees. Hold the lower cloth edge in the width to the left and right of your baby so that you can pull upwardlywith the cloth strip to your baby’s ears. Gather the entire width of material on both sides in your hands. Now take both cloth strips in your left hand and make sure that there are no twists in the cloth. With the palm of the right hand and index finger, grab upward between the two cloth strips in the direction of the baby’s face. One cloth strip should lie between the thumb and the index finger as a result. The other should come to rest between the remaining three fingers and the index finger.Tighten both cloth strips in stages, and make sure that the lower cloth edge runs taut in the hollows of your baby’s knees, since this will hold your baby later. Place the two cloth strips on the left side of your baby’s body and check with the left hand whetheryour baby’s knees are drawn up in accordance with the “straddle-tuck” position. With the right hand, lift your baby onto the left forearm. Place your baby feet-forward over the right shoulder, and grab the feet with the left hand behind your back. Guide your baby downward between the shoulder blades, and while doing so let the two separatedcloth strips slip down with the index finger of the right hand. Do not let go of your baby under any circumstances, and secure it with your left hand on the back! Dip with your head through the gaps of the two cloth strips so that one cloth strip comes to rest on your left shoulder and one on your right shoulder. Hold the cloth under tension, and with the thumb downward and the inner palm of the hand facingoutward, always grab one cloth strip from the inside. Guide this cloth strip outwardly and back forward again underneath your arms. Repeat this procedureon the other side. It is important that while doing so you keep the cloth under tension so that your baby cannot slide out under the cloth strip. Fasten the two cloth ends in front of your breast with a simple knot. Tuck the right cloth strip between your legs and spread out the left cloth strip.
17b
17A
15b
16
15A
13A
13b
9b
9A
4b
4A
14
5
12
11
10
8
7
6
3
2
1
“Back Cross Carry” CarrySling
www.amazonas-online.de
gb

Clasp the inner cloth edge with the left hand. Take this cloth edge as the upper edge, and with the lefthand guide the cloth strip backward around the body in order to take over there with the right hand and to pull it over the left shoulder like a jacket. Make sure that the cloth strip runs past your baby’s head. Tighten the cloth strip at the height of the hollows of your baby’s knees in order to generate consistent tension, and guide the cloth strip beneath the right leg forward past your body. Now fix this cloth strip between your legs and proceed in reverse order with the other cloth strip, i.e. spread out the right cloth strip and grasp the inner cloth edge with your right hand. Take this cloth edge as the upper edge, and with the right hand guide the cloth strip backward around the body in order to take over there with the left hand and to pull it over the right shoulder like a jacket. Make sure that the cloth strip runs past your baby’s head. Tighten the cloth strip at the height of the hollows of your baby’s knees in order to generate consistent tension, and guide the cloth strip beneath the right leg forward past your body. Fasten the two cloth strips in front of your body with a double knot. Check once again whether everything is pleasantly tied for both of you and there are no twists, sincethese can cause tender spots. If necessary widen the knot a bit. To take the cloth off, open the knot in front of your belly and take the cloth off by leaning your body so farforward that you only have the simple knot closed in front of your breast. Grab this knot (with one handaround your baby) under the shoulder and pull it forward around your own body. After that, move thecloth strip running around your baby’s body downward until your baby’s feet are exposed.If your baby has fallen asleep, bend your upper body forward, lay your baby down and cover it up if necessary. Your baby will normally continue to sleep. Only now should you turn the entire cloth forward in order to open the knot and to completely take off the cloth.
20b
20a
18b
18A
23
22
21
19
www.amazonas-online.de


Falten Sie das Tuch einmal der Länge nach, so dass die offene Seite oben liegt. Die Mitte des Tuches liegtauf Ihrer Schulter.Knoten Sie die Tuchenden auf Ihrer Hüfte.Ziehen sie dabei an den gegenüberliegenden Kanten, um den überflüssigen Stoff aus dem Knoten zu ziehen.Verknoten Sie nun die beiden Tuchenden zu einem flachen Knoten und schieben Sie diesen dann nachhinten auf Ihren Rücken, so dass er auf der unteren Hälfte des Schulterblattes liegt. Falten Sie das Tuch vorne auf und nehmen Sie dann Ihr Baby auf.Lassen Sie Ihr Baby über Ihre Schulter zuerst mit den Beinchen und dann mit Rücken und Kopf in dasTuch gleiten.Wenn Sie die innere Tuchbahn noch etwas nach oben ziehen, liegt das Baby wie in einem Nest.Positionieren Sie nun Ihre Baby vor Ihrem Bauch oberhalb Ihres Bauchnabels.Um die Tuchkanten optimal zu spannen, ziehen Sie die obere Kante über Ihre Schulter.Sicher und bequem für Mama und Baby.TIPP: Sie können den Knoten im Tuch lassen, so dass Sie es beim nächsten Tragen einfach nur überziehenmüssen!10
9
8
7
6
5
4
3
2
1
„Die Wiege“ CarrySling
www.amazonas-online.de
D

Fold the cloth once lengthwise so that the open side is above. The middle of the cloth lies on yourshoulder. Knot the cloth ends around your hip.At the same time, pull the opposite edges in order to pull the superfluous material from the knots. Now knot the two cloth ends into a flat knot, and then shove this backward on your back so that itlies on the lower half of your shoulder blade.Unfold the cloth forward and then pick up your baby. Let your baby slide over your shoulder – first with the legs, and then with the back and head – into the cloth. If you pull the inner cloth strip slightly upward, your baby will lie as if in a nest. Now position your baby in front of your stomach, above your navel. In order to optimally tighten the cloth edges, pull the upper edge over your shoulder. Safe and comfortable for mama and baby! TIP: You can leave the knots in the cloth so that you simply have to slip it over during the next carrying! 1
10
9
8
7
6
5
4
3
2
“The Cradle” CarrySling
www.amazonas-online.de
GB


Nehmen Sie das Tuch, falten Sie es auf und suchen Sie sich die Mitte. Fassen Sie das Tuch an der oberen Kante und legen es über Ihren langgestreckten rechten Arm. Raffen Sie mit Ihrer linken Hand die gesamte Stoffbreite zum Hals hin und achten Sie darauf, das Tuchdabei nicht zu verdrehen. Greifen Sie mit der rechten Hand die vordere innere Tuchkante und suchen mit der linken Hand dasGegenstück der hinteren Tuchbahn. Mit dem sogenannten „Badetuchtest“ überprüfen Sie nun, ob Sie jeweils die gleiche Kante der Tuchbahn in den Händen haben. Raffen Sie die gesamte Stoffbreite der hinteren Tuchbahn in Ihre linke Hand und führen Sie diese mitIhrer rechten Hand nach oben zu Ihrer rechten Schulter. Justieren Sie die richtige Länge indem Sie die Tuchbahn an Ihrer rechten Schulter weiterhin fixieren undIhren linken Daumen etwa in Hüftknochenhöhe links an Ihren Körper halten. Lassen Sie den Stoff gegebenenfalls etwas durch Ihre Hand nachrutschen bis der linke Daumen auf Hüftknochenhöhe verweilen kann. Danach die lose hängende Tuchbahn über die an Ihrer Schulter fixierte Tuchbahn nach hinten werfen. Achten Sie darauf, dass das Tuch nicht in sich verdreht ist und die Tuchkanten sauber durch die aufIhrer Schulter entstandene Schlaufe gleiten können. Führen Sie nun beide Tuchbahnen jeweils vor und hinter Ihrem Körper in Richtung linke Hüfte und fixieren Sie diese provisorisch mit einem einfachen Knoten. Nehmen Sie Ihr Baby auf die linke Schulter, greifen Sie mit der rechten Hand zwischen den beidenTuchbahnen von außen nach innen hindurch, um beide Beinchen Ihres Babys zu fassen. Setzen Sie Ihr Baby in Höhe Ihrer Hüfte so auf die Tuchbahn, dass es mit einem Bein vor und einemBein hinter Ihrer Hüfte verweilt und die Tuchbahn durch seine Kniekehlen verläuft. Fächern Sie die Tuchbahn mit der linken Hand auf, indem Sie die obere Tuchkante über Arme und Kopf Ihres Babys so nach oben ziehen, dass eine Mütze entsteht. Bei Babys, die Ihren Kopf bereits selbständig halten können, reicht es das Tuch bis unter die Arme des Kindes nach oben zu ziehen. Achten Sie darauf, dass die untere Tuchkante nicht nach oben rutscht, sondern in den Kniekehlen IhresBabys verweilt. Anschließend den Stoff zurück in den Nackenbereich schieben. Heben Sie den Po Ihres Babys leicht an und schieben die untere Tuchkante mit der rechten Hand nachoben Richtung Babys Bauchnabel. Lösen Sie nun den einfachen Knoten unterhalb des Babypopos. Halten Sie dabei unbedingt die hintere Tuchbahn mit der linken Hand fest!
9b
9a
5b
16
15
14
13
5a
12
11
10
8
7
6
4
3
2
1
„Hüfttrage“ CarrySling
www.amazonas-online.de
D

Die rechte Tuchbahn an der oberen Tuchkante nehmen und das gesamte Tuch schrittweise in drei bisfünf Phasen festziehen. Führen Sie beide Tuchenden Richtung Baby und fixieren Sie diese unterhalb des Babypopos mit einemdoppelten KnotenDie Tuchbahnen über der rechten Schulter, mit der unteren Tuchbahn beginnend, bis Mitte Oberarmnach unten ziehen. Geschafft!Zum Ausziehen des Tuches den Knoten unterhalb des Babypopos öffnen und darauf achten, dass Ihr Babynach Möglichkeit in seiner Position nicht bewegt wird. Die um Ihr Baby verlaufende Tuchbahn vorsichtignach oben über seinen Kopf schieben und es nach unten rausnehmen. Sollte Ihr Baby eingeschlafen sein,beugen Sie Ihren Oberkörper nach vorne, legen Ihr Baby ab und decken es ggf. zu. So wird Ihr Baby normalerweise weiterschlafen. Erst jetzt das gesamte Tuch ausziehen.20
19
18
17
www.amazonas-online.de

Take the cloth, unfold it and look for the middle. Grab the cloth on the upper edge and place it across your outstretched right arm.With your left hand, gather the entire width of material towards the throat, and make sure not to twistthe cloth while doing so. Grab the front inner edge of the cloth with the right hand, and with the left hand look for the counterpart of the rear cloth strip. Now, check with the so-called “bath towel test” whether ou always have the same edge of the cloth strip in your hands. Gather the entire width of material of the rear cloth strip in your left hand, and with your right handguide this upwardly towards your right shoulder.Adjust the right length by continuing to keep the cloth strip on your right shoulder in place and holding your left thumb roughly at hip-bone height on the left side of your body. If necessary, allow the material to slide down a bit through your hand until the left thumb can stay at hip-bone height. After that, throw the loosely hanging cloth strip over the cloth strip kept in place on your shoulder. Make sure that the cloth is not twisted in itself and the cloth edges can glide cleanly through the loopemerging on your shoulder. Now guide both cloth strips in front of and behind your body in the direction of the left hip, and temporarily keep these in place with a simple knot. Take your baby on the left shoulder, and with the right hand reach between the two cloth strips fromoutside inwards in order to hold both of your baby’s legs.Put your baby on the cloth strip at the height of your hip so that it stays with one leg in front of andone leg behind your hip and the cloth strip runs through the hollows of the baby’s kneed. Spread out the cloth strip with the left hand by pulling the upper cloth edge upwardly over the armsand head of your baby so that a cap is formed. With babies which can already hold up their head onthe own, it is enough to pull the cloth upwardly under the child’s arms. Make sure that the lower clothedge does not slide upwards, but stays in the hollows of your baby’s knees. Afterwards, push the material back into the neck area. Slightly lift your baby’s bottom and with the right hand move the lower cloth edge upwardly in the direction of the baby’s navel. Now loosen the simple knot underneath the baby’s bottom. While doing so, absolutely hold onto the rear cloth strip with the left hand! Take the right cloth strip by the upper cloth edge, and tighten the entire cloth gradually in three to five phases.
9b
9a
5b
17
16
15
14
13
5a
12
11
10
8
7
6
4
3
2
1
”Hip Carry“ CarrySling
www.amazonas-online.de
GB

Guide both cloth ends in the direction of the baby, and fasten these underneath the baby’s bottom witha double knot. Starting with the lower cloth strip, pull the cloth strips downward over the right shoulder to themiddle of the upper arm. Done!To take the cloth off, open the knot underneath the baby’s bottom and if possible, make sure that yourbaby is not moved in its position. Carefully move the cloth strip running around your baby upwards overits head, and remove it downward. If your baby has fallen asleep, bend your upper body forward, lay yourbaby down and cover it up if necessary. Your baby will normally continue to sleep. Only now should youtake off the entire cloth.20
19
18
www.amazonas-online.de

Leo Art. Nr.AZ -4052000
(without hammock)
Further information:
www.amazonas-online.de 11Also available:
Kaya natura Art. Nr.AZ-1010800
(without Door Clamp)
Door Clamp Art. Nr.AZ-3045000

Koala Art. Nr.AZ-4060000
Chico fantasia Art. Nr.AZ -1012120
Further information:
www.amazonas-online.de
12
V/09
Also available:
Other manuals for Carry Sling
3
Table of contents
Languages:
Other AMAZONAS Sling manuals
Popular Sling manuals by other brands

Getinge
Getinge Arjohuntleigh MAA2070M Instructions for use

K Tool International
K Tool International XD KTI-XD62115 owner's manual

Guldmann
Guldmann 28650 manual

Guldmann
Guldmann Positioning Sling instructions

Handicare
Handicare DELUXE WALKING SLING instruction sheet

Care-ability
Care-ability CA900 Transport quick start guide

Invacare
Invacare Universal Standard Sling user manual

Guldmann
Guldmann 28463 manual

Drive DeVilbiss Healthcare
Drive DeVilbiss Healthcare TOILET ACCESS SLING Instructions for use

Hoyer
Hoyer Quickfit Deluxe Sling User instruction manual

Slingmax
Slingmax Twin-path user manual

Invacare
Invacare C500 user manual