Maestro MR790 User manual

Модель: MR790
Model: MR790
Виріб сертифіковано в Україні
091
Owners manual. Pressure cooker
Instrukcji obsługi. Szybkowar
Manualul proprietarului. Oala sub presiune
Руководство по эксплуатации. Скороварка
Керівництво з експлуатації. Скороварка
EN
PL
UA
RU
RO

2
Dear customer, we thank you for purchase of goods
Functionality, design and conformity to the quality standards guarantee to you reliability
and convenience in use of this device.
Please read and comply with these original instructions prior to the initial operation of your
appliance and store them for later use of subsequent owners.
This appliance is designed for domestic use only.
Under condition of observance of user regulations and a special-purpose designation, a
parts of appliance do not contain unhealthy substances.
Due to the special features of the pressure cooker, cooking time is decreased more than
twice. At the same time, the products preserve maximum number of vitamins and useful
microelements.
The appliance allows you to save your time with the function «Delayed start». You can put
the food in the evening, run the required program and get a freshly prepared breakfast in
the morning.
Technical specications
Model: MR-790
Electrical supply:
Alternating current- AC;
Rated voltage 220-240V;
Rated frequency 50 Hz;
Power consumption 1000-1200 W
Protective class I
Protection class IPX0
Bowl: capacity 5L;
Number of programs: 15, temperature maintenance, “Delayed start”, “MULTI-CHEF”.
Programs: Borsch, SOUP, Porridge, BEANS, STEAM, Jam, BAKE, Deep frying, Braising,
Pilaf, Aspic, YOGHURT, Fish, Chicken, Meat.
1 The appliance with the installed bowl 1 pc
2 Power cable 1 pc
3Measuring Cup 1 pc

3
4 Spatula 1 pc
5 Spoon 1 pc
6Container-steamer 1 pc
7Deep fryer 1 pc
8Manual 1 pc
9Warranty card 1 pc
Note: The characteristics, specications and physical conguration of the appliance could
be slightly modied by the manufacturer, without impairing the basic consumer qualities of
the appliance.
Safety instructions
When using your appliance, basic safety precautions should always be followed,
including the following:
SPECIAL INSTRUCTIONS
WARNING!
- NEVER immerse the appliance, cable or plug in any liquid.
- DO NOT allow water and moisture on the electrical parts of the device.
- NEVER touch the appliance with wet or damp hands.
Otherwise, there is a risk to get an electric shock!
- DO NOT leave the appliance unnecessarily plugged in. Disconnect the plug from the
mains when the appliance is not being used.
- Always turn o the switch (time controller) and take electrical connector out of socket
before cleaning and storage.
- DO NOT use the power cord or the appliance in order to pull the plug out of the socket.
- Only plug the appliance into an outlet with an earthed (ground) contact.
- In the interest of safety, regular periodic close checks should be carried out on the supply
cord to ensure no damage is evident.
Should there be any signs that the cord is damaged in the slightest degree, the entire
appliance should be returned be authorized service engineer.
-If your device was brought from cold to warm room, do not switch it on within 2 hours to
prevent damage due to condensation on internal parts.
- This appliance is not intended for use by persons (including children) with reduced
physical, sensory or mental capabilities, or lack of experience and knowledge, unless they
have been given supervision or instruction concerning use of the appliance by a person
responsible for their safety.
- Do not operate the appliance if damaged, after an appliance malfunctions or it has been
damaged in any manner, return to at authorized service engineer for repair.
- DO NOT let children or untrained persons use the appliance without supervision.
- Keep the power cord away from the hot and sharp surfaces. The power cord should not
touch the top part and the back wall of the oven during its operation.
- Do not let the cord hang over the edge of a table or counter or touch hot surfaces.
- Не бросайте прибор.
- DO NOT leave the appliance exposed to the weather (rain, sun, etc. ).
EN

4
ATTENTION!
- Internal and some external parts of the appliance become very hot while working. Be
careful as you can burn touching the heated surfaces.
- Install the appliance only on a dry, stable, at, non-slip surface.
- Use potholders or kitchen mitts to remove a bowl or container.
During of non-compliance with the aforementioned rules arises the risk of burns
- It is prohibited to turn on the appliance without putting food inside, as it can lead to
serious damage.
- Do not exceed specied maximum volumes of ingredients.
- Do not lid the ventilating inlets in the lid for steam, do not lid up the appliance during
working, and make sure that there is a sucient distance for ventilation around the
multicooker during its working (at least 20 cm to walls and furniture from all sides).
- Do not use the appliance close to ammable objects (for example, near or under the
curtains).
ATTENTION!
- Never remove products from the pressure cooker with the help of sharp objects that can
damage the inner pot surface.
- Do not pour vinegar into the inner pot. That can damage the inner pot surface.
- After some time of operation, the appliance inner pot can change its colour – that is a
casual phenomenon occurring due to the fact that the inner pot surface contacts water and
cleaning agents.
Do not put foreign bodies into the release valve or any other parts of the appliance. Keep
you face and hands away from vapour exhausted from the release valve.
-THIS APPLIANCE IS FOR HOUSEHOLD USE ONLY. DO NOT USE THE APPLIANCE
FOR ANYTHING OTHER THAN INTENDED USE.
Do not use it for commercial purpose.
Actions in extreme situations:
- If a device tumbled into water, immediately, unplug the device, not touching to the device
or water.
- In case of appearance from appliance of smoke, sparkling, strong smell of a burn
isolation, immediately stop use the device, unplug the device, appeal to the nearest service
center.
Description of the appliance
1. Cover handle
2. Appliance cover
3. Cover decorative design

5
4. Handler nishing
5. Pressure limiting device
6. Vapour release valve switch
7. Removable inner pot with non-stick coating
8. Hull
9. Working chamber
10. Control panel with panel
11. Heating element
12. Base with blades
13. Cover blocking mechanism lever
14. Condensate collection container
15. Power cord with plug
16. Cover blocking mechanism lever
17. Vapour release valve with protective cover
18. O-ring
19. Internal cover
Fig. 1
EN

6
Operation
1. Open the cover. While securely holding the handle, turn in clockwise until xation, then
lift up. (Picture 1. )
2. Before use, wash the inner pot with warm soapy water. Volume of products to be loaded
together with water must not exceed 3/5 of the total height of the inner pot. In case more
solid products with lesser content of humidity, the level of lling of 4/5 of the total height is
permitted.
Minimal level of products – 1/5 of the height of the inner pot in accordance to marking.
(Picture.2).
3. Make sure that there is not dirt on the inner surface of the pot and on the surface of
the heating panel. Slightly turn the inner pot so that it tightly adjoined the heating panel.
(Picture.3)
4. Closing the cover. Make sure than the silicon O-ring, mounted on the appliance, is not
damaged and the internal aluminum panel is freely turned by hand.
Close the cover and turn the handle counterclockwise until the xator clicks.

7
(Picture 4).
5. Delete the silver label that held the pressure valve upon transportation. Make sure
that valve is turned down and can freely move, turn the valve to the air blocking position.
(Picture.5).
6. Connect the water collection block to the appliance as shown on the picture.
Connect the power to the pressure cooker, a beep will sound and the 5 lights in the middle
of the panel will ash. The device is ready for use.
Preparation for use
Before the rst cooking it is recommended to pour a few water into the removable inner
pot, set the mode “soup”, wait until it ends and pour out the water from the inner pot.
After mounting the inner pot on the pressure cooker turn it until complete contact with the
heating element.
After setting the program make sure that the inner pot with the food has been placed
correctly.
When closed, the construction of the cover ensures pressure-tight joint with the hull
that enables to create high pressure in the pressure cooker. During operation, when the
pressure in the appliance is higher than the atmospheric one, the cover is automatically
blocked.
When after completion of cooking the cover is not opening freely that means that the
pressure in the working chamber is still too high. Open the vapour release valve and wait
until the pressure in the appliance stabilizes.
Vapour release valve
The pressure cooker is tted with pressure release valve located on the cover.
EN

8
Due to the valve, the appliance can be used for cooking food under high pressure in the
pressure cooker mode or upon normal atmospheric pressure.
Selection of the operation mode is carried out by switching the valve to the position HIGH
PRESSURE or NORMAL PRESSURE.
The valve switch has technology-conditioned play that is not a defect.
Position HIGH PRESSURE – vapour release valve is closed:
Do not apply force, turn the switch clockwise until stop. While turning, the switch will lower
a little. In such position, during operation high pressure will be created and kept in the
appliance.
Upon completion of cooking under high pressure it is required to open the vapour release
valve to normalize the pressure in the working chamber.
Position NORMAL PRESSURE – vapour release valve is open: while not applying force,
turn the switch counterclockwise until stop. While turning, the switch will rise a little. In such
position, during operation normal pressure will be kept in the appliance.
Attention!
Upon opening the vapour release valve during or after completion of cooking, excessive
vertical vapour discharge is possible. Be very careful, do not stand over cover!
Note:
Upon opening the vapour release valve during or after completion of cooking, excessive
vertical vapour discharge is possible. Be very careful, do not stand over cover!
To determine the amount of cereal, use the supplied dosing jug.
Do not use the removable inner pot to wash ingredients, mix dough. Do not rewarm dishes
inside the inner pot.
Watch the products to be evenly spaced inside the inner pot.
While loading ingredients, keep in mind that during cooking some products increase in
size that is why the level of water/products must not exceed the mark of maximal permitted
level on the scale inside.
It is prohibited to leave spoon or other foreign bodies inside the inner pot during cooking.
Function “START DELAY”
Enables to set the time in which the preselected automatic cooking mode will start working.
Start delay can be set in the range of 30 minutes to 24 hours with the pitch of 30 minutes.
For that purpose:
1. Having selected the mode and cooking time, press the button “START DELAY”. On the
display the time of the delayed start appears. By default – 30 minutes.
2. By pressing the buttons “+” and “-“, set the needed value within the range of 0-24 hours
with the pitch of 30 minutes. To change fast, press and hold the button.
3. In some seconds after completion of setting the delayed start time, the numbers on the
display will stop ashing and the countdown will start.
4. To cancel the settings, press the button “TEMPERATURE MAINTENANCE/CANCEL”.

9
5. After that enter the mode parameters again.
ATTENTION! The function “START DELAY” is not available in the modes “DEEP FRYING”
and “BAKING”.
It is not recommended to use the delayed start function if the receipt includes easily spoiled
items (eggs, milk, sour cream, meat, sh, cheese, etc.).
When setting the start time, You should keep in mind that the work of the set mode and the
beginning of the cooking countdown starts only when the appliance reaches operational
parameters, the moment of achieving the required temperature and pressure values.
Function “TEMPERATURE MAINTENANCE”
This function enables to maintain temperature of ready dish within the range of 60-
80OС for 24 hours. The function switches on automatically when cooking mode ends.
The function TEMPERATURE MAINTENANCE in invalid in modes “DEEP FRYING” and
“YOGHURT”.
After the work ends, the selected mode button indicator will turn o and acoustic signal
will sound. Yellow indicator of the button “TEMPERATURE MAINTENANCE/CANCEL” will
light up and the heat maintenance function will turn on automatically. “bb” will light up on
the display. To switch the “TEMPERATURE MAINTENANCE” mode on, press the button
“TEMPERATURE MAINTENANCE/CANCEL”. The button indicator shall switch o and the
appliance will switch to standby mode.
Although the appliance can preserve products in warm condition for 8 hours, it is not
recommended to leave products in this mode for more than 2-3 hours as this sometimes
can result into change of taste properties of the dish.
Keep in mind that during operation of the temperature maintenance function the appliance
also gets heated.
Use pot holders to remove the inner pot from the device.
Do not cover the pressure cooker in the temperature maintenance mode as that can result
into appliance breakdown.
BASIC RULES FOR PRESSURE COOKING:
Do not cook in pressure cooker without water or any other liquid – that can lead to device
breakdown. Liquid volume must constitute the minimum of 2 dosing jugs.
Do not use the pressure cooker to fry products on plant oils under pressure.
You can braise cut onion, carrot or other vegetable in small amount of plant oil or broth on
the bottom of pressure cooker with opened cover in the “DEEP FRYING” mode, then add
the rest of the products, liquid, close the appliance and then cook under pressure.
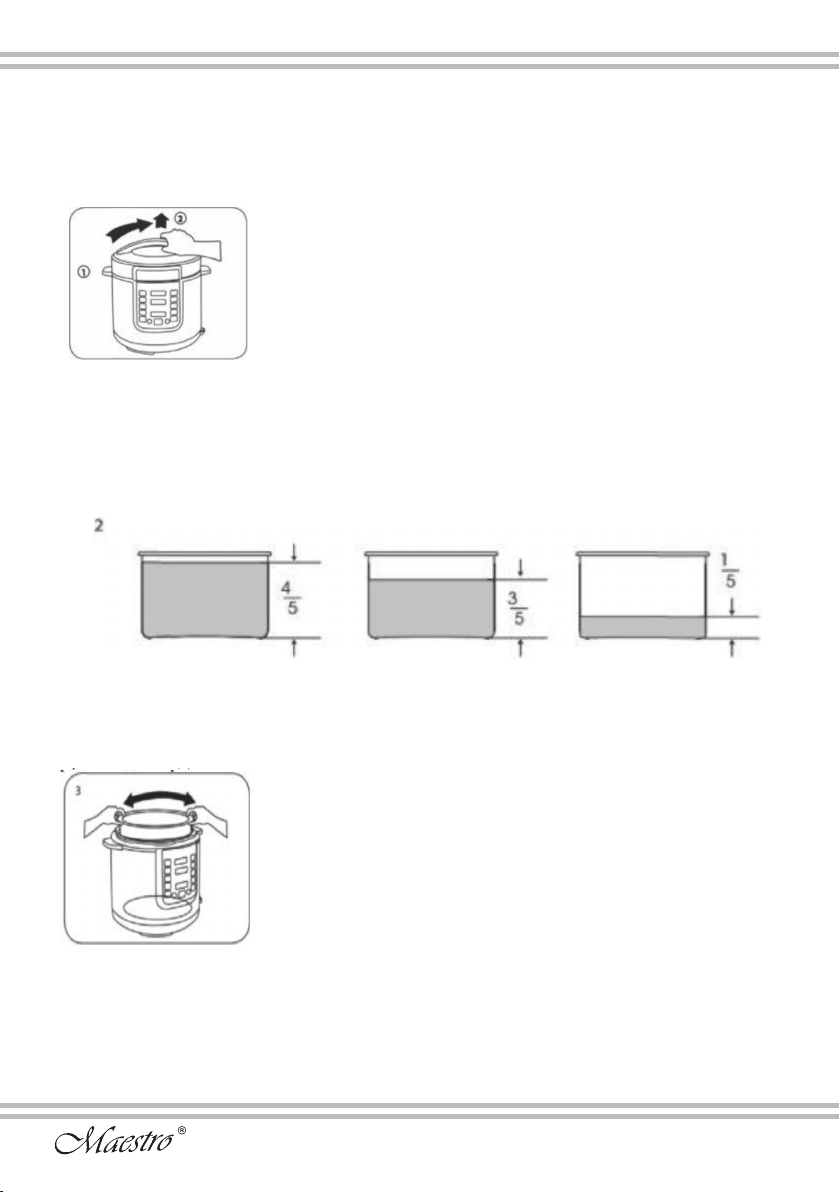
Do not load the container of the pressure cooker with products and water for more than 4/5
or less than 1/5 of the inner pot volume. When boiling products trending for swelling in hot
water or to foam (spinach, rice, beans, pasta, etc.), do not ll the pot for more than 3/5 of
the volume, otherwise the vapour release valve can become clogged.
SWITCHING ON, PROGRAM SELECTION
1. Measure ingredients out under receipt, if necessary rinse them, load to the inner pot
evenly. Pay attention that the ingredients volume without liquid mist be not more than the
EN

10
MAX mark on the pot internal surface.
2. Mount the pot into the hull, turn slightly and make sure that the pot is mounted without
any alignment error and tightly adjoins the heating element. Close and block the cover.
When using the mode “DEEP FRYING”, the cover must be open.
3. Set the vapour release valve switch on the appliance cover to the position CLOSED,
connect the appliance to the power source. Exclusion – “BAKING” mode, the valve must
be set in the position OPENED.
4. Press the button of the required program. Button indicator will light up and default value
of the cooking time will start blinking on the display.
5. Press the “MODE SELECTION” button. Select the required value:
- Minimal
- Standard
- Maximal
Remember that cooking time is specied not taking into account the time the appliance
needs to reach the required pressure and temperature.
6. To set the delayed start time, press the button “START DELAY”. Using the buttons “+”
and “-“, set the needed value. The function “START DELAY” is not applicable to the modes
“BAKING” and “DEEP FRYING”.
7. In some seconds after completion of setting, the display stops blinking and fulllment
of the set mode will start. After reaching the required temperature and pressure, the
countdown starts.
8. When cooking time ends, the acoustic signal sounds and the temperature maintenance
function switches on automatically. “bb” will light up on the display. To switch the
function on, press the button “TEMPERATURE MAINTENANCE/CANCEL”. The function
TEMPERATURE MAINTENANCE in invalid in modes “DEEP FRYING” and “YOGHURT”.
Before opening the cover, it is necessary to normalize the pressure in the working chamber
by opening the vapour release valve.
9. In case of necessity, You can cancel all entered settings or suspend the cooking process
on any stage by pressing the button “TEMPERATURE MAINTENANCE/CANCEL”.
RECOMMENDATIONS FOR COOKING MILK PORRIDGES:
Cooking porridges using pressure cooker provides for use of low fat pasteurized milk.
To prevent milk boiling away, it is recommended to perform the next actions before
cooking:
- carefully wash all the cereals until water becomes transparent;
- before cooking, spread butter over the inner pot;
- carefully keep proportions;
- in case of fat milk, dilute it with potable water in ratio 1:1.
ATTENTION!
The device is equipped with additional overheat protection in “DEEP FRYING” mode.
The device must cool down completely (about 15 minutes) before You can use it again. If
upon attempt to start the “DEEP FRYING” mode the display shows HH – that means that
the appliance temperature is too rather high and the mode switching on is blocked. This
limitation does not cover other cooking modes.
Upon cooking in “DEEP FRYING” mode do not cover the appliance cover! If the cover is

11
accidently closed and the blocking system is activated, stop the cooking process,
wait until the appliance cools down and open the cover. After that the cooking process
can be continued.
DEEP FRYER
The pressure cooker is supplied with special frying basket.
1. Fill in the inner pot with plant oil, mount the inner pot into the hull. Make sure that the
inner pot tightly adjoins the heating element.
2. Leave the cover open, connect the appliance to the power supply.
3. Press the button “DEEP FRYER”. The button indicator lights up. In some seconds the
display stops blinking and displays reverse countdown of the appliance operation in this
mode. By default, the operation time in the mode “DEEP FRYER” makes out 20 minutes.
4. Load the prepared products into the frying basket.
5. Mount handle to the frying basket. For that purpose, press the handle basis and insert it
into the special hole in the frying basket. Weaken pressure on the handle and it shall x in
that special housing.
6. In the time after the mode start specied in the receipt, immerse the frying basket with
the products into the inner pot. Press the handle basis and dismount it in the way, that the
frying basket remains in the inner pot. Be careful: oil is very hot!
7. n the time specied in the receipt, insert the handle into the frying basket (see cl. 5), rise
it and x on the inner pot rim with help of special hook on the frying basket.
8. In case of necessity, on can stop the cooking process on any stage and cancel all
entered settings by pressing the button “TEMPERATURE MAINTENANCE/CANCEL”
Cooking table
№ Programmes Cooking time
by default
(min)
Minimum
(min)
Standart
(min)
Maximum
(min) Reheat Delayed
start
1 Borsch 30 15 30 45 Yes Yes
2 SOUP 20 15 20 35 Yes Yes
3Porridge 12 812 16 Yes Yes
4 BEANS 40 20 40 50 Yes Yes
5 STEAM 10 5 10 15 Yes Yes
6Jam 25 15 25 35 Yes Yes
EN

12
7BAKE 50 30 50 90 Yes Not
8Deep frying 20 10 20 30 Not Not
9Braising 40 30 40 50 Yes Yes
10 Pilaf 20 10 2 0 30 Yes Yes
11 Aspic 75 60 75 90 Yes Yes
12 YOGHURT 480 420 480 540 Not Yes
13 Fish 15 10 15 20 Yes Yes
15 Chicken 30 15 30 45 Yes Yes
16 Meat 30 20 30 40 Yes Yes
Cleaning and maintenance
ATTENTION!
- Never clean the device while it is connected to the mains.
- Before cleaning the appliance in any way, make sure that theappliance plug is not
connected to the socket.
- Do not use abrasive and aggressive detergents, solvents, alkaline, metal objects and
wash-ups.
- Never submerge electric drive, its mains cable and plug in water or other liquid, do not
wash the drive in water or in a dish washing machine.
Before the rst use or to remove smells after cooking, it is recommended to boil a lemon
half in the “SOUP” mode upon closed vapour release valve.
Clean the inner pot after each use (use of dishwasher is acceptable).
CLEANING VAPOUR RELEASE VALVE AND O-RING
Vapour valve is located on the appliance cover and consists of an external and an internal
part.

13
1. Dismount vapour valve switch on the outer surface of the cover by pulling it up.
Clean it.
2. Open the appliance cover. There is protective cover of the vapour valve on the internal
side of the cover.
3. Pull out the protective cover, wash it with warm water. Mount the valve protective cover
on its place. Set the vapour valve switch to the side of the cover and x it with a light
pressing.
4. Carefully dismount the O-ring on the internal side of the cover, warm it with warm water.
Place the O-ring on its place evenly and without alignment errors.
5. It is recommended to perform vapour release valve cleaning after each use of the
device.
CLEANING CONDENSATE COLLECTION CONTAINER
During cooking formation of condensate is possible, it is collected in special container
in the rear part of the appliance hull. To remove condensate, dismount the container by
pulling it down, after that return it to its place.
Malfunction Potential causes Solution
Cover is hard to close O-ring is mounted not
properly
Regulate O-ring position
Floating valve stuck on
plank
Slightly push valve plank
Cover is hard to open Floating valve did not lower Slightly push the valve with
a toothpick
O-ring is mounted not
properly
Regulate O-ring position
Vapour leaks from the cover O-ring clogged Clean O-ring
O-ring damaged Replace O-ring
Cover is not closed tightly Close the cover in
accordance with the manual
Vapour leakage from
oating valve
Floating valve O-ring dirty Clean oating valve O-ring
Floating valve O-ring
damaged
Replace oating valve
O-ring
EN

14
Floating valve does not rise Products level is lower than
the permitted level
Use proper amount of water
and products in accordance
with the manual
Vapour leaks from the cover
or the vapour release valve
Address service center for
diagnostics
Storage
- Clean and dry appliance before storage.
- Keep the multicooker in the assembled state.
- Do not place heavy objects on the appliance.
- Store the device in a cool, dry and clean place beyond the assess of children and people
with limited physical and mental abilities.
Environmental protection
Old appliances contain valuable materials that can be recycled.
Please arrange for the proper recycling of old appliances. Please dispose your old
appliances using appropriate collection systems.
Subject to technical modications!

15
Dziękujemy za zakup sprzętu
Funkcjonalność, design i zgodność ze standardami jakości gwarantują Wam wygodę i
przyjemność z korzystania z naszego produktu.
Proszę, uważnie przeczytać dany podręcznik eksploatacji i zachować go w charakterze
materiału naukowego w ciągu całego czasu eksploatacji urządzenia.
Urządzenie przeznaczone jest do przygotowywania potraw w domowych warunkach.
Przy zachowaniu zasad eksploatacji i docelowego przeznaczenia produktu, części
urządzenia nie zawierają szkodliwych dla zdrowia substancji.
Właściwości wyrobu
Ze względu na specykę wysokociśnieniowego urządzenia do gotowania czas gotowania
skraca się ponad 2 razy. Jednocześnie maksymalna ilość witamin i użytecznych
mikroelementów jest zachowywana w produktach.
Z pomocą dla funkcji « Opóźnienie startu » urządzenie pozwala zaoszczędzić wasz czas.
Możecie włożyć odpowiednie produkty wieczorem, wcisnąć odpowiedni program i rano
wyjmiecie świeżo przygotowane śniadanie.
Dane techniczne
Model: MR-790
Zasilanie elektryczne: prąd zmienny
Nominalna częstotliwość 50 Hz;
Napięcie nominalne 220-240V;
Nominalna moc 1000-1200 W;
Klasa ochrony przed porażeniem elektrycznym I
Ochrona urządzenia przed wilgocią IPX3
Misa: pojemność 5 l;
Ilość programów: 15 plus tryb « podgrzewanie-utrzymanie ciepła», “Odroczenie startu
godzinaminuta”, “Multikucharz”.
Programy: Barszcz, Zupa, Kasza, Fasola, Gotowanie na parze, Kontury, Zapiekanie,
Smażenie, Duszenie, Pilaw, Galareta mięsna, Jogurt, Ryby, Drób, Mięso.
Kompletowanie
PL

16
№Nazwa Ilość
1 Urządzenie z ustawioną miską 1 szt.
2 Kabel zasilania 1 szt.
3Miarka 1 szt.
4 Łopatka 1 szt.
5 Łyżka 1 szt.
6Kontener-parowar 1 szt.
7Frytkownica 1 szt.
8Instrukcja użytkowania 1 szt.
9Karta gwarancyjna 1 szt.
Uwaga: Właściwości, wyposażenie i wygląd zewnętrzny urządzenia może się minimalnie
zmieniać, bez pogorszenia podstawowych wartości konsumpcyjnych wyrobu.
Środki bezpieczeństwa
Szanowny Kliencie, przestrzeganie ogólnie przyjętych zasad bezpieczeństwa
oraz zasad przedstawionych w niniejszej instrukcji gwarantuje bezpieczną pracę
niniejszego urządzenia
UWAGA!
- Nigdy nie należy zanurzać elementów elektrycznych, przewodu zasilającego i wtyczki w
wodzie lub innych płynach.
- Nie pozwalaj, aby woda i wilgoć dostawały się na części elektryczne.
- Nie chwytać urządzenia mokrymi rękoma.
- W przypadku nie przestrzegania zasad może dojść do porażenia prądem!
-- Nigdy nie zostawiać włączonego urządzenia bez kontroli!
- Zawsze wyłączać urządzenie za pomocą przycisku i wyciągać przewód z gniazdka, jeżeli
praca została zakończona, a także przed czyszczeniem i przechowywaniem.
- Zabrania się odłączanie urządzenia z gniazdka ciągnąc za przewód lub wyrywając
wtyczkę z gniazdka.
- Przed rozpoczęciem pracy należy się upewnić, czy napięcie sieci podane na urządzeniu
odpowiada napięciu sieci elektrycznej w Państwa domu.
- Urządzenie musi być podłączone tylko do gniazdka z uziemieniem. Upewnij się, że
gniazdko w domu jest przeznaczone do poboru mocy potrzebnej do prawidłowej pracy
urządzenia.
- Wykorzystywanie przedłużaczy elektrycznych lub przejściówek wtyczki przewodu może
spowodować uszkodzenie sprzętu oraz pożar.
-Urządzenie jest przeznaczone do stosowania z zegarami zewnętrznymi lub niezależnymi
systemami zdalnego sterowania.
- Po wniesieniu urządzenia z miejsca chłodnego do ciepłego pomieszczenia, nie należy
go włączać w przeciągu 2 godzin w celu uniknięcia jego uszkodzenia poprzez powstanie
skroplin na wewnętrznych elementach urządzenia.
- Nigdy nie używać urządzenia, jeżeli przewód zasilający lub wtyczka zostały uszkodzone,
jeżeli urządzenie działa nieprawidłowo, jeżeli urządzenie jest uszkodzone lub wpadło do
wody. Nie wolno samodzielnie naprawiać urządzenia, należy zwrócić się do najbliższego
centrum serwisowego.
- W przypadku pojawienia się z urządzenia dymu, iskier, zapachu palonej izolacji,

17
PL
natychmiast zaprzestać używania urządzenia, wyciągnąć wtyczkę z gniazdka,
zwrócić się do najbliższego centrum serwisowego.
- Niniejsze urządzenie nie jest przeznaczone do obsługiwania przez dzieci oraz osoby z
ograniczonymi zdolnościami zycznymi i umysłowymi, oraz przez osoby niemające wiedzy
i doświadczenia w zakresie korzystania z urządzeń gospodarstwa domowego, jeśli nie
są one pod kontrolą, lub nie zostały przeszkolone przez osoby odpowiedzialne za ich
bezpieczeństwo.
- Nie pozwalać dzieciom na zabawę urządzeniem i opakowaniem.
- Nie dopuszczać stykania się przewodu zasilającego z nagrzanymi i ostrymi
powierzchniami.
- Nie dopuszczać do nadmiernego napinania, zwisania z krawędzi stołu, załamań i skręceń
przewodu zasilającego.
- Nie rzucać urządzeniem.
- Nie korzystać z urządzenia na zewnątrz.
- Nie korzystać z urządzenia podczas burzy lub silnego wiatru. Możliwe są wtedy skoki
napięcia w sieci.
touch the top part and the back wall of the oven during its operation.
- Do not let the cord hang over the edge of a table or counter or touch hot surfaces.
- Не бросайте прибор.
- DO NOT leave the appliance exposed to the weather (rain, sun, etc. ).
UWAGA!
- Wewnętrzne i niektóre zewnętrzne części urządzenia są bardzo gorące podczas pracy.
Bądź ostrożny, ponieważ można się poparzyć dotykając gorącej powierzchni.
- Ustawiaj Szybkowar tylko na suchym, stabilnym, równym podłożu antypoślizgowym.
- Użyj rękawicy kuchennej do wyjmowania miski lub pojemnika.
W przypadku nieprzestrzegania powyższych zasad występuje RYZYKO OPARZEŃ!
-Z abronione jest włączać Szybkowar bez załadowania produktów, ponieważ może to
doprowadzić do poważnego uszkodzenia.
- Nie należy przekraczać wskazanych maksymalnych objętości składników.
- Nie nakrywać otworów wentylacyjnych dla pary w pokrywce, nie przykrywać Szybkowar
podczas pracy i sprawdzić, czy dookoła Szybkowar jest wystarczająca odległość potrzebna
do wentylacji podczas jego pracy (nie mniej niż 20 cm do ścian i mebli ze wszystkich
stron).
- Nie korzystać z urządzenia w pobliżu przedmiotów łatwopalnych (na przykład w pobliżu
ranek lub pod nimi).
- Nie stawiać urządzenia lub jego części na jakichkolwiek urządzeniach grzejnych.
UWAGA!
- Nigdy nie usuwaj żywności z szybkowaru ostrymi przedmiotami, które mogą uszkodzić
powłokę misy.
- Nie wlewaj octu do misy. Może to uszkodzić powłokę misy.
- Po pewnym czasie pracy misa urządzenia może zmienić kolor – jest to normalne zjawisko
związane z kontaktem powierzchni misy z wodą i detergentami.
Nie wkładaj ciał obcych do zaworu wylotowego ani żadnych innych części wyrobu. Chroń

18
twarz i dłonie przed parą,
Działania w ekstremalnych sytuacjach:
- Jeżeli urządzenie wpadło do wody, natychmiast wyciągnąć wtyczkę z gniazdka, nie
dotykając urządzenia lub wody.
- W przypadku pojawienia się z urządzenia dymu, iskier, zapachu palonej izolacji,
natychmiast zaprzestać używania urządzenia, wyciągnąć wtyczkę z gniazdka, zwrócić się
do najbliższego centrum serwisowego.
Schemat urządzenia
1. Uchwyt pokrywy
2. Pokrywa urządzenia
3. Dekoracja pokrywy
4. Powłoka uchwytu
5. Regulator ciśnienia
6. Przełącznik zaworu
wylotowego pary
7. Wyjmowana
misa z powłoką
nieprzywierającą
8. Obudowa
9. Komora robocza
10. Panel sterowania z
wyświetlaczem
11. Element grzejny
12. Podstawa z
nóżkami
13. Dźwignia
mechanizmu
blokującego pokrywę
14. Pojemnik do
zbierania kondensatu
15. Kabel
16. Dźwignia
mechanizmu blokującego pokrywę
17. Zawór wylotowy pary z osłoną
18. Pierścień uszczelniający
19. Pokrywa wewnętrzna
Korzystanie z urządzenia
1. Otwórz pokrywę. Trzymając mocno uchwyt, obróć go zgodnie z ruchem wskazówek
zegara, aż się zablokuje, a następnie podnieś (Rysunek 1).

19
PL
Rysunek 1
2. Przed użyciem spłucz misę ciepłą wodą z mydłem. Objętość produktów, które są
ładowane wraz z wodą nie powinna przekraczać 3/5 całkowitej wysokości wewnętrznej
misy. W przypadku twardszych produktów o mniejszej zawartości wilgoci dopuszczalny jest
poziom wypełnienia 4/5 całkowitej wysokości.
Minimalny poziom produktów – 1/5 wysokości miski zgodnie z oznaczeniem.
Rysunek.2
3. Upewnij się, że nie ma zanieczyszczeń na wewnętrznej stronie misy i na powierzchni
panelu grzejnego. Lekko obróć wewnętrzną misę, aby dobrze przylegała do panelu
grzejnego.
Rysunek 3
4. Zamknięcie pokrywy. Upewnij się, że silikonowy pierścień uszczelniający zamontowany
na urządzeniu jest nieuszkodzony, a wewnętrzny panel aluminiowy można swobodnie
obracać ręką.
Zamknij pokrywę i obróć pokrętło w kierunku przeciwnym do ruchu wskazówek zegara, aż
zatrzask zatrzaśnie się.
Rysunek 4

20
5. Usuń srebrną naklejkę, która utrzymywała zawór ciśnieniowy podczas transportu.
Upewnij się, że zawór jest opuszczony i może się swobodnie poruszać, obróć zawór do
pozycji blokady powietrza.
Rysunek 5
Podłączyć szybkowar do zasilania, zabrzmi sygnał dźwiękowy i zacznie migać 5
wskaźników na środku panelu. Urządzenie jest gotowe do pracy.
Przed gotowaniem
Przed pierwszym przygotowaniem zaleca się przelać niewielką ilość wody do wyjmowanej
miski, ustawić program „Zupa”, odczekać do jego zakończenia i wylać wodę z miski.
Po włożeniu wewnętrznej miski do szybkowaru obróć ją, aż zostanie całkowicie połączona
z elementem grzejnym.
Przed wyborem programu upewnij się, że wewnętrzna misa z jedzeniem została
prawidłowo umieszczona.
Szczelnie zamknij górną pokrywę urządzenia, aby uniknąć wypływu ciepła z powodu złego
uszczelnienia.
Przy zamkniętej pokrywie jego konstrukcja zapewnia szczelne połączenie z obudową, co
pozwala na wysokie ciśnienie w szybkowarze. Podczas pracy, gdy ciśnienie w urządzeniu
jest wyższe niż ciśnienie atmosferyczne, pokrywa jest automatycznie blokowana.
Gdy po zakończeniu gotowania pokrywa nie otwiera się bez wysiłku, oznacza to, że
ciśnienie w komorze roboczej jest nadal zbyt wysokie. Otwórz zawór uwalniający parę i
poczekaj, aż ciśnienie w urządzeniu wróci do normy.
Zawór wylotowy pary
Szybkowar jest wyposażony w zawór uwalniający parę, który znajduje się na pokrywie.
Dzięki zaworowi można używać urządzenia do gotowania pod wysokim ciśnieniem w trybie
szybkowaru lub przy normalnym ciśnieniu atmosferycznym.
Wybór trybu pracy odbywa się poprzez przełączenie zaworu na WYSOKIE CIŚNIENIE lub
NORMALNE CIŚNIENIE.
Przełącznik uwalniania pary ma luz technologiczny, który nie wskazuje na usterkę.
Pozycja WYSOKIE CIŚNIENIE – zawór wylotowy pary zamknięty:
Bez wysiłku obróć przełącznik zgodnie z ruchem wskazówek zegara, aż się zatrzyma.
Podczas obracania przełącznik nieco się obniży. W tej pozycji podczas pracy urządzenie
będzie pompowane i utrzymywane pod wysokim ciśnieniem.
Po zakończeniu gotowania pod wysokim ciśnieniem konieczne jest otwarcie zaworu
uwalniającego parę, aby znormalizować ciśnienie w komorze roboczej.
Table of contents
Languages: