MONIX CLASSICA User manual

CLASSICA
INSTRUCCIONES DE USO
INSTRUCTIONS FOR USE
ISTRUZIONI PER L’USO
MODE D’EMPLOI
GEBRAUCHSANLEITUNG
INSTRUKCJA OBSŁUGI
GEBRUIKSAANWIJZING
INSTRUKTIONER FÖR ANVÄNDNING
p. 02
p. 18
p. 34
p. 50
p. 66
p. 82
p. 98
p. 114
p. 145

ÍNDICE
REGLAS DE SEGURIDAD
DESCRIPCIÓN
Esquema
Características
UTILIZACIÓN
Cierre
Apertura
Llenado mínimo
Llenado máximo
Primera utilización
Antes de la cocción
Durante la cocción
Final de la cocción
TIEMPOS DE COCCIÓN
LIMPIEZA
Limpieza de la olla a presión
Limpieza de la válvula de funcionamiento
Limpieza de la válvula de seguridad
MANTENIMIENTO
Almacenaje
Recomendaciones para alargar la vida útil
SISTEMAS DE SEGURIDAD
PREGUNTAS FRECUENTES
GARANTÍA
1
2
3
4
5
6
7
8
9
Olla a presión
MONIX CLASSICA
INSTRUCCIONES DE USO
ESPAÑOL
Presión de funcionamiento
60 kPa
2 3

4 5
1. LEER ANTES DE CUALQUIER UTILIZACION DE LA OLLA A PRESION. CON-
SERVE ESTAS INSTRUCCIONES.
2. Siempre deben respetarse las reglas de seguridad durante la utilización de la olla a presión.
3. No dejar a los niños cerca cuando se esté utilizando la olla a presión.
4. No toque las supercies calientes. Utilice el asa y el mango.
5. Asegúrese de que las asas estén sujetas y puestas correctamente.
6. Tenga cuidado al transportar la olla a presión llena de liquido caliente.
7. No ponga la olla a presión en un horno caliente.
8. Nunca utilice la olla a presión para otro uso que el especíco. Este utensilio cuece
bajo presión. Una utilización inadecuada puede provocar quemaduras. Asegúrese
de que la olla a presión este bien cerrada antes de utilizarla. Para más información
sobre la utilización, remítase a las instrucciones.
9. No llene la olla a presión a más de 2/3. Cuando cocine ingredientes cuyo volumen
aumenta durante la cocción, como el arroz o las leguminosas, no llene la olla a
presión a mas de 1/2 de su capacidad total.
10.No prepare alimentos como la compota de manzana, arándanos, cebada, avena u
otros cereales,guisantes,pastas,macarrones,ruibarbo o espaguetis. Estos alimentos
tienden a producir espuma y burbujas que pueden atascar la válvula de seguridad.
11.Después de la cocción de las carnes que tienen una piel supercial (por ej.: la lengua
de buey) que puede inarse bajo el efecto de la presión, no pinchar la carne mien-
tras la piel parezca inada; se arriesga a quemarse con liquido caliente.
12.En el caso de alimentos pastosos, debe sacudir ligeramente la olla a presión antes
de abrir la tapadera para que estos alimentos no salpiquen al exterior.
13.Siempre compruebe que las válvulas de seguridad no estén atascadas antes de la
utilización. Remítase a las instrucciones de uso.
14.Es importante que la olla a presión este cerrada de manera adecuada antes de
ponerla en funcionamiento.
15.No utilice la olla a presión para cocinar solo con aceite.
16.Nunca utilizar el aparato sin añadir agua, esto lo dañaría seriamente.
17.Cuando se alcanza la presión de cocción normal, baje la temperatura; esto impedirá
que se pierda el vapor que ha creado el liquido.Vigile la olla a presión durante la
cocción.
18.Abra la olla a presión solo cuando no quede nada de presión en el interior. Nunca
fuerce la abertura. Remítase a las instrucciones de utilización.
19.No modique ninguna de las piezas de origen de la olla a presión, especialmente
los elementos de seguridad, mas allá de las instrucciones que se especican en este
manual; esto podría hacer que los elementos de seguridad se vuelvan inecaces.
Si una o varias piezas no corresponden a la descripción que gura en este folleto,
diríjase a un técnico para que pueda vericarlas.
20.Solo utilice las piezas del fabricante conformes con el modelo correspondiente. En
particular, utilice una olla y una tapadera que provengan de un mismo fabricante y
sean designadas por este como compatibles.
21. Cualquier reparación debe ser realizada por personal autorizado de los Servicios posventa.
REGLAS DE SEGURIDAD
1DESCRIPCIÓN
1. Tapeta volante
2. Volante
3. Cojinete
4. Tuerca elevadora
5. Tornillo jación volante
6. Válvula de seguridad
7. Válvula giratoria de funcionamiento
8. Recipiente
9. Centrador válvula
10. Junta de la tapa
11. Tuerca válvula
12. Abrazadera
13. Arandela tornillo
14. Tornillo jación asa
15. Asa
Esquema
Características
1
5
2
10
11
12
13
3
9
47
6
14
8
15
CAPACIDAD DIÁMETRO REFERENCIA
4 L
6 L
8 L
10 L
12 L
M530001
M530002
M530003
M530004
M530005
22 cm
22 cm
24 cm
24 cm
24 cm
Diámetro del cuerpo de la olla:
2

6 7
2 3
FUENTES DE CALOR COMPATIBLES:
LOS MODELOS DE OLLA A PRESIÓN CLASSICA DE MONIX SON COMPA-
TIBLE CON TODAS LAS FUENTES DE CALOR, INCLUIDA LA INDUCCIÓN.
• Sobre placas eléctricas, se recomienda el uso de un fogón de diámetro igual o
inferior al del fondo exterior de la olla.
• Sobre placas vitrocerámicas, se recomienda vericar que el fondo exterior de la
olla está limpio y totalmente libre de residuos.
• Sobre placas de gas, se recomienda que la llama nunca sobresalga el diámetro
del fondo de la olla.
• Sobre placas de inducción, se recomienda el uso de un fogón de diámetro igual
o ligeramente inferior (que cubra al menos un 70%) al del fondo exterior de
la olla.
REPUESTOS MONIX DISPONIBLES EN LOS SERVICIOS DE ASISTENCIA TÉCNICA:
Para la sustitución de otras piezas distintas a las aquí señaladas o reparaciones
póngase en contacto con el servicio post-venta MONIX.
Solo utilice las piezas del fabricante conformes con el modelo correspondiente.
DESCRIPCIÓN REFERENCIA
POMO PUENTE CIERRE
VÁLVULA DE FUNCIONAMIENTO
ASA LATERAL CON TORNILLO
JUNTA ESTANQUEIDAD PARA OLLAS 4 / 6 LITROS
JUNTA ESTANQUEIDAD PARA OLLAS 8 / 10 LITROS
CESTILLO VAPOR ACERO 22C
M957002
M957004
M957003
M957000
M957001
M530010
UTILIZACIÓN
• Gire el pomo hacia la izquierda para bajar el
puente.
• Deslice la tapa horizontalmente y colóquela so-
bre el borde de la olla asegurándose que cuerpo
y tapa coinciden y encajan perfectamente una
encima de la otra.
• Gire el pomo hacia la derecha hasta que el
puente de la olla entre en contacto con las
abrazaderas de la olla.
• Para asegurar el correcto cierre y estanquei-
dad de la olla, gire el pomo de nuevo (dos giros
completos).
• Gire el pomo hacia la izquierda hasta bajar el
puente totalmente.
• Levante la tapa ligeramente y deslícela horizon-
talmente hacia fuera.
• Llene siempre la olla con una cantidad mínima
equivalente a 25cl (2 vasos de agua).
• NO llene nunca el cuerpo de la olla por encima
de 2/3 de su altura.
• En el caso de que vaya a cocinar alimentos que
se dilatan durante la cocción, como el arroz, las
legumbres deshidratadas o las compotas, nunca
llene el cuerpo de la olla por encima de la mitad
de su altura.
Si se da el acontecimiento de que se ha calentado
la olla sin líquido en su interior, póngase en contacto
con el servicio post-venta MONIX para su vericación.
Cierre
Apertura
Llenado mínimo
Llenado máximo
MIN.
2/3
1/2
INDUCTION

8 9
3 3
• Coloque la válvula de funcionamiento sobre
el centrador de la válvula y empújela hasta el
fondo.
• Llene el cuerpo de la olla con agua hasta 2/3
partes de su altura.
• Cierre la olla (ver página anterior: Cierre).
• Coloque la olla a presión sobre la fuente de ca-
lor a nivel máximo.
• En cuanto empiece a salir vapor de la válvula
de funcionamiento reduzca la fuente de calor al
nivel mínimo y cronometre 20 minutos.
• Cuando hayan pasado los 20 minutos, apague
por completo la fuente de calor.
• Para despresurizar la olla a presión, colóquela
bajo un chorro de agua fría.
• Cuando deje de salir vapor de la válvula de fun-
cionamiento, retire esta última con la ayuda de
un trapo húmedo y abra la olla.
• Enjuague y seque la tapa y el cuerpo de la olla.
• Antes de cada utilización, verique que el cen-
trador de la válvula de funcionamiento no está
obstruido.
• Coloque en su posición la válvula de funciona-
miento.
• Coloque la olla a presión sobre la fuente de ca-
lor a nivel máximo.
• En cuanto la válvula de funcionamiento empiece
a girar de forma regular y continuada dejando
escapar algo de vapor, la cocción habrá empe-
zado.
SI NO SALE VAPOR POR LA VÁLVULA DE
FUNCIONAMIENTO Y NO EMITE NINGÚN
SONIDO DURANTE LA COCCIÓN:
• La presión no ha subido. Esto es normal en los
primeros minutos de cocción.
SI ESTE ACONTECIMIENTO PERSISTE,VE-
RIFIQUE que:
• La fuente de calor es lo sucientemente fuerte.
Si no es así, auméntela.
• La cantidad de líquido en el cuerpo de la olla
es suciente.
• La válvula de funcionamiento está correctamen-
te colocada, limpia y libre de residuos.
• La olla a presión está correctamente cerrada.
• La junta de estanqueidad o los bordes de la olla
no están deteriorados.
Primera utilización Antes de la cocción

10 11
3 3
• En cuanto la válvula de funcionamiento em-
piece a girar de forma regular y continuada
dejando escapar algo de vapor, reduzca la
fuente de calor.
Asegúrese de vigilar la olla a presión si hay niños
cerca.
•
Cronometre los tiempos de cocción haciendo
servir la tabla “TIEMPOS DE COCCIÓN” in-
cluida en este libro de instrucciones.
Una ligera salida de vapor por la válvula de funcionamiento durante el uso de la olla en
el proceso de cocción se considera normal.
• Durante la cocción a presión verique que salga un poco de vapor regular-
mente por la válvula de funcionamiento. Si esto no ocurre puede incrementar
ligeramente la fuente de calor, si ocurre el caso contrario, es decir, sale una
cantidad excesiva de vapor, disminuya la fuente de calor.
• Cuando haya transcurrido el tiempo de cocción apague la fuente de calor.
SI UNO DE LOS SISTEMAS DE SEGURIDAD ENTRA EN FUNCIONAMIENTO:
• Apague inmediatamente la fuente de calor.
• Deje enfriar la olla a presión.
• Verique la válvula de funcionamiento y el centrador de la válvula (por seguri-
dad realice el proceso de despresurización de la olla antes de llevar a cabo las
vericaciones).
SI ELVAPOR SE ESCAPA POR LOS BORDES DE LA TAPA DE LA OLLA A PRE-
SIÓN, VERIFIQUE:
• El cierre de la olla, y si es necesario asegure en mayor medida el cierre.
• El buen estado de la junta de estanqueidad, y si es necesario sustitúyala.
• El buen posicionamiento de la junta de estanqueidad en la tapa de la olla a
presión.
• La limpieza de la tapa, de la válvula de seguridad y de la válvula de funciona-
miento.
• El buen estado del borde del cuerpo de la olla.
• Para liberar el vapor del interior de la olla, una vez
la fuente de calor ha sido apagada, puede optar por:
1. Una descompresión lenta: Con la ayuda de un
trapo húmedo eleve ligeramente hasta el primer
escalón del centrado de la válvula para liberar
progresivamente el vapor. Si quiere liberar de for-
ma más rápida el vapor en el interior de la olla,
retire totalmente la válvula de funcionamiento. En
este caso, le recomendamos que lo haga al menos
5 minutos después de haber apagado la fuente de
calor y siempre con la ayuda de un trapo húmedo.
Tenga especial cuidado con la salida de vapor.
2. Una descompresión rápida: Coloque bajo un
chorro de agua fría.
• Cuando no sale más vapor por la válvula de fun-
cionamiento quiere decir que no queda presión
en el interior de la olla.
• Retire la válvula de funcionamiento.
• Abra la olla.
Para desplazar la olla a presión utilice las asas.
SI NO PUEDE ABRIR LA TAPA DE LA OLLA
• Despresurice la olla y retire la válvula de fun-
cionamiento.
• Asegúrese de que no queda presión en el interior.
Si es necesario, caliente algunos instantes la olla
sin la válvula de funcionamiento.
SI LOS ALIMENTOS NO SE HAN COCINADO
O SE HAN QUEMADO, VERIFIQUE:
• El tiempo empleado en la cocción.
• La potencia de la fuente de calor.
• La correcta colocación de la válvula de funcio-
namiento.
• La cantidad de agua empleada.
Durante la cocción Final de la cocción

12 13
4 5
Evitar dejar alimentos en el interior de la olla periodos largos de tiempo.
NO utilizar nunca lejía o productos que contengan compuestos clorhídricos.
• Después de cada uso, limpie la olla con la ayuda de agua tibia y un detergente
suave.
• Para lavar el interior del cuerpo de la olla puede utilizar un detergente suave y
un estropajo corriente por su lado duro.
• Para lavar el exterior del cuerpo de la olla puede utilizar un detergente suave y
un estropajo corriente por su lado suave.
• Para lavar la tapa de la olla a presión puede utilizar un detergente suave y un
estropajo corriente por su lado suave.
• Puede limpiar el cuerpo de la olla a presión a mano o en el lavavajillas.
NO dejar la tapa de la olla a presión en remojo.
NO lavar la tapa de la olla a presión en el lavavajillas.
• Limpie la válvula de funcionamiento bajo el agua.
• Limpie el centrador de la válvula de funcionamiento mediante un chorro abun-
dante y fuerte de agua, mediante una aguja.
• Limpie la base de la válvula de seguridad en el interior de la tapa de la olla.
• Verique su buen funcionamiento apretando ligeramente sobre la pieza central
roja, comprobando que se hunde sin dicultad.
Limpieza de la olla a presión
Limpieza de la válvula de funcionamiento
Limpieza de la válvula de seguridad
LIMPIEZATIEMPOS DE COCCIÓN
CARNES
Buey-Vaca
Asado
Estofado
Guisado
Cerdo
Asado
Chuletas
Lengua
Lomo
Cordero
Asado
Chuletas
Guisado
Patas
Ternera
Asado
Costillas
Guisado
Hígado
AVES Y CAZA
Conejo
Faisán
Liebre
Pato
Pavo
Perdiz
Pichón
Pollo
VERDURAS
Alcachofas
Calabaza
Cebollas
Coliflor
Coles de Bruselas
Espárragos
Espinacas
Guisantes
Habas tiernas
Judiasverdes
Nabos
Patatas
Remolacha
Repollo
Tomates
Zanahorias
FRUTAS
Frescas
Albaricoques
Cerezas
Manzanas
Melocotones
Peras
Secas
Albaricoques
Ciruela
Higos
Pasas
PESCADOS
Almejas
Anguilas
Atún
Calamares
Congrio
Langosta
Langostinos
Lenguado
Mejillones
Merluza
LEGUMBRES SECAS
Arroz
Garbanzos
Guisantes
Judías
Lentejas
CONSERVAS
De frutas
Albaricoques
Cerezas
Ciruelas
Frambuesas
Grosellas
Manzanas
Melocotones
Peras
De verduras Precoc. Cocción
Espárragos
Guisantes
Judías
Remolacha
Setas
Zanahorias
35 min.
25 “
30 “
25 min.
15 “
25 “
30 “
30 min.
15 “
15 “
25 “
20 min.
15 “
20 “
12 “
20 min.
15 “
35 “
25 “
40 “
20 “
15 “
20 “
10 min.
12min.
8 “
10 “
8 “
10 “
4 “
10 “
10 “
10 “
12 “
10 “
30 “
10 “
8 “
12 “
2 min.
2 “
6 “
8 “
10 “
8 min.
10 “
30 “
8 “
4 min.
10 “
10 “
12 min.
10 “
12 “
10 “
6 “
4 “
8 “
8 min.
35 “
25 “
40 “
30 “
10 min.
10 “
10 “
5 “
5 “
10 “
10 “
10 “
4 min. 25 min.
4 “ 35 “
4 “ 35 “
20 “ 35 “
4 “ 25 “
10“ 25 “

14 15
6 7
• Dé la vuelta a la tapa de la olla y colóquela enci-
ma del cuerpo de la olla.
• Hemos de evitar dejar mucho tiempo los alimentos, ya cocinados en la olla, ya
que tienden a pegarse. Luego tendremos más trabajo frotando, necesitaremos
más productos químicos (más detergente) y podemos rayar y estropear nues-
tra olla a presión.
• Las manchas de cal se pueden evitar si secamos la olla a presión con un trapo
seco en lugar de dejar que se seque ella sola.Así evitaremos también las man-
chas que dejan el cloro y otras sustancias que contiene el agua.
• Si tenemos alguna mancha de cal especialmente problemática en el cuerpo de
la olla podemos pasarle un trapo con vinagre caliente. Después la lavamos de
modo normal y la secamos con un trapo.
• Si ha perdido el brillo podemos frotar el cuerpo de la olla con un paño hume-
decido en alcohol.
• Elija siempre una junta correspondiente a su modelo de olla a presión.
• Sumérjala en agua jabonosa, enjuáguela y colóquela poco a poco realizando pre-
sión con los dedos hasta que esté totalmente encajada en el hueco habilitado
en el interior de la tapa.
• Nunca corte la junta de estanqueidad.
Haga vericar su olla a presión por un servicio técnico MONIX autorizado, si esta supera
los 10 años de uso.
En el caso de que se le haya quemado un alimento en el interior de la olla a presión:
• Deje en remojo el cuerpo de la olla un tiempo antes de proceder a su limpieza.
• NO utilice nunca lejía o productos que contengan compuestos clorhídricos.
Almacenaje de la olla
Recomendaciones para alargar la vida útil
Cambio de la junta de estanqueidad
La olla a presión MONIX CLASSICA dispone dos
sistemas de seguridad frente a la sobrepresión:
Durante su funcionamiento, si el sistema de eva-
cuación de presión queda taponado, dos sistemas
de seguridad pueden accionarse:
1. Primer sistema de seguridad: La válvula de se-
guridad libera la presión sobrante en el interior
de la olla.
2. Segundo sistema de seguridad: Se produciría la
salida de la presión entre el cuerpo de la olla
y la tapa como resultado de una deformación
controlada de las abrazaderas de la olla.
SI ALGUNO DE LOS DOS SISTEMAS DE SEGU-
RIDAD SE ACTIVAN:
• Apague la fuente de calor.
• Deje que se enfríe la olla.
• Verique el centrador de la válvula, la válvula de
funcionamiento y la válvula de seguridad.
PARA REPARACIONES Y RECAMBIOS:
MANTENIMIENTO SISTEMAS DE SEGURIDAD
CENTRAL SERVICIOS
TÉCNICOS
DISTRIBUCIONES
VILLA, S.L
Ctra. del Plà, 285
Nave 7
Telf. +34 977 614 627
Fax. +34 977 604 904
www.disvilla.com
43800 VALLS
(Tarragona)

16 17
8 9
¿Qué hacer si no puedo abrir la tapa?
• Despresurice la olla y retire la válvula de funcionamiento.
• Asegúrese de que no queda presión en el interior.
• Si es necesario, caliente algunos instantes la olla sin la válvula de funcionamiento.
¿Qué hacer si la olla se ha utilizado sin liquido en su interior?
• Póngase en contacto con el servicio post-venta MONIX para su vericación.
¿Qué hacer si no sale nada de vapor por la válvula de funciona-
miento, y la olla no emite ningún sonido de salida de vapor?
• La presión no ha subido. Esto es normal en los primeros minutos de cocción.
SI ESTE ACONTECIMIENTO PERSISTE, VERIFIQUE QUE:
• La fuente de calor es lo sucientemente fuerte. Si no es así, auméntela.
• La cantidad de líquido en el cuerpo de la olla es suciente.
• La válvula de funcionamiento está correctamente colocada, limpia y libre de residuos.
• La olla a presión está correctamente cerrada.
• La junta de estanqueidad o los bordes de la olla no están deteriorados.
¿Qué hacer si la válvula de seguridad entra en funcionamiento?
• Apague la fuente de calor.
• Deje que se enfríe la olla.
• Verique el centrador de la válvula, la válvula de funcionamiento y la válvula de seguridad.
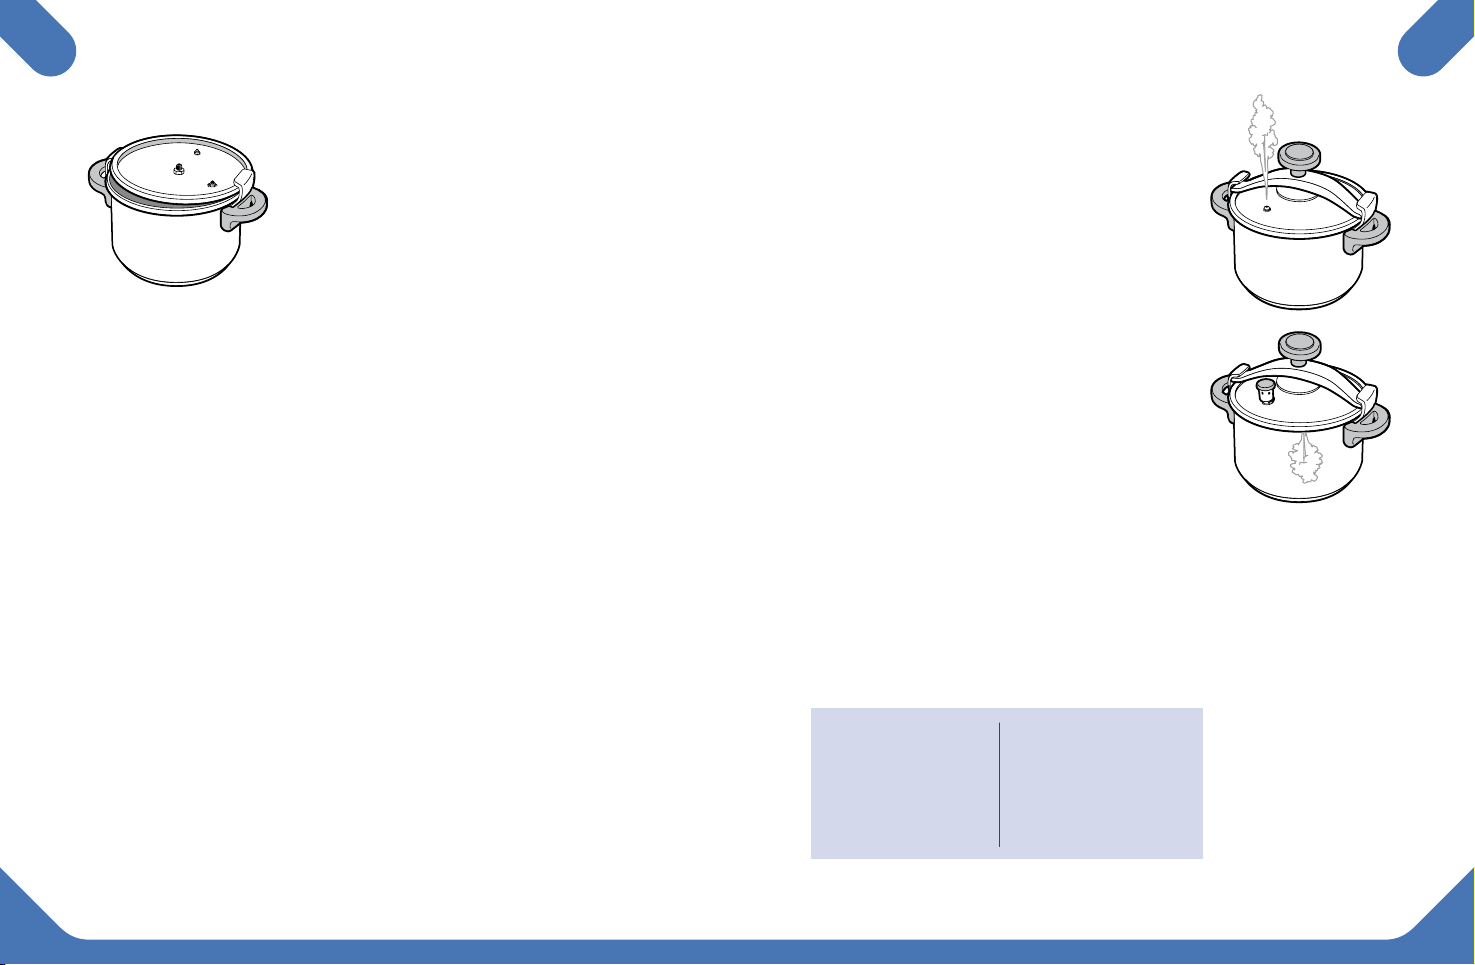
¿Qué hacer si se escapa el vapor entre la tapa y el cuerpo de la olla?
• Verique el cierre de la olla, y si es necesario asegure en mayor medida el cierre.
• Verique el buen estado de la junta de estanqueidad, y si es necesario sustitúyala.
• Verique el buen posicionamiento de la junta de estanqueidad en la tapa de la
olla a presión.
• Verique la limpieza de la tapa, de la válvula de seguridad y de la válvula de
funcionamiento.
• Verique el buen estado del borde del cuerpo de la olla.
¿Qué hacer si los alimentos no se han cocinado o se han quemado?
• Verique el tiempo empleado en la cocción.
• Verique la potencia de la fuente de calor.
• Verique la correcta colocación de la válvula de funcionamiento.
• Verique la cantidad de agua empleada.
¿Cómo limpio la olla a presión si se han quemado alimentos en su interior?
• Deje en remojo el cuerpo de la olla un tiempo antes de proceder a su limpieza.
• NO utilice nunca lejía o productos que contengan compuestos clorhídricos.
PREGUNTAS FRECUENTES
El plazo de la presente garantía es de tres años a partir de la fecha de compra del
producto, y cubre los posibles defectos de fabricación, y no cubre los defectos
derivados de un mal uso de la pieza, uso impropio de esta o los daños causados
por golpes.
Para hacer efectiva la presente garantía, el consumidor deberá dirigirse siempre al
establecimiento en que haya comprado el producto, acompañado del justicante
de compra. Sólo en el caso de que lo anterior resulte imposible o excesivamente
costoso, el consumidor podrá dirigirse al fabricante a n de reclamar la reparación
o sustitución del producto, remitiéndolo por correo ordinario a:
ISOGONA S.L., c/ Basters 4, Polígono Industrial, (43800) Valls, Tarragona (ESPAÑA).
Los posibles productos defectuosos cubiertos por esta garantía serán recepcio-
nados, reparados y/o reemplazados sin gastos, y devueltos al comprador sin cargo
alguno.
Esta garantía no afecta a los derechos de que dispone el consumidor conforme a
lo previsto en el RDL 1/2007, Ley General para la Defensa de los Consumidores
y Usuarios.
La presente se interpretará conforme a las leyes de España, siendo competentes
para dirimir cualquier posible diferencia los tribunales de España.
* En el caso de que el producto haya sido adquirido en un país distinto a España,
para hacer efectiva la presente garantía, el consumidor deberá dirigirse siempre al
establecimiento en que haya comprado el producto, acompañado del justicante
de compra. Sólo en el caso de que lo anterior resulte imposible o excesivamente
costoso, el consumidor podrá dirigirse al importador que el referido estableci-
miento le indique.
GARANTÍA

INDEX
SAFETY REGULATIONS
DESCRIPTION
Diagram
Characteristics
USE
Close
Opening
Minimum ll
Maximum ll
First use
Before cooking
While cooking
After cooking
TCOOKING TIMES
CLEANING
Cleaning the pressure cooker
Cleaning the operating valve
Cleaning the safety valve
MAINTENANCE
Storage
Recommendations to lengthen useful life
SAFETY SYSTEMS
FREQUENTLY ASKED QUESTIONS
GUARANTEE
1
2
3
4
5
6
7
8
9
Pressure cooker
MONIX CLASSICA
INSTRUCTIONS FOR USE
ENGLISH
Operating Pressure
60 kPa
18 19

20 21
1. READ BEFOREANY USE OFTHE PRESSURE COOKER. KEEPTHESE INSTRUC-
TIONS.
2. Always respect the safety regulations while using the pressure cooker.
3. Keep children away when using the pressure cooker.
4. Do not touch hot surfaces. Use the knob and handle.
5. Ensure that the handles are secured and correctly placed.
6. Take care in transporting the pressure cooker full of hot liquid.
7. Do not place the pressure cooker on a hot stove.
8. Never use the pressure cooker for anything other than the specied use. This
utensil cooks under pressure. Inappropriate use can cause burns. Ensure that the
pressure cooker is well sealed before using it. For more information about use,
read the instructions.
9. Do not ll the pressure cooker more than 2/3. When cooking ingredients which
increase in volume, such as rice or legumes, do not ll the pressure cooker more
than 1/2 of its total capacity.
10.Do not prepare foods such as apple or blueberry compote, barley, oats or other
cereals, peas, pasta, macaroni, rhubarb or spaghettis.These foods tend to produce
foam and bubbles that can obstruct the safety valve.
11.After cooking meats with skin (e.g. beef tongue) that can swell under the effect of
pressure, do not puncture the meat while the skin appears inated; there is a risk
of burns with hot liquid.
12.In case of dense foods, you should shake the pressure cooker lightly before opening
the lid so that the foods do not splash out of the cooker.
13.Always ensure that the safety valves are not blocked before use. Read instructions
for use.
14.It is important for the pressure cooker to be closed in an appropriate manner
before operating it.
15.Do not use the cooker to cook only with oil.
16.Do not use the apparatus without adding water, this could cause serious damage.
17. When normal cooking pressure is reached, lower the temperature; this will impede
the loss of steam that the liquid has created. Monitor the pressure cooker while
cooking.
18.Open the pressure cooker only when there is no pressure inside. Never force it
open. Read instructions for use.
19.Do not modify any of the original parts of the pressure cooker, especially the safety
elements, any further than specied in the instructions in this manual; this could
make the safety elements ineffective. If one or several parts do not correspond to
the description that gures in this guide, consult a technician to verify them.
20.Only use the parts from the manufacturer belonging to the corresponding model.
Specically, use a cooker and lid which come from the same manufacturer and
which are designed to be compatible.
21. Any repair must be performed by authorised personnel of the after-sales Services.
SAFETY REGULATIONS
1DESCRIPTION
1. Knob cover
2. Knob
3. Bearing
4. Elevating Screw Anchor
5. Fixed Knob Screw
6. Safety Valve
7. Revolving operating valve
8. Recipient
9. Valve centralizer
10. Lid seal
11. Valve Bolt
12. Clamp
13. Screw Washer
14. Fixed Handle Screw
15. Handle
Diagram
Characteristics
1
5
2
10
11
12
13
3
9
47
6
14
8
15
CAPACITY DIAMETER REFERENCE
4 L
6 L
8 L
10 L
12 L
M530001
M530002
M530003
M530004
M530005
22 cm
22 cm
24 cm
24 cm
24 cm
Pressure cooker body diameter:
2

22 23
2 3
COMPATIBLE HEAT SOURCES:
MONIX CLASSICA PRESSURE COOKER MODELS ARE COMPATIBLE WITH
ALL SOURCES OF HEAT, INCLUDING INDUCTION.
• On electric hobs, the use of a range with diameter equal to or less than the
exterior of the pressure cooker is recommended.
• On glass-ceramic hobs, verifying that the exterior of the cooker is clean and
completely free of residue is recommended.
• On gas hobs, it is recommended that the ames never exceed the diameter of
the cooker base.
• On induction hobs, the use of a range with diameter equal to or slightly less
than (covering at least 70%) the diameter of the exterior of the pressure co-
oker is recommended.
MONIX SPARE PARTS AVAILABLE IN THE TECHNICAL ASSISTANCE SERVICES:
To substitute or repair other parts apart from those mentioned here contact the
MONIX after-sales service.
Only use the parts from the manufacturer belonging to the corresponding model.
DESCRIPTION REFERENCE
ARCH CLOSING KNOB
OPERATING VALVE
SIDE HANDLE WITH SCREW
4 / 6 LITRES SILICONE GASKET
8 / 10 LITRES SILICONE GASKET
STEEL STEAM BASKET 22C
M957002
M957004
M957003
M957000
M957001
M530010
USE
• Turn the knob to the left to lower the arch.
• Slide the lid horizontally and place it at the bor-
der of the cooker, ensuring that the lid is posi-
tioned directly above the body and that they t
perfectly one against the other.
• Turn the knob to the right until the arch of the
cooker is in contact the cooker’s clamps.
• To ensure that the cooker is closed correctly
and is airtight, turn the knob again (two full
turns).
• Turn the knob to the left to lower the arch
completely.
• Lift the lid gently and slide it outwards horizon-
tally.
• Always ll the cooker with a minimum quantity
equivalent to 25 cl (2 cups of water).
• NEVER ll the cooker body above 2/3 of its
height.
• In the case that you are going to cook foods
that are slow cooking, such as rice, dehydra-
ted legumes or compotes, never ll the cooker
body above half of its height.
In the event that the cooker has become heated
without liquid inside, contact the MONIX after-sales
service for verication.
Close
Opening
Minimum ll
Maximum ll
MIN.
2/3
1/2
INDUCTION

24 25
3 3
• Place the operating valve above the valve cen-
tralizer and push down.
• Fill the cooker body with water up to 2/3 of
its height.
• Close the cooker (see previous page: Close).
• Place the cooker on top of a heat source at
maximum level.
• When steam begins to leave from the operating
valve, reduce the heat to a minimum level and
set time for 20 minutes.
• When the 20 minutes have passed, turn off the
heat completely.
• To depressurize the pressure cooker, place it
below a ow of cold water.
• When steam stops leaving the operating valve,
remove the valve with the help of a damp cloth
and open the cooker.
• Wash and dry the cooker lid and body.
• Before each use, verify that the centralizer of
the operating valve is not obstructed.
• Place the operating valve in its position.
• Place the cooker on top of a heat source at
maximum level.
• When the operating valve begins to turn in a re-
gular and continued manner letting some steam
escape, cooking has started.
IF NO STEAM LEAVES THROUGH THE OPE-
RATING VALVE AND NO SOUND IS EMITTED
WHILE COOKING:
• The pressure has not increased.This is normal
during the rst minutes while cooking.
IF THIS EVENT PERSISTS, VERIFY that:
• The heat source is sufciently strong.
• If not, increase the heat.
• The quantity of liquid in the cooker body is
sufcient.
• The operating valve is correctly placed, clean
and free of residue.
• The pressure cooker is correctly closed.
• The silicone gasket and the cooker’s edges have
not deteriorated.
First use Before cooking

26 27
3 3
•
When the operating valve begins to turn in a
regular and continued manner letting some
steam escape, reduce the heat source.
Be sure to monitor the pressure cooker if there
are children present.
•
Set cooking times according to the “COO-
KING TIMES” table included in this instruc-
tions book.
A light steam leaving through the operating valve while using the cooker in the cooking
process is considered normal
• While pressure cooking, verify that a little bit of steam leaves regularly through
the operating valve. If this does not occur, increase the heat source lightly. If the
opposite occurs, if a large amount of steam leaves, lower the heat source.
• When the cooking time has nished, turn off the heat source.
IF ONE OF THE SAFETY SYSTEMS STARTS OPERATING:
• Immediately turn off the heat source.
• Let the pressure cooker cool down.
• Verify the operating valve and the valve centralizer (for safety reasons, perform
this cooker depressurization process before carrying out the verications).
IF THE STEAM LEAVES THROUGH THE EDGES OF THE PRESSURE COOKER’S
LID, VERIFY THAT:
• The cooker is closed, and if necessary, ensure a tighter close.
• The airtight seal is in a good state and replace it if necessary.
• The airtight seal is correctly positioned on the pressure cooker.
• That the lid, safety valve and operating valve are clean.
• The edges of the cooker body are in a good state.
• To release the steam inside the cooker, once the
heat source is turned off, you can choose:
1. A slow decompression: With the help of a damp
cloth, lightly lift the valve to the rst thread of
the valve centralizer to progressively release the
steam. If you want to release the steam inside the
cooker more rapidly, completely remove the ope-
rating valve. In this case, we recommend that you
do so at least ve minutes after having turned off
the heat source and always do so with the help of
a damp cloth.
Take special care with the release of steam.
2. A fast decompression: Place under a stream of
cold water.
• When no more steam leaves through the ope-
rating valve it means that there is no more pres-
sure inside the cooker.
• Remove the operating valve.
• Open the cooker.
Use the handles when moving the pressure cooker.
IFYOU CANNOT OPENTHE COOKER LID
• Depressurize the cooker and remove the ope-
rating valve.
• Ensure that there is no more pressure inside
If necessary, heat the cooker a few moments wi-
thout the operating valve.
IFTHE FOODS HAVE NOT BEEN COOKED OR
HAVE BECOME BURNED, VERIFY:
• The cooking time used.
• The strength of the heat source.
• The correct placement of the operating valve.
• The amount of water used.
While cooking After cooking

28 29
4 5
Avoid leaving food inside the cooker for long periods of time.
NEVER use bleach or products which contain hydrochloric compounds.
• Before each use, clean the cooker with the help of warm water and a soft
detergent.
• To wash the inside of the body of the cooker, you can use a soft detergent and
an ordinary scrubber on its hard side.
• To wash the exterior of the body of the cooker, you can use a soft detergent
and an ordinary scrubber on its hard side.
• To wash the pressure cooker lid, you can use a soft detergent and an ordinary
scrubber on its soft side.
• You can wash the body of the pressure cooker by hand or in the dishwasher.
DO NOT leave the pressure cooker lid to soak.
DO NOT wash the pressure cooker lid in the dishwasher.
• Clean the operating valve under water.
• Clean the operating valve centralizer with an abundant and strong ow of water,
with the help of a needle.
• Clean the base of the safety valve on the inside of the cooker lid.
• Verify its proper functioning by lightly holding the central red piece, ensuring
that it submerges without difculty.
Cleaning the pressure cooker
Cleaning the operating valve
Cleaning the safety valve
CLEANINGCOOKING TIMES
MEATS
Beef
Roast
Stew
Ragout
Pork
Roast
Chops
Tongue
Loin
Lamb
Roast
Chops
Ragout
Legs
Veal
Roast
Ribs
Ragout
Liver
POULTRY & GAME
Rabbit
Pheasant
Hare
Duck
Turkey
Partridge
Pigeon
Chicken
VEGETABLES
Artichokes
Pumpkin
Onions
Cauliflower
Brussels sprouts
Asparagus
Spinach
Peas
Tender broad beans
Green beans
Turnips
Potatoes
Beets
Cabbage
Tomatoes
Carrots
FRUITS
Fresh
Apricots
Cherries
Apples
Peaches
Pears
Dried
Apricots
Plum
Figs
Raisins
SEAFOOD
Clams
Eels
Tuna
Squid
Conger eel
Lobster
Prawns
Sole
Mussels
Hake
DRY LEGUMES
Rice
Chick peas
Peas
Beans
Lentils
PRESERVES
Fruit
Apricots
Cherries
Plums
Raspberries
Redcurrants
Apples
Peaches
Pears
Vegetable Precook Cook
Asparagus
Peas
Beans
Beets
Mushrooms
Carrots
35 min.
25 “
30 “
25 min.
15 “
25 “
30 “
30 min.
15 “
15 “
25 “
20 min.
15 “
20 “
12 “
20 min.
15 “
35 “
25 “
40 “
20 “
15 “
20 “
10min.
12 min.
8 “
10 “
8 “
10 “
4 “
10 “
10 “
10 “
12 “
10 “
30 “
10 “
8 “
12 “
2 min.
2 “
6 “
8 “
10 “
8 min.
10 “
30 “
8 “
4 min.
10 “
10 “
12 min.
10 “
12 “
10 “
6 “
4 “
8 “
8 min.
35 “
25 “
40 “
30 “
10 min.
10 “
10 “
5 “
5 “
10 “
10 “
10 “
4 min. 25 min.
4 “ 35 “
4 “ 35 “
20 “ 35 “
4 “ 25 “
10 “ 25 “

30 31
6 7
• Turn the cooker lid over and place it on top of
the cooker body.
• We need to avoid leaving cooked foods in the cooker for long periods of time,
as they tend to get stuck. We will then have to work harder washing them and
we will need more chemical products (detergent) and risk scratching and da-
maging our pressure cooker.
• Lime scale marks can be avoided by drying the pressure cooker with a dry
cloth instead of leaving it to dry alone. This way we also avoid the marks left by
the chlorine and other substances the water contains.
• If we have a particularly stubborn mark we can rub the pressure cooker with
a cloth soaked in hot vinegar. We then wash it as normal and dry it with a
drying-up cloth.
• If it has lost its shine, we can scrub the cooker body with a cloth soaked in
alcohol.
• Always choose the silicone gasket corresponding to its pressure cooker model.
• Submerge it in soapy water, rinse and place it little by little using your ngers to
apply pressure until the seal ts perfectly on the inside of the lid.
• Never cut the silicone gasket.
Have your pressure cooker veried by an authorized MONIX service technician if it has
been in use for more than 10 years.
In case you have burned food inside the pressure cooker:
• Leave the cooler body to soak before starting to clean it.
• NEVER use bleach or products which contain hydrochloric compounds.
Storing the cooker
Recommendations to lengthen useful life
Changing the silicone gasket
The MONIX CLASSICA pressure cooker has two
safety systems against pressure overload:
While in use, if the pressure evacuation system is
covered, two safety systems can become active:
1. First safety system: The safety valve releases ex-
cess pressure inside the cooker.
2. Second safety system: This would release pres-
sure between the cooker body and the lid as a
result of a controlled movement of the cooker
handles.
IF ANY OF THE TWO SAFETY SYSTEMS IS AC-
TIVATED:
• Turn off the heat source.
• Wait for the cooker to cool.
• Verify the valve centralizer, the operating valve
and the safety valve.
FOR REPAIRS AND SPARE PARTS:
MAINTENANCE SAFETY SYSTEMS
Please contact the importer through the
purchase establishment.

32 33
8 9
What should I do if I cannot open the lid?
• Depressurize the cooker and remove the operating valve.
• Ensure that there is no more pressure inside.
• If necessary, heat the cooker a few moments without the operating valve.
What should I do if the cooker is used without liquid inside?
• Contact the MONIX after-sales service for verication.
What should I do if no steam leaves through the operating valve
and there is no sound of steam release coming from the cooker?
• The pressure has not increased. This is normal during the rst minutes while cooking.
IF THIS EVENT PERSISTS, VERIFY THAT:
• The heat source is sufciently strong. If not, increase the heat.
• The quantity of liquid in the cooker body is sufcient.
• The operating valve is correctly placed, clean and free of residue.
• The pressure cooker is correctly closed.
• The airtight seal and the cooker’s edges have not deteriorated.
What should I do if the safety valve becomes active?
• Turn off the heat source.
• Wait for the cooker to cool.
• Verify the valve centralizer, the operating valve and the safety valve.
What should I do if steam escapes between the cooker lid and body?
• Verify the cooker is closed, and if necessary, ensure a tighter close.
• Verify the airtight seal is in a good state and replace it if necessary.
• Verify the airtight seal is correctly positioned on the pressure cooker.
• Verify that the lid, safety valve and operating valve are clean.
• Verify the edges of the cooker body are in a good state.
What should I do if the food has not cooked or has burned?
• Verify the cooking time used.
• Verify the strength of the heat source.
• Verify the correct placement of the operating valve.
• Verify the amount of water used.
How do I clean the pressure cooker if food has burned in its in-
terior?
• Leave the cooler body to soak before starting to clean it.
• NEVER use bleach or products which contain hydrochloric compounds.
FREQUENTLY ASKED QUESTIONS
The term of this guarantee is three years from the date of purchase of the pro-
duct,and covers possible manufacturing defects but does not cover defects caused
by misuse of the machine, inappropriate use or damage caused by blows.
To use this guarantee, consumers should always go to the establishment where
the product was purchased, taking the proof of purchase. Only in the event that
the above is not possible or too costly, consumers may contact the manufacturer
in order to request repair or replacement of the product, sending the claim by
post to:
ISOGONA S.L., c/ Basters 4, Polígono Industrial, (43800) Valls, Tarragona (ESPAÑA).
Possible defective products covered by this guarantee will be accepted, repaired
and/or replaced free of charge and returned free of charge to the purchaser.
This guarantee does not affect the consumer’s rights in accordance with the con-
tents of RDL 1/2007, General Law for the Defence of Consumers and Users.
This document will be interpreted in accordance with the laws of Spain, with Spa-
nish Courts being competent for settling any possible difference.
* In the event that the product was purchased in a country other than Spain, con-
sumers should always go to the establishment where the product was purchased,
taking proof of purchase in order to use the guarantee. Only in the event that
the above is impossible or too costly may consumers contact the importer as
indicated by the aforementioned establishments.
GUARANTEE

INDICE
NORME DI SICUREZZA
DESCRIZIONE
Schema
Caratteristiche
UTILIZZAZIONE
Chiusura
Apertura
Riempimento minimo
Riempimento massimo
Primo utilizzo
Prima della cottura
Durante la cottura
Termine della cottura
TEMPI DI COTTURA
PULIZIA
Pulizia della pentola a pressione
Pulizia della valvola di esercizio
Pulizia della valvola di sicurezza
MANUTENZIONE
Conservazione
Raccomandazioni per prolungare la durata
SISTEMI DI SICUREZZA
DOMANDE FREQUENTI
GARANZIA
1
2
3
4
5
6
7
8
9
Pentola a pressione
MONIX CLASSICA
ISTRUZIONI PER L’USO
ITALIANO
Pressione di esercizio
60 kPa
34 35

36 37
1. LEGGERE PRIMA DI QUALSIASI UTILIZZO DELLA PENTOLA A PRESSIONE.
CONSERVI QUESTE ISTRUZIONI.
2. Le norme di sicurezza devono essere sempre rispettate durante l’utilizzo della
pentola a pressione.
3. Non lasciare la pentola a pressione alla portata di bambini durante l’utilizzo.
4. Non toccare le superci calde. Utilizzare gli appositi manici.
5. Assicurarsi che i manici siano ssati e montati correttamente.
6. Fare attenzione durante il trasporto della pentola a pressione piena di liquido caldo.
7. Non situare la pentola a pressione in forno caldo.
8. Non utilizzare mai la pentola a pressione per un uso diverso a quello specico
a cui è destinata. Questo utensile cuoce a pressione. Un utilizzo inadeguato può
provocare bruciature. Si assicuri che la pentola a pressione sia ben chiusa prima di
utilizzarla. Per ulteriori informazioni sull’utilizzo, consulti le istruzioni.
9. Non riempia la pentola a pressione per più dei 2/3.Quando cucina ingredienti il cui
volume aumenta durante la cottura, come il riso o i legumi, non riempia la pentola
a pressione per più di 1/2 della sua capacità totale.
10.Non prepari alimenti come composta di mele, mirtilli, orzo,avena o altri cereali, pi-
selli, pasta, maccheroni, rabarbaro o spaghetti. Questi alimenti tendono a produrre
schiuma e bolle che possono intasare la valvola di sicurezza.
11.Dopo la cottura delle carni con pelle superciale (ad es.: lingua di manzo) che può
gonarsi per l’effetto della pressione, non forare la carne quando la pelle sembra
gona, è possibile bruciarsi con il liquido caldo.
12.In caso di alimenti pastosi, la pentola a pressione deve essere mossa leggermente
prima di aprire il coperchio afnché tali alimenti non schizzino all’esterno.
13.Verichi sempre che le valvole di sicurezza non siano intasate prima dell’utilizzo.
Consulti le istruzioni per l’uso.
14. È importante che la pentola a pressione sia chiusa in modo corretto prima di utilizzarla
.
15.Non utilizzare la pentola a pressione per cucinare solo con olio.
16. Non utilizzare mai l’apparecchio senza aggiungere acqua, si danneggerebbe seriamente
.
17.Quando si raggiunge la pressione di cottura normale, diminuire la temperatura; in
questo modo si impedirà che si perda il vapore che ha creato il liquido.Controlli la
pentola a pressione durante la cottura.
18.Apra la pentola a pressione solo quando non resta nessuna pressione al suo inter-
no. Non ne forzi mai l’apertura. Consulti le istruzioni per l’uso.
19.Non modichi nessuno dei pezzi originali della pentola a pressione, in modo parti-
colare gli elementi di sicurezza, se non per quanto indicato nelle istruzioni specica-
te nel presente manuale, altrimenti gli elementi di sicurezza potrebbero perdere la
loro efcacia. Se uno o diversi pezzi non corrispondono con la descrizione indicata
in queste istruzioni, si rivolga ad un tecnico afnché possa vericarli.
20.Utilizzi solo i pezzi del fabbricante relativi al modello corrispondente. In modo par-
ticolare, utilizzi una pentola e un coperchio dello stesso fabbricante e compatibili
tra loro.
21.Qualsiasi riparazione deve essere eseguita da personale autorizzato dei servizi di
assistenza postvendita
NORME DI SICUREZZA
1DESCRIZIONE
1. Tappo pomolo
2. Pomolo
3. Cuscinetto
4. Vite di sollevamento
5. Vite di ssaggio del pomolo
6. Valvola di sicurezza
7. Valvola girevole di esercizio
8. Recipiente
9. Dispositivo di centraggio della valvola
10. Guarnizione del coperchio
11. Vite della valvola
12. Fissaggio
13. Rondella della vite
14. Vite di ssaggio del manico
15. Manico
Schema
Caratteristiche
1
5
2
10
11
12
13
3
9
47
6
14
8
15
CAPACITÀ DIAMETRO RIFERIMENTO
4 L
6 L
8 L
10 L
12 L
M530001
M530002
M530003
M530004
M530005
22 cm
22 cm
24 cm
24 cm
24 cm
Diametro del fondo della pentola:
2

38 39
2 3
FONTI DI CALORE COMPATIBILI:
I MODELLI DI PENTOLA A PRESSIONE CLASSICA DI MONIX SONO COMPA-
TIBILI CON TUTTE LE FONTI DI CALORE, COMPRESA L’INDUZIONE.
• Sulle piastre elettriche, si raccomanda l’uso di un fornello di diametro uguale o
inferiore a quello del fondo esterno della pentola.
• Su piastre di vetroceramica, si raccomanda di vericare che il fondo esterno
della pentola sia pulito e totalmente privo di residui.
• Sui fornelli a gas, si raccomanda che la amma non fuoriesca mai dal diametro
del fondo della pentola.
• Su piastre a induzione, si raccomanda l’uso di un fornello di diametro uguale
o leggermente inferiore (che copra almeno un 70%) al fondo esterno della
pentola.
PEZZI DI RICAMBIO MONIX DISPONIBILI PRESSO I SERVIZI DI ASSISTENZA TECNICA:
Per la sostituzione di pezzi diversi da quelli qui indicati o per riparazioni, mettersi
in contatto con il servizio di assistenza postvendita di MONIX.
Utilizzare solo i pezzi del fabbricante relativi al modello corrispondente.
DESCRIZIONE RIFERIMENTO
POMELLO PONTE DI CHIUSURA
VALVOLA DI ESERCIZIO
MANICO LATERALE CON VITE
GUARNIZIONE DI TENUTA PER PENTOLE DA 4 / 6 LITRI
GUARNIZIONE DI TENUTA PER PENTOLE DA 8 / 10 LITRI
CESTELLO PER VAPORE IN ACCIAIO 22C
M957002
M957004
M957003
M957000
M957001
M530010
UTILIZZAZIONE
• Girare il pomolo verso sinistra per abbassare
il ponte.
• Far scivolare il coperchio orizzontalmente e
collocarlo sul bordo della pentola assicurandosi
che il corpo e il coperchio coincidano e si incas-
trino perfettamente uno sull’altro.
• Girare il pomolo verso destra no a quando il
ponte della pentola non è a contatto con i dis-
positivi di ssaggio della stessa.
• Per assicurare una chiusura e una tenuta corret-
te della pentola, girare nuovamente il pomolo
(due giri completi).
• Girare il pomolo verso sinistra no ad abbassa-
re completamente il ponte.
• Sollevare leggermente il coperchio e farlo scivo-
lare orizzontalmente verso l’esterno.
• Riempire sempre la pentola con una quantità
minima equivalente a 25 cl (2 bicchieri d’acqua).
• NON riempire mai il corpo della pentola per
più di 2/3 della sua altezza.
• Nel caso in cui si debbano cucinare alimenti
che si dilatano durante la cottura, come il riso, i
legumi disidratati o le composte, non riempire
mai il corpo della pentola per più della metà
della sua altezza.
Se dovesse succedere che la pentola si è riscaldata
senza liquido all’interno, mettersi in contatto con il ser-
vizio di assistenza postvendita di MONIX afnché ne
eseguano un controllo.
Chiusura
Apertura
Riempimento minimo
Riempimento massimo
MIN.
2/3
1/2
INDUCTION
Other manuals for CLASSICA
1
Table of contents
Languages:
Other MONIX Electric Pressure Cooker manuals